1
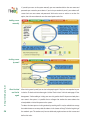
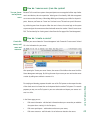
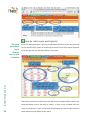
Learning with
Collaborative Software -
A guide to Fle3
Teemu Leinonen, Giedre Kligyte,
Tarmo Toikkanen, Janne Pietarila,
Philip Dean
http://fle3.uiah.fi
Media Lab,
University of Art and Design Helsinki
http://fle3.uiah.fi
1
INDEX
Introduction
3
Scenarios
4
Pedagogy
7
The actors
8
Student’s User Manual
9
Make Fle3 Personal
11
Using the Webtop
12
Using Knowledge Building
14
Using Course Information
19
Using Jamming
20
Teacher’s User Manual
23
Administrator’s User Manual
28
Fle3 Glossary
30
Fle3 has been developed in the framework of ITCOLE project funded by The European Commission in the Information Society Technologies (IST) framework; IST-00-III.2 'School of Tomorrow'.
Fle3 is a web-based learning environment. To be more specific Fle3 is server software for computer supported collaborative learning (CSCL). Fle3 is Open Source and Free Software released
http://fle3.uiah.fi
under the GNU General Public Licence (GPL). The licence protects your freedom to use, modify
and distribute Fle3.
Fle3 is easy to localize to different languages (all you need to do is to translate one file).
Currently users may choose their user interface language to be Finnish, English, Spanish, French,
Portuguese, Brazilian Portuguese, Norwegian, Dutch, Italian, Lithuanian, Estonian, German, Polish,
Danish or Chinese. New translations are welcome!
Find out more about the possibility to participate in Fle3 environment development or to trans-
2
late the software's interface to your own language from the Administrator's manual.
INTRODUCTION
What is Fle3?
Fle3 is a webbased
software for
collaborative
learning
Fle3 is a web-based learning environment. To be more specific, Fle3 is a server software for
computer supported collaborative learning (CSCL).
Fle3 is designed for group centered work that concentrates on creating and developing expressions of knowledge (i.e. knowledge artefacts).
What do I need to run Fle3?
You need a
computer
connected to a
network and a
standard web
browser
To use Fle3 you need a computer connected to a computer network. The network you will be using is most
likely, the Internet. However, a connection to “public Internet” is not a requirement as it is possible to
use Fle3 just in a local area network or Intranet using
the Internet protocol. Contact your administration
to figure out how to do this in practice.
Fle3 works with all standard web-browsers. In your
web browser you just have to point to the location
of your Fle3 server installation and log in.
What are the tools of Fle3?
Webtop
Each user gets a personal Webtop. WebTops can be used to store different items (documents,
files, links to web & knowledge building notes) related to their studies, organize them into
folders and share them with others. You can also visit other users’ WebTops.
Knowledge Building is a discussion environment for structured knowledge building in groups.
The knowledge building discussion is scaffolded by knowledge types, which label the thinking
mode of each discussion note.
Jamming
Jamming is a tool for collaborative construction of digital artefacts. In jamming you may explore the possibilites of changing a file (picture, audio, video, text, etc) by making new versions of the original artefact together with others.
The staff and other people taking care of the courses and course participants have tools for
http://fle3.uiah.fi
Knowledge
Building
managing users, courses and participants of the courses. Ordinary users (students, pupils) don’t
use these tools.
3
Scenarios
In a classroom
Planning a
study project
Two teachers in a secondary school decide to carry out a study project
with the classes they are both teaching together, on the production
and use of solar energy. One teacher is a science teacher and the
other teaches history, economics and social sciences. Together the
teachers plan the major phases of the project, search for materials
and discuss what are the main concepts, ideas, and skills they want their students to master by
the end of the project. To enrich the students learning process the teachers invite two parents
to join the online class. One parent is a locally known Green activist that supports alternative
energy sources whereas the other parent is working as a researcher in a power company, maintaining nuclear power stations.
Introducing
Fle3 for the
participants
Once the study period starts the teachers give a tour of Fle3 to the students and explain what
kinds of modules, tools and materials are available. Furthermore the teachers explain to the
students how the work is supposed to progress in Fle3, and remind them to be active producers
of their own study problems, explanations and deeper knowledge found from different sources.
For the participating parents the teachers explain that their role is mainly to act as external
experts, from whom students may get scientific information and references to information sources.
The study group starts the work in Fle3’s Knowledge Building module by presenting questions
and problems related to solar energy. Some of the problems presented in the first stage are such
as “why all the roofs of all houses are not covered with
http://fle3.uiah.fi
solar panels to gain as much solar power as possible?”
Students also present their own explanation and prior
understanding of the topic. For instance, a student’s
own explanation of the previous problem could be:
“there is not enough factories to produce all the needed
solar panels”. After several hours of working with the
Knowledge Building students are divided into teams.
The teams define for themselves their inquiry tasks and
goals.
4
In order to find scientific knowledge on solar power and the economics of energy, students use
their school books and books from the library. Students also have access to several article
databases on the Internet and the expert parents offer them a lot of new information. Some of
the groups want to try some experiments, so they decide to use the school’s science lab and
some simulation software available in the classroom computers.
For instance one group does a comparative study on the costs of the production and use of solar
energy compared to nuclear energy. As a primary source of their study, they use case studies
found from the Internet. At the end of the project the groups present the progress of their work
to others and publish it in the form of a study report and poster. The posters are presented in a
closing conference organized at the school. At the end of the project all the works are available
at the school’s digital library on the Internet.
In a blended learning project
Students’ own
initiative to
start a
project
Three students coming from Bangalore, Johannesburg and Helsinki meet in the queue to the
new Bibliotheca Alexandrina in Egypt. While waiting to get into the library building they chat
about their experiences in Egypt. All of them have noticed that the air quality in Cairo is not
very good. On the other hand all admit that its not that good in their home towns either. The
engineering student from Bangalore has just read about different new techniques and materials
for filtering air pollution. The business management student from Johannesburg, who drives a
scooter himself, is wondering why there is no motorcycle helmets where these kinds of filters
are attached. The industrial designer student points out that it would be better to filter the air
earlier than in front of people’s mouths, but still agrees that the protection device could also
protect people from pollution. After visiting the library the students exchange e-mail addresses
Forming a
group
A month later the student from Bangalore writes an email to the students he met in Egypt. He
proposes that they could make a study project about a filtering system for motorcycle helmets.
The student from Johannesburg is very interested in the idea but definitely wants to have his
friend who’s studying environmental politics to take part in the project, as well. The industrial
designer student from Helsinki is at first very skeptical and wonders if they will ever get any
http://fle3.uiah.fi
and disappear into the bazaars of Alexandria and Cairo.
credits from the work. Finally he goes and introduces the study project idea for his professor
who thinks it is a brilliant idea, and wants to be the tutor of the study project. To strengthen the
5
team the student from Bangalore proposes that his sister who uses a motorcycle daily to go
shopping, could also take part in the team. The students believe that the sister is able to
contribute with relevant information based on her experience of using a helmet. Before starting
the project the students still make sure that they can compensate some studies in their study
programs with this study project.
Design process
in Fle3
To start working in the study project the student in Bangalore sets up the Fle3 server. He invites
all the participants to the server and they start to have a general discussion in Fle’s Knowledge
Building module. In the first stage of the project all the participants introduced themselves and
get familiar with each other. In the second stage the participants collect information related to
filtering technologies, motorcycle helmets, city life and air pollution in big cities and share their
findings in Fle3. In the third stage of the project all the team members define the design
challenges from users, engineering, design, manufacturing and business points of view. The
process moves on by presenting different design ideas and evaluating them. After five weeks of
intensive work in the Fle3 Knowledge Building, the group have an initial concept idea for a
helmet with a filter. To elaborate the idea and to put it in more concrete form, they move to
work in Jamming. One of the students make a draft sketch and blueprint of the design, to start
the jam session. The members of the team provide different variations that derived from that
starting point.
http://fle3.uiah.fi
www.euro-cscl.org community website
6
Share your
experiences of
using CSCL in
the www.eurocscl.org
community
website
You can read more and share your experiences of successful use of Computer Supported Collaborative Learning technologies (CSCL) in various learning environments in the www.euro-cscl.org
community website which was also developed as part of the ITCOLE project. This web site
serves as a resource of information for practitioners (teachers), researchers and school administrators in the CSCL field. There you can find news and best practices from the CSCL community, links to CSCL research, information about CSCL software tools and have discussions with
other members of the community.
Pedagogy
Student
centered
collaborative
production of
knowledge
and design
artifacts
Fle3 software is based on the concept of a ‘Future Learning Environment’ developed since 1998
by University of Art and Design Media Lab in cooperation with the Center for Research on Networked Learning and Knowledge Building, Department of Psychology at the University of Helsinki. The term ‘Future Learning Environments’ is a loose conception of learning which differs
from traditional content, teacher, and didactic-based teaching by emphasizing meta-cognitive,
problem solving and cooperation skills. The concept stresses student centered collaborative
activities aiming to the production of knowledge and design artifacts by embedding meaningful
tools and involving the use of information and communication technology (network computers
and mobile devices) in the learning process.
New ways of
working and
new kind of
curriculum
thinking
The theoretical background of the ‘Future Learning Environment’ concept is located in social
constructivist theory that sees learning as a participation in social processes of knowledge construction. Future Learning Environment should not be understood only as Fle3 software. The
whole concept includes certain pedagogical thinking, hypothetical use cases and situations where
Fle3 software could be useful. The role of Fle3 software is to be the learning tool of the ‘Future
Learning Environment’. This means that the ‘Future Learning Environment’ requires much more
than Fle3 software. Traditional school communities utilizing a teacher-centered approach, with
45-minute lessons and strict division of school subjects must carry out organizational changes,
such as new ways of working, new kinds of scheduling and new kinds of curriculum thinking in
order to become ‘Future Learning Environments’.
In the field of learning technology solutions Fle3 has a very specific focus. We hope that Fle3 will
be useful in constructive and inquiry-like learning processes. We know that, for a more traditional teacher, concentrating on instruction and didactic-based training, Fle3 might not be the
right tool. Fle3 does not lend itself easily to ‘material based learning’, where obligatory course
material is delivered and then questioned. Neither does Fle3 offer much support for teacher
centered models, where the teacher tells learners exactly what to do and when to do it. Fle3 is
a good tool for group centered work that concentrates on creating and developing expressions
http://fle3.uiah.fi
Fle3 is a tool
for group
centered work
of knowledge (i.e. knowledge artefacts). Fle3 is a software for computer supported collaborative learning (CSCL) taking place in a ‘Future Learning Environment’.
7
The actors (roles)
By default there are three different categories of users in an Fle3 system: fle admin, staff and
Three user
roles in Fle3:
fle admin,
staff and user
user. Fle admin is the most powerful and can access all functions within the Fle3 system. The
staff user is a bit more restricted and cannot administrate an Fle3 system itself, but can create
and manage courses, students and so forth. Finally user is a restricted user who can take part in
courses, but can’t create courses or new users (nor remove existing ones). In most cases students are defined in the system as users and teachers hold the staff users’ rights. The staff user
account can also be given to a secretary of the department and she will be the person, responsible for giving user accounts, for including users to courses and managing courses etc. Additionally each user gets a role within every course. On a particular course a user can be a ‘teacher’,
‘tutor’ or ‘student’. Each level has less access rights for that course only. As an example you
might be a fleadmin and still be defined as a ‘student’ on a particular course. Additionally
somebody from the user class might be a teacher on one course and have more rights to manage
http://fle3.uiah.fi
that course (for that course only).
8
STUDENT’S USER MANUAL
How to login in and out?
Log in with
your user
name. Quit
your browser
to log out.
In order to use Fle3 you need a user name (nick name) and password. You will receive your user
name and password either directly from your teachers or you will get an invitation email asking
you to create your user name and password yourself.
When you click the ‘Log in here’ link - the system asks for your nickname and password.
To log out you have to quit your browser.
How do I navigate in Fle3?
Main tool tabs
The main tools of Fle3 are always visible in the tabs at the top of the page. From the tabs you
may choose the tool that you want to work with.
The title of the course that you’re currently working in is displayed at the top of the page. You
may change the course from the drop down menu on the top right hand side of the page. If you
http://fle3.uiah.fi
Change the
course from
the drop-down
menu
participate in only one course, there is no drop down menu available. If you change to another
tool (for example, from Jamming to Knowledge Building) you will still remain in the same course.
9
Location path
in Knowledge
Building
In Knowledge Building and Jamming tools you will find the ‘You are in’ bar telling your current
Location path
in Webtop
You can find a similar navigation on your Webtop. The location bar tells you the path to the
location. By clicking links in the bar you will reach the corresponding pages.
folder or item you are currently viewing. You may return to the top level of your Webtop by
clicking the ‘Webtop’ link inside the path.
http://fle3.uiah.fi
How do I search in Fle3?
10
Search for
items in all
Webtops and
in Knowledge
Building
You can find items on your and other people’s Webtops by making a search from your Webtop.
You can search by title, by owner (on whose Webtop the item is appearing) or by words that the
text files may contain. Using search in Knowledge Building you will find notes from a specific
course. Make sure that you are in the right course first. You can search by note title, author,
words that the note may contain, course contexts or by knowledge types.
Make Fle3 Personal
How do I change my personal information?
Follow the
‘Information’
link from the
Webtop
On the WebTop you can find the ‘Information’ link that opens your own information page. You
Change your
password,
Fle3 interface
language or
your portrait
picture
When editing your information page you can change your password, your real name (first and
can update it by clicking the ‘Edit user information’ link. If you are visiting somebody else’s
WebTop, you may view his or her information (follow the similar “Information” link), but you
cannot edit it.
last names), e-mail address and the interface language. In this page you may also change your
portrait picture and contact information as well as your further information, such as your
background, personal interests, etc.
http://fle3.uiah.fi
11
How do I add my picture?
When editing your user information page you will find the ‘add image’ item. You may either
upload your image from your own hard disk or add a link referring to your picture somewhere on
Use 32 X 32
pixel size
image
the web.The shape of the picture should be as close to a square as possible. The best size for
your picture is 32x32 pixels or larger. All pictures are cropped to a square shape and then scaled
to 32x32 pixels by the system.
Using the Webtop
How do I add folders, documents, links and memos?
Use the
toolbars in
Webtop
On your Webtop there are two toolbars. From the upper one you may add folders, documents,
links and memos to your Webtop or into the folder that you are currently in. With the tools in
the lower toolbar you may handle your folders, documents, links and memos on your Webtop or
inside the folder that you are currently viewing. First you must select which objects you want
to handle. Then you may choose ‘rename’, ‘copy’, ‘cut’ or ‘delete’.
‘Copy’, ‘cut’ and ‘paste’ work just as in most computer systems. When you ‘delete’ something
it first goes to ‘Trash’ which you must empty once in a while. From the ‘Trash’ you may also
http://fle3.uiah.fi
‘restore’ items if necessary.
12
How do I personalize the Webtop?
Choose or
upload your
Webtop
background
image
You can change the background color of your Webtop while editing your personal information.
You can either select one background image from the set of images provided or upload your
own. You can upload any .gif or .jpg image as your Webtop background image. Notice that many
items on the Webtop are white, so if you want to see them clearly choose quite dark images for
your background.
How do I visit other people’s Webtops?
You can visit other people’s Webtops (they must belong to the same course as you) by clicking
a name or an image of the person at the top of any Knowledge Building page. You may view all
the items on their Webtops, but you cannot make any changes. You can access other people’s
information by clicking the ‘Information’ link. Others can visit your Webtop too and you cannot
prevent this. (This possibility is a necessary function in support of the collaborative learning
model employed in Fle3.
http://fle3.uiah.fi
Choose a
person from
Knowledge
Building and
visit his or her
Webtop
13
Using Knowledge Building
How do I know who I’m working with?
Poeple in the
white box on
the left are
currently
online
You can see the names and images of all the people that belong to the same course at the top of
any page in Knowledge Building. Your name is always first in the row. The others that are in the
white box on the left are currently online. You can visit other people’s WebTops from here.
How do I read notes?
http://fle3.uiah.fi
Click the note
subject in the
course or
course context
page in the
Knowledge
Building
14
You can go directly to the Knowledge Building thread that interests you by clicking the subject of
the starting note from the course page. You can choose the course context that you will work in
by clicking the course context title. You can see the description of the context and starting
notes of all the Knowledge Building threads that belong to the same course context. Clicking
the ‘Show full thread’ link displays all the notes titles.
The chosen
note is at the
top and the
whole thread
at the bottom
of the page
Choose the note that you would like to read. The chosen note is displayed at the top of the page
Show all notes
bodies inline
for easy
printing
You can view all the notes body content displayed inline if you click the ‘Show bodies of all
and the rest of the thread is placed under it. To browse the notes you can either use the
‘Previous’ and ‘Next’ links or scroll down and select any note subject from the thread.
notes’ link. In this way you can overview all of the discussion at one glance or print it. Notice
that if there are many notes in the thread, it will take quite long to load the page. If you don’t
have a fast computer it is better to “hide bodies of the notes” and browse them one by one.
http://fle3.uiah.fi
15
Choose the way you want the messages to be sorted: as thread, by knowledge type, by person or
by date. Sorting ‘by date’ is a good way to catch up with the discussion - the new notes appear
at the top. Sorting ‘by knowledge type’ is useful if you want to find, for example, all the
summaries written by your group easily . You can find all your notes or see what a specific
Sort the notes,
view who has
read the notes
person in your group has been working on if you sort your notes ‘by person’.
You can see who, and how many times, has someone read each note in the Knowledge Building
by clicking an icon at the bottom of the note layout on the right side of the page.
http://fle3.uiah.fi
How do I write notes?
16
Click on note
subject in the
course or
course context
page in the
Knowledge
Building
If you are not replying to any note, but are introducing a completely new topic, start a new
Knowledge Building thread: select the course context by clicking the course context title in the
top level Knowledge Building page and click the ‘Start a new thread’ link in the toolbar.
Select the
note that you
want to reply
to. In order to
reply you
have to
choose the
knowledge
type.
If you want to reply to a note in the thread, click the title of the note that you want to reply to.
Review little
Flea’s
questions and
use the right
knowledge
type for your
note
You can find the note that you are replying to at the bottom of the page under the note that you
The selected note will appear at the top of the page. The ‘Add note’ button will be at the
bottom left corner of the note layout. You can reply only to the currently selected note. If you
want to reply to a note, you must select one of the knowledge types defined by your teacher
from the drop-down menu and then hit the ‘Add note’ button. If you don’t understand some
thinking types, you may click the question mark icon to get the knowledge type descriptions.
asking several questions at the right side of the page. The questions help you to understand how
to write a note for each knowledge type. If you see that the note that you are writing does not
correspond to the questions that Flea is asking, you can change the knowledge type from the
drop down menu below the questions. Your note will be posted under the selected knowledge
type category.
http://fle3.uiah.fi
are currently writing. If your teacher has enabled the ‘advisor’ feature, you will see little Flea
When you finish writing the note, push the “Preview” button. You may proof-read the note and
still do some changes by clicking the ‘Edit’ button. If you the decide not to publish the note at
all, hit the ‘Cancel’ button.
17
http://fle3.uiah.fi
How do I add picture and link to a note?
Upload an
image or add a
link in the
‘reply’ form
When you are writing a note, you can find ‘Add image’ command at the bottom of the page. You
can select any .gif or .jpg image from your computer hard disk and add it to the note. Remember
that web-browsers cannot display other image types other than .gif or .jpg. You may give a title
to the image.
You may add a link to the note by giving the URL address (http://...). If you don’t remember
the correct address, open another browser window, find the web page that you are referring to,
18
copy the URL from the address bar and paste it to Fle3. Give a title for the link.
How do I link Knowledge Building to Webtop?
Locate the
page that you
want to link
to the Webtop
and press the
‘Create Link
on Webtop’
button
You may link any view in Knowledge Building to your WebTop. Find the course context, Knowledge Building thread or a note that is interesting and click the ‘Create link on WebTop’ button
in the location path under the course participants names. You will see a link to that particular
page when you visit your WebTop. This functionality will help you to find important notes
afterwards. You may also group these links into folders just like any other items on the WebTop.
Using Course Information
How do I view course information?
You can access course information by clicking the link under the course title in any page. The
information page contains course starting and ending dates, course description and methods,
course members and suggested resources. The course resources will contain some Internet links
and titles of literature to read that the teacher has proposed for the course.
http://fle3.uiah.fi
View course
information
for course
description,
resources and
members
19
Where do I find information about my own participation?
You can find a link to ‘My notes’ and ‘My artefacts’ at the bottom of the course information
http://fle3.uiah.fi
Access
information
about your own
participation
from the
course
information
page
20
page. From these links you can access a page that contains all your written notes or uploaded
artefacts. The notes will be displayed as little squares on the timeline. By clicking a square you
can access a corresponding note in the Knowledge Building or artefact in Jamming. You can
choose to display the notes according to knowledge types or replies to other people. You can
sort the notes by weeks or by months. If the course is really long and you haven’t been very
active, it may be a good idea to sort all your notes ‘by month’ to make the page shorter. This
statistics page is accessible only to you.
Using Jaming
How do I view artefacts?
Different
versions of
artefacts are
derived from
the same
starting
artefact
On the top Jamming page you can find the list of all the Jam Sessions in the course. Select the
one that you would like to work on. You can see all the artefacts that your course group has
created in ‘tree’, ‘chain’ or ‘network’ layout. The artefacts that are lower in the page are
versions derived from the artefacts above. The icons of the artefacts indicate the file types:
image, sound, video, text, etc. .gif and .jpg artefacts have small thumbnail images of the
actual picture.
View artefacts
in your web
browser or
download
them to your
computer
Select the artefact that you would like to see. The files that can be displayed inline by your
browser (.gif, .jpg, .html, etc) will be rendered inside your browser window. Other files will be
downloaded to your computer hard disk. Click on the artefact icon and direct the file to the
preferred folder on your hard disk. You may open the artefact from there and make changes in
a corresponding application (image, text, sound or similar editing program).
How do I add artefacts?
Notice that when you view a jam session, each artefact has a ‘radio button’ on its left hand side.
If you want to upload your version of the artefact, you must select the original artefact that
your version is based on, by clicking its radio button. Then you may hit the ‘Continue with your
version’ button at the bottom of the page. It will bring you to the ‘Adding new artefact’ form.
You may upload your version of the artefact from your computer hard disk. Give a distinct name
for it. This will make it easier for others to recognize your artefact from the jam session view.
http://fle3.uiah.fi
Select a radio
button on the
left side of
the artifact
and continue
with your
version
21
How do I annotate artefacts?
You can see the number of annotations that the artefact received under its title in the jam
session ‘tree’ or ‘chain’ view. Clicking on the annotations link will bring you to the annotations
page. From here you can reach the artefact, read annotations or write your own.
Add your
annotation to Click on the ‘Add annotation’ link and write your own. Your name and the time of the creation
the artefact of annotation will be added by the system automatically.
How do I link Jamming views to Webtop?
Link any view The functionality for linking Jamming views to Webtop is the same as in Knowledge Building.
in Jamming to Find the appropriate view and click the ‘Create link on Webtop’ button in the location path
your Webtop
under the course participants names. You will see a link to that particular page when you visit
http://fle3.uiah.fi
your Webtop.
22
TEACHER’S USER MANUAL
Motivation
builds on
context and
shared
meaning
After reading the Introduction and Student Manual sections of this manual you already know
that Fle3 is designed to help study groups interested in collaborative learning to engage in a
research-like learning process. We know that inquiry learning requires a high level of motivation
from your students. We have also noticed that students often have difficulties adjusting themselves initially, but most who make an effort to try the process themselves will feel rewarded.
For this reason using Fle3 should always take place in a meaningful process, aiming to solve
problems. ‘Meaningful process’ means that there is a context and a shared meaning for the
group. This will result in the study group’s deeper understanding of the subject under study. It
also has a great effect on students’ motivation.
Teachers are
staff users
The ‘teacher’ in the Fle3 are most often configured to the system as ‘staff users’ (see section
‘The actors’ on page 8). The staff members have the right to start courses and add new students
to the system. There are two tools for carrying out these management tasks: Course management and User Management. These tools are visible only for the staff users.
How do I add new users to the system?
Add new users
manually or
invite them by
email
From the main tabs choose ‘User Management’. There are two alternative ways to add users to
the system: (1) You can manually write the user names and password to the system or (2) you
can invite them by email. Both ways of adding users to the system take place from inside Fle3.
http://fle3.uiah.fi
23
If you add your users to the system manually you must somehow deliver the user names and
passwords you created to your students. If you invite you students by email, your students will
create their own users names and passwords. With novice users we advice to use the first
option, but with more advanced users the second option works fine.
Adding a user
manually
http://fle3.uiah.fi
Inviting a user
by email
Check invited
and invite
again
When inviting users by email you can also invite people again if they have not responded to your
invitation. To check and invite them again click the ‘Check invites’ link in the main page of ‘User
Management’. Before adding or inviting new users it is good to check if the person already has a
user name in the system. It is possible that a colleague that teaches the same students has
already added or invited the person to the system.
To reduce the time spent on inviting students by teaching staff it may be advisable to arrange
that administrator or secretary adds all students in the classes utilizing Fle3 at the beginning of
24
the academic year. The teachers only have to add already registered users to their courses and
define their roles.
How do I remove users from the system?
You can freeze
and unfreeze
users
Because Fle3 is a multi-user system where participants are encouraged to build on top of other
users’ contributions, there is no particular ‘deleting users’ functionality. With this arrangement
we can ensure that the history of Knowledge Building and Jamming stays visible for the participants. However, staff users can ‘freeze’ and ‘unfreeze’ users. This works very much like removing or deleting users from the system. When the user is frozen, she cannot login to the system
anymore and gets the announcement that she should contact her teacher if she still wants to use
Fle3. The functionality for freezing users is found from the first page of the ‘User Management’.
How do I create a course?
Create the
course, add
users and
resources
To create your course choose the ‘Course Management’ tab. Choose the ‘Create course’ link and
fill in the information for your course.
After pressing the ‘Create your course’ button, the course will be visible on the course list of the
Course Management main page. By clicking the name of your course you can continue the course
creation by adding users and basic resources in it.
For studying and browsing purposes the admin user of the Fle3 system can also export the data
purposes you may run one Fle3 system in your own workstation and import your courses to it
once in a while.
In the Course page you can:
•
Edit course information - edit the basic information about your course that you added to
the system when creating it in the first place,
•
•
http://fle3.uiah.fi
of the whole course in a format that can be imported back to another Fle3 system. For research
Edit course participants - add students and tutors to your course,
Edit course resources - add links and a list of references related to the course.
25
How do I edit course participants?
http://fle3.uiah.fi
The course
participants
can be
students,
tutors or your
co-teachers
In the ‘Edit course participants’ view you can add students and tutors to your course from the
list of all the users of the system. On the left side you can see a list of all the users of the system
and on the right side - the users participating in your course.
Choose the users you want to add to your course and use the arrow buttons (add, remove). Your
course participants can be in the role of a ‘student’, a ‘tutor’ or your co-teacher within the
course. As co-teachers or ‘tutors’ of the course the participants will have the right to add new
26
course contexts and jam sessions to your course.
How do I start Knowledge Building and Jam Sessions?
Start
Knowledge
Building and
Jamming for
your students
As a teacher or tutor of the course you have the right to create course contexts in the Knowledge Building and start jam sessions in the Jamming. Go to the Knowledge Building of your
course and click the ‘Create course context’ -link, or in Jamming, click the ‘Add jam session’ link. From the course context page you and your students will be able to start new knowledge
building threads. It is better if you have already created course contexts to the Knowledge
Building before adding users to the course. In this way your students may start Knowledge
Building discussions immediately when they login to the system for the first time.
Select a
knowledge
type set when
creating a
course context
When creating a course context, you will be required to select the knowledge type set used in
this context. You can view available knowledge type sets if you click on the link to the ‘Knowledge types management’ in the ‘Course Management’. You will not be able to change the knowledge type set in the course context afterwards, so it is a good idea to get familiar with available
knowledge type sets before creating a course context. If you select a wrong knowledge type by
mistake, you will have to delete the whole course context and create a new one.
Select a jam
session type
when creating
new jam
session
When creating a jam session you will have to select a jam session type from 3 options:
•
•
Mutate on previous - the versions of artefacts follow one another in a linear manner;
Explore possibilities - the artefacts are layed out in a branching tree structure, there is
a possibility to upload several versions of artefacts derived from the same artefact;
•
Diverge and converge - the artefacts will be displayed in a network-like layout, a new
version of the artefact can be linked to several artefacts.
How do I manage knowledge types?
Knowledge types give you a way to scaffold and structure your knowledge building discussion.
The Knowledge Building tool contains two default "knowledge type sets": (1) Progressive Inquiry,
and (2) Design Thinking. Depending on the selected knowledge types set, users get guidelines
and a checklist on how to write their notes to the Fle3 database. You can find a link to managing
knowledge type sets from the Course Management page. From there you can view, duplicate and
edit existing knowledge type sets or create your own one. You can also import and export
knowledge types. This makes it possible to exchange your own knowledge type sets with other
http://fle3.uiah.fi
Get familiar
with existing
thinking types
before
creating a
course context
teachers. You will have to select some knowledge type when creating a course context, so it is
good to get familiar with available knowledge type sets before creating a course context.
27
How do I remove notes from Knowledge Building?
As a teacher (and tutor) of the course you have a right to remove notes from the Knowledge
Building discussion. You may also restore a removed note. When removing a note you will be
asked to write an explanation for the removal. This text will be shown for all the participants
when they attempt to open the removed note. After removal the original note is visible only for
Remove only
notes that
contain illegal
content
the author and the teacher with the explanation for the removal written by the teacher. The
removal functionality is recommended to be used only in a case of the note containing illegal
content.
ADMINISTRATOR’S MANUAL
What do I need to run Fle3 server?
You need a
computer, the
Zope
application
server
software and
a net
connection
Fle3 is a Zope product, so you need to install the Zope application server. Zope itself is a free
product that you can download from http://www.zope.org. Zope is available for Linux, Solaris
and Windows, as well as a source package that will install on any POSIX compliant system, such
as BSD and other Unices.
You need a computer that has at least a few hundred megabytes of free disk space. If others
need to connect to your Fle3, then the computer should be permanently connected to the
Internet or your intranet.
http://fle3.uiah.fi
How do I install Zope and Fle3?
28
Instructions
are at
fle3.uiah.fi
First you need to install Zope and get it running. We’ve provided more detailed instructions at
http://fle3.uiah.fi.
Note that you may need to install a few extra libraries to get all the features of Fle3 working.
Take a look at the installation instructions on our web page for more details.
How do I start using Fle3?
Create new
Fle3
environments
as needed
When you have Zope running and Fle3 is installed as a Zope product, you’ll need to create one
or more Fle3 environments, which your users can then use.
Go to the Zope Management Interface (ZMI) using your browser: enter the address http://
yourserver:port/manage as the location. The port is often 8080, but can be configured to be
anything else. You will be asked to provide a user name and password. Enter the information you
saw when installing Zope.
In ZMI, select FLE from the pull down menu, fill in the creation form and repeat for all environments that you need. We have screen shots of this process at fle3.uiah.fi.
What management tasks do I need to do?
Take backups,
campact the
database,
restart Zope
every now and
then
Maybe the most important task is taking backups. All data inside Zope is stored in Zope’s var
directory as ‘Data.fs’. Backup this file regularly, at least once per week.
One important task is compacting the database. As changes happen in Zope, its database grows
steadily and will need to be compacted every now and then. For a busy site with hundreds of
users, we recommend compacting the database once per week. This is done in ZMI’s Control
Panel, but we also have a script inside the FLE archive as util/pack_zope that you can call from
the command line or use as a cron job that will automate this task.
If you find that Zope isn’t very stable for you, restarting Zope every now and then seems to help.
You can do this right after compacting the database, for example.
Other tasks for the administrator include creating new environments and changing lost passwords. You may delegate this password replacement task to your Staff users, since they can also
do that. The creation of courses should also be responsibility of teaching Staff members.
How do I upgrade to a newer version of Fle3?
Newer versions almost always change so much that the existing old environments do not work
properly. For this reason we have an export functionality that exports an environment completely to an XML file which can later be imported as a new environment, into a newer Fle3
version. You will find an environment specific management link in ZMI, by clicking on the environment and choosing the Tools tab.
We recommend that you first export all your environments, rename them out of the way, upgrade Fle3, restart Zope and recreate new environments, selecting an appropriate export file in
the creation form for each environment.
How do I translate the Fle3 interface to my language?
You can translate the user interface, user manuals and knowledge type sets to your own lan-
http://fle3.uiah.fi
Export
existing
environments,
upgrade Fle3,
restart Zope
and import
your old
environments
again
guage. Simple instructions on how to download and translate the Fle3 vocabulary file can be
found from http://fle3.uiah.fi/how_to_translate.html. Please check your translations with other
29
You have to
translate just
one file to
localize Fle3
user interface
CSCL experts in your country and send the translation file to the developer team. It will be
included in the next release of the Fle3 system.
There are 2 knowledge type sets included in Fle3 software: Progressive Inquiry and Design thinking types sets. You may make translations of knowledge types in the Knowledge type management in Fle3, export them and send them to the development team. The translations will be
made available from the Fle3 web site for download. You may also download Knowledge Type
sets made by other users from http://fle3.uiah.fi/download.html and import them to your own
Fle3 installation.
How can I get involved in developing Fle3?
Download the
Fle3 source
code from
anonymous
CVS
If you are a software developer (or becoming one) you can browse the code at our web-based
CVS repository or download the source from anonymous CVS. You can find instruction about this
at http://fle3.uiah.fi/get.html
I have other questions or problems. What to do?
Go to http://fle3.uiah.fi and see what documents and instructions are available. If you can’t
find an answer to your question, take a look at our mailing lists. Old messages are available in an
archive, so take a look there first. If you can’t find the information you need, subscribe to ‘fle3users’ mailing list and post your question to the list.
Fle3 GLOSSARY
http://fle3.uiah.fi
the Fle3's web user interface. Some more advanced things like
30
•
•
Fle3 = Fle3 is a Learning Environment
(import and export database) must be done through the Zope's
Server = Hardware connected to the network where you
web based management user interface. Fle3 Administrator is a
run Fle3 (usually Internet). You need it to host and run Fle3.
so called, ‘global role’, in use everywhere in the system.
•
•
Web Master = Person taking care of the (web) servers
Fle Staff = Person with a right to add users and create
of your institution. In a normal situation she is also responsible
courses in the Fle3 system. Fle Staff is a so called, ‘global role’,
of taking care that the servers are on and online all the time.
and it is in use everywhere in the system.
She should also take backups of the data in the server.
•
•
User is a so called , ‘global role’, and it is in use everywhere in
Fle Administrator = Person taking care of Fle3 system.
Everything the Fle3 administrator needs to do can be done from
Fle User = Person with a right to use Fle3 system. Fle3
the system.
•
Webtop = Module of the Fle3 system. Each user gets a per-
sonal Webtop. Webtops can be used to store different items (documents, files, links, knowledge building notes) related to their studies, organize them into folders and share them with others.
•
Knowledge Building = Module of Fle3 system where the study
work takes place in courses and course contexts. Users may start
new knowledge building threads inside a course context.
•
Jamming = Module of Fle3 system where the study work
takes place in the form of developing some file together. The teacher
or tutor may start a new jam session in which users may then continue with new versions.
•
Course = In Fle3 a course means a group of people studying
together in a research-like learning process. Staff users may start
new courses in the system. A course always has a name and description.
•
Course Context = In Fle3 courses are divided into course
contexts. The course context should be a meaningful section of study.
•
Thread = In each course context there can be several knowl-
edge building threads, which are discussion paths each starting
with a single message.
•
Knowledge Type Set = A set of labels with associated in-
structions for structuring the discussion process towards a process
that the knowledge type set is designed to support.
•
Teacher (course) = Person who organizes and leads a course,
Copyright: Taideteollinen Korkeakoulu, University of Art
and Design, Media Lab
the timetable. Teacher is a so called, ‘local role’, which is in use only
Authors: Teemu Leinonen, Giedre Kligyte, Tarmo
inside a course.
Toikkanen, Janne Pietarila, Philip Dean
•
Graphic design: Giedre Kligyte
Tutor (course) = A person, or several persons, who help
http://fle3.uiah.fi
divides the course into meaningful study sections and takes care of
teacher(s) in a course. The tutor may create new course contexts to
Photography: Philip Dean, Giedre Kligyte, Umakant Soni
a course.
Printing: Yliopistopaino
•
Paper LumiArt Silk
Student (course) = A persons taking part in a course / courses.
The student may use the WebTop's and take part in knowledge building discussions.
2003
31
Media Lab
University of Art and Design Helsinki UIAH
Hämeentie 135 C
00560 Helsinki
Finland
Address: Hämeentie 135 C, 00560 Helsinki, Finland
Tel: +358 (0)975630
http://fle3.uiah.fi
Project web site: http://www.euro-cscl.org/
Work partially supported by European Community under the Information Society Technology
(IST) RTD programme, contract IST-2000-26249. The author is solely responsible for the content
of this publication. It does not represent the opinion of the European Community, and the
European Community is not responsible for any use that might be made of data appearing therein.
32
ISBN 951-558-127-3