1
Diabetes Management System
User Manual
Copyright © 2012
by
Harbor Software, Inc.
ALL RIGHTS RESERVED
Diabetes Management System Manual
Table of Contents
SYSTEM HISTORY..................................................................................................9
SYSTEM OVERVIEW...............................................................................................9
NETWORK ADMINISTRATOR NOTES...................................................................10
SYSTEM DIRECTORY STRUCTURE........................................................................10
SYSTEM DATA BACKUP......................................................................................10
SYSTEM REQUIREMENTS......................................................................................10
INSTALLATION INSTRUCTIONS.............................................................................11
NETWORK NOTES…..........................................................................................11
INSTALLING THE SYSTEM:...................................................................................11
INSTALLING WORKSTATION SHORTCUTS:............................................................11
MAPPING NETWORK DRIVES:............................................................................11
DIRECTORY STRUCTURE:.....................................................................................12
GETTING FAMILIAR WITH THE SYSTEM..............................................................12
SYSTEM SECURITY...............................................................................................12
LOGGING INTO THE SYSTEM..............................................................................12
FIRST TIME SIGN ON.........................................................................................13
MAINTAINING PASSWORDS.................................................................................13
FILE ACTIVITY LOG...........................................................................................14
SETTING UP THE SYSTEM....................................................................14
USER PASSWORDS...............................................................................................14
STAFF PROFILES..................................................................................................15
PHYSICIAN FILE..................................................................................................15
CLASS SITES .......................................................................................................16
FOLLOW UP STATUS (ASSESSMENT VISIT TYPES)...............................................16
MEDICATION FILE..............................................................................................16
COUNTY FILE.....................................................................................................17
PROCEDURES FILE..............................................................................................17
SYSTEM DEFAULTS.............................................................................................17
BEHAVIORAL GOALS .........................................................................................18
DEFAULT NOTES AND GOALS..........................................................................18
2
Diabetes Management System Manual
LOOKING UP DATES AND OTHER INFORMATION..............................................18
PARTICIPANT DEMOGRAPHIC DATA..................................................................19
ADDING DEMOGRAPHIC DATA..........................................................................19
USING AGENCY/GROUP IDENTIFIER CODE......................................................19
PATIENT E-MAIL ..............................................................................................22
REFERRAL OUT..................................................................................................22
PATIENT PATHWAY.............................................................................................23
EDUCATION MODULE........................................................................................24
CURRICULUM.......................................................................................................25
CLASS CURRICULUM MAINTENANCE...................................................................25
CLASS CHARGES/FINANCIAL INFORMATION.......................................................26
REQUIRED CLASS INFORMATION........................................................................27
CONTENT AREAS/CLASS LINK MAINTENANCE..................................................27
HOW TO CHANGE CONTENT AREAS .................................................................28
SCHEDULING BY CLASS.......................................................................................28
RECORDING CLASS ATTENDANCE......................................................................28
INDIVIDUAL EDUCATION RECORD......................................................................28
GROUP CLASS ATTENDANCE/UNSCHEDULED....................................................29
SCHEDULED ATTENDANCE.................................................................................29
EDUCATIONAL REPORTING.................................................................................29
INDIVIDUAL PATIENT CLASS SCHEDULES............................................................29
PARTICIPANT EDUCATIONAL ASSESSMENT .........................................................30
UPDATING MULTIPLE CONTENT AREAS WITH THE SAME DATA........................31
CLEARING EDUCATIONAL ASSESSMENT RECORD DATA.....................................31
CLASS ACTIVITY LISTING....................................................................................31
REQUIRED CLASS ATTENDANCE REPORT...........................................................31
ASSESSMENT AREAS LISTING..............................................................................32
CURRICULUM LISTING ........................................................................................32
CLINICAL/ASSESSMENT FLOW SHEET ...............................................................32
ADDING PARTICIPANT ASSESSMENT DATA.........................................................32
USING PRIME NEW ASSESSMENT WITH PRIOR DATA.......................................32
3
Diabetes Management System Manual
MEDICAL NUTRITIONAL THERAPY.....................................................................33
GOALS MODULE................................................................................................34
BEHAVIORAL GOAL ...........................................................................................34
PARTICIPANT BEHAVIORAL GOAL......................................................................34
DEFAULT GOALS................................................................................................35
GOAL REPORTS..................................................................................................36
MEDICATION MODULE.......................................................................................36
COMPLICATIONS / ISSUES MODULE....................................................................37
ADDING COMPLICATIONS...................................................................................37
TRACKING PARTICIPANT COMPLICATIONS..........................................................37
COMPLICATIONS SUMMARY REPORT...................................................................37
FILTERED COMPLICATIONS LISTING...................................................................38
PODIATRY MODULE...........................................................................................38
OVERVIEW..........................................................................................................38
PRINTING THE PODIATRY REPORT.....................................................................38
GRAPHING..........................................................................................................39
NUTRITION MODULE.........................................................................................39
NUTRITION HISTORY / MEAL PLAN..................................................................39
MEAL PLANNING WORKSHEET..........................................................................40
DIET HISTORY / DIET FACTORS.......................................................................40
CHARTING/LETTERS MODULE...........................................................................41
NARRATIVE CHARTING.......................................................................................41
DEFAULT NARRATIVE NOTES............................................................................41
SOAP NOTES...................................................................................................41
DEFAULT SOAP NOTES...................................................................................42
PROGRESS NOTES...............................................................................................42
SCHEDULED ACTIVITY........................................................................................42
LETTER GENERATION........................................................................................43
LETTER GENERATION MARGINS AND FONT SIZES
...........................................................................................................................43
MAIL MERGE.....................................................................................................44
4
Diabetes Management System Manual
MAIL MERGE FROM CLASS ATTENDANCE..........................................................45
TELEPHONE LOGS..............................................................................................45
GLUCOSE LOGS..................................................................................................45
PARTICIPANT’S CHARTS.....................................................................................46
ADA RECOGNITION (8TH EDITION)…............................................................46
HOW THE PARTICIPANTS ARE TALLIED FOR RECOGNITION.................................47
INSTRUCTORS AT THE SITE: ................................................................................48
CURRICULUM AT THE SITE: ................................................................................48
SUPPORTING DOCUMENTATION:.........................................................................48
BEHAVIORAL AND CLINICAL OUTCOME TRACKING............................................49
EDUCATORS DSME EXPERIENCE RECORD.......................................................49
ADA ANNUAL REPORTING RESPONSE WORKSHEET . .....................................50
CONSULTATION MODULE...................................................................................51
CONSULT TYPES.................................................................................................51
CONSULT TEMPLATES.........................................................................................51
CREATE/MAINTAIN CONSULT............................................................................52
VIEW EXISTING CONSULTS................................................................................52
GENERAL REPORTS MODULE.............................................................................53
REPORT LOCATOR..............................................................................................53
PARTICIPANT LISTINGS.......................................................................................53
ANALYSIS REPORTS.............................................................................................55
AVAILABLE ANALYSIS REPORTS..........................................................................55
CALL LISTINGS ..................................................................................................56
OUTCOMES.........................................................................................................57
AVAILABLE OUTCOMES REPORTS.......................................................................58
SCREENING / HEDIS MEASUREMENT REPORTS..............................................59
REFERRALS..........................................................................................................60
ADA 8TH EDITION RECOGNITION REPORTING................................................61
NCQA CONTROL REPORTS .............................................................................61
NCQA REPORTING CRITERIA...........................................................................62
ACTIVITY LISTINGS.............................................................................................63
5
Diabetes Management System Manual
BLANK FORMS....................................................................................................64
Labels/Mail Merge.........................................................................................
Merge.........................................................................................64
.........................................................................................64
QUALITY OF LIFE MODULE...............................................................................65
OVERVIEW..........................................................................................................65
QUALITY OF LIFE QUESTION GROUPS...............................................................65
QUALITY OF LIFE QUESTIONS............................................................................66
ON-LINE TEST..................................................................................................66
PRINTING THE TEST...........................................................................................66
QUALITY OF LIFE TEST RESULTS.......................................................................66
GENERATING QUALITY OF LIFE STATISTICS.......................................................67
APPOINTMENT SCHEDULER MODULE ................................................................68
SCHEDULER FUNCTIONS.....................................................................................68
SETTING UP THE APPOINTMENT SCHEDULER......................................................68
UPDATE/ADD AN APPOINTMENT TIME.............................................................68
RESERVE A TIME BLOCK. ..................................................................................69
CLEAR A TIME BLOCK........................................................................................69
BLOCK AN ENTIRE DAY....................................................................................69
PRINT THE DAY'S SCHEDULE. ..........................................................................69
VIEW AND PRINT A “WEEK AT A GLANCE”. ...................................................69
MAINTAINING STAFF AND ROOMS. ..................................................................69
MAINTAINING DAILY START TIMES. ................................................................69
DELETE OLD SCHEDULES. ...............................................................................69
QUICK REFERENCE/FREQUENTLY ASKED QUESTIONS….................................70
WHAT IS THE FIRST THING I DO IN THE SYSTEM? ............................................70
HOW CAN I QUICKLY FIND A PARTICIPANT IN THE SYSTEM?..............................70
HOW DO I ADD A NEW PARTICIPANT INTO THE SYSTEM?..................................71
HOW DO I ADD AND UPDATE PARTICIPANT ASSESSMENT RECORDS?.................71
HOW DO I ENTER OUR EDUCATIONAL OPPORTUNITIES?......................................71
HOW DO I ENTER IN A PARTICIPANT'S EDUCATION RECORD?...........................72
HOW DO I ENTER IN A PARTICIPANT'S EDUCATION ASSESSMENT RECORD?......72
6
Diabetes Management System Manual
HOW DO I CHANGE MY BEHAVIORAL GOAL GROUPS?......................................72
I DON’T USE THE COMPUTER WHEN I INTERVIEW A PARTICIPANT, WHAT SHOULD I
DO TO SAVE TIME?..............................................................................................73
THERE ARE SEVERAL OF US WHO USE THE SYSTEM, HOW CAN I GET A LIST OF JUST
..............................................................................................73
MY PARTICIPANTS?
THE SYSTEM HAS SO MUCH INFORMATION, WHAT DO I CONCENTRATE ON?........73
WHERE DOES THE INFORMATION FOR THE ADA 8TH EDITION WORKSHEET
SUPPORTING DOCUMENTS COME FROM IN THE DIABETES MANAGEMENT
SYSTEM?.............................................................................................................74
AND
WHAT INFORMATION DO I NEED TO KEEP IN THE DIABETES MANAGEMENT
SYSTEM FOR RECOGNITION?...............................................................................74
WHAT REPORTS DO I NEED FOR THE DSME 8TH EDITION APPLICATION AND A
RECOGNITION AUDIT?.......................................................................................74
EDUCATION RECORDS AT THIS SITE: ...................................................................75
HOW DOES THE DIABETES MANAGEMENT SYSTEM DETERMINE WHO IS
COMPREHENSIVE/INITIAL OR POST-PROGRAM INSTRUCTION?...........................75
HOW DO I KEEP TRACK OF MY OWN HOURS OF DSME EXPERIENCE?..............76
HOW DO I KEEP TRACK OF MY HOURS OF DSME EXPERIENCE IF THERE ARE
MULTIPLE INSTRUCTORS TEACHING ONE CLASS?...................................................77
PARTICIPANT DEMOGRAPHIC DATA FILE EXPORT.............................................77
FIELD SPECIFIC NOTES......................................................................................78
PARTICIPANT FOLLOW UP/ASSESSMENT DATA FILE EXPORT...........................80
FIELD SPECIFIC NOTES......................................................................................83
PARTICIPANT BILLING DATA EXPORTATION......................................................84
PARTICIPANT CLASS ATTENDANCE DATA FILE EXPORT....................................85
PARTICIPANT GESTATIONAL EPISODE DATA FILE EXPORT...............................86
BILLING DATA FILE EXPORT.............................................................................88
GOAL FILE DATA FILE EXPORT........................................................................89
PATIENT MEDICATIONS DATA FILE EXPORT.....................................................90
PARTICIPANT DEMOGRAPHIC DATA FILE IMPORTATION....................................91
FIELD SPECIFIC NOTES......................................................................................93
PARTICIPANT LAB DATA FILE IMPORTATION.....................................................94
PHYSICIAN DATA FILE IMPORTATION................................................................96
7
Diabetes Management System Manual
PRAXIS SCHEDULER DATA IMPORTATION......................................................97
HL7 INTERFACE ENGINE, AN INTRODUCTION.................................................98
SETTING UP THE HL7 ENGINE........................................................................98
STARTING THE HL7 ENGINE.............................................................................99
HL7 IMPORTATION..........................................................................................100
IMPORTATION WINDOW OPTIONS....................................................................101
HL7 EXPORTATION.........................................................................................102
THE HL7 INTERFACE ENGINE EXPORTATION WINDOW................................102
EXPORTATION WINDOW OPTIONS...................................................................102
GENERATED HL7 EXPORT FILE RECORD DETAILS........................................103
AUDIT ACTIVITY FILE......................................................................................106
FORMULAS USED....................................................................................107
TROUBLESHOOTING..........................................................................................108
FOR MORE INFORMATION................................................................................109
USER SUPPORT PAGE.......................................................................................109
COPYRIGHT NOTICE.........................................................................................109
8
Diabetes Management System Manual
System History...
Harbor Software was approached by several CDE's in 1995 who were
looking for a way to track Diabetes Outcomes for the State's Department
of Community Health. Over the next 15 years, the System evolved to
meet the needs of CDE's with Outcomes Tracking, ADA Recognition,
AADE DEAP Support Reporting, Charting, and all aspects of Data
Management for a Diabetes Education Program. Harbor Software is
continually working to improve and enhance the System to assist Diabetes
Educators with their patient care.
System Overview...
The Diabetes Management System was designed with the input of
Diabetes Educators in order to assist them with all aspects of their
Education Programs. The major goals of the system are...
•
Elimination of Redundant Data Entry.
•
Simplify Record Keeping.
•
Quantify Effectiveness of your Education Program.
•
Measure Participant Knowledge Levels and their Understanding of
Diabetes.
•
Measure Outcomes.
•
Effectively Track Participant Follow Ups.
•
Track Participant Complication Rates.
•
Maximize Reporting with Minimal Effort.
•
Tracking Educator DSME and CE Hours.
•
Assist in measuring ADA Criteria for Recognition and Annual
Reporting.
•
Assist with scheduling Staff and Patients.
9
Diabetes Management System Manual
Network Administrator Notes...
System Directory Structure
The Diabetes Management System installs in just two subdirectory
folders. NO SYSTEM FILES, DLL's, OR DATA FILES ARE
INSTALLED, NOR IS THE REGISTRY MODIFIED. The System was
designed to be very simple to install, run, and maintain. The system is
entirely self-contained within its subdirectory, including the database
drivers. No other database drivers need to be installed, nor any ODBC
connections need to be set up. The name of the system program
subdirectory folder defaults to \DMS (which you can change at
installation) and the data subdirectory folder is called DATA and is
located directly underneath the program folder.
System Data Backup
All the DMS Data Files are in a subdirectory called DATA underneath the
DMS program subdirectory (the default name is \DMS). REMEMBER,
YOUR DATA IS VALUABLE AND IT IS YOUR RESPONSIBILITY
TO DO, OR VERIFY, THAT SYSTEM-WIDE BACKUPS ARE
DONE ON A FREQUENT AND REGULAR BASIS. BECAUSE
THIS SYSTEM IS USED ON A WIDE VARIETY OF NETWORK
PLATFORMS, THERE IS NO BUILT-IN BACKUP UTILITY IN
THE DIABETES MANAGEMENT SYSTEM.
System Requirements
The Diabetes Management System was designed with a small footprint
and minimal requirements. It should run just fine on any existing
hardware. The System will operate on any standard XP, Vista, Windows7
environment on a standard Windows Network, or as a stand-alone
system. The system requires, AT A MINIMUM, the following:
•
Pentium 1 GHz CPU
•
1GB RAM (or more, depending on your network overhead)
•
Approximately 60 MEG Disk Space and a MINIMUM storage space
of approximately 0.3 Kb per participant record. This size requirement
could change with future upgrades.
10
Diabetes Management System Manual
Installation Instructions
Network Notes…
If you are installing the Diabetes Management System onto a Network,
please contact your Network Administrator before proceeding with
installation.
Installing the System:
From a CD... Insert the Installation CD in your CD Drive and it
should start automatically. If it does not, click on the START button (on
your task bar) and select RUN. In the Open Dialog box, type in the CD
Drive Letter that contains the installation CD followed by “SETUP” (ie,
type “D:\SETUP”). Press or click on the OK button to begin the
installation. Follow the prompts.
From a Download... Navigate to the download directory and run it.
Follow the prompts. All the download installs are password protected.
Be sure you have the password before you begin. Contact Harbor if you
have questions.
After the installation, the Diabetes Management System Programs can be
found in your Program Menu, as well as a shortcut icon on your desktop.
Installing Workstation Shortcuts:
The installation program installed a workstation installation program in
the main program folder called WRKINST.EXE. This installation
program automates the process of creating the necessary shortcuts on
your workstation desktops. The network drive needs to be mapped prior
to running this program.
Mapping Network Drives:
When you map the network drive to the workstation, do not set the DMS
subdirectory so that it appears as the root directory on the workstation.
This could cause a problem with the system’s built-in automatic file
upgrade utilities on some networks.
11
Diabetes Management System Manual
Directory Structure:
The default Diabetes Management System subdirectory defaults to \DMS
located off of your root subdirectory. This may be different on your
system, particularly if it was installed onto a network.
The system data subdirectory is called DATA and is located immediately
underneath the DMS subdirectory, regardless of where it is installed.
Getting Familiar with the System...
System Security
HIPAA Requirements call for security measures to protect access to
participant data. A user password is required to log in and access the
System. There are three access levels the System; Administrator, Normal
User, and Restricted User.
•
Administrator- Unlimited Access to the System (typically, ALL
licensed staff (RN's, RD's, CDE's, etc) should be set to the this
level.
•
Normal User- Access to all functions, EXCEPT: System
Defaults, User Maintenance, Audit Modules, and Utilities Menu.
The Normal User cannot update existing narrative notes.
•
Restricted User- Access to patient information, VIEW ONLY,
no update privileges.
Logging into the System
Whenever the System is started, a Log in Name and Password are
required to be entered before proceeding. (The System is initialized with
one Administrator Password.) The user has two chances to enter a
correct Log in Name and Password. If unsuccessful, the system exits to
the Operating System.
12
Diabetes Management System Manual
First Time Sign On
After installation, you will need to sign into the System as Administrator
and assign passwords and access levels to all the users. This must be
completed before the users can access the system. The Initial Log In Last
Name is: “ADMIN”, Password is: “ADMIN”,
“ADMIN” then click on the Log In
button to sign in. Click on FILE > USER MAINTENANCE to load
your users. For security purposes, you should delete the generic ADMIN
sign on ID once you have your staff ID's loaded.
Maintaining Passwords
The System will display a reminder message to the user after log in if they
have not changed their password within the last 60 days. There are two
methods of changing a password…
1. The Administrator can change any user password in the FILE |
USER MAINTENANCE Menu. Not only can they change
passwords, they can add, delete, or modify any user in the System.
2. The User can change their own password by entering in their
Name and Current Password, and clicking on the Change
Password button. They will be requested to enter a new
password, and then re-enter it again in order to verify accuracy.
When completed, click on the Update Password button to
complete the change and update the password. The user will be
logged into the System. If the Log in button is clicked instead,
they will be logged into the System, but their password remains
unchanged.
3. LOST PASSWORD? Have someone with Administrator access
log on to the System and go to FILE | USER
MAINTENANCE. They need to delete your record and add it
back in again with a new password (do not forget to enter in the
appropriate access level).
13
Diabetes Management System Manual
File Activity Log
For added security, the system automatically tracks, records, and stores
data changes on 3 major system files (participant’s demographics,
assessment data, narrative notes). Information stored includes date, time,
user name, as well as capturing before and after images of the modified
data.
SETTING UP THE SYSTEM
The DMS System requires the initialization of several files...
•
Staff Profiles
•
User Passwords (see System Security the prior page)
•
Physician Information File
•
System Defaults
•
Class Sites
•
Follow Up Status File
•
Medication File
•
Procedures File
•
Behavioral Goals
•
Default Goals (optional)
•
Default Narrative Notes (optional)
•
Default SOAP Notes (optional)
•
County File (optional)
User Passwords
Click on FILE > USER MAINTENANCE to add, update, and delete
user sign-on's. passwords, and user access levels. See prior section labeled
“Maintaining Passwords” for more information.
14
Diabetes Management System Manual
Staff Profiles
Staff Profiles give you the ability to track personal and staff data. The
following can be recorded for ADA Recognition...
•
Licensure Information
•
Hours and Responsibilities
•
Education Plans
•
CEU's
•
DSME Experience
To access, click on FILE > USER MAINTENANCE.
MAINTENANCE The Window
displays your Staff on the left side of the window. The right side of the
window displays the recorded CEU data for the highlighted staff member.
To add a new Staff Member, click on the ADD button, click on the
UPDATE button to modify an existing record. (See Also: Instructors at
This Site and Educators DSME Experience Record under ADA 8th
Edition Recognition).
Physician File
To set up the Physician File, click on FILE > PHYSICIAN
INFORMATION > PHYSICIAN MAINTENANCE.
MAINTENANCE The Look Up
Window displayed can be sorted by Name or Physician Number by
clicking on the appropriate tabs at the top of the window. To add a new
physician, click on the ADD button. The Detail Information Window
contains all the information on this physician's office. It is up to you to
set up the physician numbers so it may be compatible with any current
system. It is a good idea to set up an UNKNOWN physician if the
referral isn't known (ie, #99999 is initially set up as an Unknown
Physician).
Physician information can also be added and updated while patient
demographics records are being added.
Utilities allows for the Importation of Physician Data (see the Utilities
Menu for more information).
Check the inactive box if the physician is retired, deceased, or inactive.
Labels and Mail Merge will not include an inactive Physician. A Physician
Listing will print out an alphabetical list of Physicians, ID#, Institutions,
City and office telephone number.
15
Diabetes Management System Manual
Class Sites
The System allows you to track participants that receive education from
your site at various locations. The ADA recognizes this as an education
program choosing to deliver their same program at different locations /
addresses (the system can filter data/reports by location). If the main site
is selected for a random on site audit, the required documentation must
include documentation from each location.
To set up your Class Sites, click on FILE > SYSTEM FILE
MAINTENANCE > CLASS SITES. To add a site, click on ADD, enter
the data, and click on OK to save the data.
The option of Class Location is used whenever a participant or group are
marked as attending a class.
Follow Up Status (Assessment Visit Types)
To set up Follow Up Status Codes and Descriptions, click FILE >
SYTEM FILE MAINTENANCE > FOLLOW UP STATUS.
STATUS These
Status Codes are mandatory fields used in a patient's Assessment Record
and are used to record and group the type of Assessment visits. There
can be an unlimited number of Participant Status Codes, however it is
best to limit them to a minimum. Please review and update them for your
program BEFORE adding participant’s assessments. To change Follow
Up Status Codes in the system, highlight a follow up status code that will
not be used and change to a more appropriate description. Activity
Reports can be filtered by these Follow Up Status Codes.
Medication File
The Medication File is used to hold the patient medication history data,
which can be quickly looked up and entered into the Participant
Medication History. Also, many reports can be filtered by a Medication
Name (or partial Medication Name) so just the patients with that
medication will be printed or tallied.
To set up the Medication File, click FILE > SYTEM FILE
MAINTENANCE > MEDICATION FILE. The Look Up Window
displayed is sorted by Medication Name. To add a new Medication or
update an existing one, click on the Add or Update button respectively.
Enter in the Medication Name and click on Update to save it. The
System installs with several common medications. It is up to the users to
maintain this medication list.
16
Diabetes Management System Manual
County File
County of Residence can be tracked in a patient's demographic record.
This is an optional field. To set up the County File, click FILE >
SYTEM FILE MAINTENANCE > COUNTY. The Look Up Window
displayed can be sorted by County Name or County Number by clicking
on the appropriate tabs at the top of the window. To add a new county,
click on the Insert button. The Detail Information Window contains all
the information on this County. It is up to you to set up the county
numbers so it may be compatible with any current system. It is a good
idea to set up an UNKNOWN county if the referral isn't known (ie, use
#999).
Procedures File
The Procedures File is used to hold different Procedure names that can be
quickly searched and selected to print on the Progress Note. Note - The
data in this procedures file are only used for the Progress Note Report
(See Progress Note). To set up the Procedures File, click FILE >
SYTEM FILE MAINTENANCE > PROCEDURE FILE. The Look
Up Window displayed is sorted by Procedure Name. To Add a New
Procedure or Update an Existing Procedure, click on the ADD or Update
button respectively. Enter in the Procedure Name and an average length
of time (this is optional) and click on Update to save the information.
System Defaults
The System Defaults window controls and maintains system-wide
variables (ie, institution name and address). There is also information that
can be set to automatically load when a new participant is added (ie,
Default City, State, and Zip Code). Major Insurance Companies
Information can be set here and is carried throughout the system. Margins
for Letter/Chart Generator can be set (Inches from Top and Left), and
Font Size (10, 11, 12).
17
Diabetes Management System Manual
Behavioral Goals
The behavioral Goals Data File is used to group goals into measurable
behaviors (ie, AADE 7). Goal Outcomes can be tracked for individual
participants as well as in group aggregates. To set up the Behavioral
Goals File, click on FILE > SYSTEM FILE MAINTENANCE >
BEHAVIORAL GOALS,
GOALS then click add. These Goal Groups are used in
the Goals Module, the Goals Outcome Report, and the Behavioral Goals
Outcome Report.
Default Notes and Goals
Add standard stock narrative notes here, to be used in Assessment,
Pathway (Narrative Notes), or Progress Notes. Add standard stock SOAP
Notes here, to be used in Charting, Pathway (SOAP Notes). Maintain
standard goals to be used in Patient goal statements, Pathway > Goals >
Add > Defaults.
Looking Up Dates and Other Information
When an ellipsis button (…) is displayed, it indicates a look up window
will be displayed by clicking on that ellipsis button. If it is a date, a
monthly calendar will be displayed to select the date. Months can be
advanced or decremented by clicking on the arrows in the top right and
left of the calendar respectively. If you put a date into an area by mistake,
click on the ellipsis button and use the zero out date option. If it is
another look up field (ie, County, Physician, Hospital, etc.), the
appropriate file will be displayed to easily select the right choice.
18
Diabetes Management System Manual
Participant Demographic Data.
Adding Demographic Data
To add a new participant record, click on PATIENTS button on the
toolbar. A list of all participants in the system is displayed here. Click
on the ADD button to add a new participant record. Each record has
several tab pages that can be accessed by clicking on the appropriate tab at
the top of the form. The only mandatory fields for each record are:
•
Last and First Name
•
Referring Physician Number
NOTE THAT THESE TWO FIELDS ARE THE ONLY ONES THAT
ARE REQUIRED IN ORDER TO SAVE A RECORD. YOU DO
NOT HAVE TO ENTER ALL THE OTHER DATA AT ONE TIME
IN ORDER TO SAVE THIS PARTICIPANT'S DATA.
These mandatory fields are displayed in bold blue. Mandatory ADA fields
are displayed in bold green.
To print a demographic report on a participant, highlight the Patient |
Pathway | Face Sheet. A FACE SHEET will keep a running list of lab
work from assessment. To quickly scan for a participant, type in the first
three letters of their last name.
Using Agency/Group Identifier Code
Agency/Group Identifier Code is provided for your convenience to
further filter the participant data. Found in the Demographic File under
the General Tab, the Agency/Group Identifier Code can be used to
divide patients by institution, other disease states, etc. For example one
server may serve multiple institutions, to separate the data, Institution A
can be Agency Code 1000, Institution B can be Code 2000, etc.
19
Diabetes Management System Manual
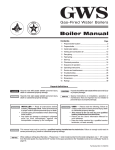
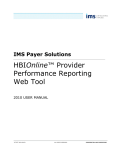
Fig. 1: Demographics Window (Demographics Tab)
Fig. 2: Demographics Window (General Tab)
20
Diabetes Management System Manual
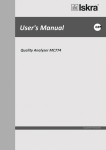
Fig. 3: Demographics Window (Contacts Tab)
Fig. 4: Demographics Window (Special Needs/Ratings Tab)
21
Diabetes Management System Manual
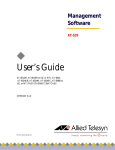
Fig. 5: Demographics Window (Management Issues Tab)
The Management Issues Tab is optional. It is simply a tool to help you
assess where the patient sees them self with their diabetes, as well as their
self-care and activity levels.
Patient E-Mail
You may store a participant’s E-Mail address in the Demographic File
under the Contacts Tab. To access their E-Mail just click on the address
at the top of their Pathway. Your E-Mail program will automatically
launch when you click on the displayed email.
Referral Out
To keep track of all participants referred out, why and when. Just
highlight participant, click REFERRAL OUT then ADD. To get a report
on referrals, Click on REPORTS > REFERRALS,
REFERRALS and pick from one of
five reports. REFERRAL TO SPECIALISTS report lists participants
who were referred out, when, and why for any specified time period.
22
Diabetes Management System Manual
Patient Pathway
The Patient Pathway is a quick and easy way to access all parts of the
patient's records. You can access the Pathway by highlighting the
patient's name in the Lookup and clicking on the PATHWAY button.
In version 5.2, a Patient Status Overview section was added on the
Pathway Window in order to quickly see key indicators for this patient.
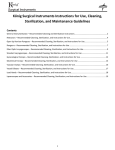
Fig. 6: The Pathway Window
23
Diabetes Management System Manual
Education Module
Comprehensive vs Post-Educational:
ONLY those patients having an educational episode (attending a class in
the System) will count in ADA 8th Edition statistics. The system
determines who went to class during the requested time period,
determines if they are Comprehensive/Initial, or Follow-Up, and then
answers the population questions.
Comprehensive and/or Initial Education: Participants received an
assessment that included relevant medical history, diabetes history, social
history, diabetes knowledge, self-management skills and diabetes related
behaviors in relation to the content areas of the National Standards,
instruction in the areas assessed as needs, on-going assessment of
knowledge and skill level and behavioral objectives. One outcome
measure was tracked pre and post instruction. In the Diabetes
Management System there are three ways the system determines who
meets the Comprehensive/Initial criteria: Any participant who has
attended an educational opportunity within the data period AND…
•
Demographic File: The box, “Completed Other DSME
Program” is NOT checked.
•
Demographic File: Under General Tab, “Date Finished
Program” field is blank.
Follow-Up (Post Program) Education: Participant has completed DSME
previously and was seen for follow-up education, or limited consult. In
the Diabetes Management System there are three ways the system
determines who is considered Follow-Up Education:
1. Any participant who has attended an educational
opportunity during the 6 months period of time and…
2. Demographic record has the box; “Completed Other
DSME” program CHECKED.
3. Or the Date Finished Program in Demographics
indicates the person finished this program at a time
period prior to the beginning of your data period.
24
Diabetes Management System Manual
Curriculum
Class Curriculum Maintenance
All Educational Episodes are considered as “classes” in the System.
The Class File contains all the education information that is used in the
Participant Education Records. To set up this File, click on
EDUCATION/CLASSES > CURRICULUM > CLASS CURRICULUM
MAINTENANCE.
MAINTENANCE
All Look-Up Windows will be displayed to show the active Educational
Opportunities (labeled classes here) loaded into the system. From this
window one can add, update, or delete Classes. All opportunities are
stored here (ie, 1:1’s, classes, support groups, Initial Assessments, Insulin
Starts, Pump Therapy, etc). Attendance Listing for a highlighted class
allows for the printing of mailing labels or use of Mail Merge. To set up
the system click Add. Each Detail Class Record contains the following
information...
•
Class Title (ie, Session 1, Class A, etc.)
•
Length (in minutes)
•
Required Class Status (is this class required for a comprehensive
program?)
•
Primary Teaching Method (ie, Lecture, Demonstration, Video,
etc.)
•
Class Format (ie, Class, Individual Session)
•
CPT and HCPCS Codes, and Charge (used for Billing).
•
Instructor Name (Optional – this is the instructor who
designed/setup the course)
•
Materials Used or Needed (Optional)
•
Additional Comments or Notes (Optional)
•
Inactive Class Check Box (Check if this class is no longer being
offered)
25
Diabetes Management System Manual
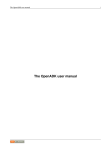
Fig. 7: A Class Detail Window
Class Charges/Financial Information
Version 5.3 added the capability to track departmental revenue, based
upon charges for class/education time. The CPT and HCPCS codes as
well as the charge for the class were added into the Class Record. If you
do not wish to track charges, you do not need to enter this information.
**NOTE*** If you add or change class charges, the information is not
retroactive. It will only affect class attendance from the time the charge
was added or changed, forward.
26
Diabetes Management System Manual
Required Class Information
Many Education Departments have requested a method to determine
who has or has not completed a “Comprehensive” program, rather than
just checking the box in Demographics. This feature works best if you
have only one set of required classes. For example, you work mainly with
group classes and your institution believes that a “Comprehensive”
program is:
•
Initial Assessment
•
Class A
•
Class B
•
3 Month Follow-Up
To indicate which classes are required, go to Class/Curriculum Look Up.
You can double click on a class to toggle the Required column on and off.
You can also modify the required status in this class' detailed record.
Content Areas/Class Link Maintenance
This file contains the Content Areas for the National Standards. They can
be altered, deleted, combined, or added to by you as the Standards
change. It is best to use “Is Able To” statements that cover the Content
Areas and describes what is taught in the corresponding class. Each
content area statement will need to be linked to the appropriate class or
classes.
Verify that every Content Area has at least one class linked to it AND
that every class is linked to all its appropriate Content Areas.
To relate a content area statement to the appropriate class, highlight a
Content Area from the list, click Update and use the ellipsis buttons to
access Class Lookup. Highlight the class and click on Select. Each
Content Area can have up to eight different classes linked to it. Review
that all classes are appropriately chosen and click on Update. To review
your class list and appropriate statements, click on Education/Classes >
Educational Reporting > Assessment Area Listing. After all your classes
are linked to the appropriate assessment area statements, putting a client
in a class will also fill in the date taught section of the client’s Educational
Assessment for that Content Area.
27
Diabetes Management System Manual
How to Change Content Areas
To replace, add to, or modify Content Areas, click...
Education/Classes > Curriculum > Content Areas/Class Link
Maintenance.
To change both content area and statement highlight group name and
description and click on delete. Click on Add. Type in the statement that
best describes what the client learns(Content Description #1 and #2) on
the Content Area (Group Description). Use the ellipsis buttons to select
all related classes (up to 12), in which the content area is covered. To
change existing content areas, highlight statement, click on Update, alter
statement and click on Update.
Scheduling by Class
To schedule participants by class go to Education/Classes > Scheduling
by Class. At the class look up window highlight the desired class and
enter the date of the class below. Click on Schedule>> button to
schedule patients for this class. Double click on the patients to be
scheduled. A Successful Add pops up indicating that this class was
successfully scheduled for this patient. Click OK.
Please Note: This does not enter that patient as having attended the class.
To get a class schedule and mark patients as having attended, go to
EDUCATION/CLASSES > ATTENDANCE > SCHEDULED
ATTENDANCE.
Recording Class Attendance
Individual Education Record
Click on Patient > Pathway > Individual Education Record, or
Education/Classes > Attendance > Individual Education Record.
Click Add, and use the ellipsis Buttons to fill in class code, class date, and
instructor. Then review your data and click on Update to save your
information.
28
Diabetes Management System Manual
Group Class Attendance/Unscheduled
To put a list of participants into a class click on Education/Classes >
Attendance > Group Class Attendance/Unscheduled. A window will
display a listing of educational opportunities. Highlight the class, then use
the ellipsis buttons to fill in class date, location, and instructor and the #
of times this class was taught on this day. Once these fields are filled in,
click on Next. A list of participants will be displayed. Double click on
each participant that attended a class. A message box will be displayed
that states This Class Record was Successfully Added for this Patient.
Scheduled Attendance
To record attendance at scheduled classes go to Education/Classes >
Attendance > Scheduled Attendance.
Attendance Highlight the Class Title. A list of
dates will appear on the right for past and present scheduled classes.
Double click on a date and a class list will follow. Mark those that
attended by highlighting their name and click on Mark as Attended, select
the Educator, and select the Class Locator. Or if everyone on the list
attended, Mark ALL as Attended. Print will provide a Class Schedule
Listing which includes whether a participant attended or not, home and
work phone numbers are provided. By marking a participant as Attended,
this class will appear in their Individual Education Record.
Educational Reporting
Individual Patient Class Schedules
This option can be accessed by clicking on EDUCATION/CLASSES >
EDUCATIONAL REPORTING > INDIVIDUAL PATIENT CLASS
SCHEDULES.
To find if a particular patient has been scheduled for a class, highlight
their name and a list of scheduled classes appear to the right. This
window only lists scheduled classes, not classes added to this participant’s
record from their Individual Education Record, or from Group Class
Attendance/Unscheduled. For a thorough list of a participant’s education
history, go to Education/Classes > Attendance > Individual Education
Record,
Record then highlight the patient name, click on Education, then Print.
29
Diabetes Management System Manual
Participant Educational Assessment
The Educational Assessment is used to keep track of a participant’s
journey through a comprehensive program using the Content Areas as a
guideline. When Class/Curriculum Information is linked to all appropriate
Educational Assessment Areas the date taught field is completed
automatically. To Access a Patient's Educational Assessment, click on the
“Educational Assessment” button from their Pathway. This window
displays all the Content Areas with any appropriate data for this patient
record. The Educational Assessment Update can easily updated from
this window.
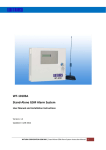
Fig. 8: Detail Education Assessment Window
You can manually update the detail records two ways....
Update all the appropriate information at the bottom of the window,
click once on the Content Area above to highlight it, then click the
Update Data button. Or you can highlight the appropriate Content Area
once to highlight it, then click on the Get Date button to fill in all the
30
Diabetes Management System Manual
appropriate fields. You can edit any or all the fields, then click the Update
Data button to update that Content Area with the new, edited data.
Updating Multiple Content Areas with the Same Data
You can update multiple Content Areas with the same data easily.
Highlight the Content Area with the data you wish to use and click GET
DATA. This will bring the data down into the lower part of the window
to be used/modified. To update the other Areas, highlight the desired
Area, then click the UPDATE DATA button.
Clearing Educational Assessment Record Data
The Clear button will clear out all the data for the highlighted Content
Area. The Clear All button will clear out ALL data for ALL Content
Areas for this Patient.
Class Activity Listing
For a synopsis of all classes taught in a requested time period run a Class
Activity Listing (EDUCATION/CLASSES > EDUCATIONAL
REPORTING > CLASS ACTIVITY LISTING). This report lists the
name of the class, Total Time Taught, and the Number of Attendees.
Required Class Attendance Report
To indicate which participants have or have not completed a
comprehensive program, go to EDUCATION/CLASSES >
EDUCATIONAL REPORTING > REQUIRED CLASS
ATTENDANCE. Fill in the appropriate patient program dates and
whether you want a Completed or Not Completed Report. Filter by start
dates, end dates or agency code (all found in the Demographic File under
the General Tab).
To set up which classes are required, refer to “Required Class
Information” in the Curriculum section above.
31
Diabetes Management System Manual
Assessment Areas Listing
This report displays all the Content Areas, along with all the related
classes (that are linked to it). Previewing this report gives you a quick
look at all content areas, related statements and all related classes.
(EDUCATION/CLASSES
(EDUCATION/CLASSES > EDUCATIONAL REPORTING >
ASSESSMENT AREAS LISTING)
Curriculum Listing
This report lists all your classes, along with any instructor information
(from the class detail) along with the appropriate Content Area(s) it is
linked to. (EDUCATION/CLASSES
(EDUCATION/CLASSES > EDUCATIONAL
REPORTING > CURRICULUM LISTING)
Clinical/Assessment Flow Sheet
Adding Participant Assessment Data
Patient Assessments is used primarily to record clinical and behavioral
outcome information.
Participant Assessment Data Records are based on visit date. Participants
can have multiple Assessment Records. Assessment Records contain
specific participant visit and lab value data. Most Outcomes Reports use
the data from Assessment. Highlighting the appropriate participant in the
Look Up Window, and click on Pathway > Assessment. Click Add to
add a new assessment or Update to update an existing Assessment. Enter
the date of the assessment and the Follow Up Status Code (why the
participant is being seen). When you access a Participant's Assessment
Record, you will see the data organized with various TABS along the top
of the window. You can bring the appropriate information to the top of
the window by clicking on the corresponding tab.
Using Prime New Assessment With Prior Data
By using Prime New Assessment With Prior Data you can prime
information from prior assessments into this new current assessment.
Note – this option was inserted at the requests of several sites that require
this. Do not use this if you are not required to. Contact Harbor
Software for more information or before using this option.
32
Diabetes Management System Manual
Medical Nutritional Therapy
DSMT and MNT are distinct but complimentary services. Both are
necessary for quality diabetes care.
You will need to design your program so that all eligible Medicare
beneficiaries have appropriate access to both benefits and to accurately
document what is being provided and what program is being reimbursed.
MNT hours are often kept separate from the DSMT hours. The DMS
allows you to decide what should and should not be counted in DSMT.
RD’s may use Assessment to accurately track Medical Nutritional
Therapy. Highlight the Participant, click Pathway > Assessment > Add.
Enter the appropriate date; use the Follow Up Status Code of MNT.
Indicate the number of minutes that you spent with the participant by
filling out the Length in Visit (in minutes) box, Click Update. To get a
report go to Reports > Activity Listing > Activity Reports,
Reports fill in date
period, click on down arrow in the Follow Up Status Type box, choose
MNT, then click on Detail Report. If the RD’s teaching should be
counted in DSMT, the nutrition classes must be in Class/Curriculum
Information and participants put in class by the individual or group class
record.
33
Diabetes Management System Manual
Goals Module
Behavioral Goal
Maintain Behavioral Goal Groups under FILE > SYSTEM FILE
MAINTENANCE > BEHAVIORAL GOALS.
Participant Behavioral Goal
The DMS System allows for unlimited customization of individualized
recording, tracking, and reporting of Participant Goals. For Participant
Goals and DSME Goals (that you set for the participant), click on Patient
| Pathway | Goals. All previously set goals for this Participant along with
their status is now displayed in the window. From here, you may add new
goals, update the status of existing goals, and/or add new ones by clicking
on the appropriate buttons at the bottom of the window. Each Goal
Record has the following information...
34
●
The Date the Goal was set.
●
A Description of the Goal (up to two lines).
●
Goal Date (When does participant want to meet this goal).
●
The Date the Goal was Met.
●
Behavioral Group (these are maintained in System File
Maintenance – see above).
●
The Degree of Achievement of the Target Goal (in percent).
●
How Often did you meet your Goal (in percent, for each followup visit).
●
How will this behavior positively affect your health or quality of
life? (free form statement).
●
What did you learn from working on this goal? (free form
statement).
●
Date areas for 1st, 2nd, 3rd, and 4th Follow Up Visit.
Diabetes Management System Manual
Fig. 8: Detail Patient Goals Window
Default Goals
You can set up templates of your standard Default Goals in order to save
redundant typing. Default Goals are created and maintained under File >
System File Maintenance > Default Notes and Goals > Default Goals.
Click Add to add a goal. Goal Line 1 and 2 are for the statement, ie, “I
will test my blood sugar 3 times a day”. Associated Behavior Group
categorizes the goal so it can be measured in outcomes reports. Standard
responses can be filled in for the Quality of Life statements and can be
added to or modified in the Participants Goal record. From the
Participant’s Pathway click on Goals > Add and fill in the date the goal
was set and click on Default. Highlight and Select the Goal Statement.
Modify or add to the goal then click on OK to save this goal. Please note,
each Add is for ONE goal statement. Participants can have many goals
listed on their Goals Look Up window.
35
Diabetes Management System Manual
Goal Reports
•
Participant’s Goal Record, go to the Patient List, highlight their
name > Pathway > Goals > Print Goal Status Report. This
report lists all goals for this participant, behavior group, and
current goal status met. For an evaluation of a participants
progress towards/or achievement of learning and behavioral
objectives and related outcomes, highlight their name > Goals >
Print ADA Goal Assessment.
•
Blank Goal Setting Form, from any participants Goal Look up,
click on the Print Blank Goal Setting Form, or Reports > Blank
Forms > Blank Patient Goal Setting Form.
•
Goal Follow-Up Date Status. A report for tracking follow up
dates, including percentages of Goals Met, and percentages of
participants that had 1st, 2nd, 3rd, or 4th follow up dates.
Medication Module
The Medication History file is used to store an unlimited drug history.
The Medication History is accessible through the patient’s pathway or
Assessment. To add medications, click on Pathway | Medication History
| Add. The following information can be stored:
•
Name of Drug (use the ellipsis button to the right to access
Medication File)
•
Start date
•
Dosage
•
Frequency
•
Comments
•
Ordered by (use the ellipsis button to access Physician File)
•
D/C date
To print a medication history, highlight the participant and click Pathway
> Medication History > Print.
36
Diabetes Management System Manual
Complications / Issues Module
The complication file is used to store various complications or issues
experienced by your participants for tracking purposes.
Adding Complications
To add complications or issues click on COMPLICATIONS >
COMPLICATIONS. Click Add and put the complication or issue in the
description text box. Click Update to save your work.
Tracking Participant Complications
The System can track an unlimited number of complications per
participant. For each complication, the following information is stored:
•
The Type of Complication. Click on the ellipsis button to look
up the various complications stored on your system.
•
The Date this Complication was identified. Clicking on the
ellipsis button will display a calendar to assist with date selection.
•
The Date this Complication was resolved (if applicable).
A listing of all the complications for a participant can be obtained by
clicking on the PRINT button. These complications will also print on the
participant's assessment sheet and recognition assessment form. Click on
FILE > PARTICIPANTS > ASSESSMENTS,
ASSESSMENTS highlight a date and
choose print option.
Complications Summary Report
To print a listing of all participants in your system with a certain issue or
complication go to Complications | Highlight the Issue or Complication
| Report. The Report gives you a list of names, record numbers, date
identified and date resolved and can be filtered by date. For a filtered
Complication Summary go to REPORTS > PATIENT LISTINGS >
FILTERED COMPLICATION LISTING.
37
Diabetes Management System Manual
Filtered Complications Listing
To print a listing of all participants in your system with a certain issue or
complication go to Reports > Patient Listings > Filtered Complication
Listing. Click the appropriate Filters and Dates, and then fill in the
complication by clicking on the down arrow in the Complication Box.
The Report gives you a list of names, record numbers, date identified and
date resolved.
Podiatry Module
Overview...
The Podiatry Module is designed for recording and printing detailed foot
assessments.
To begin, go into a patient's Pathway, then click PODIATRY. Highlight
the appropriate participant and click on the Podiatry Button. A
participant may have multiple Assessments based on Date. A small pop
up window will display the different assessment dates. To add a new
Assessment, click on the Add button. To modify an existing Assessment,
highlight that Assessment date and click on the Update button. The only
required field is the Assessment Date on the General Information Tab.
The Detail Podiatry Assessment has the following sections...
•
General Information
•
Nail / Ulcer
•
Callous / Corn
•
Vascular / Pulses
•
Vascular / Skin
•
Neuro 1 (Vibration Test, 5.07mm Filament Test) - this section is
displayed below.
•
Neuro 2 (Reflex, Pain perception, Strength)
•
Biomechanical
Printing the Podiatry Report...
The Podiatry Report is a detailed, four page report for a participant. On
the patient's Pathway, click on the Podiatry button. Highlight the desired
Assessment Date and click on the Print button.
38
Diabetes Management System Manual
Graphing
A Graphing Module is in the Pathway. Graphs can be generated for the
following Assessment outcome data point values... Weight, HbA1c,
Cholesterol, LDL, HDL, Abdominal Girth, ALT, AST, GFR, TSH,
Systolic B/P, Diastolic B/P, Following Meal Plans, and Regularity of Self
Foot Exams.
The Outcome data points are on the vertical axis and the Visit History are
on the horizontal axis. Right mouse click on the graph to open a window
for several display options, including a print option.
Nutrition Module
The Nutrition Module has three functions...
1. Automate a Nutrition History / Meal Plan. This breaks servings
down to CHO, Protein, and Fat Calories as well as calorie
percentages.
2. Diet History / Diet Factors. This records, stores, and prints out 14
Nutrition Factors and how they affect this participant's nutrition.
3. Diet Plan Worksheet / Meal Chart. You can print out a blank form
for the participant to complete at their convenience for later entry
into the system.
Nutrition History / Meal Plan...
To begin, click on FILE > MEAL PLANNING. Highlight the
Participant you wish to generate a plan for and click on the Meal Plan
button. Participants may have multiple plans. The only required fields
are the Meal Plan Number, and the Date.
This window automatically calculates calories and percentages of total diet
based upon the number of servings entered when the Tally button is
pressed. To override the tallied carbohydrates click the “Use Entered
Carb Choices in Tally”, enter your own numbers and click Tally.
39
Diabetes Management System Manual
FOOD GROUP
CHO
Calorie
Multiplier
Protein
Calorie
Multiplier
Fat
Calorie
Multiplier
Starch
15
3
1
Fruit
15
Milk - Skim
12
8
1
Milk - Low Fat
12
8
5
Milk - Whole
12
8
8
Vegetables
5
2
Meats - Very
Lean
7
1
Meats – Lean
7
3
Meats-Med Fat
7
5
Meat - High Fat
7
8
Fats
5
The Update button will update the entered this data and returns to the
Participant Lookup Window. A sample window is displayed below...
Meal Planning Worksheet...
A Meal Planning Report can be printed by highlighting any participant
and clicking on the Meal Chart button.
Diet History / Diet Factors
Click on FILE > NUTRITION (or click on the Nutrition button in the
Patient's Pathway). Highlight the Participant you wish to maintain
nutrition factors for and click on the Diet Factors button. A sample
Factor Window is displayed below. You may enter factors as appropriate.
Click on the OK button to save the data you entered. Clicking on the
Print button will generate a detail Nutrition Factors report for this
participant. You can generate an aggregate report of all participants
between two dates that have an entry for a particular factor. This report
can be printed by clicking on the displayed Print button.
40
Diabetes Management System Manual
Charting/Letters Module
The System has the ability to generate and store narrative charting and
SOAP Note charting by date, by participant. It also has the ability to
generate automated, stock letters for participants, physicians, agencies, etc.
Narrative Charting
Narrative Charting is accessed in the Charting Option under the FILE
menu. For convenience, it can also be accessed in several other sections
of the system, in the Progress Notes, and in Participant Assessments.
Click on Charting, then Narrative Notes. The Window displays an
alphabetical list of the participants. Highlight the participant and click on
Select. A Participant Narrative Note Window displays a narrative note
history. You can add, update, and print out notes by pressing the
appropriate button at the bottom of the window. Go to: FILE >
SYSTEM FILE MAINTENANCE > DEFAULT NOTES AND
GOALS. Here you can add, delete, or Update existing notes. To add a
narrative note to Charting, Assessments, Progress Notes, just click on
ADD, select a date; Select a Default Note from the Drop Down List.
This note can be altered or added to. You must include a signature.
Default Narrative Notes
Default narrative notes to be stored and used at any time. File > System
File Maintenance > Default Notes and Goals. Here you can add, delete,
or Update existing notes. To add a narrative note to Charting,
Assessments, Progress Notes, just click on ADD, select a date; Select a
Default Note from the Drop Down List. This note can be altered or
added to. You must include a signature.
SOAP Notes
SOAP Note Charting can be accessed in the Charting Option under the
FILE menu. Click on Charting, then SOAP Notes. The Window displays
an alphabetical list of the participants. Highlight the participant and click
on Select. A Participant SOAP Note Window displays a SOAP note
history. You can add, update, and print out notes by pressing the
appropriate button at the bottom of the window.
41
Diabetes Management System Manual
Default SOAP Notes
Default SOAP notes can be stored and used at any time. Go to System
File Maintenance > Default Notes and Goals > Default SOAP Notes.
Here you can add, delete, or Update existing notes. To add a SOAP note
to Charting, or Pathway, just click on ADD, select a date, and Select a
Default Note from the Drop Down List. This note can be altered or
added to. You must include a signature.
Progress Notes
A simple Progress Note can be quickly generated for the referring
physician or for your records. To generate a Progress Note, click on
Patients, Highlight Patient, Pathway, and then Progress Note. A calendar
will be displayed to choose the date of this note. Click on the desired date
and then on the OK button to continue. Another window is now
displayed showing all the Procedures loaded in your Procedures File.
Select all the options or procedures that apply, then…
To add an existing Narrative Note to this report: Click Print and select an
existing narrative note, Click Next…review the printed progress note.
To create a Narrative Note to add to this report: Once you have selected
the options or procedures, Click Narrative, ADD, select Date, Create a
new note or use the Default Note Button, select a stock narrative note.
Sign, Update, and then Close. Click Print and select this note, Click on
Next… and review the printed progress note.
Scheduled Activity
To add a (non-class) Scheduled Activity for a participant, highlight a name
and click on Pathway, then Scheduled Activity. A Scheduled Activity can
be maintained for each individual and printed for his or her convenience.
To print an aggregate list of everyone that have scheduled activities
between two dates, click on REPORTS > ACTIVITY LISTINGS >
SCHEDULED ACTIVITY LISTING.
42
Diabetes Management System Manual
Letter Generation
The System can store an unlimited number of standard letters (up to
approximately one page). Once they are entered and stored, you can
simply select a physician, participant, or agency and generate a letter. This
is very useful for generating standard follow up letters, referral letters,
education notes, etc. Click on FILE, LETTERS, and then STOCK
Letters. You can add, update, or delete your stock letters here. Some
letters are supplied for you to use or alter. Update these letters to see how
they are designed. Click Add to add a new letter, Update to save those
changes. Use the Description to name your letter so it is easily identified,
ie Referral Letter, Class Promotion Letter. This Description does not
print.
You can generate a stock letter by clicking on FILE > LETTERS >
PATIENT LETTERS. Highlight the participant you wish to generate a
letter for, then click on the GENERATE button. A window will appear
displaying all the stock letters in the system. Highlight the letter you wish
to use, enter the name of the signer, and click on LETTER for a
generated letter or CHART for a generated chart entry.
Letters to Physicians, Specialists, or other Agencies can be generated in
the same way by clicking on FILE > LETTERS >
PHYSICIAN/OTHER LETTERS. All generated letters are designed to
print on your institution's letterhead. There is approximately 2.5 inches of
space at the top of the letter to accommodate your letterhead. To set
your own margins and font go to System File Maintenance > System
Default.
Letter Generation Margins and Font Sizes
Top and Left margins and font size are adjustable. Go to FILE >
SYSTEM FILE MAINTENANCE > SYSTEM DEFAULTS.
43
Diabetes Management System Manual
Mail Merge
Mail Merge Data File Generation was added to the system for Participants
and Physicians. This module will generate an ASCII data file that can be
used as a data source in almost any word processor that has mail merge
capability.
Step-by-Step Instructions…
1. Start the Diabetes Management System.
2. Click on Reports.
3. Click on Labels/Mail Merge
4. Click on Mail Merge…
5. Finally, click on Participant Mail Merge.
6. The Participant Mail Merge Dialog Window will now be
displayed. This window allows you to select:
g. The fields to export
h. Selected Participants by: Gender, Diagnosis, Referring
Physician, and Insurance
i.
Field separator (default is a comma) in the export file.
j.
The Output Path/File Name.
11. Click on the browse/lookup button to the right of the File Name
in order to select the appropriate path and file quickly.
12. Click on OK to begin the export and generation of the merge
data file. You will see a message line on the lower left of the
window listing names export.
A message will be displayed notifying you that the export is completed.
13. At this point, you can exit from the Diabetes Management
System and start the program that uses mail merge. This
generated file will be used as the data source that will place the
data fields you select into your document.
14. Please note that if you regenerate this data into an existing file,
the file will be overwritten and the prior data will be erased.
44
Diabetes Management System Manual
Mail Merge from Class Attendance
A Mail Merge Data File can also be generated from Class Attendance
Information.
1. Start the Diabetes Management System.
2. Click on Education/Classes
3. Click on Class Information
4. Highlight the Class you are interested in and click on the
Attendance button.
5. On the Attendance Dialog Window that is displayed, select the
“from” and “to” dates, and click on the Merge button. Note that
the from and to dates are exclusive of the selected dates. For
example, if you wished to generate a listing for just one day
(2/15/07), you would have to put “the from” date as 2/14/07
and the “to” date as 2/16/07.
6. The Participant Mail Merge Dialog Window will now be
displayed. This window allows you to select: the fields to export,
the field separator, and the Output Path/File name.
7. Continue on with Step #7 above.
Telephone Logs
Telephone Logs are used to record (log) telephone contacts to and from
participants, multiple entries per day can be entered. It can be found in
the FILE > CHARTING/LETTERS >CHARTING > TELEPHONE
LOGS,
LOGS or select a participant > Pathway > Telephone Log. A log can be
printed from an individual file. For a detailed list of all Telephone Log
entries for any time period, go to Reports > Activity Listing > Telephone
Log Listing. Detailed information on the call can be recorded in a
Narrative Note.
Glucose Logs
Track daily or multiple daily Blood Glucose Levels as well as Insulin
Dosing. Click on FILE > CHARTING/LETTERS > CHARTING >
GLUCOSE LOGS, or highlight a participant, click on Pathway, and
Glucose Logs. You can ADD, UPDATE, EXPORT or PRINT from
here.
45
Diabetes Management System Manual
Participant’s Charts
A chart can be printed from the Participant’s Pathway. Highlight
Participants name, click on Pathway. Print Face Sheet and Assessment
Sheet. These reports contain a history and assessment of this participant.
A recognition initial assessment form can be printed from the assessment
look up window.
ADA Recognition (8th Edition)…
The DMS System collects and can tabulate the data required for the ADA
Recognition Worksheet for any data period length (the default length is 3
months for 8th Edition).
Reports > ADA 8th Edition Reporting > Application Worksheet.
ALWAYS CHECK FOR THE LATEST
INSTRUCTIONS/DOCUMENTATION
AT THE ADA WEB SITE, http://professional.diabetes.org/
●
Click on “Recognition
Recognition Programs”
Programs Menu Option on the left side
of this window.
●
Click on the “Education
Education Recognition Program”
Program Link at the top
of this window.
●
Click on “Applying
Applying for Recognition Link”
Link located on the right
side of this window.
●
Download the “Application
Application Instructions”
Application
Instructions and the “Application
Form Template”
Template for review.
We suggest you contact Harbor Software at the beginning of your data
period to set up an appointment where we can go over the Application
and how to use the Diabetes Management System to periodically verify if
you are on track during your data period, as well as identifying and
correcting any errors or missing data.
The System can automatically generate the Application Worksheet, your
Outcomes, Goals, Assessments, as well as many audit reports that can be
used to back up your data, in case of a ADA audit.
46
Diabetes Management System Manual
How the Participants are tallied for Recognition
Only those participants recorded as having educational episodes within
the Data Period are counted for Recognition. Therefore, ONLY those
participants put into classes in the Education/Class Module (Individual
Class Record, Group Class Attendance, or Pathway > Individual
Education Records) will show up in these statistics.
The system first looks through this module determining who went to class
during the requested time period, determines if they received
Comprehensive/Initial, or Follow-Up Education, and then answers the
population questions. In order to have accurate information for your
recognition application you must maintain good class records. To get a
good idea of what information you need to maintain in the system look at
the Worksheet under Reports > ADA 8th Edition Reporting >
Application Worksheet.
Site Information:
Information Total number of participants who received DSME
intervention at this site during the data period.
Comprehensive and/or Initial are those participants who are put into
classes from Education/Classes > Group or Individual Classes during the
time period you have chosen, AND the completed this (or other) DSME
program box is NOT checked in demographics AND the Date
Completed Program is NOT entered, OR AFTER your Data Period Start
Date.
Post-Program (Follow-Up) participants are those participants who have
received education from you also during this time period AND the
completed this (or other) DSME program IS checked, or they completed
your program PRIOR to your Data Period Start Date. The system will
tally up class time as average number of hours for both types of
participants.
Population Information:
Information This information is pulled from the
demographic file.
•
Age
•
Type of Diabetes
•
Race
•
Barriers to learning
47
Diabetes Management System Manual
Instructors at the site:
Keep staff information under File > Staff Profiles. Maintain licenses for
RN, RD etc., and the system will fill out the recognition application with
how many RNs, RDs, and others you have working as instructors. Make
sure to keep your CEU records up to date, back up your system. The
correct report is File > Staff Profile > CEU’s > Print > Detail and
Summary.
Curriculum at the site:
There is a written curriculum with measurable learning objectives in each
of the following areas: First develop a class list from Education/Classes.
A class must have the amount of time filled in (average). Choose the
content area or areas that you cover in class. Be creative. If you teach the
same class to someone with a barrier to learning and it takes longer, make
a class entry that's indicating extra time, ie Session 1 Basics/Special. Be
sure to add support groups, follow up sessions etc. Put participants into
classes by group entry or individual class entry. The Education
Assessment should contain “Is Able To” statements to describe what a
participant is expected to know on a content area. Your classes (or one
on ones) should be linked to these statements.
Supporting Documentation:
Print the required documents to back up your DSME data. (Reports
Reports >
ADA 8th Edition > Supporting Documents) The reports available are:
48
•
Participant Detail Audit (Details Comprehensive vs. Follow Up)
•
Age Breakdown Detail (from Demographics > Date of Birth)
•
Diagnosis Breakdown Detail (from Demographics > General |
Diabetes Diagnosis)
•
Race Breakdown Detail (from Demographics > Race)
•
DSME Intervention Detail (from Education/Classes Module)
•
Special Needs Detail (from Demographics > Management Issues
2 > Barriers to Learning)
•
Pre and Post Knowledge Test Results Detail (from
Demographics > General Tab)
Diabetes Management System Manual
Instructors at this site: File > Staff Profiles > CEU’s > Print > Detail and
Summary
DSME Education Hours per Instructor: File > Staff Profiles > DSME
Hrs > Print
Curriculum at this site: Education/Classes > Curriculum Listing and
Assessment Areas Listing
Educational Assessments: Patients > Pathway > Educational Assessment
> Print
Behavioral and Clinical Outcome Tracking
Before starting your Data Period, you must choose what behavioral
outcomes you are tracking and then keep that information up to date.
The System can track over 70 different Outcomes. Most of this
information is pulled from the Goals and Assessment Modules.
Remember, for Clinical Outcomes, you must have two or more different
clinical outcomes per participant to obtain a report.
Educators DSME Experience Record
This report was added to help a team member:
•
Keep track of the average number of hours of DSME experience
per month during the 12 months prior to the start of the data
collection period.
•
Keep track of the number of hours per month they were
involved in DSME during the data period.
•
Maintain records of DSME hours for credentialing.
Make sure all members of the team are listed in Staff Profile (under File).
When a participant is put into class (from Pathway, Group Class
Attendance, or Individual Class Record), use the ellipsis button next to
Instructors Initials. Highlight the educator, click on Select and then
Update to save. This attributes these hours to that educator. To get a
report by educator, go to File > Staff Profile, highlight the educator and
click on the DSME Hrs button. From here you can Print, Add, Update,
Delete, and Close. Using Add from here allows for manually adding
classes. This is useful if more than one educator teaches a class. Click
Add, highlight the class taught, and fill in the date of class and the minutes
49
Diabetes Management System Manual
credited to you. This does not alter the original class information.
Update allows you to increase or decrease minutes of time attributed to an
educator. This is useful if an educator teaches a class more than once in
one 24-hour period.
ADA Annual Reporting Response Worksheet.
REPORTS > ADA ANNNUAL REPORTING > ANNUAL
REPORTING RESPONSE WORKSHEET
As of May, 2010, the ADA has created an Online Annual Status Report
(Online ASR).
ALWAYS CHECK FOR THE LATEST
INSTRUCTIONS/DOCUMENTATION
AT THE ADA WEB SITE, http://professional.diabetes.org/
Note: Education Recognition Program (ERP) requires all recognized
programs to complete an Annual Status Report during the anniversary
month of ADA Recognition. Failure to comply with this requirement
may result into immediate loss of ADA Recognition.
The ADA Annual Reporting Response Worksheet generates the data
necessary to prepare your Annual Reporting Response. It works in much
the same way as the Recognition Worksheet. Simply set your annual data
period and click on the Tally button. The total number of patients seen
will be calculated.
The ADA also asks for the number of Medicare Patients seen. In the
Worksheet, on Panel #5 “RECOGNITION STANDARDS 9->10”,
there is a filter to set the insurances you wish to count.
BE SURE TO SET THE MEDICARE INSURANCE (and any others
you may want to view) BEFORE YOU RUN THE TALLY.
The Goals and the Standards must be entered by you.
50
Diabetes Management System Manual
Consultation Module
The Consultation Module allows the user to build an unlimited number of
standard consultation notes that can be used for participants that are
loaded into the Diabetes Management System. Each note can have an
unlimited number of sections and standard responses. Once a particular
consultation note is selected for a participant, the responses can be
customized for that participant’s situation.
The Consultation Module is made up of four sections.
Consult Types
The Consult Types allow you to set up and maintain the overview
information for your consultation notes. The data maintained here is:
1. Consultation Type
2. Signatory
3. Signatory’s Title
Consult Templates
This option is for maintaining the particular information (fields/sections
and their associated standard responses) for each consultation note. You
can Add/Maintain/ Delete individual consultation sections along with
their standard response. After clicking on Manage Consult Types, the
Consultation Line Item Lookup Window is displayed. Each individual
section has the following information that can be maintained…
1. Consult Type. Enter the Consult Type Number or press the
ellipsis button to open a Selection Lookup window.
2. Order # in Consult. This is the Section’s Order Number (or line
number) in this consultation note. Note that you may increment
and decrement the number by using the up and down arrows that
are displayed. This number increments in 10’s. This is so that
new sections may be easily added between existing sections in the
future.
3. Consult Section. The name of this particular section (ie,
Allergies, History, Education, etc.)
4. Standard Response. The normal response for this section (ie.,
Normal, Negative, etc.). These responses are pulled in when a
participant consult is created and can easily be modified.
51
Diabetes Management System Manual
Create/Maintain Consult
This option creates new consultation notes for a participant as well as
maintaining existing consultation notes. This process consists of several
steps.
1. Select a Participant. A Participant Lookup Window will be
displayed. Highlight the participant you wish to create a
consultation note for and click on Select. You can quickly locate
a participant by typing in the participant’s first two letters of last
name. The window will automatically scroll to the participant
that matches your entry.
2. Select the date of consult. A calendar will now be displayed.
Select the date for this consultation and click Accept.
3. Select the Consultation Type. Highlight type and click Select.
4. Modify the Consultation Note. The note, along with all the
sections and standard responses are displayed. Any sections that
need to be modified can be by highlighting that section and
clicking Update. The notes can be printed from this window.
5. Printing a Consultation Note. Print will result in a consult note
with your institutions name, participant’s name, and date of visit,
date of birth, gender, medical record #, and referring physician.
A lab work section will print on the note if there is an existing
Assessment Record on this date. The labs that print are: Ht, Wt,
BMI, Abd Girth, HBA1c, Chol, HDL, LDL.
View Existing Consults
This option allows you to view all the consults created for a particular
participant, as well as printing them. The consults cannot be modified
from this option.
52
Diabetes Management System Manual
General Reports Module
The following is a list of Available Reports Located in the Reports Menu...
Preview - This toggles the System's Print Preview Feature on and off. A
check on the line indicates it is turned on.
Report Locator
The Report Locator was added to quickly search, find, and navigate to any
one of the 200+ System Reports. The Report Locator can be found in
the Reports Menu. Search for the Report-by-Report Name or Report
Group.
Participant Listings
Alphabetical Participant Listing – General alphabetical Participant
List.
Filtered Participant Listing- Obtain lists of participants by any
combination of filters.
Filtered Patient Telephone Listing – Listing of Selected Patient
Telephone Numbers.
Filtered Complications Listing- Obtain lists of participants with
certain complications.
Required Class Attendance Listing- Lists all patients who have (or
have not) attended all the required elements of your program.
Participant “Referred By” Source Listing-How participants heard of
your program (Demographics).
Onset of Diabetes List- Highlight New Onset Diabetes participants.
(From Demographics| General Tab | Age at Diagnosis)
Completed Program Listing- Participant Listing of those who have
completed DSME
Listing For A Selected Physician – Participant Listing by Physician.
Medications – Participant Listing of Selected Medication usage
between two dates.
Insurance Listing – Participant Listing of Selected Insurances
between two dates.
53
Diabetes Management System Manual
Pharmacies – Participant Listing of Selected Pharmacies between two
dates.
Meter Types – Participant Listing of a Selected Meter Type.
Insulin Pump Types-Participant listing of a Selected Insulin Pump.
Case Manager – Participant Listing by Case Manager (from
demographic file)
Dietitian Visit Listing- Participant Listing of participants who have
seen a dietitian and when.
Nutritional Factors- Participant Listing by certain nutritional factors
(from Meal Planning Module)
Number in Household with Diabetes- Participant Listing for multiple
diabetic households.
Participant HBA1c/Lab Hx- Participant Listing of individual lab
histories.
Participant Abdominal Girth History-Participant Listing with
abdominal girth history.
Participant Height Growth Percentile History- Participant’s height
growth history.
Participant Weight Growth Percentile History- Participant’s weight
growth history.
Gestational Summary- Participant Listing with Gestational Diabetes
Expected Delivery Date Listing
Gestational GTT Summary
Baseline Acuity Listing
Missing Patient Data Listing- Lists all Patients with missing data.
Patient Contact Listing- Participant Lists with their Contact’s Name
and Phone Numbers.
Patient Log- Includes Names, Entry and Exit dates, and Referring
Physician Name.
54
Diabetes Management System Manual
Analysis Reports
All the Analysis Reports are an aggregate collection of the participant data
that meets any combination of the filters listed below. Clicking on
ANALYSIS in the Menu Bar can access the Participant Analysis Reports.
Each of these reports present aggregate system data between any two
selected dates.
Gender - All, Males, or Females.
Race - All, Whites, Blacks, Hispanics, American Indian, Asian, or Other.
Age- All ages, or selected birth year range.
Marital Status - All, Single, Married, Divorced, Widowed, or Separated.
Occupation - All, Manual, Professional, Retired, Disabled, or
Unemployed.
Diabetes Diagnosis Type.
Agency Code. This is an open-ended filter to use as you see needs arise.
HbA1c Range.
Zip Code.
Available Analysis Reports...
•
Filtered Population-A Fifth Edition Recognition Report showing
Percentages
•
Demographics
•
Initial Lab Values
•
HBA1C
•
Weight Analysis
•
Hyperglycemic Episodes
•
Hypoglycemic Episodes
•
Management Issues- Report from Demographics | Management
Issuers
•
Favorite Ways To Learn -Report from Demographics |
Management Issues
•
Cultural Influences Listing- Information comes from
Demographics | General
55
Diabetes Management System Manual
•
Religious Influences Listing- Information comes from
Demographics | General
•
Income Levels- Report from Demographics | Contacts | Income
Levels
Call Listings
This set of reports identifies participants in problem areas:
Eye Problem Call Listing - All participants with an identified Eye
Problem
Dilated Eye Exam Status-All participants with last eye exam date.
Foot Problem Call Listing - All participants with an identified Foot
Problem
Last Foot Exam Status- All participants with last foot exam date.
Hypertension Call Listing - All participants identified with
Hypertension
BMI Problem Listing - All participants with a Body Mass Index
greater than 26.
Cholesterol Problem Call Listing- All participants with a Cholesterol
>200
LDL Problem Call Listing- All participants with a LDL >130
HDL Problem Call Listing- All participants with a HDL >60
56
Diabetes Management System Manual
Outcomes
All the Outcomes Reports are an aggregate collection of the participant
data that meets any combination of the filters listed below. Clicking on
OUTCOMES in the Reports Menu can access the Outcomes Reports.
Each of these reports present aggregate system data between any two
selected dates. Please note that there must be two or more different sets
of data on a participant in order for the participant's data to display (and
count) in the report.
Only Patients Marked as Completed in Demographics, or with a
Completion Date
Gender - All, Males, or Females
Race - All, Whites, Blacks, Hispanics, American Indian, Asian, or Other
Age or Selected Birth Year Range- All, or any age range
Marital Status - All, Single, Married, Divorced, Widowed, or Separated
Occupation - All, Manual, Professional, Retired, Disabled, or
Unemployed
Diabetes Diagnosis
Insurance Types
Agency Code
Zip Code
Referring Physician
57
Diabetes Management System Manual
Available Outcomes Reports...
Lab Work Outcomes
HbA1c
Blood Glucose
Microalbumin
Cholesterol
HDL Outcomes
LDL Outcomes
Triglycerides Outcomes
Creatinine Outcomes
Liver Function-ALT Outcomes
Liver Function-AST Outcomes Thyroid Stimulating Hormone
Glomerular Filtration Rates
Estimated Average Glucose (eAG)
Height and Weight Outcomes
BMI
Body Weight (in lbs)
Body Weight (in kg)
Weight Growth Percentile
Height Growth Percentile
Abdominal Girth
Blood Pressure
Self Foot Exam
Hospital Admissions Outcome
Length of Hospital Stay
ER/Urgent Care
Missed Days at School or Work
Nurse Visit Outcomes
Seen by Doctor Outcomes
Goals
Behavior Goals
General Health Rating
Initial Readiness to Learn Indicators (from Demographics)
Readiness to Learn Indicators Outcomes (from Assessments)
Nutrition – Following a Meal Plan (Assessment)
Acuity Level
Cigarette Smoking
Self-Monitoring of Blood Glucose
Hospital Admissions for Diabetes
Birth Weight
Goal Follow-Up Date Status
58
Diabetes Management System Manual
Screening / HEDIS Measurement Reports
There are 22 Screening / HEDIS Measurement Reports. Each report can
filter data in a combination of ways: by date, Gender, Race, Age, Marital
Status, Occupation, Diabetes Diagnosis, Insurance Type, Agency Code,
and Zip Code. Each Report prints detail information along with
summary totals and percentages. This information is entered in the
participant’s assessment file under the HEDIS/Screening Tab. These
Reports are...
•
Childhood Immunization Screen
•
Adolescent Immunization Screen
•
Breast Cancer Screen
•
Cervical Cancer Screen
•
Chlamydia Screen
•
Prenatal Care in First Trimester Screen
•
Check-Ups after Delivery Screen
•
Advising Smoker to Quit Screen
•
Management of Menopause Screen
•
Blood Pressure Control Screen
•
Beta Blocker Control after an MI Screen
•
Cholesterol Management Screen
•
Asthma Management Screen
•
Comprehensive Diabetes Care Screen
•
Follow-up after Mental Illness Hospitalization Screen
•
Antidepressant Medication Management Screen
•
Flu Shot Date Screen
•
Yearly HbA1c Screen
•
Dilated Eye Exam Screen
•
Annual Foot Exam Screen
•
Overall Health Rating
•
Barriers to Learning
59
Diabetes Management System Manual
Referrals
Referral Analysis-Report on the percentage of participants coming from
each physician.
Physician Referral Report- Lists Physicians and the number of
participants referred to your institution.
County Referrals- Referral percentage by County.
Participant Referral Log- Lists Participants and the name of the Referring
Physician.
Referrals to Outside Specialists- What Participants were referred out and
why.
Referral Group Listing-Where referrals come from, i.e. Screenings, MNT,
Community Health, etc.
60
Diabetes Management System Manual
ADA 8th Edition Recognition Reporting
Application Worksheet- Printout of on-line report filled in with
appropriate detail.
Supporting Documentation:
1. Participant Detail Audit
2. Missing Data Audit
•
Age breakdown detail
•
Diagnosis breakdown detail
•
Race breakdown detail
•
DSME breakdown detail
•
Special needs breakdown detail
•
Pre and Post Knowledge Result Detail
NCQA Control Reports
NCQA Control Reports were added in version 5.7. This reports can be
used for the NCQA Diabetes Physician Recognition Program. The
available Control reports are:
•
HbA1c
•
Blood Pressure
•
Eye Examination
•
Smoke Status and Cessation
•
LDL
•
Nephropathy Assessment
•
Foot Examination
61
Diabetes Management System Manual
NCQA Reporting Criteria
These Control Reports can be generated using two options, custom
criteria and the NCAQ Standard Criteria:
Clinical Measures
Criteria
HbA1c Poor Control >9.0%*
≤15% of patients in sample
HbA1c Control <8.0%
60% of patients in sample
HbA1c Control <7.0%
40% of patients in sample
Blood Pressure Control ≥ 140/90 mm Hg
≤35% of patients in sample
Blood Pressure Control <130/80 mm Hg
25% of patients in sample
Eye Examination
60% of patients in sample
Smoking Status and
Cessation Advice or Treatment
80% of patients in sample
LDL Control ≥130 mg/dl
≤37% of patients in sample
LDL Control <100 mg/dl
36% of patients in sample
Nephropathy Assessment
80% of patients in sample
Foot Examination
80% of patients in sample
Each Control Report generates the detail patient information as well as summary
totals for each criteria, along with percentages.
62
Diabetes Management System Manual
Activity Listings
Activity Lists from Assessment Visit Records.
Activity Report- Lists all participant assessment activity between any two
dates. Each line shows the type of visit, participant name, Medical Record
Number, Sex, Birth Date, and Type of Diabetes, along with summary
totals. This report can be filtered by type of follow up (mandatory field in
Assessment), Case Manager (Contact field in Demographics), and Agency
Code (optional field in Demographics). From this area reports can also
be obtained for any Lab Activity, ER Visits with the option of printing
Mailing Labels and Mail Merge.
Pre-Admit Report – Lists Selected Patients for Admissions, Registration,
etc.
Tickler/Follow-up Report – This report prints all participants who
HAVE NOT been seen for an assessment visit between a number of days
(ie, between 0 and 60 days). Each line displays the Participant Name, Last
Visit Date and Type, Medical Record Number, Sex, Birth Date, and Type
of Diabetes, along with their home telephone number.
Scheduled Activity ListingListing Shows all participants with any activity
scheduled between any two dates along with the activity description and
date. Information comes from Patient | Pathway | Scheduled Activities.
Participant Chronological Listing – Click Detail to Print summary
assessment information for a selected participant in chronological order.
Click Visits for a Patient Assessment Visit Log that includes the amount
of minutes spent per visit and average number of minutes spent with
patient.
Telephone Log ListingListing Prints a summary of all telephone logs,
alphabetically, then by date.
Mailing Labels and Mail Merge can be done from any of these listings.
63
Diabetes Management System Manual
Blank Forms
Blank Participant Demographic Form. Prints a blank demographic form.
This is designed to assist with data collection away from the computer.
The data on the form is in the same order as the Demographic Windows.
Blank Participant Assessment Form. Prints a blank Assessment form.
This is designed to assist with data collection away from the computer.
The data on the form is in the same order as the Assessment Windows.
Blank Patient Goal Setting Form. Prints a blank Goal Form with
Signature lines and Quality of Life Statements.
Blank Knowledge TestTest Prints out a blank knowledge test. To customize
the test click on FILE | SYSTEM FILE MAINTENANCE |
KNOWLEDGE TEST.
Blank Quality of LifeLife Prints out a blank Quality of Life Survey. To
review or customize the Quality of Life Survey, go to | Quality of Life |
Quality of Life Grouping or Quality of Life Questions.
Labels/Mail Merge
Mailing Labels ... Participant & Physician Mailing Labels. Prints 3-across
mailing labels on standard Avery 5160 labels. Labels will not print out if
participant's address is missing or they are marked deceased in the
demographic file. Labels will not print out for Physicians if they are
marked Inactive in the Physician Maintenance File. On Selective Mailing
Labels, mark only those labels that you want to print.
64
Diabetes Management System Manual
Quality of Life Module
Overview...
The Participant Quality of Life Module has the capacity to measure
participant attitudes in a variety of subject areas. The Module has the
following features:
•
Unlimited number of question groupings (ie, Physical, Mental,
Participant Satisfaction).
•
Unlimited number of questions within each group.
•
Up to six different answer choices within each group (ie,
Yes/No, True/False, Agree Strongly to Disagree Strongly, etc).
•
The test can be printed or taken on-line.
Quality of Life Question Groups
These groupings identify the question subject areas as well as the answer
range. To begin, do the following:
•
Click on QUALITY OF LIFE | then Quality of Life Groupings.
•
A look up list will be displayed showing the groupings that are
already loaded (the system has some sample groupings loaded
initially). This listing can be sorted by ID# or by Description.
Click on the Add button to add a new group or the Update
button to view the detail information of an existing group.
•
You can add or modify the Description of this Group as well as
the Results (up to six). Every question assigned to this grouping
will have the choices that are displayed in this window.
•
Click on the OK button to update this record or Cancel to exit
without updating this information.
•
To maintain your own test, delete all groupings then go to
Quality of Life Questions and delete all questions. Go back to Q
of L Groupings and click ADD. Group description is the name
of your test or the name of this group of questions. You do not
put questions in here. Next design the answers. You do not
have to use all 6 results.
65
Diabetes Management System Manual
Quality of Life Questions
You can add, delete, and maintain all Quality of Life Questions. To
begin, do the following:
•
Click on Quality of Life, then Quality of Life Questions.
•
A look up list will be displayed showing the questions that are
already loaded (the system has some sample groupings loaded
initially), along with their associated groupings. This listing is
sorted by Question Number. Click on the Add button to add a
new question or the Update button to view the highlighted
question.
•
There are three areas you can maintain per question; the Assigned
Group, the Question Number, and the actual question text.
•
Click on the OK button to update this record or Cancel to exit
without updating this information.
On-Line Test
The Quality of Life Test can be given two ways:
1. It can be taken manually via a printed test. The results must be
entered into the system manually at a later time.
2. It can be taken On-Line as you interview the participant. Click on
Q of L > On Line Test > highlight participant > Use the Drop Down
Menu to select a specific test > Select the Test date > click on Select.
Printing the Test...
Quality of Life > Print Quality of Life Test
Quality of Life Test Results
You can view a particular participant's test results very quickly. To begin,
do the following:
66
•
Click on Quality of Life.
•
A look up list will be displayed showing all the participants loaded
into the system. You can sort this listing by Last Name, by
Diabetes Management System Manual
Medical Record Number, or by Social Security Number just by
clicking on the appropriate tab at the top of the look up listing.
•
Highlight the participant whose test results you wish to view and
click on the RESULTS button.
•
You will be prompted to Preview this Report. Click on Yes to
view the results on-line.
•
The Participant Test will be displayed by group. Each question
will have an "X" in the column with the answer the participant
had chosen along with a date the test was taken. If the
participant has taken this test multiple times, you will see multiple
answers for each question along with the appropriate test dates.
This way, you can see the changes in their answers.
Generating Quality of Life Statistics
The System has a report to list aggregate results of Quality of Life Surveys
between any two dates. To do this, do the following:
•
Click on Quality of Life.
•
Click on Quality of Life Statistics.
•
You will be prompted for the FROM and TO dates that will be
included in this report. Enter the dates (in MM/DD/YYYY)
format or click on the ellipsis button to the right of the date fields
to display a calendar. This should be a period of time where you
have entered in many participants answers pre-program (or at the
beginning of your DSME).
•
Select the Grouping to Print.
•
You will be prompted to Preview this Report. Click on Yes to
view the results.
•
The Participant Test will be displayed by group. Each question
will be displayed showing all the possible answers along with the
number of responses participants made for each answer. The
total number of responses will also be displayed along with the
average of the responses.
•
You can print a hard copy of this report from here or exit to the
Menu.
•
Post-Program, enter in answers and then run statistics for that
new time period. Compare the averages of responses for preprogram to post-program.
67
Diabetes Management System Manual
Appointment Scheduler Module
The Staff Appointment Scheduler was developed at the request of several
sites that wanted the ability to have a simple, centralized Appointment
Scheduling System for their Staff. The Appointment Scheduler allows
your staff to coordinate, view, and print their schedules across a network
quickly and easily. The Appointment Scheduler allows you to set your
own start and end times for appointments, set standard length of
appointments for staff or classrooms, inactivate staff, and print daily or
weekly calendars.
Scheduler Functions...
Setting up the Appointment Scheduler...
1. Load your staff into the Diabetes Management System. Start the
Diabetes Management System and click on FILE | Staff Profiles.
You will need to have the staff names entered, at a minimum.
You can add additional staff and rooms within the Appointment
Scheduler.
2. Start the Appointment Scheduler. It can be found by clicking on
the “Staff
Staff Sched” toolbar button.
3. Click to highlight the desired Staff Member (or Classroom) and
click SELECT.
4. The Appointment Schedule is very easy to use. All functions can
be viewed and accessed from this one window. The main
calendar in the lower left, and the associated daily schedule in the
middle, and the function buttons along the right side of the
window.
Update/Add an Appointment Time.
Highlight the appropriate start time with a single mouse click and click on
the "Update" button (or simply just double click on the start time). The
detailed appointment window will be displayed. The End Time can be
modified with the left and right arrows, which will increment the end time
in 15-minute increments. You have one line for an appointment
description. The ellipsis button ("...") to the right of the description line
can be used to display a list of participants. Selecting a participant will
enter their name into the description line automatically. Click on
68
Diabetes Management System Manual
"Update" to enter this appointment and return to the Daily Detail
Schedule.
Reserve a Time Block.
To Reserve a Time, simply highlight the appropriate start time and click
on the "Reserve Time" button. This will block out this time with a "***
RESERVED ***" description.
Clear a Time Block.
To Clear out a time slot, simply highlight the time and click on the
“Clear” button.
Block an Entire Day.
To Block out an Entire Day, Click on the "Day Block" Button. To
Remove the Day Block, simply click on the "Day Block" Button again.
Print the Day's Schedule.
Click the “Print” button to print out the displayed schedule.
View and Print a “Week at a Glance”.
Click the “By Week” button to view a 5-day “Week at a Glance”
Schedule. This schedule can be modified and printed from this Week
View.
Maintaining Staff and Rooms.
Staff and Rooms that need to be scheduled can be maintained by clicking
on the “Staff/Rooms”.
Maintaining Daily Start Times.
Click on the “Default” button to set up the default daily Start Time.
Delete Old Schedules.
Click on the Purge Button to delete all schedules prior to a specific date.
69
Diabetes Management System Manual
Quick Reference/Frequently Asked Questions…
What is the first thing I do in the System?
It is very important to set up the system before adding participants. Please
feel free to contact Harbor Software for orientation to the System.
Several System Files need to be updated and/or populated with pertinent
records....
1. Enter your Staff under FILE | STAFF PROFILES
2. Enter your Physicians under FILE | PHYSICIAN
INFORMATION (Note – you do not have to add all your
physicians into the System prior to using it. You can add
Physician Information as you enter patient data as well).
3. Follow -Up Status Codes. This is found under FILE | SYSTEM
FILE MAINTENANCE | FOLLOW-UP STATUS CODES.
This is used for participant assessment and is a mandatory field in
Patient Assessments. Some institutions use initial visit, 3 month, 6
month, MNT, etc. You can update and delete the follow up
codes you do not need.
4. System Default Information (FILE | SYSTEM FILE
MAINTENENANCE | SYSTEM DEFAULTS) Use System
Defaults to update your address/phone information, as well as
default print margin info. Also, the most common Insurance
Companies dealt with in the area. They will then show up on the
demographic file. (For more information see Getting Familiar
With The System, Setting Up the System.)
5. Set up your classes and link them to the appropriate content
areas.
How can I quickly find a Participant in the System?
Click on the “Patients” button on the System tool bar, and all the
Participants in the System will be displayed in alphabetical order. By
clicking on the “by MedRec#...” and “by SocSec#...” tabs located at the
top of the window, you can change the sort order to Medical Record or
Social Security Numbers, respectively.
To quickly scroll to a specific participant name, simply type in the
participant's last name. The System will scan automatically to the first
name that matches with what you have typed.
70
Diabetes Management System Manual
How do I add a new Participant into the System?
Click Patients, and then click on the ADD button. If the participant
already exists, click on UPDATE.
How do I add and update Participant Assessment
Records?
Click on Patients. Highlight the Participant Record you wish to access
and click on the ASSESSMENT button. A list of assessment records for
this participant will be displayed. You can click on the ADD button to
add a new assessment record or the UPDATE button to update the
highlighted record. If you want to keep your data from assessment to
assessment click on File | System File Maintenance | System Default and
click on the Prime New Assessment with Prior Data. With each Add
prior data will be loaded allowing you to compare new information with
past information.
How do I enter our educational opportunities?
Click on EDUCATION/CLASSES then Curriculum. You can add or
modify information here. Add all offered education opportunities that is
provided (1:1, class, Insulin Starts, Support Group).
(See Getting Familiar with the System, Education Module)
71
Diabetes Management System Manual
How do I enter in a Participant's Education Record?
There are 3 ways to enter a participant into classes...
1. Pathway > Individual Education Record.
2. Education/Classes | Scheduling By Class, then go to Scheduled
Attendance and mark as having Attended.
3. Group Class Attendance/Unscheduled
... go to the EDUCATIONAL MODULE Section of this manual
for detailed information.
How do I enter in a Participant's Education Assessment
Record?
Click on EDUCATION/CLASSES > PATIENT EDUCATIONAL
ASSESSMENT. Or, click on the EDUCATIONAL ASSESSMENT
button from the Patient's Pathway. Highlight the participant whose
record you wish to modify and click on the SELECT button. The
participant's record will be loaded with the Assessment Content Areas
ready for you to update. Content Areas can be maintained through
CONTENT AREAS / CLASS LINK MAINTENANCE by going into
the ASSESSMENT AREAS option in this same pull-down menu. Using
this feature you can supply written documentation of the participant’s
progress through the education program. Class dates will automatically
fill in the Dates Taught if content areas have been linked to classes in the
Education Assessment. (See Education Module)
How do I change my Behavioral Goal Groups?
Change Behavioral Goal Groups under FILE > SYSTEM FILE
MAINTENANCE > BEHAVIORAL GOALS. Do not Delete old
Behavioral Goals. They are still needed for historical reporting.
72
Diabetes Management System Manual
I don’t use the computer when I interview a participant,
what should I do to save time?
Print Blank Demographic and Assessment Forms from REPORTS >
BLANK FORMS. These forms can be sent to the participant ahead of
time or filled out partially while they wait. You may also want to print
blank diet history forms from FILE | MEAL PLANNING | DIET
FACTORS or MEAL CHARTS. All the blank forms match the screen to
simplify data collection.
There are several of us who use the system, how can I get
a list of just my participants?
In the participant’s demographic file, Contact Tab, use the Case Manager
ID. You can use a code, number, or short name. To get a list of
participants click on REPORTS > PARTICIPANT LISTINGS | CASE
MANAGER PARTICIPANT LISTING. Put in the date period you
want and the Case Manager ID, Print.
The System has so much information, what do I
concentrate on?
After you set up your system under file, the FOUR most important
files/records to maintain are the Participant's...
1. Demographic Record,
2. Assessment Record,
3. Education Record.
4. Goals.
To be ADA recognized you need to decide what outcomes you are
tracking. Once you have decided, be sure to keep that information filled
out and up to date.
73
Diabetes Management System Manual
Where does the information for the ADA 8th Edition
Worksheet and Supporting Documents come from
in the Diabetes Management System?
ONLY those participants actually put into classes in the Education/Class
Module are counted in these statistics. The system first looks through this
module determining who went to class during this time period,
determines if they are Comprehensive/Initial, or Post-Program
Instruction (this used to be called “follow up”), and then pulls in the
answers for population from Demographics. So in order to have accurate
information for your recognition application you must keep good class
records.
What information do I need to keep in the Diabetes
Management System for Recognition?
To get a good idea of what information you need to maintain in the
system look at the Worksheet under Reports > ADA 8th Edition
Reporting > Application Worksheet. (See Recognition).
What reports do I need for the DSME 8th Edition
Application and a Recognition Audit?
Supporting documentation (Reports > ADA 8th Edition > Supporting
Documents) prints the required documents to back up your DSME data.
The reports available are:
•
Age Breakdown Detail (from Demographics | Date of Birth)
•
Diagnosis Breakdown Detail (from Demographics | General |
Diabetes Diagnosis)
•
Race Breakdown Detail (from Demographics | Race)
•
DSME Intervention Detail (from Education/Classes Module)
•
Special Needs Detail (from Demographics | Management Issues
2 | Barriers to Learning)
Instructors at this site:
site File > Staff Profiles > CEU’s > Print > Detail
and Summary. File > Staff Profiles > DSME Hrs > Print.
Curriculum at this site: Education/Classes > Curriculum Listing and
Assessment Areas Listing.
74
Diabetes Management System Manual
Education records at this site:
•
An individualized initial assessment that includes relevant medical
history, diabetes history, and social history: File > highlight
Participant > Assessment > Print Recognition Assessment
Form.
•
A face to face assessment of the participant’s diabetes knowledge,
self-management skills and diabetes related behaviors based on
the content areas of the National Standards: Reports >
Knowledge test
•
Results. Pre and Post Knowledge Test Results Detail. Quality of
Life Statistics Report.
•
An education plan, which includes measurable learning
objectives, and participant, selected behavioral objectives based
on the above assessments. Goals > highlight Participant > Print
Goal Status Report.
•
Educational interventions, which include the date of intervention,
content taught and the names of the instructors. Education /
Classes > Educational Reporting > Patient Educational
Assessment.
•
Evaluation of progress towards/or achievement of learning and
behavioral objectives and related outcomes. Goals > highlight
Participant > Print ADA Goal Assessment.
•
Participant Outcomes: This depends on which outcome your
DSME has chosen to track. Outcomes reports are under Reports
> Outcomes, or Reports > Screening/HEDIS.
How does the Diabetes Management System determine
who is Comprehensive/Initial or Post-Program
Instruction?
Comprehensive and/or Initial education: participants received an
assessment that included relevant medical history, diabetes history, social
history, diabetes knowledge, self-management skills and diabetes related
behaviors in relation to the content areas of the National Standards,
instruction in the areas assessed as needs, on-going assessment of
knowledge and skill level and behavioral objectives. One outcome
measure was tracked pre and post instruction. In the Diabetes
75
Diabetes Management System Manual
Management System there are three ways the system determines who is
Comprehensive/Initial.
1. Any participant who has attended a class during the 6 months
period of time.
2. Demographic File: The box, Completed this (or other) DSME
Program is NOT checked.
3. Demographic File: Under General Tab, Date Finished Program
is blank or after the beginning data of your requested data period.
Post-Educational/Follow-Up: Participant has received initial or
comprehensive education previously and was seen for follow-up
education, or limited consult. In the Diabetes Management System there
are three ways the system determines who is considered Follow-Up
Education.
1. Any participant who has attended a class during the 6 months
period of time
2. Demographic record has the box; Completed this (or other)
DSME program, CHECKED.
3. Or the Date Finished Program in Demographics indicates the
person finished this program at a time period prior to the time
you have requested.
How do I keep track of my own hours of DSME
experience?
Make sure all members of the team are listed in Staff Profile (under File).
When a participant is put into class (from Pathway, Group Class
Attendance, or Individual Class Record), use the ellipsis button next to
Instructors Initials. Highlight the educator, click on Select and then
Update to save. This attributes these hours to that educator. To get a
report by educator, go to File > Staff Profile,
Profile highlight the educator and
click on the DSME Hrs button. From here you can Print, Add, Update,
Delete, and Close. Using Add from here allows for manually adding
classes. This is useful if more than one educator teaches a class. Click
Add, highlight the class, and fill in the date of class and the minutes
credited to you. This does not alter the original class information. Use
Update to increase the time spent teaching. This is useful if you have
taught the class more than once in a 24-hour period.
76
Diabetes Management System Manual
How do I keep track of my hours of DSME experience
if there are multiple instructors teaching one class?
The easiest solution is to break up the class into separate classes for each
instructor. It is more accurate and will save a lot of time later on.
Otherwise, when a class is taught by more than one instructor you will
have to manually attribute time to each instructor from the Staff Module.
Participant Demographic Data File Export.
The Diabetes Management System Utilities can generate an export file
containing Participant DEMOGRAPHIC data. The default name for this
file is PTDEMO.CSV, but the user can change the path/file name just
prior to creation of the file during the exportation process. This file is a
comma delineated ASCII file, which can be imported into almost any
standard database system (ie, Access, Excel, etc) that is capable of
importing ASCII files. The file layout is listed below. (Note – You must
have access rights to the Path and Folder this file is created in.)
FIELD #
DESCRIPTION
LENGTH
1
Last Name
20
2
First Name
20
3
Middle Initial
1
4
Social Security Number
9
5
Birth Date - Month Number (1-12)
2
6
Birth Date - Day of Month Number (1-31)
2
7
Birth Date - Year (4 Digit)
4
8
Address - Line 1
30
9
Address - Line 2
30
10
City
20
11
State
2
12
Zip Code
10
13
County Code
3
14
Home Telephone
10
15
Work Telephone
10
16
Sex Code
1
17
Race Code
1
18
Multiracial Flag
1
19
Ancestry Code
1
77
Diabetes Management System Manual
20
Marital Status
1
21
Occupation Code
1
22
Insurance Code (NOT USED)
1
23
Insurance Types
6
24
Ambulatory Status
1
25
Agency Code
4
26
Medical Record Number
20
27
Spoken Language Code
1
28
Written Language Code
1
29
Years of Schooling
2
30
Highest Degree Attained
4
31
Age at Diagnosis
2
32
DM Type
1
33
Height
5
34
Weight
5
35
Consent Form Signed
1
36
Month Consent Form Signed (1-12)
2
37
Day Consent Form Signed (1-31)
2
38
Year Consent Form Signed (4 Digit)
4
39
Month Entered Program (1-2)
2
40
Day Entered Program (1-31)
2
41
Year Entered Program (4 Digit)
4
42
Referring Physician Code
4
43
Reserved for Future Use #1
10
44
Reserved for Future Use #2
1
45
Reserved for Future Use #3
1
46
Reserved for Future Use #4
1
Field Specific Notes...
Sex Code - M-Male, F-Female
Race Code - W-White, B-Black, H-Hispanic, I-American Indian, A-Asian,
P-Pacific Islander, E-Middle Eastern, O-Other
Multiracial Flag - 1-Yes, 2-No
Marital Status - S-Single, M-Married, D-Divorced, W-Widowed, PSeparated, 6-Unknown
Occupation - M-Manual, P-Professional, R-Retired, U-Unemployed, DDisabled, 6-Unknown
78
Diabetes Management System Manual
Insurance Types (by Position) - 1-Medicaid, 2-Medicare, 3-HMO, 4BCBS, 5-Other, 6-None. 1 position for each insurance (six total).
Ambulatory Status - O-Outpatient, I-Inpatient, H-Home Health, NNursing Home, T-Other
Spoken Language - E-English, S-Spanish, F-French, O-Other
Written Language - E-English, S-Spanish, F-French, O-Other, N-None
Diabetes Type - I-Type 1, N-Type 2, Non Insulin Treated, X-Type 2,
Insulin Treated, G-Gestational, D-Difficult to Classify, O-Other, TImpaired Glucose Tolerance, C-Cystic Fibrosis Related Diabetes, Q-PreDiabetes (0-18 yrs), P-Pre-Diabetes (>18yrs).
Height - In Inches.
Weight - In Pounds.
All Dates have separate fields for Month, Day, and Year. The field is
blank if no date was entered. The Year Fields are 4 characters long to
include the century digits.
79
Diabetes Management System Manual
Participant Follow Up/Assessment Data File Export
The Diabetes Management System Utilities can generate an export file
containing Participant FOLLOW UP assessment data. The default name
for this file is PTFEXP.CSV, but the user can change the path/file name
just prior to creation of the file during the exportation process.
This file is a comma delineated ASCII file, which can be imported into
almost any standard database system (ie, Access, Excel) that is capable of
importing ASCII files. The file layout is listed below (Note – You must
have access rights to the Path and Folder this file is created in).
FIELD # DESCRIPTION
LENGTH
1
Last Name
20
2
First Name
20
3
Middle Initial
1
4
Social Security Number
9
5
Medical Record Number
20
6
Month of Assessment (1-12)
2
7
Day of Assessment (1-31)
2
8
Year of Assessment (4 Digit)
4
9
Month of Birth (1-12)
2
10
Day of Birth (1-31)
2
11
Year of Birth (4 Digit)
4
12
Follow Up Status Code (The Follow Up Status Codes are 3
based on the Codes loaded in the System Status File)
13
Type of Contact Code (H-Home, O-Office, T-Telephone) 1
14
Change or Loss in Hearing
1
15
Read Newsprint (Vision Changes)
1
16
Normal Sensation to Touch Flag
1
17
Packs Smoked Per Day
1
18
Years Smoked
2
19
Years Since Quit Smoking
2
20
Month Last Seen by Doctor for DM (1-12)
2
21
Day Last Seen by Doctor for DM (1-31)
2
22
Year Last Seen by Doctor for DM (4 Digit)
4
23
Times Hospitalized for Diabetes
2
24
Month Last Hospitalized for DM (1-12)
2
25
Day Last Hospitalized for DM (1-31)
2
80
Diabetes Management System Manual
26
Year Last Hospitalized for DM (4 Digit)
4
27
Glucose
4
28
Cholesterol
4
29
HDL
4
30
LDL
4
31
Triglycerides
4
32
Creatinine
5
33
Potassium
4
34
Month of Last Urine Microalbumin (1-12)
2
35
Day of Last Urine Microalbumin (1-31)
2
36
Year of Last Urine Microalbumin (4 Digit)
4
37
Microalbumin Negative Flag
1
38
Microalbumin Value
5
39
Weight (lbs)
5
40
Blood Glucose
5
41
Blood Glucose Type
1
42
HBA1c
6
43
Month of HBA1c (1-12)
2
44
Day of HBA1c (1-31)
2
45
Year of HBA1c (4 Digit)
4
46
Liver Function (ALT)
6
47
Liver Function (AST)
6
48
Abdominal Girth
5
49
Height (inches)
6
50
Height (cm)
6
51
Systolic Blood Pressure Value
3
52
Diastolic Blood Pressure Value
3
53
Month of Last B.P. Check (1-12)
2
54
Day of Last B.P. Check (1-31)
2
55
Year of Last B.P. Check (4 Digit)
4
56
Month Last Seen for HTN (1-12)
2
57
Day Last Seen for HTN (1-31)
2
58
Year Last Seen for HTN (4 Digit)
4
59
DM Intervention Flag - Insulin
1
60
DM Intervention Flag - Oral Meds
1
61
DM Intervention Flag - Diet Planning
1
62
DM Intervention Flag - Exercise Planning
1
63
DM Intervention Flag - Glucose Monitoring
1
81
Diabetes Management System Manual
64
DM Intervention Flag - Insulin Pump
1
65
DM Intervention Flag - No Management
1
66
Reserved for Future Use
1
67
Reserved for Future Use
1
68
Reserved for Future Use
1
69
Month of Last Dietitian Visit (1-12)
2
70
Day of Last Dietitian Visit( 1-31)
2
71
Year of Last Dietitian Visit (4 Digit)
4
72
Month of Last Foot Exam (1-12)
2
73
Day of Last Foot Exam (1-31)
2
74
Year of Last Foot Exam (4 Digit)
4
75
Foot Problem Flag - Calluses
1
76
Foot Problem Flag - Deformity
1
77
Foot Problem Flag - Fungal Toenails
1
78
Foot Problem Flag - Neuropathy
1
79
Foot Problem Flag - Ulcer
1
80
Foot Problem Flag - Amputation
1
81
Foot Problem Flag - Bunions
1
82
Foot Problem Flag - None
1
83
Month of Last Dilated Eye Exam
2
84
Day of Last Dilated Eye Exam
2
85
Year of Last Dilated Eye Exam
4
86
Eye Problem Flag - Retinopathy
1
87
Eye Problem Flag - Cataracts
1
88
Eye Problem Flag - Glaucoma
1
89
Eye Problem Flag - Blurred Vision
1
90
Eye Problem Flag - Blindness 1 Eye
1
91
Eye Problem Flag - Blindness 2 Eye
1
92
Eye Problem Flag - None
1
93
# MD Visits in last 12 months
3
94
# RN Visits in last 12 months
3
95
# Hospital Admissions in last 12 months
3
96
Month of Most Recent Hospitalization
2
97
Day of Most Recent Hospitalization
2
98
Year of Most Recent Hospitalization
4
99
Hospital ID Code for Hospitalization
6
100
Primary ICD9 Code
6
101
Month of NEXT Most Recent Hospital.
2
82
Diabetes Management System Manual
102
Day of NEXT Most Recent Hospital.
2
103
Year of NEXT Most Recent Hospital.
4
104
Hospital ID Code for Hospitalization
6
105
Primary ICD9 Code
6
106
Month of NEXT Most Recent Hospital.
2
107
Day of NEXT Most Recent Hospital.
2
108
Year of NEXT Most Recent Hospital.
4
109
Hospital ID Code for Hospitalization
6
110
Primary ICD9 Code
6
Field Specific Notes...
All Dates have separate fields for Month, Day, and Year. The field is
blank if no date was entered.
Foot Problem Flags - 1-True, Blank-False.
Eye Problem Flags - 1-True, Blank-False.
DM Intervention Flags - 1-True, Blank-False.
83
Diabetes Management System Manual
Participant Billing Data Exportation
The Diabetes Management System Utilities can generate an export file
containing Participant MEDICATION data. The default name for this
file is BILLEXP.CSV, but the user can change the path/file name just
prior to creation of the file. This file is a comma delineated ASCII file,
which can be imported into almost any standard database system (ie,
Access, Excel) that is capable of importing ASCII files. The file layout is
listed below (Note – You must have access rights to the Path and Folder
this file is created in).
FIELD DESCRIPTION
MAX LENGTH
1
Last Name
20
2
First Name
20
3
Medical Record Number
20
4
Internal ID#
20
5
Class ID#
20
6
Class Name/Description
20
7
Attendance Date (MM/DD/YYYY)
10
8
Class Length (in minutes)
10
9
CPT Code
10
10
HCPCS Procedure Code
10
11
Charge Amount
10
13
Frequency
10
84
Diabetes Management System Manual
Participant Class Attendance Data File Export
The Diabetes Management System Utilities can generate an export file
containing Participant Class Attendance data between two dates. The
default name for this file is PTCLEXP.CSV, but the user can change the
path/file name just prior to creation of the file. This file is a comma
delineated ASCII file, which can be imported into almost any standard
database system (ie, Access, Excel) that is capable of importing ASCII
files. The file layout is listed below (Note – You must have access rights
to the Path and Folder this file is created in).
FIELD
DESCRIPTION
MAX LENGTH
1
Attendance Date - Year
4
2
Attendance Date - Mon
2
3
Attendance Date - Day
2
4
Class Title
30
5
Class Length (in minutes)
4
6
Class Method (LEC, DEM, DIS, RTN, VID, OTH,
UNK)
3
7
Class Format (CLS, IND, OTH, UNK)
3
8
Instructor's Initials
3
9
Class Location
10
10
Patient Last Name
20
11
Patient First Name
20
12
Patient Middle Initial
1
13
Medical Record Number
15
14
Patient Gender (M, F)
1
15
Patient Date of Birth (MM/DD/YYYY)
10
85
Diabetes Management System Manual
Participant Gestational Episode Data File Export
The Diabetes Management System Utilities can generate an export file
containing Participant Gestational episode data. The default name for
this file is GESTEXP.CSV, but the user can change the path/file name
just prior to creation of the file. This file is a comma delineated ASCII
file, which can be imported into almost any standard database system (ie,
Access, Excel) that is capable of importing ASCII files. The file layout is
listed below (Note – You must have access rights to the Path and Folder
this file is created in).
FIELD# DESCRIPTION
LENGTH
1
Medical Record Number
15
2
Last Name
20
3
First Name
1
4
Mother's Date of Birth (YYYYMMDD)
15
5
Episode Number
2
6
Number of Fetuses
2
7
Delivery Outcome (N-Normal, C-Caesarian, SStillborn, T-Terminated)
2
8
Mother's Normal Weight (lbs)
8
9
Mother's Delivery Weight (lbs)
8
10
Baby #1 Birth Weight (lbs)
8
11
Baby #2 Birth Weight (lbs)
8
12
Baby #3 Birth Weight (lbs)
8
13
Baby #4 Birth Weight (lbs)
8
14
Estimated Gestational Age in Weeks
2
15
GTT Test Date (YYYYMMDD)
15
16
GTT Fasting
5
17
GTT 1 Hour
5
18
GTT 2 Hours
5
19
GTT 3 Hours
5
20
Estimated Delivery Date (YYYYMMDD)
15
21
Actual Delivery Date (YYYYMMDD)
15
22
Number of Pregnancies
2
23
Order of Pregnancy
2
86
Diabetes Management System Manual
24
Number of Live Births
2
25
Prior Diabetes Diagnosis Type (Description)
20
26
Maternal Hypoglycemia (Y or N)
1
27
Cephalo-Pelvic Diaproportion (Y or N)
1
28
Traumatic Delivery (Y or N)
1
29
Non Elective C-Section (Y or N)
1
30
Macrosomia (Y or N)
1
31
Shoulder Dystocia (Y or N)
1
32
Neonatal Hypoglycemia (Y or N)
1
33
Management Issue – Insulin (1 if TRUE, BLANK if
FALSE)
1
34
Management Issue – Oral Meds (1 if TRUE, BLANK
if FALSE)
1
35
Management Issue – Diet Planning (1 if TRUE,
BLANK if FALSE)
1
33
Management Issue – Exercise Program (1 if TRUE,
BLANK if FALSE)
1
33
Management Issue – Glucose Monitoring (1 if TRUE, 1
BLANK if FALSE)
33
Management Issue – Insulin Pump (1 if TRUE,
BLANK if FALSE)
1
33
Management Issue – None (1 if TRUE, BLANK if
FALSE)
1
33
Management Issue (Currently Not Used, Reserved
for Future Use)
1
33
Management Issue (Currently Not Used, Reserved
for Future Use)
1
33
Management Issue (Currently Not Used, Reserved
for Future Use)
1
87
Diabetes Management System Manual
Billing Data File Export
The Diabetes Management System Utilities can generate an export file
containing Class Episode Billing Data. The default name for this file is
BILLEXP.CSV, but the user can change the path/file name just prior to
creation of the file. Also, the activity date range can be set from the
prompt window. This file is a comma delineated ASCII file, which can
be imported into almost any standard database system (ie, Access, Excel)
that is capable of importing ASCII files. The file layout is listed below
(Note – You must have access rights to the Path and Folder this file is
created in).
FIELD
DESCRIPTION
MAX LENGTH
1
Patient Last Name
20
2
Patient First Name
20
3
Medical Record Number
15
4
Patient's System Internal ID#
20
5
Class ID #
15
6
Class Title
3
7
Class Date (MM/DD/YYYY)
3
8
Class Length (in minutes)
3
9
CPT Code
10
10
HCPCS Code
20
11
Charge Amount
20
88
Diabetes Management System Manual
Goal File Data File Export
The Diabetes Management System Utilities can generate an export file
containing Patient Goal Data. The default name for this file is
GOALEXP.CSV, but the user can change the path/file name just prior to
creation of the file. This file is a comma delineated ASCII file, which can
be imported into almost any standard database system (ie, Access, Excel)
that is capable of importing ASCII files. The file layout is listed below
(Note – You must have access rights to the Path and Folder this file is
created in).
FIELD
DESCRIPTION
MAX LENGTH
1
Patient Last Name
20
2
Patient First Name
20
3
Patient Middle Name
10
4
Date of Birth (MM/DD/YYYY)
10
5
Diagnosis Type
10
6
Medical Record Number
15
7
Group Filter Code
10
8
Date Goal Set (MM/DD/YYYY)
10
9
Goal Description – Line 1
80
10
Goal Description – Line 2
80
11
Scheduled Date to Meet Goal (MM/DD/YYYY)
10
12
Status of Goal
10
13
Date Goal Met (MM/DD/YYYY)
10
14
Behavioral Group
10
15
Follow Up #1 Date (MM/DD/YYYY)
10
16
Number of Times Met
10
17
Follow Up #2 Date (MM/DD/YYYY)
10
18
Number of Times Met
10
19
Follow Up #3 Date (MM/DD/YYYY)
10
20
Number of Times Met
10
21
Follow Up #4 Date (MM/DD/YYYY)
10
22
Number of Times Met
10
23
How did this affect your Quality of Life?
80
24
What did you learn from this Goal?
80
89
Diabetes Management System Manual
Patient Medications Data File Export
The Diabetes Management System Utilities can generate an export file
containing Patient Medication Data. The default name for this file is
MEDSEXP.CSV, but the user can change the path/file name just prior to
creation of the file. Also, the activity date range can be set from the
prompt window. This file is a comma delineated ASCII file, which can
be imported into almost any standard database system (ie, Access, Excel)
that is capable of importing ASCII files. The file layout is listed below
(Note – You must have access rights to the Path and Folder this file is
created in).
FIELD
DESCRIPTION
1
Patient Last Name
20
2
Patient First Name
20
3
Patient Middle Initial
1
4
Medical Record Number
15
5
Date of Birth – Month
2
6
Date of Birth – Day
2
7
Date of Birth – Year
4
8
Med Start - Month
2
9
Med Start - Day
2
10
Med Start - Year
4
11
Med ID
10
12
Med Name
30
13
Frequency
10
14
Dose Description
80
15
Route
10
16
Comments
80
17
Ordered By
30
18
DC Date - Month
2
19
DC Date - Day
2
20
DC Date - Year
4
90
MAX LENGTH
Diabetes Management System Manual
Participant Demographic Data File Importation
The Diabetes Management System Utilities has the capability to import
Participant Demographic Data.
This Importation file must be a comma delineated ASCII file, which can
be generated by almost, any standard database system (ie, Access, Excel,
etc) that is capable of exporting ASCII files. The default import file name
is PTINTAKE.CSV. This Importation File must have the following
layout...
FIELD DESCRIPTION
#
LENGTH
1
Last Name
20
2
First Name
20
3
Middle Initial
1
4
Social Security Number
9
5
Birth Date - Month Number (1-12)
2
6
Birth Date - Day of Month Number (1-31)
2
7
Birth Date - Year (4 Digit)
4
8
Address - Line 1
30
9
Address - Line 2
30
10
City
20
11
State
2
12
Zip Code
10
13
County Code
3
14
Home Telephone
10
15
Work Telephone
10
16
Sex Code (M-Male, F-Female)
1
17
Race Code W-White, B-Black, I-American Indian, A-Asian,
P-Pacific Islander, O-Other
1
18
Multiracial Flag (1-Yes, 2-No)
1
19
Ancestry Code
1
20
Marital Status S-Single, M-Married, D-Divorced, W-Widowed,
P-Separated, 6-Unknown)
1
21
Occupation Code M-Manual, P-Professional, R-Retired,
U-Unemployed, D-Disabled, 6-Unknown)
1
22
Insurance Code (RESERVED FOR FUTURE USE – LEAVE
BLANK)
1
23
Ins. Type #1 (1st Insurance (Default Medicaid), 1 = True; Blank if
None)
1
24
Ins. Type #2 (2nd Insurance (Default Medicare), 1 = True; Blank if
1
91
Diabetes Management System Manual
None)
25
Ins. Type #3 (3rd Insurance (Default HMO), 1 = True; Blank if None) 1
26
Ins. Type #4 (4th Insurance (Default BCBS), 1 = True; Blank if
None)
1
27
Ins. Type #5 (5th Insurance,(Default Other), 1 = True; Blank if
None)
1
28
Ins Type #6 (6th Insurance (Default None), 1 = True; Blank if None)1
29
Ambulatory Status (O-Outpatient, I-Inpatient, H-Home Health, NNursing Home, T-Other)
1
30
Agency Code
4
31
Medical Record Number
20
32
Spoken Language Code (E-English, S-Spanish, F-French, O-Other) 1
33
Written Language Code (E-English, S-Spanish, F-French,
O-Other, N-None)
1
34
Years of Schooling
2
35
Highest Degree Attained
4
36
Age at Diagnosis
2
37
Diabetes Diagnosis Type
1
38
Height (In Inches)
5
39
Weight (In Pounds)
5
40
Consent Form Signed
1
41
Month Consent Form Signed (1-12)
2
42
Day Consent Form Signed (1-31)
2
43
Year Consent Form Signed (4 Digit)
4
44
Contact Person Last Name
20
45
Contact Person First Name
20
46
Contact Person Address
20
47
Contact Person City
20
48
Contact Person State
2
49
Contact Person Zip Code
10
50
Contact Person Telephone Number
10
51
Contact Person Relation Code 1-Friend, 2-Neighbor, 3-Relative,
4-Other)
1
52
Referring Physician Code
5
53
Month Entered Program (1-12)
2
54
Day Entered Program (1-31)
2
55
Year Entered Program (4 Digit)
4
92
Diabetes Management System Manual
Field Specific Notes...
•
Sex Code - M-Male, F-Female
•
Telephone Numbers - just numbers, do not include any
formatting characters.
•
Race Code - W-White, B-Black, I-American Indian/Eskimo, AAsian/Pacific Islander, H-Hispanic, O-Other, E-Middle Eastern.
•
Multiracial Flag - 1-Yes, 2-No
•
Ancestry Code - E-European, A-African, H-Hispanic, IAmerican Indian, B-Arab, S-Asian, F-Finnish, O-Other
•
Marital Status - S-Single, M-Married, D-Divorced, W-Widowed,
P-Separated, 6-Unknown
•
Occupation - M-Manual, P-Professional, R-Retired, UUnemployed, D-Disabled, 6-Unknown
•
Insurance Types - 1-Medicaid, 2-Medicare, 3-HMO, 4-BCBS, 5Other, 6-None
•
Ambulatory Status - O-Outpatient, H-Home Health, N-Nursing
Home, T-Other
•
Spoken Language - E-English, S-Spanish, F-French, O-Other
•
Written Language - E-English, S-Spanish, F-French, O-Other, NNone
•
Diabetes Diagnosis Type - I-Type 1, N-Type 2 (non insulin
treated), X-Type 2 (insulin treated), G-Gestational, D-Difficult to
Classify, O-Other, T-Impaired Glucose Tolerance, C-CFRD, QPre-Diabetes (0-18yrs), P-Pre-Diabetes (> 18yrs).
•
All Dates have separate fields for Month, Day, and Year. The
field is blank if no date was entered.
•
The Year Fields are 4 characters long to include the century
digits.
•
Contact Person Relation Code - 1-Friend, 2-Neighbor, 3-Relative,
4-Other.
The "Date Entered Program" (Month, Day, Year) Fields #53, #54, #55.
If these fields are left blank, the importation process will put in the
current System Date. Regardless, this date will never be left blank in the
patient demographic record after importation. The reason is that almost
all the reports are based (and filtered) on this date. We suggest putting in a
date of 1/1/1990 for this date. That way, the users can easily filter on
93
Diabetes Management System Manual
this date and print a report on all the imported patient records who need
to have there data completed and their correct program entry date
entered.
Participant Lab Data File Importation
The Diabetes Management System Utilities has the capability to import
Participant Lab Data.
This Importation file must be a comma delineated ASCII file, which can
be generated by almost, any standard database system (ie, Access, Excel,
etc) that is capable of exporting ASCII files. The default import file name
is PTLABS.TXT. This Importation File must have the following layout...
FIELD # DESCRIPTION
LENGTH
1
Medical Record Number
15
2
Month of Lab Work (2 digits)
2
3
Day of Lab Work (2 digits)
2
4
Year of Lab Work (4 digits)
4
5
Cholesterol
10
6
HDL
10
7
LDL
10
8
Triglycerides
10
9
Creatinine
10
10
Potassium
10
11
Liver Function (ALT)
10
12
Liver Function (AST)
10
13
Month of Urine Microalbumin (2 digits)
2
14
Day of Urine Microalbumin (2 digits)
2
15
Year of Urine Microalbumin (4 digits)
4
16
Microalbumin Negative (1=Neg., 0=Pos)
1
17
Microabumin Result
10
18
Height in Inches
7
19
Height in Centimeters
7
20
Weight in Pounds
10
21
Weight in Kilograms
10
22
Abdominal Girth
5
23
Blood Glucose
10
24
Glucose Type (1=FBS, 2=Pre-Meal, 3=PP, 0=Unknown) 1
94
Diabetes Management System Manual
25
Self Monitoring of Blood Glucose (0=No, 1=Yes)
1
26
HBA1c
8
27
Month of HBA1c (2 digits)
2
28
Day of HBA1c (2 digits)
2
29
Year of HBA1c (4 digits)
4
30
Ketones (0=Nie, 1=Trace, 2=Small, 3=Moderate,
4=Large, 5=Not Tested)
1
31
TSH (Thyroid Stimulating Hormone)
10
Note – Only NEW Assessment Records will be added during the
importation process. If the participant already has an Assessment Record
with the same date as the Import Record, the Import Record will not be
imported into the System.
95
Diabetes Management System Manual
Physician Data File Importation
The Diabetes Management System Utilities has the capability to import
Physician Data.
This Importation file must be a comma delineated ASCII file, which can
be generated by almost, any standard database system (ie, Access, Excel,
etc) that is capable of exporting ASCII files. The default import file name
is DRINTAKE.CSV. This Importation File must have the following
layout...
FIELD #
DESCRIPTION
LENGTH
1
Physician ID Number
6
2
Last Name
20
3
First Name
20
4
Middle Initial
1
5
Institution Name
35
6
Address – Line 1
30
7
Address – Line 2
30
8
City
20
9
State
2
10
Zip Code
10
11
Work Telephone (no formatting characters)
10
12
Home Telephone (no formatting characters)
10
13
Fax Telephone (no formatting characters)
10
14
Office Contact Person Name
20
15
Specialty
20
16
UPIN or NPI#
20
Note – Only NEW Physician records will be added (based upon Physician
ID Number).
96
Diabetes Management System Manual
PRAXIS Scheduler Data Importation
The Diabetes Management System Utilities has the capability to import
Participant data from the PRAXIS Scheduler System.
This Importation file must be a comma delineated ASCII file, which is
generated by the PRAXIS Scheduler. The default import file name is
PIMPORT.CSV. This Importation File must have the following layout...
FIELD #
DESCRIPTION
LENGTH
1
Participant ID (Med Rec #)
12
2
Last Name
20
3
First Name
20
4
Middle Initial
1
5
Sex Code (M, F)
1
6
Birth Date (MM/DD/YYYY)
10
Service Date (MM/DD/YYYY)
10
8
Social Security No. (XXX-XX-XXXX)
11
9
Street Address
30
10
City
20
11
State
2
12
Zip Code
10
13
Day Telephone (XXX-XXX-XXXX)
12
14
Home Telephone (XXX-XX-XXXX)
12
15
Referring Physician
40
16
Responsible Relative
40
17
Relation
8
18
Insurance
10
19
Group
10
20
Insurance Phone
10
21
Comments #1
20
22
Comments #2
20
23
Primary Physician
20
Fields # 15 to 23
Below Are Not
Imported...
97
Diabetes Management System Manual
HL7 Interface Engine, An Introduction.
The Diabetes Management System has a stand-alone HL7 Interface
Engine. The application is located in the Diabetes Mgmt System
program folder and is named DMSHL7.EXE.
•
The Engine uses the HL7 v2.x standard.
•
The Engine can import patient demographic and lab data
using the PID, PV1, NK1, and OBX message segments.
•
The Engine can export Diabetes Mgmt System generated
data into HL7 format for use in other systems. The
following data can be exported into HL7 formats:
◦
Patient Demographics (using the PID, PV1, NK1, and
OBX segments).
◦
Clinical Values from Assessment Visits (using OBX
segments).
◦
Narrative and SOAP Notes (using NTE segments).
◦
Educational Records (using NTE segments).
◦
Educational Assessment Records (using NTE
segments).
◦
Goal Status Records (using NTE segments).
◦
Medication Records (using NTE segments).
Setting Up the HL7 Engine
Shortcuts to the Engine should only be set up on the workstations
that need to run the Engine. Setting up the Engine just is a matter
of mapping the drive and folder where the Diabetes Mgmt System
resides (if it is not mapped already), and setting up a shortcut to the
HL7Engine application, DMSHL7.EXE.
98
Diabetes Management System Manual
Starting the HL7 Engine.
The HL7 Engine is password protected. Only users with
administrative access to the Diabetes Management System. Users
can only be maintained with the main Diabetes Mgmt System.
The HL7 Interface Engine Log In Window
99
Diabetes Management System Manual
The HL7 Interface Engine Main Window.
HL7 Importation
The HL7 Interface Engine Importation Window.
100
Diabetes Management System Manual
Importation Window Options
Path/File Name of the Importation File: Enter the complete path and
file name of the file containing the HL7 importation data. You can use
the Browse button to navigate folder quickly.
Patient Number to be Used: The HL7 standard PID segment has three
different fields that can contain a patient number and you can choose
which one to use for the Medical Record Number during importation.
The default (and normal) field is the first choice; the HL7 Internal ID.
Default Status Code for New Assessment Records:
Records If new Assessment
Records are imported into the System, this Status Code (Assessment Visit
Type) will be used for these records.
Update Type: You can choose the update type of importation records...
•
Add New and Update Existing Records.
•
Add Only New Records (no updates).
Lab Type Identifiers: This section contains all the lab values that can be
imported by the Engine. Enter the lab text your importation file contains
for that particular lab type. The Engine uses these value labels to identify
the various values.
Program Entry Date: This is the date the Engine will use to use for
“Program Entry Date” for new imported demographic records.
Import Button:
Starts the Importation Process.
Update Defaults Button: Saves your values on this window as the system
default values.
Cancel Button: Cancels this procedure and closes the window.
101
Diabetes Management System Manual
HL7 Exportation
The HL7 Interface Engine Exportation Window.
Exportation Window Options
Path/File Name of the Export File: Enter the complete path and file
name of the file where you wish to export your exported HL7 data to.
You can use the Browse button to navigate folder quickly.
Export Type Options: The Export will automatically, at a minimum, the
patient demographic data. This section allows you to select which record
types, beyond the demographics, you wish to export. All the record types
are set to export, by default. Uncheck the record types you wish to
suppress exportation.
Update Defaults Button: Saves your Exportation Path/File Name as the
system export default value.
Export HL7 Data Button: Begins the HL7 Process.
Cancel Button: Cancels the Exportation and Closes this window.
102
Diabetes Management System Manual
Generated HL7 Export File Record Details
MSH Segment (Message Header)
The MSH segment is required for all messages and will always be the first
segment in the message
Sample Generated MSH Segment:
MSH|^~\&|HarborDMS||HarborDMS||20120327101102||ADT^A08|HSI4977077|P|2.3|||||
All generated Export files will have a ADT^A08 message type, Patient
Update.
PID Segment (Patient Identification)
The PID segment contains information about the patient, and is used to
export demographic data fields from the Diabetes Mgmt System.
Sample Generate d MSH Segment:
PID||00 J111|200705171051038||JOHNSON^JACK^BENJAMIN^||19461115|M||W|115
WILLSTOM ST.^^PETOSKEY^MI^32174||2313478866|2313479473|E|M|||||||||||||||
PV1 Segment (Patient Visit Information)
The PV1 segment is used to contain additional information about the
patient. The HL7 Engine uses this record to export info about the
patient's referring physician.
Sample Generate d MSH Segment:
PV1|0001|DMS|R||||1^HALLAH, MD KATHLEEN L||||||||||||||||||||||||||||||||||||200702050800
|||||||0000000.00|0000000.00
103
Diabetes Management System Manual
NK1 Segment (Next of Kin Information)
The NK1 Segment is used to export the patient's Contact Person
information. If the patient has two contacts in their demographic record,
two NK1 segments are generated.
Sample Generate d NK1 Segment:
NK1|0001|CANDY JOHNSON||115 WILLSTOM ST.^PETOSKEY^MI^32174|(231)3478866
OBX Segment (Observation Information)
The OBX Segment is used to export one patient observation per record.
The Engine generates OBX segments for Barriers to Learning and for
Clinical Assessment Values.
Sample Generate d OBX Segment for a Barrier to Learning
OBX|001|ST|Learning Barrier||VISUALLY IMPAIRED|||||||||20070102
Sample Generate d OBX Segments for Clinical Lab Value
OBX|002|NM|CHOLESTEROL (MG)|| 180|||||||||20070102
OBX|003|NM|HDL (MG/DL)|| 55|||||||||20070102
OBX|004|NM|LDL (MG/DL)|| 90|||||||||20070102
OBX|055|NM|HbA1c (%)|| 7.0|||||||||20070312
OBX|057|NM|BLOOD PRESSURE||118/ 70|||||||||20070312
NTE Segment (Notes and Comments)
The NTE Segment is used to export several types of patient records;
Narrative Notes, SOAP Notes, Educational Records, Educational
Assessment Records, Goals, and Medications.
Sample Generate d NTE Segments for Narrative Notes
NTE|1|Nar Note^(Note Date)20070205^(Signer)Susan Hemme, RN^(Record ID)3663473
NTE|2|Patient came with wife. Both very apprehensive and worried. Wife will be
involved in care. Patient willing to "work hard" at controlling blood sugar for his wife.
Right now patient refuses to do his own testing. Wife will do it and come to all classes
with patient. SH
NTE Segments for Narratives contain two records for each narrative.
Line #1 contains general note information with each field identified
within parenthesis. Line #2 contains the body of the note.
104
Diabetes Management System Manual
Sample Generate d NTE Segments for SOAP Notes
NTE|1|SOAP Note^(Note Date)20070305^(Signer)Debra King^(Record ID)4268540
NTE|2|SUBJECTIVE^I don't want to alter my life. I don't think I can do my own blood
sugars
NTE|3|OBJECTIVE^Patient has reservations about new diagnosis. Seems embarrassed
for his friends and family to know.
NTE|4|ASSESSMENT^Wife is supportive and willing to help while patient gets used to
new diagnosis
NTE|5|PLAN^wife to come to all education. Pt willing to go through complete education
NTE Segments for SOAP Notes contain five records for each SOAP.
Line #1 contains general note information with each field identified
within parenthesis. Line #2 contains the Subjective data, Line #3
contains the Objective data, Line #4 Assessment data, and Line #5, the
Plan.
Sample Generate d NTE Segments for Educational Records
NTE|001|Ed Rcd^(Class Date)20070205^(Class)INITIAL INTERVIEW^(Minutes)60
^(Instructor Initials)SH
NTE|002|Ed Rcd^(Class Date)20070319^(Class)SESSION 1^(Minutes)180^(Instructor
Initials)DK
NTE Segments for Educational Records contain one record for each
exported record, each field identified within the parenthesis.
Sample Generate d NTE Segments for Educational Assessment
Records
NTE|001|Ed Assess^(Content Area)PREVENTING, DETECTING, AND TREATING
ACUTE COMPLICATIONS^(PrePgm Assess Date)20070205^(PrePgm
Initials)SH^(PrePgm Knowledge)0^(Date Taught)20070409^(PostPgm Assess
Date)20070518^(PostPgm Initials)SH^(PostPgm Knowledge)1^(Reinforcement
Date)^(Signatures)
NTE|002|Ed Assess^(Content Area)PREVENTING, DETECTING, AND TREATING
CHRONIC COMPLICATIONS^(PrePgm Assess Date)20070205^(PrePgm
Initials)SH^(PrePgm Knowledge)0^(Date Taught)20070409^(PostPgm Assess
Date)20070518^(PostPgm Initials)SH^(PostPgm Knowledge)1^(Reinforcement
Date)^(Signatures)
NTE Segments for Educational Assessment Records contain one record
for each exported Educational Assessment record, each field identified
within the parenthesis.
105
Diabetes Management System Manual
Sample Generate d NTE Segments for Goal Records
NTE|003|Goal Rcd^(Desc)I WILL EXAMINE MY FEET EVERY DAY.
^(BehavGrp)REDUCING STRESS^(Set Dte)20070205^(Sch Dte)20070319^(Met
Dte)20070628^(Acheive)100^(FU1)^(FU1%)90^(FU2)^(FU2%)0^(FU3)^(FU3%)0^(FU4)^(
FU4%)0^REDUCE RISK OF FOOT-RELATED COMPLICATIONS^NOT A HARD GOAL
TO MEET, I CHECK FEET AFTER SHOWER
NTE Segments for Goal Records contain one record for each exported
Patient Goal, each field identified within the parenthesis.
Sample Generate d NTE Segments for Medication Records
NTE|001|Meds^ WELLBUTRIN^(Dose)100MG BID^(Ord By) LOOM P.A.-C^(Start
Dte)20060518^(DC Dte)20060518^(Cmts)STATES IT HAS HELPED HER "KEEP ON
TASK"
NTE|002|Meds^ LANTUS^(Dose)44 UNITS PM DAILY^(Ord By) HALLAH, MD^(Start
Dte)20061116^(DC Dte)20061116^(Cmts)SKIPS EVENING SLIDING SCALE
NTE Segments for Medication Records contain one record for each
exported Patient Medication, each field identified within the parenthesis.
Audit Activity File.
The Engine records activity with the interface to a text file named
HAUDIT.TXT located in the HL7 folder beneath the DMS program
folder.
106
Diabetes Management System Manual
FORMULAS USED
IDEAL BODY WEIGHT (IBW)
FOR MEN: IBW = 50 + ((HEIGHT - 60) * 2.3)
For Height less than 60 inches tall, use 50 kg.
FOR WOMEN: IBW = 45.5 + ((HEIGHT - 60) * 2.3)
For Height less than 60 inches tall, use 45.5 kg.
BODY MASS INDEX (BMI)
BMI = Weight (kg) / (Height (meters) * Height (meters))
Guidelines...
BMI > 22 - at risk for Diabetes
BMI > 27 - overweight
BMI > 30 – obese
CALORIE NEED CALCULATOR (Mifflin-St. Jeor Equation)
For Women...
REE** = 10(kg) + 6.25(cm) – 5(age) -161
For Men...
Men...
REE** = 10(kg) + 6.25(cm) – 5(age) + 5
Calculated Calorie Need = REE * Activity Factor of 1.3 or 1.4 or 1.5
*REE = Resting Energy Expenditure
ESTIMATED AVERAGE GLUCOSE
eAG = 28.7 × A1c − 46.7
107
Diabetes Management System Manual
Troubleshooting
You are welcome to call Harbor any time for help with questions. Listed
below are some common questions we receive...
Problem:
Lost / Forgotten Password.
Solution:
Have another user who has Administrator Access, log
into the System and click on FILE > USERS. They can
update your password from there.
Problem:
Update did not work.
Solution:
Make sure all users are completely out of the Diabetes
Management System before performing the upgrade. A
common (and easy) method is to rename the main
application (DMS.EXE). If you cannot successfully
rename it, someone has the system running.
Problem:
System stops with an Error Message Displayed.
Solution:
Write down the complete Error Message that is displayed
and contact Harbor.
Problem:
A report does not display any information.
Solution:
Many reports are based on a date range. Be sure the
date range is correct and try again. Otherwise call
Harbor.
Problem:
Patients are displayed on one workstation, but not on
another.
Solution:
Verify that the two workstations are accessing the same
data folder. Otherwise, call Harbor.
Problem:
I expected more patients to be listed on my Outcomes
Report.
Solution:
An outcome measures change over time, so a minimum
of two values are required. The System only displays
patients with two or more outcome values.
108
Diabetes Management System Manual
For More Information
Our staff can be reached at any of the following numbers for more
information...
Voice: (231) 347-8866 (between 9a-5p EST, Monday through Friday).
Fax:
(231) 347-9473
E-mail:
[email protected]
Web Site:
http://www.harborsoft.com
User Support Page...
Harbor Software has a user support page for Diabetes Mgmt System
Users, located here...
http://www.harborsoft.com/
.. Click on “Diabetes
Diabetes Mgmt”,
Support”.
Mgmt then “Support
Support System news, Upgrade
Information / Download Links, and Documentation can be found here.
Copyright Notice
Diabetes Management System
Copyright (c) 1996 - 2011 by
Harbor Software International
231 State St.
P.O. Box 831
Petoskey, MI 49770 U.S.A.
ALL RIGHTS RESERVED
109