1
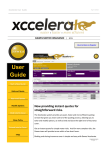
Table of Contents 1.0 Introduction 1.1 Background 1.3 Scope Page 2 Page 2 Page 2 2.0 How do I log into the Client Terminal system? Page 2 3.0 What happens once I am logged in? Page 3 4.0 My Prole Page 3 5.0 Elements of the main shift screen and terminology Page 4 5.1 Shift search buttons 5.2 Headings on the shift results Page 4 Page 5 6.0 How do I enter a new shift? Page 6 7.0 How can I add multiple bookings? Page 7 8.0 How do I monitor the allocation process? Page 7 9.0 How do I cancel a shift? Page 7 10.0 How do I approve a shift online? Page 8 11.0 Additional important information Page 8 Contact information Page 8 1 1.0 Introduction 1.1 Background Computers have become very much a way of life and have proven to be an invaluable tool. Recognising the challenges associated with the management of casual staff, Nursing Australia has developed a number of innovative software packages (HRLink and HRLink Client Terminal) that provide efficient and effective tools designed to streamline the process involved in casual staffing placements. 2.0 How do I log into the Client Terminal system? 1. Start your Internet Explorer browser by double clicking on the Internet Explorer Icon on your desktop. You will be presented with the login screen as depicted in Figure 1. The introduction of the Client Terminal is a result of our commitment to providing world-class human resources services that exceed customer expectations. 1.2 Scope The user manual is designed to be an additional resource that can be referred to once you have been introduced to the system by a member of the Nursing Australia team. The manual outlines the functionality of the Client Terminal such as : • Logging into the Client Terminal • Understanding the elements and terminology of the main shift screen • Booking a shift • Understanding the process involved in cancelling a shift • The steps involved in checking a shift progress • Identifying the staff member attending a shift • Approving a shift for invoicing Figure 1 2. Enter your login name and password, then click the Sign-In button. The system will start the process of validating your login details. 3. If you have entered a correct login name and pass word the main shift screen will be displayed. Tips: URL address If you lose your URL address type in the following - http://ct.hrlink.com.au and then add to Favorites to save to your browser. Figure 2 2 3.0 What happens once you are logged in? You will be presented with the Home page (Figure 3). You will be able to access all areas of the system from here. A detailed description of the various elements of the Home page screen will be presented in the next section. Figure 4 Figure 3 4.0 My Prole You are able to customise your HRLink Client Terminal with the all-new My Profile settings. This function allows you to pre-set the shift requirements for your ward/ facility. Figure 5 You are able to: • specify your individual shift defaults (Figure 4) • include minimum qualification requirements (Figure 5) • determine pay classes (Figure 6) e.g. in charge rates This will save you time when placing bookings. In the interests of security and confidentiality, you are able to alter your HRLink Client Terminal password. Figure 6 3 5.0 Elements of the main shift screen and terminology • Cancelled Displays shifts that have been cancelled by you (the client). Shifts must be cancelled by telephoning the National Allocations Centre, as you are unable to cancel the shift via the Client Terminal. • Unable to fill Displays shifts for which there are currently no suitable matches. In this instance we are able to continue to source staff or consult with you regarding an alternative solution. New Shift Click to enter new shift. View Shift Basket Displays shifts that you have created and have not yet submitted for processing. Figure 7 5.1 Shift search buttons Shift Results Brings up your shift search for the date you have requested for a maximum 30 days date range. Outcome Type Allows you to see filled, unfilled, cancelled and unable to fill shifts. You may also choose to view only one category of shifts. • Unfilled Displays all shifts that are currently being processed. • Member confirmed Displays the shifts that have been filled but have not been confirmed back to you by the National Allocations Centre. • Filled Displays all the shifts that have been filled and confirmed with you. You can view the member’s details for both ‘filled’ and ‘member confirmed’ shifts by clicking on the view button. Advanced Options Filter by ‘Facility’ • Client/Campus (multi client users only) To display all shifts for a particular client check the box, select the client you wish to view then click the FIND button. • Ward To display all shifts for a particular ward, select the ward you wish to view then click the FIND button. Filter by ‘cost centre’ Displays all shifts for a given cost centre. Only cost centres in use are displayed. Enter the name/number of the cost centre then click the Find button. Filter by ‘member’ Click to display all shifts for a particular member who has previously worked at your facility. Fill in the members name then click on the Find button. Find Button Displays shifts based on the search criteria entered. Reports Button Press to display or print reports on usage for facility and/or divisions if access is available for this. Sign Out Click to end your HRLink session. 4 Page Counter Page 1 of 3 would indicate that you are on page 1 of total of three pages of data. 5.2 Headings on the shift results Shifts are arranged on the screen in rows, each row represent one shift. There are the following headings above each column: • Peach Unable to fill. • Grey Shift filled and confirmed with client. View Click on View button to see details of the shift Date Shift date and time. • Req (Required) The minimum level of experience necessary to fill the shift. e.g. RN 21, RN 1.3 Campus Identifies the campus the shift is booked for. e.g. Monash Medical Centre Clayton Campus. • View Photo By clicking on this box you will be able to see staff photographs if available. Ward Displays ward name, number etc. Each ward is connected to a cost centre. The cost centre is identified for the purposes of invoicing. • Work area/Qual The work area refers to the broad clinical field. e.g: critical care. The qualification refers to the specific skills or certificates needed e.g. certificate critical care. Member The name of the member who is to work the shift. Trade Trade requested, for example RN. Class Grade of the nurse/healthcare member. e.g. RN Grade 2 Yr 6 or RN 1.8 Outcome Filled/Unfilled/Cancelled/Unable to Fill/Member Confirmed. Please Note A colour-coding scheme is used in this column to represent the following: • Mauve Allocation in progress, shift yet. • Green Member confirmed. • Pink Cancelled by client. 5 • Qualifications Click to view current registration certificate. 6.0 How do I enter a new shift? Classification: Min Class Select class of person required to fill the shift i.e. The minimum year of experience e.g. RN 1.2 Will Pay Class If shift is to be paid above award rate, select rate at which person is to be paid, e.g. incharge shift. Date Field Type in the date when a shift is to be worked. Start time field Type in the time when a shift is to start. Alternatively chooses the morning/afternoon/night buttons to automatically default to your shift times. Please contact the National Allocations Centre if the default times require adjustment. Finish time field Type in the time when a shift is to finish. Figure 8 1. Click the ‘New Shift’ button located in the left hand menu column. 2. If you have set a default this information will appear, you use this or change the specifications as required: 3. Fill in shift parameters listed below. Client/Campus/Site Name Select location e.g. Monash Medical Centre Clayton Campus. Ward list box Select name of the ward. e.g. Ward 1 Trade list box Select trade of trade required. e.g. RN 21 Work Area The broad clinical skills a member will need. e.g General Acute. Qualifications Fine-tunes the work area. Select from the list the experience and/or qualifications needed to fill the shift. X= experience, C= certificate, X = general acute. 6 Meal Break Check Box Fill in time in minutes, standard meal break is 30min, if person is to be paid for the whole shift i.e. no 1/2 hour meal break deducted from total time. (Breaks are deducted automatically from all shifts longer than 5 hours) Shift Comments text box Type in any additional information needed about filling shift. i.e. Concessions for another member if the person requested is not available to fill shift, any special requirements. Reason for shift Choose the reason why the shift was needed. e.g. sick leave, roster shortfall. Options: Problem Flag Place a tick in the box if the start or finish times of a shift are uncertain. This is also used to highlight a shift that you wish to bring to the attention of the NAC staff. Request a member box Allows you to request a particular member for a shift. Gender Allows you to select gender specific requirements for your shift. 4. Click Add To HRLink 5. To add multiple bookings refer to section 7 Please Note You will not be able to cancel the shift once it has been saved. To cancel please call the National Allocations Centre. 7.0 How can I add multiple bookings? 8.0 How do I monitor the allocation process? By looking at the shift contact history, you will be able to view the progress of a shift. You can also identify the NAC operator who has performed the activity. To access this information, click View then click on the Shift Contact History. Traceability Indicates progress in activity on a shift. Once the shift is filled, the member’s name will appear in the member column. Please Note: If you have multiple shifts in for the same day, you will notice more contact in one shift as calls are logged against one of the multiple shifts. Figure 9 1. Add new shift - Refer to section 6 2. Then add shift to Basket 3. At any point you can edit or delete a shift that is in the Basket 4. When you have finished adding to the basket and are happy with your bookings you then click on ‘Order Basket’ Tips: Shift Basket Scroll the mouse over the date of the shift and it will display the ward and trade details of that particular shift. 7 Figure 10 9.0 How do I cancel a shift? Please contact the National Allocations Centre by telephone to cancel a shift. 10.0 How do I approve a shift online? For technical support issues please contact: When the member presents their timesheet at the end of the shift, the details can be checked off against the details presented by the system. Thank you for using the HRLink Client Terminal. Should you experience any difficulties or require assistance please contact the Client Support Team. • • • • • • Phone : 1800 008 728 Email : [email protected] Start and finish times Ward Meal breaks Pay rate Reason Certificates Timesheets with correct corresponding details to those on the system can be approved by checking the ‘approved’ button. Any inaccuracies can be corrected by entering the shift via the ‘view’ button and amending the details. If you discover an error after approving a shift, you are able to ‘unapprove’ the shift, re-edit it then reapprove the shift. Once you have approved the shift, it is not possible for Nursing Australia staff to alter the shift unless you “unapprove” the shift first. For further training in this area please speak to a Client Support Representative. 11.0 Additional Important Information Shifts booked directly over the phone will still appear on your screen. Likewise, if the member is confirmed by phone his/her name will still appear. When performing general shift edits, make sure you click on the update to basket, not Add to basket. 8 If you wish to send an email when using the Client Terminal, simply click Contact Us located on the orange bar at the top of the screen.