1
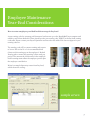
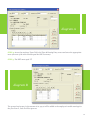
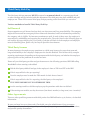
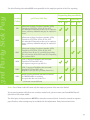
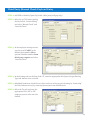
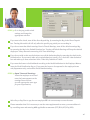
2013
PayLoad Year-End Guide Book
Table of Contents
2
Processing Deadlines
3
Employee Maintenance Year-End Considerations
5
PayLoad Information Regarding W-2s
7
Tax Information
7
Adjustment Payrolls to Consider
7
Manual and Void Check Entry
9
Group Term Life Insurance Entry
10
Moving Expense Entry
12
Third Party Sick Pay Entry
15
Bonus Payrolls
17
Receiving Year-End Upload and Update Files
19
Backing up 2013 QTD/YTD
21
Information for Sage Abra HR Clients
22
Schedule Generation
23
Instructions for completing W-2C
25
Forms
25
Year-End Questionnaire (Form 1)
27
Tax Filing Report Balancing Worksheet (Form 2)
28
Request to Increase ACH Limit (Form 3)
29
Special Payroll Processing Request (Form 4)
30
Client W-2C Checklist (Form 5)
PayLoad Processing Deadlines
Standard PayLoad Deadlines
BenefitMall must receive all payroll information by the deadline in the payrollprocessing contract, two business days prior to the check date. Any PayLoad
payroll information, such as adjustments, received after the deadline
may not be processed timely due to necessary processing and handling
time.
Clients that use BenefitMall’s tax processing service will be responsible for penalties
and interest that may arise from payroll information received after the deadline.
Year-End Deadlines
Adjustments may be made for the year 2013 up to NOON Central time on January 8,
2014. Any adjustments needed to correct payroll information after January 8, 2014, will
have to be in the form of a W-2C. Adjustments can be made any time prior to January 8, 2014, as
long as your database has not been closed for the year.
31st 27th
Tax Deposit Deadlines
December 27, 2013
$100K Tax Liability – Employers whose federal tax liability in a payroll deposit
period is $100,000.00 or more (or any December 31, 2013, adjustments combined with a
December 31, 2013, payroll totaling $100,000 or more tax liability) are required to deposit the
taxes to the IRS on the first business day following the check date. Therefore, in order to ensure a
timely federal deposit on January 2, 2014, BenefitMall must receive the transmission file no later
than NOON Central time, December 27, 2013.
December 31, 2013
Less than $100K Tax Liability – Employers whose federal tax liability (or December
31, 2013, adjustments combined with December 31, 2013, payroll totaling less than
$100,000.00 in tax liability) and are required to deposit the taxes to the IRS on a semiweekly
basis, the third business day following the check date. Therefore, in order to ensure a timely
federal deposit on January 4, 2014, BenefitMall must receive the transmission file no later than
NOON Central time, December 31, 2013.
2
Employee Maintenance
Year-End Considerations
How to enter employer-provided health coverage in PayLoad
A new earning code for company paid insurance has been set up on the BenefitMall host computer and
added to each client database. Clients should see the new earning code “EPRH” in the PayLoad earning
code table. Please contact your Payroll Specialist and have the code added if it does not appear in your
earning code list.
The earning code will be a memo earning and reports
to box 12-DD on the W-2. It is recommended that
clients set this earning up on the employee’s Default
Earning tab to ensure the reporting is done each pay
period. The amount the client enters in the employer
health earning must reflect the employer portion plus
the employee contribution.
Below is a sample data entry screen from PayLoad,
which shows the coding:
sample screen
3
Employee Audit
Have employees verify their Social Security number (SSN), name and address prior to your last payroll
in December and notify your Payroll Specialist with corrections.
verify
1
2
3
Social Security Number
Address
Name
In order for the name to appear correctly on the employee’s W-2 it must be formatted
as such: LASTNAME, FIRST MIDDLE (initial or name – as indicated on their SSN card)
Example: SMITH, JOHN MATHEW
The name field in PayLoad is 40 characters long.
The only comma allowed is after the last name. The middle initial OR name is
separated from the first name with a single space. There are no periods.
Names entered without this format will not print properly on the W-2. The name must
match the employee’s Social Security card. Errors on SSN or name can prevent posting
of employee’s wages to their Social Security record.
Retirement Plan
If an employee is an ACTIVE participant of a qualified
pension plan (making contributions to the plan),
it is not necessary to check the pension box in the
“Employee Maintenance Job Tab” of PayLoad. If the
Pension box is not checked on the Job Tab, and the
employee is making contributions to the plan, the
contribution amounts will print in the appropriate box
on the W-2.
If your retirement plan administrator requires that an employee who is “eligible” to participate
but does not participate be specified on the W-2, you must check the pension box in the “Employee
Maintenance Job Tab” in order to indicate they are not participating.
Sage Abra Users! Be sure to verify the Pension flag on the EMPMST panel in Abra.
4
Do You Have Employees in Puerto Rico?
Review Puerto Rico’s rules, and check your employee’s hours to see if you are required to pay the
mandatory Christmas Bonus due between the dates of December 1 and December15 (unless another
payment date has been agreed upon between employer an employees). Late payments increase the
required bonus.
W-2
There are also specific earnings and deduction codes that must be recorded on the W-2. Indicators
have been set up on the BenefitMall main frame to accommodate this break out. You will be required to
contact your BenefitMall Payroll Specialist and identify for them the following information:
1. Earnings codes
2. Deductions codes
Earnings codes that are classified as
commission, taxable allowances or
reimbursed expenses.
Deductions codes that are taxable
allowances, reimbursed expenses
(nontaxable) and contributions to a
retirement fund.
Your Payroll Specialist will update the earnings and deduction masters to reflect the codes that are
required to be denoted on the W-2. This must be done before the 4th quarter is closed.
PayLoad Information Regarding W-2s
W-2 Information for PayLoad
copies
A W-2 tape total report will be sent with the employee copy of the W-2s this will contain information
that may be necessary for future total reference. Refer to Form 1 (in the Forms Section this document)
to find the Tax Filing Reports Balancing Worksheet used to reconcile your quarterly and annual filings.
Employer copies of W-2s will be sorted and sent first by Corp Code/Active Status/
alphabetically by Name and then Corp Code/Inactive Status and alphabetically by Name.
Any client wishing to receive printed copies of the employer W-2 will be required to send
an email request to [email protected] prior to March 28, 2014.
The requested employer printed copies will be available and sent after January 31, 2014.
THE DEADLINE FOR REQUESTING EMPLOYER PRINTED COPIES from BenefitMall is
March 28, 2014. After this date any requests for reprints will be quoted and billable to the
client.
5
In addition to the employee printed copy of the W-2, BenefitMall will provide Instant W-2s to all
clients as well as in Online Reporting. The Instant W-2 option allows users to select one employee
for reprinting. This copy will be a replica of the Employee W-2 copy. The Online Reporting access allows
the user to reprint their entire employee database without selecting each employee. This will be a copy
of the Employer W-2.
Instant W-2 Information
As the employer, you will receive information via a website with your entire employee base included so
that you can reprint a W-2 copy any time you have a request. Employers will also have access to five
previous years of employee W-2 information. The W-2s will be available online in February 2014.
To access Instant W-2 log in to www.compupayonline.com
Enter the Client/Corp ID, Username & Password. If you have previously been granted
access to CompuPayOnline you may enter the same username and password. If you have not been
granted access or cannot remember your access information, contact your Client Support team for
assistance.
Select the Instant W-2 Tab on the top left-hand side of the screen.
To view an employee’s W-2, use the search options to find the employee and select Display W-2.
The six page W-2 form will be displayed allowing you to select the form(s) that need to be viewed or
reprinted.
Your employees will also have access to their W-2s online via PayView so they can reprint their
copies if necessary.
W-2s in Online Reporting:
https://online.compupay.com/ Reports/StandardReports.aspx
Enter your user name and password and account information in search.
Select Bank All (unless otherwise specified).
Select Standard Reports:
W-2: the first page will be blank, select the next page to view the W-2 information.
6
Tax Information
Online Tax Returns Enter your user name and password and account information in search.
Select the Tax Return.
Select your Corp ID from the drop down and the screen will refresh with a list of available tax
packages for viewing and printing.
Tax forms and changes for tax filers
Forward all preprinted tax forms to your BenefitMall Payroll Specialist; your Payroll Specialist will
ensure the forms are sent to the proper tax department. Send all SUTA rates and federal or state
frequency requirements for tax deposits as you receive them. Please include any new state ID numbers
from ones you have applied for recently and received or for any that have changed.
Please forward all notices labeled “2014 Tax Deposit Requirements” and “2014 State
Unemployment Rates” to BenefitMall your Payroll Specialist ASAP.
Adjustment Payrolls
to Consider
Manual and Void Checks
Be sure all manual and void checks have been processed prior to the processing of the final 2013
payroll.
Voids can only be processed with payroll earnings; be sure a pay period is open. Also, keep in mind that
the pay period being processed must have the same frequency as the check that is being voided. If you
are unable to meet these requirements (e.g. all payrolls for the year have been processed) please call
your Payroll Specialist for additional assistance.
All 2013 voids or manual check entries not completed and transmitted to BenefitMall
prior to closing the year will result in a W-2C and REQUIRE AMENDED RETURNS TO BE
COMPLETED.
7
Steps for Entering the Manual Check in PayLoad
If it is necessary to write a manual check for an employee AND BenefitMall on-site Check Calculator is
not being used to issue them, there are several steps that need to be taken.
1
2
3
Write (or type) the Manual Check to give to the employee. The Check Calculator can be used
to calculate the net amount of this check. The check can be written from a non-payroll account
or from the payroll account if preprinted manual checks are on-site. If manual check stock is
required from BenefitMall, call your Payroll Specialist to request up to 50 blank checks at a time.
Open a Manual Pay Period. This will instruct BenefitMall to record the manual check in the
system without processing an actual check.
To open a Manual PPD, go to Pay Period Scheduler on the PayLoad Suite Menu Screen. Once in
the Pay Period Search box, if the manual pay period has not been added to the schedule, select
Open PPD and add the pay period (see Chapter 5 of PayLoad User Guide for procedures on
opening the PPD).
The PPD should be the next scheduled pay period, such as B102 (biweekly, month of October,
second payroll of the month), with an extension that denotes an additional payroll. Typically,
an “M” is used to signify a “Manual” pay period. Therefore, B102M would be an appropriate pay
period format to add to the schedule using the same “root” pay period end date and check date.
Select the Switch Settings tab and ENTER the following adjustments:
Turn ON the Manual Check flag by clicking in the field.
Turn ON the Override Taxes flag by clicking in the field.
Turn OFF the Direct Deposit flag by deselecting the flag.
Determine whether Default Earnings should be left on or turned off. The Default
Earnings from the employee’s master file will populate the Time & Earning screen if this
switch is selected. A blank earnings screen will appear during Time & Earnings entry if the
flag is turned off. This will allow the user the opportunity to enter exactly what was paid to
the employee.
Determine whether Deductions should be left on or turned off. Deductions from
the employee’s master file will populate the Time and Earning entry if this switch is selected.
A blank deductions screen will appear during Time and Earnings if the flag is deselected. The
opportunity to include or delete deductions as necessary at the time of entry is available.
Determine whether Fixed Distributions should be left on or turned off. If
the Fixed Distributions switch is left on, earnings will be split according to the setup in
Employee Maintenance. If it is turned off, all earnings will default to the home unit and
department from the Job tab of Employee Maintenance.
8
Active
4
Record the Manual Check in Time and Earnings. This will record the manual check in the
system and update the employees’ YTD.
Open Time & Earnings.
Select the manual pay period from the pay period drop-down menu.
Select the employee record to be updated with the manual check information.
Enter the manual check number (the check number given to the employee).
Select the Override Taxes flag by entering “√” in the box. This will allow the entry of the
taxes in the tax tab.
Enter the hours or amounts into the Earnings tab.
Enter changes or adjustments to the Deductions tab.
Select the Tax tab and enter tax amounts from the Check Calculator.
The Net Amount field can either be left blank or the Net Amount entered. If left blank,
when Pay or Pay/Next is selected, the system will return an error message to indicate the
Net Amount will be changed from “0” to the amount calculated by the system. Select OK to
populate the Net Amount field.
If the amount calculated is different than the amount the check was issued for, select OK and
then return to the Earnings, Deductions or Tax tabs to correct the entry.
If the Net Amount matches what was given to the employee, select Pay or Pay/Next to record
the manual check entry when the PPD is transmitted for processing.
Group Term Life Insurance PayLoad Entry
Note: W-2GR is a non-cash earning code. It adds to the gross for FICA withholding but does not
affect the net. Since it is a non-cash code, you DO NOT need to offset the amount with a deduction
entry.
W-2GR is a non-cash earning code to be used when the FIT is not to be taken.
For Active Employees
The earnings code W-2GR /GLT must be used to enter these amounts.
It must be entered with the employee’s regular check on or before the last payroll
of the year.
You must enter W-2GR /GTL with other cash earnings in order to have money
to withhold FICA.
9
NonActive
For Non-Active Employees
If withholding for Social Security and Medicare was not taken while a former employee
was active, the employer must pay the applicable taxes on behalf of the employee and
report them as wages subject to employment and withholding taxes.
The employer may request reimbursement from the employee. If the employer will not
be able to obtain reimbursement, the tax must be grossed up and paid by the employer.
Moving Expense
The following earnings codes are available to use for recording moving expenses. Some of these are
non-cash earnings codes. They add amounts to employee’s gross pay, but do not affect the net of a
check. These are often used in an adjustment payroll during year-end processes.
GRUP: Cash Gross Up Amount. GRUP represents the tax amount paid by the employer. Enter in the
total of the taxes calculated in the gross up. Deduct this cash amount on the Tax Tab to net the
check to zero. The tax will be drafted and paid to the appropriate agencies.
MOVT: Non-Cash Taxable Earnings. Enter in the net amount of the moving expense reimbursement
before the gross up.
MOVD: Non-Cash Deductible Earnings. Enter in the amount that is deductible under IRS regulations.
This amount will populate Box 12 on the W-2 with Code P.
If you do not have the current earnings codes or are not sure which ones to use with your particular
circumstance, please call your Payroll Specialist.
See entry instructions on the following pages.
Moving Expense PayLoad entry
This example assumes $1,000.00 in reimbursed taxable moving expenses, $500.00 in deductible
(nontaxable) reimbursements. (see screen graphic on next page)
STEP 1: Select the employee in Time & Earnings.
STEP 2: Type the word CASH in the manual check # field.
(If you wish to print a check stub leave check# blank)
STEP 3: Check the Override Taxes box at the top of the screen.
10
diagram A
STEP 4: Access the employee Taxes Tab in the Time & Earning Entry screen and enter the appropriate
taxes (the sum of the taxes should equal the GRUP amount).
STEP 5: The NET must equal “0”
diagram B
The grossed-up income, in the amount of $1,441.96 will be added to the employee’s taxable earnings for
the year. Box 12, Code P will be $500.00.
11
Third Party Sick Pay
The third party sick pay amounts MUST be entered as a manual check, in a separate payroll and
no other earnings may be included with this adjustment. The third party may have withheld and paid
employee tax. There will be several third party sick pay earning codes from which you can select.
Various methods to handle Third Party Sick Pay:
Self-Insured
Some companies are self-insured and pay their own short-term and long-term disability. The company
might self-insure and have an agent process claims and determine, based on information provided by
the company, who is eligible. No insurance premiums are paid. In each of these cases, the employer is
responsible for withholding and reporting any required taxes. The codes listed on the following page are
not used for this type sick pay plan. If you need a code that will draft for both employer and employee
taxes for disability plans, please call your Payroll Specialist for assistance.
Third Party Insurer
In many instances, the employer pays premiums to a third party insurer who pays short-term and
long-term disability to the company’s employees who become disabled. This can have fairly complex
reporting requirements, depending on the agreement with the third party, and whether the employee
pays any portion of the premium on an after-tax basis.
Please call your third party provider and get the answers to the following questions, BEFORE calling
BenefitMall to have earning codes added:
Did the third party withhold and pay in the employee’s share of FICA and FIT to the IRS?
Who is responsible for the 941 reporting?
Does the employer need to make the FICA match for their share of taxes?
Who is responsible for the W-2 reporting, the third party or the employer?
IT IS VERY IMPORTANT TO DETERMINE THIS.
Are the earnings taxable or did the employee pay the premiums with after-tax dollars?
If the earnings are taxable, are they short-term (less than 6 months) or long-term (over 6 months)?
Other Agreements
There are other possible agreements with third parties. See IRS Publication 15-A, Section 7 for detailed
information.
Be sure you know how your plan works. Check with your plan administrator if you are unsure.
Failure to coordinate your reporting with your third-party’s reporting can cause IRS and SSA notices,
and possible penalty assessments.
12
3rd Party Sick Pay
Use the following codes when YOU are responsible for the employer portion of the W-2 reporting.
Reporting Responsibility
Earning
Codes
3SK
3SKX
3rd Party Sick Pay
Client’s
w-2
941
3rd Party’s
w-2
941
Short-term sick pay, less than 6 months. (STD)
Taxable for FIT, FICA, FUTA, SUTA*, SIT*.
We make the FICA match on the 941 for employer
share. 3rd Party withholds and pays in employee’s
share.
Short-term sick pay, less than 6 months. (STD)
Taxable for FIT, FICA, FUTA, SUTA*, SIT*.
We make the FICA match on the 941 for employer
share. 3rd Party withholds and pays in employee’s
share.
3SKU
Short-term sick pay, less than 6 months. (STD)
Taxable for FIT, FICA, FUTA, SUTA*, SIT*.
3rd Party does all 941, W-2, and FICA reporting.
We only need to do the FUTA and SUTA reporting.
Do not enter FICA.
3SKN
LTD - Long-term Disability, after 6 months.
Taxable for FIT and SIT* only.
We report as wages on 941 and W-2.
3SKZ
LTD - Long-term Disability, after 6 months.
Taxable for FIT and SIT* only.
Reports on our 941 only. 3rd Party issues W-2.
3SKE
Employee pays premium with after-tax dollars.
It is NOT taxable for anything.
It reports into Box 12J on the W-2.
* Each state can tax different
Note: Use of these codes will cause only the employer portion of the tax to be drafted.
If your earning master table does not contain a needed code, please contact your BenefitMall Payroll
Specialist to have them added.
The third party sick pay amounts MUST be entered as a manual check. It must be entered as separate
payroll and no other earnings may be included with this adjustment. Entry instructions follow.
13
Third Party Manual Check PayLoad Entry
STEP 1: Add PPD to schedule/Open Pay Period: (third party sick pay only).
STEP 2: Select the 3rd Tab when opening
the Pay Period, “Switch Setting”
and select “Manual Check” and
“Override Taxes”.
STEP 3: In the employee earnings screen,
type the word “CASH” as the
manual check number OR an
optional identifier number from
third party reports and select
“Override Taxes”.
STEP 4: In the Earnings tab use the Rate Code “0”, enter the appropriate third party sick pay Earning
Type and Amount to be recorded.
STEP 5: Scheduled Deductions should be zero (this can be set in the pay period setting by “deselecting”
the Take Deductions box) by removing the amount in the deduction tab.
STEP 6: Select the Tax tab and enter the
appropriate FICA, SIT or FIT
employer portion of the tax to be
drafted.
14
Bonus Payrolls
Many companies pay employees a bonus at yearend. The bonuses can be paid on the same check
the employee is receiving for the pay period or in
a separate check. Each option for bonus checks is
described in detail below.
Keep in mind that effective this year all payroll
transmission files containing ACH deposits are
subject to ACH limits established by BenefitMall.
Therefore, if you are planning an additional bonus
payroll you may need to request a one-time ACH increase. Submit Form 3 (in the Forms section of this
document) to request an increase.
Note: According to the IRS, bonus wages are considered taxable income subject to all employee and
employer taxes. Refer to your IRS publication on supplemental wage guidelines for the federal income
tax conditions.
Earning Code for Bonus Amounts
If you want to have a bonus taxed at 25 percent FIT and don’t already have a code set up, please call
your Payroll Specialist. Your Payroll Specialist will set up a new earning code which can have a ‘built in’
25 percent FIT tax rate. This will allow the regular earnings to be taxed as usual, with the bonus amount
being taxed at the supplemental rate.
Method 1
Paying Bonus Amounts on a Separate Payroll Check
STEP 1: Open a new pay period - if the pay period has a different ending date or check date
than the regular earnings pay period, add another pay period to your schedule prior to
transmitting. Complete and fax Form 5 (in the Forms section of this document) to your
Payroll Specialist prior to transmitting the special payroll. Refer to Appendix A of the PayLoad
User Manual for procedures on adding an additional payroll to your schedule.
STEP 2: DO NOT select AUTOMATICPAY unless you intend to pay all your AutomaticPay
employees their default salary.
15
STEP 3: Go to the pay period switch
settings and change the
appropriate switches.
If you want a live check, turn off the direct deposit flag, by removing the flag in the Direct Deposit
box. Turning this switch off will only affect the specific pay period you are working in.
If you do not want the default earnings lines in Time & Earnings, turn off the default earnings flag,
by removing the flag in the Default Earnings box. Turning off Default Earnings will keep the salaried
employees’ salary amount from moving in to Time & Earnings.
If you do not wish to take any deductions, turn off the deductions flag by removing the check in the
Deduction box. If you want to take only certain deductions (401(k), etc.), check the “take deduction”
box and make up to three selections in the “Take Only Deductions” fields.
If you want the bonus to be distributed according to the fixed distributions in the Employee Master,
leave the Fixed Distribution flag on. If you want the bonus to be expensed to the employee home
unit/department only, uncheck the Fixed Distribution flag.
STEP 4: Open Time and Earnings.
Locate the employee record and
enter the bonus amount on the
earnings line as follows.
(use the appropriate earn type
for your organization)
Select Pay or Pay/Next to pay the next employee IF it is not necessary to enter the taxes.
Please remember that if it is necessary to use the state supplemental tax rates, you must address it
by overriding taxes and entering ALL applicable tax amounts (FIT/FICA/SIT/City/SDI).
16
Method 2
Paying Bonus Amounts on the Employee Regular Payroll Check
STEP 1: Select the employee in Time & Earnings and retrieve their earnings record.
STEP 2: Move to the next available earnings line (down arrow on keyboard or click on the + button on
the Browse Keys).
STEP 3: Enter the earning line using the appropriate bonus earning type and amount.
STEP 4: Select Pay Or Pay/Next to pay the next employee.
Receiving the PayLoad
Year-End UpLoad and
Update Files
IMPORTANT INFORMATION – PLEASE READ CAREFULLY!!
When your last payroll and all adjustments are processed (date indicated on the questionnaire),
BenefitMall will proceed in the year-end closing process.
It is very important that you DO NOT make any changes in PayLoad after your last payroll
transmission file has been sent.
BenefitMall will create a YEAR-END UPLOAD and will contact you when the file is ready to
receive.
As with all UPLOAD files received from BenefitMall, it is imperative that you pick up the file
before any changes are made in PayLoad.
To Receive the Year-End Upload
Select the down arrow from your quick keys in PayLoad and follow the prompts
as indicated. If you receive an error message indicating changes have been found
PLEASE CONTACT YOUR PAYROLL SPECIALIST IMMEDIATELY.
Failure to receive the final upload prior to making employee maintenance changes for
2014 OR opening a 2014 pay period may result in DATA ISSUES THROUGHOUT THE
UPCOMING YEAR.
17
Receiving the Year-End upload will complete the following processes:
Purge termed employees who did not have any earnings for the current year.
Purge employee deduction codes that have a stop date or a target date that has been met prior to
the year-end.
Reset target amounts for deductions such as 401(k), 401(k) Catch-up and 403(b).
NOTE: If your employees are setup in PayLoad with a current target less than the
maximum limit for 401(k), the targets will NOT update for 2014.
This means that for those clients who have employees with more than one retirement deduction
(e.g. Roth IRA and 401(k)) set up on two different codes the target amounts are currently less
than $17,500 and will not be updated to the 2014, $17,500 limit. The client will be required
to manually increase the target amounts according to how each employee wishes to
distribute their contribution for the new year.
For clients who currently utilize one target for both the 401(k) and 401(k) Catch-up code, the target
amount will reset the target of $23,000 for 2014.
For those clients utilizing two separate codes for 401(k) and 401(k) Catch-up and the target is
currently set to $17,500 and $5,500 limits the system will reset the targets to $17,500 and $5,500
respectively.
System Maintenance Processes
AFTER RECEIVING THE YEAR-END UPLOAD PLEASE COMPLETE THE FOLLOWING
SYSTEM MAINTENANCE PROCESSES:
System Check
The System Check reindexes, or updates, the main operating system files of PayLoad Suite.
To perform a System Check:
STEP 1: Choose the Utilities menu. Select System Check
STEP 2: The System Check dialogue box will open; click Start to begin the System Check.
18
Health Check
Health Check validates the integrity of pertinent files and reduces the amount of disk space by
defragmenting each PayLoad Suite file within the current group.
If PayLoad Suite is being used on a network all users must be logged out of the group when Health
Check is being performed.
To perform a Health Check:
STEP 1: Choose the Utilities menu. Select Health Check.
STEP 2: The Health Check dialogue box will open; click Start to begin the Health Check.
The Pack Files option is located at the bottom of the BenefitMall Checks screen. Entering a “√” in
the Pack Files and selecting either the Health Check or System Check box will accomplish removing
the deleted records.
Employee Check
Employee Check is a system security file, which verifies that each employee SSN is a unique number.
By running the Employee Check, the system will verify that the employee does not exist in the
current data file.
To perform an Employee Check:
STEP 1: Choose the Utilities menu. Select Employee Check.
STEP 2: The Employee Check dialogue box will open. Select Start to begin the Employee Check.
To Receive the Update File in PayLoad Reports
Select the PayLoad Reports quick launch icon, click on the UPDATE icon and
follow the prompts as indicated. Once you have received your last Update file for
2013, all of your employee PayDetail from 2013 and prior years will be available
to report on in PayLoad Reports. However, clients wishing to save 2013 QTD/
YTD files will need to back up the files before receiving the first Update file of 2014. Receiving your
first Update file of 2014 will override the QTD/YTD PayLoad Tab information.
Backing up 2013 QTD/YTD Files
STEP 1: Open PayLoad Reports and select Update to receive any QTD/YTD files that may have
been created during year-end adjustment payrolls. If there are no file(s) to pick up you will
receive a message indicating there are no file(s). If you have just processed payroll there
should be an Update file to receive, contact your Payroll Specialist and they will create a file
for pickup.
19
STEP 2: When you have received your last Update file for 2013, you are ready to back up the 2013
files before you receive the first update of 2014. If you wish to save (by backing up) the QTD/
YTD 2013 files please follow the procedures outlined below.
STEP 3: Use Windows Explorer to navigate to the Data directory for PayLoad.
(<Drive>:\Pmx\Winpay\Pay####)
Create a new Folder by going to File > New > Folder > and name it “2013”.
STEP 4: Find the files in the Data directory called Rpt.DBF and Rpt.MDX. Highlight both files and
Copy from the Edit Menu.
STEP 5: Double click on the new folder called “2013”and select Paste from the edit menu. This will
create a copy of the QTD/YTD files for future use.
If you have more than one PayLoad ID you must complete the steps 3 through 5 for each ID.
Restoring QTD/YTD Files from Backup
STEP 1: Using Windows Explorer, navigate to <Drive>:\Pmx\Winpay\Pay####\2013.
STEP 2: Highlight the Rpt.DBF and Rpt.MDX files and choose copy. DO NOT cut and paste these files
so a copy will always reside in the 2013 directory.
STEP 3: Navigate back into the Data directory (Pay####) by selecting the back button on your menu
bar.
STEP 4: Find the existing Rpt.DBF and Rpt.MDX files and rename them. We suggest just adding one
character to the names so you can still identify the files. (E.g.: xRpt.DBF and xRpt.MDX).
STEP 5: Choose Paste from the file menu. This will copy the backup files into the current directory.
Log in to PayLoad and run a health check to reindex the files.
STEP 6: The files can now be viewed through employee maintenance or PayLoad Reports QTD/YTD
reports.
To Restore current QTD/YTD files
STEP 1: Either rename or delete the existing Rpt.DBF and Rpt.MDX files.
STEP 2: Find the Rpt files that were renamed earlier and change the names back to Rpt.DBF and Rpt.
MDX. OR wait until the first Update file for 2014 is received.
The QTD/YTD information in the RPT databases will be replaced with the current year’s
information. If you choose this method, be sure you leave the copied files in the 2013
backup folder. Once an Update file for 2014 has been received it will overwrite the
2013 information, which cannot be recovered.
STEP 3: Log in to PayLoad and run a health check.
20
Information for Sage Abra HR Clients
The PayLoad Year-End process does “housekeeping” in the employee master file. Any employee record
that does not have earnings during the calendar year will be deleted. Also, any deduction codes in an
employee record that were not used during the year will be deleted from the employee record. This
is an important consideration for HRLink IMPORT clients who link data from the Abra
system into PayLoad. You may choose any of the following methods to maintain your Abra HR
employee records.
Procedures for stopping terminated employees from linking to PayLoad
The HRLink interface has a switch setting for the “Import” link process to ignore terminated employee
records if the employee’s Abra status is “T” and the Abra termination date is less than the first day of the
current year, and the employee record does not exist in PayLoad.
The PayLoad data will be refreshed during the end of year process; however, the employee records in
Abra will not be affected in any way. This allows you to keep multiple years of history in the Abra HRIS.
If you wish to eliminate old terminated employee records from your Abra database (NOT A
RECOMMENDED PRACTICE), you may use one of the following options:
Delete the employee record in Abra
Print the employee profile report and any other reports for which you wish to maintain paper
copies. When you are finished deleting unwanted records, be sure to run the Reform Index and the
Optimize database processes.
Archive terminated employee records
Records will be removed from the HRPERSNL.dbf but some pieces of information from
demographics and job will be stored in an archive database. This information is available only
through your Abra report writer and cannot be restored to the active Abra databases.
Setting the Pension/Retirement Flag in PayLoad
The Pension/Retirement flag in Abra HR is selected on the EMPMST Custom Detail/Page and will link
to PayLoad during the HRLink process. Please review the employees EMPMST Custom Detail/Page
to ensure those employees eligible to participate in a qualified pension/retirement plan and are not
participating have the flag selected. You may find it helpful to create a report in Abra to show you the
employees eligible to contribute to a retirement plan and verify their record specifically.
System Maintenance: System Check/ Health Check/ Employee Check
If you have access to PayLoad please complete the maintenance processes outlined (on page 18 of
this document ) after the Year-End UpLoad has been received from BenefitMall. Otherwise have your
Payroll Administrator complete the processes.
21
Schedule Maintenance Generating
2014 Payroll Schedules
PayLoad Schedule Maintenance
With the schedule maintenance capability, clients will be responsible for creating and
maintaining their own payroll schedules. This will give the client the flexibility to
create, change and add new items to their schedules as the need arises. The Schedule
Maintenance option can be accessed from the Pay Period Search screen in PayLoad.
There are two important buttons on the Pay Period Search screen:
1
2
Schedule Maintenance
The Schedule Maintenance Button takes you into the schedule maintenance screen where
the generation of your schedule may be completed for the entire year, an existing pay period
changed or verified for possible check dates falling on bank holidays.
Schedule Report
The Schedule Report Button takes you into the schedule report screen so hard copies of
schedules can be printed for record or distribution purposes.
The schedule generation portion of Schedule Maintenance is used for the mass generation of a payroll
schedule. The complete document for generating your schedule is included in Appendix “A” of the
PayLoad User Guide. Using the Schedule Generator is a much quicker way to create the pay periods
rather than adding each pay period code item separately.
Before a schedule can be generated, several types of information need to be supplied.
The pay frequency (weekly, biweekly, semimonthly, monthly or quarterly) must be selected.
The first PPD ending date and the first PPD check date must be supplied for each payroll bank code.
The bank codes loaded for selection are those that are available in the current PayLoad group and
one must be selected before continuing with the schedule generation.
The STOP at Calendar Year End option is selected as the default so that no PPD beyond the end
of the year will be generated. Deselect this switch to create the upcoming year schedule. The holiday
schedule for 2014 has been loaded and is available for generating 2014 schedules.
NOTE the semimonthly schedule creator has been modified in PayLoad Version 6.6.3 to offer a more
flexible selection criterion. If you are not using PayLoad Version 6.6.3 and need assistance creating your
semimonthly calendar, please contact your Payroll Specialist.
22
Instructions for Completing a W-2C
BenefitMall encourages clients to issue W-2Cs that require name changes or Social Security number
changes only. In these specific cases, the client can file the necessary amendments with the appropriate
state/federal agencies on their own or, for a fee, they can send it to BenefitMall to file. For full details,
see Instructions for Forms W-2C and W-3C, downloadable from the IRS web site. If you need the
W-2C fillable form, please contact your Payroll Specialist and they will be happy to send it to you.
Alternatively, you can download the forms from the IRS website.
Social Security and/or Name Change Only and Check Boxes
Should you find the need to correct an employee’s name or SSN, you will issue the employee a Form
W-2C to correct the original W-2 with the erroneous information. It is to your benefit to process
your own W-2Cs and W-3Cs, to correct W-2s that were issued under the erroneous name or SSN.
If BenefitMall prepares and processes these documents, you will be charged a fee for doing so.
Electronic Creation: this site allows employers to complete the W-2C and W-3C online:
http://www.ssa.gov/employer/bsohb-usingTheServices.htm#W-2conline
distribution
If you create the W-2C manually, you will distribute the employee his/her copies of the W-2C (see chart
below), the employee will need to file both the W-2 with the erroneous information and the W-2C with
the correct information. Use the chart below to determine how to distribute the W-2C and W-3C
information and distribute accordingly.
Document/Page
Description
Client send to
W-3C
Transmittal of Corrected Wage and Tax Statements
Social Security
Administration
(address is on form)
W-2C / Copy A
For Social Security Administration
Social Security
Administration - along
with W-2C forms
W-2C / Copy 1
State, City, or Local Tax Department
It is not necessary to
send Copy 1 to the state
or local authority
W-2C / Copy D
For Employer
Employer keeps this
copy for their records
W-2C / Copy B
To Be Filed With Employee’s FEDERAL Tax Return
Give this copy to the
employee
W-2C / Copy 2
To Be Filed With Employee’s state, city, or Local
Income Tax Return
Give this copy to the
employee
W-2C / Copy C
For EMPLOYEE’S RECORDS
Give this copy to the
employee
23
ALWAYS fill in employee and employer identification boxes a through i.
To correct - If the SSN was incorrect, complete Box f (Incorrect SSN), as well as Box
d (Correct SSN). To correct name, complete Box h with correct information, check
the check Box e, and enter the incorrect name in Box g.
If one of the Box 13 check boxes for Statutory Employee, Retirement Plan or Third
Party Sick Pay is checked or not checked correctly, complete the W-2C portions
reading ‘Previously Reported’ and ‘Corrected’ to check or not check the box, as
needed.
Correcting Federal and State Wages
and/or Tax
BenefitMall will complete any W-2Cs that involve wage
adjustments. This includes voids, additional earnings, and
moving of wages. BenefitMall will complete the W-2Cs
along with the necessary amended returns for federal and
state agencies.
BenefitMall will handle all W-2Cs that involve wage and/or tax adjustments in order to ensure proper
completion and handling. If you wish to complete your own W-2Cs, BenefitMall asks that you complete
the necessary amended returns.
24
Year-End Questionnaire
Form 1
PLEASE COMPLETE THE FOLLOWING QUESTIONNAIRE AND RETURN TO YOUR PAYROLL
SPECIALIST AT BENEFITMALL BY Monday, December 16, 2013.
Email the questionnaire to your Payroll Specialist.
[email protected] • [email protected] • [email protected]
We appreciate your prompt response and look forward to serving you in the coming year!
Company
Contact
PhoneFaxEmail
1. Will you have end of year adjustments? Yes
No
Note: Adjustment payrolls include but are not limited to: moving expenses; manual checks, third
party sick pay, taxable fringe benefits, voided checks, etc.
If you are processing an adjustment payroll and adding it to your schedule maintenance at yearend, complete and return the Special Payroll Form 5 (in this document) to your Payroll Specialist.
This form must be submitted prior to transmitting your payroll to ensure that
requested processes will be handled correctly (e.g. should accruals be run? should the
401(k) file be run?). BenefitMall will not be responsible for tax penalties incurred as a result of a
late adjustment payroll run.
2. Will you be processing an end of year bonus payroll? Yes
No
In order to protect our clients’ assets against fraud, BenefitMall has assigned an ACH limit to each
direct deposit and OnePay® client that is in line with their typical payroll direct deposit amounts. If
you are processing a bonus payroll and it will affect your BenefitMall ACH limit for direct deposit
and One Pay, please complete the Request for ACH Increase Form 3 (included in this document).
The request to increase your limit must be approved prior to sending your transmission file.
3. When will you be ready for BenefitMall to close your database for 2013?
The 2013 database MUST be closed prior to processing ANY 2014 payrolls. This includes ALL payroll
banks associated with the database. PLEASE coordinate the closing date with your corporate office.
DATE:
/
/
AS OF THIS DATE WE WILL NO LONGER PROCESS ANY
2013 PAYROLLS. **If you need to change this date, call your Payroll Specialist IMMEDIATELY,
otherwise your database, (including all banks within that database) will be closed on the date you
have indicated here!**
4. Have you verified the legal name and addresses for all corporations? Yes
Your federal ID number? Yes
No
Your state unemployment account number? Yes
Your state and local withholding numbers? Yes
No
No
No
This information can be verified by reviewing your quarterly tax filing statements.
5. Have you created your new payroll schedule(s) for 2014? Yes
No
If not please do so before year-end.
6. Do you work with a third party insurer to provide sick pay/disability? Yes
No
25
Thank You!
Thank you for taking the time to complete the 2013 End of Year Questionnaire and email it back to your
Payroll Specialist. Your prompt response will help to ensure a smooth year-end processing schedule.
We appreciate your help and look forward to another successful year!
Payroll Specialist Emails:
[email protected]
[email protected]
[email protected]
26
Tax Filing Report Balancing Worksheet
Form 2
You should verify that the amounts reported on your Quarterly 941 Reports filed with the IRS, balance with your annual W-3 Report filed with the
SSA. Any discrepancy can result in the generation of IRS/SSA notices. Use the worksheet below to reconcile your quarterly and annual filings. Your
“Total 941” amounts should match your “Form W-3” amounts for each row (i.e. – there should be no variance between the two).
It is especially important to balance your IRS and SSA filings if BenefitMall was not the only payroll service provider you
used this year to file and pay taxes for any given federal employer identification number.
Quarterly Reports – Forms 941
Reconciliation Items
1st Qtr.
2nd Qtr.
3rd Qtr.
4th Qtr.
Total 941
Variance
(Add 1st, 2nd,
(“Total 941” minus
3rd & 4th Qtr). Form W-3 “Form W-3” amount)
Wages, tips and other compensation
(Form 941, Line 2 / Form W-3, Box 1)
Federal income tax withheld
(Form 941, Line 3 / Form W-3, Box 2)
Taxable Social Security wages
(Form 941, Line 5a, Column 1 / Form W-3, Box 3)
Social Security tax withheld
(Form 941, Line 5a, Column 2 / Form W-3, Box 4)
Taxable Social Security tips
(Form 941, Line 5b, Column 1 / Form W-3, Box 7)
Taxable Medicare wages & tips
(Form 941, Line 5c, Column 1 / Form W-3, Box 5)
Medicare tax withheld
(Form 941, Line 5c, Column 2 / Form W-3, Box 6)
Advance EIC payments
(Form 941, Line 9 / Form W-3, Box 9)
27
Request to Increase ACH Limit
Form 3
It may take up to two business days to review and decision this request.
Subject to credit department approval.
ATTENTION: BenefitMall
EMAIL: [email protected] • [email protected] • [email protected]
List the bank groups for which you are requesting an ACH increase and the respective amount you
are requesting. Additionally, please mark whether the increase is a permanent change (i.e. increased
workforce, increased salaries, etc.) or a one-time change (i.e. bonus, commission, extraordinary
payout). If it is a one-time change, please advise the check date for the extraordinary payroll. If more
than 3 bank changes are needed, submit an additional form.
Company (Legal Name)Phone
Address
HIP Account
Permanent
Bank Group
Corp ID
Limit Requested
One time need for check date of
Reason for Increase
Company (Legal Name)Phone
Address
HIP Account
Permanent
Bank Group
Corp ID
Limit Requested
One time need for check date of
Reason for Increase
Company (Legal Name)Phone
Address
HIP Account
Permanent
Bank Group
Corp ID
Limit Requested
One time need for check date of
Reason for Increase
Authorized Signature
Print Name and Title of Authorized Representative
Your Payroll Specialist will correspond with you when your account has been reviewed.
Credit Department Internal
28
Special Payroll Processing Request
Form 4
Your Payroll Specialist must be notified PRIOR to payroll file transmission to BenefitMall!
Client
Payroll Bank
Pay Period Code
Ending Date
Check Date
The check date cannot be prior to the day on which payroll is transmitted.
Should accruals be run on this additional pay period?
Y
Will direct deposit be turned on for this payroll?
N
Transmit Date:
M
T
W
Th
Y
N
F
Special instructions for this pay period:
Will this payroll increase the combined FIT & FICA tax liability to $100,000.00 for this pay date?
BenefitMall is not responsible for tax penalties incurred due to late payroll
transmission.
Client Signature
BenefitMall Payroll Specialist Email Addresses:
[email protected] • [email protected] • [email protected]
BenefitMall Use Only
Salesforce Case #:
Date added to schedule:
Date Processed:
CSA:
cc: Production Manager
Check Date:
29
Client W-2C Checklist
Form 5
Return this form with the W-2C(s). Depending on the type of correction(s), filing a W-2C incorrectly
can result in account imbalances and subsequent notices calling for further corrections. Please complete
this form entirely and accurately in order to ensure that your W-2C(s) are processed correctly.
EMAIL: [email protected] • [email protected] • [email protected]
Contact
Date
Company
FEIN
Phone Number
Number of W-2Cs
Detailed reason must be provided. It is part of the required information submitted with the amended
returns.
Period of Error
(Month / Quarter)
Date
Discovered
Detailed Reason for Correction
(i.e. void check, third party sick pay, etc.)
Use additional forms if different issues exist
Have all over-collected Social Security and Medicare taxes for the prior calendar year been repaid
to employees? (Year addressed on the W-2C). Please note whether the credit or refund due was
never withheld from the employee wages. (For claims of over-collected employee Social Security and
Medicare taxes in earlier years, a written statement must be obtained from each employee stating that
the employee has not claimed and will not claim refund or credit of the amount of the over-collection).
This statement is an affidavit, and should contain an “under penalty of perjury” statement, or the refund
could be denied to the employer by the IRS.
Tax has been refunded and affidavit received.
Have tax deposits been made for any amounts due?
Credit or refund amount due was never
withheld from employee wages.
Yes (If yes, please attach proof of payment)
No
Adjustment waiver has been signed and included with W-2C checklist.
30
©2013 BenefitMall. All rights reserved. BenefitMall, the BenefitMall Logo, the BenefitMall ALL TOGETHER, BETTER Logo, the ALL Logo, ALL TOGETHER, BETTER and CompuPay are trademarks or registered
trademarks of Centerstone Insurance and Financial Services, Inc. d/b/a BenefitMall or its affiliates in the U.S. California License #063979. *All other trademarks are the property of their respective owners.