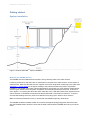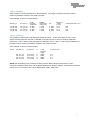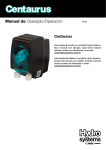
1
CEETIDE ™ User Manual Version 1.27.02 www.ceehydrosystems.com CEETIDE™ User Manual V1.27.02 Copyright This manual is copyright © 1992-2010 Bruttour International Pty. Ltd. All rights reserved. This manual, or parts thereof, may not be reproduced or transmitted in any form or by any means, electronic, mechanical, photocopying, recording or otherwise, without prior written permission of Bruttour International Pty Ltd except on "an in-house" basis by Users of the CEE range of Hydrographic surveying equipment and software, for the express purpose of their own use. The following known Trade Marks or Trade Names may appear in this manual and are used in an editorial context in the text with implied benefit to the Owners of those Trade Marks or Trade Names with no intention of any infringement of those Trade Marks or Trade Names: HYPACK, Ashtech, Siemens, THE PROBE, Probe LU, Probe LR, SITRANS, Milltronics, LEMO, SATELLINE, SATEL, Microsoft, HyperTerminal, Windows, and any variants, severally thereof. Notice of Liability The information in this book is distributed on an "as is basis" without Warranty. Every effort has been made to ensure accuracy in the accuracy of the information contained in this book but neither Bruttour International Pty Ltd, nor its Employees and Associates shall have any liability to any person or entity with respect to liability, loss, consequential loss, or damage caused directly, or indirectly, by the use of the information in this book. CEEDUCER PRO TM TM and CEETIDE are registered TRADE MARKs of: Bruttour International Pty. Ltd. FCC Information for the USA This equipment may radiate radio frequency energy which could cause interference to radio and television reception. The equipment has been tested and found to comply with the limits of a Class A computing device pursuant to part 15 of the FCC rules. The equipment is also believed to comply with the requirements of a Class B computing device but has not been tested thereto. This equipment was tested for compliance under conditions that included the use of shielded cables and connectors between it and peripherals. It is important to use shielded cables to reduce the possibility of causing, or suffering from, the effects of radio interference. For Users in the USA, the booklet published by the FCC and entitled "How to identify and resolve RadioTV interference Problems" may be of help. Copies can be obtained from: The US Government Printing Office WASHINGTON DC 20402 Stock No. 004-000-00345-4 2 Contents Quick reference guide ................................................................................................................................. 4 Introduction .................................................................................................................................................. 5 System Description .................................................................................................................................. 5 System Options ....................................................................................................................................... 5 System Operation .................................................................................................................................... 6 TM The CEETIDE Unit ................................................................................................................................... 7 Front Panel .............................................................................................................................................. 7 Connections ............................................................................................................................................. 9 Getting started ........................................................................................................................................... 10 System installation ................................................................................................................................. 10 System Configuration ............................................................................................................................ 13 TM operational considerations................................................................................................. 18 TM menu system options ......................................................................................................... 21 TM Utility software ................................................................................................................... 28 TM download formats .............................................................................................................. 32 TM Real time output formats ................................................................................................... 33 CEETIDE CEETIDE CEETIDE CEETIDE CEETIDE Appendix A – hardware details .................................................................................................................. 36 Physical Properties – CEETIDE™ control unit ...................................................................................... 36 Electrical Properties ............................................................................................................................... 36 UHF Modem .......................................................................................................................................... 36 GPS Properties ...................................................................................................................................... 36 Serial Output data .................................................................................................................................. 37 Appendix B – cable details ........................................................................................................................ 38 Appendix C – probe details ....................................................................................................................... 40 Milltronics THE PROBE Dimensions ..................................................................................................... 44 Appendix D – remote command options ................................................................................................... 47 Appendix E – Download example via HyperTerminal ............................................................................... 53 Index .......................................................................................................................................................... 55 3 CEETIDE™ User Manual V1.27.02 Quick Reference Guide To setup the CEETIDE™ acoustic tide gauge system you will need the CEETIDE™ control box and the probe with a suitable mount. − Select a position for the probe that will have a clear projection to the water surface at all times with a minimum range of 50cm at the highest water level. The ground should not be exposed at low water, no vessels should be moored under the probe and there should be no structures or interference within the beam footprint (see Appendix B in user manual). The height of the probe face above datum should be measured and recorded for later use. − Connect the external power source to the CEETIDE™ (the internal battery is designed for short term, backup use only) − Connect the probe data cable to the CEETIDE™ control unit and turn the system on. The screen will remain blank however the LED’s on the left side will light up indication the system is operating. Press the DISPLAY key to turn on the screen. The probe will take a short time to stabilise before suppling a distance reading. − Unlock the keypad by simultaneously pressing the ENTER key and the MENU key and hold for 3 seconds. Press the MENU key again to display the setup options. Set the clock date and time as required. Press the ENTER key to confirm settings then press the MENU key to go to the next menu option. − Select the Probe Height option and enter the measured height of the face of the probe above (or below) the datum (in metres) to be used to reference the water level. Press the ENTER key to set the height value then press CLEAR to go back to main tide profile view or press MENU to adjust another setting. − If required change the logging interval and measure period to suit your requirements and location. The CEETIDE™ will start recording water levels automatically once the first reading is received. Turn the screen off by pressing the DISPLAY button, alternatively the screen will automatically turn off after a short time. The CEETIDE™ tide gauge system does not require the screen to be on to collect data saving power consumption. Refer to the CEETIDE™ user manual for information on downloading recorded data and for real time output configuration. 4 Introduction System Description The CEETIDE™ tide gauge system offers easy installation and accurate recording of tide movement over short or long periods. Lightweight and portable, the CEETIDE™ is equally suitable for fixed or temporary installations. The CEETIDE™ system consists of an electronic Control Unit (the CEETIDE™) connected to a distance sensing instrument (both the acoustic LU and radar LR options are referred to in this manual as the PROBE) installed above water. The PROBE measures the distance to the water surface. The measurement of the PROBE is collected in the Control Unit. The Control Unit records and processes the data, converts it to tide height relative to a given datum that is stored in internal memory. The CEETIDE™ provides a serial port for data output in a variety of formats (both in real time and download of stored data). An external power supply is required for long term installation, although the unit is provided with an internal standby battery to allow operation for short periods of time where external power may become unavailable. There are no moving parts or submerged installations. There is only one necessary cable connection from the PROBE to the CEETIDE™. There are virtually no metal parts exposed on the probe to the outside world, thus corrosion is negligible. System Options The PROBE used can be either acoustic or a radar 4-20mA loop powered distance measurement sensor. Optionally, there is also the ability to run directly powered (non-loop powered) sensors via a 3 wire connection, however these devices use more power and require slightly different build option in the CEETIDE™. This option is only supported for people already in possession of a working Milltronics PROBE from an older CEETIDE™ system. The CEETIDE™ unit can also have optional telemetry installed making a neat, efficient, broadcasting Tide gauge system for use in real time by survey vessels and dredgers, as well as remote display in Port Control offices and the like. Provision of telemetry also allows the remote monitoring of the CEETIDE™ status, battery condition, downloading of logged data, and change of recording interval. Telemetry is by use of UHF radio or 3G/CDMA phone services. The two basic telemetry options available allow different kinds of service, depending on what is required of the CEETIDE™ system installation. A UHF telemetry system is great for broadcasting local area real time corrections, or a short range connection from an office to a CEETIDE™ on a local site. In this case, a separate modem to match the one inside the CEETIDE™ is required to receive the data. There is no limit to the number of vessels/offices receiving the data transmission allowing for multiple vessels to have access to real time information. Data transmission (once setup) is free. A 3G or CDMA telemetry system is great for remote tide gauge installations where real time correction data is not required, but periodic downloads from a (possibly very) remote location are. In this case, the CEETIDE™ internal modem logs onto a local telephone network and can be dialled up and accessed from a remote computer anywhere in the world using the standard telephone system and a standard dial up modem. Distance is greatly increased, but data transmission is not free. 5 CEETIDE™ User Manual V1.27.02 Alternatively a CEETIDE™ with a 3G modem can be configured to send a tide value at a given interval to up to five mobile phone numbers as a SMS (Short Message Service). This is configured using the CEETIDE™ utility program (version 2.2.0.0 or later) via a direct connection to the CEETIDE™ control box. NOTE: The SMS function disables the remote dial in function of the internal Next G modem. Additionally, a GPS time sync option is available where an internal GPS system is built into the CEETIDE™ just for the purposes of keeping the CEETIDE™ clock automatically in synch with GPS system time, and removes the need for manually adjusting system time over long installations. System Operation The CEETIDE™ tide gauge system provides two independent modes of operation. 1. A logging system for recording and storing tides over an extended period of time. 2. A real time tide data source, for providing timely information on current water levels in an area. In both cases, these modes of operation rely on measuring the distance from a probe down to a physical Water Level, determining this distance as accurately as possible, and then using the known distance of the probe to a specific Reference Datum in order to produce a measurement of physical Water Level to known Reference Datum. For Real Time data the probe measures constantly and CEETIDE™ will send the last recorded level at predetermined intervals. For the logging system it is necessary to determine an acceptable Tide information interval. When the CEETIDE™ is set to run with Real Time data out the system will continue to log the water level at the predetermined intervals. In order to calculate an accurate distance from probe face to water level the CEETIDE™ will collect a series of data points, filter the data points to remove outliers, and then calculate a distance based on the average of the filtered measured data. Filtering is done by a method of Standard Deviation testing. For logging purposes, it is possible to select no filtering, removal of data points more than 2 Standard Deviations from the raw average or removal of data more than one Standard Deviation from the raw average. In the case of Logged data, the time of this average is given as the centre time of the Logging Period. For real Time purposes, the raw data is filtered to remove data points over 2 Standard Deviations from the raw average. The average of the remaining data points is the sum of the remaining data points, divided by their number. In the case of Real Time data, the time of this data is given as time it is transmitted. Transmitted tide data is the same from the beginning of a logging period to the end of the logging period. 6 The CEETIDE™ Unit Front Panel The CEETIDE™ front panel interface is for making settings and controlling the CEETIDE™ manually as well as reviewing the logged data. This interface is made up of three main parts. Figure 1: The CEETIDE™ control unit. CEETIDE™ LEDs TM The CEETIDE is equipped with 8 LEDs. These LEDs are used to communicate the immediate status of TM the CEETIDE in a simple fashion. Power on Low battery Charged Sleep mode Data Out/RS232 Measure Modem Error Indicates CEETIDE™ is running. Indicates internal battery is at a low state of charge. Indicates internal battery is fully charged. Indicates CEETIDE™ probe is turned off to save power. Indicates serial data is being output. Indicates Measurement is in progress. Indicates internal Modem is powered ON. Indicates an ‘error’ condition. 7 CEETIDE™ User Manual V1.27.02 CEETIDE™ Display The CEETIDE™ is equipped with a 320x240 graphic LCD module, and this display can be used to see more of what is happening with the CEETIDE™ , as well as to examine or edit parameter settings, and to examine log data history. CEETIDE™ Buttons TM The CEETIDE is equipped with 8 front panel buttons. These buttons are mostly used in conjunction with the display in order to examine or edit parameter settings, view log data history, and initiate log downloads. ON/OFF MODEM DISPLAY MENU (UP) (DOWN) ENTER CLEAR Turn the CEETIDE™ on and off. Turn the CEETIDE™ internal modem (if installed) on and off. Turn the CEETIDE™ display on or off. Bring up the CEETIDE™ menu system for editing settings Increment a value or move up the menu selection screen. Decrement a value or move down the menu selection screen. Accept changes to a parameter Discard changes to a parameter or exit from menu selection screen. NOTE: That the CEETIDE™ implements a key control system – in normal operating mode the only button that will work normally is the DISPLAY button. The other buttons are not set to respond to being pushed. This is to help stop unauthorized and unwanted changing of parameters in a running tide gauge. To enable key access have the CEETIDE™ powered on and press the DISPLAY button to enable the display. Key access is enabled by holding down the MENU and the ENTER buttons together for 3 seconds. With key access enabled the screen will display a message KEY ACCESS OK at the top left area. See “Enabling CEETIDE™ key access” section for more details. 8 Connections Figure 2: The connections on the right hand side of the CEETIDE™ control unit On the right side of the CEETIDE™ unit are the sockets for the connections that can be made to the CEETIDE™ unit. Looking at these sockets from the side, you can see from left to right there are the connectors for POWER (3 pin LEMO), PROBE (black CA connector), DATA (5 pin LEMO) and the optional TELEMETRY ANTENNA (TNC). There can be a BNC connector for the GPS antenna connection if the GPS time sync option is installed. 9 CEETIDE™ User Manual V1.27.02 Getting started System installation Figure 3: A basic CEETIDE TM system installation Mounting the PROBE (Sensor) The PROBE must be installed above the water, facing vertically down to the water surface. It must be positioned so that there are no obstructions in the path to the water surface, and be fixed to a solid structure. Make due allowance for the ‘spread’ of the beam angle when measuring to the water (see Appendix C – probe details for the figures relating to the particular Probe being used in a particular installation). All PROBE types have a beam spread figure, that results in a given diameter measurement area at a given distance from the probe. Visualise a cone extending down from the probe, as shown in red in Figure 3. If anything sits above the water inside this cone, it will reflect false return signals that can cause confusion in the distance measurement that all CEETIDE™ information is based on. To ensure accurate tide readings avoid any chance of reflections from jetty pylons, walls or other surfaces. Make sure that small boats do not tie up underneath the PROBE temporary obstructions. The PROBE should be installed at least 50 cm above the highest Spring (King) tides and wave action. Also the PROBE location should be such that the water underneath the PROBE does not dry-out at low water. 10 Determining PROBE height The relation between the chart datum and the PROBE reference zero must be known. Please look into Appendix C – probe details to determine the particular PROBE reference zero for your PROBE. The probe zero height should be measured from a surface with known relationship to the tide datum in use (i.e. wharf or jetty benchmark). Alternatively the PROBE height can be levelled to datum zero or other known benchmark. If no datum information is to hand a rough and practical setting can be made by reference to (any) available tide tables. The tide tables will give times and predicted heights of the tide. Using a tape measure, measure from the Probe face to the water level at a known time. Add this value to the predicted height of the tide for that time; this will give the height of the Probe above tide datum. When the predicted height of tide is known, make the CEETIDE™ read that height of Tide by adjusting the setting of the Probe height above datum in the CEETIDE™. Subsequently recheck several times at close, regular intervals to monitor the difference between known tide and recorded tide. Note that resultant tide reading can be positive or negative depending on the tide datum in use. Installing the CEETIDE™ unit The CEETIDE™ unit is rated to IP65 for water ingress, and is therefore quite environment proof. However some concessions must be made for its installation. If the CEETIDE™ system is to run for an extended period of time (more than 24 hours) then it should have an external power supply to run from. This can be a large lead-acid battery (12V), a lead acid battery charger (12V rated around 1A and preferably 3 stage) or a DC power supply (nominal 12V) In a very hot location, the CEETIDE™ unit should not be left to run in direct sunlight. Installing a telemetry antenna If a telemetry option is to be used then it is necessary to mount the telemetry antenna somewhere so that all receivers can access its data. Generally the telemetry antenna is required to be as high as practically possible and setup so its radiation pattern covers the area where reception is needed. There are many different antenna types possible to be used here, and an explanation of each type and best installation instructions are beyond the scope of this manual. Please contact your local agent or CEE HydroSystems™ for assistance with selecting an antenna to suit your particular CEETIDE™ system. Installing a GPS antenna If a GPS time sync option is to be used then it is necessary to have a place to mount the GPS antenna so that it can get a clear view of the sky and where an antenna cable can be run back to the CEETIDE™. Placement of the antenna inside, underneath, or beside structures of metal is not advised. GPS signals are extremely low level, and in order to work, the antenna needs a good collection of GPS satellite signals that are free of multipath reflections. 11 CEETIDE™ User Manual V1.27.02 Making connections The PROBE connects to the CEETIDE™ with a heavy duty cable, wired into the PROBE at one end with screw terminals. The other end is plugged into the CEETIDE™ control unit with a large black plug with a screw down collar for making a firm attachment. If Telemetry options are to be used, it is very important that the telemetry antennas are attached to the CEETIDE™ before power is applied to the modem WARNING: If power is applied to a modem without an external antenna attached this can result in damage to the output stage of the modem. This damage is not covered by warranty. Data from the CEETIDE™ RS-232 serial port is supplied via the data output cable connected to the 5 pin LEMO connector. Line up the red dot on the plug with the red dot on the socket, and push the plug in as far as it will go. The plug will lock into place with a physical click. The LEMO plugs may be detached again by pulling firmly on the knurled barrel of the plug, which will slide back to disengage the locking mechanism. On the other end of this cable is a standard DB9 with pins in the universal DCE serial port arrangement that can be plugged into the standard D9 serial port on any PC or connected to most USBSerial convertors. CEETIDE™ serial cables are also available with the D9 pins in a DTE arrangement. In the case where a supplied CEETIDE™ cable does not connect to the desired device, an appropriate NULL-MODEM can be purchased and used to convert DTE/DCE connectors. External power is run to the CEETIDE™ via a cable terminated in a 3 pin LEMO plug. On the other end of this cable are tinned wire leads. RED is connected to the positive (+) terminal of the 12V power supply, and BLACK is connected to the negative (-) terminal of the 12V power supply. 12 System Configuration Powering up the CEETIDE™ With all devices connected up correctly, it is time to power up the system. If the CEETIDE™ unit is off it can be turned on by momentarily pressing the ON/OFF button (the green POWER LED on the front panel is not lit when turned off). The CEETIDE™ unit can be turned off by holding down the ON/OFF button for 3 seconds, but ONLY IF the DISPLAY is on and KEY ACCESS is enabled (see below). These safeguard features are designed to make it harder for a system that once installed is less likely to be turned off accidentally or have the settings changed by an unauthorised operator. Enabling the CEETIDE™ display As a long-term data logging system, the CEETIDE™ is designed to run with as little current draw as possible. To help with this the display is turned off when not in use. The default operating state of a CEETIDE™ is to have the screen off. If the CEETIDE™ is running and you wish to view the screen, then it is simply a matter of pressing the DISPLAY button. At any time an active screen can be turned off by pushing the DISPLAY button again. Alternatively, the CEETIDE™ is designed to time out and turn off the screen by itself after a period of time to ensure that the screen can never be left on accidentally. With just the display enabled CEETIDE™ will time out and turn off the display after one minute. Enabling CEETIDETM key access The CEETIDE™ system of enabling KEY ACCESS is designed to create a simple (but non-obvious) barrier to making changes to the setup of, or turning off the CEETIDE™. With the CEETIDE™ powered ON, and the DISPLAY active, key access is enabled by holding down the MENU and the ENTER buttons together for 3 seconds. With KEY ACCESS enabled, the screen will display a message KEY ACCESS OK at the top left area. In addition to this, KEY ACCESS has an automatic timeout feature – it will count down from 10 minutes to zero. At the end of its count, KEY ACCESS will display “None” and the display will be turned off. When KEY ACCESS is enabled, the time remaining countdown is shown at the top right of the screen. In KEY ACCESS mode, it is possible to enter the menu system, to power cycle the built in telemetry system, and to turn off the CEETIDE™ itself. 13 CEETIDE™ User Manual V1.27.02 Turning Internal Telemetry on and off The MODEM button is used to turn on the power for an internal MODEM (UHF or 3G/CDMA) if one is installed in the CEETIDE™ unit. KEY ACCESS MODE must be enabled to turn the modem on. Modem power status can be seen by viewing the “Modem” LED. If it lit up orange, then power is present for the modem. To turn on the modem simply press the MODEM button once. KEY ACCESS MODE must be enabled to turn the modem on. To turn off the modem (when key access is enabled) simply hold the MODEM button for 3 seconds, and then release. (This is designed to provide protection against accidental switching off of the modem). KEY ACCESS MODE must be enabled to turn the modem off. In earlier versions of CEETIDE™ firmware the modem power status will be returned to previous setup it was when the system power was turned off. For this reason, please remember to turn OFF the internal modem before turning off the CEETIDE™ unit, if you do not wish for the modem to switch on next time the CEETIDE™ is powered on. CEETIDE™ 1.25 and onwards will require the modem to be manually turned on each time the CEETIDE™ is powered up. WARNING: A UHF modem must not be powered on without an appropriate antenna connected to it. If the modem tries to transmit a message with no (or the wrong) antenna connected, this can cause damage to the output stage of the modem which is not covered by warranty. NOTE: The modem will not turn off when CEETIDE™ is in sleep mode NOTE: The modem functions will control an internal modem only. These functions will not control settings or supply power to an external modem 14 The CEETIDE™ default screen Whenever the display is freshly enabled, the CEETIDE™ will begin by showing its default screen. This screen is designed to show as much relevant operating information as possible, so the operator can, at a glance, confirm correct operation and configuration of the CEETIDE™ system. 27 Mar 2009 11:52:57 25/03 20:00 26/03 12:00 Measure Per Logging Int Output Int Key Access 27/03 : 60 : 5 : OFF : NONE 04:00 4.00 -1.00 SLEEP Batt: 13.0V Figure 4: CEETIDE™ default screen. The default display can be divided into a few main areas: The top left area displays the current date and time (underneath this, KEY ACCESS status is also displayed) The top right area shows the Measure period (in seconds) the Logging interval (in minutes) the Real Time output Interval (in seconds) and the remaining KEY ACCESS time in minutes. The graph through the middle shows the most recent log records, as a tide profile. A basic visual inspection of the performance of the CEETIDE™ log file can be performed from this screen display. The profile range (how many days/hours that are displayed) can be set to the required range. The upper and lower graph tide limits can be set to display the tide range expected for the particular installation as well as possible. See Graph Scale for how to configure the graph settings. The bottom left area of the display will show the status of the tide gauge – it will show SLEEP if the probe is turned off or it will show the current tide value if the probe is running. It will show ERROR if a probe is not detected (or just turned on and the CEETIDE™ is waiting for a valid measurement to come through). 15 CEETIDE™ User Manual V1.27.02 The bottom right section will display the current battery voltage. If the PROBE is running at that time, this area also holds a circular display of the PROBE current (in mA) the distance measured by probe to water surface (in metres) and tide height relative to datum entered (in metres). At the middle of the bottom area there is a message showing the current status of the LOG process. This can show “IDLE” – (the tide logging process is not measuring anything). It can show a numeric countdown - (a Measure period is underway and probe distance data is being collected) or it can show “LOG!” – (a Measure period has just been completed, and the log file is being updated) Using the menu system With the CEETIDE™ display on and key access enabled, press the MENU key. The CEETIDE™ MENU will appear. 27 Mar 2009 11:52:57 Set Date /Time View History Log Interval Log Measure Period RT Output interval RT Measure period Output Format 4 mA Distance 20 mA Distance Probe Height Calibration Download Format Download Rejection Graph Scale Graph Scale Maximum Graph Scale Minimum Clear Log Hard Reset Radio Channel Com Baud rate Exit Demo Mode Set Probe Type Set Clock Date & Time Press ENTER to change Figure 5: CEETIDE™ menu screen Move through the MENU using the (UP) and (DOWN) keys to position the cursor to the setup item that you want, and then press ENTER to activate. As you move the cursor from option to option, the bottom of the display shows a short description of the currently selected item, and where relevant will show possible values and gives the current value. Press ENTER to adjust the setting of a selected item. 16 Use the (UP) and (DOWN) keys to change parameter(s) to new value(s) then press ENTER to accept the changes or press CLEAR to cancel the changes. After successfully editing a setting, there are two options - To edit another item setting, press MENU to allow use of the (UP) and (DOWN) keys and select the next required item as before. Otherwise press CLEAR to leave the menu system and return to main operating screen. Critical settings To start the 4mA and 20mA distance settings on the CEETIDE™ must match the configuration of the PROBE. Also, the Calibration setting should be left at the default value of 500 unless you are absolutely sure that the probe scale does need calibration and have experimentally determined the calibration setting required to make your CEETIDE™ system work correctly. Please contact CEE HydroSystems™ or the authorized local representative if you require the factory settings of your CEETIDE™ and acoustic probe. If these PROBE interface settings are not exactly correct, then any measurements (and hence tide records) cannot be relevant or usable. The time and date setting is very important and should match the time being used in the local area. When tide data from the CEETIDE™ is merged with other data the time in the log file will allow correct values to be used. On installation always check your CEETIDE™ internal system clock and confirm it is correct. Similarly, the probe height above datum is very important. This number is the interface between your raw probe distance measurement and the actual tide height value needed for surveying, dredging and/or water level monitoring purposes. Without this information entered correctly to reflect the physical installation, the tide values logged and transmitted will not be correct. It may be possible to shift height data in post processing however it’s a lot easier and leaves less opportunity for error to have set correctly. Important settings After the fundamental interface options, the most important things to set in your new CEETIDE™ installation are dependent on what you wish the installation to achieve. Firstly, it is important to consider the Log Interval required – What is the end use of your logged data? How often are records needed to be made? See Log Interval for information on how to set this. Once a Log Interval has been selected, an appropriate Measurement Period and SD rejection option need to be chosen. See Log Measure Period and Rejection chapters for making these settings. If real time data is required, then the minimum rate of Real Time data needs to be decided on, and configured (see RT Output Interval). In addition, if internal telemetry needs to be setup, then the channel frequency should be configured (see Radio Channel) where possible. If the CEETIDE™ needs to be setup for use with an external telemetry system the serial port baud rate should also be considered (see Communications Baud) 17 CEETIDE™ User Manual V1.27.02 CEETIDE™ operational considerations PROBE height vs. Tidal range The range of the PROBE is important when positioning the PROBE height. The Siemens LU probe is set to read a 12m tide range as a default. If your tidal range is only 3 metres for instance, CEE HydroSystems™ can make the readings more sensitive by re-setting the 4mA and 20mA limits to say 0.5 -5 metres, so that the smaller range of Probe to water distance is transferred by the full range of signal mA. NOTE: The 4mA and 20mA height values need to be set in both the PROBE and in the CEETIDE™ Control Unit. NOTE: Instructions for reconfiguring the different probes are in Appendix B. The Siemens probe requires a hand controller to program the settings for use. This controller is not part of the standard equipment kit of the CEETIDE™ system. Contact CEE HydroSystems™ if you require a hand controller for the Siemens Probe. WARNING: a sub-optimal range setting in the PROBE and the CEETIDE™ is infinitely preferable to an incorrect range setting between the PROBE and the CEETIDE™ – The first may not be as good as it possibly could be, but the second is absolutely incorrect. Please do not adjust these distance ranges unless you are absolutely sure of what you are doing and have the time to test the system after adjustment to make sure that measured probe distance matches actual probe distance over multiple points in your expected range of the CEETIDE™ system. 18 Calculate battery power consumption For a short term installation, it is necessary to provide a CEETIDE™ with the energy needed to run at the power requirements it has, for the time it needs to run. Remember that to use a battery, the capacity of the battery must be equal to or greater than the number of hours required to run, multiplied by the average current required. It is possible to estimate the average current requirement by examining the configuration and settings used in the installation. Please look into CEETIDE™ running power requirements, in Appendix A – hardware details, for information on the current draw required for different modes of operation of the CEETIDE™ – By getting the current draw requirements for various parts of the CEETIDE™ system and calculating the time that these parts of the system are powered, an average current draw can be calculated. This example is for a CEETIDE™ system with no modem and a Probe LU: Log interval: 5 minutes (= 300 seconds) Measure period: 60 seconds Guard Period: 45 seconds (same for all measure periods) RT output interval: 0 (off) Display: Off Modem: Not available In this case the probe is on for 60 seconds plus a guard period of 45 seconds every 5 minutes. Out of the 300 second (5 minutes) log interval we have a weighting of 0.32 applied to probe ON current of150mA ((60+45)/300 x 150mA) plus a weighting of 0.65 applied to the system idle current of 100mA ((300(60+45))/300) x 100mA). This gives us an average current of 52.5mA + 65mA = 117mA. Therefore, to run this system for 7 days (168 hours) would require a minimum size of 168 x 0.117 = 19.656 Ah for the battery energy capacity. NOTE: The quoted battery output is calculated based on ideal conditions. It is best to overestimate the power requirement to save running out of battery power towards the end of an installation period. NOTE: When the Probe type in the CEETIDE™ is set to the LR (radar) probe option the probe does not go to sleep mode. 19 CEETIDE™ User Manual V1.27.02 Regularly clearing Log Data in a circular buffer memory system In normal operation you do not need to clear Log Memory as the CEETIDE™ automatically continues to log by overwriting the oldest data when the memory reaches 100% capacity. However if the data retrieval procedure relies on downloading ALL data at regular intervals then doing a Clear Log after a successful download (and backup to multiple locations!) of tide data will make the downloading ALL process faster next time by reducing file size to be downloaded and save duplicating log data in multiple files over multiple downloads. If the tide gauge is moved to a new location you should perform a Clear Log during the initial install. UHF telemetry system configuration There are two internal UHF modem options offered in the CEETIDE™. All internal modems are powered by the CEETIDE™ system power and should be considered when calculating the power required to run the system. The ISM 2.4GHz option uses a send and receive module that are frequency hopping units. The operating frequency range cannot be adjusted and cannot be connected to third party radio receivers. The Satel UHF modem option allows for the internal UHF modem channel (frequency used for transmit and receive) to be selected. This allows the operating frequency of the telemetry system may be adjusted up and down inside the allowed frequency range. The Satel UHF option will broadcast on a fixed frequency allowing any receiver also operating on the same frequency to receive the data message. Be aware that other UHF users may disrupt your communications system, and be on the lookout for things such as intermittent service or garbage data coming through your receivers occasionally. In the case of the Satel modem adjusting your modem channel settings may allow you to avoid interference (The frequency on BOTH the transmit end and the receive end of the link must be matching). It is possible to configure the CEETIDE™ to output real time data at a rate much greater than the system will log internally. You can consider this option for real time tide corrections for survey or dredge work at the cost of higher average system power consumption. GPS time correction option There are no user settings for GPS time correction option (If installed) The system turns on the GPS receiver at power up, waits up to 5 minutes for a position, and then takes the UTC time from the GPS to correct the internal system clock time within a range of 5 minutes. Every 1 day, 3 minutes and 28 seconds (done deliberately to move sync time slowly) the CEETIDE™ will power on its GPS receiver and repeat the time correction process if a GPS position is available. NOTE: if the time reference is adjusted, the existing Measure Period (and the associated time Log) will be cancelled. 20 CEETIDE™ menu system options Memory capacity used The current memory capacity used is displayed as a percentage (%) when the user exits from the MENU screen to return to the normal graphic display. Firmware version The firmware version installed on your CEETIDE™ control unit is displayed when the user exits from the MENU screen to return to the normal graphic display. The modem type installed is also displayed here. The label is blank if there is no modem installed. Set Date / Time This menu item is used to set the internal date and time. When active, the date and time are broken into separate integer fields. Use the (UP) and (DOWN) keys to adjust the current part of the date or time. Pressing ENTER after each selection to move to the next section of the date and time, or CLEAR to move to the previous selection. Once seconds are set, press ENTER to accept the changes. NOTE: if the system time is adjusted, any Measure Period running at this time (and associated Log Record) will be cancelled, and a new Measure Period will be scheduled for the next possible Log Record. View History This menu item allows the display of logged data for a selected period as chosen by the Operator. In order to View History, the date and time are broken into separate integer fields. Use the (UP) and (DOWN) keys to adjust the date or time. Pressing ENTER after each selection to move to the next section of the date and time, or CLEAR to move to the previous selection. Once seconds are set, press ENTER to accept. On pressing ENTER to accept this display date and time, the View History screen is shown. There are two data viewing modes. The first viewing mode is a graphical format similar to the default display screen. By pressing ENTER in this display the function of the (UP) and (DOWN) keys changes. Each function option is shown at the bottom of the screen. In the first option the (UP) and (DOWN) keys can be used to ZOOM the data on display. This sets the size of the view period. In the second option the (UP) and (DOWN) keys can be used to move the view period through available data. In the third option the (UP) and (DOWN) keys can be used to select between Graphical and List viewing format. NOTE: If it is desired to look through history in Graphical display mode, then prior to selecting View History, the Graph Minimum and Graph Maximum values should be set to display the full range of tides expected, as the graph minimum and maximum cannot be changed in View History mode. The second viewing mode is a list viewing format where it is possible to browse all individual logged data records as text. By pressing ENTER in this display, the function of the up and down buttons changes. In the first function option the (UP) and (DOWN) keys can be used to scroll through the data list 5 tide records at a time. In the second function option the (UP) and (DOWN) keys can be used to scroll through the data list 10 tide records at a time. In the third function option the (UP) and (DOWN) keys can be used to select between Graphical and List viewing format. 21 CEETIDE™ User Manual V1.27.02 log Interval This menu item sets the logging interval in MINUTES (1, 2, 5, 6, 10, 15, 20 or 30) The CEETIDE™ will store a maximum of 65,535 readings. Refer to the table below showing the capacity vs. days of logging, if an absolute amount of continuous logged tides stored in memory is a requirement. Once memory reaches 100% capacity the circular buffer system deletes the oldest log to save the new one and the CEETIDE™ will continue to measure and record water levels. Interval 24hr 7 days 30 days 45 days 90 days 120 days 180 days 1 year Max. days 1 minute 1440 10080 43200 64800 2 minute 720 5040 21600 32400 64800 5 minute 288 2016 8640 12960 25920 34560 51840 227 6 minute 240 1680 7200 10800 21600 28800 43200 273 10 minute 144 1008 4320 6480 12960 17280 25920 52560 455 15 minute 96 672 2880 4320 8640 11520 17280 35040 682 20 minute 72 504 2160 3240 6480 8640 12960 26280 910 30 Minute 48 336 1440 2160 4320 5760 8640 17520 1365 45 91 Figure 6: Table showing number of levels recorded per period based on log interval set. NOTE: If the Log Interval is adjusted, any Measure Period in progress (and associated Log Record) will be cancelled and a new Measure Period will be scheduled for the next possible Log Record. NOTE: The log interval cannot be set to a shorter time than the log measure period Log Measure Period This menu item sets the period in SECONDS (60, 120, 180, and 240) over which the measurements are taken, Standard Deviation filtered and averaged for logging. The Log Measure period cannot be longer than the Log Interval. NOTE: if the Log measure Period is adjusted, any Measure Period running at this time (and associated Log Record) will be cancelled, and a new Measure Period will be scheduled for the next possible Log Record. NOTE: The log interval cannot be set to a shorter time than the log measure period 22 Real Time Output Interval This menu item sets the Real Time (RT) Output Interval. This is the rate in SECONDS (OFF, 5, 10, 15, 30, and 60) at which tide data messages are sent to the serial port (and modem, if fitted). Note, that as RT Output Interval can be set to faster than the RT measure period, the last real time “measure” period value is transmitted repeatedly until the value is updated. For example, given an RT Measure Period of 1 minute, and an RT Out Interval of 5 seconds, there will be 12 readings with the same value. NOTE: When real time output is selected the SLEEP mode is not used. Real Time Measure Period This sets the period in SECONDS (30, 60, and 90) over which measurements are taken and averaged for Real Time tide output. Output Format This sets the Real Time data output format. The 9 choices are summarised as follows: 1. ASCII 1 2. SHORT 3. ASCII:2 4. LONG 5. RevTyp1 6. RevLONG 7. SHORT 3 8. LONG 3 9. Denison See page 32 for details and examples of Real Time output formats. 4 mA Distance Set the distance reading in metres that relates to a PROBE signal of 4mA. This must be the same as the 4mA distance on the PROBE. 20 mA Distance Set the distance reading in metres that relates to a signal of 20mA. This must be the same as the 20mA distance on the PROBE. Probe Height Set the height of the PROBE relative to the datum level (tide gauge zero) in metres measured to the zero reference of the PROBE. Refer to Appendix B to find the zero point of the probe type being used. 23 CEETIDE™ User Manual V1.27.02 Calibration This is a parameter where the relative scale of the probe measurement distance can be fine-tuned. If everything is ideal, then the measured distance reads correct for a factor of 500. Changing this factor UP makes the measured range longer, changing down makes the measured range shorter. Once the correct value is set, make a note of it, and do not change this again. Note that the factor of 500 is not a distance. Internally, the value is translated in a percentage correction, up or down, applied to the mA -reading received from the PROBE. WARNING: While this setting is provided to the Operator, and described here, we have not seen any instances where a PROBE and CEETIDE™ unit required special calibration. This is provided as a possible “problem solver” for the possibility of a future unknown calibration issue. If a physically measured PROBE distance is different to what is shown in the CEETIDE™, please double check ALL other things (probe zero measure point, 4mA distance setting, 20mA distance setting) before considering adjusting this. Do not adjust this setting without specific instruction from CEE HydoSystems™ Technical Support staff. NOTE: Calibration, if ever required, should be done in a test setup with the PROBE pointing at a solid surface (wall etc) at about the mid-distance. Compare the measured distance as shown on the PROBE, to the measured distance shown on the CEETIDE™ unit, as well as an actual measurement from probe face to the solid surface, and fine-tune using the calibration value. Once the system is calibrated, do not change this setup. Download Format Three download formats are available: ASCII:1 ASCII:2 ASCII:3 All formats carry the same basic information of time, date and water level relative to datum, but have different features for different purposes. Please select the output format that best matches how you wish to deal with the downloaded data. See page 32 for details of Download Output Formats. Download To start a download of logged data from the CEETIDE™, you need to specify how far back in time to go (hours before NOW). Ensure the download format is set as required for your application. Choices are: 0 2, 6,12,24,48 ALL No Download last 2, 6, 12, 24, 48 hours etc. (downloads all points in memory) The download will start when you press ENTER. NOTE: The download request period is hours before NOW (as shown on system clock) and not the last hours logged by the CEETIDE™. In the case where a CEETIDE™ has been removed from its installation and taken back to an office to download (and has therefore been switched off for a period of time) Requesting log data relating to a time period where the CEETIDE™ was off and in transit will result in an empty data set. 24 Rejection Here you can set the level of data rejection for logged data, this is so that spurious or outlier readings are rejected, and not used when the average is calculated for each logging period. There are three options: 0 no rejection (all readings are accepted as valid) 1 reject any reading outside 1 x Std. deviation of the group 2 reject any reading outside 2 x Std. deviation of the group. 1 x Standard deviation accepts readings within a 67% confidence region. Given a set of measured data with no special case strange readings, 1/3 of the readings are likely to be rejected. 2 x Standard deviations accepts readings within a 95% confidence region, so given a set of measured data with no special case strange readings, 1/20 of the readings are likely to be rejected. It is often necessary to have data rejection in the observations, so that the average value (which is logged) is relatively un-contaminated by readings that are clearly outside the norm. Use 0 (no rejection) only for the very short logging periods, where a few bad readings can be trapped when the data is processed. NOTE: Each logging period is treated as a new group, so that the Standard deviation calculation is not carried over indefinitely. If something goes wrong with the observations, this will only affect a single log point. Graph Scale This sets the x-axis (time) of the graph display. Set this to cover the period of interest. The graph scale does not alter anything other than the display of the amount of previous tide records on the LCD. Graph Maximum This sets the top line y-axis in height above datum (maximum tide on graph). The maximum tide display on the LCD graph does not affect anything but the display. If tide readings are above the maximum, they will not be plotted on screen, but are still logged and output. Graph Minimum This sets the bottom line y-axis in height above datum (minimum Tide shown on graph). The minimum tide display on the LCD graph does not affect anything but the display. If tide readings are below the minimum, they will not be plotted on screen, but are still logged and output. 25 CEETIDE™ User Manual V1.27.02 Clear Log This is used to clear the memory of all logged data. When in edit mode use the (UP) and (DOWN) keys to set the value to 1 then press ENTER and all Logged Data will be erased. (Set to 0, this menu item exits without clearing logged data) WARNING: make sure that you have downloaded and backed up any important data that you need before clearing the memory. Hard Reset This is used to do a hard reset. When in edit mode use the (UP) and (DOWN) keys to set the value to 1 then press ENTER and the entire system, including Log data records will be reset. (Set to 0, this menu item exits without change) A hard reset is only an emergency escape; a last resort if all else fails, if the unit does not appear to be working properly. The time has stopped for example, or the CEETIDE™ does not accept any inputs, and a normal Power Cycle does not fix the problem. In normal use you should never need to do a Hard Reset. NOTE: That if a Hard Reset is executed then the CEETIDE™ Unit must be Power Cycled to resume normal operation. WARNING: make sure that you have downloaded and backed up any important data that you need before performing a hard reset. A hard reset erases all Log Data. In addition to this, a Hard reset will reset all entered setups and values. Most values are set to defaults, but you will need to go through all the setups to make sure that all is setup correctly, including Probe height above datum, Time and Date. Radio Channel This function is not available on all UHF modem options. Ensure that you have a Satel modem installed as displayed in the About screen when exiting from the Menu screen. If a Satel internal radio modem is fitted then you can use this function to change radio channels. Nominal channel range is -40 to 40. Channel zero corresponds to the centre frequency of the supplied modem. Use the (UP) and (DOWN) keys to scroll through the selection and then press ENTER to accept the new radio channel. The tide gauge will search for the radio modem. If it finds the Satel modem then the processor will go through an initialization of the radio/ modem. This may take several minutes, with the progress displayed on the screen. If the Satel radio setup is successful, then the correct channel frequency and radio ID will be verified. NOTE: Make sure that the (internal) radio is switched ON (Modem LED it lit) before attempting to do a radio setup. NOTE: The channel changing function is disabled on the UHF modem identified as the 2.4GHz modem in the about screen. Only the Satel radio modems change perform channel changes. WARNING: Make sure that you an antenna connected the modem before turning the modem on. Running the modem without an antenna connected will damage the modem. This damage is not covered under the warranty offered with the CEETIDE™ 26 Communications Baud This function is used to set the output data serial port baud rate (2400, 4800, 9600, 19200, 38400, or 57600) Use the (UP) and (DOWN) keys to scroll through the selection, then press ENTER to accept the new baud rate setting. Other related serial port settings are preset. The CEETIDE™ system runs 8 data bits, no party, and 1 stop bit. NOTE: Default baud rate of the CEETIDE™ firmware version 1.24 or earlier is 9600 bps, the baud rate required when using an internal CDMA, Next G or Satel UHF Modem is 19,200bps. NOTE: Default baud rate of the CEETIDE™ with firmware 1.25 or later is 19,200 bps Exit This exits the setup menu and returns to the normal graphic display. When exiting the Menu window the firmware version and memory capacity currently used is displayed before the main tide profile window is displayed. Demo Mode This clears the log, and then generates demonstration data for the preceding 24 hours in the shape of a sine wave. WARNING: Ensure all logged data is downloaded and saved (in several locations if possible) prior to starting DEMO mode. All logged data is erased from memory when the demo mode is run. Set Probe Type This setting is used to instruct the CEETIDE™ which probe option is connected. General refers to the standard LU acoustic probe. LR refers to a radar probe. In this case sleep mode is disabled and the probe runs constantly to avoid potential errors during the settling period a radar probe uses during start up. 27 CEETIDE™ User Manual V1.27.02 CEETIDE™ Utility software The CEETIDE™ Utility software is supplied on the utility disk at time of purchase. The latest version is available for download at www.ceehydrosystems.com. When CEETIDE™ Utility software is installed onto your PC a shortcut icon to launch the program will be placed on the desktop. Once the utility program has been installed the CEETIDE™ settings can adjusted from a computer by direct serial data cable connection or via radio telemetry connected to the CEETIDE™ system (internal or external). The tide data logged in the control box can be downloaded and real time data transmission can be started or stopped. Information on using CEETIDE™ Utility software is explained below. A terminal program can also be used to adjust the settings of a CEETIDE™ and for starting a real time data feed and/or download. For information on sending remote commands through a terminal program see the instructions in Appendix C. NOTE: Data cannot be deleted from memory via a remote connection. Data can only be deleted via the main front panel. NOTE: The CEETIDE™ must be turned on to receive remote commands (in sleep mode or active measure mode). NOTE: The CEETIDE™ utility software must connect through a serial port on a PC. Connecting to CEETIDE™ Utility program When CEETIDE™ Utility software is started you will be asked which serial communications port (comm. port) to connect to and at what baud rate. Select the appropriate communications port and baud rate for your installation (default baud rate is 9600 bps. To communicate through the Satel Radio system the baud rate is 19,200 bps). With the correct connection settings made CEETIDE™ Utility software will open and display the current configuration settings of the control unit as shown below in figure 7. Figure 7 – current configuration of CEETIDE™ 28 System Setup The CEETIDE™ Utility software can be used to query the CEETIDE™ current configurations. The settings can be adjusted by using drop down menu to select predefined options (log interval or measure period), the (UP) and (DOWN) keys displayed next to the relevant field or by manual entry in the text box. Any field that will be adjusted will display a red box next the appropriate field. Once settings have been made click on APPLY. The red boxes will change to green when the change has been made successfully and the displayed information on the right hand side will be updated with the new settings. Clicking on REFRESH to will update the display to check for any system changes such as updating the time field or probe status without any changes to the setup being made. Figure 8 Red shows fields to be changed, green confirms changes have been made SMS Configuration If the CEETIDE™ has been enabled for SMS real time tide data you can configure the settings by clicking on the SMS Setup button. Figure 9 Set the require start and end time of the data transmission as well as the tide message interval in the Time Setup box. Select the days the data is scheduled to be sent by enabling the check boxes on the right hand side of the screen. 29 CEETIDE™ User Manual V1.27.02 Setup the phone numbers that are to receive the tide data at the prescribed intervals. The administrator number has extra controls described in the SMS Commands section in the next section. At the bottom of the SMS Recipient setup window is the option to allow external numbers to receive tide data when the text message TIDE is sent to the CEETIDE™. If the box is unchecked as shown above only the numbers entered in the recipient list will be allowed to access the data. Once the SMS configuration is correct click on Apply to close the SMS setup window and display the utility window with a red box displayed next the SMS Setup button. Click on the CANCEL button of the SMS setup window to discard changes and go back to the Utility window with no changes to be made. You must click Apply in the Utility program to confirm the SMS Setup changes in the CEETIDE™ control box. NOTE: The SMS interval does not alter the Log Interval of the CEETIDE™. The most recent tide value logged will be the Tide value sent as the SMS. SMS Commands Mobile numbers that that are listed in the SMS Recipient list can request a tide value at any time that the CEETIDE™ is running irrelevant of the. If the check box allowing other numbers access to tide data is ticked during SMS setup any mobile phone can receive the latest tide at any time irrelevant of the SMS message interval setup. The mobile number entered as the administrator is able to start, stop or cancel the Tide output SMS function. The commands can only be sent from the administrators phone number. All commands must be sent in capital letters Message Available to Result TIDE STRT All listed numbers plus external numbers only if enabled in SMS Setup Administrator STOP Administrator HALT Administrator Last recorded tide any time the CEETIDE™ is running Start SMS function for the calendar day only that the message was sent at the SMS interval set in the CEETIDE™ End SMS function enabled by sending the STRT command Cancel all days enabled for regular SMS transmission. Days must be re-enable in the SMS setup function of the CEETIDE™ Utility program to resume regular transmission 30 Downloading stored data To download logged data using CEETIDE™ Utility click on the DOWNLOAD tab, select the data you wish to download (select recent data by hours or all data), select the format (option 1,2 or 3 – each option is shown in Appendix A). The data will be downloaded to the default directory that CEETIDE™ Utility software has been installed to (C\:ProgramFiles\Bruttour\CEETIDE™Utility\data\logged), alternatively you can select the directory location for the download by clicking the browse icon. Once you are satisfied with the data to be downloaded, format and destination click DOWNLOAD, you will be asked to confirm download and download will commence after 30 seconds. Once download has finished it is automatically saved to the chosen location as a text file (.txt) and you are able to view the downloaded file, create a new download or exit the program. NOTE: Downloading does not remove data from CEETIDE™ memory. Data can be downloaded as often as you like without loss of data. NOTE: Selecting a specific number of hours to download relates to the time of the system clock. For example; if the unit has been removed from its location and turned off for week while in transit selecting to download the last 24 hours will not give any data as the last logged water level was 7 days earlier. 31 CEETIDE™ User Manual V1.27.02 CEETIDE™ download formats The three DOWNLOAD formats available as described below: Type 1 – ASCII output 1 This is the same as the normal ASCII output (type 1). DD-MM-YY HH:MM:SS ;START OF LOGGED DATA 07 11 07 11 54 07 8.46 07 11 07 11 55 07 8.46 07 11 07 11 56 07 8.46 07 11 07 11 57 07 8.46 ;END OF LOGGED DATA Tide Height (metres) Type 2 – ASCII output 2 This is the same as the previous ASCII format, except that '-' characters are used as separators in date, and ':' in time. Tide is in metres with 2 decimal places. DD-MM-YY HH:MM:SS Tide Height (metres) ;START OF LOGGED DATA 07-11-07 11:54:07 8.46 07-11-07 11:55:07 8.46 07-11-07 11:56:07 8.46 07-11-07 11:57:07 8.46 07-11-07 11:58:07 8.46 07-11-07 11:59:07 8.46 ;END OF LOGGED DATA Type 3 – ASCII output 3 Type 3 download is the same as type 2 but with Tide data output to 3 decimal places, i.e. to millimetres. Please refer to Type 7 Real Time output format description for field descriptions. DD-MM-YY HH:MM:SS Tide Height (metres) ;START OF LOGGED DATA 07-11-07 11:54:07 8.455 07-11-07 11:55:07 8.455 07-11-07 11:56:07 8.455 07-11-07 11:57:07 8.457 07-11-07 11:58:07 8.458 07-11-07 11:59:07 8.458 ;END OF LOGGED DATA When you process the tide data in spreadsheet such as Microsoft EXCEL, the spreadsheet will easily accept the date and time format with the '-' and ':' in the date and time columns without any further definitions. Real Time Data Output CEETIDE™ Utility software allows you to enable real time data to be sent from the CEETIDE™. Select the Real Time Data tab, select the format required (see output formats in the next section) and the output rate the data will be sent at. Changing the output rate to zero will turn off the real time data function. Real time data can be logged by the CEETIDE™ Utility program. Real Time data will be logged to the default directory that CEETIDE™ Utility software has been installed to (C\:ProgramFiles\Bruttour\CEETIDE™Utility\data\logged), alternatively you can select the directory location for the download by clicking the browse icon. 32 CEETIDE™ Real time output formats Type 1 – (ASCII 1) The format is standard ASCII and is terminated by CR/FL characters. The height in metres is the water surface relative to the datum entered in the setup procedure. (record length: 26 char's including CR/LF) dd mm yy hr mm ss 17 17 17 17 13 13 13 13 06 06 06 06 09 09 09 09 06 12 18 24 35 35 35 35 Tide height (metres) 7.85 7.90 7.99 8.03 <CR><LF> Type 2 – (short) This type is the same as type 2, but without any date information and with ':' characters as separators in the time part. The height in metres is the water surface relative to the datum entered in the setup procedure. This is the tide format accepted by the CEEDUCER PRO™ Hydrographic Survey System and the CEESTAR™ Dual Frequency Echosounder for real time tide correction of depth data. (record length: 17 chars including CR/LF) Hr:mm:ss 13:20:00 13:30:00 13:40:00 13:50:00 14:00:00 Tide height (metres) 8.90 8.78 8.70 8.50 8.29 <CR><LF> Type 3 – (ASCII: 2) This type is the same as type 1, but it includes '-' characters as separators in the date part, and ':' characters as separators in the time part. It also includes a checksum, generated from all the characters preceding the asterisk. The height in metres is the water surface relative to the datum entered in the setup procedure (record length: 30 char's including CR/LF) dd-mm-yr hr:mm:ss 17-06-09 17-06-09 17-06-09 17-06-09 13:20:35 13:20:40 13:20:45 13:20:50 Tide height (metres) 8.90 8.90 8.90 8.90 *checksum <CR><LF> *30 *32 *37 *33 33 CEETIDE™ User Manual V1.27.02 Type 4 – (LONG ) This is similar to type 3, but includes further information: the distance from the PROBE, the PROBE mA reading, and battery voltage. The height in metres is the water surface relative to the datum entered in the setup procedure (record length: 51 char's including CR/LF) dd-mm-yr hr:mm:ss 17-06-09 17-06-09 17-06-09 17-06-09 13:21:03 13:21:05 13:21:10 13:21:15 Tide height (metres) 8.90 8.90 8.90 8.90 PROBE distance (metres) 1.10 1.10 1.10 1.10 mA 5.06 5.06 5.06 5.06 Battery level Volts 12.4 12.4 12.4 12.4 *checksum<CR><LF> *0E *08 *0C *09 Type 5 – (RevType1) This output displays the water level in the first field as required by some software systems. The height in metres is the water surface relative to the datum entered in the setup procedure. This is the tide format accepted by HYPACK Hydrographic software for real time tide correction of depth data. (record length: 30 char's including CR/LF) Tide height (metres) 8.90 8.90 8.90 8.90 dd-mm-yr hh:mm:ss *checksum<CR><LF> 17-06-09 17-06-09 17-06-09 17-06-09 13:21:30 13:21:30 13:21:30 13:21:30 *34 *31 *33 *36 Type 6 – (RevLong) This output is a more detailed output of format 5. The height in metres is the water surface relative to the datum entered in the setup procedure. This format is also accepted by HYPACK Hydrographic software for real time correction of depth data (record length: 51 char's including CR/LF) Tide height (metres) 8.90 8.90 8.90 8.90 dd-mm-yr hr:mm:ss 17-06-09 17-06-09 17-06-09 17-06-09 13:22:07 13:22:10 13:22:15 13:22:20 PROBE distance (metres) 1.10 1.10 1.10 1.10 mA 5.06 5.06 5.06 5.06 Battery level Volts 12.4 12.4 12.4 12.4 *checksum<CR><LF> *09 *0F *0A *0C Type 7 – (SHORT 3) Same as type 3(ASCII:2) but with tide output to 3 decimal places. The height in metres is the water surface relative to the datum entered in the setup procedure (record length: 30 char's including CR/LF) dd-mm-yr hr:mm:ss 17-06-09 17-06-09 17-06-09 17-06-09 13:22:51 13:22:55 13:23:00 13:23:05 34 Tide height (metres) 8.901 8.901 8.901 8.901 *checksum <CR><LF> *21 *25 *24 *21 Type 8 – (LONG 3) Same as type 4 but with tide output to 3 decimal places. The height in metres is the water surface relative to the datum entered in the setup procedure (record length: 51 char's including CR/LF) dd-mm-yr hr:mm:ss 17-06-09 17-06-09 17-06-09 17-06-09 13:23:36 13:23:40 13:23:45 13:23:50 Tide height (metres) 8.900 8.900 8.900 8.900 PROBE distance (metres) 1.100 1.100 1.100 1.100 mA 5.066 5.066 5.066 5.066 Battery level Volts 12.5 12.5 12.5 12.5 *checksum<CR><LF> *1D *1C *19 *1D Type 9 – (Denison) The message is started with a special ASCII leading character – control char “Start Of Text” <STX> (ASCII character 002) then the date, in MM-DD-YY format, the time in 24 hour format, a designator followed by a colon, and then the Tide height in millimetres, then a 1 and a 0. The height in millimetres is the water surface relative to the datum entered in the setup procedure (record length: 34 char's including CR/LF) <STX> mm-dd-yr hr:mm:ss 1: 06-17-09 06-17-09 06-17-09 06-17-09 13:24:25 13:24:30 13:24:35 13:24:40 1: 1: 1: 1: Tide height (mm) 8900 8900 8900 8900 1 0<CR><LF> 1 1 1 1 0 0 0 0 NOTE: that depending on the character set being used to display this data, because the <STX> character is relatively rarely used, this will display differently in different systems. As well as the character shown here, it is common to see <STX> displayed as a little “smiley face” 35 CEETIDE™ User Manual V1.27.02 Appendix A – hardware details Physical Properties – CEETIDE™ control unit Dimensions (lid closed): Weight: Temperature range: 345mm(w) x 300mm(d) x 150mm(h) 6.6 kg 0-50 degrees Celsius. Electrical Properties CEETIDE™ running power requirements Input Voltage: 11V – 13V Internal battery: 2V/7Ah SLA (suitable for back up, short term use only) Input Current @ 12V: 100mA (BASE POWER REQUIREMENT) +100mA (DISPLAY ON) +50mA (4-20mA loop powered Siemens LU and LR probe ON) (note: 80mA start-up draw over the first 10s) +270mA (Milltronics The Probe ON) +30mA (ISM 2.4GHz modem ON + TRANSMIT) +125mA (Satel UHF modem ON) +450mA (Satel UHF modem ON + TRANSMIT) NOTE: These current draw figures are for energy budget power calculations only. Input current assumes absolutely NO charge current is going into the internal lead-acid battery inside the CEETIDE™ unit. Recharging of the internal battery is not included in power requirements above. NOTE: The CEETIDE™ does not go to sleep mode when running a radar (LR) probe. The probe is always measuring. CEETIDE™ battery charger requirements Nominal voltage: 12V Max Input Current: 1.5A Charger Type: 3 stage Lead Acid. Absolute maximum ratings Input voltage: 13.7V (maximum open circuit lead-acid battery voltage) UHF Modem 2.4GHz modem option Operating Frequency: 2.4GHz Satel UHF modem option Frequency Range: 2MHz Channel width: 25kHz Transmit power: 1W GPS Properties Frequency band: L1 Satellite reception channels: 12 36 Serial Output data Baud rate: Data Bits: Parity: Stop Bits: 2400-57600 8 None 1 Probe Connector – Loop powered Probe The Probe connection port on a CEETIDE™ is designed to mate with a Hirschmann CA6LS – 934-126100 plug. Signal Name Loop current supply Loop current output N.C. CA pin # 1 2 3,4,5,6,F Probe Connector – 24V powered Probe The Probe connection port on a CEETIDE™ is designed to mate with a Hirschmann CA6LS – 934-126100 plug. Signal Name Probe 24V Probe current output Probe GND N.C. CA pin # 1 2 F 3,4,5,6 Power Connector The Power connector port on CEETIDE™ is designed to mate with a 3-way LEMO 1B series male plug (LEMO P/N: FGG1B303CLAD) Signal Name 12V GND LEMO Pin# 1 2,3 Serial Data Connector The Serial connector port on CEETIDE™ is designed to mate with a 5-way LEMO 1B series male plug (LEMO P/N: FGG1B305CLAD52) Signal Name GND CEETIDE™ Data output CEETIDE™ Data Input NC LEMO pin # 5 4 3 2,1 Modem Antenna Connector The modem antenna cable connects to CEETIDE™ with a standard TNC connector. GPS Antenna Connector The GPS Antenna cable connects to CEETIDE™ with a standard BNC connector 37 CEETIDE™ User Manual V1.27.02 Appendix B – cable details CEETIDE™ PROBE Cable (Loop Power) For Siemens LU and LR probe types use 20m of 2 core Canare L-2T2S cable, with Hirschmann CA6LS – 934-126-100 plug. The other end of the cable is bare stripped and tinned wire (~1cm) for connection to the PROBE screw terminals. Signal Name Loop current Supply Loop current return CA6LS pin # 1 2 Probe terminal “+” “-“ wire WHITE BLUE CEETIDE™ PROBE Cable (24V power) For Milltronics “The Probe” use 20m of standard 3 conductor Australian mains flex, with Hirschmann CA6LS – 934-126-100 plug. The other end of the cable is bare stripped and tinned wire (~1cm) for connection to the PROBE screw terminals. Signal Name 24V Supply Probe Current output GND CA6LS pin # 1 2 F Probe Terminal “24V+” (3) “mA+” (1) “-“ (2) wire BROWN BLUE GREEN/YELLOW CEETIDE™ POWER Cable Use 2.5m of 2 core Canare L-2T2S cable, with LEMO P/N: FGG1B303CLAD on one end, and the other end terminated with tinned Red and Black 1.5A rated leads. Signal Name Vsupply (12VDC) GND LEMO pin # 1 2,3 wire RED BLACK CEETIDE™ Serial Data Cable (DCE) To connect a CEETIDE™ to a computer with a standard D9 DTE interface, the cable should be terminated with a D9 female, with pins in DCE arrangement. Use 2.5m of 2 core Canare L-2T2S cable, with LEMO P/N: FGG1B305CLAD52 on one end, and a D9 female on the other. Signal Name LEMO pin # D9 FEMALE Pin # GND TM CEETIDE serial out TM CEETIDE serial in 5 4 3 5 2 3 38 CEETIDE™ DATA Cable (DTE) Most third party modems with a standard D9 connector for RS232 data will have the connector configured as a DCE interface. In this case, the cable to go from CEETIDE™ to the modem should be terminated with a D9 male, with pins in the DTE arrangement. Use 2.5m of 2 core Canare L-2T2S cable, with LEMO P/N: FGG1B305CLAD52 on one end, and a D9 male on the other. Signal Name GND TM CEETIDE serial out TM CEETIDE serial in LEMO pin # 5 4 3 D9 MALE Pin # 5 3 2 TM CEETIDE TELEMETRY ANTENNA Cable Use 10m of 50-ohm coaxial cable (RG-58) terminated at one end with a male TNC connector and at the other end with a male N-Type connector. TM CEETIDE GPS ANTENNA Cable Use 5m of 50-ohm coaxial cable (RG-58) terminated at one end with a male BNC connector and at the other end with a male TNC connector. 39 CEETIDE™ User Manual V1.27.02 Appendix C – probe details Sitrans Probe LU Dimensions Details The Sitrans Probe LU is a 4-20mA loop powered acoustic liquid level sensor. The version of the LU sold with a CEETIDE™ is supplied by default configured for 0.5 (4mA) to 12.0m (20mA). The Probe reference point is the face (lowest point) of the acoustic probe. Please specify on your order if you would like the probe to be supplied configured with a different operational range (if probe is to only be used in an area of small variation of water level) The reference point is the face of the transducer (lowest point). Beam angle = 10° @-3dB boundary. Figure 10: Sitrans Probe LU 40 Configuration Figure 11 LU and LR probe display screen Display layout 1. Parameter value entered 2. Parameter 3. Programming icon. In programming mode when displayed 4. Parameter explanation To configure a Sitrans Probe LU, the operator will require a hand programmer. The hand programmer is not supplied as part of the standard CEETIDE™ kit; please contact CEE HydroSystems™ or your local agent if you require a hand programmer. It is also a requirement for the CEETIDE™ to power the probe. Connect the CEETIDE™ control unit to the Probe, turn on the CEETIDE™, enable the display, and enable Key Access. This will provide 10 minutes of probe power in order to make adjustments. 1. The probe requires settings for “Empty Level” (i.e. the maximum distance – which is the 20mA distance) and for the “Span” (i.e. the range that can be measured – which is the 20mA distance minus the 4mA distance). This converts the mA distance to metres (if configured to display metres) i.e., given default CEETIDE™ 4mA distance of 0.5m, and 20mA distance of 12.0m, the PROBE “Empty Level” is set to 12.0m, and the probe “Span” is set to (12m – 0.5m) = 11.5m. 2. Point the programmer at the Probe, and press the program button (this button has an icon that is a matrix of 3x4 squares). The LCD screen of the Probe will then display this programming icon. 3. Next press the display button (which has an icon that is an arrow in a clockwise circle) to get into programming mode. 4. Use the up and down buttons to increase or decrease the parameter number, or press display button, followed by the parameter number on the keypad, and then enter (a circle with a star in it, with an arrow that goes down then left) to go to a parameter directly. Values for parameters are set by keying them in on the keypad and then pressing enter. A parameter can also be set to its default value by pressing the clear (capital C) button and then the enter button. Clear/enter is the key sequence used to trigger a master reset, when on the master reset parameter, too. 41 CEETIDE™ User Manual V1.27.02 Settings for a probe LU should be set in the following order: P999 (master reset) – initialise probe back to default settings) P010 (language) set to 1 – English P001 (mode of operation) set to 3 – DISTANCE measurement P002 (material) set to 1 – water P003 (response time) set to 1 – slowest P005 (units) set to metres P006 (“empty level” – max distance) set to 9.5m P007 (“span” – measurement range: empty level – span = min distance) set to 9m P201 (ma output function) set to 2 – space between top of span, and actual water height. Setting the master mode (P001) to 3 sets display and mA output to mode 3, and then setting P201 to 2 leaves display in mode 3, and sets mA output to mode 2.) NOTE: Adjusting P001 will also reset the value of P201. Always ensure that P201 is set correctly after adjusting P001. Sitrans Probe LR Dimensions Details The Sitrans Probe LR is a 4-20mA loop powered radar liquid level sensor. It operates using radar signals rather than acoustic signals. The long polyproelne it requires a radar waveguide to operate, it has a physically different appearance. The probe reference point is at the bottom of the metal locking collar. Figure 12: Sitrans Probe LR 42 Configuration of LR Radar Probe To configure a Sitrans Probe LR, the operator will require a hand programmer. The hand programmer is not supplied as part of the standard CEETIDE™ kit; please contact CEE HydroSystems™ your local agent if you require a hand programmer. It is also a requirement for the Probe to be powered on (i.e. CEETIDE™ running the probe) connect the CEETIDE™ control unit to the Probe, turn on the CEETIDE™, enable the display, and enable Key Access. This will provide 10 minutes of probe power in order to make adjustments. The setup is procedure is described below: 1. The LR probe does not use a 4mA distance and a 20mA distance like the CEETIDE™ does. To convert your required 4mA distance and 20mA distance into the numbers your probe needs is simple. The probe requires settings for “Empty Level” (i.e. the maximum distance – which is the 20mA distance) and for the “Span” (i.e. the range that can be measured – which is the 20mA distance minus the 4mA distance) i.e., given default CEETIDE™ 4mA distance of 0.5m, and 20mA distance of 9.5m, the PROBE “Empty Level” is set to 9.5m, and the probe “Span” is set to (9.5m – 0.5m) = 9m. 2. Point the programmer at the Probe, and press the program button (this button has an icon that is a matrix of 3x4 squares). The LCD screen of the Probe will then display this programming icon. 3. Next press the display button (which has an icon that is an arrow in a clockwise circle) to get into programming mode. 4. Use the up and down buttons to increase or decrease the parameter number, or press display button, followed by the parameter number on the keypad, and then enter (a circle with a star in it, with an arrow that goes down then left) to go to a parameter directly. Values for parameters are generally set by keying them in on the keypad, and then pressing enter. However a parameter can also be set to its default value by pressing the clear (capital C) button and then the enter button. Clear/enter is the key sequence used to trigger a master reset, when on the master reset parameter, too. Settings for a probe LR should be set in this order: P999 (master reset) - initialise probe back to default settings) P010 (language) set to 1 - English P001 (mode of operation) set to 3 - DISTANCE measurement P003 (response time) set to 1 - slowest P004 (antenna type) set to 240 – rod antenna P005 (units) set to metres P006 (“empty level” - max distance) set to 9.5m P007 (“span” - measurement range: empty level – span = min distance) set to 9m P201 (ma output function) set to 2 –space between top of span, and actual water height. NOTE: Adjusting P001 will also reset the value of P201. Always ensure that P201 is set correctly after adjusting P001. 43 CEETIDE™ User Manual V1.27.02 Milltronics THE PROBE Dimensions Details The Milltronics The Probe is a direct 24V powered acoustic liquid level sensor. That provides a 4-20mA output signal. The version of The Probe sold with a CEETIDE™ has a maximum range of 0.5-10m, but is supplied by default configured for 0.5-9.5m (please specify during order if you would like this supplied configured with a different range). The reference point is the face of the transducer (lowest point). Beam angle = 10 degrees at -3dB boundary. Figure 13: Milltronics THE PROBE Configuration Milltronics THE PROBE has a 2 button interface with a 3 character LCD, so does not require a remote control unit to operate. To access the control panel of the probe, a single screw at the top of the unit must be loosened, and then a hinged lid can be lifted up to reveal the programming interface. There are only two buttons available. In this case, to edit a parameter, both buttons must be pressed together a number of times to select the parameter to edit, and then the “20” button will increment the selected parameter, while the “4” button will decrement the parameter. There is no edit cancel or parameter select cancel button – While selecting a parameter, each subsequent press of the buttons together will select the next one. After editing a parameter, the probe must be left alone to time out (around 30 seconds) it will then save the new parameter value into non-volatile memory, and go back to the default display mode. 44 Press buttons (together) Mode Shows Default Units 4 + 20 c4 4 mA distance 0.50 metres c 20 20 mA distance 9.50 metres bL blanking dist 0.50 metres SP response Speed 2 ( 1 to 4 ) (see note) 1=slow, 2=norm al 3=fast, 4=very slow AL Alarm 0.0 (not used) FLS Fail Safe option 3 (not used) UN Units 1 (1=metr e) (press again) 4 + 20 (press again) 4 + 20 (press again) 4 + 20 (press again) 4 + 20 (press again) 4 + 20 (press again) 4 + 20 45 CEETIDE™ User Manual V1.27.02 Probe mounting bracket All PROBEs sold by CEE HydroSystems™ are supplied with a steel mounting bracket. This mounting bracket provides a way to secure the probe by its collar mount system, and can be bolted either to the side or to the underside of a structure, allowing the Probe a direct and unimpeded line of sight down to the water level to be measured. Figure 14: Probe mounting bracket Calculating Probe Beam footprint Given a probe angle of Y degrees, and a given distance D from the probe, then the surface hit by the beam from the probe (the footprint) is a circle, with radius given by the equation R = D tan (Y/2). The Diameter is found by doubling the radius. Diameter = 2 x distance x tan(Y/2) This calculation can be done on any basic scientific calculator, the Microsoft Windows Calculator utility (in scientific mode), or even inside Microsoft Excel. NOTE: Ensure calculator is not in radians mode when evaluating the TAN() expression. Example footprint radius at given distances for a probe with a 10° beam angle: Beam width: 10 TAN(beam width/2): Distance (m) 46 footprint radius (m) 0.087488664 footprint diameter (m) 1.0 0.087 0.175 2.0 0.175 0.350 3.0 0.262 0.525 4.0 0.350 0.700 5.0 0.437 0.875 6.0 0.525 1.050 7.0 0.612 1.225 8.0 0.700 1.400 9.0 0.787 1.575 10.0 0.875 1.750 Appendix D – remote command options All CEETIDE™ remote commands have a similar format to them. The protocol used is logical, very easy, and virtually self-prompting. The commands are very similar to the MENU used from the front panel, and the same parameters are used. A prefix of two characters &* (ASCII CHR 38 and CHR 42) is sent before all commands. This is required to stop accidental access to CEETIDE™ settings. The command should finish with the <CR> and <LF> characters. (These are normally sent from the terminal program when you press the ENTER key). To request a report of the value of a parameter, simply send the related command by itself. To change the value of a parameter, follow the command with a forward slash character “/” and the new value. Responses to remote commands follow a similar structure. With either a parameter query or a set command, the CEETIDE™ unit will respond with the parameter name, the setting prior to the command being sent, and a list of possible values. Then if a parameter has been changed, a new line will follow specifying the new value that the parameter has been set to. In the case where a parameter has been requested to be set to an invalid value, the CEETIDE™ will respond with “no change” to highlight this. All commands listed below are provided with of an example of their use. In this case, Operator input is shown in bold, alongside CEETIDE™ response lines. &* SETUP The command &* SETUP is a special case, because it returns all the current parameter values, together with the options and allowable parameters, as well as operating parameters like battery voltage and PROBE status at the time the command is sent. The SETUP command provides an easy reference list to the other commands as they are displayed in the same form as they are entered as a command For example: &*SETUP CLOCK CLOCKUP CLOCKDN LOGINT MEASURE OUTINT OUTMEAS OUTFMT DOWNLFMT DOWNLOAD 4MADIS 20MADIS PROBLEVL REJECT CALIBRATE BATTERY PROBE VAL : : : : : : : : : : : : : : : : : 17 Jun 2009 14:21:09 / (Adjust seconds up) / (Adjust seconds down) 5 / 1,2,5,6,10,15,20,30 min 60 / 60,120,180,240 sec 0 / 0,5,10,15,30,60 sec 60 / 30,60,90 sec 9 / 1,2,3,4,5,6,7,8,9 1 / 1,2,3 48 / Hours to download 50 / Sensor setting 950 / Sensor setting 1000 / Height above datum 1 / 0,1,2 x Std 500 / Mid-range = 500 12.6V / Battery voltage SLEEP 47 CEETIDE™ User Manual V1.27.02 &* CLOCKUP or &* CLOCKDN These commands set a time offset in seconds (0-30) for the Real Time clock in the CEETIDE™. They change the clock up or down by a number of seconds, see example: &*CLOCKUP/2 CLOCK : CLOCKUP : CLOCKDN : CLOCK : 17 Jun 2009 14:21:27 / (Adjust seconds up) / (Adjust seconds down) 17 Jun 2009 14:21:29 &*CLOCKDN/2 CLOCK : CLOCKUP : CLOCKDN : CLOCK : 17 Jun 2009 14:21:35 / (Adjust seconds up) / (Adjust seconds down) 17 Jun 2009 14:21:33 The new time reading is sent in the command response, so it is easy to check that the clock adjustment is correct, but allow for approximately 1 second delay in the data transmission. NOTE: if the system time is adjusted, any existing Measure Period (and associated Log Record) will be cancelled, and a new Measure Period will be scheduled for the next possible Log Record. &* LOGINT This command sets the log interval in minutes to one of the following options; 1,2,5,6,10,15,20 or 30 minutes, see example: &*LOGINT/1 LOGINT : LOGINT : 5 / 1,2,5,6,10,15,20,30 min 1 / NOTE: if the Log Interval is adjusted, any existing Measure Period (and associated Log Record) will be cancelled, and a new Measure Period will be scheduled for the next possible Log Record. &* MEASURE This command sets the Logging Measure Period in seconds (60,120,180,240) – note that if no real time output is enabled, then this Measure Period determines the on time of the probe every Log Interval, see example: &*MEASURE/60 MEASURE : MEASURE : 120 / 60,120,180,240 sec 60 / NOTE: if the measure Period is adjusted, any existing Measure Period (and associated Log Record) will be cancelled, and a new Measure Period will be scheduled for the next possible Log Record. 48 &* OUTINT This command sets the Real Time Output Interval in seconds (0,5,10,15,30,60), see example: &*OUTINT/30 OUTINT : OUTINT : 0 / 0,5,10,15,30,60 sec 30 / &* OUTMEAS This command sets the Real Time averaging algorithm’s measure period. In Seconds (30,60,90), see example: &*OUTMEAS/60 OUTMEAS : OUTMEAS : 30 / 30,60,90 sec 60 / NOTE: if the Real Time measure period is adjusted, then the existing real Time Measure Period will be cancelled, and a new one started. &* OUTFMT This command sets the Real Time Output Format option (1,2,3,4,5,6,7,8,9), see example below: Output format options: 1. ASCII 1 2. SHORT 3. ASCII:2 4. LONG 5. RevType1 6. RevLONG 7. SHORT 3 8. LONG 3 9. Denison &*OUTFMT/1 OUTFMT : OUTFMT : 9 / 1,2,3,4,5,6,7,8,9 1 / selects the current output format to type 1 &* DOWNLFMT This command sets the Log Data Download Format (1,2,3), see example: &*DOWNLFMT /1 DOWNLFMT : DOWNLFMT : 2 / 1,2,3 1 / selects the download format to type 1 49 CEETIDE™ User Manual V1.27.02 &* DOWNLOAD This command begins a download process for a number of HOURS before NOW of Log Data (032,500,ALL) Download time selection 0 = No download 1 to 32500 = download period in hours ALL = All data The DOWNLOAD command requires a confirmation stage, in order to double check that the user wants to download the age of data requested. The download starts 30 seconds after the confirmation, to allow the operator to open or specify a file to capture the data. In Windows HyperTerminal, use the capture text option and enter the file name and location in which you will store the download data. On completion of the download ‘STOP’ the capture text. If when viewing the download file there are any extra lines these can be removed in the viewing editor – typically WordPad. NOTE: The download request period is hours before NOW (as shown on system clock) and not the last hours logged by the CEETIDE™. In the case where a CEETIDE™ has been removed from its installation and taken back to the office to download (and has therefore been switched off for a period of time) requesting log data relating to a time period where the CEETIDE™ was off and in transit will of course result in an empty data set. Example: &*DOWNLOAD/ALL DOWNLOAD : 48 / Hours to download 0=CANCEL, ALL send command &*CONFIRM DOWNLOAD :ALL waiting for CONFIRM &*CONFIRM CONFIRMED.. DOWNLOAD :start in 30 seconds &* 4MADIS This command sets the distance (in CENTIMETRES) that relates to a signal of 4mA from the PROBE, see example: &*4MADIS/65 4MADIS : 4MADIS : 50 / Sensor setting 65 / sets the 4mA distance from 50 to 65 centimetres. NOTE: The 4mA and 20mA setting MUST be set to match the configuration of the PROBE. If the 4mA and/or 20mA values do not match the recorded levels will not be correct. The factory setting of the probe is included on the packing documents at time of delivery. Default factory setting for 4mA distance is 50cm. Contact CEE HydroSystems™ if you require confirmation of your probe settings. 50 &* 20MADIS This command sets the distance (in CENTIMETRES) that relates to a signal of 20mA from the PROBE, see example: &*20MADIS/950 20MADIS : 20MADIS : 999 / Sensor setting 950 / sets the 20 mA distance from 999 to 950 centimetres. NOTE: The 4mA and 20mA setting MUST be set to match the configuration of the PROBE. If the 4mA and/or 20mA values do not match the recorded levels will not be correct. The factory setting of the probe is included on the packing documents at time of delivery. Default factory setting for 4mA distance is 950cm. Contact CEE HydroSystems™ if you require confirmation of your probe settings. &* PROBLEVL This command sets the height (in CENTIMETRES) of the probe zero above or below the Reference Datum. The range available is -9999.9 to 9999.9 centimetres. example: &*PROBLEVL/500 PROBLEVL : 1000 / Height above datum PROBLEVL : 500 / sets the PROBE level from 1000 to 500 centimetres above the tide zero datum. &* REJECT This command sets the Standard Deviation rejection filter (0, 1, 2) 0 1 2 example: &*REJECT/1 REJECT : REJECT : = No data rejection = reject > 1 x Std. dev = reject > 2 x Std. dev 0 / 0,1,2 x Std 1 / sets the rejection filtering from OFF, to 1 x Std. deviation. 51 CEETIDE™ User Manual V1.27.02 &* CALIBRATE This command sets the PROBE calibration factor (400-600) 500 is mid range. WARNING: While this setting is provided to the Operator, and described here, we have not seen any instances where a PROBE and CEETIDE™ unit required special calibration. This is provided as a possible “problem solver” for the possibility of a future unknown calibration issue. If a physically measured PROBE distance is different to what is shown in the CEETIDE™, please double check ALL other things (probe zero measure point, 4mA distance setting, 20mA distance setting) before considering adjusting this. Do not adjust this setting without specific instruction from CEE HydroSystems™ Technical Support staff. NOTE: Calibration, if ever required, should be done in a test setup with the PROBE pointing at a solid surface (wall etc) at about the mid-distance. Compare the measured distance as shown on the PROBE, to the measured distance shown on the CEETIDE™ unit, as well as an actual measurement from probe face to the solid surface, and fine-tune using the calibration value. Once the system is calibrated, do not change this setup. Example &*CALIBRATE /480 CALIBRATE : 500 / Mid-range = 500 CALIBRATE : 480 / sets the calibration factor to 480, so that the measured distances will be shortened. &* CLEARLOG This command starts the process to remove all logged data from the internal memory. It accepts the arguments (1,0) 1 = YES, 0 = NO The CEETIDE™ will require confirmation of this command. It will reply with a confirmation request, and on receipt of the confirmation, it will clear all Log Memory, see example: &*CLEARLOG/1 CLEARLOG : 0 = no / 1 = yes send command &*CONFIRM CLEARLOG : waiting for CONFIRM &*CONFIRM CONFIRMED.. ERASING ALL LOG DATA LOG DATA CLEARED 52 Appendix E – Download example via HyperTerminal Any terminal program can be used to access the CEETIDE™ system and change configurations or download Log Data. An example of how to access the CEETIDE™ via HyperTerminal is shown here, as HyperTerminal is a widely known and available terminal program. However any other terminal program should be able to do the same thing, and the principles shown here apply to all of them. 1. First, Launch HyperTerminal. 2. The first HyperTerminal window asks you to enter a NAME for a new connection profile – people typically use AAA, but it’s possible to name it something memorable, and then SAVE that connection profile so that the profile can be loaded in future, and setup parameters don’t have to be re-entered. If you don’t have an existing profile Click OK If you do have an existing profile, click CANCEL, and skip to step 5. 3. If connecting direct by cable or radio Modem, ignore the telephone number field and select the “Connect using” field to show the Communications port to be used. Typically, “COM1” and then Click OK. NOTE: to use a dialup service to connect to a 3G /CDMA telemetry equipped CEETIDE™, you need to select the computer’s modem instead of a com port, and then enter the phone number of the CEETIDE™ modem. 4. The Properties setup window for the com port selected will then appear. Set the BPS to match that set in the CEETIDE™ (or in use at the local radio Modem) Leave Data bits, Parity and Stop Bits as 8, None, 1 (these are default settings) set “Flow Control” to None. click Apply, click OK 5. You will now be on the HyperTerminal main terminal window, which will be connected to the Com Port you selected, at the settings you selected, or will not be connected if you simply pressed CANCEL at step 2. i. To set-up ‘echo’ of characters typed locally follow the sequence: Select the “File>Properties” menu option. This will pop up the properties window for your current connection profile. Click on the “Settings” tab, and then the “ASCII Set-Up” button. In the ASCII sending window tick both “line feed” and the “echo locally” check boxes. Click OK and again click OK to return to the main HyperTerminal window. ii. To load and save connection profiles here, simply select the “FILE>OPEN”, “FILE>SAVE”, and “FILE>SAVE AS” menu items as required. When you type a character on the computer keyboard it should appear on the computer screen. Type &* SETUP followed by the enter key on the computer. The CEETIDE™ should respond with the current set-ups in use. 53 CEETIDE™ User Manual V1.27.02 Once communication with the CEETIDE™ is established all variable settings can be changed. 6. With connection configured, it’s time to communicate with the CEETIDE™ Before downloading logged data from the CEETIDE™ it is necessary to open a file on the computer to receive the incoming data. To open a file for reception of Data on the active HyperTerminal screen follow the sequence: Select the menu item TRANSFER>CAPTURE TEXT The Capture Text dialog window will come up, where the file name for capturing the serial port data is selected. Click Browse.. and choose the location and name of file. Click START. All screen information from here-on will be recorded in the named file. 7. First check that the download format currently set in the CEETIDE™ is what you require. Choices are 1,2 or 3. Typing the command “&*DOWNLFMT” will show you what format is currently selected. You can change the format to any of( 1,2,3) with a command “&*DOWNLFMT/1” 8. Type in the command &* DOWNLOAD /ALL - This command instructs the CEETIDE™ to send all logged Data. Other periods for Data download can be specified by using the /nn command suffix where nn = hours. On receipt of the command the CEETIDE™ responds by asking for confirmation of the command. Reply by sending “&* CONFIRM” The CEETIDE™ responds by advising that Data download will commence in 30 seconds. This delay is to allow the Operator to set-up a receiving file if not already prepared. On expiry of the 30 sec delay Data transfer begins with the data being sent in packets until all is transferred. Data is displayed on the computer screen as it is being received. Pauses in reception are normal and are intended to avoid overloading any data buffers in the telemetry link. The first line of the logged data transfer is: ;START OF LOGGED DATA The last line of the logged data transfer is ;END OF LOGGED DATA On completion of download you will see the last line. 9. On the main HyperTerminal Window select TRANSFER>CAPTURE TEXT>STOP. The receiving file is now closed. 10. Disconnect HyperTerminal from the computer com port by selecting the Call>Disconnect menu item. HyperTerminal can now be shut down. 11. Use Windows WORDPAD or similar text editor to view the downloaded file. Delete any ‘extra’ text such as the download commands present in the file. The Tide data can be edited or field order changed by use of Windows Excel or similar Spread sheet. 54 Index & Downloading stored data ................................ 31 &* 20MADIS.....................................................51 &* 4MADIS .......................................................50 &* CALIBRATE ................................................52 &* CLEARLOG ................................................52 &* CLOCKDN ..................................................48 &* CLOCKUP...................................................48 &* DOWNLFMT ...............................................49 &* DOWNLOAD ...............................................50 &* LOGINT.......................................................48 &* MEASURE ..................................................48 &* OUTFMT .....................................................49 &* OUTINT.......................................................49 &* OUTMEAS ..................................................49 &* PROBLEVL .................................................51 &* REJECT ......................................................51 &* SETUP ........................................................47 E 2 20 mA Distance ...............................................23 4 4 mA Distance .................................................23 B baud rate ..........................................................27 C Calculate battery power consumption .............19 Calculating Probe Beam footprint ....................46 Calibration ........................................................24 TM CEETIDE download formats ........................32 CEETIDE™ Buttons .......................................... 8 CEETIDE™ Display ........................................... 8 CEETIDE™ LEDs .............................................. 7 charger requirements ......................................36 Clear Log .........................................................26 clearing Log Data.............................................20 Communications Baud ....................................27 Configuration of LR Radar Probe ....................43 configure a Sitrans Probe LU ..........................41 Connecting to CEETIDE™ Utility program ......28 Connections ....................................................... 9 Copyright ........................................................... 2 Critical settings ................................................17 D DATA Cable (DTE) ..........................................39 Demo Mode .....................................................27 Download .........................................................24 Download example via HyperTerminal ............53 Download Format ............................................24 Electrical Properties ........................................ 36 TM Enabling CEETIDE key access ................... 13 TM Enabling the CEETIDE display Display ......................................................... 13 Exit .................................................................. 27 F FCC Information for the USA ............................ 2 Firmware version ............................................ 21 Front Panel ....................................................... 7 G Getting started ................................................ 10 GPS ANTENNA Cable .................................... 39 GPS Antenna Connector ................................ 37 GPS Properties ............................................... 36 GPS time correction ........................................ 20 Graph Maximum ............................................. 25 Graph Minimum .............................................. 25 Graph Scale .................................................... 25 H Hard Reset ...................................................... 26 I Important settings ........................................... 17 Installing a GPS antenna ................................ 11 Installing a telemetry antenna ......................... 11 TM Installing the CEETIDE unit ......................... 11 Introduction ....................................................... 5 K key access ...................................................... 13 L Log Interval ..................................................... 22 Log Measure Period........................................ 22 M Making connections ........................................ 12 Memory capacity used .................................... 21 menu system ................................................... 16 Menu system options ...................................... 21 Milltronics THE PROBE Dimensions .............. 44 Modem Antenna Connector ............................ 37 Mounting the PROBE (Sensor) ....................... 10 N Notice of Liability ............................................... 2 55 CEETIDE™ User Manual V1.27.02 O operational considerations ...............................18 Output Format..................................................23 P Physical Properties – CEETIDE™ control unit 36 POWER Cable .................................................38 Power Connector .............................................37 power requirements .........................................36 TM Powering up the CEETIDE ...........................13 PROBE Cable (24V power) .............................38 PROBE Cable (Loop Power) ...........................38 Probe Connector..............................................37 Probe Height ....................................................23 PROBE height .................................................11 PROBE height vs. Tidal range.........................18 Probe LU Dimensions ......................................40 Probe mounting bracket ..................................46 Probe Type ......................................................27 Q Quick Reference Guide ..................................... 4 R Radio Channel .................................................26 Real Time Data Output ....................................32 Real Time Measure Period ..............................23 Real time output formats .................................33 Real Time Output Interval ................................23 Rejection ..........................................................25 remote command options ................................47 System Configuration...................................... 13 System Description ........................................... 5 System installation .......................................... 10 System Operation ............................................. 6 System Options ................................................. 5 System Setup .................................................. 29 T TELEMETRY ANTENNA Cable ...................... 39 TM The CEETIDE default screen ...................... 15 Turning Internal Telemetry on and off ............. 14 Type 1 Download .................................................... 32 Real Time .................................................... 33 Type 2 Download .................................................... 32 Real Time .................................................... 33 Type 3 Download .................................................... 32 Real Time .................................................... 33 Type 4 Real Time .................................................... 34 Type 5 Real Time .................................................... 34 Type 6 Real Time .................................................... 34 Type 7 Real Time .................................................... 34 Type 8 Real Time .................................................... 35 Type 9 Real Time .................................................... 35 S U Serial Data Cable (DCE) .................................38 Serial Data Connector .....................................37 Serial Output data ............................................37 Set Date / Time ................................................21 Sitrans Probe LR Dimensions .........................42 SMS Commands..............................................30 56 UHF Modem .................................................... 36 UHF telemetry system configuration ............... 20 Utility software ................................................. 28 V View History .................................................... 21 57 CEE Hydro Systems Unit 1, 12 Cecil Rd, Hornsby NSW 2077 Sydney Australia t: +61 (0) 2 9987 1581 f: +61 (0) 2 9987 1584 e: [email protected] www.ceehydrosystems.com www.ceehydrosystems.com