1
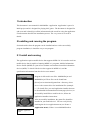
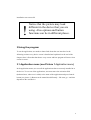
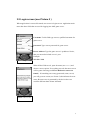
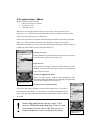
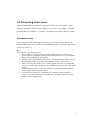
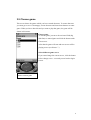
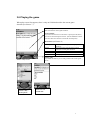
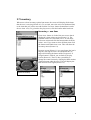
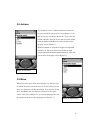
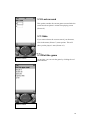
Mobi-project
User manual
Jouni Kuisma,
Mika Petra,
Tommi Salonen,
Seppo Silaste,
Tommi Suvinen
Software Engineering Project
Instructor: Marianne Korpela
UNIVERSITY OF HELSINKI
Department of Computer
Science
Helsinki 7th December 2003
Version history:
Version:
1.0
Date:
4.12.2003
Authors:
Mika Petra
Changes
Version for surveying
ii
Contents
1 Introduction ............................................................................................................ 1
2 Installing and running the program ......................................................................... 1
2.1 Install and running ............................................................................................... 1
3 Using the program .................................................................................................. 2
3.1 Application menu (see Picture 1 Application menu)............................................. 2
3.2 Login screen (see Picture 2 ) ................................................................................ 3
3.3 Login screen – Menu ........................................................................................... 4
3.4 Connecting to the server ...................................................................................... 5
Connection error.................................................................................................... 5
3.5 Choose game ....................................................................................................... 6
3.6 Playing the game ................................................................................................. 7
3.7 Inventory ............................................................................................................. 8
Inventory – use item .............................................................................................. 8
3.8 Actions ................................................................................................................ 9
3.9 Move ................................................................................................................... 9
3.10 Look around .................................................................................................... 10
3.11 Stats................................................................................................................. 10
3.12 Exit the game................................................................................................... 10
iii
1 Introduction
This document is user manual for MobiMidlet –application. Application is part of a
Mobi-project and it’s designed for playing MrX games. The document is designed for
end users and it should give all the information he/she needs for using the application.
First document describes the installation process. The very screen is covered in
details.
2 Installing and running the program
Section describes how the program can be installed and run. After successfully
program installation, it should be easy to run program.
2.1 Install and running
The application requires mobile-device that supports MIDP 2.0. It is tested to work on
mobile-device that is capable of running MIDP 2.0 –programs. Mobile Information
Device Profile (MIDP) is a part of Java runtime environment for mobile information
devices (MID). To check if the device has support for MIDP 2.0, read the
specification information from the devices user manual.
Program is delivered in two files: MobiMidlet.jar and
MobiMidlet.jad. These files can be found from
[driver]\src\ava\mrx\mobi\gameclient –directory, where
driver is the current driver for installation files (example
c:\.) To install files, you need application installer that can
be downloaded from manufactures homepage (devices). to
successfully install files to mobile-device, follow the
application installers instructions.
After successfully installation, the game files should be
installed to your mobile device. You can verify this by
checking the devices application menu (see Picture 1
Application menu). If there is text MobiMidlet then
Picture 1 Application
menu
installation was successful.
!
Notice that the picture may look
different in the device that you are
using. Also options and button
functions can be in different places.
3 Using the program
To use the application, user needs to know little about the user interface. In the
following sections every device screen is detailed and explained. At the end of the
chapter, there is flowchart that shows every screen and how program will move from
screen to screen. .
3.1 Application menu (see Picture 1 Application menu)
In the application menu, user sees all the applications that are currently installed in to
the device. To use one of the applications, user must move the activation field
(darkened area, where text is white) to the name of the application and press launchbutton (see picture 1). Button can be named also differently – like start, go – and that
depends on the used device.
2
3.2 Login screen (see Picture 2 )
When application is successful started, next screen is login-screen. Application main
menu has three fields that are used for logging into MrX game server.
Username: To this field type correct, qualified username for
game server.
Password: Type correct password for game server.
Server address: Type the game server’s ip-address. Notice,
that you must also include server’s port.
Example:
Picture 2 Login
192.168.1.1:80
When all the fields are ok, open the menu (see Picture 4 ) and
choose connect-option. If everything was ok, then next screen
will be game choosing (see Error! Reference source not
found. ). If something was wrong (password, name, server)
you will get error screen (see Picture 3) that informs the error
cause. Because error is generated by the device the error
could be different than written informed.
Picture 3 Error screen
3
3.3 Login screen – Menu
Menu screen has three functions.
1. Choose old server to connect
2. Connect to server’
3. Clear old servers’
When user is connecting the first time to server, there isn’t any old server on
menu(see Picture 4). When successful connection to server is made, the server will be
shown in the menu next time (see Picture 5).
Old servers are shown in the menu with following information: username, password
and server. These fields are separated with ;-delimiter. If some of the field’s
information is hidden, your can choose the field and the information will be written to
underlying forms fields (see the fields from Picture 2).
Connect to server
If the information in the fields looks fine, then you can login
to the server by selecting the connect-text.
Clear servers
If this option is selected, it will clear all the old servers from
database. Also this will refresh the current view and clear the
servers from the menu.
Go back to application menu
If you – for some reason – want to exit the application, click
Exit-button and application will stop running and application
screen will be displayed. See Picture 1).
Picture 4 Login - Menu
Previous servers and usernames
If you have previously logged successful to MrX game server, you can see
the old logins in the Menu. To use old server, username and password just
choose previous login from the menu and the information will be written to
the fields.
!
Notice that application can save only 5 old
servers. When the menu displays 5 servers and
you connect to new server, the first server is
removed and new server is inserted to menu.
Picture 5 Login Old servers
4
3.4 Connecting to the server
After the information is written to the appropriate fields, you can connect to game
server by opening the menu and choosing the connect-text. If everything – username,
password and server address – is in order, you will next go to game choosing –menu.
Connection error
If error occurred while connecting to the server, you will get message that tells the
reason for that error. After you have clicked DONE-button, you are back to the Login
screen (see Picture 2).
Errors
There are five errors that can occur.
1. Server address is wrong. You have forgotten the server port or the server
doesn’t exist. To correct this kind of error check that the server is operational
and you are connecting to correct port.
2. You don’t have any character in the server. This means that you have to go to
the homepage of the server and create character for the current server.
3. There isn’t any game on the server. If this happens, there isn’t any thing that
you can do. You must wait that the server administrator will create some game
to play.
4. You username incorrect. Check that you have typed the username correctly
and try again connecting to the server.
5. You password is incorrect. Check that your username and password are
correct. If you think that they are in order and you cannot connect to server,
contact servers administrator.
5
3.5 Choose game
This screen shows the games which you have created character. To create character
you must go to server’s homepage, create character and insert that character to some
game. When you have done this and you want to play that game, the game will be
shown in this menu.
Choose game
To choose game, just move the activated field (big
dark line) to wanted game and click the button under
Choose-text..
After that the game will start and next screen will be
playing screen (see Picture 7 )
Select different game server
If you want change the current server, click the button
below change server – text and you are back at loginscreen.
Picture 6 Choose game
6
3.6 Playing the game
When play screen first appears, there is only on field that describes the current game
situation (see Picture 7 ). .
Game description:
This field tells the current game situation.
Are description:
If you have used actions or look around –options from the menu,
you will see area description text here. (see also Picture 8 where
user have done some actions or used look around-option)
Menu button (see Picture
Inventory
Actions
Move
Look around
Stats
Picture 7 Play screen
Picture 9 Play menu options
9)
Go to screen, where you can see players
inventory
Go to screen that will tell all the possible
actions for current game situation
Move to different place if the game world
Search the current area
Show player stats.
Change game
If you click this button, you are will go back to the choose game –
screen. .
Picture 8 Look
around done
7
3.7 Inventory
When user selects inventory-option from menu, the screen will display all the items
that the user is carrying (Picture 10). To use item, move the active are (darkened line)
to the item that you want to use and click the Use item –button (button that is under
the use item –text). To go back to the play-screen, click the button under back-text.
Inventory – use item
If use item –button is clicked, the next screen that is
displayed is item actions-screen (Picture 12). The
possible actions are send from server, so user must
select one action and click the button under the With
action –text. If you want to select different item click
the button under Back-item –text. This will show the
inventory menu (Picture 10).
In target screen (Picture 11) you can choose the item’s
target by moving the active are (darkened line) to
target and clicking the button under Target-text. If
Target-button is clicked, you are back to the play
screen (Picture 9). There is also a possibility to
change the wanted action by clicking the Back-actions
–button (button under the text). This will display the
Item actions screen again (Picture 12).
Picture 10 Inventory
Picture 12 actions
Picture 11 Target
8
3.8 Actions
If you choose actions –option from menu (Picture 9),
next screen will be user actions screen (Picture 13). In
this screen you can choose what to do. To act click the
button under the Act-text. If you want to cancel action,
click the button under Back-text and you are back to
the play screen (Picture 7).
When Act-button is pressed, the targets are displayed
(Picture 14). There you choose one of the possible
options and click the button under DoIt-text. After that
you are back to the play screen (Picture 7).
Picture 13 user actions
3.9 Move
When you select move from menu (Picture 78), then you will
be shown the move-screen (Picture 15). In this screen you can
move you character to different location. You write the X and
the Y coordinate and you character will move in the game
world. After successfully move, you will be displayed the new
description of the area in the playing screen (Picture 7).
Picture 14 Actions target
9
3.10 Look around
This option searches the current game area and after the
search area description is written into playing screen
(Picture 8).
3.11 Stats
If you want to know the current stats of you character,
click in the menu (Picture 7) stats-options. This will
show you the player’s stats (Picture 16).
3.12 Exit the game
Picture 15 Move
At any time, you can exit the game by clicking the red
phone-button.
Picture 16 Stats
10