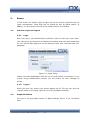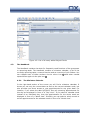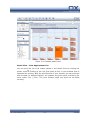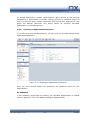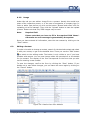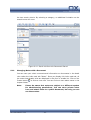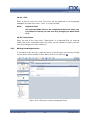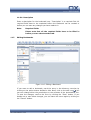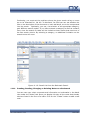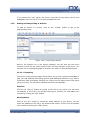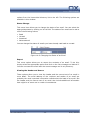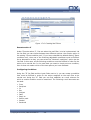
1
OPEN-XCHANGE™ Server 5
User Manual
v1.32
© Copyright 2005-2006, OPEN-XCHANGE Inc.
This document is the intellectual property of Open-Xchange Inc., Tarrytown, NY,
USA
The document may be copied in whole or in part, provided that each copy
contains this copyright notice.
The information contained in this book was compiled with the utmost care.
Nevertheless,
erroneous
statements
cannot
be
excluded
altogether.
Open-Xchange Inc., the authors and the translators are not liable for possible
errors and their consequences.
The names of software and hardware used in this book may be registered
trademarks; they are used without guarantee of free usability. Open-Xchange
Inc. generally follows the spelling conventions of the manufacturers. The
reproduction of brand names, trade names, logos etc. in this book (even without
special marking) does not justify the assumption that such names can be
considered free (for the purposes of trademark and brand name regulations).
Please direct any recommendations or comments to
[email protected]
Author:
Michael Mielewczik
Editors:
Michael Mielewczik, Dave Cuthbert, Marcus Klein,
Robert Colombara
Translation:
e-Lexica Digital Localization and Content, SRL (Madrid)
Layout:
Robert Colombara
© Copyright 2005-2006, OPEN-XCHANGE Inc.
-2-
Contents
1.
Preface ....................................................................................................... 7
2.
Introduction ............................................................................................... 8
2.1.
2.2.
2.3.
2.4.
2.5.
3.
Basics ....................................................................................................... 20
3.1.
3.2.
3.3.
3.4.
3.5.
3.6.
3.7.
4.
Calendar Basics ................................................................................46
Appointment View.............................................................................54
Creating an Appointment ...................................................................59
Contacts ................................................................................................... 70
6.1.
6.2.
6.3.
6.4.
6.5.
6.6.
6.7.
7.
The Portal Page ................................................................................40
The "Current" Page – Groupware News................................................42
The Handbook ..................................................................................43
Calendar ................................................................................................... 46
5.1.
5.2.
5.3.
6.
Intranet: Login and Logout ................................................................20
Graphical Buttons .............................................................................20
Rights Management ..........................................................................24
Notes ..............................................................................................31
Object Linking ..................................................................................33
Global Search ...................................................................................36
Sending E-Mails from the Groupware...................................................38
The Open-Xchange Server Portal .............................................................. 40
4.1.
4.2.
4.3.
5.
Benefits of Groupware Solutions .......................................................... 8
The Concept of Open-Xchange Server .................................................11
Introducing Open-Xchange Server ......................................................14
Working with the Groupware ..............................................................16
Now we’re ready to go.......................................................................18
Contacts ..........................................................................................70
Creating a new Contact .....................................................................75
Editing a Contact ..............................................................................80
Deleting a Contact ............................................................................81
Creating, Reading, Changing or Deleting Notes on a Contact ..................81
Linking a Contact with other Objects ...................................................83
Contact Attachments .........................................................................83
Tasks ........................................................................................................ 84
7.1.
7.2.
7.3.
7.4.
7.5.
Tasks Overview ................................................................................84
Tasks View.......................................................................................86
Creating a New Task .........................................................................86
Searching for a Task .........................................................................91
Changing a Task ...............................................................................92
OX 5 User Manual v1.32
-3-
Preface
7.6.
7.7.
7.8.
7.9.
7.10.
7.11.
8.
Projects .................................................................................................... 95
8.1.
8.2.
8.3.
8.4.
8.5.
8.6.
8.7.
8.8.
8.9.
8.10.
8.11.
8.12.
8.13.
8.14.
9.
Projects Overview .............................................................................95
Details View of a project ....................................................................96
Printing a Project List ........................................................................97
Creating a Project .............................................................................98
Changing a Project..........................................................................101
Project Archive ...............................................................................102
Creating, Reading, Changing or Deleting Notes on a Project .................103
Linking a Project with other Objects ..................................................103
Milestones for Projects.....................................................................103
Tasks for Projects ...........................................................................103
Dependencies.................................................................................104
Chart ............................................................................................105
History ..........................................................................................105
Project Attachments ........................................................................105
Documents ............................................................................................. 106
9.1.
9.2.
9.3.
9.4.
9.5.
9.6.
9.7.
9.8.
9.9.
9.10.
9.11.
9.12.
9.13.
10.
Delegating a Task .............................................................................92
Deleting a Task ................................................................................93
Creating, Reading, Changing or Deleting Notes on a Task ......................93
Linking Tasks to other Objects............................................................93
History ............................................................................................93
Task Attachments .............................................................................93
Document Folders ...........................................................................107
Creating Documents on the Server (Uploading) ..................................111
Retrieving a Document (Downloading)...............................................114
Changing Document Descriptions and Permissions ..............................114
Document Write Protection ..............................................................115
Sending an E-mail with a Document Link ...........................................115
Sending a File as an E-mail Attachment .............................................115
Deleting Documents ........................................................................116
Moving Folders and Documents ........................................................117
Searching for Documents.................................................................120
Managing Notes with a Document .....................................................121
Linking a Document with other Objects..............................................122
History ..........................................................................................122
Knowledge Entries.................................................................................. 123
10.1.
10.2.
10.3.
10.4.
10.5.
Knowledge Overview .......................................................................124
Creating new Folders.......................................................................125
Changing Folders ............................................................................126
Deleting Folders..............................................................................126
Viewing Knowledge Entries ..............................................................128
© Copyright 2005-2006, OPEN-XCHANGE Inc.
-4-
10.6.
10.7.
10.8.
10.9.
10.10.
10.11.
10.12.
10.13.
11.
Bookmarks ............................................................................................. 136
11.1.
11.2.
11.3.
11.4.
11.5.
11.6.
11.7.
11.8.
11.9.
11.10.
11.11.
11.12.
11.13.
12.
Forum Overview .............................................................................149
Creating and Editing Forums ............................................................150
Adding and Responding to Articles ....................................................151
Forum Archive ................................................................................153
Deleting Forums .............................................................................153
Deleting an Article ..........................................................................153
Editing an Article ............................................................................154
Searching for Articles ......................................................................154
Linking Objects to a Forum ..............................................................154
Subscriptions .................................................................................154
Canceling Subscriptions ...................................................................155
Pin Board ................................................................................................ 156
13.1.
13.2.
13.3.
13.4.
14.
Bookmarks Overview.......................................................................136
Creating new Folders.......................................................................138
Changing Folders ............................................................................139
Deleting Folders..............................................................................139
Opening and Viewing Bookmarks ......................................................141
Creating new Bookmarks .................................................................141
Editing Bookmarks ..........................................................................143
Deleting Bookmarks ........................................................................144
Moving Folders and Bookmarks ........................................................144
Searching for Bookmarks .................................................................146
Creating, Reading, Changing or Deleting Notes on a Bookmark.............147
Linking Bookmarks to other Objects ..................................................148
History ..........................................................................................148
Forum ..................................................................................................... 149
12.1.
12.2.
12.3.
12.4.
12.5.
12.6.
12.7.
12.8.
12.9.
12.10.
12.11.
13.
Creating new Knowledge Entries .......................................................128
Editing Knowledge Entries................................................................129
Deleting Knowledge Entries..............................................................130
Moving Folders and Knowledge Entries ..............................................130
Searching for Knowledge Entries.......................................................132
Creating, Reading, Changing or Deleting Notes on a Knowledge Entry ...134
Linking a Knowledge Entry with other Objects ....................................134
History ..........................................................................................135
Pin Board Overview .........................................................................157
Creating and Editing Entries .............................................................157
Printing the Pin Board Overview........................................................158
Deleting Entries ..............................................................................159
Email / Web Mail .................................................................................... 160
OX 5 User Manual v1.32
-5-
Preface
14.1.
14.2.
14.3.
14.4.
14.5.
14.6.
14.7.
14.8.
14.9.
14.10.
15.
Folder Concept........................................................................................ 191
15.1.
15.2.
15.3.
15.4.
15.5.
15.6.
15.7.
15.8.
15.9.
15.10.
16.
Private Folders ...............................................................................191
Public Folders .................................................................................191
Shared Folders ...............................................................................191
System Folders...............................................................................192
Open Folders..................................................................................192
Creating Folders .............................................................................192
Edit Folders....................................................................................195
Creating public Folders ....................................................................195
Deleting Folders..............................................................................195
Move Folders..................................................................................195
WebDAV Scenario to Access Documents ................................................. 196
16.1.
16.2.
16.3.
17.
Login and Logout ............................................................................160
How to Navigate the Web Mail Module ...............................................161
Email Overview ..............................................................................166
Email Details View ..........................................................................169
Reading and Editing Emails ..............................................................169
Writing new emails .........................................................................176
Moving Email Messages ...................................................................186
Deleting Emails ..............................................................................186
Personal Settings ............................................................................186
Adding Email Addresses as Contacts..................................................190
Accessing the Document Server using KDE Konqueror (Linux) ..............196
Accessing the Document Server using Windows 2000/XP .....................199
Accessing the Document Server using a Web Browser (Windows) .........202
Personal Setup ....................................................................................... 203
17.1.
17.2.
17.3.
17.4.
17.5.
17.6.
17.7.
Personal Data.................................................................................203
Groupware Settings ........................................................................203
Password .......................................................................................205
Mail Filter.......................................................................................206
Vacation Notice ..............................................................................211
Mail Folders....................................................................................213
Spam ............................................................................................214
© Copyright 2005-2006, OPEN-XCHANGE Inc.
-6-
1.
Preface
Many thanks and congratulations for having decided on the purchase of OpenXchange Server 5. The Open-Xchange Servers 5 product is a combination of an
efficient email server and a comprehensive groupware solution. In order to make
the introduction of a groupware solution successful in your enterprise, both for
company management as well as for users who are content and convinced, you
need to strive for user acceptance of this fascinating software solution. For this
reason, we will emphasize on the following pages what you can expect from a
groupware product in general and from Open-Xchange Server 5 in particular. We
will give you tips to help you make the introduction of a product whose
functionality is suitable for many enterprise structures a direct hit.
We extend our special thanks to the engineering project manager Martin Kauss
and the developers of the groupware portion of Open-Xchange Server 5 Ben
Pahne, Stefan Preuß, Marcus Klein, Benjamin Otterbach, Sebastian Kauss,
Thorben Betten, Jan Finsel, Sebastian Kotyrba, Manuel Kraft, Leonardo Di Lella,
Thorben Betten, Viktor Pracht and all other participants.
OX 5 User Manual v1.32
-7-
Preface
2.
Introduction
Since the application of IT systems in companies has brought massive changes
to the enterprise processes, more and more of these processes rely on electronic
data processing. Tasks which used to be performed in close personal
collaboration are now carried out asynchronously, in different locations and not
exclusively with persons of the own enterprise. In order to meet the resulting
demands for coordination, communication and high quality standards within and
beyond the enterprise, a requirement profile has developed that is met by a
unified software solution called “groupware”.
2.1.
Benefits of Groupware Solutions
Open-Xchange Server combines a powerful web-based groupware solution with
the proven email server which in turn builds on top of robust Linux Enterprise
platforms. You have thus decided on one of the most comprehensive solutions in
this category that is largely based on free software.
2.1.1.
Taking Care of Customer Relations
Most enterprises have recognized that customer relationships play a special role
for company success. No customer likes to repeat his requests over and over to
different employees or to hear the response “my colleague isn’t in and,
unfortunately, I don’t know when he’ll be back”. The speed of market changes
requires a quick and adaptable enterprise structure that is able to resist the
competitive pressures. The increasingly flatter structures (teamwork and project
work) place higher demands on communication and coordination of the involved
parties. The optimal company organization plays a central role for
communication and information flow, both for enterprise-internal processes as
well as for the collaboration with customers, suppliers or business partners. It is
vital to avoid breaks in communication structures, to close information gaps and
to accelerate the flow of information.
2.1.2.
What can Groupware do for You?
Groupware solutions such as Open-Xchange Server can help you better and
quicker coordinate spatially distributed employees by allocating tasks, providing
project support or by supplying the compulsory appointment calendar. Even in
small companies, coordinating employees with suitable applications leads to
higher efficiency and less collisions. In many companies, systematic data
collection and control of customer communications is a challenge requiring
centralized data storage and communication structures in order to be able to
retrieve the most current information at any given time. The concentration of
e.g. individual address sources in groupware such as Open-Xchange Server
© Copyright 2005-2006, OPEN-XCHANGE Inc.
-8-
reduces the duplication of data and the ensuing problems. If one person in the
company learns of particular address changes, the database can be updated and
the new address is immediately accessible to everyone. Of course, this means
that your colleagues also learn about the consequences of false entries, because
the permission structure makes it possible to change address data in such a way
that they become inaccessible to others.
2.1.3.
Central Data Storage
The possibility of associating a company address with several contacts reduces
the amount of redundant data. Another type of software meeting similar
requirements is known as “Customer Relationship Management” (CRM).
However, it has become clear that the real value of a groupware solution does
not lie in radical specialization of individual functions, but in the optimization of
business processes and in the support of the basic procedures. Thus, the
interoperability of groupware in general and Open-Xchange Server in particular
with other systems deployed in the enterprise (e.g., ERP, CRM) are an important
factor for positioning groupware as a supplement and integrator of existing
components of IT infrastructure. A further essential aspect of such
interoperability may be management of documents connected with customers or
projects.
2.1.4.
Information for All
As a rule, documents are created with a word processor or editor, sent out with
an email program and the document remains hidden from all others on the
workstation of the creator. In contrast, it makes sense to keep all documents
related to customers or projects together with the customer data or project data.
This can be accomplished with project and document management of the OpenXchange server. You colleagues thus have access to all relevant documents,
emails, calculations, appointments or notes and via the permission system you
can exercise meaningful control on the structure of the team. By defining their
own tasks and automatic reminders with the task management of Open-Xchange
Server, your colleagues can avoid missing important appointments or important
tasks.
2.1.5.
Information Pool
Of course you can also expand the scenario described for customer relations to
the documentation of bids, contact history or contract information. The first step
is, however, to achieve effective collaboration of your project teams via complete
documentation of project events or the customer relation. Documentation of all
business events is the basis for meeting the demands of customer relationship or
project management. Thus, this opens the possibility of molding communication
and information structures into an “information office”.
OX 5 User Manual v1.32
-9-
Introduction
2.1.6.
Keeping the Overview
In your company there are certainly other organizational tasks which are
perhaps also tied to a schedule, e.g. resource management. How often do you
need conference rooms, prepare beamers for meetings or reserve automobiles?
With resource management, you can better organize meetings, determine who is
currently using a resource or control resource utilization.
2.1.7.
Everybody Participates
The successful implementation of a groupware solution in your company depends
on planning for its application and gaining user acceptance for the ensuing
changes in the business processes. With its carefully selected range of
functionality, Open-Xchange Server contributes to 100% user acceptance. It
brings real benefits to your colleagues and does not pester them with a plethora
of tasks. Nevertheless, it is easiest to start working with calendars, tasks or
projects, if your users are completely convinced that a groupware solution really
supports their own productivity, because one fact is obvious: You can only see
things in a calendar that are actually in there. And someone who does not
associate all documents written for a customer with the customer or a suitable
project remains caught in the old structures and inefficiencies.
2.1.8.
Smooth Introduction
The creation of “workflows” - i.e. software-supported definitions of work
procedures - must be go hand in hand with acceptance of the utilized application
by every single user without exception. This means that company-internal
hierarchies must be overcome, because modern teamwork with flat hierarchies is
precisely based on the fact that you pull different users into workgroups - from
the receptionist over the department manager to the boss - and this increases
the benefit of a groupware philosophy. Since rights und privacy of each group
member are valued and 100% guaranteed, independent from the company
hierarchy, you can specifically and effectively delegate procedures and
processes. For example, the assistant can call in meetings or conferences only
on the basis of the entries in the group calendar without further inquiries. When
already existing processes are mapped, users have fewer problems with the use
of groupware than when the introduction of the groupware is accompanied by
substantial changes in processes. However, Open-Xchange Server absolutely
allows to define new processes and procedures which ignore the hierarchies of
the existing enterprise structure and are driven by the potentials of OpenXchange Server for creating workgroups across departments and including
external partners or even customers.
© Copyright 2005-2006, OPEN-XCHANGE Inc.
- 10 -
2.2.
The Concept of Open-Xchange Server
As company manager or system administrator you are confronted with the task
of leading the introduction of Open-Xchange Server in your company to success.
The key to successful implementation of a groupware solution lies in the fact that
the functionality is available to truly all users throughout the company who you
support to do their work more efficiently.
2.2.1.
Functionality
The users can have access to all of the available functionality of Open-Xchange
Server via a powerful web front end. Not only does this offer all users a uniform
client interface but it also relieves you as the administrator from installation and
maintenance tasks on the client side. On the server side you have a secure and
powerful platform with Open-Xchange Server and SUSE's or Red Hat's Enterprise
Linux Systems. Open-Xchange Server offers a unique combination of a powerful
email server, which is easily configurable via the included tools, with a
groupware solution to enhance efficient collaboration that meets the needs and
requirements of modern business communication.
2.2.2.
Modules
Open-Xchange Server concentrates on functions that are actually required by
infrastructures of companies of different sizes and it does without superfluous or
redundant functions. For appointment management and appointment
coordination, Open-Xchange Server offers personal calendars, group calendars,
appointment series, resource management, a reminder function, as well as
powerful availability checks and automatic scheduling. Besides scheduling,
contact management for the management of main addresses with corresponding
personal contacts is the functional core of Open-Xchange Server. Of course, the
contact management includes the possibility for export (vCard). Due to the open
structure of the application you also have direct access to databases (e.g., for
data import). The task management module organizes group tasks and allows
easy creation of tasks with accompanying receipt requests, as well as emailed
reminders. Open-Xchange Server can also completely and effectively replace
existing project management tools. The project information module allows for
easy and organized project management. You can also create project-specific
tasks and very easily integrate all relevant persons who can access all relevant
project data and linked objects (addresses, documents, forums, etc.). Another
component of Open-Xchange Server is the integrated document management. It
allows to store documents in folders and group-related storage locations, upload
and download via the internet, and it offers document-related account policy
management with inheritance of folder permissions to subfolders and
documents.
OX 5 User Manual v1.32
- 11 -
Introduction
Furthermore, Open-Xchange Server has a module for knowledge management
with which you can collect all kinds of knowledge in a central location, organize it
in categories and subcategories and keep it accessible. Every user can extend
existing knowledge entries, add further items, or set up new categories.
Knowledge is also organized in a folder structure and offers full-text search for
item content and descriptions. Via linking, every knowledge entry can also be
associated with any document, forum entry, bookmark or task. Open-Xchange
Server also has powerful bookmark management. With bookmark management,
interesting links can be made accessible to all colleagues. The access to one’s
own bookmarks can be limited or restricted to individual groups. To make things
easier to find, you can set up a folder structure with arbitrarily many main
folders and sub folders, analogously to document management. Open-Xchange
Server can manage an unlimited number of forums and offers additional
information to the subscribers of a forum, for example information about the
most popular forums. In addition, you can subscribe via email to specific forums
or respond to specific contributions in a forum. The forum function is
complemented with a pin board module. The pin board is a virtual black board to
which every user can “pin” a note. These entries have a limited life span, so that
the messages are always current. Authorized users or groups can publish pin
board entries to the portal page of Open-Xchange Server, depending on user and
group permissions. Another efficient possibility for making teamwork easier is
the notes module. In nearly all modules of Open-Xchange Server your users can
deposit arbitrary amounts of notes on the different objects. The notes module
also allows to differentiate access permissions (privately or corresponding to the
relevant object permissions). For example, private notes can be attached to a
contact to create a traceable contact history e.g. for sales support.
2.2.3.
Enterprise server
Both SUSE LINUX Enterprise Server 9 (SLES 9) and Red Hat Enterprise Linux
(RHEL) serve as the server operating system basis for Open-Xchange Server.
Both Server distributions are known for their robustness and reliability; meeting
the highest security demands and also offers professional maintenance support
and longer product life cycles. In addition, Open-Xchange Server builds on the
proven open-source email servers Cyrus (IMAP) and Postfix (SMTP, POP3).
2.2.4.
Security
Security certainly plays a dominant role also in your company. With OpenXchange Server you have decided on the right solutions. The security aspect
becomes especially important when you communicate with your colleagues,
partners and customers via the internet. However, security is above all a
question of the client side. With PCs on the client side, widespread mail clients
and groupware clients (fat clients) in particular pose a known security problem.
© Copyright 2005-2006, OPEN-XCHANGE Inc.
- 12 -
Also web servers that do not - like Apache - build on a relatively safe Linux
platform represent a known weak spot that an attacker can possibly use to gain
access to the underlying operating system core. Here it is reassuring that SUSE
or Red Hat Linux Server systems provide special protection from attacks through
its user and permission philosophy.
For external access, Open-Xchange Server supports SSL encryption (the
standard for banks) that ensures worldwide safe access to company-internal
data from any PC.
2.2.5.
Open Standards
In the ever-changing world of today’s IT infrastructures it is of increasing
importance that Open-Xchange Server is a choice based on open standards and
allows integration of different products that already exist in your company.
Open-Xchange Server belongs to the class of solutions that build on open
industry standards and do not only give the appearance of supporting open
standards. This allows Open-Xchange Server to mesh with third-party products
and respects the heterogeneous IT structure of your company. Open-Xchange
Server thus does not tie you to proprietary solutions - unlike other comparable
groupware and communication solutions. From the administrator and user
perspective, other established and grown groupware solutions often exhibit a
bewildering jigsaw puzzle of interdependencies of components like web server,
directory service, database, client software and authentication system. OpenXchange Server supports all important communication standards, such as LDAP
and IMAP, completely and without limitation. In Open-Xchange Server, all
internal directory access occurs via LDAP, without the need for an additional
directory service.
2.2.6.
Extensibility
With Open-Xchange Server, you as administrator barely need to pay attention to
existing solutions, infrastructures or data supplies because Open-Xchange Server
can not only use all common protocols and standards of modern internet
communication, but it also has an open structure that allows direct access to the
database. Open-Xchange Server is primarily an alternative to products like
Exchange or GroupWise, i.e. it does not tie in with resources such as existing
Exchange servers. However, Open-Xchange Server offers a synchronization
function for using MS OutlookTM as a client for the system. It supports MS
Outlook versions for Windows 98, NT, 2000 and XP. It is also possible to
synchronize with the Palm client. The synchronization tool also works with PDAs,
since most handhelds as well as the newest generation of mobile phones for
their part can exchange standardized data with Outlook or Palm clients. It is
possible to migrate predecessor products (SUSE LINUX Openexchange) to OpenXchange Server using a migration tool supporting the migration process. It
OX 5 User Manual v1.32
- 13 -
Introduction
provides a quick and easy way to integrate existing data into the new OpenXchange Server system. Specially trained partners of Open-Xchange Inc. offer
professional help at any time. There is also software support for customers
interested in migrating from MS Exchange to Open-Xchange Server. Because
such projects are very complicated, Open-Xchange has consultants ready to help
enterprise customers with project planning and project realization. Licenses
All license costs only depend on the number of users of the groupware system,
regardless of which client they are using to access your data and how many
servers you use for the purpose. Due to the fact that Open-Xchange Server does
not depend on other products, there are no further costs.
2.3.
Introducing Open-Xchange Server
In the following we provide tips, suggestions and examples to help make the
introduction of Open-Xchange Server smooth, non-disruptive and successful. For
this, some thought and preparation is required concerning which users and
groups need to be set up, which individual projects and workgroups. Basically
you need to ask yourself how you can map your company structure onto the
individual function modules of Open-Xchange Server. The resulting processes
may require users to change their ways and they arise only partially from the
functionality of Open-Xchange Server itself. On the other hand, Open-Xchange
Server also leaves the greatest possible freedom to form your business
processes according to your needs. Thus, you need to be creative in defining
groups, projects, forums or the structure of a knowledge database. Skillful
assignment of user rights is vital for the efficiency resulting from your plan. Their
effectiveness guarantees the trust of users in the protection of their private
sphere in view of central storage of all information. This introduction will provide
you with some suggestions and examples.
2.3.1.
How to Map your Company Structure onto the Product
Mapping your company structure onto the module concept of Open-Xchange
Server can and should be a gradual process. Open-Xchange Server offers several
options, and mapping your company and departmental structures is merely the
first step. First, a groupware solution like Open-Xchange Server naturally
promotes the formation of small workgroups which you should anchor in the user
and group management of Open-Xchange Server. Here you need to consider
which part of the company structure such workgroups are supposed to
represent, or what type of productivity is supposed to be facilitated by this group
formation. The formation of workgroups can model existing workgroups within
departments or it can represent whole departments such as purchasing,
controlling, accounting, IT etc., or it can take concrete projects or an existing
customer allocation as the starting point. In practice, a gradual process turned
out to be reasonable and efficient. Begin with small groups which can motivate
© Copyright 2005-2006, OPEN-XCHANGE Inc.
- 14 -
their other colleagues in your company (still outsiders) with their new efficient
processes. Then you can expand the groupware integration gradually to the
whole department, then to the whole office and finally also to mobile colleagues
and the whole company.
2.3.2.
System Requirements
In advance, you have already determined the technological requirements for the
efficient deployment of Open-Xchange Server; otherwise you would not have
decided to purchase this solution. On the user side, you are on safe ground
anyway with the platform independent web concept. In order to make the
introduction of your new groupware solution successful, you should make your
users aware of some important implications that naturally go hand in hand with
a JavaScript and browser based user concept. Only modern browsers such as
Mozilla 1.x, Netscape 6.x/7x, Opera or IE6 with activated JavaScript option
should be used. However, you do not need to worry about Java, because this
functionality is made available on the server side. It is also important for your
users to understand that each page shown in the browser is always newly
generated by the application server. Hence, it is absolutely necessary that, e.g.,
the browser cache is disabled and users must also stop using the navigation
elements of their browser, because the latter may show them only “outdated”
information from the browser-internal cache. While the “back” button is useful
for quickly pulling up information from the previous page, but it should not be
used if you directly enter new information. Within the groupware it is better to
exclusively rely on the GUI of Open-Xchange Server with its own navigation
elements. On the server side, the system administrator must ensure that the
Java engine is running and functional. The remaining components that are
required to operate the groupware, such as the PostgreSQL database server, the
Open-LDAP server or the Apache web server, are established during the
automatic installation of Open-Xchange Server. The interaction of the three main
components of the groupware, namely mail server, LDAP server, as well as the
actual groupware (application server), looks as follows: The LDAP server is
responsible for all aspects of user authentication. All users of Open-Xchange
Server are set up and administered in LDAP. The LDAP tree also includes the
email folder structures for the individual users which the Cyrus IMAP server
delivers on request to the IMAP clients. In addition, all public and private address
books of the groupware are stored in the database as well as in the LDAP server.
Individual data pieces about specific user authorizations and object permissions,
on the other hand, are saved in the groupware and thus in the PostgreSQL
system. The Apache web server delivers the pages for the individual processes of
the application server. Depending on the qualification of your colleagues, it can
be advisable to explain this during an internal training session, although
understanding the underlying processes is not required for flawless operation.
OX 5 User Manual v1.32
- 15 -
Introduction
2.4.
Working with the Groupware
For increasing and cementing user acceptance it is absolutely necessary that
users work as efficiently and completely as possible with the groupware. Only if
all available modules are used efficiently, in accordance with operational
requirements, a solution like this really pays off. Sticky notes, secondary
applications, external address books, telephone CD, fax directories and mobile
phone address books or wall calendars should become history. Every instance of
data duplication not only represents unnecessary time expense, but it also
undermines the concept of a comprehensive groupware solution with central
data storage. Think of yourselves as a team and do so with all your might.
Hence, urge your colleagues over and over again to utilize the advantages of the
groupware.
2.4.1.
Interaction of Email Server and Intranet Modules
The mail server of Open-Xchange Server as well as the intranet modules interact
transparently and without problems. The most important common information is
stored in the LDAP tree, or in the accompanying LDAP directories, which in its
central role as a directory service is the core element of the email server, as far
as data storage and delivery is concerned. Since mail management remains
centralized thanks to IMAP, your users have access to their mail at all times and
from all locations. During your introductory training sessions, you should
demonstrate the advantages of IMAP to your users once again. Once your users
have learned to like such mail comfort, they will motivate other users to support
your groupware project.
Furthermore, the groupware uses the functionality of the built-in email server for
notifications, which are automatically generated and sent to users, as for
example acknowledgements of appointment schedules or deadline extensions, or
reminders for an upcoming task. The Web Mail function of the groupware also
accesses the email server directly.
Below we provide you with a few more suggestions for searching and finding
information. These you should also pass on to your colleagues during the
training sessions.
2.4.2.
Searching and Finding
The efficient use of all groupware modules crucially hinges on how quickly and
immediately the user can find the desired information. Of course, Open-Xchange
Server has several search functions which are extensively discussed in the
module documentation in the chapter Graphical Buttons.
However, for you as administrator it is important to ensure first of all that your
users are actually utilizing the available search functions. Within the groupware
© Copyright 2005-2006, OPEN-XCHANGE Inc.
- 16 -
there are complementary or overlapping search functions which all work
differently. It is always possible to limit your search inquiries to a specific module
(module search). A search with wildcards is certainly also possible. Information
is the core element of groupware and discovering and evaluating information is a
vital process for each user of the groupware. Thus, every user must become
deeply familiar with the functionality to fully exploit the advantages of
groupware. Thus, every user should know what type information can be found
where and how you can always keep an overview of the daily information flood.
This daily information flood grows substantially as more users work efficiently
with the groupware, as is the aim of the concept. Thus it becomes even more
important that users can manage the daily information flood with ease.
2.4.3.
Keep the Overview
It is crucial that your users always keep the overview and are able to decide how
the pieces of the daily information flood are to be prioritized. At each login, the
portal page provides each user with a first overview by grouping all relevant
information for the day.
2.4.4.
Using the Tools for real
Right after logging in, the user can see on the portal page whether new email
messages are available or whether there are pertinent tasks or appointments.
Projects that are currently unfinished (overdue) are pointed out here. Another
important overview function is fulfilled by the “Current” tab. Under “Current”,
every user can quickly and efficiently learn current news from all modules and
sections which other users have made available to the intranet during the
absence. Thus, every user quickly gets an overview of changes in the
information state in the company, independent of personal preferences and
priorities. This page can be customized as to which time period the news should
be selected from. Users can of course also use this page as a stepping stone into
the individual sections to learn more detailed information or to work on any
pertinent tasks. It is also important that your users use the linking function
conscientiously and effectively to thereby contribute to the exponential growth of
information content (without increasing the amount of stored data). It is also
vital that existing links are actually shown (resolved) during the information
search to point out information dependencies which would not necessarily
become evident during a purely linear search. Thus, it is very useful if the search
for a certain project also brings up all accompanying links e.g. to relevant
appointments or documents that are directly or indirectly connected with the
current project. Information structure naturally plays an important role here.
However, smart groupware like Open-Xchange Server does not force an efficient
and thought-out data structure on you, but instead it leaves it in your planning
responsibility.
OX 5 User Manual v1.32
- 17 -
Introduction
2.4.5.
Privacy
The introduction of a groupware concept can fail just because of lacking user
acceptance. A frequent argument of doubtful users often has to do with
reservations against central data storage. In this context, users fear for the
privacy of their personal data. However, in spite of team philosophy, the
ingenious user and group management of Open-Xchange Server guarantees that
private and personal information and data of every user is completely safe in
contrast to public areas on the basis of LDAP functionality.
2.4.6.
International Functionality
Open-Xchange Server is geared to the needs of internationally operating
companies in many respects. In the setup section you can e.g. define in which
time zone you are currently working. Existing appointments are automatically
updated when the time zone is changed. This way you always keep the complete
overview even for appointments abroad. Costs of projects and tasks can be
flexibly planned for in different currencies. Your administrator can easily tune the
available currencies to your needs. In fact, the actual and planned costs of a
project can be automatically traced project-wide, including the costs of all
subtasks. Tasks can be tracked in different currencies. If you need schedules in
US date format, you can easily select this in the setup section of Open-Xchange
Server. The web front end completely supports UTF-8 character sets. Entries via
the web front end can be made with foreign characters, for example, in
Japanese. Emails can be sent with UTF8 encoded characters.
2.4.7.
Corporate Identity
Since Open-Xchange Server is suited for companies of different size and
structure, from small offices over medium-sized companies to enterprises
operating worldwide, one of its signature elements is the adaptability and
customizability of its intranet functions as well as the look of its client
applications. Thus, it is possible to customize the layout of the web interface to
match your corporate identity.
2.5.
Now we’re ready to go
Before the purchase you have informed yourself about the capabilities of OpenXchange Server. If the functionality of the email server made you decide to
handle your email with Open-Xchange Server, we hope that this introduction is
be able to impress you with the functionality of powerful groupware.
The following pages will give you detailed documentation of all functions of
Open-Xchange Server. Now it is up to you to lead the introduction of the
groupware concept to full success in your company. Start with training individual
groups of colleagues and introduce the product gradually. The expected
© Copyright 2005-2006, OPEN-XCHANGE Inc.
- 18 -
enthusiasm of your colleagues is guaranteed to automatically motivate the
remaining colleagues and the switch to your new intranet on the basis of OpenXchange Server will happen all on its own.
OX 5 User Manual v1.32
- 19 -
Introduction
3.
Basics
In this section we explain login & logout as well as special properties such as
rights management, notes and links to objects as well as global search. In
addition, we provide an overview of the buttons used in the intranet.
3.1.
Intranet: Login and Logout
3.1.1.
Login
When you log in, you authenticate yourself as a user via with your login name.
Your login gives you access to all modules and objects that have been authorized
for you. On the start page you see the dialog to enter your username and your
password:
Figure 3-1: Login Dialog
Please note that capitalization and the use of small letters is significant. If you
provide wrong authentication entries, you will receive an error message as
shown:
3.1.2.
Logout
When you quit your session you should always log off. For this you click the
"logout" button in the upper right corner of the groupware interface.
3.2.
Graphical Buttons
All icons in the groupware section of Open-Xchange Server 5 are introduced
here.
© Copyright 2005-2006, OPEN-XCHANGE Inc.
- 20 -
Portal A click on the portal icon returns you to the portal page (see
chapter "Open-Xchange Server Portal").
Calendar A click on the calendar icon takes you directly to your
appointment calendar. Existing appointments can be shown there in a
day, week or month view. Existing appointments can also be changed
there and you can make new entries (see chapter "Calendar").
Contacts A click on the contact icon takes you directly to your
contact and company address book. There you find all existing global
and private contacts and accompanying company addresses in form
of a clear, alphabetically sorted table. Existing contacts and company
addresses can be edited there and you can enter new contacts and company
addresses (see section "Contact Management").
Tasks A click on the tasks icon takes you to the tasks assigned to
you. All pertinent tasks are listed in a table with time stamps. New
entries can easily be added. Existing tasks can easily be edited. Of
course, you can also delegate tasks here (see chapter "Tasks").
Projects A click on the project icon takes you directly to a list of
projects assigned to you. In the table display you can quickly access
the contents of existing projects. Of course, projects can also be
changed here and new ones can be entered (see chapter "Projects").
Documents By clicking on the documents icon you reach the
document section of the groupware. A simple file manager gives you
access to all stored information. Of course, you can also add further
documents here (see chapter "Documents").
Knowledge A click on the knowledge icon takes you to the section
where you make own contributions available to your colleagues or
profit from the knowledge of others. The directory structure helps you
order and catalog the knowledge entries. (see chapter "Knowledge").
OX 5 User Manual v1.32
- 21 -
Basics
Bookmarks A click on the bookmark icon shows you the central
bookmark directory. As in the favorite list known from your browser
you see hierarchically organized links via which you can quickly
access saved intranet and internet pages about different subjects.
Compared with the favorite list of a browser, the groupware function has the
advantage that important links can be inserted for all users at once or just some
users. Of course, it is also possible at this point to paste new links or to modify
existing entries (see chapter "Bookmarks").
Forums The forum icon leads you to the forum of Open-Xchange
Server 5. The forum module allows you and your colleagues to have
discussions in the intranet. Every discussion is divided into discussion
threads. These threads make it very easy to follow discussions. In
order for important responses be noticed in a timely fashion, you can subscribe
to receive responses to contributions or even whole forums via email. Thanks to
the permission management you can grant external business partners access
specifically to the forums.
Pin Board The pin board icon leads you to a system that allows
you to put up notes for yourself or also for other users. A click on the
pin board icon thus takes you not only to a list of all your own notes,
but also allows you to add new notes or edit existing pin board notes.
You can also always define whether a pin board note should also be shown on
the portal page. The pin board system can also be used as a notification system
in addition to email (see chapter "Pin board").
Email A click on the email icon takes you to your web mail account.
There you have access to your incoming email messages and you can
write emails yourself (see chapter "Emails").
© Copyright 2005-2006, OPEN-XCHANGE Inc.
- 22 -
3.2.1.
Buttons: Create, Edit and Delete Objects
Create new
Create new folder (documents, bookmarks, knowledge)
Edit
Delete
3.2.2.
Button: Notes
Create note
3.2.3.
Buttons: Miscellaneous
Move Documents/Folders
Print The printer icon allows you to print out lists of objects. The active list
is converted into a format optimized for printing, which can then be
printed via the browsers print functions.
Calendar
A small calendar allows you to quickly select a date with a few mouse clicks.
OX 5 User Manual v1.32
- 23 -
Basics
3.3.
Rights Management
The groupware part of Open-Xchange Server 5 uses several aspects of rights
management: On one hand, the administrator can set specific access rights for
individual users for every section; on the other hand, for each object within a
section specific read and write permissions can be assigned to particular users.
Rights are assigned hierarchically. If a user does not have rights for a given
section, he automatically has no way of accessing objects within this section.
3.3.1.
Rights for a Section
Single Section Rights
The intranet administrator can set up a profile for every user which states for
which sections he is generally authorized. If you have not received rights for a
section, you will not see the respective icon in the main navigation bar. If you
need authorization for a section, you can always ask the administrator to grant
you the relevant rights.
Note:
Changing single section rights
Newly granted rights only become effective after a new login
to the groupware!
3.3.2.
Defining Object Specific Rights
Every time you add or change an object in the sections for bookmarks,
knowledge entries, documents, or pin board you can determine who has the
right to access this object. If someone does not have the right for specific
objects, he will not see them in search results or other listings. Authorization is
usually granted via the tabs "read access" and "write access" which are available
when you create a new object or edit an existing one in the individual program
categories. Alternatively, it is also possible to define settings via the list field
"templates", which allows you to set up defaults for read and write permissions.
Generating new templates is done analogously to setting read and write
permissions. Under "read access" you can list the users who should only have
permission to read the object data. Under "write access" you can list all users
who should be able to access the object for reading as well as writing. In the
groupware, "write access" also includes the right to delete an object. Under
groups of users you can select whole groups as well as single users who should
have access to the object. Finally, you can save the settings as a new template
under the "templates" tab. Analogously to single objects you can assign read and
write permissions to folders and subfolders in the mentioned modules.
© Copyright 2005-2006, OPEN-XCHANGE Inc.
- 24 -
3.3.3.
Defining Folder-specific Rights
Open-Xchange Server 5 knows two types of folders: Private and public folders.
Only you can see private folders, while public folders can be used also by other
users. In addition, you can grant access to individual folders to individual users
or user groups. All folders that are visible for you are listed in the side frame (on
the left or on the right) of the groupware portal. You can find detailed
information about granting rights and configuring folders in the chapter on
"folder management."
The folders in the modules bookmarks, knowledge
and documents belong to a special type of folder. Here you have folders for
which you can directly assign read/write permissions. The approach corresponds
to that already discussed under "defining object-specific rights ".
3.3.4.
Creating Templates
Via the list field "templates" you can utilize existing templates for the
creation/editing of an object. Templates contain information about read and
write permissions. Then, you do not have to add the relevant settings by hand
any more. If you want to generate a new template yourself, simply add the
desired settings via the "read access" and "write access" tabs. Once you have
defined read and write permissions, you can save these settings as a template.
You do this via the edit pages of the "templates" tabs. These allow you to save
the entered settings as a template. Under "title" you give the template a suitable
name. Under description you can enter a short description for the new template.
If the new template should become the default template for new objects, check
the flag "default template". You can then save the new template by clicking on
the button "save template". Existing templates are shown in the list field at the
end of the page. Templates are managed separately for the individual module
sections, such as documents, knowledge, bookmarks, forum and pin board.
Note:
Read and write permissions
You can find detailed information regarding read and write
permissions in the individual chapters. For example, when you
create an object there are default settings which allow for
quick and easy work.
3.3.5.
Groups of Users
You can add a group of users by selecting the group directly in the top left select
field and then pressing the "Add" button. The selected group is then added to
the right-hand select field showing the participating groups. You can also directly
search for a group by entering its name. For this you enter the group's name - if
necessary with wildcards - into the text field above the left select list and then
start the search by pressing the GO button.
OX 5 User Manual v1.32
- 25 -
Basics
Figure 3-2: Read permissions: Assigning Object-related Rights
In the "groups of users" section you see only the groups whose member you are.
In order to remove a group of users from the selection list, select this group in
the right-hand select list and click the button "< remove". All select lists allow
for multiple selections by holding the Ctrl button.
3.3.6.
Users
In order to add users, you must first select a group in the left-hand select field
under "groups of users" in which the user is a member. Then click on the button
"Show users". Now you see a list of all members of the selected group of users
in the left-hand select list in the "users" section. Users without access to the
active section are grayed out and cannot be selected. In order to assign the
desired user to the object, select this user in the left-hand select field and click
the "Add" button. Alternatively, you can also use the input field above the user
select list to pick a certain user directly from the list.
© Copyright 2005-2006, OPEN-XCHANGE Inc.
- 26 -
Figure 3-3: Assigning Read Permission for Users
Users without access to the active section are shown in gray and cannot be
selected for rights management.
It is possible to search for the user using first name, last name or user name.
Here, wildcards are also accepted. You find a detailed description on the
following pages or under the respective tab in the online help; more about the
search function can be found in the subchapter "Global search" in this manual.
In order to remove a participant from the object assignment, select this
participant in the right-hand select list and click the button "< remove".
3.3.7.
Delete Permission
Using the list field "Delete permission" you can specify who should have the right
to delete the object in the future. If you select the entry "Like write access" from
the list field, all groupware users with write permission may also delete the
object or folder. If you select one of the displayed users at this point, this
particular user is granted the relevant permission for the object. Only this user
may delete the object in the future or pass on the delete permission to another
user. In the history of the object the user with delete permission is shown as an
owner.
OX 5 User Manual v1.32
- 27 -
Basics
3.3.8.
Extended View
In addition to the normal selection of participants for an object you can also
perform the selection in an extended view. Simply select the button "More" in
the upper right-hand corner underneath the status line.
Figure 3-4: Extended View of Rights Management
On the left-hand side of the extended view you see a tree view of all existing
groups. If you click on the plus sign in front of a group, the view increases to
include the members of this group of users. In order to add participants or
groups to the object, select them by clicking on the box before the respective
name. Now select the button "add>" to associate the users and groups with the
object. Groups appear in the upper participant selection field, users in the lower
one. You remove a participant or a group of users from the object, make your
selection in the respective select field and press the button "< remove" below
this select field.
Note:
Rights Management
The respective chapters on individual modules detail the
differences between the modules that arise from the fact that
these options are treated differently from module to module.
The following is generally true: If you first give write
© Copyright 2005-2006, OPEN-XCHANGE Inc.
- 28 -
permissions to a user, he will automatically get read access.
The opposite is not true! If you first give read access to a user,
this does mean that he also automatically receives write
access.
3.3.9.
Special Access Rights
In the Calendar, Tasks and Contacts modules, the access rights are defined via
the choice of folders. When an object is created or edited in one of these
modules, you select in which folder this object should be placed. Then the access
rights correspond to those of the selected containing folder. You will find more
information about this in the individual chapters on the modules Calendar,
Contacts and Tasks as well as in chapter 15, which explains in detail the
everyday handling of the folder system.
3.3.10. Templates
Once you have defined read and write permissions for an object (participant),
you can save these settings as a template. You do this via the edit pages of the
"Templates" tabs. These allow you to save the entered settings as a template.
Under "Title" you give the template a suitable name. Under "Description" you
can enter a short description for the new template. If the new template should
become the default template for newly created objects within the same module,
then check the flag "Default template". You can then save the new template by
clicking on the button "Save Template". Existing templates are shown in the list
field at the end of the page. To assign an already established template to a
document, simply select the desired entry from the list field "templates" in the
main dialog page of an object. It is also possible to choose directly from the list
field under the "Templates" tab. Templates are managed separately for the
individual module sections, such as Documents, Knowledge and Bookmarks. If
you would like to set up several templates at once, you have to keep in mind
that you have to go back to the start dialog for the object each time after you
add a new template. There you have to set the list field "Templates" back to
"None". If you do not do this, you just keep changing the active template over
and over again instead of defining new templates. You can see a list of all
templates for a module section under "Templates".
OX 5 User Manual v1.32
- 29 -
Basics
Figure 3-5: Selecting a Template for Read and Write Permissions
Figure 3-6: Creating a Template for Read and Write Permissions
© Copyright 2005-2006, OPEN-XCHANGE Inc.
- 30 -
3.4.
Notes
You can add notes to almost any object. You can decide yourself whether the
notes should be accessible only to you or to the group that has the right to see
the object.
3.4.1.
Viewing Notes of an Object
In the detail view of an object (e.g., of an address) you can switch to the notes
menu via the "Notes" tab. You will get an overview with a list of already existing
notes which have been added to this object.
Figure 3-7: Notes List
3.4.2.
Creating Notes for an Object
From the Notes list you can add a new note via the Create button. Every note
has a title and content which you can enter now.
OX 5 User Manual v1.32
- 31 -
Basics
Figure 3-8: Creating a new Note
You can assign access rights to every note. The relevant settings are entered via
two radio buttons above the entry section. With these you can set which users
have access to the new note. If you select the option "Personal", only you
yourself have access to the note. By contrast, via the option "like the associated
object" you ensure that all users have access to the note when they have access
to the containing object.
3.4.3.
Deleting Notes of an Object
You can delete notes at any time by accessing the relevant note via its object
and then clicking the trash button. If you delete an object you delete all
accompanying notes automatically with it. Also, if you delete a user all his
personal notes that were visible only for this user are deleted as well.
Note:
Objects of a deleted user
If a user is deleted, this also has consequences for the notes
created by him. All objects created by the user to be deleted
and which were not set to be personal are preserved in the
system. In the system, the user is automatically replaced with
the mail administrator, who can thus reassign calendars,
delegated tasks, documents, etc. via write permissions to the
© Copyright 2005-2006, OPEN-XCHANGE Inc.
- 32 -
person who should henceforth take over the tasks of the
deleted user. Thus, the deleted user is relieved from the tasks
delegated to him and they are reassigned to the mail
administrator.
The mail administrator should use his account only for such
purposes, because these delegated tasks now appear in his
account. If the mail administrator has entered nothing else in
this system, the objects of the deleted user can easily be
identified. (After all, the account was completely empty
before). Therefore, if the mail administrator would also like to
administer his own tasks and calendars with the intranet
solution, he should create an additional user account for
himself besides his Admin account.
3.5.
Object Linking
Objects from different sections can arbitrarily be linked to each other. These
additional connections provide a better overview and optimize your work. For
example, a calendar entry can be linked with different documents. This way the
user can look at the calendar entry and immediately gains an overview of which
documents are connected with this calendar entry. It is also possible to link a
calendar entry with a project, which provides an easy overview of the temporal
scheduling for individual projects. Any objects in the system can be linked. For
example, addresses can be linked with calendar entries, addresses with projects,
projects with documents, etc. It is not only possible to link an object to another
(1:1 linking), but also to link an object directly to several other objects (1:n
linking).
3.5.1.
Creating Links
Every object can be linked with one or several other objects. To create a link
between two individual objects, proceed as follows: first open one of the two
objects which you would like to link in the detailed view and change from there
to the "Links" tab. All existing links are listed here in table form. In order to
create a new link, you just need to click on the buttons "Activate linking mode"
and "Add to linking repository". Then switch to the detail view of the second
object to be linked and switch there to the "Links" tab as well. In order to finalize
a link you just need to click the "Create" button. The link is now active. In order
to leave the linking mode, click on the button "End mode". All objects selected
for the linking process can be displayed at any time via the left/right frame of
the groupware portal under "active links".
OX 5 User Manual v1.32
- 33 -
Basics
3.5.2.
Group Links - Procedure 1
In order to link several documents with a project, proceed just as described
under "Creating Links" on this page. Then do not quit the linking mode, but
change to the detailed view of another document that you also want to link to
the project selected first. Here you also need to the "Links" tab and click on the
"Create" button. This establishes the link. You can now repeat this approach until
you have processed all documents that are to be linked with the project selected
first. Next, to leave the linking mode, click on the button "End mode".
3.5.3.
Group Links - Procedure 2
There is another way for quickly creating multiple links. In order to link several
addresses with a project, for instance, first open one of the addresses and select
its "Links" tab.
Figure 3-9: Linking, first Object
In the overview you see all existing links of this address to other objects. In
order to add new links, first click the "activate linking mode" button. Under
© Copyright 2005-2006, OPEN-XCHANGE Inc.
- 34 -
"linking mode active" you can see the current address which is to be linked. If
you want to link further addresses with a project, successively open these
objects and open their "Links" tab as well. The button "Add to linking repository"
adds the individual elements to the stored list of links. Finally you open the
project with which the selected addresses are to be linked, and open its "Links"
tab. The actual linking is performed by clicking the "Create" button. Finally you
should leave the linking mode by clicking on the button "End mode". Links are
bidirectional, by the way. If an address was linked to a project, the link is shown
for the project as well as for the address. By clicking on the respective links you
can comfortably jump back and forth between the objects. The object to which
you would like to link does not need to be loaded in the linking list. It is always
displayed under the "Links" tab. Simple clicking on the "Create" button is
sufficient.
3.5.4.
Example
You work on a task in a group. You would like to discuss how the task is to be
done in a forum. Detailed information about this task can be found in a PDF file
in the document archive. In order to provide a better overview of these objects,
you want to connect them with each other. First select the "Links" tab of the
task. Then click on the "Activate linking mode" button. Please note: The task is
stored in the linking repository. The task cannot be linked with itself, which is
why the checkbox is absent in the first column of the table. Now select the
Documents section from the menu bar and there select the PDF document that
you want to connect with the task and the forum. Click on the "Links" tab. The
task is already present in the linking repository. Click on the checkbox in the first
column of the table and then on the "Create" button. In the lower table showing
the links to this object an entry appears for the task. Test the link by clicking on
the yellow arrow in the first column of the table. You are taken to the detail view
of the task. Click on the "Links" tab again. There you see a link to the PDF
document. Links are bidirectional. Click on the yellow arrow again and navigate
back to the linking page of the document. In order to be able to connect the PDF
document with the forum, you first have to put it into the linking repository. On
the "Links" page of the PDF document click on the "Add to linking repository"
button. Now the linking repository contains your task and the PDF document.
Next, navigate to the "Links" page of the forum. Select both checkboxes and
click on "Create". Congratulations! You have connected a task, a forum and a file
with each other. You immediately see which objects belong to another and thus
you can work more efficiently. Finally, click on the button "End mode".
3.5.5.
Display of Links
Once an object is linked, it is added to the list of existing links. You can see the
existing links for an object by opening the suitable object via the individual
OX 5 User Manual v1.32
- 35 -
Basics
modules and clicking on the "Links" tab. There you can follow the individual links
by clicking on them with the mouse pointer.
Figure 3-10: List of existing Links
3.5.6.
Delete Links
A link can be deleted at any time. Go to the "Links" tab of an object to see the
list of existing links. At the end of each row in the tabular listing of currently
existing links you find a small checkbox. Activate this checkbox for all links that
you would like to delete. Then delete the selected links by clicking the "Delete"
button.
Note:
Deleting a Link
When you delete the link between objects only the link is
deleted, but not the objects themselves!
3.6.
Global Search
The global search is a fast and easy way to find objects within a section.
© Copyright 2005-2006, OPEN-XCHANGE Inc.
- 36 -
3.6.1.
Global Search for Objects
You find the global search in the right/left frame of the portal page. It consists of
two parts: In the upper part you can select a section you would like to search via
a drop-down list. Here, the sections "Addresses", "Contacts", "Projects",
"Documents", "Calendars", "Tasks", "Knowledge" and "Bookmarks" are available.
Figure 3-11: Global Search
In the second part you enter the search string. After filling both fields with
suitable values, click on the "Go" button to search or simply press Enter on your
keyboard.
The search looks for precise matches. This means that only results are reported
which exactly match the search query. The search string is case insensitive. In
the current version you can also use wildcards for searching. If part of your
search string is supposed to match anything, use an asterisk "*" as a
placeholder. Thus, searching your contacts with the search string me*, for
instance, will match Meyer, Meier, Meeser, Mel, Metzig. You can also use
question mark "?" as placeholder for individual letters. A search for Me?er would
find Meyer and Meier. The placeholders "*" and "?" can be combined at will.
3.6.2.
Navigating within Search Results
Search results are displayed in list form. You can reach every result entry by
clicking with the mouse button on the icon
or by clicking on the first column
of an entry row in the detailed view.
OX 5 User Manual v1.32
- 37 -
Basics
Figure 3-12: Searching for Objects by Category
If a search yields many hits, you can page through the results with help of the
icon switches XXX and XXX. The precise number of records per page is preset to
10. In each search module this value can be changed to 5, 10, 15 or 20 records.
3.6.3.
Sorting Search Results
If a search query yields many hits, it may be sensible to sort the result list
according to a specific column. This is done via icon switches XXX and XXX in the
header of each column. The icon switch XXX sorts the results according to the
selected column alphabetically in ascending order (from A to Z). The icon switch
XXX sorts the results according to the selected column alphabetically in
descending order (from Z to A).
3.7.
Sending E-Mails from the Groupware
3.7.1.
E-mail Container
You can send emails from the email container to several persons at the same
time. If you click the link of an email address in Contacts, Company Addresses, it
is not your local email client that pops up, but a window with several choices. In
this simple context menu you quickly add further email addresses. Just click on
© Copyright 2005-2006, OPEN-XCHANGE Inc.
- 38 -
"Add more addresses". The other email addresses that you now select from the
contacts section are automatically added to the email list. By clicking the button
"Send via web mail" you are automatically taken to the mail editor where you
can easily and comfortably compose a message via the web front end. Instead of
the web interface you can also use a local email client on your workstation. The
collected email addresses can automatically be transferred to an external email
application such as MS OutlookTM or MS Outlook ExpressTM by clicking the button
"Send with local email-Client" in the Mail container. The intranet portal
automatically selects your default email program on your system.
Figure 3-13: Collecting Email Addresses via the Mail Container
OX 5 User Manual v1.32
- 39 -
Basics
4.
The Open-Xchange Server Portal
4.1.
The Portal Page
The portal page gives you an overview of important data. You can also see all
recent news in the intranet via the ‘New’ tab. After a successful login or when
you click on the ‘Portal’ icon
you see the portal page. It serves as an info
board and as an overview of your appointments for the day, your tasks and
projects that are marked for resubmission. In your user-setup you can
additionally arrange for current appointments to appear on the portal page a few
days in advance. You also see whether somebody has created new appointments
or tasks for you. On the portal page you also find current pin board notes and
alerts for unread e-mail messages. The portal page is divided into several
sections. In the uppermost part of the portal bar you will find the Open-Xchange
Server 5 menu bar with a green background. From there you can go to "Setup"
and groupware help. If you would like to leave Open-Xchange Server 5 you
should log off from the system via the "Logout" button. Directly underneath you
see the navigation bar of the groupware. The individual icons give you direct
access to the individual sections of Open-Xchange Server 5 (see "Graphical
Buttons" in the "Basics"-chapter).
Figure 4-1: The Portal Page of the Open-Xchange Server
© Copyright 2005-2006, OPEN-XCHANGE Inc.
- 40 -
Further below you find the portal page overview showing current information
about your work and message items. This overview takes up the most space of
the portal page. The last section is the so-called "handbook" that can be to be
found at right or left edge of the screen half, depending on the configuration.
The handbook contains a miniature calendar that can quickly show you
appointments for a certain date, a list of current tasks, and shortcuts for creating
new elements. In the lowest section of the handbook you see an overview of you
groupware folder contents. There you can sort Contacts, Calendar items and
Tasks according to your own needs.
4.1.1.
Overview
In the "Overview" section you see all current information concerning you. The
left column of this section of the portal page you see today’s upcoming events,
tasks and projects. The right column shows information about new incoming
email messages, appointments and tasks. The lower third of the portal page
shows a "pin board" section with an overview of important current messages.
4.1.2.
Appointments (section: Today)
Here you see an overview of your appointments for today. The appointment
description provides a link leading to the details of the respective calendar item.
4.1.3.
Tasks (section: Today)
This overview shows all tasks that have not been completed yet. The tasks
marked for resubmission are listed in this section every day until their due date.
Overdue tasks are marked in red. The task title is a link leading to the detail
view.
4.1.4.
Pin board
Under ‘Pin board’ you see currently relevant information. In order to have new
messages displayed on the portal page you create a new entry in the ‘Pin board’
module.
Note:
Permissions relevant to Pin Board Entries
Depending on your section rights you may not place pin board
entries on the portal page. Please consult the system
administrator for this.
4.1.5.
Projects marked for review
For each project you can set a resubmission date. When the resubmission date is
reached, the project is displayed on your portal page. Thus you can create
OX 5 User Manual v1.32
- 41 -
The Open-Xchange Server Portal
reminders for important milestones. The projects are displayed similar to tasks
(see Chapter Creating new projects)
4.1.6.
Email(s)
Here you can have new e-mails displayed directly on the portal page. If there
are new emails, you see here the number of newly arrived and unread
messages. For instance, you see a line such as
You have 2 new and 6 unread messages.
Via the linked number of messages you can directly jump to the Web Mail
module and read your new emails.
4.1.7.
New Appointments
All appointments that have recently been created for you are listed here. Here
you can also jump the detail view via to the appointment description.
4.1.8.
New Tasks
All tasks that have recently been created for you are listed here.
4.2.
The "Current" Page – Groupware News
The ‘Current’ tab shows you news from all sections that have been created for
you during your absence. This page keeps you informed if you have not been
logged in to the groupware for a longer period. You can set the time frame for
which you would like to retrieve news. You choose the time frame via the list
field "New Items". Here you can choose between
Entries
Entries
Entries
Entries
Entries
Entries
since yesterday
during the last 3 days
during the last 5 days
during the last 10 days
during the last 20 days
during the last 30 days
From the overview page for all sections you can switch to the individual sections
to see their details. The overview list shows you all new entries from the selected
time frame for the sections ‘Appointments’, ‘Documents’, ‘Knowledge’,
‘Bookmarks’, ‘Pin board’, ’Forum’, ‘Contacts’, ‘Tasks’ and ‘Projects’. From the
‘Current’ page you can use the links to switch to the individual sections and see
their details.
© Copyright 2005-2006, OPEN-XCHANGE Inc.
- 42 -
Figure 4-2: List of all newly added Object Entries
4.3.
The Handbook
The Handbook contains shortcuts for frequently used functions of the groupware
or upcoming tasks. The Handbook contains a miniature calendar, a list of the
currently upcoming tasks, a search function and an overview of your folders. You
can collapse each of these sections via the minus icon
and when needed
expand them again via the plus icon .
4.3.1.
The Miniature Calendar
In the right-hand section of the screen you will find a miniature calendar. It
shows you not only the current date as well as the current calendar week, but
also provides you direct access to your appointments for any given date. For
instance, if you select the date 9/5/2005, then all upcoming appointments for
this day are displayed in form of a "Day view". If you select a calendar week
instead of an individual day, then the appointments for the whole week are
displayed in form of a "Week view". Similarly you can select a whole month to
see all appointments for the selected month in form of a "Month view".
OX 5 User Manual v1.32
- 43 -
The Open-Xchange Server Portal
Figure 4-3: Calendar Overview
You find more information about calendars and appointment functions in the
chapter Calendar.
4.3.2.
Tasks
In order to quickly get an overview of currently upcoming tasks you can use the
miniature task list in your Handbook. A simple click is enough to jump to the
detail view for a task.
4.3.3.
The Search Function
Below the miniature calendar you find the intranet search function. By entering a
search string you can search whole sections for specific object entries. More
about the global search function can be found in the section Global Search.
4.3.4.
Create new
Via the portal page you can very quickly create new "Contacts", "Projects",
"Appointments" and "Tasks". Simply click on the suitable entry in the lower right
display area. You will automatically be forwarded to the suitable window for
creating the desired object.
© Copyright 2005-2006, OPEN-XCHANGE Inc.
- 44 -
4.3.5.
Folder Management
The folder management serves as a company-wide folder system, where you can
create special calendar entries, contacts data and tasks. The individual elements
are arranged in a directory structure for a better overview. In order to change to
a displayed folder, simply click on it with the left mouse button.
If you click on a folder with the right mouse button, a pull-down menu appears
which allows you to manage and edit the individual folder. You can also create a
new folder this way.
Please refer to the Chapter "Folder Concept" to learn more about Folder
Management and Permission Management.
OX 5 User Manual v1.32
- 45 -
The Open-Xchange Server Portal
5.
Calendar
The calendar provides management of your personal and group appointments,
taking resources into account. All group appointments that you have with other
colleagues are displayed directly without having to integrate them into your
calendar. Thus, there is no tiresome clicking between different calendar views unless, you would like to look in other folders that are accessible to the public or
to you specifically. If you activate the checkbox "Show my appointments in every
folder" the calendar view is extended accordingly. You can open other calendar
folders directly via the handbook frame on the left or right edge of the
groupware portal as long as you have suitable access privileges.
5.1.
Calendar Basics
5.1.1.
Day View, Week View and Month View
After choosing the calendar you see the homepage of the calendar function. In
the main part of the page the user sees his Day view showing the appointments
created for him and his group.
Navigation
With the arrow keys
and
you can either go back or forward by one day.
Changing the View
You can use the tabs to choose between Day View, Week View and Month View
as well as Team View. In all views you can the appointment description so see
the properties of the appointment.
Adding to the Calendar View
With help of the folder menus in the handbook frame you can access other
calendar folders that are public or were released to you. Simply select the
desired folder. The further handling corresponds to that of your own calendar. If
you would like to see all your appointments in all folders accessible to you,
activate the checkbox "Show my appointments in every folder" on the calendar
homepage.
© Copyright 2005-2006, OPEN-XCHANGE Inc.
- 46 -
Displaying Appointment Information
If you briefly let the cursor hover over an appointment, you will see a short
summary of the appointment showing the participants as well as start and end
date. If you would like to see further details for an appointment, you can click by
on the appointment to switch to the detail view.
5.1.2.
Day View
Display
The Day View shows all appointments for which you have the appropriate
permission as a white box that stretches across the whole appointment period. If
you do not have relevant permissions, the appointment is shown as a
transparent box. Within the box you see icons besides the appointment
description. These icons are color representations of the type of appointment. A
booked appointment is displayed in blue, a preliminary one in yellow, a vacation
event is shown in green, and if you are not in the office at the time of the
appointment, it is displayed in red. Appointment sequences are represented by
an icon. All-day appointments are represented by the icon
in the "24 h" row in
the Day View. If several all-day appointments exist for a date, they are displayed
together in this line.
Day View – Print Appointment List
You can print the list of all appointments shown in the Day View by clicking the
printer icon
. Clicking on the icon first opens a form in your browser that is
optimized for printing. You can now print out this page as you normally would by
using the printing function of your browser. In Internet Explorer, for instance,
the print option is found under the menu item "File | Print". The print function
helps you print out list fields correctly.
OX 5 User Manual v1.32
- 47 -
Calendar
Figure 5-1: Print-optimized Output of the Calendar Day View
Creating Appointments
In the Day View there are to several ways for creating appointments. The first
possibility is clicking the create icon
. The second possibility is to click on one
of the times displayed in the leftmost column. If you use this possibility, the
beginning time of the appointment is automatically preset to the time you
clicked.
5.1.3.
Week View
Display
The Week view shows the appointments over the course of one week. The
display of each individual day corresponds with the Day view. Every entry begins
with the start and end times and it gives an appointment description. If the
description is too long to be shown completely, the display is truncated, which is
indicated by three dots.
© Copyright 2005-2006, OPEN-XCHANGE Inc.
- 48 -
Figure 5-2: Calendar Day View
The appointment type is not displayed, but recurrent appointments are marked
with the icon .
Week View – Print Appointment List
You can print the list of all appointments shown in the Week View by clicking the
printer icon
. Clicking on the icon first opens a form in your browser that is
optimized for printing. With the print function of your browser you can print this
now as usual. In MS Internet ExplorerTM, for instance, the print option is found in
the menu under "File | Print". The print function helps you print out list fields
correctly.
Creating Appointments
In the Week View you can click on the create icon
to add further
appointments. Furthermore, you can click on one of the dates to enter an
appointment where the weekday you clicked automatically becomes the
appointment start.
OX 5 User Manual v1.32
- 49 -
Calendar
5.1.4.
Month View
Display
The Month View shows the appointments over the course of a whole month. The
appointments are displayed with their start time, as well as some letters of the
appointment description. In the Month View you can click on the
icon to add
further appointments. Furthermore, you can click on a day to enter an
appointment where the weekday you clicked automatically becomes the
appointment start.
Figure 5-3: Calendar Week View
© Copyright 2005-2006, OPEN-XCHANGE Inc.
- 50 -
Figure 5-4: Calendar Month View
Month View – Print Appointment List
You can print the list of all events shown in the Month View by clicking the
printer icon
. Clicking on the icon first opens a form in your browser that is
optimized for printing. With the print function of your browser you can print this
now as usual. In Internet Explorer, for instance, the print option is found in the
menu under "File | Print". The print function helps you print out list fields
correctly.
OX 5 User Manual v1.32
- 51 -
Calendar
Team View
Figure 5-5: Calendar Team View
On this page you see the Team View of the calendar. Here you see an overview
of the appointments of one day for all users and resources that were selected in
the result field of the search menu. All appointments are shown for each user in
its own day column. You can see at most 3 users or resources at the same time.
If you have selected more than 3 users or resources via the search field before,
you now have to use a special form to select the resources and users from the
result list who should actually be displayed in the Team View. To make your
selection, simply move the desired users into the user column on the right. If
you really want to have more than 3 users or resources be displayed at the same
time, the administrator has to manually change a setting accordingly in the
configuration files of the groupware. The number of displayable columns can be
extended up to 10.
© Copyright 2005-2006, OPEN-XCHANGE Inc.
- 52 -
Figure 5-6: Selecting Users and Resources to be displayed in the Team View
and
you can either go back or forward by one
With the blue arrow keys
day. You can also set the date with the form on the right below the menu bar. In
order to create a new appointment, click on the "Create appointment" icon
. If
you click on a time in the left section of the page, you are also taken to the form
for creating an appointment. Then the start datum is set to the value you just
clicked. If you click on the plus sign above of the calendar sheet, you are taken
to a tabular display of all appointments for this day. If a user has more than 5
appointments within the display period, this is indicated by the text "there are
more appointments". If you want to see the details for an appointment, click on
the title of the appointment or on the colored rectangle before the name. The
color of the rectangle shows you the type of the appointment: A booked
appointment is displayed in blue, a preliminary one in yellow, a vacation
appointment is shown in green, and if you are not in the office at the time of the
appointment, it is displayed in red. The display of the appointments always
conforms to the currently active time zone. If the time zone is changed, e.g. due
to a trip, you can set the time zone via your profile configuration.
5.1.5.
Calendar View of other Colleagues, Groups or Resources
With the Team View you can look into the calendars of your colleagues, as long
as these appear as participants in your own appointments. Further appointments
OX 5 User Manual v1.32
- 53 -
Calendar
of other users are visible to you if these appointments are saved in public or
released folders. (See chapter Folder Management)
5.2.
Appointment View
If you click on an appointment in one of the calendar views, you get a view of
the appointment which contains all detailed information.
5.2.1.
Viewing, Editing or Deleting an Appointment
In the top right section of the appointment view you can click on the Create icon
to create a new appointment. Via the change icon
you can change the
appointment data. If you would like to delete the appointment, select the trash
icon
and confirm the subsequent security query. An appointment can only be
deleted if you have delete permission for the folder in which the appointment
was saved. The buttons for editing and deleting are only visible if you have the
appropriate authorization for editing and deleting (write access). If you delete an
appointment with multiple users created by another Open-Xchange user from a
private folder, then you can only delete all available instances of this
appointment if you have created the appointment yourself or if you possess
corresponding delete rights. If another appointment participant deletes the
appointment in his private calendar, then the user will simply be removed from
the participant list, without the appointment being deleted from other users'
calendars. This fundamental rule for the deletion of appointments is independent
of the interface (web interface or SyncML) with which the appointment was
created.
© Copyright 2005-2006, OPEN-XCHANGE Inc.
- 54 -
Figure 5-7: Appointment Details View
You see a summary of the appointment with description, place, time and
participants as well as any remarks that have been entered. Furthermore, you
can also find out whether it is a recurrent appointment and which resources are
booked for it. In the bottom section you can confirm or refuse the appointment.
You can also enter a short comment. If you refuse an appointment, you must
add a comment. These entries are then displayed in the list of participants.
5.2.2.
Appointment Participants
If you click on the participants tab, you get a listing of all participants of this
appointment. In this tabular display you see the name of the participant as well
as the current status. In the status display you can distinguish three status
types. If you see confirmed in green next to the participant, the participant has
seen the appointment and has confirmed. If you see open in black, the
participant has neither refused nor confirmed this appointment. If you see
refused in red, the participant refuses this appointment.
OX 5 User Manual v1.32
- 55 -
Calendar
Figure 5-8: Participants of an Appointment
5.2.3.
Appointment History
If you click on the "History" tab you see when the appointment was created,
when it was last updated and who has performed this update.
© Copyright 2005-2006, OPEN-XCHANGE Inc.
- 56 -
Figure 5-9: History of an Appointment
5.2.4.
Appointment Notes
Different notes can be entered for an appointment. These notes are displayed in
tabular form under the "Notes" tab. In order to see these notes, simply click on
the icon
. In order to create new notes you click on the icon
. Every note
consists of a simple text title as well as a short description with the actual note
content. Notes for an appointment can be saved as private or public.
OX 5 User Manual v1.32
- 57 -
Calendar
Figure 5-10: Notes for an Appointment
Figure 5-11: Creating a new Appointment
© Copyright 2005-2006, OPEN-XCHANGE Inc.
- 58 -
5.2.5.
Linking Appointments
You can add links to an appointment. For more details about linking objects
please refer to the "Linking" section of the 'Basics' chapter.
5.2.6.
Attachments
Appointments can be linked not only with documents. You also have the
possibility to add files directly as attachments to an appointment. For this you
simply click on the "attachments" tab and select via "Browse" the file that you
would like to attach to the appointment. The Mime type is determined
automatically and you only have to click the button "Attach" upload the
attachment. Of course you can also attach several files. Repeat the steps
described above as often as you wish. If you want to delete an attachment later,
simply click the "Delete" button in the row of the respective attachment. An
attachment may be deleted by any user with delete permissions for the relevant
calendar folder in which the containing appointment is saved.
5.3.
Creating an Appointment
5.3.1.
Defining an Appointment
To create a new appointment, you have to fill out some required fields that are
obligatory for each appointment. Only if these required fields are filled out, an
appointment can be created.
Required Fields
The required fields for creating a new appointment are the following:
Description
Appointment Start
Appointment End
Appointment start and end are automatically filled in, depending on how you
want to create an appointment. Typical ways are clicking on an appointment in
the Day View, Week View or Month View. Only if the description field is filled out
you can change to other tabs where you can provide more details for your
appointment.
Personal and Group Appointments
In the "appointment" tab you can create an appointment and via two radio
buttons you can specify whether this should be a personal or a group
appointment. There are different ways for creating appointments quickly and
easily.
OX 5 User Manual v1.32
- 59 -
Calendar
Personal Appointments to which nobody else has Access
When you create an appointment, "personal appointment" is selected by default.
If you do not want to grant your colleagues access to this appointment, you just
need to your appointment data and click on the "Save" button. Of course you
can check the availability of resources, e.g. a car and also book it for your
appointment. Finally, the appointment is saved to your personal calendar.
Group Appointment
When you create a group appointment in which you would like to take part
yourself, click on "Group appointment" and you will automatically be taken to the
list of participants. Continue with selecting the remaining participants. As a
participant, you can select all available users, resources and user groups.
Additionally, you have the possibility of selecting entire contributor lists. In this
case, all Open-Xchange 5 server users that are contained in this contributor list
will be added as participants in the appointment. All participants receive the
appointment via e-mail. Via the web front end, the participants can accept or
refuse appointments by hand. If the notification email is opened by a participant
via the Open-Xchange server, a popup window appears where the appointment
can be accepted or refused directly. Of course it is also possible to create
appointments in which you do not participate yourself. Simply delete yourself
from the list of participants. Besides the text, every e-mail appointment message
contains an attachment in the form of an ICAL-file. You can use this ICAL-file
with the help of an external ICAL capable appointment planner, for example, the
Thunderbird program. Optionally, you have the possibility of using the link
contained in the e-mail. Via this link, you can directly reach the corresponding
appointment entry in the web interface of the Open-Xchange groupware server.
Folders
Via this field you specify in which folder the new appointment should be saved.
Here you can select between your personal appointment book, public
appointment books and released appointment books, depending on your
permissions for the respective folders. Please note that the read, write and
delete permissions of the selected folder are copied to the new appointment.
Description
Enter a short description of this appointment in this field. "Description" is a
required field. If you cannot fill in this field, the appointment cannot be created
or changed.
© Copyright 2005-2006, OPEN-XCHANGE Inc.
- 60 -
Begins, Ends
Enter here the appointment data. You can either enter the date directly or click
on the calendar icon
to select a date from an integrated calendar. In order to
select an appointment from the calendar, you simply click on the desired day.
Then the calendar is closed and the selected day is automatically entered in the
field. Within the calendar you switch between the displayed months. With the
pull-down menu you can select a time for your appointment. If your appointment
is an all-day appointment, select the relevant checkbox. For all-day
appointments the time fields are ignored. The all-day appointment is created for
all days, beginning with the start date and ending with end date. Upon saving,
the entered appointments are automatically checked for overlaps with other
appointments and resources are checked for conflicts. No conflict handling is
performed for all-day appointments.
Display as
Here you enter as which type the appointment should be displayed. Select the
type of appointment from the pull-down menu. The type of the appointment
determines in which color it is displayed in the Day View. Possible settings are
"reserved", "temporary", "absent on business", and "free".
Categories
You can sort appointments into different categories to maintain a better
overview. The available categories can be selected via a popup window. By
default, you can choose from the following categories:
Remarks
In the remarks field you can add additional information.
Reminder
You can specify here whether and when you would like to get an email reminder
for an appointment. Every participant of an appointment can individually specify
the desired reminder for this appointment. For this, the user has to go to the
detail view of the appointment, select the desired time frame and click the
"Save" button.
Notify participants
If you select this checkbox all participants of this appointment are informed via
email of its creation and/or updates to it. If you change important appointment
data, you should activate this notification.
OX 5 User Manual v1.32
- 61 -
Calendar
5.3.2.
Selecting Participants
If the appointment is a group appointment, you can add further participants and
participant groups to the appointment. Assigning participants to an appointment
works similar to assigning object permissions as already discussed in Defining
object-specific rights. It is generally the case that all participants of an
appointment have read and write access. Public and released folders are
exceptions. All system users of the groupware have access to public calendar
folders. For released folders, the object rights depend on the rights set for the
folder. You find further details in the chapter "Folder Concepts".
Figure 5-12: Selecting further Participants
5.3.3.
Assigning Read and Write Access
A manual configuration of the read and write permissions is not necessary during
the creation of an appointment. A new appointment has the same permissions as
the folder in which it is saved. You find a detailed discussion of this topic in
chapter "Folder Concepts".
5.3.4.
Assigning Resources
Besides participants you also can assign resources to an appointment if it is a
group appointment. The assignment work similar to that in the participants tab
© Copyright 2005-2006, OPEN-XCHANGE Inc.
- 62 -
as already described in section object-specific rights. Similar to the previous
assignment of participants you access resource groups or individual resources
here. For this you select "system resources" from the list box "data source" and
select the desired resources. This works similar to choosing individual
participants or participant groups.
5.3.5.
Creating an Appointment Sequence
If you set up a recurrent appointment, you can enter the relevant setting under
appointment sequence.
Figure 5-13: Creating an Appointment Sequence
Here you have several options for specifying the repetition period for the
appointment:
No Sequence
If the repetition period has this setting, an individual appointment is created
without repetition. This is the default setting for appointments.
OX 5 User Manual v1.32
- 63 -
Calendar
Daily
If you select this as the repetition period, the appointment is repeated
periodically after the given days. If the appointment sequence is going to be
edited later, please note that this option cannot be changed any more. Changing
to "weekly" or "monthly" is not possible.
Weekly
With a weekly repetition period, you can add appointments that should recur in
weekly intervals. For example, if you have set the repetition period to be 3
weeks, the appointment is added to the calendar every 21 days. You can also
specify on which weekdays the appointment should be repeated. For this you
simply click the appropriate flag for "Monday", "Tuesday", "Wednesday",
"Thursday", "Friday", "Saturday" and "Sunday", depending on which weekday
the appointment should be repeated on. If the appointment sequence is going to
be edited later, please note that this option cannot be changed any more.
Changing to "daily" or "monthly" is not possible.
Monthly
If this appointment occurs periodically on a specific day in intervals of a certain
number of months, you select this option. In the left text field you enter the day
of the month on which the appointment takes place and in the right one how
many months should pass between an appointment and the next in the
sequence. If the appointment sequence is going to be edited later, please note
that this option cannot be changed any more. Changing to "daily" or "weekly" is
not possible.
Yearly
Yearly recurring appointments can also be set up via the sequence configuration.
For this simply set the date of the recurring appointment under "yearly".
Appointment Sequence until
If you have decided on a repetition period, you can specify here up to which date
the appointments should be repeated. You can enter the date directly (in
day..month..year format) or click on the icon
to select the date via a mouse
click on the integrated calendar. Upon saving, the entered sequence
appointments are not automatically checked for overlaps with other
appointments. Thus, appointments that are entered later could very well lead to
conflicts with existing sequence appointments.
© Copyright 2005-2006, OPEN-XCHANGE Inc.
- 64 -
5.3.6.
Checking Availability
Via this tab you can check whether all participants or resources are available for
the appointment. The check is done for a time span of a day.
Figure 5-14: Availability Check
Setting the Availability Time Span
You can set the time span to be examined via the input field and pull-down
menus. You can enter the date to be examined directly or via the integrated
calendar. Furthermore, you can select whether the availability check should be
carried out for either participants or resources only, or whether both should be
included in the analysis. Once you have made your choice, you can run the
availability check via "check".
Determine Availability
Once the analysis is finished, you receive a tabular report with which you can
determine whether the necessary persons and resources are available for your
appointment.
OX 5 User Manual v1.32
- 65 -
Calendar
Figure 5-15: Availability of Participants and Resources
The report is sorted by hour and participant and contains color marking for easy
interpretation. The times within the examined time span at which one of the
participants has an appointment are marked with red cells. The times within the
examined time span at which none of the participants have any appointments
are marked with green cells. The times outside the examined time span at which
one of the participants is unavailable are marked with gray cells. The times
outside the examined time span at which none of the participants have any
appointments are marked with white cells. You can exclude a participant from
this appointment by activating the checkbox in the same row and then clicking
the "Apply" button. The buttons on the right underneath the table allow you to
repeat the check for the "previous day" or the "next day".
Perform a Query
In order to check a longer time span for the availability of persons and
resources, you can perform a query. The system automatically searches for
possible dates and graphically displays reasonable suggestions for possible
dates.
© Copyright 2005-2006, OPEN-XCHANGE Inc.
- 66 -
Figure 5-16: Performing Queries
For a query you can specify a start and an end date or selected these via the
calendar icon . The check is performed for the specified time span. In order to
set the time span for the check, you can set the start and end dates via the
dropdown menus. The duration specifies how long the appointment should last.
Available times within the time span are displayed as green blocks. Times within
this span that would lead to conflicts are marked with red blocks. Times within
the selected date frame but outside the selected time span are included in the
check and the result is displayed as well. In the display these times are
represented by white and gray blocks, where the white block correspond to the
meaning of green blocks within the selected window and the gray blocks
correspond to the red blocks. You can carry out such queries for date spans up
to 31 days. If you click on the desired start time, the necessary appointment
data are automatically transferred and filled into the suitable fields in the
"appointment" tab.
OX 5 User Manual v1.32
- 67 -
Calendar
Figure 5-17: Query Results for an Appointment
5.3.7.
Conflict Management
When you create an appointment, an automatic conflict check is performed in
which the data of the new appointment are checked for overlaps with other
appointments and resources. Only when you create appointment sequences,
conflict checking is skipped for reasons of clarity and simplicity. However, when
you later create further appointments these can absolutely conflict with
individual appointments within the appointment sequence. In addition, there is
no conflict checking for all-day appointments. Whether or not a new appointment
overlaps with another appointment is checked after you press the "Save" button.
Apparent conflicts are displayed in a list. There you also find a listing of potential
conflicts with respect to resources, in case a resource for a certain appointment
is already being used. You can generally indicate at this point whether an
appointment conflict should be ignored. Resource conflicts, on the other hand,
cannot be ignored. In order to ignore existing conflicts and to still create the
appointment, simply click the button "ignore conflicts and save". If you would
like to remove an appointment conflict, you perform an appointment query via
the conflict page, where you click the button "Send request". Alternatively, you
can use the "Back" button to return to the appointment creation form. If you
would rather like to quit entering the appointment at this time, you can simply
click the "Cancel" button. All changes made by you would then be lost.
© Copyright 2005-2006, OPEN-XCHANGE Inc.
- 68 -
Figure 5-18: Conflict Management during Appointment Creation
OX 5 User Manual v1.32
- 69 -
Calendar
6.
Contacts
Via the contact management you can manage contacts together with the
corresponding company addresses. You can search for a contact or a company
address with different search criteria and you can create arbitrarily many notes
and links. The following functions are available for the "Contacts" module:
6.1.
Searching for Contact
Creating a new Contact
Editing a Contact
Deleting a Contact
Exporting Contacts
Managing Notes for a Contact
Linking Contacts to other Objects
Contacts
As soon as you open the contacts module, you see an overview list of all
contacts to which you have access. The list field in the upper module section
allows you sort the contact by different categories. The following categories are
available in the Web front end of Open-Xchange:
Standard
The usual start page with existing contact data from the private and global
address books to which you have access. The table columns show the fields
Name, Company, Tel. Business, Tel. Mobile and Email.
Company
This contact list shows a table with all company addresses to which you have
access. The table columns show the fields Company, Tel. Company, Street,
Postal Code, City and Email.
Communication
This contact list shows a table with all your contacts and their most important
communication data. The table columns show the fields Name, Tel. Business,
Tel. Home, Tel. Mobile, Tel. Business Fax and Email.
© Copyright 2005-2006, OPEN-XCHANGE Inc.
- 70 -
Private
This view shows a contact list with all of your private contact addresses. The
table columns show the fields Name, Birthday, City (Private), Tel. Home, Tel.
Mobile, and Email.
Categories
This view shows all contacts to which a category was assigned. Via the category
field a contacts can, for instance, be marked as private, customer or business.
The table columns show the fields Name, Company and Category.
Birthday
This view shows all contacts for which a date of birth is specified. The following
fields are shown as columns.
If you have performed a contacts search, you find here the result list of the
search query. You can change the sort order of the table by clicking one of the
arrows (down
for a descending sort order, up
for ascending) next to the
column headings. In order to specify how many search results should be
indicated on a page, you can use the pull-down menu above the table. In order
to reach the next/preceding pages, please use the blue arrows
at the top
of the page or you click directly on the desired page number. In order to see the
to the left of the
details of a contact, click on the name or the yellow arrow
name. In order to print the list of all found contacts, click on the printer icon
.
Via the printer icon you can print out all entries that were found via a contacts
search. For this you first open a print-optimized form in your browser. Via the
print function of your browser you can print this now as usual. In MS Internet
ExplorerTM, for instance, the print option is found in the menu under "File |
Print". The print function helps you print out list fields correctly.
6.1.1.
Customize Layout
Under the "Customize Layout" tab you can assort predefined views for the
contact module. Each created layout can be opened using the list field in the
"Contact Layout" tab.
To add a new customized contact layout enter a
significant "Layout name" in the text field. Afterwards click the button "Add
Layout". A new layout with the given name is now available and active as your
present contact layout.
Use the left list box on the lower left to select the contact data fields to be shown
in the customized layout. You can select all kinds of predefined and dynamic
contact fields available (e.g. Name, Given Name, Suffix, Company etc). If you
want to select more than one field at once, hold |CTRL] while selecting. Once
you have select all the data fields you want to be shown, click on the "Add >"
OX 5 User Manual v1.32
- 71 -
Contacts
button to accept them. All selected fields will now appear in the right list field
"Selected fields". To remove data fields, already listed here, select them by
mouse-click and click on the button "< Remove". To save the layout click on the
"Save" button. Click the "Abort" button to stop composing a new contact view.
6.1.2.
Searching Contacts
You have different possibilities for searching contacts. Besides the global search
from the Handbook frame you can launch a detailed search or search by initial
letter.
Global Search
You find the global search in the right/left handbook frame. In the global search
you can enter a search string. If you select "Contacts" in the list field, the
system searches in your address book entries. The query searches the names of
contacts. Here, you can use wildcards as well. The search is case insensitive.
Searching for initial Letters
In the "Contacts" section you can search for the initial letter of the contact's
name. Via the "all" link you can also get a complete list of contacts displayed.
Detailed Search - Contacts
You find the detailed search for a contact address in the "Contacts" section under
the "Contact search" tab. There you can search for the different descriptive field
entries that can be saved with a contact entry. For instance, you can search for
the name of the associated company, the name of the contact, the position and
department, the birth date of the contact or the address at which the contact is
located (street, place and country) or for a general email address. You can also
search for postal codes, phone numbers or other entries. It is possible to use
wildcards such as "*" and "?" as with the global search. The postal code search is
always performed "from...until...". If you enter only one value, e.g., only the
field postal code from, the system only searches for this specific postal code.
This form also allows you to search for specific creation and update intervals. For
this you simply select the desired appointment via the calendar icon with a few
mouse clicks. With the "Categories" button you can search for the contact entries
that were associated to a specific contact category.
Please note that before a search is performed, you must specify the address
book in which the given information is to be searched for. The selection is carried
out via the "Search in Folder" list field at the top position under this tab. There
are multiple options available for the search in this case. If you choose, for
example, the "All OX Folders" option in the list field, then the search will be
carried out in all address books on the Open-Xchange server itself. Optionally,
© Copyright 2005-2006, OPEN-XCHANGE Inc.
- 72 -
you can limit the search to single address books such as the "Global Address
Book" or the "List of Internet Users". As an alternative to that, you can search
using an external, additional LDAP address book provided by the server and
individually selected using the list field.
Note:
Please note that additional LDAP address books must be made
available explicitly by the administrator. Additionally, such
LDAP address books will not be accounted for in the "All OX
Folders" search, because in this case the search does not
literally involve an Open-Xchange folder server. The search of
such LDAP address books therefore has to be carried out
separately.
Search in Contact Folders
Due to the folder management of Open-Xchange Server, contacts can only be
placed in the global address book, in public contact folders or contact folders
released by other users. In the list field "Search in Folder" you determine which
folder Open-Xchange should search for contacts. Activate the checkbox "Search
in Subfolders" if all subfolders of a contact folder should be included in the
search.
Figure 6-1: Detailed Search for a Contact Address
OX 5 User Manual v1.32
- 73 -
Contacts
Displaying a Contact
You find a contact most easily by using the global search function. You can pick
the appropriate entry from the list of found entries and look at it in detailed
mode by clicking on it with the mouse. Another possibility for displaying contact
data is to open the corresponding company address and changing to the detailed
view. Here you will find all informational details that are associated with the
address entry.
In the detail view of a contact itself, you can print the contact with all detail
information in an overview format. To do that, click on the Print symbol. Printing
in this indirect way has the advantage that the contact form displayed is
optimized for printing. With help from the print function of your browser, you can
now print this as usual. In Internet Explorer™, for example, you will find the
print option on the menu bar under "File | Print". The print function serves
thereby for the correct printing of list fields.
Via the "Company Information" list field at the top of the contact detail view, you
have direct access to the company and additional contacts with which the
current contact entry is linked. If you would like to create such a link, then click
on the "Edit" symbol and make the necessary settings in under the "Dynamic
Fields" tab.
© Copyright 2005-2006, OPEN-XCHANGE Inc.
- 74 -
Figure 6-2: Search by initial Letters
6.2.
Creating a new Contact
You can create a new contacts address via the "New" menu on the portal page or
via the "Create" button
in the Contacts section under the Contacts tab. In the
window that opens then you can enter the contact address details.
OX 5 User Manual v1.32
- 75 -
Contacts
Figure 6-3: Creating a Contact
Please note that the top input field must be filled out every time because it is a
required field. Please note that the names have to do with a unique identification
field, under whose title the contract entry is saved on the LDAP-Server. Enter the
last name, a company name or the name of a contributor list here.
You can add additional contact information in the extended view under the "All
Fields" tab. The diagram on the next page gives an overview of all available
fields that you can fill out there. With the communication data that you have
entered, you should have entered all available communication information,
particularly e-mail addresses, telephone numbers, fax numbers and mobile
telephone numbers. Particularly the last two types of information can, as is
always possible with e-mail addresses, be used directly over the server under
certain conditions, as long as a corresponding third party auxiliary module has
been installed by the administrator. In this case, the fax or e-mail address can
be inserted into the recipient e-mail address field in the Open-Xchange server
web mailer. The "Birthday" field must also be mentioned particularly. Via the
miniature calendar symbol, you can enter a birth date for the current contact.
The special characteristic of this field is the fact that for birthdays that have been
inputted, a recurrent calendar entry will be created. You can create additional
field entries under the "All Fields" and "Dynamic Fields" tabs. Using the "Dynamic
© Copyright 2005-2006, OPEN-XCHANGE Inc.
- 76 -
Fields" tab, you may define your own fields which are not made available by the
groupware by default.
6.2.1.
Quick View
The "Quick View" tab allows you to enter the most important contact data as
quickly as possible. Besides title, last name and first name, you can enter, for
instance, birthday, phone number as well as address at this point. Via the list
field "In Folder" you can specify in which folder the new contact should be saved.
By default, contacts are stored in your personal contacts folder.
If you would like to enter additional information for the contact, please use the
"All fields" and "Dynamic Fields" tabs. Please note that you can only select these
tabs once you have filled out the required field "Name".
Categories
A special input field in the quick view is the "Category" button. With this button
you can place the contact in a specific contact category. If you click the button, a
popup window appears where you can select between different predefined
contact categories. Select the appropriate checkbox following the desired
category and click the button "Add selected Categories". You set up a private
category by entering it by hand in the text field. With the button "Save
categories list" you add it permanently. In order to delete individual categories
you select the checkbox in front of the category and click the button "Delete
Selected Categories".
OX 5 User Manual v1.32
- 77 -
Contacts
Figure 6-4: Selecting a Contact Category
6.2.2.
All Fields
Via the "All fields" tab you can add a lot more detailed information to a contact
such as, for example, additional telephone numbers, email addresses or tax
identification numbers.
6.2.3.
Dynamic Fields
Via this tab you can add further contact information. For this you use
dynamically assigned fields. Which input fields are available to you depends on
the groupware settings made by your administrator.
In the top display area of the tab, you can additionally link the current contact
entry with another contact entry. This procedure is particularly appropriate for
the linking of an employee contact with their corresponding company. To create
the link, use the search field at the left to select the contact folder where the
contacts that are to be linked with the current contact are to be found. After
pressing the "Search" button, all contact entries in this folder will be displayed in
© Copyright 2005-2006, OPEN-XCHANGE Inc.
- 78 -
the results field. In this field, you can now mark all contacts with which a link is
be created by selecting with the mouse. A multi-selection is possible here-- to do
this, hold the shift key down. Click on the "Add" button to apply the current
selection. The link targets will be displayed in the list field at the right under
"Company". Click on the "Save" button to definitively apply the links that have
been created. In the future, a direct link to the assigned company and/or all
other contact links created in this way will be available to you in the detail view
of the contact in the "Company Information" list field.
6.2.4.
Distribution Lists
In the "Distribution List" tab you can set up email distribution lists. Optionally,
you can also do this when you set up regular contacts, but in general you will
create special contacts for this with the title of the email distribution list. In order
to add an email address from your contact address book, find it first using the
search bar. Then select it from the search results and click the "Add" button.
With "Add independent email" you can also directly add the email addresses that
should be included in the distribution list. All contacts that were already added to
the distribution list are shown under "Attached Contacts" and "Attached
independent emails".
Figure 6-5: Distribution Lists
OX 5 User Manual v1.32
- 79 -
Contacts
6.2.5.
Image
Under this tab you can add an image file to a contact. Usually this would be a
photo of the respective person, or in the case of companies, a company logo. In
order to add a new picture you click on the button "Browse and select a file for
uploading via a file manager. Then click the "Upload" button to start the upload
process. Please note that only JPEG images may be used.
Note:
Required field
Please note that you have to fill in the required field 'Name'.
Otherwise an error message is generated by the system.
Once you have entered all information, save the new contact by clicking on the
"Save" button.
6.3.
Editing a Contact
In order to be able to change a contact, search for the desired contact and select
it with your mouse, to get to the detailed view. There you use the "Edit" button
to switch to the editing mode. The button is only visible to you if you have
suitable write access. You can now change either the permissions or the details
for the contact. The display of the form corresponds to the form that you also
use for entering a new contact.
To save the changes, confirm the form by clicking the "Save" button. If you
decide not to save these changes, you can leave the menu again by clicking on
the "Cancel" button.
Figure 6-6: Details View of an Address
© Copyright 2005-2006, OPEN-XCHANGE Inc.
- 80 -
6.4.
Deleting a Contact
In order to delete a contact, you have to change to the detail view. There click
on the trash button
with your mouse. Here the icon is also visible only if you
have permission to delete. The system asks you a security question to make
sure you really want to delete this contact.
If you are sure you want to delete, confirm by clicking the "Delete" button. If
you decide not to continue with this deletion, you can leave the menu again by
clicking on the "Cancel" button.
6.5.
Creating, Reading, Changing or Deleting Notes on a Contact
For contacts you can click on the "notes" tab to switch to the notes management
of the detail view. All existing notes are listed here in table form. Via the create
you can add additional notes. Please be aware that notes are subject to a
icon
different system for administering permissions. You can store private notes here
and attach them to a public address, but only you can see these notes. For this
you just have to activate the "personal" radio button. If a note should have the
same permissions as the address, activate the radio button "like the associated
object". To delete a note, open it and click with the mouse on the icon
. To
edit a note, open it and click with the mouse on the change icon
.
6.5.1.
Note History
You will also find the "History" tab in the detail view of a note. The information
displayed there tells you which user originally created the note and on what date
it was created. In addition, this location records the date of the most recent
changes to the note and which user made the changes.
OX 5 User Manual v1.32
- 81 -
Contacts
Figure 6-7: Adding a private Note to an Address
Figure 6-8: History of a Contact Note
© Copyright 2005-2006, OPEN-XCHANGE Inc.
- 82 -
6.6.
Linking a Contact with other Objects
You can add as many links as you like to every contact. You can link a contact to
other contacts, tasks, projects, appointments, documents, knowledge entries,
bookmarks and forums. You can have a look at available links to a contact in the
detail view of the contact, by selecting the "links" tab there. How exactly a
contact is linked to other objects is explained in chapter 3. There you also learn
how to delete an existing link.
Figure 6-9: Displaying Links set to an Address
6.7.
Contact Attachments
It is not only possible to link appointments with documents. You can also add
files directly to a contact as attachments. For this you simply click on the
"attachments" tab, and "Browse" to the file that you would like to attach to the
contact. The MIME type is determined automatically and you only have to click
the button "Attach" to upload the attachment. Of course you can also attach
several files. Repeat the steps described above as often as you wish. If you want
to delete an attachment later, simply click the "Delete" button in the row of the
respective attachment. An attachment may be deleted by any user with delete
permissions for the contact folder where the relevant contact is saved.
OX 5 User Manual v1.32
- 83 -
Contacts
7.
Tasks
You can use the tasks module to plan your activities in an organized manner.
You can also create tasks and assign them to other users and groups. Different
views are available to you as, for example, project tasks, delegated tasks, etc.
You can assign a status to a task. Completed tasks are crossed out in the
display. Tasks can also be directly associated with a project. Furthermore, as in
the other modules you can add notes and links to every task. The following
views and functions are available for the "Tasks" module:
7.1.
Overview of different task types
Creating a new task
Changing a task
Forwarding a task
Deleting a task
Creating, reading, changing and deleting notes on a task
Linking tasks to other objects
Tasks Overview
Figure 7-1: Listing all your Tasks
From the overview of the tasks you can get views of different task types. The
tasks shown here are all assigned to you. How many tasks are displayed on a
page can be changed via the pull-down menu in the upper right-hand corner of
© Copyright 2005-2006, OPEN-XCHANGE Inc.
- 84 -
the module. If you just want to see general tasks, project tasks or delegated
tasks, switch to the desired view via the list fields in the upper margin. All lists
work with the same type of navigation.
7.1.1.
List of all Tasks
On this page you see an overview of all tasks assigned to you. All tasks are
shown that have not been archived yet. In the second list field you can choose
between different limited views within the view of all tasks:
A simple list
Active tasks
Next 7 days
Tasks past due
Delegated tasks
Finished tasks
7.1.2.
Project Tasks
Other than general tasks, project tasks are tightly linked to a project. They are
always created in the Tasks module, but they also appear under the associated
project in the project overview. Otherwise this page is identical in its
functionality with the page in which all tasks are listed. With the second list field
you can limit this view further.
7.1.3.
Global Tasks
Global tasks are tasks that were not associated to a project, but are instead of
more general nature. It is irrelevant who has assigned this task to the user.
Otherwise this page is identical to the list of all tasks. With the second list field
you can limit this view further.
Tasks past their due date are highlighted in orange. You can change the sort
order of the table by clicking one of the arrows (down
for a descending sort
order, up
for ascending) next to the column headings. In order to specify how
many tasks should be shown on a page, you can use the pull-down menu above
the table. In order to reach the next/preceding pages, please use the blue
arrows
at the top of the page or you click directly on the desired page
number. In order to see the details of a task, click on the name or the yellow
arrow
to the left of the task name.
7.1.4.
Delegated Tasks
If you create a task and assign it to other persons or groups, the creator of this
task will see is displayed as a "delegated task". Otherwise this page is identical
to the list of all tasks.
OX 5 User Manual v1.32
- 85 -
Tasks
7.2.
Tasks View
Click on the "Customize Layout" tab in order to put together your own tasks view
that will be displayed on the tasks overview page. To do this, enter a name for
the new view into the "Layout name" text field. Now, click on the "Add Layout"
button and the new view will be added and automatically selected as active.
Using the selection field at the left under the image, you can select text fields
that are to be displayed in the view. The task information items Subject, Priority,
Start date and Description, for example, are among the task fields available. If
you would like to select multiple fields simultaneously, then hold the [CTRL] key
down as you select them. As soon as you have selected all desired fields, press
the "Add >" button in order to apply the fields to the new view. The fields will
now appear in the selection menu at the right under "Selected Fields". To
remove fields from fields added there, mark these and press the "< Remove"
button. If the fields listed under "Selected Fields" are actually only the ones that
you want to make available for the new view, then click the "Save" button. If
you would like to end the procedure for creating a new task view, without
applying the selections, then you can press the "Cancel" button at any time.
7.3.
Creating a New Task
Figure 7-2: Creating a new Task
Via the create icon
be completed:
you can add additional tasks. The following fields need to
© Copyright 2005-2006, OPEN-XCHANGE Inc.
- 86 -
7.3.1.
Standard Information
Subject
Under "subject" you simply enter the title under which the task should be saved.
"Subject" is a required field without which a task cannot be created.
Start Date
Here you enter the date when the task should be worked on. The date format is
DD.MM.YYYY. They can also select the date with help of the built-in calendar. For
this, click on the calendar icon to the right of the input field. A new calendar
view opens. Simply click on the desired date, the calendar closes and the
selected date appears in the text field. The default for the start date is always
the today's date. The system also automatically checks upon creation of a
project task whether the start date falls within the project time frame. "Start
date" is a required field. If you cannot fill in this field, the appointment cannot be
created or changed.
Note:
Required fields
All required fields must be filled in before you can select
another tab.
End Date
Here you enter the date by when the task should be completed. The date format
is DD.MM.YYYY. They can also select the date with help of the built-in calendar.
For this, click on the calendar icon
to the right of the input field. A small
calendar view opens. Simply click on the desired date, the calendar closes and
the selected date appears in the text field. The system also automatically checks
upon creation of a project task whether the end date falls within the project time
frame. "End date" is a required field. If you cannot fill in this field, the
appointment cannot be created or changed.
Description
Please enter a precise description of the task.
Priority
At this point you assign a priority to the task. Here you can choose between
"low", "normal" and "high". The default is "low".
OX 5 User Manual v1.32
- 87 -
Tasks
Status
Here you enter which status the task has at the moment. Normally you can
choose between three different status options that correspond to the completion
in percent:
Not started (0%)
In progress (25%)
Done (100%)
In addition, a task can be "deferred" or "wait" for someone else.
When you create a new task, the setting "Not started" is the default status.
Reminder by Email
If you want to be reminded of a task by email, you can enter here when you
would like to be reminded. Depending on the value, you will receive the
reminder by email between1 day and 4 weeks before the "end date".
Notify Participants
If you would like that the other participants of this task are also reminded,
please check the checkbox "notify participants".
Categories
A special input field is the "Categories" button. With this button you can place
the task in a specific task category. If you click the button, a popup window
appears where you can select between different predefined task categories.
Select the appropriate checkbox following the desired category and click the
button "Add selected Categories". You set up a personal category by entering it
by hand in the text field. With the button "Save categories list" you add it
permanently. In order to delete individual categories you select the checkbox in
front of the category and click the button "Delete Selected Categories".
7.3.2.
Task Details
Via the "Details" tab you can add additional details to a task. The following
additional fields are available:
Assignment
Here you indicate whether this task is a general task, or whether it belongs to a
project. If it belongs to a project, please select the project in the pull-down
menu. Otherwise please select "Global task". If the task is a project task, the
system checks whether the start date falls within the project time frame.
© Copyright 2005-2006, OPEN-XCHANGE Inc.
- 88 -
Currency
Here you specify which currency should be used for the estimated costs and iscosts. Which currencies are available to you here depends on the list of
currencies made available by the system administrator during the configuration
of Open-Xchange Server.
Overall Duration
Specify here the estimated duration of the task in "hours" or "days". To change
the unit of measurement, please use the pull-down menu on the right of the text
field.
Note:
Overall Duration
This value can only be changed by participants who have
Write- access.
Is-Duration
Specify here the actual duration of the task in "hours" or "days". The unit is the
same as for the overall duration. On the overview page you can see the
difference between estimated duration and is-duration and recognize
immediately whether you are on schedule. In the Projects section the is-values
of all project-specific tasks are added up to provide a summary overview.
Overall Costs
Enter here the estimated costs of the task in the currency that you have selected
before.
Is-Costs
Enter here the actual costs of the task in the currency that you have selected
before. On the overview page you can see the difference between estimated
costs and is-costs and recognize immediately whether you are on budget. In the
Projects section the is-values of all project-specific tasks are added up to provide
a summary overview.
Additional Information
The text fields "Trip meter", "Billing information" and "Companies" allow you to
add further information to the new task.
OX 5 User Manual v1.32
- 89 -
Tasks
7.3.3.
Participants
Via the tabs you reach other entry forms where you add the "participants" for
this task. Selecting participants
Assigning participants to a task works similar to assigning object permissions as
already discussed in Defining object-specific rights. It is generally the case that
all participants of a task have read and write access. Public and released folders
are exceptions. All system users of the groupware have access to public task
folders. For released folders, the object rights depend on the rights set for the
folder. You find further details in chapter 15 Folder management.
Assigning Read and Write Access
Manual configuration of the read and write permissions is not necessary during
the creation of a task. A new task has the same permissions as the folder in
which it is saved. You find a detailed discussion of this topic in the "Folder
Management" chapter.
7.3.4.
Sequence
If this is a periodically recurring task, you can specify this via the sequence tab.
Here you have several options for specifying the recurrence period of the task:
No Sequence
If the repetition period has this setting, an individual task is created without
repetition. This is the default setting for tasks.
Daily
If you select this as the repetition period, the task is repeated periodically after
the given days. If the task sequence is going to be edited later, please note that
this option cannot be changed any more. Changing to "weekly" or "monthly" is
not possible.
Weekly
With a weekly repetition period, you can add tasks that should recur in weekly
intervals. For example, if you have set the repetition period to be 3 weeks, the
task is added to the calendar every 21 days. You can also specify on which
weekdays the task should be repeated. For this you simply click the appropriate
flag for "Monday", "Tuesday", "Wednesday", "Thursday", "Friday", "Saturday"
and "Sunday", depending on which weekday the task should be repeated on. If
the task sequence is going to be edited later, please note that this option cannot
be changed any more. Changing to "daily" or "monthly" is not possible.
© Copyright 2005-2006, OPEN-XCHANGE Inc.
- 90 -
Monthly
If this task occurs periodically on a specific day in intervals of a certain number
of months, you select this option. In the left text field you enter the day of the
month on which the task takes place and in the right one how many months
should pass between a task and the next of the task sequence. If the task
sequence is going to be edited later, please note that this option cannot be
changed any more. Changing to "daily" or "weekly" is not possible.
Yearly
Yearly recurring tasks can also be set up via the sequence configuration. For this
simply set the date of the recurring task under "yearly".
The Sequence ends on
If you have decided on a repetition period, you can specify here up to which date
the task should be repeated. You can enter the date directly (in day.month.year
format) or click on the icon to select the date via a mouse click on the
integrated calendar.
To save the entries, click on the "Save"-button. To reject them, please click on
the "Cancel"-button.
7.4.
Searching for a Task
A task being searched for is not always directly findable in large task databases.
The web interface of Open-Xchange Server therefore makes a simple tool
available to you to search for a specific task. To use this, click on the "Search"
tab in the task module.
In the first text field listed, you have the possibility of entering search text. The
use of wild cards is allowed here. Moreover, you add multiple terms into the text
field if you wish.
Continuing, you must specify the fields in which the given string or terms are to
be searched for. Via the "In" list field, you can set whether the subject line or the
notes assigned to the task are to be accounted for in the search.
Additionally, you can refine the search via the "in Folder" and "With importance"
and "Status" list fields. If a subfolder of a folder is also to be searched, then you
must additionally activate the "incl. subfolder" checkbox.
Optionally, by selecting appropriate search categories, you can get alternative
search results. If you have entered a category as well as a search term, then the
search for tasks will produce results that meet one of these two criteria. By
selecting a category, no limitation on the search terms will occur.
OX 5 User Manual v1.32
- 91 -
Tasks
7.5.
Changing a Task
Figure 7-3: Task Details View
In order to be able to change a task, you should be in the detail view of the task
to be edited. There you use the "Edit" button to switch to the editing mode.
Provided that you have write access, you can now change the assigned people,
as well as the details of the task. You can, for instance, change the status of the
task or set it to "finished". Changing all detail fields is only possible if you have
write access to the task.
You find more information about the meaning of the individual fields in the
section "Creating a new Task".
To save the changes, confirm the form by clicking the "Save" button. If you
decide not to save these changes, you can leave the menu again by clicking on
the "Cancel" button. Under "options" of a task you can refuse or accept a task
assigned to you. Refusing a task requires that you fill out the following text field
providing a reason for the rejection. Via the "participants" tab, all participants
can see a tabular listing of all participants as well as the status of their
participation: "Open", "Denied" or "Approved".
7.6.
Delegating a Task
If you have received a task from another user that was not assigned to you as
an individual or group member, you have the possibility to delegate this task. All
you have to do is to edit the task to modify the list of participants according to
your wishes. Changing the list of participants is only possible, of course, if you
also have the suitable write permissions.
© Copyright 2005-2006, OPEN-XCHANGE Inc.
- 92 -
7.7.
Deleting a Task
In order to delete a task you change to the detail view of the task that you would
like to delete. Click on the trash symbol
with your left mouse button. In order
to delete a task you need, of course, the appropriate delete permission for the
folder containing the task. Before the task is actually deleted, you have to
confirm your decision one more time. As soon as the task is deleted, all
participants of the task are automatically informed via email.
7.8.
Creating, Reading, Changing or Deleting Notes on a Task
You can save your short comments and remarks on tasks in the detail view
under the "Notes" tab. Once you display this tab, all existing notes are listed in
table form. Click on the Create button to write a new note. Please be aware that
notes are subject to a separate system for administering permissions.
You can store private notes here and attach them to a public task, but only you
can see these notes.
7.9.
Linking Tasks to other Objects
You can add as many links as you like to every task. You can link a task to
addresses, tasks, projects, appointments, documents, knowledge entries,
bookmarks and forums. Set the link by opening the detail view of a task under
the "Links" tab. All existing links for this entry are listed here in table form. You
can simply add a link to the current task now by clicking on the button "Activate
link mode". Finally, switch to the detail view of the object to be linked and also
select the "Links" tab there. There, all you have to do is click the "Create" button
and the link is created. Finally, to leave the linking mode, click on the button
"End mode". Please bear in mind that the permission system works here, too: If
you do not have read permission for a linked object, you will not be able to view
details on this object.
7.10.
History
You will also find the "History" tab in the detail view of a task. There you see
which user originally created the task and on what date it was created. In
addition, this location records the date of the most recent changes to the task
and which user made the changes.
7.11.
Task Attachments
It is not only possible to link tasks with documents. You can also add files
directly to a task as attachments. For this you simply click on the "attachments"
tab, and "Browse" to the file that you would like to attach to the task. The Mime
type is determined automatically and you only have to click the button "Attach"
OX 5 User Manual v1.32
- 93 -
Tasks
to upload the attachment. Of course you can also attach several files. For this
repeat the steps described above as often as you wish. If you want to delete an
attachment later, simply click the "Delete" button in the row of the respective
attachment. An attachment may be deleted by any user who has delete
permissions for the task folder, in which the relevant task is saved.
© Copyright 2005-2006, OPEN-XCHANGE Inc.
- 94 -
8.
Projects
The Projects module is used for collecting and administering project-related
information. The filing of project data is done in self-designated project folders.
In addition to entering project data you can see project tasks here. You can
define "milestones" for which you can also configure reminders. In addition,
project notes can be entered as well as links to other modules. For example, you
can set up a project-related forum and link it to the project. The following views
and functions are available for the "Projects" module:
8.1.
Project overview
Creating a new project
Changing a project
Searching for a project
Project archive
Deleting a project
Creating, reading, changing and deleting notes on a project
Linking a project with other objects
Projects Overview
Figure 8-1: Projects Overview
OX 5 User Manual v1.32
- 95 -
Projects
On this page you see an overview of all projects assigned to you. All projects are
shown that are still in progress. Overdue projects are highlighted in orange. You
can change the sort order of the table by clicking one of the arrows (down for a
descending sort order, up for ascending) next to the column headings. In order
to specify how many projects should be shown on a page, you can use the pulldown menu above the table. In order to reach the next/preceding pages, please
use the blue arrows
at the top of the page or you click directly on the
desired page number. In order to see the details of a project, click on the name
to the left of the project name. If you want to create a
or the yellow arrow
new project, click on the "Create project" icon
.
Via the list field in the upper right-hand corner you can select which modules
should be shown in the tabular listing. The following choices are available:
8.1.1.
List
All existing, active projects are listed here in a tabular overview.
8.1.2.
Post-due Projects
Post-due projects are projects that have not been completed yet, although the
project end date is already past.
8.1.3.
Next 7 Days
This option allows you to display all projects that become due in the next seven
days, i.e. their end date is reached.
8.1.4.
Archive
This option allows you to display all projects that have already been completed
and transferred into the archive. You can choose a project via a simple mouse
click on the title of a project shown in the table, or with help of the "yellow
arrow" in the first column. Then you switch to the detail view of the project
where you can see all information related to the project.
8.2.
Details View of a project
Once you have changed to the detail view of a project, you can look at all
information related to the project.
© Copyright 2005-2006, OPEN-XCHANGE Inc.
- 96 -
Figure 8-2: Project Details View
Projects past their due date are highlighted in orange. The is-cost and isduration are calculated from the sum of the is-costs and is-durations of all tasks
of this project. The currency used in the fields "Is costs", "Planned costs" and
"Gains" is the currency that was set during the creation of the project or the
individual tasks. Amounts in different currencies are added up separately
according to currency.
8.2.1.
Options
If you have been assigned this project by someone else, you can now "accept" or
"reject" it. In the text field you can write a remark that is added to your
response. If you decline, the system requires a remark from you, so that your
rejection is understandable for others. Your response and remark is shown in the
list of participants. Once you have selected a response, click on the "Save"
button.
8.2.2.
Further Information
The tabs take you to other details of this project such as team, milestones,
tasks, dependencies, chart, history, notes, links and attachments. With the
"Cancel" button you go back to the list page. You find more precise information
on the help pages to the relevant page.
8.3.
Printing a Project List
The printer icon
allows you to print the displayed overview of projects.
Clicking on the icon first opens a form in your browser that is optimized for
OX 5 User Manual v1.32
- 97 -
Projects
printing. Via the print function of your browser you can print this now as usual.
In Internet Explorer, for instance, the print option is found in the menu under
"File | Print". The print function helps you print out list fields correctly.
8.4.
Creating a Project
Figure 8-3: Creating a Project
You can create a new project via the "New" menu on the portal page or via the
create icon
. A valid entry contains at least: end date, project name, project
type and project participants taken from the suggested persons and groups.
Afterwards you can enter further details for the project. The following settings
and entries can be saved during the creation of a project.
8.4.1.
Project Start Date
Enter the date at which the project begins. The date format is DD.MM.YYYY. You
can also select the date with help of the built-in calendar. For this, click on the
to the right of the input field. A small calendar view opens.
calendar icon
Simply click on the desired date, the calendar closes and the selected date
appears in the text field. The default for the start date is always the today's
date. "Start" is a required field. If you cannot fill in this field, the project cannot
be created or changed.
Note:
Required fields
All required fields must be filled in before you can select
another tab.
© Copyright 2005-2006, OPEN-XCHANGE Inc.
- 98 -
8.4.2.
Project Information
Project End Date
Enter the date when the project ends. The date format is DD.MM.YYYY. You can
also select the date with help of the built-in calendar. For this, click on the
to the right of the input field. A small calendar view opens.
calendar icon
Simply click on the desired date, the calendar closes and the selected date
appears in the text field. "End" is a required field. If you cannot fill in this field,
the project cannot be created or changed.
Project Due Date
This is where you enter the due date of the project. The date format is
MM/DD/YYYY. You can also select the date with help from the built-in calendar.
To do this, click on the calendar symbol to the right of the input field. A small
calendar view will open. Simply click on the date you desire. After that, the
calendar will close and the selected date will appear in the text field. The project
due date can be set independently from the given end date.
Follow-up
Here you enter the date on which the project should be presented to you again.
On this day, a message concerning this project appears on the portal page. The
date format is DD.MM.YYYY. You can also select the date with help of the built-in
calendar. For this, click on the calendar icon
to the right of the input field. A
small calendar view opens. Simply click on the desired date, the calendar closes
and the selected date appears in the text field.
Name
Here you can enter the name of this project.
Project Type
Enter the type of project that is to be established for the new project. If you
would like to select a project that is already available, then you can select the
desired one from the list of available projects displayed at the right.
Project Goal
Utilize this text field to enter an exact project goal for this project.
Client
Utilize this text field in order to enter a client for the project.
OX 5 User Manual v1.32
- 99 -
Projects
Leader
This field simply serves information purposes and displays the leader of the
current project. Project leader selection can be done using the "Team" tab.
Description
Please enter a description of the project here that is exact as possible.
Status
Here you state how much of the project is already completed (in percent). The
percent figure increments in steps of 10. Normally this value is set to "new".
Then over the course of the project the status can gradually be increased until it
finally reaches "done". Later the status can be changed to "archive". Then the
project disappears from the current list of projects, but it can still be accessed
via the archive list.
Currency
Enter the desired currency here that should be used to enter and display the
planned expenses and gains. To change the currency, please use the pull-down
menu on the right of the text field. Which currencies are available here, depends
on which currency has been set up by the system administrator in the server
configuration. If you lack a currency here, please contact your system
administrator. The currency chosen for the project is also automatically used as
the default setting for the tasks that are associated to the project.
Planned Costs
Enter here the estimated costs in the currency that you have selected before and
the estimated duration of the project in hours or work days. To change the unit
of measurement, please use the pull-down menu on the right of the text field.
8.4.3.
Team
The assignment of team members to a project is carried out in the "Team" tab.
Generally, all participants in a project have read and write rights to it, as long as
the participants are system users.
The selection of team members is carried out by adding single persons or groups
or both to the columns shown on this page. Select the desired persons or groups
using the search function and mark the desired team members in the search
results. Next, click on the "Add" button. Depending on whether you would like to
select single persons or an entire group, you must utilize the selection forms at
© Copyright 2005-2006, OPEN-XCHANGE Inc.
- 100 -
the left or right. After adding new project team members, they will be displayed
in the bottom part of the window under "Selection". Typically, team members
are assembled from system users for a project. Optionally, you can also use the
contact folder entries as a data source. To finish, you can set rights for every
team member. The following options are available:
Leader:
System users who area assigned the role of project receive
full access to all project related items. Only one leader can be assigned to
each project when the project is created.
Manager:
System user or contact who is assigned the same
permissions as the project leader. A Project Manager thus has full access to all
project related items.
Staff:
The staff assignment corresponds to a normal member of the
project team. Normal team members can simply view and edit project related
items where they are involved themselves as participants. Delete rights are
not normally assigned to team members.
Chief:
The chief assignment allows the user to view all project
related items. The user cannot perform deletions or make changes.
To save the entries, click on the "Save" button. To discard the entries, click on
the "Cancel" button. For every project you can create as many project tasks as
you wish in the Tasks module (see chapter Tasks) or you can also associate
tasks afterwards.
8.4.4.
Creating and Changing Milestones
Under the "Milestones" tab, you will find a listing of the important milestones of
a project. Using milestones, you can easily get an overview of how a project is
advancing. On this page you see an overview of all milestones of this project. In
the area at the top of the window you can add new milestones to the project.
Give the new milestone a desired date, a title and a significant description.
8.5.
Changing a Project
To change a project, go to the detail view of the project that needs to be edited.
There you use the Change
button to get into the change mode. You can now
change the assigned participants or the details for the project. You can, for
instance, increment the status of the project or set it to "done". You can archive
completed projects by changing the status from "done" to "archive". You can
only do this if you also have write permission for the project. Otherwise can just
set the project status to "Done". You find more information about the meaning of
the individual fields in the section "Creating a new Project". To save the changes,
confirm the form by clicking the "Save" button. If you decide not to save these
changes, you can leave the menu again by clicking on the "Cancel" button.
OX 5 User Manual v1.32
- 101 -
Projects
8.6.
Project Archive
Figure 8-4: Project Archive
The project archive contains completed and then archived projects. You can call
up a list of all "archived" projects via the "magic tool bar". There you simply
select "archive" from the pull-down menu in the right, upper corner of the
module block. The module block now shows you a list of all completed projects
that were moved into the archive. You can click on each of the projects shown
here to reach the detail view. Any archived project can be changed there just
like a regular project.
8.6.1.
Deleting a Project
To delete an existing project, open first the detail view of this project and then
click the delete icon
in the upper right-hand corner. If you really want to
delete this project, confirm the deletion by clicking on the "Delete" button .If you
do not want to delete the project, click on "Cancel". Deletion is only possible if
you are the owner or a participant of this project. Upon deletion of a project, all
participants automatically receive a notification via email.
Note:
Together with the project, all associated project tasks can also
be deleted. For this, activate the checkbox "Delete assigned
jobs". If you have delete permission for the project, but not
for all project tasks, only the project tasks for which you have
delete permission are automatically deleted. All other project
tasks are preserved, but they are no longer marked as a
project task. From now on, these project tasks are accessible
as regular, unbound tasks.
© Copyright 2005-2006, OPEN-XCHANGE Inc.
- 102 -
8.7.
Creating, Reading, Changing or Deleting Notes on a Project
You can save your short comments and information on projects in the detail view
under the "Notes" tab. If you click on this tab, all existing notes are listed in
tabular form. Click on the Create button
to add a new note. Please be aware
that notes are subject to a separate system for administering permissions. You
can store private notes here and attach them to a public project, but only you
can see these notes.
8.8.
Linking a Project with other Objects
You can create as many links as you like to every project. You can link a project
to contacts, tasks, other projects, appointments, documents, knowledge entries,
bookmarks and forums. Set the link by opening the detail view of a project
under the "Links" tab. All existing links for this entry are listed here in table
form. You can create a link to the project entry via the button "activate link
mode". Finally, switch to the detail view of the object to be linked and also select
the "Links" tab. There, all you have to do is click the "Create" button and the link
is created. Finally, to leave the linking mode, click on the button "End mode".
8.9.
Milestones for Projects
In the detail view of a project under the "milestones" tab you find a listing of
important stages of the project. Milestones help you keep an overview of how
your project is progressing. On this page you see an overview of all milestones
for the project. Overdue milestones are highlighted in orange. You can change
the sort order of the table by clicking one of the arrows (down
for a
descending sort order, up
for ascending) next to the column headings. In
order to specify how many milestones should be shown on a page, you can use
the pull-down menu above the table. In order to reach the next/preceding
pages, please use the blue arrows
at the top of the page or you click
directly on the desired page number. In order to see the details of a milestone,
click on the name or the yellow arrow
to the left in the first column.
Milestones are generally very important for a project. Thus, is especially
important that the involved participants adhere to the due dates for the
milestones. As a participant you can get reminders for these dates and you can
also inform participants about the creation of a milestone. For this, switch to the
edit mode of a milestone and enter your settings under "options". If you want to
create a new milestone, click on the "Create" icon
.
8.10.
Tasks for Projects
In the detail view of a project under the "tasks" tab you see an overview of all
tasks that belong to this project. Overdue tasks belonging to this project are
highlighted in orange. You can change the sort order of the table by clicking one
OX 5 User Manual v1.32
- 103 -
Projects
of the arrows (down
for a descending sort order, up
for ascending) next to
the column headings. In order to specify how many tasks should be shown on a
page, you can use the pull-down menu on the right above the table. In order to
reach the next/preceding pages, please use the blue arrows
at the top of
the page or click directly on the desired page number. In order to see the details
of a task, click on the name or the yellow arrow to the left of the task name.
If you want to create a new task, click on the "Create" icon
. This takes you
directly to the "New" form in the Tasks module. The task is automatically
assigned to the project, from where out initiated the task creation. You find more
information for creating a task in the section "Creating a new Task"
8.11.
Dependencies
The completion of projects normally involves the completion of single project
tasks and milestones. The completion of the entire project is therefore
dependent upon these items. Therefore, individual projects and milestones are
dependent upon other projects and milestones.
With large and complex items, the management of these dependencies is
important. The web interface of the Open-Xchange server offers you comfortable
management of dependencies. Open the detail view of a project and click on the
"Dependencies" tab. In the overview, a list of all available dependencies will first
be displayed.
8.11.1. New Dependency
To create a new dependency, click on the "Create New" symbol. In the selection
menu that appears, set the type of dependency. Via the list field, the following
selection options are available to you:
Finish to Start
Finish to Finish
Start to Start
Start to Finish
The standard selection "Finish to Start" can mean, for example, that the
predecessor milestones or project tasks must be completed before the following
tasks/milestones begin.
To select desired predecessors for the dependency, click on the "Predecessor"
tab. There, a list of all the project tasks and milestones belonging to the project
will be displayed. Via the checkboxes at the front, mark the project tasks or
milestones that you would like to define as predecessor items. After that, click
on the Successor tab. In the same way, you can select successor tasks and
milestones from the tasks and milestones belonging to the project. Click on the
"Save" button in order to apply your settings.
© Copyright 2005-2006, OPEN-XCHANGE Inc.
- 104 -
8.12.
Chart
In the detail view, you have multiple ways of getting informed about a project
and its status. You will find a particularly practical method under the Chart tab.
In table form, you will find a calendar-scaled overview of the current project in
the form of a Gantt chart where all dependencies of project tasks and milestones
are accounted for. The start date of the project is displayed in this diagram as a
date field highlighted in blue. The end date of the entire project is underlined in
black. The length of individual milestones and project tasks is displayed in the
form of a light blue shaded boxes on the chart. The resubmission deadline is
marked with a light blue band. Dependencies among project tasks and
milestones are notated with black links.
8.13.
History
You will also find the "History" tab in the detail view of a project. There you see
which user originally created the project and on what date it was created. In
addition, this location records the date of the most recent changes to the project
entry and which user made the changes.
8.14.
Project Attachments
It is not only possible to link projects with documents. You can also add files
directly to a project as attachments. For this you simply click on the
"Attachments" tab, and "Browse" to the file that you would like to attach to the
project. The Mime type is determined automatically and you only have to click
the button "Attach" to upload the attachment. Of course you can also attach
several files. Repeat the steps described above as often as you wish. If you want
to delete an attachment later, simply click the "Delete" button in the row of the
respective attachment. An attachment may be deleted by any user with delete
permissions for the project folder where the relevant project is saved.
OX 5 User Manual v1.32
- 105 -
Projects
9.
Documents
In the "Documents" module you can upload document files on the server and
make them accessible to other users. Other users can view these documents
directly or download them. An infinitely expandable folder structure is
implemented to simplify document administration. Also, documents with the
same name in the same directory receive different version numbers. Users who
want to edit a file can "lock" such files for as long as they are editing them.
Other users are then blocked from saving new versions of the same file on the
server during that period. This prevents version conflicts from occurring that
might otherwise arise.
Both the folder structure in the document directory tree and the individual
documents are subject to a special administration system for permissions.
The following topics are discussed here:
The Documents Directory Structure
Creating Folders
Changing Folders
Deleting Folders
Placing Documents on the Server (uploading)
Retrieving Documents (downloading)
Changing Document Descriptions and Permissions
Deleting Documents and Document Versions
Moving Folders and Documents
Searching for a Document
Managing Notes with a Document
Linking a Document with other Objects
Document History
© Copyright 2005-2006, OPEN-XCHANGE Inc.
- 106 -
9.1.
Document Folders
9.1.1.
Explanation of the Index Structure
Figure 9-1: Documents Directory Structure
A folder structure was implemented to make the task of administering
documents straightforward. You can create as many folders and subfolders as
you want in different levels. Because of the permission administration, you can
only see those folders that you have access permission to. The permission here
is hierarchical: this means that if you lack permission for a folder, you are also
unable to access its contents, even if the documents and subfolders within it are
public. In this case, you also cannot see the contents of folders you have access
to as results in a document search.
Note:
Please note that folder administration in the document module
of the groupware is completely independent of the general
folder structure based on public, released and private folders
as these are used in the appointments, contacts and tasks
modules.
The directory structure in the document module is organized as follows:
OX 5 User Manual v1.32
- 107 -
Documents
To display the contents of a folder, use the mouse to click on the "plus sign"
in front of the corresponding folder. The plus sign now becomes a "minus sign",
the folder icon is open
and the contents are shown. To close the folder
,
click on the "minus symbol" .
If there is neither a plus nor a minus symbol in front a folder, the folder is
empty. Besides the structured view for document entries, you can also display all
the document entries together as a list. To do this, use the mouse to click on the
index card tab "List". This gives you the same functional options as are available
in the structured view. The printer icon here also allows you to print the list of
displayed document entries. Clicking on icon first opens a form in your browser
that is optimized for printing. You can now print out this page as you normally
would by using the printing function of your browser. In Internet Explorer™, for
instance, the print option is found under the menu item "File | Print". The print
function here helps you print out list fields correctly.
Note:
Permissions
Please note that you can assign different permissions for each
folder and each document. If the folders and the subfolders
and documents contained inside have the same permissions,
all users with permission can see the complete contents of the
folder. If the subfolders and documents have more restrictive
permissions than the folder they are in, only part of the
contents will displayed to certain users. If the higher-level
folder has more restrictive permissions than the folders and
documents contained inside, users without permission to
access the folder will not be allowed to see the folder or any of
its contents.
© Copyright 2005-2006, OPEN-XCHANGE Inc.
- 108 -
9.1.2.
Creating Folders
Figure 9-2: Creating a Document Folder
Before you can create a new folder, you first have to find a place to put it. First
mark the option button of the folder containing the directory you want to create
button on the rightthe new folder in; next, click on the "Create new folder"
hand upper edge of the module page. If you do not mark a folder, the new folder
will be created at the main level. On the next page, a form appears with
questions about assigning permissions and with a field for you to enter a name
for the new folder.
Once you click on the "Save" button, the data for the new folder are saved.
Otherwise, you can click on the "Cancel" button to leave the page without
saving.
9.1.3.
Changing Folder Details
Please select the folder you want to change from the directory overview by
marking its options button. Next, click on the "Change"
button on the righthand upper edge of the page. A change form now opens to allow you to change
the permissions and the name of the folder.
OX 5 User Manual v1.32
- 109 -
Documents
Once you click on the "Save" button, the modified folder data are saved. If you
decide not to save these changes, you can leave the page again by clicking on
the "Cancel" button. You cannot change folders that you do not have write
permission for. If you still attempt to make changes to a folder you have no
write permission for, the system will generate a brief error message and then
automatically return to the directory tree after three seconds.
9.1.4.
Deleting a Folder
To delete a folder, you once again have to mark its option button in the directory
overview. Next, click on the trashcan button
on the right-hand upper edge of
the page. The system asks a security question as shown in Figure 1.3. You can
only delete a folder if you also have permission to delete it.
Warning: Potential hazards of Deleting Folders
Be sure to keep in mind that this method not only deletes the
folder itself, but also all the subfolders and all the documents
saved inside. You can generally only delete folders that you
also have permission to delete. If you do not have permission
to edit any of the saved subfolders or documents, instead of
getting the security question, an error message appears for
around three minutes and you are then returned to the first
page of the module with the overview of the directory tree. If
the folder appears to be empty, there may still be documents
or subfolders inside that you do not have permission to access
and thus are not permitted to delete. The root folder is the
core folder of the directory hierarchy. This cannot be deleted.
Figure 9-3: Deleting a Documents Folder
If you are sure you want to delete the folder, confirm the security question by
clicking the "Delete" button. If you decide not to continue with this deletion, you
can leave the menu again by clicking on the "Cancel" button.
© Copyright 2005-2006, OPEN-XCHANGE Inc.
- 110 -
Figure 9-4: Error Message when Deleting a Folder without Permission
9.2.
Creating Documents on the Server (Uploading)
To place a document in the correct position in the directory structure, first mark
the radio button of the folder you want to place the new document in. If none of
the folders is marked, the document will be added to the main level. Now click
on the Create button on the top right-hand side of the page in the insert mode.
Figure 9-5: Creating a Document
A new page opens up to allow you to set the name and the description that the
file can be found under on the document server in the future. You can also set
the general permissions for this file. The following notes are important in this:
OX 5 User Manual v1.32
- 111 -
Documents
9.2.1.
Permissions
This is where you define the access permissions for this document. You can
assign permissions "individually" using the system for administering them, or
you can allow permission for everyone. If you want the document to be
accessible only to you, select "Private". If you set the index card tabs "Read
permission", "Right permission" and "File" manually to determine who has access
to the file or is allowed to modify it, this automatically selects the option
"Individually".
9.2.2.
Document Title
Specify the file a name that will be displayed for this document in the archive.
Tip:
9.2.3.
Automatically assigning the File Name
If you want the document to have the same name as the one
on your hard drive, leave this field blank. When you upload a
file, this file name is entered into this field. New versions can
thereby be uploaded under a new file name and in a new file
format
Description
Enter a description for the document. Keep in mind that this description is
version specific: each version of the document has its own description
Tip:
9.2.4.
Version-specific description
Formulate the description in a way that will help you telling
the difference between different versions. For example, you
could enter a small log of how the file content has changed
from version to version in this field.
Assigned Version
This field shows which version of the document you are editing. If you create a
new document, you are editing the first version. Be sure to keep the version
number in mind when you fill in the version-specific fields ("File name",
"Description", "MIME type", "File size"). Enter the actual file to be uploaded to
the server in the index card tab "File". There, click on the button "Search". Using
a file browser, you can now select a file on your PC to upload to the server. Once
you have selected a file, the file manager closes again and the file appears in the
text field marked "File" with the file's associated path name. Now click on the
button "Upload" and the actual file transfer will occur. Depending on the size of
the file, this may take some time.
© Copyright 2005-2006, OPEN-XCHANGE Inc.
- 112 -
Finally, you have to set the MIME type if it isn't automatically recognized, and
then click on the "Save" button to accept the document settings you have
defined in this section up to now.
Figure 9-6: Uploading a Document File
9.2.5.
MIME Type
MIME (multipurpose internet mail extension) was originally a standard that
described how the different file types (such as picture or music files) would be
transmitted between different email servers. A MIME standard makes it possible
for you to attach files to your emails. Since the standard is very flexible, it has
become established in many other areas of the internet. For instance, the MIME
type helps your browser determine how to display a specific file you want to
view. Thus, your browser normally displays text documents and tries to play
music files. For files that you have placed in the archive to be handled properly
by your browser, you need to provide the MIME type of your file. If you upload a
file, the system tries to determine the MIME type on its own and enters the
result in this text field. But you also have the option of overwriting the MIME
type to correct the system's guesswork as needed. What follows is a table of
MIME types which is by no means to be considered exhaustive. Many file types
are also associated with multiple MIME types. Most browsers offer the MIME type
"application/octet-stream" for downloading files. If you are not certain which
OX 5 User Manual v1.32
- 113 -
Documents
MIME type to enter and you are uncomfortable with the one your system
chooses, enter this generic MIME type.
MIME type
application/octet-stream
text/plain
text/html
application/msword
application/pdf
application/rtf
application/zip
image/bmp
image/jpeg
image/png
audio/midi
audio/mpeg3
video/mpeg
Description
Generic data stream
ASCII text
HTML document
Word document
PDF document
RTF document
Zip archive
Bitmap Bild
JPEG image
PNG image
Midi audio file
MP3 audio file
MPEG video
Table 1.1: MIME types
9.3.
Retrieving a Document (Downloading)
Please look for the appropriate document in directory structure. You now have
two options. If you click on the document symbol
, the document is displayed
in a browser window if it recognizes the associated file type. If you click instead
on the actual title of the document, you see the detail view of the document,
allowing you to see the information saved together with the document, including
the related file permissions and the file properties. You also see a link to the file
within the file properties. If you click on this, your browser will ask where and
under what name you would like to save the file on your local system. If you let
the mouse cursor rest on top of the name of a document in the directory tree, a
"Tool tip" opens, showing the author, file size and version.
Note:
9.4.
Document Content
Please note that you cannot change the content of the
attached document at this point. You can only change the
contents by downloading, modifying and then uploading the
corresponding document again. You thus create a new version
of the document. The original document continues to exist for
now. A new version of the document is created at the moment
that you upload the new file when changing the document.
Changing Document Descriptions and Permissions
You have to split from the document name to the detail view to change the
description of a document. There you use the Change
button to get into the
© Copyright 2005-2006, OPEN-XCHANGE Inc.
- 114 -
change mode. You can now
the document. To save the
button. If you decide not to
by clicking on the "Cancel"
versions of the document by
9.5.
change either the permissions or the description of
changes, confirm the form by clicking the "Save"
save these changes, you can leave the menu again
button. Also, from this point you can upload new
clicking on the index card tab "Load file".
Document Write Protection
You have the option of write protecting a document in the detail view of the
document. Clicking on the button "Write protect" here locks the document. Other
users are then restricted from editing the document. The edit symbol
is then
not visible to the other users for the time being. If a document is writeprotected, its document symbol
is shown in red in the document overview.
The write protection feature is designed to maintain continuity and integrity in
the version administration system of the document administration. Once you
have write protected a document, you are the only person who is permitted to
upload new versions of it. This prevents situations where two users are
inadvertently working on the same document at the same time.
9.6.
Sending an E-mail with a Document Link
If you want to enable a colleague to have fast access to a document, without
them having to navigate the document area, you have the possibility of sending
a link to the document via e-mail. To do this, click on the "Send link as e-mail"
button in the detail view of a document. A web mail-client window will open to
allow for the sending of a new e-mail message. A direct link to the document is
already entered into the text field of the message. Via this link, the recipient can
directly access the document in the web interface of the Open-Xchange
groupware interface. Select recipients, enter a subject, add something to the
mail text already contained in the text form and click on "Send".
9.7.
Sending a File as an E-mail Attachment
In certain cases it can be useful to send the file directly as an e-mail attachment
as opposed to sending a document entry link. This is particularly sensible when
you want to make the file available to people who are not in your company and
that do not have access to your intranet. Click on the "Send file as e-mail
attachment" button. A web mail client window will open to allow the sending of a
new e-mail message. The file is now attached. Enter the recipients, the subjects
and an accompanying text and click on the "Send" button.
Note:
If multiple versions of the file have been saved in the
document entry, the "current" version will always be sent as
an e-mail attachment.
OX 5 User Manual v1.32
- 115 -
Documents
Figure 9-1: Sending a File as an Attachment
9.8.
Deleting Documents
There are two methods to delete documents from the document server.
9.8.1.
Deleting the whole Document Entry and all its Versions
To delete a document entry along with all its older and newer versions from the
server, switch from to the detail view via the document name. Now click on the
trashcan button
to go from the detail view into the delete mode. The system
asks you a security question to make sure you really want to delete this
document. If you are sure you want to delete the folder, confirm by clicking the
"Delete" button. If you do not want to delete, you can leave the menu by clicking
on "Cancel". Of course, to delete a document you also have to have permission
to do so.
9.8.2.
Deleting older File Versions
To delete older file versions from the server, go to the detail view for a
document via the document name and select the index card tab marked
"Versions" from there. There you will see a table listing all the older and the
current versions of the file. You can tell which version is the current version by
looking in the "Current" column. There is a check box at the end of every version
line. You have to put a checkmark in the box beside each version you want to
delete from the server. Finally, click on the button "Delete versions". The
selected versions are now deleted from the server.
© Copyright 2005-2006, OPEN-XCHANGE Inc.
- 116 -
Figure 9-7: Deleting older Versions
9.9.
Moving Folders and Documents
9.9.1.
Selecting Folders and Documents to be Moved (Defining Sources)
To get to the move mode, click on the "Move"
OX 5 User Manual v1.32
- 117 -
button in the directory.
Documents
Figure 9-8: Selecting Source Folders and Documents to be Moved
As on the document main page you will see a directory tree where you can select
documents and folders that you want to move. Here you have check boxes that
allow multiple selections rather than the option buttons that only allow a single
selection. As needed, you can also mark individual documents or whole folders to
be moved. If you want to move a folder with all the subdirectories and
documents inside, then only mark that single folder. The entire contents of the
marked folder are then automatically selected as well. The permission rules also
apply to moving folders and documents, of course. You can only select folders
that you are permitted to access. You can select these with the white check
boxes. You cannot select folders and documents that you do not have access to;
these are gray in color.
9.9.2.
Defining the Destination
Once you have made your selection, click on the index card tab marked
"Destination". Now choose the option button in front of the directory you want to
move the selected documents and folders into. Next, select a directory by
marking the radio button of the desired destination folder.
© Copyright 2005-2006, OPEN-XCHANGE Inc.
- 118 -
Figure 9-9: Selecting the Destination Folder
Note:
9.9.3.
Folders and Subfolders
If you try to move a folder into itself or into one of the
subfolders contained within, the system will produce an error
message.
Completing the Move
Now confirm the move by clicking on the "Move" button. If you decide not to
continue with this move at this point, you can leave the menu again by clicking
on the "Cancel" button.
OX 5 User Manual v1.32
- 119 -
Documents
9.10.
Searching for Documents
Figure 9-10: Searching for Documents using the Magic Bar
In large collections of documents, a sought-after document cannot always be
found directly. The Open-Xchange Server web interface therefore makes a
simple tool available to you to help search for a certain document. To do this,
click on the "Search" tab in the Documents module. In the first text field listed
you have the possibility of entering the desired search text. The use of wildcards
is allowed here. Moreover, you can enter multiple terms into the text field if you
want. In this case, you must specify via the three checkboxes below how the
search terms are to be accounted for in the search. The following three different
options are thereby available for you to choose:
Result has to contain all search pattern
Result has to contain one search pattern
Search for complete string
To continue, you must set in which position the given string or term is to be
searched for. Via the list field in attribute you can set whether only the title or
the description of documents or both are to be accounted for in the search.
Searching the content of posted documents themselves is not possible.
Optionally, by choosing an appropriate category, you can get alternative search
results. If you have selected a category and also a search term, then all
document entries will be searched for which one of the search criteria applies.
That is, by selecting a category, no additional limitation of the search terms will
occur.
Continuing, you must set the positions where the given search string or terms
are to be searched for. Via the "In Attribute" list field you can set whether the
title or the description of the document or both attributes, are to be incorporated
into the search. Optionally, you can, via selection of an appropriate category,
gain different search results. If you have entered a category as well as a search
term, then the search for tasks will be limited to those results that meet one of
© Copyright 2005-2006, OPEN-XCHANGE Inc.
- 120 -
the two search criteria. By selecting a category, no additional limitation on the
search terms will occur.
Figure 9-11: Result List from the Document Search
9.11.
Managing Notes with a Document
You can save your short comments and information on documents in the detail
view under the index card tab "Notes". Once you display this index card tab, all
the notes that already exist are displayed in the form of a table list. Click on the
Create button
to write a new note. You can find out more about notes in the
chapter Notes.
Note:
Please be aware that notes are subject to a different system
for administering permissions. You can store private notes
here and attach them to a public document, but only you can
see these notes.
OX 5 User Manual v1.32
- 121 -
Documents
9.12.
Linking a Document with other Objects
You can make as many links you would like to every document. You can link a
document to contacts, tasks, projects, appointments, other documents,
knowledge entries, bookmarks and forums. Set the link by opening the detail
view of a document entry under the index card tab "Links". All the links that
already exist for this entry are displayed here in the form of a table list. You can
set a link to the current document entry now simply by clicking on the button
"Activate link mode". Finally, switch to the detail view of the object to be linked
and also select the index card tab "Links". There, all you have to do is place a
check in the box for the document and then click the "Create" button and the
link is created. Next, to leave the linking mode, click on the button "End mode".
For more information on linking, refer to the section "Linking Objects".
Note:
9.13.
Please bear in mind that the permission system works here,
too: If you do not have read permission for a linked object,
you will not be able to view this link.
History
You will also find the index card tab "History" in the detail view of a document.
The information displayed there tells you which user originally created the
document entry and on what date it was created. In addition, this location
records the date of the most recent changes to the document entry and which
user made the changes.
9.13.1. Old Versions
You will also find the index card tab "Versions" in the detail view of a document.
A list of all the old and current versions is shown. By clicking on the option
button in the column "Current", you can determine which version of the
document you want to be the current version at this time. You then click on the
button "Change current version" to accept this new setting. As soon as you have
chosen an older version to be the new version, you can once again edit the old
version.
© Copyright 2005-2006, OPEN-XCHANGE Inc.
- 122 -
10.
Knowledge Entries
You can use the knowledge database to collect interesting facts and share them
with your colleagues or benefit from the knowledge of your coworkers. A
directory structure similar to the one in the document system helps you
categorize and administer your knowledge entries. Both the folder structure in
the document directory tree and the individual entries are subject to the system
for permissions. This means you can group the individual areas of knowledge to
specific departments or workgroups.
The following points on the subject of knowledge are discussed here:
Knowledge Directory Structure
Creating new Folders
Changing Folders
Deleting Folders
Viewing Knowledge Entries
Adding new Knowledge Entries
Editing Knowledge Entries
Deleting Knowledge Entries
Moving Knowledge Entries
Searching the Knowledge Entries
Managing Notes on a Knowledge Entry
Linking a Knowledge Entry with other Objects
Knowledge Entry History
OX 5 User Manual v1.32
- 123 -
Knowledge Entries
10.1.
Knowledge Overview
10.1.1. The Knowledge Directory Structure
Figure 10-1: Directory Structure for Knowledge Entries
A folder structure was implemented to make the task of administering
knowledge entries straightforward. You can create as many folders and
subfolders as you want in different levels. Because of the permission
administration, you can only see those folders that you also have access
permission to. This permission is hierarchical:
If you lack permission for a folder, you are also unable to access its contents,
even if the subfolders and knowledge entries within it are public. You only see
the folder contents that you have access to as results when you do a keyword
search using the search field at the top of the knowledge module block.
The directory structure is organized as follows: To display the contents of a
folder, use the mouse to click on the "plus sign"
in front of the corresponding
folder. The "plus sign" now becomes a "minus sign", the folder icon is open and
the contents are shown. To close the folder, click on the "minus symbol".
If there is neither a plus nor a minus symbol in front a folder, the folder is
empty. Besides the structured view for knowledge entries, you can also display
© Copyright 2005-2006, OPEN-XCHANGE Inc.
- 124 -
all the knowledge entries together as a list. To do this, use the mouse to click on
the index card tab "List". This gives you the same functional options as are
available in the structured view. The printer icon here also allows you to print
the list of displayed knowledge entries. Clicking on icon first opens a form in your
browser that is optimized for printing. You can now print out this page as you
normally would by using the printing function of your browser. In Internet
Explorer, for instance, the print option is found under the menu item "File |
Print". The print function here helps you print out list fields correctly.
10.2.
Creating new Folders
Figure 10-2: Creating a Folder for Knowledge Entries
Before you can create a new folder, you first have to find a place to put it. First
mark the option button of the folder containing the directory you want to create
the new folder in; next, click on the "Create new folder" button on the right-hand
upper edge of the module page. If you do not mark a folder, the new folder will
be created at the main level. On the next page, a form appears with questions
about assigning permissions and with a field for you to enter a name for the new
folder.
OX 5 User Manual v1.32
- 125 -
Knowledge Entries
Once you click on the "Save" button, the data for the new folder are saved.
Otherwise, you can click on the "Cancel" button to leave the page without
saving.
Note:
10.3.
Permissions
Please note that you can assign different permissions for each
folder and each knowledge entry. If the folders and the
subfolders and knowledge entries contained inside have the
same permissions, all users with permission can see the
complete contents of the folder. If the subfolders and
knowledge entries have more restrictive permissions than the
folder they are in, only part of the contents will displayed to
certain users. If the higher-level folder has more restrictive
permissions than the folders and knowledge entries contained
inside, users without permission to access the folder will not
be allowed to see the folder or any of its contents.
Changing Folders
Please select the folder you want to change from the directory overview by
marking its options button. Next, click on the "Change" button on the right-hand
upper edge of the page. A change form now opens to allow you to change the
permissions and the name of the folder. Once you click on the "Save" button, the
modified folder data are saved. If you decide not to save these changes, you can
leave the page again by clicking on the "Cancel" button. You cannot open folders
that you do not have permission for. If you still attempt to open a folder you
have no permission for, the system will generate a brief error message and then
automatically return to the directory tree after three seconds.
10.4.
Deleting Folders
To delete a folder, you have to mark its option button in the directory overview.
Next, click on the trashcan button on the right-hand upper edge of the page. The
system asks for confirmation to make sure you really want to delete this folder.
You can only delete a knowledge entry if you also have delete permission for this
folder.
© Copyright 2005-2006, OPEN-XCHANGE Inc.
- 126 -
Figure 10-3: Confirmation Dialog when Deleting Folders
If you are sure you want to delete this item, confirm the security question by
clicking the "Delete" button. If you decide not to continue with this deletion, you
can leave the menu again by clicking on the "Cancel" button.
Warning: Potential hazards of deleting folders
Be sure to keep in mind that this method not only deletes the
folder itself, but also all the subfolders and all the knowledge
entries saved inside. If you do not have permission to edit any
of the saved subfolders or knowledge entries, instead of
getting the security question, an error message appears for
around three minutes and you are then returned to the first
page of the module with the overview of the directory tree. If
the folder appears to be empty, there may still be knowledge
entries or subfolders inside that you do not have permission to
access and thus are not permitted to delete. The root folder is
the core folder of the directory hierarchy. This cannot be
deleted.
OX 5 User Manual v1.32
- 127 -
Knowledge Entries
10.5.
Viewing Knowledge Entries
Find the desired entry in the directory overview to get to the detail view of a
of the corresponding
knowledge entry. Next, click on the document symbol
entry and the knowledge entry is displayed in detail mode.
10.6.
Creating new Knowledge Entries
Figure 10-4: Creating a new Knowledge Entry
To place a new knowledge entry in the correct position in the directory structure,
first mark the radio button of the folder you want to add the knowledge to. If
none of the folders is marked, the entry will be added to the main level. Now
click on the Create button on the top right-hand side of the page in the insert
mode. A new page opens. Enter the all the data for the knowledge entry in this
form.
10.6.1. Permissions
This is where you define the access permissions for this knowledge entry. You
can assign permissions "individually" using the system for administering them,
or you can allow permission for everyone. If you want the document to be
accessible only to you, select "Private".
© Copyright 2005-2006, OPEN-XCHANGE Inc.
- 128 -
10.6.2. Title
Enter a title for the entry here. The entry will be displayed in the knowledge
database list under this name. "Title" is a required field.
Note:
Required field
All required fields have to be completed before the entry can
be created or before you can save any changes you have made
to it.
10.6.3. Description
Enter the text of the entry here. "Description" is a required field. All required
fields have to be completed before the entry can be created or before you can
save any changes you have made to it.
10.7.
Editing Knowledge Entries
If you want to edit an entry, mark the entry in the directory overview by clicking
on the option button beside its title. Next, click on the edit icon .
Figure 10-5: Editing an existing Knowledge Entry
OX 5 User Manual v1.32
- 129 -
Knowledge Entries
You can now change either the permissions or the contents of the entry. You can
find more information on the meaning of the individual fields in the chapter
"Creating new Knowledge Entries". To save the changes, confirm the form by
clicking the "Save" button. If you decide not to save these changes, you can
leave the menu again by clicking on the "Cancel" button.
10.8.
Deleting Knowledge Entries
To delete a knowledge entry, you once again have to mark its option button in
the directory overview. Next, click on the trashcan button on the right-hand
upper edge of the page. The system asks you a security question to make sure
you really want to delete this knowledge entry. If you are sure you want to
delete the entry, confirm by clicking the "Delete" button. If you decide not to
continue with this deletion, you can leave the menu again by clicking on the
"Cancel" button. You can only delete a knowledge entry if you also have delete
permission for this entry.
10.9.
Moving Folders and Knowledge Entries
10.9.1. Marking Folders and Knowledge Entries for Movement
(Defining Sources)
To get to the move mode, click on the "Move" button in the directory overview.
© Copyright 2005-2006, OPEN-XCHANGE Inc.
- 130 -
Figure 10-6: Selecting the Source Folders and Knowledge Entries to be Moved
As on the document main page, you will see a directory tree where you can
select knowledge entries and folders that you want to move. Here you have
check boxes that allow multiple selections rather than the option buttons that
only allow a single selection. As needed, you can also mark individual knowledge
entries or whole folders to be moved. If you want to move a folder with all the
subdirectories and documents inside, then only mark that single folder. The
entire contents of the marked folder are then automatically selected as well. The
permission rules also apply to moving folders and documents, of course. You can
only select folders that you are permitted to access. You can select these with
the white check boxes. You cannot select folders and knowledge entries that you
do not have access to; these are gray in color.
10.9.2. Defining the Destination
Once you have made your selection, click on the tab marked "Destination"
(formerly "Target"). Now choose the option button in front of the directory where
you want to move the selected knowledge entries and folders. Next, select a
directory by marking the radio button of the desired destination folder.
Note:
Folders and Subfolders
OX 5 User Manual v1.32
- 131 -
Knowledge Entries
If you try to move a folder into itself or into one of the
subfolders contained within, the system will produce an error
message.
Figure 10-7: Selecting the Destination Folder
10.9.3. Conducting the Move
Now confirm the move by clicking on the "Move" button. If you decide not to
continue with this move at this point, you can leave the menu again by clicking
on the "Cancel" button.
10.10. Searching for Knowledge Entries
In large knowledge databases, a sought-after element cannot always be found
directly. The Open-Xchange web interface therefore makes a simple tool
available to you to search for a certain knowledge entry. To use this, click on the
<b>Search</b> tab in the Knowledge module.
In the text field in the first
position you have the possibility of entering the desired search text. The use of
wildcards is allowed here. If you want, moreover, you can enter multiple terms
in the text field. In this case, you must specify how the corresponding terms are
to be accounted for in the search via the three checkboxes listed below. The
following three different options are thereby available for you to choose:
© Copyright 2005-2006, OPEN-XCHANGE Inc.
- 132 -
Result has to contain all search pattern (AND operator)
Result has to contain one search pattern (OR operator)
Search for complete String (exact input - without Wildcards)
Continuing, you must set the positions where the given search string or terms
are to be searched for. Via the "In Attribute" list field you can set whether the
title or the description of the knowledge entries, or both attributes, are to be
incorporated into the search. Optionally, you can, via selection of an appropriate
category, gain different search results. If you have entered a category as well as
a search term, then the search for knowledge entries will be limited to those
results that meet one of the two search criteria. By selecting a category, no
additional limitation on the search terms will occur.
Figure 10-8: Searching for Knowledge Entries using the Magic Bar
Note:
Please be aware that notes are subject to a different system
for administering permissions. You can store private notes
here and attach them to a public knowledge entry, but only
you can see these notes.
OX 5 User Manual v1.32
- 133 -
Knowledge Entries
Figure 10-9: The Results of a Search for Knowledge Entries
10.11. Creating, Reading, Changing or Deleting Notes on a Knowledge Entry
You can save your short comments and information on knowledge entries in the
detail view under the "Notes" tab. Once you display this tab, all the notes that
already exist are listed in the form of a table. Click on the "Create" button to add
a new note.
10.12. Linking a Knowledge Entry with other Objects
You can make as many links you would like to every knowledge entry. You can
link a knowledge entry to contacts, tasks, projects, appointments, documents,
other knowledge entries, bookmarks and forums. To set the link, click on the
"Links" tab in the detail view of the knowledge entry. All the links that already
exist for this entry are listed here in the form of a table. You can set a link to the
current know entry now simply by clicking on the button "Activate link mode".
Finally, switch to the detail view of the object to be linked and also select the
"Links" tab. There, all you have to do is place a check in the box for the
knowledge entry and then click the "Create" button and the link is created. Next,
to leave the linking mode, click on the button "End mode".
© Copyright 2005-2006, OPEN-XCHANGE Inc.
- 134 -
Note:
Please bear in mind that the permission system works here,
too: If you do not have read permission for a linked object,
you will not be able to view this link.
10.13. History
You will also find the "History" tab in the detail view of a knowledge entry. The
information displayed there tells you which user originally created the knowledge
entry and on what date it was created. In addition, this location records the date
of the most recent changes to the knowledge entry and which user made the
changes.
OX 5 User Manual v1.32
- 135 -
Knowledge Entries
11.
Bookmarks
11.1.
Bookmarks Overview
You can save links to interesting websites in the form of bookmarks that you can
share with your colleagues or use them to benefit from the bookmarks of your
coworkers. A directory structure similar to the one in the document system helps
you categorize and administer your bookmarks. Both the folder structure in the
bookmark directory tree and the individual entries are subject to the system for
permissions. This means you can group the individual areas of knowledge into
specific departments or workgroups.
The following points on the subject of bookmarks are discussed here:
Explanations of the directory structure
Creating new folders
Changing folders
Deleting folders
Creating new bookmarks
Editing bookmarks
Deleting bookmarks
Moving folders and bookmarks
Searching for bookmarks
Creating, reading, changing and deleting notes on a bookmark
Linking a bookmark to other objects
© Copyright 2005-2006, OPEN-XCHANGE Inc.
- 136 -
11.1.1. Explanations of the directory structure
A folder structure was implemented to make the task of administering web links
(bookmarks) straightforward. You can create as many folders and subfolders as
you want at different levels.
Figure 11-1: Directory Structure for Bookmarks
Because of the permission administration, you can only see those folders that
you also have permission to access. This permission is hierarchical: if you lack
permission for a folder, you are also unable to access its contents, even if the
subfolders and knowledge links within it are public. You only see the folder
contents that you are allowed to access as results when you do a keyword
search using the search field at the top of the bookmark module block. The
directory structure is organized as follows: to display the contents of a folder,
use the mouse to click on the "plus sign" in front of the corresponding folder.
The "plus sign" now becomes a "minus sign", the folder icon is opened and the
contents are shown. To close the folder, click on the "minus symbol".
If there is neither a plus nor a minus symbol in front a folder, the folder is
empty. Besides the structured view for bookmark entries, you can also display
all the bookmark entries together as a list. To do this, use the mouse to click on
the "List" tab. This gives you the same functional options as are available in the
OX 5 User Manual v1.32
- 137 -
Bookmarks
structured view. The printer icon here also allows you to print the list of
displayed bookmark entries. Clicking on the icon first opens a form in your
browser that is optimized for printing. You can now print out this page as you
normally would by using the print function of your browser. In MS Internet
ExplorerTM, for instance, the print option is found under the menu item "File |
Print". The print function here helps you print out list fields correctly.
11.2.
Creating new Folders
Figure 11-2: Creating Folders
Note:
Permissions
Please note that you can assign different permissions for the
folder and the actual link. If the folders and the subfolders
and bookmarks contained inside have the same permissions,
all users with permission can see the complete contents of the
folder. If the subfolders and bookmarks have more restrictive
permissions than the folder where they are located, only part
of the contents will displayed to certain users. If the higherlevel folder has more restrictive permissions than the folders
and bookmarks contained inside, users without permission to
© Copyright 2005-2006, OPEN-XCHANGE Inc.
- 138 -
access the folder will not be allowed to see the folder or any of
its contents.
Before you can create a new folder, you first have to find a place to put it. First
mark the option button of the folder containing the directory you want to create
the new folder in; next, click on the "Create new folder" button on the right-hand
upper edge of the module page. If you do not mark a folder, the new folder will
be created at the main level. On the next page, a form appears with questions
about assigning permissions and with a field for you to enter a name for the new
folder.
Once you click on the "Save" button, the data for the new folder are saved.
Otherwise, you can click on the "Cancel" button to leave the page without
saving.
11.3.
Changing Folders
Please select the folder you want to change from the directory overview by
marking its options button. Next, click on the "Change" button on the right-hand
upper edge of the page. A change form now opens to allow you to change the
permissions and the name of the folder. Once you click on the "Save" button, the
modified folder data are saved. If you decide not to save these changes, you can
leave the page again by clicking on the "Cancel" button. You cannot open folders
that you do not have permission for. If you still attempt to open a folder you are
not permitted to access, the system will generate a brief error message and then
automatically return you to the directory tree after three seconds.
11.4.
Deleting Folders
To delete a folder, you once again have to mark its option button in the directory
overview. Next, click on the trashcan button on the right-hand upper edge of the
page. The system asks you a security question to make sure you really want to
delete this folder. You have to have the appropriate permission before you can
delete a folder.
Warning: Potential hazard of Deleting Folders
Be sure to keep in mind that this method not only deletes the
folder itself, but also all the subfolders and all the bookmarks
saved inside. If you do not have permission to edit any of the
saved subfolders or documents, instead of getting the security
question, an error message appears for around three minutes
and you are then returned to the first page of the module with
the overview of the directory tree. If the folder appears to be
empty, there may still be bookmarks or subfolders inside that
you do not have permission to access and thus are not
OX 5 User Manual v1.32
- 139 -
Bookmarks
permitted to delete. The root folder is the core folder of the
directory hierarchy. This cannot be deleted.
Figure 11-3: Security Question when Deleting Folders
If you are sure you want to delete the folder, confirm the security question by
clicking the "Delete" button. If
© Copyright 2005-2006, OPEN-XCHANGE Inc.
- 140 -
Figure 11-4: System Warning: You are not permitted to delete this folder
If you decide not to continue with this deletion, you can leave the menu again by
clicking on the "Cancel" button.
11.5.
Opening and Viewing Bookmarks
To view a web link saved under bookmarks, find the entry you would like to view
from the directory overview and then click on the title of the entry. Find the
desired entry in the bookmark overview to get to the detail view of a bookmark.
of the corresponding entry and the
Next, click on the document symbol
bookmark is displayed in detail mode.
11.6.
Creating new Bookmarks
To place a new bookmark in the correct position in the directory structure, first
mark the radio button of the folder where you want to add the web link. If none
of the folders is marked, the entry will be added to the main level. Now click on
the Create button on the top right-hand side of the page in the insert mode.
A new page opens. Enter the all the data for the bookmark in this form.
OX 5 User Manual v1.32
- 141 -
Bookmarks
11.6.1. Permissions
This is where you define the access permissions for this bookmark. You can
assign permissions "individually" using the system for administering them, or
allow everyone to access them. If you want the bookmark to be accessible only
to you, select "Private".
Figure 11-5: Creating a new Bookmark
11.6.2. Title
Enter a title for the bookmark here. The bookmark will be displayed in the
bookmark administration list under this name. "Title" is a required field. All
required fields have to be completed before the bookmark can be created or
before you can save any changes you have made to it.
11.6.3. URL
Enter the URL (internet address) for the bookmark here. This link will be stored
in the system as a bookmark. Make sure you use the protocol (e.g.: http://) in
front of the link or it will not work properly. "URL" is a required field. All required
fields have to be completed before the bookmark can be created or before you
can save any changes you have made to it.
© Copyright 2005-2006, OPEN-XCHANGE Inc.
- 142 -
11.6.4. Description
Enter a description for the bookmark here. "Description" is a required field. All
required fields have to be completed before the bookmark can be created or
before you can save any changes you have made to it.
Note:
Required Fields
Please note that all the required fields have to be filled in
before you can select another tab.
11.7.
Editing Bookmarks
Figure 11-6: Editing a Bookmark
If you want to edit a bookmark, mark the entry in the directory overview by
clicking on the option button beside its title. Next, click on the edit icon
. You
can now change either the permissions or the contents of the bookmarked link.
To save the changes, confirm the form by clicking the "Save" button. If you
decide not to save these changes, you can leave the menu again by clicking on
the "Cancel" button.
OX 5 User Manual v1.32
- 143 -
Bookmarks
11.8.
Deleting Bookmarks
To delete a bookmark entry, you once again have to mark its option button in
the directory overview. Next, click on the trashcan button on the right-hand
upper edge of the page. The system asks you a security question to make sure
you really want to delete this bookmark. If you are sure you want to delete it,
confirm by clicking the "Delete" button. If you decide not to continue with this
deletion, you can leave the menu again by clicking on the "Cancel" button. You
can only delete a bookmark if you also have the appropriate delete permission
for it.
11.9.
Moving Folders and Bookmarks
11.9.1. Marking Folders and Documents for Movement (Defining
Sources)
To get to the move mode, click on the "Move" button in the directory overview.
Figure 11-7: Selecting the Source Folder and Bookmarks to be moved
As on the bookmark main page, you will see a directory tree where you can
select bookmarks and folders that you want to move. Here you have check
boxes that allow multiple selections rather than the option buttons that only
© Copyright 2005-2006, OPEN-XCHANGE Inc.
- 144 -
allow a single selection. As needed, you can also mark individual bookmarks or
whole folders to be moved. If you want to move a folder with all the
subdirectories and bookmarks inside, then only mark that single folder. The
entire contents of the marked folder are then automatically selected as well. The
permission rules also apply to moving folders and bookmarks, of course. You can
only select folders that you are permitted to access. You can select these with
the white check boxes. You cannot select folders and bookmarks that you do not
have access to; these are gray in color.
11.9.2. Defining the Target/Destination
Once you have made your selection, click on the tab marked
"Target"/"Destination". Now choose the option button in front of the directory
where you want to move the selected bookmarks and folders. Next, select a
directory by marking the radio button for the desired target folder.
Figure 11-8: Selecting the Target Folder
Note:
Folders and Subfolders
If you try to move a folder into itself or into one of the
subfolders contained within, the system will produce an error
message.
OX 5 User Manual v1.32
- 145 -
Bookmarks
11.9.3. Completing the Move
Now confirm the move by clicking on the "Move" button. If you decide not to
continue with this move at this point, you can leave the menu again by clicking
on the "Cancel" button.
11.10. Searching for Bookmarks
Figure 11-9: Searching for Bookmark Entries
In large collections of links, a sought-after element cannot always be found
directly. The Open-Xchange web interface therefore makes a simple tool
available to you to search for a certain bookmark. To use this, click on the
"Search" tab in the bookmark module. In the text field listed first, you have the
possibility of entering the desired search text. The use of wildcards is allowed
here. If you want, moreover, you can enter multiple terms in the text field. In
this case, you must specify via the three checkboxes below how the search
terms are to be accounted for in the search. The following three different options
are thereby available for you to choose:
Result has to contain all search pattern (AND operator)
Result has to contain one search pattern (OR operator)
Search for complete string (exact input - without wildcards)
© Copyright 2005-2006, OPEN-XCHANGE Inc.
- 146 -
Continuing, you must set the positions where the given search string or terms
are to be searched for. Via the "In Attribute" list field you can set whether the
title or the description of the document or both attributes, are to be incorporated
into the search. Optionally, you can, via selection of an appropriate category,
gain different search results. If you have entered a category as well as a search
term, then the search for tasks will be limited to those results that meet one of
the two search criteria. By selecting a category, no additional limitation on the
search terms will occur.
Figure 11-10: Result List from the Bookmark Search
11.11. Creating, Reading, Changing or Deleting Notes on a Bookmark
You can save your short comments and information on bookmarks in the detail
view under the "Notes" tab. Once you display this tab, all the notes that already
exist are listed in the form of a table. Click on the "Create" button to add a new
note.
OX 5 User Manual v1.32
- 147 -
Bookmarks
11.12. Linking Bookmarks to other Objects
You can make as many links you would like to every bookmark. You can link a
bookmark to contacts, tasks, projects, appointments, documents, knowledge
entries, other bookmarks and forums. Set the link by opening the detail view of
a bookmark entry under the "Links" tab. All the links that already exist for this
entry are listed here in the form of a table. You can set a link to the current
bookmark now simply by clicking on the button "Activate link mode". Finally,
switch to the detail view of the object to be linked and also select the "Links"
tab. There, all you need to do is place a check in the box for the bookmark and
then click the "Create" button and the link is created. Next, to leave the linking
mode, click on the button "End mode".
Note:
Please bear in mind that the permission system works here,
too: If you do not have read permission for a linked object,
you will not be able to view this link.
11.13. History
You will also find the "History" tab in the detail view of a bookmark entry. The
information displayed there tells you which user originally created the bookmark
and on what date it was created. In addition, this location records the date of the
most recent changes to the bookmark and which user made the changes.
© Copyright 2005-2006, OPEN-XCHANGE Inc.
- 148 -
12.
Forum
The forum module allows you and your colleagues to have discussions in the
intranet. Every discussion is divided into discussion threads. These threads make
it very easy to follow discussions. For important responses to be reported to you
in a timely fashion, you can subscribe to receive responses to contributions or
even whole forums by email. Thanks to the permission system you can grant
external business partners access to the forums specifically.
12.1.
Forum Overview
The forum overview displays all the discussion forums that are currently open.
Aside from the forum topic, the display also shows how many articles have been
posted in each forum, how many you have not yet read how many threads there
are and when the latest article was posted. You can also see who the moderator
is for the discussion and when the forum was originally created. The printer icon
here allows you to print the displayed overview of forum topics. Clicking on the
icon first opens a form in your browser that is optimized for printing. You can
now print out this page as you normally would by using the printing function of
your browser. In MS Internet ExplorerTM, for instance, the print option is found
under the menu item "File | Print". The print function here helps you print out list
fields correctly. In a similar fashion, you can click on the "Archive" tab and print
the archived list of all forum topics.
Figure 12-1: All Forums in one Table
OX 5 User Manual v1.32
- 149 -
Forum
When you click on a forum, a detail view of that forum opens. The individual
threads are listed in this view. If a thread has multiple articles, you can click on
the "plus" symbol to open it and see the following entries in a tree structure. To
read an article, simply click on it.
Figure 12-2: All Articles of a Discussion Thread
12.2.
Creating and Editing Forums
To open your own forum, click on the "Create" button.
Figure 12-3: Creating a new Forum
To create a new forum, you first have to provide a forum topic. If you want to
make the new forum accessible for everyone, mark the radio button for
"Everyone". If you want to restrict access to the forum to specific individuals or
groups of people, select the option "Individually" and set the permissions under
the "Read access" and "Write access" tabs accordingly. Once you have set up a
forum, you are returned to the table showing an overview of all forums once
again. Normally, you should open the discussion by posting the first article at
this point. When you edit an existing forum, you can select the "Archive" option.
© Copyright 2005-2006, OPEN-XCHANGE Inc.
- 150 -
If you choose the "Yes" option, the forum is moved into the archive and it then
disappears from the list of all currently available forums.
12.3.
Adding and Responding to Articles
To post an article in a forum, click on the "Create" button to get to the
appropriate screen.
Figure 12-4: A new Forum Article
Next to the subject line in the actual message, you can also set the forum
module to send you an email anytime there are any changes in the forum. You
can also use a scripting language to format your article in many different ways.
12.3.1. Formatting
The forum in the web groupware client allows you to use a scripting language to
help you add different formatting options and additional effects to your article.
Implement each formatting selection by clicking on the button below the article
you are writing. The following individual functions are available:
Web link
Click on the "http://" button to include a web link in your article. You can enter
the address of the link in the window that opens. Confirm the information you
entered by clicking the "OK" button.
Email address
Click on the "@:" button to include an email address in your article. You can
enter the address of the link in the window that opens. Confirm the information
you entered by clicking the "OK" button.
OX 5 User Manual v1.32
- 151 -
Forum
Adding pictures
Click on the "IMG" button to include a picture or graphics in your article. The
image itself has to be located at an address somewhere on the internet. You can
enter the address of the link in the window that opens. Confirm the information
you entered by clicking the "OK" button.
Bold
You can use the article editor to show individual sections of text in boldface.
Simply click on the "B" button and enter the text that you want to appear in
boldface print. The text will now be displayed in the appropriate formatting of
the script language in the forum.
Italic
You can use the article editor to show individual sections of text in italics. Simply
click on the "I" button and enter the text that you want to appear in italic print in
the window that opens. The text will now be displayed in the appropriate
formatting of the script language in the forum.
Underline
You can use the article editor to show individual sections of text with an
underline. Simply click on the "U" button and enter the text that you want to
appear underlined in the window that opens. The text will now be displayed in
the appropriate formatting of the script language in the forum.
Emoticons
The editor in the forum allows you to include emoticons in your articles.
Emoticons are the little smiley images that help you express emotions without
long verbal explanations. Emoticons have become established as more than just
a fashionable novelty in the age of digital communication. Instead, they serve to
expand the expressiveness of normal texts. To include an emoticon in your
forum article, simply click on one of the emoticons shown on the right-hand side
of the forum. The true meaning of an emoticon depends, of course, on its
context in the article.
If you reply to a forum article, your new article is inserted at the corresponding
location in the tree structure. You can use the following emoticons.
That's strange!!!
I could cry
That's great
© Copyright 2005-2006, OPEN-XCHANGE Inc.
- 152 -
Raised Eyebrow / Are you sure?
I'm sorry
I'm surprised
I don't like that
Grin
I don't understand
Cool!!!
I could cry
I'm angry
I'm happy / That's funny
I don't like that
Relax
I'm very happy
12.4.
Forum Archive
Forums are not normally deleted, but instead sent to the forum archive. You can
read older articles there for a long time. Click on the "Archive" tab to get to the
archive view. The archive is arranged just like the normal forum overview. You
can add new articles to the forum and look at the existing articles. This archive
of concluded discussions primarily helps to keep the current discussion overview
easy to use and understand.
12.5.
Deleting Forums
To delete a forum, go to the detail view of the forum you want to delete. Click on
the trashcan symbol
with your left mouse button. Of course, you also need to
have the appropriate write access before you can delete a forum. Before the
forum is finally deleted, you have to confirm your decision one more time.
12.6.
Deleting an Article
To delete an article within a forum, go to the detail view of the article you want
to delete. Click on the trashcan symbol
with your left mouse button. Of
course, you also need to have the appropriate write access before you can delete
an article. Before the article is finally deleted, you have to confirm your decision
one more time.
OX 5 User Manual v1.32
- 153 -
Forum
12.7.
Editing an Article
You can also edit and modify forum articles you have already posted. To edit an
article within a forum, go to the detail view of the article you want to edit. Click
on the edit symbol
with your left mouse button. Of course, you also need to
have the appropriate write access before you can edit an article.
12.8.
Searching for Articles
In large forum archives, a forum article being searched for cannot always be
found directly. The web interface of the Open-Xchange Server makes a simple
tool available to you to search for a particular forum article. To use this, click on
the "Extended search" tab in the Forum module. In the first text field listed you
have the possibility of entering the desired search text. The use of wildcards is
allowed here. If you want, moreover, you can enter multiple terms in the text
field. In this case, you have to specify via one of the three option fields listed
below how the terms are to be incorporated into the search. The following three
different options are thereby available for you to choose:
Result has to contain all search pattern (AND operator)
Result has to contain one search pattern (OR operator)
Search for complete String (exact input - without Wildcards)
To continue, you must set in which position the given string or term is to be
searched for. Via the list field in attribute you can set whether only the title or
the description of the forum article or both are to be accounted for in the search.
Optionally, the search can be limited through the selection of an appropriate
"forum".
Using the "Also search in archive" checkbox, you can search for additional, older
and archived articles. Additionally, you can limit the search to a particular time
frame via the "Postings since" and "until" option fields. If you have selected a
forum and a search term, as well as entered a desired time frame, the search
will find forum articles that match all of these search options.
12.9.
Linking Objects to a Forum
To make a discussion clearer for all the participants, it is often worthwhile to
include an external object in the forum. This is an easy way to provide a
common foundation for the discussion. To link an object to a forum, click the tab
"Links".
12.10. Subscriptions
You can subscribe to a forum and keep up with the latest articles posted in the
discussion. There are different ways to do this. For one, as soon as you add an
article to a forum, choose whether or not you would like to receive emails
© Copyright 2005-2006, OPEN-XCHANGE Inc.
- 154 -
informing you of new remarks in this forum or in this thread; another option is to
subscribe to a discussion as an uninvolved participant by going to the desired
forum and then clicking on the "Subscribe" tab. After you click on the tab,
confirm your email address by clicking on the "Subscribe" button.
12.11. Canceling Subscriptions
If you decide to cancel a subscription, click on the "Subscribe" tab in the forum
overview. You then see an overview of all the forums you are subscribing to.
Click on the check boxes in front of the names of the forums to select all the
forum subscriptions you want to cancel. Once you have made your selection,
click on the "Unsubscribe" button to end the subscription.
OX 5 User Manual v1.32
- 155 -
Forum
13.
Pin Board
You and your coworkers can post individual notes on the pin board module just
like on a real public bulletin board. It makes no difference whether you want to
post a lost-and-found message or a short message to all colleagues or a
personal reminder. You can also save pin board entries on your personal portal
page.
Figure 13-1: The most important Messages displayed in the Portal
© Copyright 2005-2006, OPEN-XCHANGE Inc.
- 156 -
13.1.
Pin Board Overview
The pin board displays all the currently active pin board entries in the usual table
overview format. This overview also contains the author of the entry and the
period of time for the entry to be active along with the subject.
Figure 13-2: All Entries at a Glance
to the left of the
You can open the individual entries by clicking on the symbol
title of the entry in the detail view. If you want to create a new entry, click on
the "Create project" symbol
. Older entries can always be accessed in the
archive. If you want to print the displayed list of pin board entries, click on the
"Print" symbol
.
13.2.
Creating and Editing Entries
Before you can create a new entry, you first have to give it a description. If you
want to make the new entry accessible for everyone, mark the radio button for
"Everyone". If your entry is only a personal note, select the option "Private" to
restrict viewing access to the note to yourself. If you want to restrict access to
the entry to specific individuals or groups of people, select the option
"Individually" and set the permissions under the "Read access" and "Write
access" tabs accordingly. When creating the entry, you can choose the option
OX 5 User Manual v1.32
- 157 -
Pin Board
"Display on portal page" to determine whether or not the entry will be displayed
on your personal portal page. Further, you can set the "Start date" and "End
date" to define how long the entry is displayed on the pin board before it is
moved into the archive. Once you have set up an entry, you are returned to the
table showing an overview of all active pin board entries once again.
Figure 13-3: Creating a new Entry
You can also edit any pin board entries you are permitted to edit. To edit an
entry, click on the symbol
in the right-hand upper edge of the page. Changes
to an entry are recorded in the history. To view the entry's history, click on the
"History" tab when viewing the individual entry.
13.3.
Printing the Pin Board Overview
The printer icon
allows you to print the overview of entries listed on the main
page. Clicking on the icon first opens a form in your browser that is optimized for
printing. You can now print out this page as you normally would by using the
printing function of your browser. In Internet Explorer, for instance, the print
option is found under the menu item "File | Print". The print function here helps
you print out list fields correctly. You can print the list of all the archived pin
board entries stored under "Archive" in the same manner.
© Copyright 2005-2006, OPEN-XCHANGE Inc.
- 158 -
13.4.
Deleting Entries
If you want to delete an entry, go to the detail view of the corresponding entry.
Click on the trashcan icon
in the upper right-hand part of the page to delete
the entry. After clicking, confirm the security question and the entry is deleted.
You can only delete an entry if you also have delete permission for it.
OX 5 User Manual v1.32
- 159 -
Pin Board
14.
Email / Web Mail
Click on the Email symbol in the main menu bar to open the Web Mail interface
of the Open-Xchange Server, where you can comfortably handle all your email
correspondence using your internet browser. Once you have clicked on the
symbol, a new browser window opens automatically to display the actual email
web interface. This allows you to read, create or administer your emails and the
emails you have saved. The following list of features and views described
throughout this chapter is available in the email/webmail module:
14.1.
Login and logout
Overview of the interface and how to navigate the Web Mail module
Reading and editing emails
Writing new emails
Answering emails
Forwarding emails
Moving email messages
Deleting emails
Using the address book
Configuring the personal settings
Setting the basic configuration
Login and Logout
You do not need to login to the Web Mail client since the email program is an
integral part of the intranet interface of the Open-Xchange Server: the login
formalities required by the mail server are completed automatically. If you want
to close the Web Mail module, simply click on the menu item "Close" in the
upper-left part of the frame. The system briefly displays a message telling you
that you were logged out of the system. The browser window closes
automatically after around three seconds. If you do not change any settings in
the Web Mail client for some time, you are automatically logged out.
© Copyright 2005-2006, OPEN-XCHANGE Inc.
- 160 -
Figure 14-1: Logging out of the Web Mail Module
Optionally, you can use the login screen to log in to the Web Mail client directly
without going through the groupware. To do this, select the entry "Web Mail"
instead of the entry "Groupware" in the login screen under "Redirect".
14.2.
How to Navigate the Web Mail Module
The Web Mail module itself has an easily understood structure. Notice at first
that the window is arranged in three frames with different functions.
Figure 14-2: Overview of the Web Mail Client
14.2.1. The Web Mail Menu Bar
The left side of the Web Mail client has two frames. The upper frame contains a
small menu to allow you to access the different functions of the Web Mail
interface directly.
OX 5 User Manual v1.32
- 161 -
Email / Web Mail
Figure 14-3: The Menu Bar of the Web Mail Client
Here, you can click directly on the following selections:
New Message Use this link to open a window where you can create a new
email. This automatically opens a new window. For more information on
composing an email, see the section on writing email messages.
Retrieve Use this link to open the folder with the emails you have
received. This is the default window that is automatically displayed whenever
you open the Web Mail client.
Options Use this link to get to the configuration menu where you can
personalize your settings for the Web Mail client. The configuration menu is
automatically opened in a new window. For more information on personalizing
your Web Mail settings, see the section on personal settings.
Close Use this link to logout of the Web Mail client (but not out of the
whole program).
14.2.2. Web Mail Directory Overview
The left frame in the Web Mail client has two sections. The lower section
provides a hierarchical overview of the email directory. You can directly click on
the following contents and folders as the default choices:
© Copyright 2005-2006, OPEN-XCHANGE Inc.
- 162 -
Figure 14-4: Email Directory Folder for your Account
<Account Name> The top entry in this frame shows the name of the account
you used to login to the system at present. This corresponds to the email
address where you receive emails in the Open-Xchange Server. In the illustration
above, this would be the account name [email protected]. All the
other directory entries you see here are stored under this account name.
Inbox You can think of the "Inbox" folder as the mailbox for your email
account. It contains all the emails that have come to your account. After the
name of the folder, the display shows two different numbers, for instance (14/0).
The first number is the number of emails located inside this particular folder. In
this example, you currently have 14 messages in your inbox. The second
number is the number of emails you have not yet read or opened in this folder.
In the example, you have no new emails in your inbox. By clicking on this folder
with your mouse, you will see the contents of the inbox in the upper-right frame
of this module's window.
Drafts The "Drafts" folder holds a collection of templates to help you create
emails more easily. You can move or copy all the emails you may want to use as
templates for everyday messages to this folder. After the name of the folder, the
display shows two different numbers, for instance (10/0). The first number is the
number of email templates currently saved inside this particular folder. In this
example, you currently have 10 messages in your drafts folder. The second
number is the number of emails you have not yet read or opened in this folder.
In the example, you have no unread emails in your drafts folder. By clicking on
this folder with your mouse, you will see the contents of the drafts folder in the
upper-right frame of this module's window.
Sent The "Sent" folder contains all the emails you have sent through your
account. After the name of the folder, the display shows two different numbers,
for instance (14/0). The first number is the number of emails currently located
inside this particular folder. It is the number of messages you have sent so far.
OX 5 User Manual v1.32
- 163 -
Email / Web Mail
In this example, you currently have 14 messages in your sent folder. By clicking
on this folder with your mouse, you will see the contents of the sent folder in the
upper-right frame of this module's window.
Spam The "Spam" email folder contains all the messages you have received
through your account, but which the email filter has identified as spam, blocked
and automatically routed to this folder. After the name of the folder, the display
shows two different numbers, for instance (14/0). The first number is the
number of emails currently located inside this particular folder. It is the number
of messages that have been identified as spam so far. In this example, you
currently have 14 messages in your spam folder. The second number is the
number of emails you have not yet read or opened in this folder. By clicking on
this folder with your mouse, you will see the contents of the spam folder in the
upper-right frame of this module's window.
Note:
How is Spam detected?
Use your personal configuration settings of the intranet portal
to determine which emails are identified as "spam". Here you
can also determine whether or not messages identified as
"spam" are move to this folder.
Trash The "Trash" folder is the trashcan for your Web Mail client. All the
emails you have deleted from your other folders are automatically placed here. If
you delete messages from this folder, they will be permanently erased. After the
name of the folder, the display shows two different numbers, for instance (14/0).
The first number is the number of emails currently located inside this particular
folder. In this example, you currently have 14 messages in your trash folder.
The second number is the number of emails you have not yet read or opened in
this folder.
Other folders Other, additional folders are sometimes displayed in the
overview. These are folders you can create for yourself, perhaps so you can save
your own private emails there. To create additional folders, go to your personal
configuration settings for the intranet portal.
© Copyright 2005-2006, OPEN-XCHANGE Inc.
- 164 -
14.2.3. Overview of a Mail Directory
Figure 14-5: Contents of the Active Email Folder
This frame displays a table of all the email messages presently located inside the
email folder you have selected to view. You can find out how to view different
email folders in the section Web Mail directory overview. All the emails you have
received are displayed here when you open the Web Mail client. The page title on
the gray background shows you which folder you are currently viewing. Inside
the window list of the e-mail messages, you can scroll in order to find a desired
e-mail message. If a folder contains more e-mail messages than can be
displayed at one time, then you can use the list field displayed at the top border
of the image to reach the additional e-mail messages. The display is divided into
pages, where certain, set number of messages are displayed in the overview.
Searching for Emails
You can also use the title bar for a quick search for emails within the folder.
Select a search field from drop-down list to the left to choose a criterion for the
search. Enter the actual search term in the text field to the right of the dropdown list. You can select from among the following search criteria:
OX 5 User Manual v1.32
- 165 -
Email / Web Mail
From
If you select this criterion, the Web Mail client will search for all emails in the
active folder that come from the sender you enter as a search term. You can
simply enter a desired email address as the search term.
To
If you select this criterion, the Web Mail client will search for all emails in the
active folder that were sent to the recipient you enter as a search term. You can
simply enter a desired email address as the search term.
CC
CC stands for "carbon copy", which is a copy of the email you not only sent as a
message to the intended recipient but also as information to another person. If
you select this criterion, the Web Mail client will search for all emails in the active
folder that were sent as a copy to the person you enter as a search term. You
can simply enter a desired email address as the search term.
Subject
If you select this criterion, the Web Mail client will search for all emails in the
active folder that contain certain content in the Subject line. You can simply
enter the content of the Subject line you wan to find.
Mail text
If you select this criterion, the Web Mail client will search for all emails in the
active folder that contain certain content in the body of the email. You can
simply enter the words you want to find in the contents of an email.
14.3.
Email Overview
The overview of an email folder is displayed as a table of the emails stored inside
and is oriented towards the lines of the table. You can see all the information
that will fit in the line for each email message. The first column of each email
shows you whether or not you have read the message displayed in the Web Mail
client. The symbol
shows that this email has the status unread. Unread emails
are also marked in boldface type. The symbol
shows that the email has been
opened and accordingly read. Previously read emails are shown in normal type
and not in boldface. Emails that you have answered are shown with a different
small symbol
in the overview. If the email has an attachment, the message is
also marked with a small paper clip icon . You can see who sent the email in
the second column. The sender's email address is displayed here. If you are in
© Copyright 2005-2006, OPEN-XCHANGE Inc.
- 166 -
the "Sent" folder, this column shows the email address of the recipient instead of
the person who sent it. The third column in the table displays the subject line for
each email. This makes it quicker for you to find the appropriate entry from the
email list. The last two columns show the date of when the email was received
and the file size of the email together with its attachments. It is easy to sort the
emails in the list according to their different columns. This is done via icon
switches in the header of each column. The icon switch XXX sorts the result
according to the selected column alphabetically in ascending order (from A to Z).
The icon switch XXX sorts the results according to the selected column
alphabetically in descending order (from Z to A). If you want to open an email
for reading or for some other reason, simply click on the corresponding sender or
subject in the list. A detail view of the email then opens in the lower frame of the
Web Mail client. You can accept or reject new appointments or tasks that are
reported to you in emails directly through the email client. This information is
then set immediately in the database. If you receive an email notifying you of an
appointment or task inquiry created in the Open-Xchange Server, selecting the
email automatically opens a popup window where you can either accept or reject
the appointment or task. To reject a task or appointment, mark the "Deny" radio
button. To accept, select the "Accept" radio button. You can enter a short
message into the text field in both cases. Confirm your response by clicking the
"OK" button. If you do not wish to respond to the request at the moment, click
the "Cancel" button. But please keep in mind that the next time you click on the
item, it will not open a popup window.
Next time you will have to go to the "Appointments" or "Tasks" module to accept
or deny such a request manually. If the email sender activates the "Request read
receipt" option, a popup window opens automatically when you click on the
email. If you click on the "OK" button, the sender is automatically notified that
you have opened his request. If do not want to notify the sender that you have
received his email, click on the "Cancel" button. This popup function can also be
turned off globally. The appropriate settings are found in the configuration
section.
Messages that have already been answered in the Web Mail interface are marked
with an additional small icon in front of them in the overview. In this list you also
have the option to delete emails or move them to other email directories. To
delete an email, put a checkmark the check box in front of it in the overview and
click the "Delete" button...
14.3.1. List or Tree Overview
Use this list field to switch between the traditional list overview of the email
folders and the tree structure overview. In the tree structure, the emails are
shown in a discussion thread format. This means that the emails are shown as
branches of related email correspondence. The IMAP analyzes the emails to
OX 5 User Manual v1.32
- 167 -
Email / Web Mail
determine which emails belong to the correspondence. Please keep in mind that
first email of a thread is the one used to determine the time of each
correspondence.
14.3.2. Opening Emails
If you want to open an email for reading or for some other reason, simply click
on the corresponding sender or subject in the list. A detail view of the email then
opens in the lower frame of the Web Mail client. In this list you also have the
option to delete emails or move or copy them to other email directories. To open
an email in a new window, double click on that particular email in the list.
14.3.3. Marking Emails
This list field allows you to mark an email manually as read or unread. You also
have the option of marking individual messages as answered or unanswered.
Emails that have been answered are marked with a small green icon
in the
second column after the attachment icon . In addition, you can use different
colors to mark the emails, perhaps to denote a specific status for the message.
The following color codes are available:
Important (red)
In progress (brown)
Private (green)
To do (blue)
Later (purple)
Depending on how the administrator set up the server, you may have more and
different colors available to use. You can mark one or more messages with the
colors. First activate the check boxes in front of the messages you want to color
code. Next select the marking type you want to apply under "Mark as". Please
note that each email can only have one marking type at a time.
14.3.4. Selecting Emails
Use the list field "Select" to display all the emails in the active folder that are of
a specific type. The options here are the same as the ones you can set under
"Mark as".
14.3.5. Moving, Copying and Deleting Emails
You can mark the emails in a folder so you can perform certain operations on
them. First put a check in the check box in front of the messages you want to
select and then click on one of the operation buttons. After selecting the target
folder, click on the "Copy" button to copy the marked message into another
folder. You can also move the marked messages in the same manner. Simply
© Copyright 2005-2006, OPEN-XCHANGE Inc.
- 168 -
click on the "Move" button. To delete the selected message, click on the “Delete”
button.
14.3.6. Deleting the Whole Folder
The Web Mailer also allows you to delete the whole contents of an email folder.
To do this, click on the "Empty folder" button. The Web Mailer then asks you to
confirm that you really want to delete all the messages in the active folder.
Figure 14-6: Details View of an Email
14.4.
Email Details View
When you open the Web Mail client, the lower right frame of the newly opened
window shows you the status of your connection. Your name, the name of your
company and your email address are all displayed. The program also shows
which browser you are currently using and the IP address under which you are
logged into the system. If you open an email, its contents are displayed in this
frame. You can now read or edit this email, for instance, by replying to the
original message or by printing or forwarding the email.
14.5.
Reading and Editing Emails
If you click on an email in the overview of an email directory, it is displayed in
the lower right frame of the email module window. You can use the symbols in
the upper right margin of the frame to display the different functions in the detail
view. Information on the sender and recipients of the email is shown against a
yellow background, along with the subject line and the date the email was
received or sent. The actual content of the email is shown against a white
background. The attachment area is farther down on the screen. All the files
OX 5 User Manual v1.32
- 169 -
Email / Web Mail
attached to the email are listed in the form of a table here. File attachments are
marked with the attachment icon . If the attachment happens to be in a format
that your browser knows, you can view the contents of the attachment in the
email by clicking on the plus symbol to the right of the attached file. If a false
content type as been set for the attachment so that the attachment cannot be
properly displayed, then you have the possibility of correcting this and setting an
appropriate value via the list field at the side. To hide the attached file displayed
in the email, simply click on the minus symbol.
14.5.1. Opening and saving attachments
You can save the attachment to your hard drive by clicking on the icon. To do
this, click on the button "Save" in the context menu that opens and select the
appropriate directory and file name in the Explorer window to save the
attachment. If you want to view the attachment right away without saving it,
click on the name of the document instead of on the diskette icon
. The new
file attachment is then displayed in a new browser window if it happens to be in
a file format that your browser can use.
14.5.2. Appointment and Task Notifications
You can accept or reject new appointments or tasks that are reported to you in
emails directly through the Web Mail client. This information is then set
immediately in the database. If you receive an email notifying you of an
appointment or task request created in the Open-Xchange Server, selecting the
email automatically opens a popup window where you can either accept or reject
the appointment or task. To reject a task or appointment, mark the "Deny" radio
button. To accept, select the "Accept" radio button. You can enter a short
message into the text field in both cases. Confirm your response by clicking the
"OK" button. If you do not wish to respond to the request at the moment, click
the "Cancel" button. But please keep in mind that the next time you click on the
item, it will not open a popup window. Next time you will have to go to the
"Appointments" or "Tasks" module to accept or deny such a request manually.
14.5.3. Requesting Read Receipts
If the email sender activates the receipt notification option, a popup window
opens automatically when you select the email. If you click on the "OK" button,
the sender is automatically notified that you have opened his request. If do not
want to notify the sender that you have received his email, click on the "Cancel"
button. This popup function can also be turned off globally. The appropriate
settings are found in the configuration section.
© Copyright 2005-2006, OPEN-XCHANGE Inc.
- 170 -
14.5.4. Adding Addresses to your Contacts
You can add the email addresses in an email you have received directly to your
list of contact addresses. In the email, simply click on the green icon
beside
each email address in the To: or cc: lines. The email address is automatically
entered into the context menu for creating a new contact, where you can enter
additional information such as the telephone number and street address.
14.5.5. Exporting Attachments
The Open-Xchange Server web mail client offers you the possibility of exporting
e-mail message attachments. Exporting means in this case that the attachment
can be saved as a document in the Document module of the Open-Xchange
Server. To export an attachment, click on the "Export" link to the right of the
attachment. In the pop-up window that appears, select the index in the
Document module in which the attachment is to be saved as a document.
14.5.6. Detail View Actions
Once you have received and opened an email, there are several things you can
do with the message. These different actions are available to you via the
symbols in the upper edge of the frame. You can select among the following
symbols and actions:
Reply Click on this icon if you want to reply to an open email. This
opens a window for composing a new email, as described in the section on
writing new email messages. The only difference is that in this case the email
that you want to answer is included as a quotation in the new message. In
addition, the person who originally sent you the email is included in the form as
the recipient in the "To" line. The Subject line shows the subject of the original
message with "Re:" in front to show that the message was sent in reply.
Reply all As with the email reply, you can select this icon to answer
everyone. This takes you to the form for composing new email messages as
described in the section on writing new messages. The fields for "Subject" and
"To" as well as the contents are filled in here as was the case for simple replies
to emails. The only difference is that the new recipients in the "To" line also
include the recipients who received a copy of the original email.
Forward Normally, there are frequent occasions when you receive
emails either that were not intended for you or that might be of interest to your
coworkers. Such situations are what the "Forward" icon is meant to handle. By
OX 5 User Manual v1.32
- 171 -
Email / Web Mail
clicking on this, the form for writing a new email opens automatically. The
"Subject" line now shows the same subject line as was in the original message.
The abbreviation "Fwd:" appears in front of the subject in the line to indicate
that the email was forwarded. You can now enter an email address for a
recipient you want to forward the message to in the "To:" field. The contents and
attachments of the original email are automatically copied into the new email.
But you should note that these contents are not displayed in the form for writing
a new email. These contents are included when you forward the message to the
recipient.
Warning Delete
There is no security question here! The email is sent right to
the "Trash" folder without any warnings. If you later delete
the email from the "Trash" folder, the system will be removed
permanently from the system.
Delete The detail view of an email makes it very easy for you to
delete it. Simply click on the "Delete" icon. The deleted email is automatically
deleted and copied into the "Trash" email directory.
Print If you click on the "Print" icon in the detail view of an email,
the program automatically opens up the context menu of your printer software.
There you can set up your printer as you normally would for printing and then
print out the email by clicking on the "Print" button.
Figure 14-7: Printer Configuration Menu
Options Click on the "Options" icon in the detail view of an email and the
Web Mail client automatically opens a new window where you can change the
status of an email, export it or view its source code. You can select the individual
© Copyright 2005-2006, OPEN-XCHANGE Inc.
- 172 -
options from the hierarchical directory list to the left. The following options are
available in this window:
Status Change
This menu item allows you to change the status of an email. You can select the
appropriate status by clicking on its list field. The status of an email can be set to
one of the following values:
Read
Unread
Answered
Not answered
You can change the status of emails you have already read back to unread.
Figure 14-8: Changing the Status of an Email
Export
This menu option allows you to export the contents of an email. To do this,
simply select the appropriate option and click on the link message.eml behind it.
You can now save the email with the name message.eml in any directory.
Viewing the Header and Source
These options allow you to view the header and the source text of an email in
more detail. The email address of the recipient and sender of an email are
probably the most important information contained at the head of an email. But
the header and the source text of an email also include additional information
that might be of some use in certain circumstances.
OX 5 User Manual v1.32
- 173 -
Email / Web Mail
Figure14-9 : The Header of an Email
Email Header
The following information is found in the header of an email:
Return path:
This field displays an entry on the host that sent you the
email. The information here serves to show a secure pathway to the recipient of
an email. In nearly all situations, the entry under "Return path" is the same as
the entry under "From".
X sieve:
The sieve filter version used.
Received: This line shows you the route through which the email was sent to
you. Typical emails are not sent directly from the sender to the recipient. They
are more often forwarded through a series of hosts. This entry has the following
syntactic structure:
Received from Mail: Name of the sender's host
By:
Name of the receiving host
With:
Name of the protocol used
© Copyright 2005-2006, OPEN-XCHANGE Inc.
- 174 -
ID:
The identification number assigned by the receiving host
For:
Email address of the recipient for whom the email is intended
Date:
When (date and time) the email was received by a host
If more than one host is involved, a received line is shown for each.
Message ID: This entry shows the specific identification number of the host
through which the email is sent.
From:
To:
This entry contains the email address of the sender.
This entry contains the email address of the recipient.
Reply to: This entry contains the email address of the sender if it is not identical
to the email address shown in the "From" line. This entry is always displayed
whenever the sender has chosen to have replies to his emails sent to a different
email address.
CC: This entry contains the email addresses of any additional recipients.
Subject:
This line contains the subject line of the email.
Mime version: This entry contains the mime version used by the sender. Here,
MIME stands for multipurpose internet mail extension, and it is the common
email standard. Depending on the mime version used, additional email formats
may also be in use. This method is used, for example, to include additional nontext elements in an email.
Content type: Different possible contents for emails are grouped into different
categories according to the mime standard. These distinguish between text,
graphics or audio elements. You can see which categories are contained in an
email by looking at this entry.
Content transfer encoding: This entry shows the mime encoding that was
used to transmit the email components that went beyond the basic text
components of the message.
X mailer: This entry shows the potential name of the email client the email was
written on. This entry is optional and not every email client includes this
information.
X priority: This entry shows the priority of an email. Some email clients, such
as the Web Mail client in the Open-Xchange Server, allow emails to be marked
as urgent with different levels of urgency. Mail clients that support this function
emphasize emails that include such markings.
X confirm reading to: Several email clients, including the Web Mail client in the
Open-Xchange Server, allow the function "Read receipt" to be used in emails. As
soon as the recipient of an email marked with this command opens the email,
OX 5 User Manual v1.32
- 175 -
Email / Web Mail
the original sender is sent a receipt message. You can see if this function is
activated by looking at this entry.
Date:
This entry contains the date and time when the message was sent.
Since emails are a global communication medium, the sender's time zone is also
displayed.
Email source text All the information shown in the email header is also
contained in the source text of an email message. This function additionally
displays the entire contents of an email along with its formatting tags.
14.6.
Writing new emails
In the left frame of the Web Mail client main page, click on the "New message"
link and the Web Mail client automatically opens a new window with a form for
creating a new email. There you can select the following settings:
Figure14-10: The Complete Source of an Email
© Copyright 2005-2006, OPEN-XCHANGE Inc.
- 176 -
14.6.1. To:
Enter the email address of the intended recipient here. Recipients in the "To" line
can see which other recipients were entered in the "To" and "CC" fields. The
recipients entered under "To" cannot, however, see any recipients who are
entered into the "BCC" field.
14.6.2. CC:
CC stands for carbon copy. Accordingly, you can enter the email addresses of
people you want to send a copy of the current email for information. If you want
to enter multiple email addresses, you have to separate them by commas.
Recipients entered in the "CC" line can see the addresses of the other recipients.
The recipients entered under "CC" cannot, however, see any recipients who are
entered into the "BCC" field.
14.6.3. BCC:
BCC stands for blind carbon copy. Accordingly, you can enter the email
addresses of people you want to send a copy of the current email for
information.
OX 5 User Manual v1.32
- 177 -
Email / Web Mail
Figure 14-11: The Email Editor
If you want to enter multiple email addresses, you have to separate them by
commas. Recipients entered into the "BCC" line are not visible to the recipients
in the "To" and "CC" fields.
14.6.4. Contacts
When creating a new email, click on one of the three buttons "To", "CC" or
"BCC". This opens an address book with the email addresses for all the contacts
you have permission to select. The selections you choose appear in the lower
half of the screen, which can also be used to enter the recipient information, CC
and BCC recipients. The Magic bar at the top of the screen allows you to search
the address database for specific contacts. You can also use wildcards to help
you in your search. Select a specific area from list field to the right of the text
field – internal system users, global address book or private contacts entered
into the groupware contact administrator – to specify your search. Once you
© Copyright 2005-2006, OPEN-XCHANGE Inc.
- 178 -
have entered a search term and selected an address location in the list field,
start the search by pressing the return key. This produces a list of contact sorted
alphabetically below the search field. Click on the contacts you want to send the
email to in this list. Decide whether you want these in the "To", "CC" or "BCC"
lines. Then click on the "Insert" button. If you change your mind after making a
selection, click on the "Clear" button. Close the browser popup window. The
contacts you chose are now inserted into the "To", "CC" or "BCC" fields in the
window "New message".
14.6.5. Subject
You can enter any text you wish into the Subject line to describe the contents of
the email you are writing. To maintain clarity, you should try to write a subject
that is short and to the point, helping the recipient understand what subject
matter your email contains.
14.6.6. Inline HTML Editor
The latest version of the Web Mailer offers you the option of using a web HTML
editor when you compose your emails. This means you can format the contents
of your message however you want. Simply use the mouse to mark the section
of text you want to format and then click on the button with the desired HTML
effect. Please note that you only have the HTML editor available to you if the
corresponding function is activated for your account in the Web Mailer options
and if you are using one of the following browsers:
Internet Explorer 5 and later
Netscape 6 and later
Mozilla 1.3 and later
The following HTML formatting effects are available in the HTML interface:
Style Template List Field
The web HTML editor offers several templates for specific entries. They allow you
to choose the appropriate titles or addresses for your email.
Font
This drop-down list lets you manually set the font within an HTML email. As
default fonts, the web HTML editor gives you the choice of Arial, Courier New,
Times New Roman and Verdana.
OX 5 User Manual v1.32
- 179 -
Email / Web Mail
Font Size
You can define the font point size of a text section using the third drop-down list
in the HTML editor. You can choose from font sizes ranging from 1 to 7 for the
preinstalled fonts.
Text only / Text and HTML / HTML only
This list helps you determine whether you want to create a text or an HTML
email. Optionally, an email can include a formatted HTML message and a plaintext message at the same time.
Bold
You can use this button to mark individual text sections in your email in
boldface. To do this, the HTML editor uses the tags <Strong> and </Strong>.
Italic
You can use this button to mark individual text sections in your email in italics.
To do this, the HTML editor uses the tags <EM> and </EM>.
Underline
You can use this button to underline individual text sections in your email. To do
this, the HTML editor uses the tags <U> and </U>.
Left align
You can use this button to align individual text sections against the left margin.
To do this, the HTML editor uses the tags <P align=left> and </P>.
Centered
You can use this button to center individual text sections. To do this, the HTML
editor uses the tags <P align=center> and </P>.
Right align
You can use this button to align individual text sections against the right margin.
To do this, the HTML editor uses the tags <P align=right> and </P>.
© Copyright 2005-2006, OPEN-XCHANGE Inc.
- 180 -
Numbering
You can use this button to number lines of text. To do this, the Web Mail HTML
editor uses the tags <OL> and </OL> to turn numbering on and off for the text
section to be numbered. Each text section to be numbered is also place between
the tags <LI> and </LI>.
Bullets
You can use this button to place lines of text in a bullet list. To do this, the Web
Mail HTML editor uses the tags <UL> and </UL> to turn numbering on and off
for the text section to be numbered. Each text section to be listed with bullets is
also place between the tags <LI> and </LI>.
Decrease/Increase Indentation
Unfortunately, you cannot use the Tab key when writing an email in HTML mode.
As an alternative, you can use the buttons "Increase indent" and "Decrease
indent" to achieve the effect. The former is nearly the same as pressing the Tab
key. The latter deletes or decreases the indentation previously added to the
email.
Font Color
You can use this button to change the color of the font in sections of text. First
mark the section of text you want in a different color and then press this button.
Then choose one of the 70 colors offered by the color chart that opens up. The
Web Mail HTML editor uses the command tags <P><FONT color=hex;> and
</FONT></P>. The hexadecimal number is a typical six-figure hexadecimal
number. By manually editing the source text, you can choose from an even
wider range of text colors.
Background color
You can use this button to change the background color for sections of text. First
mark the section of text you want in a different color and then press this button.
Then choose one of the 70 colors offered by the color chart that opens up. To
create this formatting, the HTML editor uses the tags <style"BACKGROUNDCOLOR: hex;> and </span>. The hexadecimal number is a typical six-figure
hexadecimal number. By manually editing the source text, you can choose from
an even wider range of background colors.
OX 5 User Manual v1.32
- 181 -
Email / Web Mail
Hyperlink
To add working internet or email addresses to your text, use the "Hyperlink"
button. Clicking on the button opens a small window where you can enter the
new address. Click on the "OK" button for the link to be inserted into your HTML
email.
External Spell Checker
Some browsers, including Internet Explorer, have an internal spell checker
program. To use this rather than the ISpell checker on the Open-Xchange
Server, click on the button "External spell checker". If this feature is not installed
on your computer, the Web Mailer asks if you would like to download and install
it to your PC. Now you can use the feature directly by clicking on the button. Be
sure not to confuse this spell checker with the spell checker on the OpenXchange Server. The two spell checkers have their own databases that are
maintained independently of one another.
Undo/redo
Use these buttons to undo changes you have made to your email or to redo the
changes you just undid. The HTML editor always saves the latest changes you
made to your messages in the background. This also makes it possible to undo
or redo several changes made in editing.
Source Text
Activate this check box to view the source text of the email created using the
Web Mail HTML editor. This allows you to made additional changes, such as
adding more complex HTML effects and creating tables. Consult the manual to
find more information on this option.
Text Field
You enter the actual text of your email in this large text box. Emails are normally
structured exactly like normal mail letters. You can, of course, vary this format
anyway you like. In your own workgroup, it will most likely be more common to
exchange short notes via email rather than more formal messages. But you
should probably maintain a certain degree of formality in your style when
communicating with business partners.
Character Sets
The Web Mail client also allows you to send emails written using special or
foreign character sets. This option lets you define the character set to be used in
© Copyright 2005-2006, OPEN-XCHANGE Inc.
- 182 -
encoding your message. In most cases, you most likely want to set this for
UTF8.
14.6.7. Sender Domain
You can set the value for your sender domain in this field. Normally you should
leave the preset placed by the groupware as it is here.
14.6.8. Priority
This field lets you set a priority level for you email. You can choose from five
priority levels ranging from very high to very low. The default setting is normal.
Some email clients, such as the Open-Xchange Server Web Mail client, show
emails with a higher priority with special markings. But please note that not all
email clients support this function and than only a small fraction of users pays
any attention to the priority of an email.
14.6.9. Attaching a vCard
Place a checkmark in this box to add your personal business card as an
attachment to the email you are writing. This vCard makes it quick and easy for
the recipient to add your address to his contacts.
14.6.10.
Requesting Read Receipts
This option allows you to add another function to the email you are writing. If
you activate the check box, the email client sends you a notification message as
soon as the recipient opens your email. But you should be aware when you use
this function that the recipient has the ultimate decision as to whether or not the
notification is sent.
14.6.11.
Adding a Signature
This option allows you to add a signature to your email. Signatures are a type of
footer to your text that appears after the body of the email. Signatures normally
contain information that you may always want to include in your messages. A
signature could, for instance, include information such as the name of your
company, your bank details or your telephone number. The Web Mail client
allows you to create and save different signatures for various purposes. But you
can only choose from among existing signature entries when you create an email
using the form. To select the signature, select the one you want from the list.
Many users use signatures not only to add important information, but also to
include minor ASCII artwork. Many users have a large collection of various
signatures intended for different purposes. You can find out more about creating
your own signatures in the subchapter Managing signatures.
OX 5 User Manual v1.32
- 183 -
Email / Web Mail
14.6.12.
Inserting Mailing Lists
The Open-Xchange Server Web Mail client allows you to create email distribution
lists. These mailing lists are lists of email addresses that you can compile into
groups. You can find out more about creating distribution lists in the subchapter
Managing mailing lists. You can use the address book to select distribution lists
that have already been created. The email you create is then sent automatically
to all the participants in the mailing list you have selected.
14.6.13.
Importing Attachments
You can add an unlimited number of files as attachments to an email you create.
To attach an individual file to your email, simply click on the "Browse" button
and then use the file manager to choose the desired file to attach to your email.
Once you have selected the file, click on the "Attach" button to add it to your
email. If you wish to add more attachments, complete these steps for each
additional file. If the files you want to attach contain a very large quantity of
data, it may be useful to compress them using a zip program such as gzip. If the
size of the attached files exceeds a certain limit, your recipient may not receive
the message if his email inbox is not allowed to exceed a certain amount of data
or if his email server is set to reject incoming files above a certain size.
Otherwise, you may want to use archiving programs like tar if you want to
attach a large number of small files to your email. This allows you to save
multiple files in a single archive file. When you use the Web Mail client later on,
you can then simply select this archive file as the attachment and save yourself
a lot of effort.
14.6.14.
Checking Spelling
After composing your email, simply click on the "Check" button and the Web
Mailer conveniently checks your spelling. The program displays your whole text
in the upper part of the window. Unknown or misspelled words are marked in
red. Now the spell checker goes through your text word by word. Each active
word is marked with a red background. Words that have been checked are
shown in turquoise. The program offers different options for each misspelled
word.
Accepting Changes
To replace a word with one of the suggestions shown, click on the entry you
want from the list of suggested words. Next click on the "Replace" button to
replace the word marked in your text with the suggestion. If you want to replace
the same word throughout your text, click on the "Replace all" button. If you
would like to replace the misspelled word with your own suggestion, in a
situation where no suitable suggestion is offered for instance, enter the desired
© Copyright 2005-2006, OPEN-XCHANGE Inc.
- 184 -
text manually under "Replace with" and then click on either the "Replace" or the
"Replace all" button.
Ignoring Misspellings
If you wish to ignore the detected error, for instance because the word is not
really misspelled, click on the "Ignore" button. If you want the spell checker
program to ignore the same word throughout your text, click on the "Ignore all"
button.
Learn
If the spell checker is unfamiliar with a word you often use, you can teach this
word to the software. Simply click on the "Learn" button. This spelling will now
always be recognized as correct by the spell checker.
Edit
Do you wish the suggestions list contained some additional entries? You can add
them manually. Simply click on the "Edit" button and add other entries to the
dictionary in the popup window that opens. The longer you use the spell checker,
the dictionary will become more and more adapted to the texts you write and
will continue to get better.
Going back a Step
If you want to return to the last word checked, use your mouse to click on the
"Back" button. If you want to return to a previous word any time during the spell
check, click on the "Back" button as often as needed.
Canceling the Spell Checker
To cancel the spell checking without accepting the changes made so far, simply
click on the "Cancel" button.
Finishing the Spell Checker
To complete the spell checking and accept the changes made so far, click on the
"Finish" button.
14.6.15.
Sending the Email
Once you have finished writing your email and editing it to your satisfaction,
click on the "Send" button to mail the message. If you decide against sending
the email at any time, just click on the "Cancel" button to leave the email editor.
OX 5 User Manual v1.32
- 185 -
Email / Web Mail
14.7.
Moving Email Messages
To move emails from one email directory to another, you have to first be in the
main window of the Web Mail client and in the email folder where the emails you
want to move are located. Put a checkmark in the boxes in front of all the emails
you want to move. Once you have selected the messages you want to move,
choose a target folder from the drop-down menu. Next, simply click on the
"Move" button to move the messages you chose to another folder. Finally, select
the folder where you want to move the messages.
14.8.
Deleting Emails
Before you can delete emails, you have to be in the main window of the Web
Mail client in the email folder you where the messages are located that you want
to delete. Next, put a checkmark in the lines before the emails you want to
delete. Once you have selected the emails you want to delete, simply click on
the "Delete" button. All the emails you have selected are now automatically
copied into the "Trash" email folder. Once you delete the messages from that
folder, they are permanently erased from the system.
14.9.
Personal Settings
Click on "Options" in the Web Mail menu list to change the email module to meet
your personal needs. You can set up the email editor, your personal signature or
even your own mailing list in the hierarchical menus that appear.
14.9.1. Changing the Presets
You can configure the general settings for the Web Mailer under the first menu
option.
Layout
Set the layout to define the font, font size and font color you want to use. Once
you have chosen a specific layout, confirm your selection by clicking the "Accept"
button.
Page Size
If you receive a lot of emails, it can make it easier to keep track of them by
displaying them on separate pages. You can use this field to determine whether
all of your emails are always displayed at once, or if the display should be limited
to a certain number of them at once. Limiting the number displayed may make
sense especially if you are accessing your emails over a slow internet
connection, because a limit would mean a smaller amount of data per query.
© Copyright 2005-2006, OPEN-XCHANGE Inc.
- 186 -
Deleting Emails immediately
Whenever users delete their emails right after reading them, they are first
moved to the trash folder, where they can still be accessed if needed. If you
want, you can change this behavior and have the emails deleted immediately by
setting the option "Delete emails immediately" to "Yes".
Standard Email Address
The administrator can assign access to multiple email accounts to any user. This
option allows you to determine which of these multiple accounts you want to be
your default account for sending emails.
Reply Address (Reply-To)
When you send an email, you often also receive replies to it. Normally these are
sent to the sender address. If you would like the replies to go to another
address, you can enter this in the "Reply-To" address line.
Quotation Reply
If you set this option to "Yes", the original text of the email you are replying to is
copied and marked as a quotation in the reply email. This option allows you to
reply to the individual lines of the message you received.
Forwarding
It is easy to forward emails you receive to other users. Here, the original text
you received is copied into the new message to be forwarded. There are two
different ways to copy this forwarded text. The original message can be copied
as text in the message or attached to the new email. This configuration option
lets you decide which of these options you wish to choose.
Save after Sending
If you want to keep a copy of the emails you send in the "Sent" mail folder, set
this option to "Yes".
Inline HTML
In principle, it is possible to send messages in HTML format alongside purely
text-based emails. For the received HTML version of the text to be displayed in
as it was written, set the Inline HTML option to "Yes".
OX 5 User Manual v1.32
- 187 -
Email / Web Mail
Attaching a vCard
If you want each email you send to include your vCard as an automatic
attachment, set this option to "Yes".
Email Header
When viewing an individual email, you can add additional header fields. Simply
enter the title of additional headers to be displayed into the text field. If you
want to show more than one header, separate each with a semicolon.
Color-coding Quoted Text
Activate this option to mark the message quoted in a reply in color. This can help
to simplify everyday correspondence considerably.
Graphic Emoticons
When you activate this option, the most commonly used emoticons are
converted to graphic images in the email display. This makes it easier to
interpret emoticons in everyday work. You have to activate this option before the
emoticons are converted.
Automatic Text Wrap around
The Web Mail client automatically adds line breaks after a certain number of
typed characters when you write messages. This is necessary for the spell
checker to work correctly. You can manually adjust this option to set the number
of characters that are typed before a line break is added.
Return receipt
You have to activate this option if you want to be notified that you have received
an email with a request for a return receipt. As soon as you open an email
requesting a return receipt, a popup window opens to allow you to return this
receipt automatically.
Preview
Activate this option if you want to view an automatic preview of the active email
in the lower frame. This is typically part of the common default settings.
14.9.2. Selecting default Folders
In the personal settings menu, click on "Folder" to select the folders where your
sent and deleted emails are stored. The default folder for sent messages is the
© Copyright 2005-2006, OPEN-XCHANGE Inc.
- 188 -
folder "Inbox.sent"; for deleted messages and folders it is the folder
"Inbox.trash". If you change these folders, click the "Save" button to confirm the
changes. You can also subscribe to individual email folders here. It is, of course,
also possible to create, rename or delete individual folders, too.
Deleting Folders
To delete an existing email folder, proceed as follows: First, choose the folder
you want to delete from the list "Here you can create / rename / delete folders"
Finally, click on the button "Delete". Please note that is normally unwise to
delete any of the default folders: Spam, Trash, Sent, Inbox and Draft.
Renaming Folders
You can rename an existing email folder in the same way as you would delete it.
First select the folder you want to edit from the list field. Enter the new name of
the folder in the text field next to the drop-down list. Click on the "Rename"
button to accept the name you have entered for the selected folder.
Creating Folders
The Web Mail front-end of course also lets you create new additional email
folders. Additional email folders can be useful to you, especially if you use
complex filtering options to sort individual emails automatically into different
suitable subfolders. To create a new folder, first select the higher-level folder
where you want the new folder to be created. Do this with the drop-down folder
list. Then enter the name of the folder you want to create in the text field and
click on the "Create" button.
Exporting Folders
The Web Mail client allows you to export whole email folders to the mBox format.
Select the desired folder from the list field "Export folder" and click the "Export"
button. Now you can use the file manager that opens to determine where the
export file should be saved on your system. Please note that exporting whole
folders can take some time. This is particularly true for large extensive folders
with many emails or messages with very large attachments. The export folders
function allows you to import folders from the Web Mail client to other email
client programs that support the mBox format.
14.9.3. Administering Signatures
You can use signatures to sign your emails automatically. The Web Mail client
option "Options | Signatures" allows you to create, delete and administer your
signatures.
OX 5 User Manual v1.32
- 189 -
Email / Web Mail
To create a new signature, you first have to enter a name for it in the field
"Name". Afterwards, you can select the signature saved under this name. Enter
the actual text of the signature under "Description". Normally, the signature
contains a closing and your name, but quotes and slogans are also added as
signatures to emails. Once you are satisfied with your signature, click on the
"Save" button to save the signature.
If you want to edit an existing signature, choose the signature you want to edit
from the drop-down list of signatures in the above field. The description and the
text of the selected signature then appear in the lower fields. This is where you
edit the signature. Once you are finished, click on the "Save" button to save your
changes. If you want to delete an existing signature, choose the appropriate
signature from the drop-down list of signatures in the field above. Once the
name and text of the signature appear, click on the "Delete" button to delete the
signature.
To select the signature you want to use as the default signature for all your
emails, choose the desired signature from the list above. The signature becomes
the default when you click on the button "Save". If you want to turn off the
automatic signature, select the list entry "-DO NOT INSERT A SIGNATURE-".
14.9.4. Synchronizing or Replicating with Outlook and Palm
You can synchronize or replicate important information saved in the groupware
section of the Open-Xchange Server (calendar dates, contacts, tasks) with
Microsoft Outlook or the Palm client. This involves data mapping to take the
different concepts – especially the different permission systems – sensibly into
account. The procedure allows you to work with the data offline using the
Microsoft Outlook or Palm clients after synchronizing or replicating the OpenXchange Server data. You can create, edit data both on the Open-Xchange
Server and on the Outlook or Palm client depending on your permissions. Since
nearly all handheld devices on the market can be synchronized with Microsoft
Outlook, the Open-Xchange Server data are accessible to these devices as well.
For more information on synchronization and replication, consult the OpenXchange Maintenance Web. There you will find both the client software for the
replication along with the related manuals.
14.10. Adding Email Addresses as Contacts
You can automatically save the addresses of email senders and recipients
displayed in your email messages as contacts in your address book. Simply click
on the icon
displayed beside the email address you want to select. The
chosen email address is automatically incorporated into the form for creating a
new contact. Of course, you can also add all the other contact data here, too.
© Copyright 2005-2006, OPEN-XCHANGE Inc.
- 190 -
15.
Folder Concept
All modules of the Open-Xchange Server facilitate precise configuration and
management of permissions to all objects and folders. Concerning the modules
calendar, contacts and tasks privilege management is executed on the level of
folders, four different types of which exist in the Open-Xchange Server:
Private folders
Public folders
Shared folders
System folders
All folders, you have access to, are display in the left/right frame of the OpenXchange Server web interface.
15.1.
Private Folders
Private folders are essentially folders which hold only one user's data and are
accessible only for that user. By default, each user has three private folders after
installing Open-Xchange Server. Contacts, calendar, and tasks, each of which is
connected to the corresponding folder type. Each user has the option of creating
more private orders of type contact, task, or event. There is also the option of
creating unbound folders. A user's private folders can be shared by that user, so
that other users can be granted access to the folder. The sharing is done by
defining access permissions for a folder. A user's shared private folders are
displayed to other users under the heading "Shared Folder" in the left/right
frame of the web interface. All data listed under "Outlook today" is basically
assigned to private folders. Appointments and tasks, stored in a private calendar
or task can be viewed and edited by all of its participants.
15.2.
Public Folders
Under "Public Folders" there is a list of all folders which are not bound to a
particular user. Public folders are basically intended for the storage of schedules,
contacts, and tasks which should be available to multiple users. Which users and
user groups have access to a public folder is determined by the folder's access
permissions.
15.3.
Shared Folders
Shared folders are the private folders of another user, to which you have access.
Whether you have write access, delete access, or only read access for this folder
depends on the configuration of access permissions of the folder. By default, the
shared folders of other users in MS OutlookTM are listed with the following
syntax: "User name – folder name". The title of a folder thus tells you the folder
OX 5 User Manual v1.32
- 191 -
Folder Concept
type and the user the folder belongs to. Please note, that sharing a private folder
does not work recursively. Subfolders stored in a shared private folder have to
be shared separately.
15.4.
System Folders
System folders are folders provided by Open-Xchange Server which are visible to
all users. Two different system folders exist:
Global address book
Internal users
The folder "Internal users" includes all system users who have accounts on the
Open-Xchange Server. The opposite of this is the global address book in the Web
interface. Here, all contacts are stored which should be visible to all users. In
Outlook, this folder has the name "OX Shared Address Book".
15.5.
Open Folders
To open a private, public or shared folder, left-click on the folder entry located in
the left/right frame of the web interface. In the main frame of the OpenXchange web interface the content of the folder will be displayed. If there are
subfolders located in a folder, listed in the left/right frame, a small plus icon is
located in front of the folder. Left-click on the plus icon to open a more detailed
folder view in the left/right frame, including all the subfolders stored in the
folder.
15.6.
Creating Folders
15.6.1. Creating private Folders
To create a new private folder, right-click on the entry "Private folder", located in
the left/right frame of the web interface. From the selection menu which opens
up, select the entry "New Subfolder". A context dialog appears in which you can
configure the new folder to be created. In the "Folder name" field, enter the
name of the private folder to be created. Using the option buttons "Folder type:"
select the type of data which will be created in this private folder. As element
type, select one of the following options:
Unbound folder
Contact
Appointment
Task
A corresponding private folder will be created which you can then access through
the Open-Xchange Server web interface. Depending on the chosen element type
© Copyright 2005-2006, OPEN-XCHANGE Inc.
- 192 -
you can only store objects (e.g. appointments, contacts, tasks) of a certain type
in this folder afterwards. Unbound folders are needed for compatibility reasons
for some third party clients. Using the Open-Xchange web interface you are not
able to open unbound folders.
15.6.2. Rights
Direct ACL configuration using the "rights" tab is not allowed for private folders.
If you try to change the Access right configuration for the new folder here, the
Open-Xchange server will generate a short error message. Please note –
Granting access for a private folder to another user can only be done by sharing
the private folder using the "Share" tab.
15.6.3. Share
To share a private folder, open the "Share" tab.
Use the "Search for users" and "Search for groups" selection menus to find one
or more users or groups, you want to grant access to your new private folder.
Click on the "Add users" or "Add groups" buttons, to add all selected entries from
the selection menu to your Access Control List, displayed in "Set rights for
selected users and groups". The Access configuration can be done, using the
select menus of each row, shown for every user, added to the Access control
List. From left to right, the following list fields exist:
User:
The first list field of each row shows, you that in this row the permissions for one
"user" are defined. A special selection in the list field is not necessary.
Folder Permissions:
Use this list field to access level for the private folder itself. By default users
have no access level to the private folder. There are four levels of folder
permissions that can be granted to a particular user, listed in the Access Control
List:
+Read Folder
+Create Objects in Folder
+Create Subfolders
+Admin
If you select the option "Read folder" the selected user is allowed to read and
open the folder, but he can't create new objects and subfolders. If you select the
"Create Objects in Folder" option he is additionally allowed to create objects in
this shared folder. To allow him to create subfolders as well, you have to select
OX 5 User Manual v1.32
- 193 -
Folder Concept
the option "Create folders". Delete rights for a shared private folder are only
granted, if you select the "Admin" option.
Object read rights:
Use this list field to define the read right for objects, stored in the private folder,
you want to share. By default users just added to the Access Control List have
no read right to objects, stored in the private folder. There are three levels of
object read rights that can be granted to a particular user, listed in the Access
Control List:
+Read own objects
+Read all Objects
+Admin
If you select the option "Read own objects" the selected user is only allowed to
view objects, owned by him. If you select the "Read all objects", he is
additionally allowed to open and view objects that where owned by other users.
Object Write-rights:
Use this list field to define the write right for objects, stored in the private folder,
you want to share. By default users just added to the Access Control List have
no write right to objects, stored in the private folder. There are three levels of
object write rights that can be granted to a particular user, listed in the Access
Control List:
+Edit own objects
+Edit all Objects
+Admin
If you select the option "Edit own objects" the selected user is only allowed to
edit objects, owned by him. If you select the "Edit all objects", he is additionally
allowed to edit objects, stored in the private folder to share, that where owned
by other users.
Object Delete-Rights:
Use this list field to define the delete right for objects, stored in the private
folder, you want to share. By default users just added to the Access Control List
have no delete right to objects, stored in the private folder. There are three
levels of object delete rights that can be granted to a particular user, listed in
the Access Control List:
+Delete own objects
+Delete all Objects
+Admin
© Copyright 2005-2006, OPEN-XCHANGE Inc.
- 194 -
If you select the option "Delete own objects" the selected user is only allowed to
delete objects, owned by him. If you select the "Delete all objects", he is
additionally allowed to delete objects, stored in the private folder to share, that
where owned by other users.
15.7.
Edit Folders
To edit a private, public or shared folder, access must have been granted to you.
If you have the right to edit the folder, right click on the folder you want to edit
in the right/left frame of the web interface. From the selection menu which
opens up, select the entry "Edit Subfolder". A context dialog appears in which
you can configure the folder to be edited. Editing folders is similar to create a
new folder.
15.8.
Creating public Folders
Creating a public folder is done in exactly the same way as the creation of a
private folder.
To create a new public folder, right-click on the entry "Public folder", located in
the left/right frame of the web interface. From the selection menu which opens
up, select the entry "New Subfolder". In the dialog which appears, define the
name and type of the elements which will be stored in this folder. Use the tab
"rights" instead of the "Share" tab to define an Access Control List, granting right
to particular users and groups.
15.9.
Deleting Folders
To delete a private, public or shared folder, delete permissions must have been
granted to you. If you have the right to delete the folder, right click on the folder
you want to edit. To delete a folder, right-click on the folder, listed in the
left/right frame of the web interface. From the selection menu which opens up,
select the entry "Delete". If you really want to delete the folder, then confirm by
clicking "Delete" or "Abort".
15.10. Move Folders
To move a folder right-click on the folder, listed in the left/right frame of the web
interface, you want to move. From the selection menu which opens up, select
the entry "Cut". Right-click on the folder or subfolder, you want choose as target
folder. From the selection menu which opens up, select the entry "Paste". The
folder is moved to the target folder at once.
OX 5 User Manual v1.32
- 195 -
Folder Concept
16.
WebDAV Scenario to Access Documents
16.1.
Accessing the Document Server using KDE Konqueror (Linux)
Step 1
Open Konqueror from the start menu of your Linux desktop client.
Figure 16-1: Using Konqueror to Access the Document Module.
Step 2
Enter the following address in the Location filed of the Konqueror window:
http://<ip-address>/servlet/webdav.documents
where <ip-address> is the IP address or URL of the Open-Xchange Server.
© Copyright 2005-2006, OPEN-XCHANGE Inc.
- 196 -
Step 3
Now you have to enter your user name and your password. Please use the same
login parameters you use for the Open-Xchange web interface.
Figure 16-2: Access Information for the Open-Xchange Server.
Step 4
After successfully logging in, you can use your browser to access the document
section of the Open-Xchange Server.
Figure 16-3: Browsing Document Files using the Konqueror
Warning: When you delete a file entry via the WebDAV interface you will
delete the whole version history of the document and also its
description.
OX 5 User Manual v1.32
- 197 -
WebDAV Scenario to Access Documents
Note:
It is important to remember that files listed here only reflect
the "current" version of the corresponding document. Due to
the limited capabilities of the browser you will not see the
version history behind the document nor the document's
description.
© Copyright 2005-2006, OPEN-XCHANGE Inc.
- 198 -
16.2.
Accessing the Document Server using Windows 2000/XP
Step 1
In the Windows 2000 operating system open "My Network Places" from your
workplace. In Windows XP you can access the "Network Resources" via the
"Start" button in the lower right of your workplace.
Figure 16-4: Windows 2000 Network Environment
Step 2
Click on the "Add a Network Place" (Windows XP: "Add a Network Resource").
Figure 16-5: Adding a Network Resource
OX 5 User Manual v1.32
- 199 -
WebDAV Scenario to Access Documents
Step 3
Enter the address of the Open-Xchange Server as the path. The address is
structured as follows:
http://<ip-address>/servlet/webdav.documents .
Be sure to replace <ip-address> with the address or URL of the Open-Xchange
Server.
Step 4
Now you have to enter your user name and your password. Please use the login
data of the web interface.
Figure 16-6: Logging in to the Open-Xchange Server
Step 5
After successfully logging in you can now assign a name to the network
resource:
Figure 16-7: Naming the Document Section
© Copyright 2005-2006, OPEN-XCHANGE Inc.
- 200 -
Step 6
This concludes the installation of the document folder. You can access the newly
created folder via your network environment. This corresponds to the folder
structure of the document area of the Open-Xchange Server.
Figure 16-8: Viewing Open-Xchange Server Documents under Windows
Warning: When you delete a file entry via the WebDAV interface you will
delete the whole version history of the document and also its
description.
Note:
It is important to remember that files listed here only reflect
the "current" version of the corresponding file. Due to the
limited capabilities of the Explorer you will not see the version
history behind the document nor the document's description.
OX 5 User Manual v1.32
- 201 -
WebDAV Scenario to Access Documents
16.3.
Accessing the Document Server using a Web Browser (Windows)
Alternatively you can access the document section of the Open-Xchange Server
using your web browser (e.g. Internet Explorer). Simply enter the following URL
into your web browser:
http://<ip-address>/servlet/webdav.documents/
Be sure to replace <IP-address> with the address or URL of the Open-Xchange
Server.
After entering your user login parameters your browser will display the files from
the document server like an FTP-Server:
Figure 16-9: Accessing the Document Server using the Internet Explorer
Warning: When you delete a file entry via the WebDAV interface you will
delete the whole version history of the document and also its
description.
© Copyright 2005-2006, OPEN-XCHANGE Inc.
- 202 -
17.
Personal Setup
Use the "Setup" button of the Open-Xchange Groupware to get to the "Personal
setup" screen. Here you have the option of changing your personal user
registration data in the groupware as well as the general groupware settings that
apply to you. You can also change your password, define e-mail mail filters, set
access rights for your mail folders and set up vacation notices on this screen.
17.1.
Personal Data
The "Personal Information" tab displays the user data currently saved under your
user name. Aside from your name, surname and title, the information can
contain other details such as a personal website, a telephone number or your
birth date. If you want, you can edit this data and add more information to the
values stored here. Next make the changes you want in the input form that
opens and save your changes by clicking on the "Save" button.
Figure 17-1: Completion of User Data in Personal Setup
17.2.
Groupware Settings
You can define several settings for the appearance and actions of the groupware
interface for your user account under the "Groupware settings" tab. The settings
are essentially divided into three sections. "Web front-end options",
"Task/calendar options" and "Email notification".
17.2.1. Web Front-end Options
This section allows you to configure two options for the appearance of the web
front-end.
OX 5 User Manual v1.32
- 203 -
Personal Setup
Displaying the Calendar Frame
This option includes the handbook frame displaying a miniature calendar, brief
general information on current tasks, a folder overview and a search function.
You can choose between displaying the handbook frame on the "Left" or "Right"
side of the groupware interface. Set this display option by clicking on the radio
button in this configuration line.
Language
As the default, the Open-Xchange Server groupware interface comes with two
language versions preinstalled: German and English. Your administrator can
install other language localizations as needed. Use the option buttons to
determine the localization version to be used in displaying the groupware and
web interface for your account.
17.2.2. Tasks / Calendar Options
Displaying Tasks on the Start Page
As the default, the main page of the groupware portal displays all the tasks that
are currently active for you or that will shortly be active. Current tasks are not
only displayed on the date they are due but also several days in advance to
make sure you do not miss them. As the default, current tasks are shown on the
portal page several days before their end date. You can use this option to make
sure these tasks are shown even earlier if you need.
Displaying Appointments on the Start Page
Much like the current tasks, the main page of the groupware also lists the
appointments that are soon to come due. As the default, the appointments are
displayed on the portal page one day in advance. You can set this option to
make sure that appointments are displayed on the main page of the groupware
portal several days in advance, as needed.
Day View Interval (min.)
This option allows you to set the time intervals used when displaying the
calendar module. The preset configuration is set to an interval of 30 minutes. In
some cases, individual users may find it helpful to choose a different value (15,
45 or 60 minutes).
© Copyright 2005-2006, OPEN-XCHANGE Inc.
- 204 -
Day View Start/End Time
This option lets you set the start and end times used in the calendar for the daily
chronological display. This is important because you do not normally have any
scheduled events during the night. The overnight hours shown in the calendar
would thus only serve as a distraction. The preset values of 7a.m. and 5p.m.
thus correspond to typical office hours. Depending on the office hours in your
company, you can also choose different values for this setting.
17.2.3. Email Notification
The groupware web interface provides various options to let you receive
notification when you get new emails. The normal notification is a blinking email
symbol on the web interface of the portal page. As an alternative, you can also
set this option so that a popup window opens to tell you of new messages. In
contrast to the first option, you should only use this setting if the volume of your
email communication is not too large. Otherwise, the constant popup
notifications may soon become irritating. The notification using the blinking email
symbol is more subdued in contrast, and it is often better for users who receive
a lot of email every day.
Figure 17-2: Groupware Options
17.3.
Password
Even though the Open-Xchange Server is an extremely secure communication
platform, no security system offers absolute protection. This is particularly true
since the groupware web interface is not an isolated system, but can instead by
used from external systems as well. To maintain your own protection, you
should change your password from time to time – about every four weeks is
suggested. You can change this setting under the "Password" tab. First, enter
your old password in the "Current password" line. Next come up with a new
OX 5 User Manual v1.32
- 205 -
Personal Setup
password and enter this twice into the two fields below the old password. For the
encryption mechanism, you can choose between SHA and MD5. Make sure to
choose a password that is hard to guess. Birthdays, personal names or movie
titles are poor choices. The ideal password contains special characters, is at least
eight characters long and cannot be guessed by people you know based on your
personal biography. Do not use birthdays, names or the title of your favorite
film. Once you have created a new password, save your changes by clicking on
the "Save" button.
Figure 17-3: Changing the Password
17.4.
Mail Filter
Mail Filters enable you to use scripts to analyze and process incoming emails.
You can use the post processor for the latter task, for instance, by automatically
sending emails from a particular sender or with specific contents directly to a
predefined folder. The mail filters are then saved for each user in Open-Xchange
in a unique script file. To create mail filters for your user account or to edit
existing mail filters, go to the "Mail Filter" tab in the setup.
© Copyright 2005-2006, OPEN-XCHANGE Inc.
- 206 -
Figure 17-4: Overview of All Existing Script Mail Filters
17.4.1. Creating and Editing Mail Filters
When you first open the "Mail filters" tab, there is no filter script available. This
has to be created by you first. To do this, click on the "Add New Rule" link on the
overview page. If a filter script has already been created, then the procedure is
identical; however, all established mail filters will be displayed in the overview. If
you would like to delete an existing mail filter, then click on the symbol to right
of the corresponding rule. If you would like to edit an existing rule, then click
on the symbol next to the corresponding rule. The dialog for editing a mail filter
corresponds to the dialog for the creation of a new mail filter; however, all
established conditions and actions of this rule will be automatically displayed.
Figure 17-5: Creating a Filter Script
In the window that opens, you now have the possibility of setting a new mail
filter. To do this, proceed as follows:
OX 5 User Manual v1.32
- 207 -
Personal Setup
Figure 17-6: Creating Mail Filters
Execute action if
Under "Execute action if", first set when the mail filter is to be implemented. Via
the list field you can choose between two different options: the simpler option is
the setting "Some condition met". If you have selected the default setting "Some
condition met", then one of the following adjustable conditions must be fulfilled.
As an alternative to that, you can select the "Meets all conditions" option via the
list field. In this case, all the following conditions must be fulfilled in order for the
action to be carried out. In the case that you want to simply set one condition,
then it does not matter which of the two options you have selected.
Configuring Conditions
Using the "If" list field and the input fields next to it, you can create a condition
that must be fulfilled in order for the action assigned to the mail filter to be
carried out. Using the "If" field you can first establish an e-mail element for
which a certain condition must be examined. The following e-mail elements can
be used:
From
Recipient
Cc
Bcc
Subject
Date
Reply to
Return path
Sender
Received
© Copyright 2005-2006, OPEN-XCHANGE Inc.
- 208 -
You can, via corresponding choices, filter e-mails based on their sender, subject
line or date, for example. Besides that, you can choose among condition variants
to be utilized for the filtering. The following operations are thereby available:
contains
contains (Regexp)
equals
not equals
contains not
contains not (Regexp)
Contains
If you choose the "contains" relational operator using the list field, then incoming
e-mail messages will be examined by the filter script to determine if the text
entered under "If" is contained in the e-mail. Example: You selected the
"Subject" e-mail element under "If" and entered "OX5" as a text operator. The
filter script will examine the subject lines of all incoming e-mail messages to
determine whether the text contains "OX5".
Contains (Regexp)
The "Contains (Regexp)" operator corresponds to the "Contains" conditional
operator. E-mails will also be examined here to determine if the selected e-mail
element contains the value entered in the text field. Continuing, this conditional
operator also allows the use of regular expressions in the text field, so that
complex conditional requests are possible.
Equals
If you have selected the "Equals" list field, then the filter script will determine if
there is an exact match. The conditional operator can also be used, for example,
with all incoming e-mails to check if the sender's e-mail address matches a
certain pre-set address.
Not equals
This conditional operator is similar to the "Equals" operator; however, the
desired option will only be performed if the given text for the selected e-mail
element does not agree with the corresponding content of the element in an
incoming e-mail. This is practical when there is a mail filter with multiple
conditions for which all e-mails from a certain sender are to be moved to a
certain folder, and at the same time all e-mail messages from the sender that
have a certain CC address must be placed into another mail folder.
OX 5 User Manual v1.32
- 209 -
Personal Setup
Contains not
When using this conditional operator, the defined mail filter action will only be
carried out when the given text for the selected e-mail element is not contained
in an incoming e-mail message. You can use this conditional operator to sort email messages based on their subject or content, for example. As a counterpart
to the "Contains" operator, the configuration of mail filters in individual cases
can be made much easier.
Contains not (Regexp)
This conditional operator functions exactly like "Contains not"; however, you can
also use regular phrases in the text field when you select this conditional
operator.
Configuring Additional Conditions
As mentioned before, a mail filter can be used to examine incoming messages
for the fulfillment of a certain condition. In practice, you will often desire in many
cases to have an action carried out if multiple conditions are fulfilled. After
entering the first condition, you must add additional conditions when creating a
mail filter. To do this, click on the "New Condition" button. An additional
condition that you can configure as you wish will now be added to the web
interface. Please note that all conditions are by default connected with an "OR"
operator. The action to be configured will only be carried out if one of the given
conditions is fulfilled. You can optionally set the "Perform action when" list field
so that the individual conditions are linked by "AND". In this case, all conditions
must be fulfilled in order for the action to be carried out on an incoming e-mail
message. A combination of "AND" and "OR" operators is not possible.
Defining Actions
Finally, you must specify what is to happen to incoming e-mail messages that
meet the condition or conditions defined. The mail filter configuration menu
provides the following options:
Move mail to folder
Forward to
Return message because
Discard message
If you choose the "Move mail to folder" option, then all incoming e-mail
messages that fulfill the condition described before will automatically be moved
to another folder. You can freely select a corresponding folder via the folder list
field. The automatic transfer of messages is suited for the assurance of a better
© Copyright 2005-2006, OPEN-XCHANGE Inc.
- 210 -
overview of your mailbox. As an alternative to that, you can select the "Forward
to" action. Incoming e-mail messages that fulfill the given conditions will then be
automatically forwarded to the given e-mail addresses. Optionally, you can
reject incoming e-mail messages with a freely defined reason. If you have
selected the "Discard message" option, then all incoming e-mail messages that
contain the selected conditions will be directly thrown away when they enter the
server. Thus, these e-mail messages will not appear in your mailbox. If you
have defined the conditions and actions for the current mail filter that you
desire, then you only have to save them. To do that, click on the "Complete"
button.
17.4.2. Editing and Deleting the Filter Script
Mail filters are set for every user in an individually designed script. If you have
already created a filter script, then this will be displayed under the "Mail filters"
tab. Using the corresponding buttons, you can "Edit" or "Delete" the script. Using
the "Activate" list field, you can turn the filter script on and off. Click on the
button and you will get an overview of all mail filters that have already been
created in the filter script.
Figure 17-7: Filter Script - Overview
17.5.
Vacation Notice
If you are ever on vacation for a long time, then it can be sensible to answer
questions using an automatic e-mail message in which you indicate that you are
not currently available and who the corresponding, available contact person. Go
to the "Vacation Notice" tab in the Setup area and configure an appropriate
vacation notice.
OX 5 User Manual v1.32
- 211 -
Personal Setup
17.5.1. Absence Note
Activate this checkbox and the absence notes will automatically be sent. As soon
as you have saved a vacation notice with the activation checkbox marked,
incoming e-mails will be answered automatically. If you would only like to save a
vacation notice template that can be used if necessary, then deactivate the
checkbox before saving.
17.5.2. Subject
Enter the subject line that is to be used for automatic vacation notices into this
field. You can optionally leave the field empty. In this case, the original subject
of an incoming e-mail message will be used for the vacation notice generated
automatically.
17.5.3. Text
Enter the content of your vacation notice into the text field. The text can be
chosen freely.
17.5.4. Repetition Interval
Via the repetition interval, you can set the earliest time at which a new vacation
notice is sent to the sender of an incoming e-mail message. This is sensible in
order to avoid annoying the composer of incoming e-mails because of countless
repeating vacation notices.
17.5.5. E-mail Addresses
Under E-mail addresses, you can select which e-mail addresses on the OpenXchange server are to receive a vacation notice. Selected e-mail addresses are
highlighted in blue.
17.5.6. Forwarding
In addition to sending automatic vacation notices, you can also have incoming email messages forwarded. For example, you can have them sent to your private
e-mail address where you can be reached during this time. If you wish, you can
activate the "Don't create extra local copies" checkbox. In this case, no copies of
forwarded e-mails will remain on the Open-Xchange server.
© Copyright 2005-2006, OPEN-XCHANGE Inc.
- 212 -
Figure 17-8: Vacation Notice
17.6.
Mail Folders
Within a workgroup it can be sensible to make e-mail messages in your inbox
available to other coworkers and colleagues. You can configure this release by
using the "Mail Folders" tab in the Setup area. Using the "Mail Folder" list field,
select the folders from which you would like to release messages. After that, you
can search for and select individual users to whom you would like to assign
access to the selected folders. To do that, mark the corresponding groups or
users with the mouse so that they appear highlighted in blue. Using the list field
at the side, you can now set which rights each user or user group is to be
allowed. The following rights are available to you:
Read
Post
Append
Write
All Rights
If you have assigned the desired right to another user, then you have to save it.
To do this, click on the "Set permission" button. All users that are assigned
rights for the mail folder being displayed will be displayed below and at the side.
OX 5 User Manual v1.32
- 213 -
Personal Setup
Figure 17-9: Releasing Mail Folders
17.7.
Spam
Open-Xchange Server is by default able to recognize incoming e-mail messages
as spam mail. The effectiveness of this recognition depends on the
administrator's configuration of the Spam-Assassin. E-mail messages that are
recognized as spam will automatically be marked as spam in their header and
subject lines. In the "Spam" tab in the Setup area, you can set how e-mails
marked in this way are to be treated. There are three different options, among
which you can choose by using the corresponding option fields. The typical
solution is the automatic transfer of e-mails recognized as spam into the Spam
Mail Folder (INBOX/Spam). Another possibility is the selection of the "Nothing"
option. In this case, the header and the subject line of an incoming message
recognized by the server as spam will still be denoted as spam, but will still be
taken in by the post inbox folder. The third possibility ensures that incoming email messages that are recognized by the server as spam will automatically be
deleted.
© Copyright 2005-2006, OPEN-XCHANGE Inc.
- 214 -
Figure 17-10: Activating Spam Protection
OX 5 User Manual v1.32
- 215 -
Personal Setup
Index
1:1 linking .............................. 33
1:n linking .............................. 33
Access Control List ..................194
access rights ................ 24, 29, 32
account................................... 33
ACL configuration ....................193
Activate link mode ..................122
address book ......16, 178, 184, 190
addresses .......................... 33, 37
administration ................ 137, 142
administrator.... 11, 13, 15, 16, 18,
24, 32, 33, 204
Apache ................................... 13
apointment
date ................................... 67
application server..................... 15
appoinment
free .................................... 61
appointment
absent on business............... 61
attachment ......................... 59
availability .......................... 65
booked ............................... 53
categories ........................... 61
confirmed............................ 55
conflict check....................... 68
coordination ........................ 11
create new ............... 48, 49, 59
date ................................... 61
day view ............................. 59
delete ................................. 54
description ............... 48, 55, 60
detail view .......................... 54
edit .................................... 54
folder ................................. 60
history ................................ 56
linking ................................ 59
month view ......................... 59
notes .................................. 57
notification ................... 60, 170
participants .................... 55, 62
personal.............................. 60
prihnt ................................. 49
query ................................. 66
recurrent............................. 55
refuse................................. 55
refused .......................... 55, 60
repitition ............................. 63
reserved ............................. 61
resources ............................ 62
sequence ....................... 63, 64
status ................................. 55
temporary ........................... 61
type .............................. 49, 61
week view ........................... 59
appointments ... 40, 41, 42, 43, 46,
47, 48, 49, 50, 52, 53, 59, 60,
61, 63, 64, 66, 68, 107, 122
monthly .............................. 64
new.................................... 42
weekly ................................ 64
yearly ................................. 64
attachment..59, 83, 167, 168, 169,
170, 183, 184, 188
delete ................................. 59
authentication.......................... 13
authorization ........................... 24
availability............................... 65
availability check ...................... 65
BCC ............................... 177, 178
bidirectional............................. 35
birthdays................................. 71
blind carbon copy ................... 177
bookmakrs
linking............................... 136
move ................................ 145
bookmarks ..22, 23, 24, 25, 37, 42,
136, 137, 138, 139, 141, 144,
145, 147, 148
create new ................. 136, 141
delete ........................ 136, 144
description ........................ 143
detailed view ..................... 141
directory ........................... 136
edit ........................... 136, 143
entry ................................ 137
folder................................ 136
history .............................. 148
linking............................... 148
move ......................... 136, 146
notes ......................... 136, 147
overview ........................... 137
permissions ................ 142, 145
private .............................. 142
search............................... 136
subdirectory ...................... 145
title .................................. 142
URL .................................. 142
browser........................ 15, 22, 49
business................8, 9, 10, 11, 14
cache...................................... 15
calendar 21, 23, 29, 33, 37, 43, 46,
52, 53, 54, 59, 60, 61, 62, 64,
65, 67, 190, 191
day view ........................46, 47
detail view........................... 47
entry .................................. 33
linking................................. 59
month view ....................46, 50
navigation ........................... 46
print ................................... 47
query.................................. 66
team view ........................... 52
views .................................. 46
week view ......................46, 48
carbon copy.................... 166, 177
categories ..........................12, 61
category
notify participants ................ 61
remarks .............................. 61
reminder ............................. 61
cc 171
© Copyright 2005-2006, OPEN-XCHANGE Inc.
- 216 -
CC166, 175, 177, 178
collaboration .................... 8, 9, 11
communication......................... 13
communication structures............8
company addresses ............ 21, 70
company hierarchy ................... 10
company structure.................... 14
conflict check ........................... 68
contact
folder .................................. 73
contact management ................ 70
contacts 21, 29, 37, 38, 39, 42, 70,
71, 72, 73, 75, 77, 79, 81, 83,
107, 122, 191
all fields ........................ 77, 78
attached .............................. 79
attachment .......................... 83
birthday .............................. 71
categories...................... 70, 77
create new..................... 70, 75
delete ........................... 70, 81
dynamic fields ...................... 77
edit............................... 70, 80
export ................................. 70
images ................................ 80
layout ................................. 71
linking ........................... 70, 83
notes ............................ 70, 81
permissions ......................... 80
print ................................... 71
quick view ........................... 77
search ........................... 70, 72
costs ....................................... 14
CRM..........................................9
currency .................................. 89
Current ................................... 17
Customer Relationship
Management ..........................9
Cyrus (IMAP) ........................... 12
data source.............................. 63
date format ............................. 18
delete ..................................... 24
delete right .............................. 24
directory structure .................... 21
discussion...22, 149, 150, 153, 154
Distribution List ........................ 79
distributions............................. 12
document ............... 21, 29, 34, 35
directory............................ 106
folder ................................ 106
document management............. 11
document system ................... 136
documents.... 9, 10, 11, 17, 21, 23,
24, 25, 32, 33, 34, 37, 42, 103,
105, 106, 107, 108, 110, 113,
116, 118, 121, 122
delete ............................... 106
directory............................ 107
download.................... 106, 114
edit................................... 106
file size ............................. 112
linking ....................... 106, 122
locked................................115
Mime type ..........................112
move.................................106
notes ......................... 106, 121
search ....................... 106, 107
title ...................................114
upload ....................... 106, 112
versions .............................106
write protection ..................115
Dokumente
Beschreibung......................112
herunterladen .....................114
Historie...................... 106, 122
hochladen .................. 111, 115
löschen ..............................116
Notizen ..............................121
öffnen................................114
sperren ..............................115
suchen...............................120
Upload ...............................111
verschieben......... 117, 118, 119
Version ...................... 116, 122
Dokumentordner
bearbeiten..........................109
löschen ..............................110
Dynamic fields ......................... 78
Dynamic Fields ........................ 77
email .... 22, 38, 79, 160, 162, 163,
164, 165, 166, 167, 168, 169,
170, 171, 172, 173, 174, 175,
176, 177, 178, 179, 180, 181,
182, 183, 184, 185, 186, 187,
188, 189, 190
account..............................163
address book ......................160
answer ..............................160
answered ...........................173
attachment ................ 167, 184
CC 175
character set ......................182
configuration ......................160
confirm ..............................176
contacts .............................. 79
content ..............................175
date ..................................176
delete .......... 160, 169, 172, 186
detail view .........................169
drafts ................................163
export ...............................173
folder ................. 165, 186, 189
font ...................................180
font color ...........................181
format ...............................179
forward............... 160, 171, 187
from .......................... 166, 175
header....................... 173, 188
HTML.................................179
hyperlink............................182
ID 175
inbox .................................163
layout ................................186
login..................................160
OX 5 User Manual v1.32
logout ............................... 160
mail text ........................... 166
mailing lists ....................... 184
mark as ............................ 168
move ......................... 160, 186
open ................................. 168
options....................... 162, 173
overview .................... 160, 166
presets ............................. 186
preview ............................. 188
print ................................. 172
priority.............................. 183
quotation .......................... 187
read .......................... 169, 173
received ............................ 174
reply................................. 171
reply all............................. 171
reply to ............................. 175
retrieve ............................. 162
return path ........................ 174
sender domain ................... 183
sent mail ........................... 164
settings............................. 160
signature........................... 186
source text ........................ 182
spam ................................ 164
spell checker...................... 182
subject....................... 166, 175
to 175
trash................................. 164
tree view ........................... 168
unanswered ....................... 173
unread .............................. 173
vCard................................ 183
write................... 160, 162, 176
email address .......................... 38
email addresses ................ 39, 171
email folder ........................... 164
email messages ....................... 22
incoming ........................22, 41
emails..................................... 38
emoticons ...................... 152, 188
encryption ............................... 13
error message ....................... 139
Exchange ................................ 14
favorite list .............................. 22
folder...... 23, 25, 27, 29, 106, 107,
108, 109, 110, 111, 116, 118,
119, 123, 124, 125, 126, 127,
128, 131, 132, 136, 137, 138,
139, 140, 141, 145, 191, 192,
193, 194, 195
change.............................. 139
create ............................... 192
create new ........................ 139
delete ..........139, 140, 141, 195
delete rights ...................... 194
directory ........................... 139
edit .................................. 195
internal users..................... 192
move ................................ 195
name ................................ 139
open ................................. 192
- 217 -
permissions ..................11, 193
private ....................... 191, 193
public ................................ 191
share ................................ 193
shared............................... 191
system .............................. 191
type .................................. 193
unbound ............................ 192
folder management................... 45
folder system ........................... 29
folder_administration .............. 107
forum.. 22, 42, 149, 150, 151, 152,
153, 154, 155
archive .............................. 153
articles ....................... 151, 153
create ............................... 150
delete ............................... 153
emoticons.......................... 152
format........................ 151, 152
images .............................. 152
linking ............................... 154
moderator ......................... 149
permissions ....................... 150
print ................................. 149
scripting ............................ 151
subscription ....................... 154
web link ............................ 151
functionality 10, 11, 14, 15, 16, 17,
18
global address book ................ 192
global search 20, 36, 37, 44, 72, 74
group ................ 25, 26, 28, 31, 35
members ............................. 26
name .................................. 25
group appointment ........ 59, 60, 62
groups ................... 24, 25, 26, 28
groupware 8, 9, 10, 11, 12, 13, 14,
15, 16, 17, 18
handbook ................................ 43
handbook frame ....................... 72
HTML ....... 179, 180, 181, 182, 187
HTML editor ..... 179, 180, 181, 182
image
upload................................. 80
IMAP ...................... 12, 13, 15, 16
inbox .................................... 163
infrastructure ........................... 13
integration ......................... 13, 15
Internet Explorer ............. 179, 182
Internet ExplorerTM 49, 71, 138, 149
intranet ............. 20, 22, 24, 33, 39
IT infrastructure .........................9
Java........................................ 15
JavaScript................................ 15
JPEG ....................................... 80
knowledge ......... 21, 23, 24, 25, 37
database ........................... 123
delete ........................ 123, 130
description......................... 129
directory............................ 123
edit................................... 123
entry...................123, 128, 129
folder ......................... 123, 126
Personal Setup
history ....................... 123, 135
linking ....................... 123, 134
move........... 123, 130, 131, 132
notes ......................... 123, 134
permissions ........................124
print ..................................125
search ...............................123
title ...................................129
Knowledge .............................123
LDAP ...................... 13, 15, 16, 18
directories ........................... 16
license .................................... 14
linking ......................... 12, 17, 33
linking mode ........................... 35
linking repository ................ 33, 35
links
delete ................................. 36
localization .............................204
login..................20, 160, 161, 163
logout.............................. 20, 162
mail administrator .................... 33
Mail container .......................... 39
mail editor .............................. 39
mail filters..............................206
Mailordner..............................214
maintenance ...................... 11, 12
MD5 ......................................206
migration ................................ 13
milestones ..................95, 97, 103
MIME .....................................175
mime type .............................. 59
Mime type ........... 83, 93, 105, 113
MIME type...................... 112, 113
modules.................. 12, 14, 16, 17
Mozilla ............................. 15, 179
MS Outlook ExpressTM ............... 39
MS OutlookTM ........................... 13
multiple links ........................... 34
create................................. 34
multiple selections ................... 26
navigation bar ......................... 24
Netscape.......................... 15, 179
note ....................................... 23
edit .................................... 23
notes........... 20, 22, 31, 32, 57, 81
add .................................... 31
history ................................ 81
notification ..................... 203, 205
object
create new ..................... 23, 24
delete ................................. 23
detailed view ....................... 31
edit ............................... 23, 24
history ................................ 27
linking ................................ 33
move.................................. 23
notes .................................. 31
owner ................................. 27
participants ......................... 28
permissions .................... 27, 62
print ................................... 23
rights ................................. 62
objects.. 20, 23, 24, 25, 29, 32, 33,
34, 35, 36, 191, 193, 194, 195
Open-Xchange Server . 8, 9, 10, 11,
12, 13, 14, 15, 16, 17, 18
Opera ..................................... 15
Outlook ................................. 190
OutlookTM ......................... 39, 191
OX Shared Address Book......... 192
Palm ..................................... 190
participant .................... 27, 28, 29
remove ............................... 27
participants .28, 47, 53, 55, 60, 61,
62, 65, 66
password ....................... 203, 205
PDA ........................................ 13
PDF ........................................ 35
permission management ........... 22
permission system...................... 9
permissions .24, 25, 26, 29, 32, 54,
62, 80, 90, 92, 93, 94, 106,
108, 109, 111, 112, 114, 115,
121, 136, 138, 139, 142, 143,
191, 193, 195
personal information ................. 18
pertinent tasks......................... 21
pin board 12, 22, 24, 25, 156, 157,
158
create entry....................... 157
delete entry ....................... 159
edit entry .......................... 157
overview ........................... 157
print ................................. 158
placeholder.............................. 37
POP3 ...................................... 12
portal...........21, 22, 25, 33, 37, 39
portal page ........ 21, 40, 41, 42, 44
Postfix .................................... 12
PostgreSQL.............................. 15
print ................... 23, 47, 138, 158
printer .................................... 23
priority.................................... 87
private contacts ....................... 21
private folder ........................... 25
private sphere.......................... 14
project
tasks .................................. 85
project management................. 11
projects 21, 33, 37, 40, 41, 42, 95,
96, 97, 100, 101, 102, 103, 105
archive................... 95, 96, 102
attachment ........................ 105
costs................................... 97
create ................................. 98
create new .......................... 95
delete .......................... 95, 102
detail view........................... 96
edit ............................. 95, 101
history .............................. 105
linking................................. 95
links ................................. 103
milestones ......................... 103
notes ........................... 95, 103
print ................................... 98
© Copyright 2005-2006, OPEN-XCHANGE Inc.
- 218 -
search ................................. 95
tasks.................... 95, 101, 103
public calendar ......................... 62
public folder....................... 25, 62
read access............................. 29
read access........................ 24, 25
read permissions ........... 24, 25, 62
Red Hat Enterprise Linux ........... 12
requirements ............ 9, 11, 15, 16
resource management......... 10, 11
resources ... 46, 52, 55, 60, 61, 62,
65, 66, 68
booked ................................ 55
results.......................... 24, 37, 38
rights management............. 24, 27
scripting language .................. 151
search...24, 25, 27, 37, 38, 44, 70,
71, 72, 73, 79, 80
query .................................. 37
results................................. 37
search function......................... 27
security ................................... 12
sender address....................... 187
settings ................................. 203
setup .................................... 203
SHA ...................................... 206
side frame ............................... 25
signature ........... 18, 183, 186, 190
signatures ...............183, 189, 190
SMTP ...................................... 12
sort ........................................ 38
Spam .................................... 215
spell checker .... 182, 184, 185, 188
SSL......................................... 13
subcategories........................... 12
subfolder ........... 11, 124, 137, 193
SUSE LINUX Enterprise Server 9 12
synchronization ........................ 13
system folder ......................... 192
tasks.....11, 21, 29, 32, 33, 37, 40,
41, 42, 43, 44, 45, 84, 85, 86,
89, 90, 91, 93, 107, 122, 191,
193, 204
active.................................. 85
assignment .......................... 88
attachment .......................... 93
categories............................ 88
cost .................................... 89
create new........................... 84
currency .............................. 89
daily ................................... 90
date .................................... 87
delegate .............................. 21
delegated ...................... 85, 92
delete ........................... 84, 93
description........................... 87
duration .............................. 89
edit............................... 84, 92
forward ............................... 84
global.................................. 85
history ................................ 93
linking ........................... 84, 93
monthly............................... 90
notes ............................. 84, 93
notification .........................170
participants .................... 88, 90
permissions ......................... 90
priority ............................... 87
reminder ............................. 88
sequence ............................ 90
sequency ............................ 91
status ................................. 88
subject ............................... 87
types .................................. 84
weekly ................................ 90
yearly ................................. 91
template ...................... 24, 25, 29
description .......................... 25
save ................................... 25
title .................................... 25
templates..................... 24, 25, 29
OX 5 User Manual v1.32
threads .....................22, 149, 150
time zone ................................ 53
URL ...................................... 142
Urlaubsnotiz .......................... 213
user 20, 24, 25, 26, 27, 29, 32, 33,
52, 191, 193, 194, 195
first name ........................... 27
last name ............................ 27
remove ............................... 26
UTF-8 ..................................... 18
vCard ............................ 183, 188
Verteiltes Arbeiten.................. 115
web links............................... 141
web mail ............................22, 39
account ............................... 22
Web Mail ... 16, 160, 161, 162, 164,
165, 166, 167, 168, 169, 170,
- 219 -
172, 175, 176, 181, 182, 183,
184, 186, 188, 189
WebDAV ................................ 196
weekdays ................................ 64
weekly repetition ...................... 64
wildcards ................ 25, 27, 37, 72
Windows 2000 ......................... 13
Windows 98 ............................. 13
Windows NT............................. 13
Windows XP ............................. 13
workflow ................................. 10
workgroups........................ 10, 14
write access ....... 24, 25, 27, 29, 62
write permissions .......... 24, 25, 62
X-Mailer ................................ 175
Zielordner.............................. 118
Personal Setup
Software License Agreement
BY CLICKING THE BUTTON “I ACCEPT” OR ENTERING “YES” WHEN ASKED TO ACCEPT THIS AGREEMENT, YOU ARE AGREEING
ON YOUR OWN BEHALF AND ON BEHALF OF THE ENTITY THAT YOU ARE ACTING FOR (COLLECTIVELY “LICENSEE”) THAT
LICENSEE WILL BE BOUND BY AND IS MADE A PARTY TO THIS AGREEMENT. IF LICENSEE DOES NOT AGREE TO ALL OF THE
TERMS OF THIS AGREEMENT, DO NOT CLICK THE “I ACCEPT” BUTTON OR ENTER “YES” WHEN ASKED TO ACCEPT THIS
AGREEMENT AND DO NOT USE THE LICENSED PRODUCT. LICENSEE WILL NOT BE MADE A PARTY TO THIS AGREEMENT AND
WILL NOT BE AUTHORIZED TO USE THE LICENSED PRODUCT UNLESS AND UNTIL LICENSEE HAS AGREED TO BE BOUND BY
THESE TERMS. YOU MAY CONTACT US BY VISITING THE WEB SITE www.open-xchange.com.
This agreement entered into by and between Open-Xchange Inc., (“Licensor”), a Delaware corporation having its principal
offices at 303 South Broadway, Tarrytown, New York 10951, USA and the Licensee determines the rights and licenses granted
to Licensee in the Licensed Product (hereinafter defined) supplied by the Licensor.
1. Definitions. As used in this Agreement, the following definitions apply:
a. “Licensed Product” means collectively the Licensed Software and the Licensed Documentation.
b. ”Licensed Software” means the Licensor’s proprietary software which is delivered in the form of executable code, scripts
and configuration files as an add-on to the Open-Xchange Server as licensed under this Agreement. In particular the
Licensed Software includes, but is not limited to, the Microsoft Outlook™ connector (called the Outlook OXtender),
Palm™ connector (called the Palm OXtender), Administration interface software, migration tools, and/or installation
tools.
c. “Licensed Documentation” means all the documentation, in printed or electronic form, that is related to the Licensed
Software.
d. “Use”, with regard to the Licensed Software, means Licensee may install, use, access, run, or otherwise read the
Licensed Software into and out of memory in accordance with the documentation and the license grant from Licensor.
With regard to the Licensed Documentation, “Use” means Licensee may read, use, reproduce and otherwise employ the
Licensed Documentation as needed to make use of the Licensed Software.
e. “Effective Date” means the date of acceptance of this agreement by Licensee by clicking the “I accept” button or
entering “Yes” when asked to accept this License Agreement.
f. “Remote Access” means direct connection to the systems wherein the Software resides via the Internet, via high-speed,
point-to-point network access between Licensee and Licensor.
g. “Named User” means each person who is administered by the Administration Interface Software and is given a user
name and password by Licensee.
2. License grant.
a. Subject to the payment of the license fees and charges to Licensor, Licensor grants to Licensee a limited, nonexclusive, non-transferable license to Use the Licensed Product during the Agreement’s term. Licensee agrees that it
has no right, power or authority to make any modifications to, or unauthorized copies of, the Licensed Product.
Licensee must acquire one license for each “Named User” who Uses the Licensed Product.
b. Licensee may make one copy (in machine-readable form only) of the Licensed Software solely for backup or disaster
recovery purposes. Licensee must reproduce the copy without modification, including all copyright and other proprietary
notices that are on the original copy. The Licensed Documentation may be reproduced in print and electronic forms for
use by the Licensee. Licensee may not modify the Licensed Documentation or distribute it to third parties in any form.
3. Delivery.
a. The Licensed Product shall be delivered via Licensor’s website or Licensor’s download service provider, and any
applicable or required serial number(s) to activate the Licensed Software will be delivered via email as soon as
practicable after the Effective Date. All Licensed Software delivered via download shall be deemed accepted upon
delivery of the serial number(s).
b. If requested in writing by Licensee, Licensor shall deliver the Licensed Product via email to an email address that
Licensee shall provide to Licensor. The Licensor shall email to Licensee a compressed file containing the Licensed
Products in a common compression format or as a self-extracting executable in addition to any applicable serial
number(s). Licensor and Licensee both warrant that their respective email servers can process, receive and store files
or the type and memory size of the attached file. Licensor shall deliver the Licensed Product via email within three (3)
days after Licensee provides the email address. Licensee shall provide the email address within three (3) days after the
Effective Date. Licensee shall inform Licensor within ten (10) days after delivery if Licensee is unable to properly
extract, decompress and install the Licensed Product from the file. Licensor shall take steps after such notification to
either attempt another email delivery or to provide for physical delivery of the Licensed Product to Licensee.
4. Support services and updates.
a. Licensor shall provide Licensee with all corrections, revisions, patches, service packs, updates and subsequent releases
of the Licensed Product made available by Licensor for the period of one (1) year from date of purchase.
5. License fees, charges and taxes.
a. Licensee shall pay Licensor’s license fees and charges for the Licensed Product in effect at the time of Licensee’s
acceptance of the Agreement.
© Copyright 2005-2006, OPEN-XCHANGE Inc.
- 220 -
b.
c.
The license fees and charges, taxes and other applicable charges are due and payable within ten (10) days after
Licensee’s receipt of the applicable invoice unless such fees have already been paid on-line through the Licensor’s web
site or the Licensor’s designated e-commerce service provider. Licensee shall pay a late payment charge of 1.5 percent
per month, or the maximum rate permitted by applicable law, whichever is less, per whole or partial calendar month on
the unpaid amount.
If permitted under applicable law Licensee shall pay all taxes based on or in any way measured by this Agreement or
any related services (e.g. sales taxes, value added taxes), excluding taxes based on Licensor’s net income, but
including personal property taxes, if any. If Licensee challenges the applicability of any such tax, it shall pay the same
to Licensor and Licensee may then seek a refund.
6. Term.
a. The term shall commence on the Agreement’s Effective Date and shall continue in perpetuity.
7. Prohibited Uses. Licensee shall not:
a. Allow other persons than Named Users the use of and access to the Licensed Product.
b. Modify, translate, reverse engineer, decompile, disassemble, reduce the Licensed Software to a humanly perceivable
form, or create derivative works based upon the Licensed Product, or cause another to do so, except to the extent
expressly permitted by applicable law despite this limitation;
c. Remove any proprietary notices, labels, copyright marks, or trademarks on the Licensed Product;
d. Modify, adapt, rent, lease, commercially host, sublicense, redistribute, or loan the Licensed Product.
8. Warranty.
a. Licensor warrants that for one year from the date of purchase of the Licensed Product:
i.
ii.
b.
c.
d.
e.
Under normal Use and service, the media on which the Licensed Software is delivered shall be free
from defects in material and workmanship, and
The Licensed Product will meet Licensor’s published specifications for the Licensed Software that
were current at time of purchase.
If the Licensed Product fails to meet the media warranty of Paragraph 9(a)(1) and Licensee gives Licensor written
notice thereof during the applicable warranty period, Licensor shall replace such media. If the Licensed Product fails to
meet the warranty of Paragraph 9(a)(2) and Licensee gives Licensor written notice thereof during the applicable
warranty period, Licensor’s sole obligation shall be to provide technical services via email or phone or through Remote
Access to attempt to correct the failure, provided that Licensee gives Licensor detailed information regarding the failure
and Licensor is able to duplicate or view the same. Licensee acknowledges that the Licensed Product is complex, may
not be error free, and that all errors, if any, may not be correctable or avoidable.
EXCEPT AND TO THE EXTENT EXPRESSLY PROVIDED IN PARAGRAPH 8 AND IN LIEU OF ALL OTHER WARRANTIES,
THERE ARE NO WARRANTIES, EXPRESS OR IMPLIED, INCLUDING, BUT NOT LIMITED TO, ANY WARRANTIES OF
MERCHANTABILITY, INFORMATIONAL CONTENT, FITNESS FOR A PARTICULAR PURPOSE OR SYSTEM INTEGRATION, OR
NON-INFRINGEMENT OR THIRD PARTY RIGHTS RELATING TO THE LICENSED PRODUCT. Some jurisdictions do not
permit the exclusion of implied warranties or limitations on applicable statutory rights of the consumer, and, as such,
some portion of the above limitation may not apply to Licensee. In such jurisdictions, Licensor’s liability is limited to the
greatest extent permitted by law.
Licensee shall be solely responsible for the selection, use, efficiency, and suitability of the Licensed Product and Licensor
shall have no liability therefore.
The warranty provisions of this Paragraph 8 do not apply if the Licensed Product has been subject to modification by a
party other than Licensor or in a manner not in accordance with Licensor’s instruction, has not been installed, operated,
repaired, or maintained in accordance with instructions supplied by Licensor, is subject to accident or abuse, or is used
in ultra hazardous activities.
9. Negation of proprietary rights indemnity.
a. THERE IS NO WARRANTY AGAINST INTERFERENCE WITH LICENSEE´S QUIET ENJOYMENT OF THE LICENSED PRODUCT
OR AGAINST INFRINGEMENT, AND LICENSOR HAS NO LIABILITY TO LICENSEE FOR THE INFRINGEMENT OF
PROPRIETARY RIGHTS BY THE LICENSED PRODUCT OR ANY PORTION THEREOF.
10. Limitation of liability.
a. IN NO EVENT SHALL LICENSOR BE LIABLE TO LICENSEE FOR ANY INDIRECT, SPECIAL, INCIDENTAL, OR
CONSEQUENTIAL DAMAGES OF ANY KIND, REGARDLESS OF THE FORM OF THE ACTION, ARISING OUT OF OR RELATED
TO THIS LICENSE AGREEMENT OR THE PERFORMANCE OR BREACH THEREOF, EVEN IF LICENSOR HAS BEEN ADVISED
OF THE POSSIBILITY THEREOF. LICENSOR´S LIABILITY TO LICENSEE HEREUNDER, IF ANY, SHALL IN NO EVENT
EXCEED THE TOTAL OF THE LICENSE FEES PAID TO LICENSOR HEREUNDER BY LICENSEE. IN NO EVENT SHALL
LICENSOR BE LIABLE TO LICENSEE FOR ANY DAMAGES RESULTING FROM OR RELATED TO ANY FAILURE OF THE
LICENSE PRODUCT, INCLUDING, BUT NOT LIMITED TO, LOST DATA TIME, PROFITS, DELIVERY DELAY OR LICENSOR´S
PERFORMANCE OF SERVICES UNDER THIS LICENSE AGREEMENT. SOME JURISDICTIONS DO NOT ALLOW THE
LIMITATION OF LIABILITY FOR PERSONAL INJURY, OR OF INCIDENTAL OR CONSEQUENTIAL DAMAGES, SO THIS
LIMITATION MAY NOT APPLY TO LICENSEE. In such jurisdictions, Licensor’s liability is limited to the greatest extent
permitted by law.
11. Termination/Cancellation.
a. Licensor may terminate/cancel this Agreement if Licensee is in default of any other provision hereof and such default
has not been cured within thirty (30) days after Licensor gives Licensee written notice.
OX 5 User Manual v1.32
- 221 -
Personal Setup
b.
In the event of any termination/ cancellation, Licensor may require, as an exclusive remedy, that Licensee cease any
further use of the Licensed Product or any portion thereof and immediately destroy all copies of the Licensed Product
and erase the Licensed Software from any temporary RAM and permanent memory. Upon Licensor’s request, an
authorized representative of Licensee shall provide a written certification that warrants compliance with Paragraph
11(b).
12. General.
a. Any claim arising out of or related to this Agreement must be brought no later than one (1) year after it has accrued.
b. This Agreement is the sole agreement between the parties relating to the subject matter and supersedes all prior
understandings, writings, proposals, representations, or communications, written or oral, of either party. Only a writing
executed by the authorized representatives of both parties may amend this Agreement.
c. This Agreement and the licenses granted hereunder may not be transferred or assigned by Licensee without the prior
written consent of Licensor.
d. Should any part of this Agreement be held invalid or unenforceable, that portion will be construed consistent with
applicable law as nearly as possible to reflect the original intention of the parties and all other portions of this
Agreement will remain in full force and effect. In the event of any termination or cancellation of this Agreement,
provisions that are intended to continue and survive shall do so.
e. Failure of either party to enforce any provision of this Agreement will not be deemed a waiver of the provision or the
right to enforce that provision.
f. Licensee shall not export or re-export, or allow exporting or re-exporting of the Software or any copy, portion or direct
product of the foregoing, in violation of any export laws, restrictions, national security controls or regulations of the
United States or any other applicable foreign agency or authority. By accepting this Licensing Agreement, Licensee
represents and warrants that it is not located in, under control of, or a national or resident in a United States
embargoed country, or on the United States Treasury Department’s List of Specially Designated Nationals or the United
States Commerce Department’s Denied Person’s List or Entity List.
g. This Agreement shall be interpreted in accordance with the substantive law of the State of Delaware. The application of
the Uniform Law on the International Sale of Goods and the Uniform Law on the Formation of Contracts for the
International Sale of Goods - both dated July 17, 1973 – and of the UN agreement on the sale of goods of April 11,
1980 shall be excluded. In action arising out of or relating to this Agreement or the Licensed Product, both parties
consent to the nonexclusive jurisdiction of the federal and state courts located in the County of New Castle, Delaware.
The prevailing party of any dispute shall recover its reasonable attorneys’ fees and costs incurred in litigating,
arbitrating, or otherwise settling or resolving such dispute.
h. During the Agreement’s term, Licensee agrees to regularly back-up its data derived from the Use of the Licensed
Product onto a separate media. Licensee acknowledges that any failure to do so may significantly decrease its ability to
mitigate any harm or damage arising from any problem or error in the Licensed Products or the provision of services
under this Agreement.
i. NOTWITHSTANDING ANYTHING TO THE CONTRARY CONTAINED IN THIS AGREEMENT, IT IS SPECIFICALLY
ACKNOWLEDGED AND AGREED THAT NO REPRESENTATION, WARRANTY OR OTHER ASSURANCE IS MADE, DIRECTLY
OR INDIRECTLY, THAT (I) ALL OR ANY PORTION OF THE LICENSED PRODUCT COMPLIES WITH ANY FEDERAL, STATE
OR LOCAL LAWS, RULES, REGULATIONS, OR ORDINANCES, AS THE SAME MAY BE CHANGED FROM TIME TO TIME, OR
(II) LICENSEE´S USE OF THE LICENSED PRODUCT WILL RESULT IN LICENSEE´S COMPLIANCE WITH ANY FEDERAL,
STATE OR LOCAL LAWS, RULES, REGULATIONS, OR ORDINANCES, AS THE SAME MAY BE CHANGED FROM TIME TO
TIME.
j. Portions of the Licensed Products utilize or include third party software and other copyrighted material.
Acknowledgements, licensing terms and disclaimers for such material are contained in separate agreements and
Licensee’s use of such material is governed by the related agreements terms.
Third party licenses and packages can be found at www.open-xchange.com/en/legal . Java, JavaMail, Java Activation
Framework, JavaBeans and all their acronyms are trademarks of Sun Microsystems, Inc. The JavaMail library and the Java
Activation Framework library are Copyright (c) Sun Microsystems Inc. and distributed unmodified and according to grants in
their license; the licenses and the original files are included with the packages. The JDOM library is Copyright (C) 2000- 2004
by Jason Hunter & Brett McLaughlin. OPEN-XCHANGE is a trademark of OPEN-XCHANGE Inc., and all other brand and product
names are or may be trademarks of, and are used to identify products or services of, their respective owners. Please make
sure that third-party modules and libraries are used according to their respective licenses.
Tarrytown, New York, March 2006
© Copyright 2005-2006, OPEN-XCHANGE Inc.
- 222 -