1
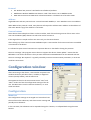
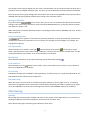
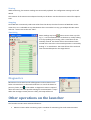
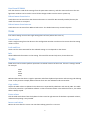
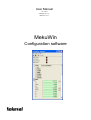
User Manual 18.11.2014 MekuWin V1.21.0MekuUI V1.21.0- MekuWin Configuration software Introduction MekuWin can be used to change the configuration settings in various Nokeval products. It loads the structure and the contents of the configuration menu from the target device, so the same MekuWin version can be used with past and forecoming products. There is no need to update this software every time a new product or product version is released. The software runs in Windows XP, Vista, 7, 8, and 10, both 32 and 64 bit editions. Installing The installation package can be obtained on Nokeval Software CD, or downloaded from www.nokeval.com with no charge. Run Setup.exe and go through the wizard. The default installation folder is C:\Program Files\Nokeval\MekuWin or Program Files (x86). Administrative privileges may be necessary. Connecting When MekuWin is started, the launcher window is shown. It is used to select the serial port, protocol, baud rate, serial bus address, and slot address. These have to match the device. Port There are three types of ports supported: FTDI USB ports. The devices are listed by their serial number. The USB serial number of nokeval devices is the device serial number prefixed with ”N”. E.g. Device A101605 appears as NA101605. COM ports. Mekuwin supports real and virtual COM ports up to COM255. Please note that the same device can often be accessed via both FTDI and COM ports. Offline. This can be used to examine a menu without connecting to a physical device. 2 Protocol SCL: Nokeval SCL protocol. Used with most of Nokeval products. ModbusRTU: Nokeval Modbus RTU devices. Used if the device is set to Modbus mode. SEM: Status Instruments SEM series in-head transmitters. The baud rate is forced to 1200. Address Legal addresses with SCL protocol are 0…123 and 126. With Modbus, 1…247. SEM does not use an address. When Nokeval SCL protocol is used, many devices will respond in address 126 in addition to the address of their own. Worth trying if the address is not known. Connect buttons Some devices have multiple card slots or other modules, each of them having a menu of their own. In this case use the Master/A/B/C buttons to select the card to connect to. If the target device is simple and has one menu only, use the Direct button. After clicking any of the connect buttons MekuWin opens a new window for the menu and tries to establish a connection to the device. It is allowed to open several connections to separate devices or slots before closing the previous. The error message ”This program version does not support this device. Please update.” means that this MekuWin is too old for this device. Then you must download a new MekuWin from the Nokeval web site. The error message “No response” is typically caused by incorrect communication parameters, or incorrect serial bus connections. Configuration window After connecting to the device, a new window is opened. The window contains a pull-down menu, a toolbar, a diagnostic section (initially hidden), and the menu tree. The uppermost level in the tree contains items ”Conf” and ”Mon”. Under Conf are the configuration settings of the device. The Mon item is used to monitor the device, i.e. view some live values. Configuration Menu tree The configuration settings are arranged as a hierarchical tree: The Conf menu has submenus, and these contain settings and possibly more submenus. In the tree view, the submenus can be expanded using the + buttons, or collapsed back using the same buttons. 3 The settings can be freely changed. The new value is automatically sent to the device when the Enter key is pressed or focus is changed to another item. This way you can immediately see how the device is affected. Some items may have a green background. These values are continuously updated from the device (unless disabled with the Device/Update volatile items setting in the pull-down menu). Saving to EEPROM If you see a button next to a menu title, you can use it to command the device to store all the settings in that menu and its submenus to the permanent EEPROM memory, so that they will be retained even when the power is off. When closing the connection, Mekuwin checks if everything has been saved to EEPROM, and if not, shows a dialog to the user. Password protection A button appears if some menu is password protected. To enter the password, click the Password button and enter the password. If it is not known, the settings can't be changed, only viewed. The settings will be grayed. File operations All the settings can be stored in a file with button and later retrieved with . File format is simple: there is the hierarchical name of the setting, a tabulator, and the value in a human readable form. The file can be edited with any text editor as far as the tabulators are retained. Info button Some detailed information on the selected setting can be obtained by clicking . Lock and Free Some settings may have buttons next to them. They can be used to send a Lock or a Free command. Their use is dependent on the device. Device help If Mekuwin has help texts available for the target device, it will show them in a separate help window. The help window can be called from the toolbar also. Disconnecting When all is done, the connection is closed by closing the window on the top right corner X, or selecting File/Exit on the pulldown menu. Please do this always before detaching the cables or powering the target off, so that MekuWin can ensure that all changes are stored in the EEPPROM memory of the device. Monitoring Starting Monitoring means watching the readings and other varying results of the target device. It is started by expanding the Mon(itor) menu by clicking the + button next to the ”Mon” text. Some devices have green monitoring items inside the Conf menu. 4 Viewing While monitoring, the monitor readings are continuously updated. The configuration settings can be still edited. The contents of the monitor menu depend entirely on the device. See the device user manual for explanations. Stopping Since Mekuwin continuously reads new values from the device, the other functions of Mekuwin can become slow, so it is advisable to stop the Monitor when not needed. To stop, just collapse the Mon menu with the – button next to the text ”Mon”. Simulating Some readings may have buttons next to them. By clicking ”L”, a Lock command is sent to the device, usually making it to stop updating that reading. Then a new value can be manually entered. The device will use the simulated value instead of the real value. The normal operation is returned by clicking ”F” or Free button. The exact effects of the Lock and Free commands depend on the target device. Diagnostics Most devices have some kind of self-diagnostics and can detect some faults in themselves or in the attached devices. To view if the device reports any faults, click in the toolbar. A diagnostics section is opened above the menu tree. Each possible message is associated with a ”lamp”. When the message is active (there is a fault), the lamp will be red. Other operations on the launcher The launcher contains some advanced functions: Monitor comms: When connecting, opens a window for monitoring the serial communications. 5 Long timeout: Extends the command-response timeout to 10 seconds, for modem use. Help: Opens this manual. Info: Shows version info. Save to File: Saves the settings of all the open configuration windows to a single file. This should be used with a multi-slot device only. Load: Opposite to Save to Files. Close All: Closes all configuration windows. Pull-down menu File Load settings… Loads the settings from a file. Same as in the toolbar. If the file contains settings that do not match the menu of the target device, a dialog will be shown. If the file contains settings that will go to a password protected menu, the passwords of the protected menus must be entered first by using the buttons. Save Conf settings as… Saves the settings in the Conf menu to a tab-separated file. Same as . Save everything as... Saves all items to a file, including Cal (factory calibration) and other main level menus. Print… Prints the settings on paper. Not implemented yet. Exit Closes the configuration window, and ensures that all the settings have been sent to the device and written in the permanent EEPROM memory. Device Show diagnostic indicators Shows or hides the diagnostic lamps. Same as . Show main level Normally only the Conf and Mon menus are shown, but the devices contain more menus for factory calibration and possibly for some other functions. These can be accessed by selecting Show main level. For experts only! Write to EEPROM Sends all the settings and stores in the permanent EEPROM memory in the device. This is done automatically when the configuration window is closed. 6 Read from EEPROM Tells the device to read all the settings from the permanent memory, and then retrieves them to the configuration window. Can be used to cancel all the changes made since last save or power-up. Reload menu from device Loads the menu structure from the device and writes it in a mek file. Not normally needed, but may be useful if the menu is corrupted. Reload menu from internet Loads the menu structure from Nokeval web server. The loaded menu may contain help texts. Item Item menu settings concern the single setting that has focus (where the cursor is). Reload value Loads a single setting from the device to the configuration window. Can be used to ensure that the setting value is correct. Lock and Free Gives a Lock or Free command for the selected setting. Its use depends on the device. Info Shows additional information on the setting. If the mek file contains help texts, shows them too. Table Table menu can be used to perform operations on tabular sections of the menu. If there is settings named for example Mea1 Sca1 Mea2 Sca2, Mekuwin detects that there is regular repetition and allows clipboard operations and inserting and deleting a row. In the previous example, Mea1 and Sca1 form one row and Mea2 and Sca2 another. Copy values Copies the table values to clipboard. The columns are separated by tabulators and rows by CRLF. The table can then be pasted to a spreadsheet software. It does not matter where in the table the focus is; the whole table is always copied. Paste values Fills the table with values from the clipboard. There must be right amount of tabulator-separated columns, otherwise the pasting is not possible. Insert row before Moves the rows after the cursor one row down making space for a new row. 7 Delete row Deletes the row at cursor by moving the following rows up by one. 8