1
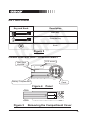
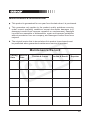
Shanghai Diebold Security Equipment Co., Ltd.
Thank you for choosing Shanghai Diebold LCD electronic lock
safe. In order for you to use this product well, please read this
User's Manual carefully before using this product.
This is a new generation of LCD electronic lock safe series
developed meticulously by Shanghai Diebold with succinct
appearance and reliable structure. All functioning indicators on
LCD are clear to read and make it easy to operate. Blue backlit
display is pleasant to users. High anti-burglar capability for
Diebold safe is secured with its patented boltwork and locking
system.
Shanghai Diebold Security Equipment Co., Ltd. (SDSEC) is a
joint venture with foreign partner, the world famous multinational
corporation —— Diebold, Inc., and is licensed to use the Diebold
patents and the world famous trademark ——
. For
over one hundred years, Diebold has been the world market
leader in security products and financial equipment industry.
SDSEC regards high-tech, high standard and high quality as
its basis, and excellent service and good reputation as its root.
Note:
This User's Manual applies to models:
FDG-A1/D-75L2S and FDG-A1/D-110L2S.
First Time Operation
Insert the override key into the main lock keyhole
(Figure 4, P.4), turn it clockwise for 45°~ 50° ,then
return it counterclockwise to its reference position
and remove it. Now insert the main key into the main
lock keyhole, turn it clockwise to the end, then turn
the knob clockwise to open the door. Take out four AA batteries from inside the safe
and remove the battery compartment cover (Figure
5, P.4), then install the batteries properly into the
compartment and replace its cover.
To download our English User's Manual, please visit
our website: www.diebold.cn
CONTENTS
First Time Operation
LCD Electronic Lock Safe (Figure 1)
2
Button and LCD Screen (Figure 2)
3
Key and Knob (Figure 3)
4
Panel and Battery Compartment (Figure 4 and 5)
4
Operations
5
To Open/Close
5
To Change Code
6
To Test the New Code
7
To Change the Number Entered
7
To Use Spyproof Function
7
To Change Batteries
8
To Open in Emergency
8
Beeper Indication
9
Trouble Shooting
9
Related Link and To Bolt Down the Safe
10
Customer Support
11
Electrical Parameters and Accessories List
12
Maintenance Guarantee
13
1
SAFE WITH ELECTRONIC COMBINATION LOCK
LCD screen
Body
Upper door
1
4
2
5
3
6
7
8
9
Clear
0
Prog
Lower door
Keypad
Knob
1
4
2
5
3
6
7
8
9
Clear
0
Prog
Shelves
Inner door lock
Bolt-down
holes
Inner door
Bolt-down holes
Inner door
lock
Shelves
FDG-A1/D-75L2S
FDG-A1/D-110L2S
Figure 1
2
BUTTONS AND LCD SCREEN
Button
Function
'0-9' ten numeric keypad are used to enter the code.
Prog
'Prog' keypad is used to validate the entered code.
Clear
'Clear' keypad is used for closing the code display or
clearing the entered code.
1
2
4
3
Figure 2
LCD screen will be used to display the entered code and the status graphs:
' will be highlighted to indicate that changing the user code is
1. The prompt '
under process.
' will be highlighted to indicate that the electronic combination
2. The prompt '
lock is unlocked.
' will be highlighted to indicate that the batteries are low and
3. The prompt '
the user should replace them with new ones.
'
4. Digits will be displayed to indicate the user code entered; The prompt '
will be displayed to indicate the corresponding code number entered at the
spyproof function mode.
'
' will be displayed to indicate that the keyboard is under dead lock and the
code cannot be entered now.
'error 1', 'error 2' and 'error 3' will be displayed respectively to indicate an incorrect
user code is entered once, twice and three times.
3
KEY AND KNOB
Key and Knob
Description
Main Key
Override Key
Knob
Figure 3
PANEL AND BATTERY COMPARTMENT
LCD screen
Main Lock
Keyhole
1
2
3
4
5
6
7
8
9
Clear
0
Prog
Battery Compartment
Panel
Figure 4
Figure 5
Panel
1
2
3
4
5
6
7
8
9
Clear
0
Prog
Removing the Compartment Cover
4
OPERATIONS
Prior to your use of Shanghai Diebold LCD electronic lock safe
you have got, please install batteries in accordance with 'FIRST
TIME OPERATION ' first. All indicators on LCD will go on and then
go off. Now, you can follow the instructions below:
1. Insert the main key into the main lock keyhole (please note the
key direction. See figure 3 and 4);
2. Enter the factory code '1,5,9' ;
3. Press the 'Prog' button and the prompt '
' will be displayed;
4. Turn the main key clockwise;
5. Turn the knob clockwise to open the door.
To follow steps for both upper and lower door.
TO OPEN/CLOSE
To Open
Step 1
Insert the main key into the main lock keyhole (please note the
key direction. See figure 3 and 4);
Step 2
Enter your code. The number you are entering will display on LCD
(If a wrong number is entered, use the 'Clear' button to clear it);
Step 3
Press the 'Prog' button and the prompt '
' will be displayed;
Step 4
Turn the main key clockwise, then turn the knob clockwise to open
the door.
5
Note:
If 3 consecutive invalid entries occur, the keypad will
discontinue functioning for 2 minutes and any key entry
will not be accepted.
To Close
Close the safe door.
Turn the knob counterclockwise.
Turn the main key counterclockwise to lock the door.
Remove the main key.
TO CHANGE CODE
To follow the following steps to change code:
1. Press the 'Prog' button;
2. Enter the existing code (if it is the first time to change, please enter the
factory code '1,5,9') followed by pressing the 'Prog' button;
3. Enter the code you want to use (2~8 digits);
4. Press the 'Prog' button and the new code you have programmed will flash
three times.
The new code has been programmed successfully.
The codes for upper door and lower door shall be changed
in separately.
You must keep your new code in mind because
you have to enter the code first before you try to
change it again.
6
TO TEST THE NEW CODE
1. Insert the main key into the main lock keyhole (Please note the key direction.
See figure 3 and 4);
2. Enter the new code you have programmed. If a wrong number is entered,
press the 'clear' button to clear it;
3. Press the 'Prog' button and the prompt '
' will be displayed;
4. Turn the main key clockwise;
5. Turn the knob clockwise to open the door.
Please make sure the new code works before you close
the door. Turn the knob counterclockwise and turn the
main key counterclockwise to lock the door, then remove
the main key.
TO CHANGE THE NUMBER ENTERED
If a wrong number is entered, simply press the 'Clear' button to clear
it followed by entering correct ones. If the 'Clear' button is pressed
consecutively, numbers on LCD will all be cleared.
TO USE SPYPROOF FUNCTION
Before entering code, press the 'Clear' button first. Now all the
numbers you are entering will display symbol ' _ '. (After each
operation, this function will not be activated again. Normal display
will be functioned.)
7
TO REPLACE THE BATTERIES
When '
' displays on LCD, it indicates batteries are low and you need to
replace with new batteries.
Method:
Remove battery cover per Figure 5 and replace with new batteries properly.
Place back battery cover.
Note:
If your safe will not be used for a long time, it is suggested
that you remove batteries. When batteries are placed back, the
code will be still stored.
TO OPEN IN EMERGENCY
In case in emergency, please use override key and main
key to open your safe.
1. Insert override key and turn it clockwise (approx. 4550 degrees), then
turn it counterclockwise and remove it (see Figure 3 and 4);
2. Insert main key and turn it clockwise;
3. Turn the knob clockwise to open the door.
To follow steps for both upper and lower door.
NOTE:
Override key is used only in emergency. Please
keep it in a secure place and do not place it inside
this safe.
8
BEEPER INDICATION
One beep indicates:
A button is pressed;
After code is changed with three flashes of code on LCD to indicate
the code is changed successfully;
'
' displays on LCD when correct code is entered and the lock
activates;
Batteries are changed.
Three beeps indicate wrong code is entered.
Six beeps indicate the circuit has problem.
TROUBLE SHOOTING
No.
Trouble
No reaction
upon button
pressing
Lock
cannot
open
Cause
Solution
No batteries installed (Refer to 'TO
REPLACE THE BATTERIES ')
Install the conformity batteries
Batteries installed incorrectly with
wrong polarity placement or
non-conformity batteries
Install the conformity batteries
according to Figure 5
Wrong key or incorrect insert direction
(See Figure 3 and Figure 4)
Use the right key and insert it
in the right direction
Low batteries (Refer to 'TO
REPLACE THE BATTERIES ')
Replace the old batteries with
new conformity batteries
Incorrect user code
Enter the right user code
User code is forgotten
Refer to 'HOW TO OBTAIN
ASSISTANCE '
9
RELATED LINK
Override key is used in emergency. Please keep it in a secure place and do
not place it inside this safe.
If user is changed, your code must be changed.
If your safe is not used for a long time, it is suggested that you remove
batteries, or the circuit will possibly get damaged.
Please keep your code properly.
TO BOLT DOWN THE SAFE
Place the safe where it will be installed. Mark the locations of the bolt-down
holes (See Figure 1).
Move aside the safe and drill about 100mm-deep holes by using an electric
percussion drill with a φ12mm drill bit in the marked locations.
Put and tighten the bolt-down bolts into the holes. Remove the nuts and
washers.
Replace the safe where it will be installed and align the bolt-down holes.
Install and tighten the washers and the nuts from inside the safe.
Bolting down is complete now.
TO PROVIDE INFORMATION
If you provide the following information to service people,
you will get quicker assistance:
Product Serial Number (See label on the right side of product)
Product Model
Purchase Invoice of Product
Maintenance Guarantee
10
CUSTOMER SUPPORT
HOW TO OBTAIN ASSISTANCE
If you have any question that this User's Manual cannot
answer when using this product, please take one of the
following approaches to obtain assistance:
To call SDSEC Technical Advisory Service at
T : 0 2 1 - 6 4 8 0 9 3 5 5
To send questions through SDSEC's fax response system
to get product specifications.
Fax:
86 21 6480 3291
Service hot line: 133 8629 0300
ext 6320, 6321, 6322 or 6323.
Compensation Conditions for Product Liability Insurance.
This product is manufactured in line with the national standard
GB 10409-2001. If any attack provided in this standard is made to
this product and valuables stored in the safe are lost, the following
items need to be provided in order to get compensations (maximum
30,000RMB) from the insurance company for the losses herein.
Original invoice to show that it's still within one-year
guarantee period.
Evidence to show that you've reported the case to the local
police (county level or above) within 24 hours after the case
happens.
To visit our website:
http://www.diebold.cn
11
ELECTRICAL PARAMETERS
1. Operational Power: 4 x 1.5V/AA battery;
2. Non Operational Voltage By Circuit Protection: +/-10VDC;
3. Normal Operational Voltage Range: 3.5V 7V;
4. Sleeping Mode Current: 4VH < 0.5uA; 7VH (typ) < 2uA;
5. Stand By Mode Current: 4VH < 100uA; 7VH < 300uA.
ACCESSORIES LIST
User's Manual
1 PC
Main key
2 PCS / each door
Override Key
1 PC / each door
Inner Door Key
2 PCS
Conformity Certificate
1 PC
Bolt-down hardware
2 Sets
AA Battery
8 PCS
12
MAINTENANCE GUARANTEE
This product is guaranteed for one year from the date when it is purchased.
This guarantee only applies to the product quality problems occurring
under normal operating conditions except man-made damages (e.g.
damages incurred from improper operation or carelessness), damages
incurred from assemble or disassemble, repair and improper installation
without permission from our company, and damages incurred from force
majeure.
The original invoice that is issued when this product is purchased must
be presented when guaranteed maintenance service is provided.
Maintenance Record
Calling
Date
Service
Date
Trouble & Cause
Action & Result
Repairer
13
TO AFFIX THE INVOICE
Please affix the invoice (or copy)
for this product in this place in
order to present it to our customer
support personnel and get assistance
without delay.
MEMO
SDSEC PRODUCT SERIES
Various security container and floppy disk media security
container series;
Safe Series;
Vault Door Series;
Vault Wall Module Panels;
Remote Teller System (RTS) Series — Integrated;
Bullet-resistant and robbery-proof system such as windows,
windows frame, passageway, lattice window shooting holes,
article receiving boxes;
ATM safes and After-Hour Depositories (AHD);
Access Control Systems — with different complex and
advanced levels;
Parking Lot Control Systems;
Integrated Security System — be able to monitor and control
all sensitive places within the designated facilities including
alarm systems, closed circuit television (CCTV), access
controls, remote facility monitoring systems and advanced
telecommunication technologies.
No. : B-05033