1
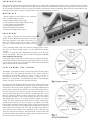
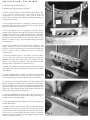
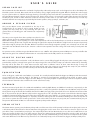
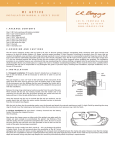
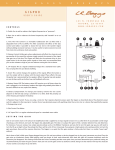
U
S
E
R
'
S
M
A
N
4 8 3 N O R T H F R O N TAG E R D. , N I P O M O, C A 9 3 4 4 4
PHONE (805) 929-3545 FAX (805) 929-2043 EMAIL [email protected]
U
A
L
I N T R O D U C T I O N
Thank you for purchasing the iBeam. The installation is simple and straightforward if your guitar is X-braced, has a pin style
bridge and already has an endpin jack hole. We recommend that the installation be done by a professional installer and we
do not provide installation advice to end users. Read the instructions before proceeding. We will not be responsible for any
damage to your guitar or injury to yourself that results from installation or misuse.
M A T E R I A L S
- iBeam pickup pre-attached to the Strapjack
Plus or to iBeam Active preamp
- Battery holder (iBeam Active only)
- 2 self-stick wire holders (iBeam Active only)
- 1 extra adhesive pad for iBeam
- Pin-bridge mounting fixture
-iBeam installation instructions
- Strapjack installation instructions
I M P O R T A N T
1. The iBeam is designed to work with X-braced
guitars and the iBeam Active preamp is voiced for
steel string guitars. Your guitar must have 3" of
flat open surface inside of the guitar directly
under the saddle between the X braces (see Fig.
1).
2. The mounting fixture will work with pin bridge guitars only. If
you have a non-pin bridge guitar (see the Alternative Bridge
section.
3. There is a small slit under the iBeam cap about 1/2" from each
end of the pickup. We know that it looks tempting but do not
poke anything into the slit!
4. The peel-and-stick adhesive is the best way to adhere the iBeam.
It will hold the iBeam quite firmly, yet it will be possible to remove
it at a later time. The use of any adhesive other than the provided
self-stick pads will void the warranty.
P O S I T I O N I N G
T H E
I B E A M
The iBeam is designed to attach to the bridge plate, directly under
the saddle line and generally parallel to the saddle with the
attached peel-andstick adhesive. Good results should be
consistently had by attaching the pickup as shown in Fig. 2.
However, as every guitar is an individual you may be rewarded with
a little searching around for the optimum location.
In general, placing the iBeam directly under the saddle will provide
the greatest sense of immediacy, impact, snap and “string” sound.
This position will be the most aggressive sounding. Offsetting the
pickup either toward the sound hole or toward the bridge pins in
the area shown in Fig. 3 will increase the amount of “body” in the
sound and generally have a more mellow and homogeneous sound
with less midrange. We have often achieved our very best results
by placing the pickup as close to the string ball-ends as is practical
and offsetting it about 1 to 2 mm toward the treble side of the
saddle. The other alternative location that has often worked well,
provided the X-braces are wide enough, is to offset the pickup
toward the front edge of the bridge plate. An extra positioning pad
is included in the kit for re-positioning the pickup. Once you have
firmly adhered the pickup you will need to replace the adhesive
every time that you remove it to reposition it. The adhesive may
easily be removed by rolling it off the bottom of the pickup like
carpet. Burnish the new adhesive backing with the edge of a pencil
to stick it down to the pickup securely .
I N S T A L L A T I O N :
P I N
B R I D G E
1. Assemble the mounting fixture.
2. Remove the strings from the pin holes.
3. Reach inside the hole and feel around under the bridge
to be sure the bridge plate is free from debris and
obstructions. If you are unsure, stick a mirror inside to
inspect this area. The surface that you adhere the iBeam to
must be flat and clean.
4. If your guitar already has a Strapjack, remove it now. If
the guitar does not have a Strapjack hole already, do this
now. (see Strapjack Installation.)
5. Place the iBeam and the Strapjack or iBeam Active
preamp into the guitar through the sound hole. Adjust the
length of the pinch nut on the Strapjack for the tail block
thickness now, but do not attach the Strapjack yet. Extract
the iBeam Stick the iBeam to the adhesive dots on the
fixture as shown in Fig. 5. and Strapjack/Strapjack preamp
from the guitar.
6. Place the stationary rod of the mounting fixture in the
high-E bridge pin hole and adjust the moveable rod
laterally in the slot until it drops into the low-E bridge pin
hole as shown in Fig. 4. Tighten the nut to secure the
moveable rod.
7. Place the adhesive dots on the fixture over the saddle,
one on each side of the big slot. Remove the adhesive
backing from the dots and position the iBeam over the
fixture in the desired location. Stick the iBeam to the
adhesive dots on the fixture as shown in Fig. 5.
8. Remove the fixture and iBeam together from the bridge
and remove the adhesive backing from the bottom surface
of the iBeam.
9. Insert Strapjack/iBeam Active preamp and the fixture
holding the iBeam into the guitar. Search for the high and
low E string bridge pin holes with the rods on the fixture.
10. Insert the rods into these holes and then elevate the
fixture straight up until the rods just poke out of the holes
about 1/2". Grasp one of the rods from the outside of the
guitar and hold it. Do not pull up yet. While holding the one
rod let go of the fixture inside of the guitar and grab the
other rod on the outside of the guitar.
11. Now pull STRAIGHT UP on the rods as shown in Fig. 6 to
elevate the iBeam until it contacts the bridge plate. Tug up
on the rods to secure the pickup.
12. Pop the fixture off of the iBeam inside of the guitar and
remove the fixture.
13. Press up firmly along the top surface of the iBeam, and
especially on the ends, to secure it. It's usually a good idea
to press down on the bridge from the outside of the guitar
as you press up on the iBeam from the inside to equalize
pressure and avoid cracking the top. Wiggle the iBeam front
to back a little as you press.
I N S T A L L A T I O N :
P I N
B R I D G E
( C O N T I N U E D )
14. Finish the installation by securing the end pin jack or iBeam Active preamp in the tail block of the guitar, and install the
battery.
A L T E R N A T I V E
I N S T A L L A T I O N :
N O N - P I N
B R I D G E S
Installation on non-pin bridge guitars requires that you drill a guide hole in each end of the saddle slot for reference. You
will need an inspection light, an inspection mirror, a drill and a 1/16" drill bit, a couple of wooden stick matches and a small
pencil stub.
1. Drill a 1/16" hole through the bridge at both ends of the saddle slot. If the guitar already has a hole in the saddle slot for a
pickup, you can use this as one of the holes.
2. Press the stick matches into the holes until they just protrude (1/16" to 1/8") into the guitar.
3. Remove the adhesive backing from the iBeam and, holding the iBeam upright between your thumb and two middle
fingers, use your index and little fingers to locate the matches.
4. Hold the iBeam and back the slot in the bottom of the iBeam over one of the matches. Rotate the other end of the pickup
until you find the other match with the slot in the other end. Then very lightly (!!) kiss the adhesive against the bridge plate
with just barely enough pressure to hold it in place.
5. Once you have tacked the pickup into place, insert an inspection mirror into the body to check the placement of the
pickup. After confirming that it is located correctly, remove the matches and press firmly with a little rocking motion over
the surface of the top of the pickup to secure it to the bridge plate. Be sure to apply an equal downward force to the top of
the bridge when pressing up from the inside to prevent damage to the guitar.
6. If you wish to experiment with pickup placement do not secure the adhesive. Rather, use your pencil stub now to outline
the pickup placement as a reference.
7. Rock the pickup body towards the front or rear to release the adhesive enough to re-position it. Move the pickup and
then again very lightly (!!) kiss the adhesive against the bridge plate with just barely enough pressure to hold it in place.
Check the new placement with your mirror and repeat the procedure until you've got it where you want it. Now secure it.
2 - P I C K U P
I N S T A L L A T I O N S
If you wish to add the iBeam to a guitar with an existing saddle or under saddle pickup like the LB6 or Ribbon Transducer, a
provision has been made in the bottom (contact surface) of the iBeam for the saddle or under saddle pickup wire to exit
through it. This provision consists of a slot in each end of the iBeam. When installing the iBeam with an undersaddle pickup,
do not use the positioning fixture. Rather, leave the bridge pins in and use this wire as a positioning guide for one end of
the iBeam. If the wire is stiff, bend it back and away from the iBeam so the slot in the iBeam will freely go over it. Feel around
for the bridge pins on the other end and use them as a reference. Remember to tack the iBeam down very lightly until you
are sure that it is where you want it.
For Ribbon Transducers, drill a new hole at the very end of the slot at an angle so the wire will exit through the top beyond
the end of the iBeam. Then use the "Lazy S" method of attachment as described in the RT Installation Guide.
I N S T A L L I N G
T H E
I B E A M
A C T I V E
The procedure for installing the iBeam Active is identical to that of the iBeam except for the battery holder. Follow the
instructions included with the battery holder to install that. Be sure to secure the battery wires with the provided clips as
the iBeam is sensitive to hearing stuff rattling around inside of the guitar.
P I C K U P
R E M O V A L
A N D
R E P O S I T I O N I N G
Place three fingers along the length of the back side of the pickup. Pull firmly with even pressure parallel to the guitar top,
until the adhesive gives way. Rock it up onto one edge and then lift up one end to pull the adhesive away from the bridge
plate. DO NOT PULL UP ON THE CAP. Then pull the pickup off. The adhesive used to secure the iBeam is pretty gnarly stuff.
Once you stick it down, it will increase its grip over about a week's time. So if you wish to experiment with placement, it will
be easier before the adhesive develops its full strength. If the adhesive comes off the guitar cleanly when you remove the
iBeam you may be able to use it again. However, it is recommended that you use a fresh pad every time. To remove the
adhesive from the bottom of the pickup roll it off like carpet. After tacking the new pad to the bottom of the pickup use the
edge of a pencil to press the adhesive firmly to the pickup. We've included an extra pad in the kit. Pads are also available
from us in packs of 10 for $5.00. Be sure to inspect the bridge plate for any adhesive before you re-position it.
U S E R ' S
I B E A M
G U I D E
P A S S I V E
We recommend that the iBeam be used with a high quality outboard preamp such as the Gigpro, Para DI, or the Mixpro if a
blended system is desired. Best results will be insured by using a high quality full range PA. When in doubt, the rule to apply
to your system choice is, “Would I be happy hearing a recording of my voice with this system/amp?” For home use you can
plug the iBeam through a Gigpro or Para DI into your home stereo, using a ¼”connector to RCA plug adapter. Use the “Aux
In”and put your stereo in mono mode. Be careful to sneak up on the levels so you don’t blow your stereo up or break any
windows. We will not accept any responsibility for blown speakers, amps, preamps, eardrums, etc.
A D D I N G
A
S E C O N D
P I C K U P
The passive iBeam comes pre-attached to the tip of our
Strapjack Plus. If you wish to add a second pickup to your
system, you may easily do so by soldering the plus and
ground wires to the Ring pin and Ground tabs respectively
(see Fig. 7).
The two passive signals from these pickups may then be run
down a stereo cord to an outboard mixer such as the Mixpro.
NOTE: When adding a second pickup, it is best if the impedance and level of both pickups are similar to minimize cross-talk
(inductive mixing of the Low Z signal into the High Z signal). The output of the iBeam is High Z and can be paired passively
with other High Z pickups like the LB6, Ribbon Transducer. Even though magnetic pickups are relatively Low Z and will
cross-talk into the iBeam channel, the amount is often inconsequential and most mags will work well passively with the
iBeam.
For pristine results, add the mag to the iBeam Active or use a Buffer Jack phantom powered Mixpro accessory to buffer the
iBeam at the guitar. For additional information on crosstalk, check out the FAQ section on our website.
A C O U S T I C
G U I T A R
A M P S
With a reasonably short cord (under 10 ft.) the iBeam can be successfully plugged directly into some acoustic guitar amps,
provided the amp has enough clean gain in the input stage. The sound of these amps can often be enhanced by elevating
the amp off of the floor on a chair. Most acoustic amps have a definite “voice” of their own which may or may not
complement the iBeam. Just remember the rule when trying amps: “Do I want to sing through this setup?” If you would be
disappointed with your voice you will certainly not like the results with the iBeam either.
E Q U A L I Z A T I O N
As far as EQ goes, a mild mid-cut of 6dB, or so, around 1k is usually beneficial. Both the Gigpro and Mixpro, with the controls
set at 12:00, have this mid-cut built in. The iBeam is sensitive to low frequency variations from guitar to guitar; and a
variable low cut, as found on the Gigpro and the Mixpro, is especially helpful in optimizing the low end response without
the need to turn down the bass and thin the sound out unnecessarily.
F E E D B A C K
We have measured peak SPL’s of 110 dB and 108dB from similarly EQ’d iBeams and Ribbon Transducers, respectively, in the
same guitar with both pickups in the optimum phase. This is really loud, painful in fact. But, since the iBeam easily has twice
the dynamic range of the RT, the feedback threshold at RMS (average playing level) will be 3 to 6 dB lower than that of the
RT. So if you want to play the iBeam really loud we suggest the use of a preamp with phase reversal like the Para DI, Gigpro
or Mixpro. Experiment with phase to find the phase that offers the most stability – it’s pretty obvious as the SPL climbs. The
variable low cut in the Gigpro/Mixpro is especially useful for taming the low end without making the sound overly thin. If
you desire a system that still sounds great and is rock solid at SPL levels that can peel paint, we recommend that you pair
the passive iBeam with an LB6 or a sound-hole magnetic pickup and the Mixpro.
I B E A M
A C T I V E
The iBeam Active system pairs the iBeam pickup with an all discrete Class A FET preamp built into the endpin jack. It runs on
a 9V battery which should last for about 1000 hours. Plugging the cord in turns it on. There will be a turn on “pop”so be sure
your PA or amp is muted when you plug in. The output impedance of the iBeam Active is very low and, at 600 ohms, it can
drive any length of cable and it can plug into just about any outboard gear with full frequency response. And since EQ is
built into the preamp this system is plug and play ready. The only additional EQ you may need is to compensate for system
and room differences. The iBeam is top sensitive so an outboard preamp, such as the Para DI, Gigpro, or Mixpro, with phase
I B E A M
A C T I V E
( C O N T I N U E D )
reversal is often helpful in controlling feedback.
I B E A M
A C T I V E
2 - P I C K U P
I N S T A L L A T I O N
It is possible to add a second pickup to the iBeam Active but, to avoid cross talk, the second pickup must have a low
impedance output. This requirement basically eliminates everything but magnetic pickups. DO NOT USE HIGH IMPEDANCE
PICKUPS like the LB6 or the Ribbon Transducer with the iBeam Active. If you wish to combine a high impedance pickup with
the iBeam, just attach both pickups to the Tip and Ring terminals of the Strapjack Plus and run both the iBeam and the
second Hi Z pickup passively down a stereo cable to the Mixpro or use a stereo Y-cable to two Para DI’s. Often in a twopickup system the “brass knuckles” or “default” pickup will be preferred to be on the Tip contact of the Strapjack. The iBeam
Active preamp is normally routed to the Tip contact but a provision has been made with solder bump jumpers on the PC
board to reverse the pickup assignment, as shown in Fig. 8. This will allow the passive magnetic pickup to be the default
pickup on the Tip and the iBeam to be on the Ring. Even if the iBeam is moved to the Ring, plugging and unplugging the
cord will still turn the preamp on and off.
P A I R I N G
T H E
I B E A M
A C T I V E
W I T H
The iBeam Active preamp has a built in EQ curve. Both
the Gigpro and Mixpro preamps also have a built in EQ
curve when the controls are set “flat” at 12:00 0’clock. If
you wish to use the Gigpro/Mixpro with the iBeam
Active we recommend that you back the EQ off of the
Gigpro/Mixpro to avoid being double EQ’d. Back the Gain
control and low cut all the way off and start with both
the bass and treble EQ on the Gigpro/Mixpro in the 8 to
9 O’clock positions, then flavor to taste.
T H E
G I G P R O / M I X P R O