1
User Manual
Content Manager software for
Nav N Go iGO 8
English
April, 2008, ver. 1.2.525
Copyright note
The product and the information contained herein is subject to change without prior
notification.
This manual may not, in whole or in part, be reproduced or transmitted in any form either
electronically or mechanically, including photocopying and recording, without the express
written consent of Nav N Go Kft.
© 2008 - Nav N Go Kft.
All rights reserved.
Microsoft, Windows, Vista, and Outlook are either registered trademarks or trademarks of
Microsoft Corporation in the United States and/or other countries.
2
Table of contents
1 Getting started with Content Manager .......................................................................... 5
1.1 Installing Content Manager ......................................................................................................6
1.2 Starting Content Manager ........................................................................................................6
1.2.1 Selecting a device profile.................................................................................................................7
1.2.2 Recovery ..........................................................................................................................................7
1.3 Controls.....................................................................................................................................7
1.3.1 Menu bar..........................................................................................................................................7
1.3.2 Toolbar icons ...................................................................................................................................8
1.3.3 Operations window (available in Advanced mode only) .................................................................9
1.3.4 Information window ........................................................................................................................9
1.3.5 Contents list (available in Advanced mode only) ..........................................................................10
2 Using Content Manager................................................................................................. 11
2.1 Managing contents..................................................................................................................11
2.1.1 Installing contents ..........................................................................................................................11
2.1.2 Removing contents ........................................................................................................................11
2.1.3 Updating contents ..........................................................................................................................11
3 Options and Tools .......................................................................................................... 13
3.1 Transfer Trip Plans.................................................................................................................13
3.1.1 Importing KML or KMZ files........................................................................................................13
3.1.2 Exporting KML or KMZ files to the PC........................................................................................13
3.1.3 Removing Trip Plans .....................................................................................................................14
3.2 Backups ...................................................................................................................................14
3.2.1 Creating backups ...........................................................................................................................14
3.2.2 Restoring backups..........................................................................................................................14
3.2.3 Removing backups.........................................................................................................................14
3.3 Content DVDs .........................................................................................................................15
3.4 Licenses...................................................................................................................................15
3.5 Device profiles ........................................................................................................................15
3.5.1 Removing device profiles ..............................................................................................................15
3.5.2 Editing device profiles ...................................................................................................................16
3.6 Preferences .............................................................................................................................16
3.6.1 General...........................................................................................................................................16
3.6.2 Visualisation ..................................................................................................................................16
3.6.2.1 Customising table fonts........................................................................................................................... 16
3
3.6.2.2 Customising table colours....................................................................................................................... 17
3.6.3 Connection.....................................................................................................................................17
4 Troubleshooting.............................................................................................................. 18
5 Uninstalling Content Manager...................................................................................... 19
4
1 Getting started with Content
Manager
Content Manager is a PC based application that has a number of important features to help
you manage the content of your the device. With Content Manager you can:
•
Backup the content stored on your device to your PC and restore it back to your device
later.
•
Connect to the Content Manager server to download updates or additional content for
your navigation software.
•
Transfer trip plans in KML or KMZ format between your PC and your device.
There are several types of navigation content that are loaded on your device and that can be
used with Content Manager. The content that is available depends on the device you
originally purchased and the country you purchased it from.
Content is broken down into smaller, more manageable pieces for each region or country.
The various types of content that might be available include:
•
Maps are the road networks used by the navigation system to route your trips.
•
Landmarks are 3D artistic or block representations of prominent or well-known
objects. 3D landmarks are only available in selected cities and countries.
•
3D Cities are full 3D city building data that represents actual building size and position
on the map. 3D cities building data is limited to the city centre of major cities in the US
and Europe.
•
POIs are Points of Interest, which are specific reference points that can be searched
and navigated to. They are sorted into different categories like hotels, restaurants,
tourist attractions, banks and many other locations users may want to find while they
travel.
•
Phonemes are used by the Text to Speech navigation engine to announce the road
names during navigation. Text to Speech voices are not available for all languages and
can be set on your device by selecting any voice profile with '(TTS)' in its name.
•
Relief is the 3D terrain map data that shows changes in terrain, elevations or
depressions in the land when you view the map, and use it to plot the route map in 3D
when you navigate.
•
Voice language is the voice profile used for navigation guidance. These are either
pre-recorded voices or Text to Speech voices. Text to Speech voice profiles are
indicated by '(TTS)' and use artificial intelligence to announce road names during
navigation. Non Text to Speech voices are recorded in the identified language and just
tell the user to turn left or right and at what distance.
•
Application is the navigation software that is running on your device.
•
Menu language is a list of available languages for the navigation software to display
button labels and screen messages.
•
Schemes are different daytime and night colour profiles that let you personalise the
look of the map in the navigation software.
5
System requirements
To use Content Manager, you need an SD card reader and a computer that meets the
following minimum specifications.
To access the Content Manager server, you also need an active Internet connection on your
PC.
Minimum
Recommended
Operating
system
Windows XP
Windows Vista
Processor
300 MHz clock
speed
Intel Pentium/Celeron family, or AMD K6/Athlon/Duron
family, or compatible processor
System
memory
256 MB
512 MB
Free disk
space
2 GB
5 GB
NOTE: In order to install new contents on your device, you need an active Internet
connection on your PC!
1.1 Installing Content Manager
Follow these steps to install Content Manager on your computer:
1.
Insert the Nav N Go iGO 8 Content DVD in your PC, and start installing Content
Manager.
2.
Select a language from the list, then click OK.
3.
Review the license agreement. If you want to continue, click I Agree.
4.
Select the installation folder. A default installation folder is already given. To choose a
different one, type in the path name, or click Browse, and select a different folder.
5.
Click Install to start the copying process. To see the details during copying, click Show
Details.
6.
Click Next to continue.
7.
(optional) To start Content Manager right after the installation, tick the checkbox.
8.
The installation is complete, click Finish to exit.
Content Manager has an auto-updating feature to ensure you always have the most up-todate version on your PC. Each time you launch the application, it checks for available
updates.
1.2 Starting Content Manager
To start Content Manager, do the following:
1.
Click Start > All Programs.
2.
Select Nav N Go.
3.
Click Content Manager.
NOTE: In order to be recognised by Content Manager, you need insert the Nav N Go
iGO 8 memory card in your PDA, install it, and run it at least once before connecting it
to Content Manager.
6
1.2.1 Selecting a device profile
When Content Manager is used with more than one device, the device profile screen appears
before startup. Select the appropriate profile name, or enter a new name for the connected
device.
Every time you start Content Manager with a new device, a different device profile needs to
be created.
1.2.2 Recovery
When the device profile selection window pops up during startup, you can overwrite the
content of your device with a previously saved backup. Do the following:
1.
Click Recovery .
2.
Select a profile name and a device type.
3.
Select the backup and the device drive.
4.
Click Start to begin the recovery.
NOTE: In order to perform a recovery, you need a full backup. Creating a full backup
is recommended when you start using your device.
NOTE: If Content Manager is used with only one device, and the device profile
selection does not appear at startup, you can perform recovery from the Tools menu.
1.3 Controls
When Content Manager is started the first time, it opens in Simple mode. Simple mode
contains only the most frequently used functions.
Later you can switch to Advanced mode in the View menu. In this mode all functions are
available.
The main window of Content Manager is divided into the following sections:
•
the Menu bar
•
the Toolbar icons
•
the Contents list, all content items available for the connected device (available in
Advanced mode only)
•
the Operations window (available in Advanced mode only)
•
the Information window
1.3.1 Menu bar
The Menu bar contains the following submenus:
•
File:
•
•
Exit: Quits Content Manager.
Content (available in Advanced mode only):
•
Install: Installs the selected contents on the device.
•
Install all: Installs all available contents on the device.
•
Update: Updates the selected contents on the device.
7
•
•
•
•
•
Update all: Updates all contents on the device.
•
Remove: Removes the selected contents from the device.
Operation (available in Advanced mode only):
•
Perform operations: Executes all content operations listed in the Operations
window.
•
Remove operation: Cancels the selected content operations.
•
Clear operations:
window.
Cancels all content operations listed in the Operations
View:
•
Advanced mode: In this mode all content operations and tools are accessible.
•
Simple mode: In this mode all functions in the Tools menu are available, but
only two of the content operations (Install all and Update all) can be chosen.
Tools:
•
Transfer Trip Plans: Launches the Manage Trip Plans screen to transfer KML
or KMZ format trip plans from your PC to your device, or from your device to
your PC.
•
Backups: Launches the Manage backups screen to create a backup or
recover one to your device.
•
Content DVDs: Content Manager can read and catalogue the content of DVDs
that are bought for or enclosed with the product. This way you can install or
reinstall content items on your device without an Internet connection.
•
Licenses: Opens the list of active and inactive licenses on your device, and
lets you activate or deactivate them one by one.
•
Device Profiles:
created.
•
Preferences: Lets you manage preferences available for Content Manager.
Lets you edit and remove the device profiles you have
Help:
•
Online support: Launches the product website (my.navngo.com) using the
Internet connection of the PC.
•
About: Version and copyright information of Nav N Go iGO 8 Content
Manager.
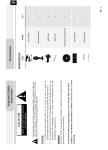
1.3.2 Toolbar icons
The icons under the menu bar perform the same actions as the menu items in the Content,
Operation and Tools menus.
The following icons are available in Advanced mode only:
Icon Menu Item
8
Function
Content > Install
Installs the selected contents on the device.
Content > Update
Updates the selected contents on the device.
Content > Remove
Removes the selected contents from the device.
Icon Menu Item
Function
Content > Install all
Installs all available contents on the device.
Content > Update all
Updates all contents on the device.
Operation > Perform
operations
Executes all content operations listed in the Operations
window.
Operation > Remove
operation
Cancels the selected content operations.
Operation > Clear
operations
Cancels all content operations listed in the Operations
window.
The following icons are always available:
Icon Menu Item
Function
Tools > Transfer Launches the Manage Trip Plans screen to transfer KML or KMZ
format trip plans from your PC to your device, or from your device to
Trip Plans
your PC.
Tools > Backups Launches the Manage backups screen to create a backup or
recover one to your device.
1.3.3 Operations window (available in Advanced mode only)
After selecting an action, it appears in the Operations window. The name, type and size of
the content are displayed here together with the icon of the assigned action and the targeted
storage location.
All the content operations in the Operations window can be performed by clicking
by clicking Perform operations in the Operation menu.
, or
1.3.4 Information window
This window displays information about the connected device. The following parameters are
shown:
•
The name of the device.
•
The memory type ('SD card').
•
The Before column displays the current amount of free storage space in the available
storage locations.
•
The After column displays the amount of free storage space in the different storage
locations after performing the currently selected operations.
•
The Capacity column displays the total amount of storage space in the different
storage locations.
•
Update available for: The number of update packages is displayed together with their
total required storage space.
•
Not installed: The number of packages not yet installed on the device is displayed
together with their total required storage space.
9
1.3.5 Contents list (available in Advanced mode only)
The largest part of Content Manager is the list of content elements available for the connected
device. The columns of the list are as follows:
•
Name: The name of the content. This column can also include an icon that shows the
status of the specific content:
Icon
Function
This content is not installed yet.
This content can be updated.
No icon
This content is installed and up-to-date.
•
Type: The type of content.
•
Installed: The column indicates whether the content was installed. It also displays the
amount of storage space the installed content currently uses, and an icon that shows
where the content is installed:
Icon
Function
This content is installed on the memory card inserted in your device.
•
Available: This column displays the amount of storage space needed to install this
content element, and an icon that shows the location of the available content:
Icon
Function
This content can be downloaded from the internet. When you initiate
Perform Operations, Content Manager downloads it from the product site,
and installs it on your device.
This content is already downloaded to your PC. Content Manager can
install it on your device without an active Internet connection.
This content is available on DVD. Content Manager can install it on your
device without an active Internet connection.
There are three filters to narrow the Contents list: Status, Type and Location.
•
Status: Filters contents based on their status:
•
All: Displays all contents.
•
Installed: Displays only contents installed on the device.
•
Not installed: Displays only available contents that are not installed on the
device.
•
Updatable: Displays contents that have a newer version than the one installed.
•
Updatable or not installed:
updatable.
•
Up-to-date: Displays all installed and up-to-date contents.
Displays all contents that are not installed or
•
Type: Filters contents based on their type.
•
Location: Filters contents based on their storage location.
NOTE: Not installed content items only appear in the list when Location is set to All.
10
2 Using Content Manager
2.1 Managing contents
2.1.1 Installing contents
NOTE: Only non-installed contents can be installed. They have an
their name in the Contents list.
icon next to
To upload the selected contents to the device, do the following:
1.
Select the content items from the Contents list. There are several ways to do this:
•
Click on a content item in the Contents list. To select multiple items, use either the Shift
or the Ctrl key. Click Install in the Content menu or click
in the toolbar.
•
Drag-and-drop the content items to the Operations window.
•
Double-click a content item.
•
Right-click on a content item and select Install.
2.
Execute the actions by clicking Perform operations in the Operation menu or by
clicking
in the toolbar.
3.
Confirm the installation by clicking Yes.
4.
Click OK when the process is finished.
2.1.2 Removing contents
NOTE: Only installed contents can be removed.
To remove selected content elements, do the following:
1.
Click on a content item in the Contents list. To select multiple items, use either the Shift
or the Ctrl key.
2.
Click Remove in the Content menu, click
selected contents and click Remove.
3.
Execute the actions by clicking Perform operations in the Operation menu or by
clicking
in the toolbar, or right-click on the
in the toolbar.
4.
Select Yes from the popup box.
5.
Click OK when the process is finished.
2.1.3 Updating contents
NOTE: Only non-up-to-date contents can be updated. Non-up-to-date contents have
an
icon next to their name in the Contents list.
11
To update the selected contents, perform the following steps:
1.
Select the content items from the Contents list. There are several ways to do this:
•
Click on a content item in the Contents list. To select multiple items, use either the Shift
or the Ctrl key. Click Update in the Content menu or click
in the toolbar.
•
Drag-and-drop the content items to the Operations window.
•
Double-click a content item.
•
Right-click on a content item and select Update.
2.
Execute the actions by clicking Perform operations in the Operation menu or by
clicking
3.
in the toolbar.
Click OK when the process is finished.
TIP: You can perform different content operations (installing, updating, removing) at
the same time. Just group them in the Operations window together, and click on
Perform operations in the Operation menu, or click
in the toolbar.
12
3 Options and Tools
The tools and options in Content Manager can be accessed in the Tools menu.
3.1 Transfer Trip Plans
If planned trips are available in KML or KMZ format, you can upload them to your device with
Content Manager.
Trip plans can be transferred to your device as Routes or as POIs.
3.1.1 Importing KML or KMZ files
1.
Save the trip plan to your PC.
2.
Insert the Nav N Go iGO 8 card into the card reader and launch Content Manager.
3.
Under Tools, select Transfer Trip Plans.
4.
You can select Import as Route, or Import as POI:
•
Import as Route copies the trip plan on the Nav N Go iGO 8 memory card, and the
content of the file appears in the navigation software as a route.
•
Import as POI moves the route points of the trip plan into the POI database on your
device. They can be searched and used to navigate with, just like the pre-installed
POIs.
5.
Select the trip plan stored on your PC to have it transferred to your device.
6.
Click Open to start the transfer.
7.
Click OK when the process is finished.
8.
The imported file appears in the list with the following details: file name, type and
storage location.
9.
Click Close.
3.1.2 Exporting KML or KMZ files to the PC
A trip plan already imported in your device can be saved to your PC.
1.
Under Tools, select Transfer Trip Plans.
2.
Highlight one of the trip plans in the list.
3.
Click Export to PC.
4.
Select the location, and modify the file name if necessary.
5.
Click Save to download the trip plan from your device to your PC.
6.
Click OK when the process is finished.
7.
Click Close.
13
3.1.3 Removing Trip Plans
If you no longer need a trip plan that is already imported on your device, do the following:
1.
Under Tools, select Transfer Trip Plans.
2.
Highlight one of the trip plans in the list.
3.
Click Remove.
4.
Click Close.
3.2 Backups
You can make a duplicate copy of the device contents and store it on your PC. Backups are
useful to have as a safety precaution if you unintentionally delete content off your device. You
always have license to the content that you purchased with your device and you can use
Content Manager to re-download this at any time. Backups can come in handy to save the
time of downloads or if your PC is not connected to the Internet.
3.2.1 Creating backups
To backup your data, do the following:
1.
Select Backup from the Tools menu to open the Manage backups window.
2.
Click on Backup in the Manage backups window, then select Backup.
3.
Use the radio buttons to select the data to save:
•
full backup
•
backup user data only
•
backup user contacts only
4.
The default backup folder is displayed. To define a different one, click I want to define
a folder manually, and then enter the path of the desired location, or click Browse
and select the folder.
5.
Click OK to start the backup process.
6.
Click OK when the process is finished.
3.2.2 Restoring backups
To restore backed up data, do the following:
1.
Select Backup from the Tools menu to open the Manage backups window.
2.
Select a previously saved backup from the list.
3.
Click Restore.
4.
Click Yes to start restoring your data.
5.
Click OK when the process is finished.
NOTE: The time needed for backup or restore can vary considerably depending on the
size of the files you selected to backup or to restore.
3.2.3 Removing backups
To remove backed up data, do the following:
1.
Select Backup from the Tools menu to open the Manage backups window.
2.
Select a previously saved backup from the list.
14
3.
Click Remove.
4.
Click Yes to delete the backup.
3.3 Content DVDs
Content Manager can read and catalogue the content of DVDs that are bought for or
enclosed with the product. This way you can install or reinstall content items on your device
without an Internet connection.
When this function is started the first time, the list is empty. If you have a content DVD in your
PC, click Add, and Content Manager checks the content of the DVD and puts the name of the
disc on the list.
If you no longer need one of the listed DVDs, highlight it, and click Remove. The DVD is
deleted from the list, and the catalogue of its content is cleared from Content Manager.
3.4 Licenses
You can list and manage the access licenses in your device.
When your Nav N Go iGO 8 memory card is connected to Content Manager, the licenses
found on the card are automatically saved in the device profile associated with this card. This
way Content Manager can recover damaged or lost licenses automatically.
In the Tools menu click Licenses to see the list of license files installed on your device.
Different content elements may have separate license files associated with. A content is only
visible in the navigation software if the appropriate license is active.
To change the status of the installed licenses, highlight one of the list items, and then click
Activate for an inactive license, or Deactivate for an active one.
NOTE: If you deactivate some of your licenses, a part of the content installed on your
device becomes invisible. To be able to use them again, you need to return here and
activate the necessary license or licenses.
3.5 Device profiles
Existing device profiles can be edited and removed in the Device profiles menu. The current
device profile is displayed in bold.
NOTE: New device profiles can only be created when you start Content Manager with
a new Nav N Go iGO 8 SD card inserted.
3.5.1 Removing device profiles
To remove a device profile that is no longer needed, do the following:
1.
Select Device profiles from the Tools menu.
2.
Click on the device profile you want to remove.
3.
Click Remove.
4.
Click Yes to proceed with deleting the selected device profile.
NOTE: The currently used profile cannot be deleted.
WARNING: When removing a device profile, all backups and licenses saved with the
profile will be deleted from the PC.
15
3.5.2 Editing device profiles
To edit a device profile, do the following:
1.
Select Device profiles from the Tools menu.
2.
Click on the device profile you want to edit.
3.
Click Edit.
4.
Modify the profile parameters:
•
To change the name of the profile, enter the desired profile name.
•
To change the type of the device, select the appropriate device type from the list of
available device types.
5.
Click OK to confirm the changes.
3.6 Preferences
Settings can be configured in the Preferences menu. Settings are displayed on the following
tabs:
•
General
•
Visualization
•
Connection
3.6.1 General
The General preferences window has the following sections:
•
Language: The language of Content Manager can be changed by selecting a
language from the drop-down menu.
•
Mouse wheel speed: The mouse wheel speed in the Contents list can be changed
by moving the slider to the desired position.
•
Cache: When a content item is installed on the memory card from the Internet, the
content item is also saved automatically on the computer in a cache. If a content item
is stored in the cache, later it can be installed again on the memory card or on any
other connected Nav N Go iGO 8 memory card without an Internet connection. The
overall size of all content items stored in your computer is displayed. The cache can be
emptied by clicking Clear.
WARNING: By clearing the cache, all saved contents are deleted from the PC. If you
need to install them again later, you need to download them using the Internet
connection of the PC.
3.6.2 Visualisation
You can set customised fonts and colours for the Contents list.
3.6.2.1 Customising table fonts
To change table fonts, do the following:
1.
Enable custom fonts by ticking Enable customised fonts in tables.
2.
Click Font.
3.
Select the desired font and click OK.
16
3.6.2.2 Customising table colours
You can define custom foreground and background colours for the different content types. By
choosing custom table colours, content types are easier to distinguish.
To change table colours, do the following:
1.
Enable customised table colours by ticking Enable customised colours in tables.
2.
Click on the button next to a content type in the foreground or the background column.
3.
Select the desired colour.
3.6.3 Connection
Settings in the Connection preferences window determine how Content Manager is
connected to the Internet:
•
Direct connection to the Internet: The PC has a direct Internet connection. Content
Manager can use this channel to access the remote database of existing updates.
•
Manual proxy configuration: If your PC is connected to the Internet via a proxy
server, you need to enter the proxy parameters in order to gain access to the Internet.
If you are not experienced in configuring proxy connections, ask for the help of your
network administrator.
NOTE: The changes take effect only after clicking OK.
17
4 Troubleshooting
In case of erroneous or suspicious behaviour of Content Manager, check the log file for
details.
On Windows Vista computers the log file can be found at the following location:
C: \Users\<user name>\AppData\Roaming\Nav N Go\Content Manager\Log\cm.log
On Windows XP computers the log file can be found at the following location:
C: \Documents and Settings\<user name>\Application Data\Nav N
Go\Content Manager\Log\cm.log
18
5 Uninstalling Content Manager
To uninstall Content Manager, do the following:
1.
Exit Content Manager if it is running.
2.
Click Start > All Programs.
3.
Open Nav N Go.
4.
Select Uninstall Content Manager.
5.
Click Uninstall. To see the details during the process, click Show Details.
6.
Click Close to exit when the process is finished.
19