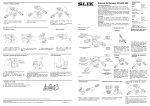
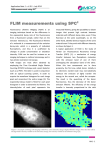
1
Model 512
Dual Counter/Timer
User’s Manual
9234643A
Copyright 2002, Canberra Industries, Inc. All rights reserved.
The material in this document, including all information, pictures,
graphics and text, is the property of Canberra Industries, Inc. and
is protected by U.S. copyright laws and international copyright
conventions.
Canberra expressly grants the purchaser of this product the right
to copy any material in this document for the purchaser’s own use,
including as part of a submission to regulatory or legal authorities
pursuant to the purchaser’s legitimate business needs.
No material in this document may be copied by any third party, or
used for any commercial purpose, or for any use other than that
granted to the purchaser, without the written permission of
Canberra Industries, Inc.
Canberra Industries, 800 Research Parkway, Meriden, CT 06450
Tel: 203-238-2351 FAX: 203-235-1347 http://www.canberra.com
The information in this document describes the product as
accurately as possible, but is subject to change without notice.
Printed in the United States of America.
Table of Contents
1. Introduction . . . . . . . . . . . . . . . . . . . . . . . . . . . . . 1
2. Controls and Connectors . . . . . . . . . . . . . . . . . . . . . . 2
Front Panel . . . . . . . . . . . . . . . . . . . . . . . . . . . . . . . . . . . . . . . . . . . . . 2
Rear Panel . . . . . . . . . . . . . . . . . . . . . . . . . . . . . . . . . . . . . . . . . . . . . . 3
3. Programming the Model 512 . . . . . . . . . . . . . . . . . . . . 4
Selecting the Counting Mode . . . . . . . . . . . . . . . . . . . . . . . . . . . . . . . . . . . . 4
The Timer/Counters (Tmr+Ctrs) Mode . . . . . . . . . . . . . . . . . . . . . . . . . . . . . 4
The High Resolution Timer/Counter (HRT+Ctr) Mode . . . . . . . . . . . . . . . . . . . . 4
The Preset/High Resolution Timer (Pset+HRT) Mode . . . . . . . . . . . . . . . . . . . . . 5
The Preset/Counter (Pset+Ctr) Mode . . . . . . . . . . . . . . . . . . . . . . . . . . . . . . 5
The Counters Only (CtrsOnly) Mode . . . . . . . . . . . . . . . . . . . . . . . . . . . . . . 5
Choice of Presets . . . . . . . . . . . . . . . . . . . . . . . . . . . . . . . . . . . . . . . . . . 5
Channel Input Configuration . . . . . . . . . . . . . . . . . . . . . . . . . . . . . . . . . . . . 5
4. Operate Mode . . . . . . . . . . . . . . . . . . . . . . . . . . . . 7
Display Operation (Upper/Lower) . . . . . . . . . . . . . . . . . . . . . . . . . . . . . . . . . 7
Display Formats . . . . . . . . . . . . . . . . . . . . . . . . . . . . . . . . . . . . . . . . . . . 8
Switch Functions . . . . . . . . . . . . . . . . . . . . . . . . . . . . . . . . . . . . . . . . . . 9
Counting Modes . . . . . . . . . . . . . . . . . . . . . . . . . . . . . . . . . . . . . . . . . . 10
Standard Timer + Two Counters. . . . . . . . . . . . . . . . . . . . . . . . . . . . . . . . 11
High Resolution Timer + Counter . . . . . . . . . . . . . . . . . . . . . . . . . . . . . . . 11
Preset Counter + High Resolution Interval Timer . . . . . . . . . . . . . . . . . . . . . . . 12
Preset Counter + Counter (Pset + Ctr) . . . . . . . . . . . . . . . . . . . . . . . . . . . . . 13
Counters Only . . . . . . . . . . . . . . . . . . . . . . . . . . . . . . . . . . . . . . . . . 14
Self Test . . . . . . . . . . . . . . . . . . . . . . . . . . . . . . . . . . . . . . . . . . . . 14
Events Counter/Event Preset. . . . . . . . . . . . . . . . . . . . . . . . . . . . . . . . . . 15
Auto-Recycle . . . . . . . . . . . . . . . . . . . . . . . . . . . . . . . . . . . . . . . . . 15
Auto-Start on Reset . . . . . . . . . . . . . . . . . . . . . . . . . . . . . . . . . . . . . . 15
5. Configure Module Mode . . . . . . . . . . . . . . . . . . . . . . 16
Reset Event Counter . . . . . . . . . . . . . . . . . . . . . . . . . . . . . . . . . . . . . . . . 17
Start Count on Reset . . . . . . . . . . . . . . . . . . . . . . . . . . . . . . . . . . . . . . . . 17
Auto-Recycle Enable/Disable . . . . . . . . . . . . . . . . . . . . . . . . . . . . . . . . . . . 17
Select Counting Mode . . . . . . . . . . . . . . . . . . . . . . . . . . . . . . . . . . . . . . . 18
Select Standard Time Base . . . . . . . . . . . . . . . . . . . . . . . . . . . . . . . . . . . . . 18
Select Count Direction . . . . . . . . . . . . . . . . . . . . . . . . . . . . . . . . . . . . . . . 19
Recall User Configuration . . . . . . . . . . . . . . . . . . . . . . . . . . . . . . . . . . . . . 19
Save User Configuration . . . . . . . . . . . . . . . . . . . . . . . . . . . . . . . . . . . . . . 19
Select Power On Default . . . . . . . . . . . . . . . . . . . . . . . . . . . . . . . . . . . . . . 20
Switch Functions . . . . . . . . . . . . . . . . . . . . . . . . . . . . . . . . . . . . . . . . . . 21
6. Program Presets Mode. . . . . . . . . . . . . . . . . . . . . . . 23
Select Preset . . . . . . . . . . . . . . . . . . . . . . . . . . . . . . . . . . . . . . . . . . . . 23
Switch Functions . . . . . . . . . . . . . . . . . . . . . . . . . . . . . . . . . . . . . . . . . . 24
7. Program Inputs Mode . . . . . . . . . . . . . . . . . . . . . . . 26
Select Channel . . . . . . . . . . . . . . . . . . . . . . . . . . . . . . . . . . . . . . . . . . . 26
The Polarity Menu . . . . . . . . . . . . . . . . . . . . . . . . . . . . . . . . . . . . . . . 27
The Adjust Threshold Menu . . . . . . . . . . . . . . . . . . . . . . . . . . . . . . . . . . 27
Switch Functions . . . . . . . . . . . . . . . . . . . . . . . . . . . . . . . . . . . . . . . . . . 28
A. Specifications . . . . . . . . . . . . . . . . . . . . . . . . . . . 30
Inputs . . . . . . . . . . . . . . . . . . . . . . . . . . . . . . . . . . . . . . . . . . . . . . . . 30
Interval In/Out . . . . . . . . . . . . . . . . . . . . . . . . . . . . . . . . . . . . . . . . . . . 30
RS-232 . . . . . . . . . . . . . . . . . . . . . . . . . . . . . . . . . . . . . . . . . . . . . . . 30
Display . . . . . . . . . . . . . . . . . . . . . . . . . . . . . . . . . . . . . . . . . . . . . . . 31
Controls . . . . . . . . . . . . . . . . . . . . . . . . . . . . . . . . . . . . . . . . . . . . . . 31
Performance . . . . . . . . . . . . . . . . . . . . . . . . . . . . . . . . . . . . . . . . . . . . 32
Power Requirements . . . . . . . . . . . . . . . . . . . . . . . . . . . . . . . . . . . . . . . . 32
Physical . . . . . . . . . . . . . . . . . . . . . . . . . . . . . . . . . . . . . . . . . . . . . . 33
Enviornmental . . . . . . . . . . . . . . . . . . . . . . . . . . . . . . . . . . . . . . . . . . . 33
ii
B. RS-232 Communications Interface . . . . . . . . . . . . . . . . 34
Remote Control . . . . . . . . . . . . . . . . . . . . . . . . . . . . . . . . . . . . . . . . . . 35
Definitions . . . . . . . . . . . . . . . . . . . . . . . . . . . . . . . . . . . . . . . . . . . 35
Read/Write Registers. . . . . . . . . . . . . . . . . . . . . . . . . . . . . . . . . . . . . . . . 38
Model 512 Instruction Set . . . . . . . . . . . . . . . . . . . . . . . . . . . . . . . . . . . 41
Model 512 Command Set . . . . . . . . . . . . . . . . . . . . . . . . . . . . . . . . . . . 41
ANSI/IEEE Std 488.2 Common Commands . . . . . . . . . . . . . . . . . . . . . . . . . 42
Model 512 Setup Commands . . . . . . . . . . . . . . . . . . . . . . . . . . . . . . . . . 44
Model 512 Learn Strings . . . . . . . . . . . . . . . . . . . . . . . . . . . . . . . . . . . 45
Model 512 Executable Commands and Queries . . . . . . . . . . . . . . . . . . . . . . . . 47
Remote Programming . . . . . . . . . . . . . . . . . . . . . . . . . . . . . . . . . . . . . . . 49
Remote Enable . . . . . . . . . . . . . . . . . . . . . . . . . . . . . . . . . . . . . . . . . 50
Device Clear . . . . . . . . . . . . . . . . . . . . . . . . . . . . . . . . . . . . . . . . . . 51
RS-232 Polling and Status Byte . . . . . . . . . . . . . . . . . . . . . . . . . . . . . . . . 51
RS-232 Message Exchange Protocol and Query Errors . . . . . . . . . . . . . . . . . . . . 53
Synchronizing Data Transfers . . . . . . . . . . . . . . . . . . . . . . . . . . . . . . . . . 53
Mode+Option Program Option . . . . . . . . . . . . . . . . . . . . . . . . . . . . . . . . . . 54
Select Baud Rate . . . . . . . . . . . . . . . . . . . . . . . . . . . . . . . . . . . . . . . . 55
Select Data Bits . . . . . . . . . . . . . . . . . . . . . . . . . . . . . . . . . . . . . . . . 55
Select Stop Bits . . . . . . . . . . . . . . . . . . . . . . . . . . . . . . . . . . . . . . . . 56
Select Parity On/Off . . . . . . . . . . . . . . . . . . . . . . . . . . . . . . . . . . . . . . 56
C. Installation Considerations . . . . . . . . . . . . . . . . . . . . 57
iii
Notes
iv
1. Introduction
The Model 512 Dual Counter/Timer offers greater than 250 MHz count rate capability
for the most demanding counting applications. In addition, the 512’s counters have a
count capacity of 1015–1. Photon counting applications, or experiments requiring
pulse-pair resolutions of about 4 ns, are now no longer limited by the counter/timer.
The Model 512 offers standalone performance in addition to being completely computer-controllable, if desired. Standalone operations are menu driven, and illuminated
pushbuttons are used to select displayed data, operating mode, count/stop/reset operation, and for manual programming. All functions, including threshold settings, are programmable though either the instrument’s front panel or the RS-232 interface.
The Model 512 also includes two timers. The non-gatable standard timer has a
selectable resolution of 0.01 seconds or 0.01 minutes, and is programmable from 0.01
to 99 999 999.99 seconds/min. The standard timer is software-based, so both hardware
counting channels are available for counting.
The high resolution timer is gateable and fully programmable, with a resolution of 0.1
µs from 1 µs to 9.999 999 9 seconds, and 10 s resolution up to 99 999 990.0 seconds.
Depending on the mode of operation, the high resolution timer uses channel 1 or channel 2, so that only one counting channel is available when the high resolution timer is
used. Also included is a programmable recycle timer which resets and initiates a new
counting interval at the completion of a cycle.
The Model 512 includes two high speed counters capable of greater than 250 MHz operation. Polarity, threshold, and counter/timer presets are all fully front-panel programmable. Depending on the mode of operation, channel 1 may be defined as a preset
counter or preset high resolution timer. Also, depending on the mode selected, channel
2 may be defined as a high resolution interval timer. When channel 1 is defined as the
preset counter, it is fully programmable from 1 to 99 999 999 counts. Both counter
channels have a dynamic range of 1015–1 counts, so overflow outputs are not required.
Both channels are gatable from the front-panel GATE inputs in both counter and timer
configurations.
The Model 512 includes a software-based event counter which increments at the completion of each counting interval. If the event counter value equals the event preset
register, further count intervals are inhibited (recycle is disabled).
Eight different user-defined operating configurations: presets, input polarity/threshold,
operating modes, etc., may be saved in non-volatile memory and recalled on command. In addition, one of these configurations may be selected as the power-on default
configuration. A self-test mode allows confirmation of proper counter/timer functioning at power on.
The built-in RS-232 serial communications interface provides computer control of all
Model 512 functions except the communications parameters.
Controls and Connectors
2. Controls and Connectors
Front Panel
This is a brief description of the Model 512’s front panel controls and connectors. For
more detailed information, refer to Appendix A, Specifications.
Figure 1 Front Panel Controls and Connectors
2
Rear Panel
Rear Panel
This is a brief description of the Model 512’s rear panel connector. For more detailed
information, refer to Appendix A, Specifications.
Figure 2 Rear Panel Connector
3
Programming the Model 512
3. Programming the Model 512
Programming the Model 512 for use in a counting system involves a number of considerations:
• Which counting mode to use (this chapter)
• Setting up the module (chapter 4 on page 7).
• Configuring the module (chapter 5 on page 16)
• Selecting the Presets (chapter 6 on page 23)
• Programming the inputs (chapter 7 on page 26)
• And if necessary, setting up the RS-232 interface (“Mode+Option” on page 54).
Selecting the Counting Mode
Choice of which Counting Mode to use depends on the application. In most applications, the Model 512 will be the Master, or only, counter/timer in the system. Some
applications will require that several counter modules be gated together; in this case
the Model 512 could act as counters only (CtrsOnly) and be controlled by another
timer module.
Note: When setting up a new configuration, the Counting Mode should be selected
first because changing the mode changes the Counter/Timer Preset to the default for that mode and may redefine CH 1 or CH 2.
The Timer/Counters (Tmr+Ctrs) Mode
The “Tmr+Ctrs” mode should be selected when the desired counting interval is constant, AND greater than 0.01 Sec, AND time-correction is not required. Both input
channels are available as counters.
The High Resolution Timer/Counter (HRT+Ctr) Mode
The “HRT+Ctr” mode should be selected if the desired interval is less than 0.01 sec or
if it is necessary to extend the interval for live-time correction. Channel 1 is redefined
–7
as the High Resolution Timer, which may be gated at 10 sec resolution; Channel 2 is
a normal counter.
4
Choice of Presets
The Preset/High Resolution Timer (Pset+HRT) Mode
The “Pset + HRT” mode should be selected to measure the time interval required to
accumulate the desired number of counts. Channel 1 is a preset counter; Channel 2 is
redefined as the High Resolution Interval Timer. The High Resolution Interval Timer
would not normally be gated in this mode.
The Preset/Counter (Pset+Ctr) Mode
The “Pset + Ctr” can be used to determine the ratio of counts accumulated. If time information is needed, in addition, an external, gatable timer is required. Channel 1 is
the preset counter; Channel 2 functions as a normal counter.
The Counters Only (CtrsOnly) Mode
The “CtrsOnly” mode is a Slave mode, in that once the Model 512 is enabled to count,
it continues until reset. An external interval generator is required. Both Channels function as normal counters.
Choice of Presets
Once the Counting Mode is programmed, the Counter or Timer Preset may be entered.
It must be reprogrammed after any mode change.
Channel Input Configuration
After a Counting Mode change, the Channel Input configuration should be checked. If
the mode change caused CH 1 or CH 2 to be re-enabled as a counter, the last
polarity-threshold programmed for that channel is loaded.
Note: The last programmed polarity/threshold information may have been loaded
with the User default or recalled configuration which had been saved in the
past – so check the new state. Also: if CH 1 or CH 2 is programmed as the
High Resolution Timer, its mnemonic will not appear in the Select Channel
Menu. See Chapter 7, “Program Inputs Mode”.
When selecting or reselecting the polarity for a channel, the threshold is reset to the
NIM Logic Threshold for that polarity. For example, if Positive polarity is selected for
CH 1, the threshold is set to +1.5 volts. This threshold is compatible with the logic
level outputs of NIM instruments such as Single Channel Analyzers (SCAs). Once the
Polarity is selected, the threshold may be set, if different from the Logic Threshold.
5
Programming the Model 512
Hint:
6
When setting the thresholds, set the Counter/Timer preset to give an interval of
about 1 sec, and enable Auto-Recycle with a Recycle Preset of about 0.5 sec
(make sure the Event Preset is very large so it won’t stop). Press
COUNT/STOP. The Model 512 will then count for about a second, stop and
hold, reset, then restart. The counts being accumulated in the selected channel
will be displayed, and the threshold may be adjusted. The count/stop/hold/reset
sequence may also be controlled by the COUNT/STOP and RESET +
COUNT/STOP sequences, if it is desired to not change the presets.
Display Operation (Upper/Lower)
4. Operate Mode
In the Operate Mode the OPER switch is illuminated, and the Model 512 is functioning in one of the MASTER counting modes described in “Counting Modes”, starting
on page 10. The Model 512 enters Operate Mode at power on and on exit from any of
the Local Programming Modes.
At power on, the Model 512 first checks memory, and performs other housekeeping
functions. If all is OK, the Model 512 then displays the message:
TENNELEC
TC 512
Unit’s model number
for two seconds, then:
00000-00
Serial Number of this unit
Rev 2.1
Main Program Software Revision
for two seconds, then:
TC512-02
RS-232 Communications Interface Installed
Rev 2.10
RS-232 Communications Interface Revision
for two seconds.
The Model 512 then enters the Operate Mode, loading a User-defined default configuration, if one has been defined.
Display Operation (Upper/Lower)
In Operate Mode, any valid channel for a given counting mode may be displayed in either display. Available display channels are determined by the selected counting mode.
Display Channel Mnemonics
1: Ctr1A
Channel 1 Counter
2: Ctr2A
Channel 2 Counter
1: PsetA
Channel 1 Preset Counter
7
Operate Mode
Display Channel Mnemonics
1: HRTA
Channel 1 High Resolution Preset Timer
2: IntvlA
Channel 2 High Resolution Interval Timer
StdTmr A
Standard Timer (O.01 Sec/Min)
RecycleA
Auto-Recycle Timer
Events A
Event Counter
A “1:” or “2:” appearing in the mnemonic indicates that this channel is associated with
the corresponding hardware channel, CH 1 or CH 2. Note that several of these mnemonics refer to the same hardware channel; these “aliases” are intended to quickly indicate the current counting mode and function of the channel. For example: “2:lntvlA”
means that the current counting mode is “Pset + HRT” and that CH 2 is operating as a
High Resolution Interval Timer. Since CH 2 is internally configured to act as a timer,
any external input connected to CH 2 INPUT will have no effect. An external input to
the CH 2 GATE will gate the High Resolution Interval Timer, as expected.
A display channel is selected by pressing one of the two CH SEL push-buttons (normally unlighted). When first pressed, the CH SEL button illuminates and the corresponding display shows the mnemonic of the currently selected channel for two
seconds.
If the CH SEL button is again pressed while illuminated, the display mnemonic increments to the next valid channel. After all possibilities have been scanned, the sequence
repeats.
In Operate Mode, the Counter and Timer information is normally formatted to eight
digits:
Display Formats
Counts/Events
12345678
counts < 108
1.234E08
counts ≥ 108
Standard/Recycle Timer (Seconds)
1234.56S
Time < 104 sec
1.234E5S
8
Time ≥ 104 sec
Switch Functions
Standard/Recycle Timer (Minutes)
1234.56M
Time < 104 min
1.234E5M
Time ≥ 104 min
High Resolution/Interval Timer
123.4uS
Time1 < 0.001 sec
123.45mS
0.001 ≤ Time ≤ 1 sec
1234.56S
1 ≤ Time < 104 sec
1.234E5S
Time ≥ 104 sec
Channel Threshold
±1.500V
0.100V ≤ Thresh ≤ 10.000V
Any of the formatted displays may be “deformatted” for about 20 seconds by pressing
the LEFT or RIGHT button. Also, if the LEFT or RIGHT button is pressed again in
the deformatted mode, the displays will scroll left or right to display the complete
number (this will also extend the deformat time by 20 seconds). Twenty seconds after
the last key press, the display will reformat. Alternatively, pressing the MODE +
OPER two button sequence will reformat the display.
Switch Functions
The phrase “Two-button sequence” refers to the MODE and RESET push-button
switches. If one of the buttons is pressed (in local mode), the “warning” lamp is lit for
two seconds. If a valid button is then pressed, the corresponding mode change/reset
operation is executed. If no valid button is pressed within two seconds, or an invalid
button is pressed, the operation is aborted, and the lamps extinguish.
Ch Sel (Upper/Lower)
Pressing either the Upper or Lower CH SEL button lights the switch for two seconds,
and the display indicates the mnemonic for the currently displayed channel. If the button is pressed again while lit, the display channel increments to the next valid selection
for that counting mode.
Left/Right
Pressing either the LEFT or RIGHT arrow buttons while either display is in the formatted mode will deformat both displays, and allow them to be scanned left and right.
Mode + Prog Preset
Two button sequence. The Model 512 enters Program Presets Mode.
9
Counting Modes
Mode + Prog Inputs
Two button sequence. The Model 512 enters Program Inputs Mode.
Mode + Config Module
Two button sequence. The Model 512 enters Configure Module Mode.
Mode + Oper
Two button sequence. Re-enables automatic display formatting if displays are
deformatted; otherwise, no effect.
Count/Stop
Enables/Disables counting. If the Model 512 is counting, it stops; if it is stopped (and
has not reached preset), it starts. Gating is synchronous to the next time mark or input
count, depending on counting mode. The switch is illuminated while enabled for
counting.
Reset + Count/Stop
Two button sequence. Resets timer and counting channels, and disables counting.
COUNT/STOP must then be pressed to initiate counting (if “AutoStrt” is in effect, the
Model 512 will immediately resume counting).
Mode + Option
Two button sequence. Enters RS-232 Setup Mode (discussed in ”Mode+Option“ on
page 54).
Option
No effect.
Counting Modes
The Model 512 incorporates five counting modes and a self-test mode. In four of these
modes, plus the self-test mode, the Model 512 is a “MASTER”, in that it generates the
master counting interval, available at the rear-panel INTERVAL IN/OUT connector,
In the fifth mode, the Model 512 is a “SLAVE”, in that it responds to an externally
generated master counting interval.
10
Operate Mode
Standard Timer + Two Counters
“Tmr + Ctrs” mode is selected when CONSTANT time intervals are desired; both
hardware channels are available as counters. The non-gatable, software-based timer
controls the master time interval applied to the counting channels. CH 1 (Ctrl A) and
CH 2 (Ctr2A) function as non-presettable, gatable counters. The rear-panel
INTERVAL IN/OUT connector functions as master gate output to control additional
counters. When the “Tmr + Ctrs” mode is selected (or reselected), the Standard Timer
Preset is set to 1.00 sec/min, depending on the state of the Standard Timebase.
Ch Sel Menu (Tmr + Ctrs)
(Upper and Lower Display)
1: CtrIA
CH 1 Counter
2: Ctr2A
CH 2 counter
StdTmr A
Standard Timer (0.01 sec/min)
RecycleA
Auto-Recycle Timer
Events A
Event Counter
In"Tmr + Ctrs" Mode, the Model 512 counting Interval is synchronized to the
Standard Timebase (either 0.01 sec or 0.01 min resolution). The ENABLE signal is
asynchronous to the timebase. It is generated by pressing the COUNT/STOP button in
local mode or on receipt of a START command from the RS-232 communications
interface. The next timer tick after ENABLE goes TRUE (or FALSE) starts (or stops)
the counting interval, CH1 GATE and CH2 GATE inhibit Ctrl A and Ctr2A,
respectively.
Note: Since timer ticks are 0.01 min (0.6 sec) apart when the MINUTES timebase is
selected, there will usually be a perceptible delay after generating the
ENABLE signal until the Model 512 starts (or stops) counting.
High Resolution Timer + Counter
“HRT + Ctr” is selected when it is desired to gate the timer channel, for instance, for
live-time correction. It is also selected when the desired counting interval is less than
0.01 sec. Channel 1 is reprogrammed to act as a high frequency timer (HRTA). CH 1
INPUT is internally disconnected and a 10 MHz oscillator signal is gated into channel 1. The counting interval may be extended by gating the timer through the CH 1
GATE input. Channel 2 functions as a non-presettable, gatable counter (Ctr2A). The
rear-panel connector, INTERVAL IN/OUT, functions as master gate output to control
additional counters. If “HRT + Ctr” mode is selected (or reselected), the High Resolution Timer Preset is set to 10.000 000 0 sec.
Ch Sel Menu (Hrt + Ctr)
(Upper and Lower Display)
11
Operate Mode
2: Ctr2A
CH 2 counter
1: HRTA
CH 1 High Resolution Preset Timer
RecycleA
Auto-Recycle Timer
Events A
Event Counter
In “HRT + Ctr” Mode, the Model 512 counting Interval is synchronized to the 10
MHz High Resolution Timebase. The ENABLE signal is asynchronous to the
timebase. It is generated by pressing the COUNT/STOP button in local mode or on
receipt of a START command from the RS-232 communications interface. The next
timer tick after ENABLE goes TRUE (or FALSE) starts (or stops) the counting
interval. CH 1 GATE gates HRTA and CH 2 GATE gates Ctr2A.
Preset Counter + High Resolution Interval Timer
Select the “Pset + HRT” mode when it is desired to measure the time required to accumulate a preset number of counts. Channel 2 is reprogrammed to act as a high resolution timer (IntvlA). CH 2 INPUT is internally disconnected and a 10 MHz oscillator
signal is gated into channel 2. Channel 1 functions as a fully presettable counter
(PsetA).
Note: In this mode, the timer is not presettable. It measures the time interval required
to accumulate N preset counts.
Ch Sel Menu (Pset + Hrt)
(Upper and Lower Display)
1: PsetA
CH 1 Preset Counter
2: IntvlA
CH 2 High Resolution Interval Timer
RecycleA
Auto-RecycleA Timer
Events A
Event Counter
The counting interval is extended by gating the preset counter through the CH 1
GATE input. The rear-panel INTERVAL IN/OUT connector functions as master gate
output to control additional counters. When “Pset + HRT” mode is selected (or
reselected), the Counter Preset is set to 1 000 000.
12
Counting Modes
In “Pset + HRT” Mode the Model 512 counting Interval is synchronized to the Preset
Counter Input (CH 1). The first count in CH 1 after ENABLE goes TRUE (assuming
CH 1 is not currently being gated) starts the timing interval and enables the High Resolution Interval Timer in CH 2. The Model 512 then counts until N counts (the Counter Preset) have been accumulated, then stops. If COUNT/STOP is pressed while
counting, the count gate closes on the next CH 1 input event. The ENABLE signal is
asynchronous to CH 1 input events. It is generated by pressing the COUNT/STOP button in local mode or on receipt of a START command from the RS-232 communications interface. CH 1 GATE inhibits the CH 1 Preset Counter. CH 2 GATE would not
normally be used in this application.
Preset Counter + Counter (Pset + Ctr)
CH 1 functions as a fully presettable counter and CH 2 functions as a normal counter.
Both counters are gatable through the corresponding gate inputs. No timer is available
in this mode, so any time information would be through an external timer, gated by the
INTERVAL IN/OUT signal. Gating CH 1 extends the counting interval. The rear-panel
INTERVAL IN/OUT connector functions as master gate output to control additional
counters. When this mode is selected (or reselected), the Preset Counter Preset is set to
1 000 000.
Ch Sel Menu (Pset + Ctr)
(Upper and Lower Display)
2: Ctr2A
CH 2 counter
1: PsetA
CH 1 Preset Counter
RecycleA
Auto-Recycle Timer
Events A
Event Counter
In “Pset + Ctr” Mode, the Model 512 counting Interval is synchronized to the CH 1
Preset Counter Input. The first count in CH 1 after ENABLE goes TRUE (assuming
CH 1 is not currently being gated) starts the interval and enables CH 2 INPUT. The
Model 512 then counts until N (the preset) counts have been accumulated, and stops.
If COUNT/STOP is pressed while counting, the count gate closes on the next CH 1
input event. The ENABLE signal is asynchronous to CH 1 input events. It is generated
by pressing the COUNT/STOP button in local mode or on receipt of a START
command from the RS-232 communications interface. CH 1 GATE inhibits the CH 1
Preset Counter. CH 2 GATE inhibits the CH 2 Counter.
13
Operate Mode
Counters Only
“CtrsOnly” mode is used when more channels are required to accumulate data with respect to the required Counting Interval than are available in one NIM module. When
this mode is selected, CH 1 and CH 2 function as normal counters. Both counters are
gateable through the corresponding gate inputs. No timer is available in this mode.
The rear-panel INTERVAL IN/OUT connector functions as master gate input from an
external timer. There is no preset in “CtrsOnly” mode.
Ch Sel Menu (CtrsOnly)
(Upper and Lower Display)
1: Ctr1A
CH 1 counter
2: Ctr2A
CH 2 counter
In “CtrsOnly” mode, the Model 512 will acquire while the external interval is TRUE
and COUNT/STOP is illuminated; i.e., from the time the Model 512 is enabled
(COUNT/STOP is pressed or a START signal is received) until RESET +
COUNT/STOP or a CLEAR command is executed. The Time Interval is set
externally.
Self Test
The Model 512 “SelfTest” mode is used to check correct operation of the instrument.
CH 1 and CH 2 INPUTS are internally disconnected, and the 10.000 MHz oscillator is
gated into the two counting channels. A pseudo-”Tmr + Ctrs” mode is then entered,
and counting begins at one second intervals. The displays should indicate 10 000 000
±400 counts if the timebases are within tolerance.
Note: CH 1 and CH 2 GATE INPUTS should be disconnected while “SelfTest” is
being performed.
Ch Sel Menu (SelfTest)
(Upper and Lower Display)
14
1: Ctr1A
CH 1 counter
2: Ctr2A
CH 2 counter
StdTmr A
Standard Timer (0.01 sec/min)
RecycleA
Auto-Recycle Timer
Events A
Event Counter
Counting Modes
Events Counter/Event Preset
The Model 512 Event Counter increments each time the unit reaches End of Interval.
If the Event Counter is then greater than, or equal to the Event Preset, Auto-Recycle is
set to OFF, and the Model 512 halts.
Auto-Recycle
The Model 512 Auto-Recycle feature allows the device to automatically initiate a
counting interval, accumulate counts, detect End of Interval (EOI – e.g., preset is
reached), stop, display accumulated counts, and repeat the sequence. Auto-Recycle is
not available in the slave, “CtrsOnly”, mode.
Recycle ON – When Auto-Recycle is ON, and EOI is reached, the Model 512 holds
the final display for up to 600.00 sec/min, depending upon which time base is selected.
The Event Counter is incremented and compared to the Event Preset. If the Event
Counter is less than the Event Preset, a delay period is initiated. When the delay is
completed, the Model 512 automatically clears, and re-initiates a counting interval. If
the Event Counter is greater than, or equal to the Event Preset, Recycle is disabled,
and the device stops.
Recycle OFF – When Auto-Recycle is OFF, only one interval will be executed from
the reset condition for each ENABLE command received. The Event Counter will be
incremented for each EOI detected.
Auto-Start on Reset
The Auto-Start function, when ON, allows the Model 512 to initiate a new counting
interval immediately after a reset; it is not necessary to press COUNT/STOP. When
OFF, the Model 512 will wait in the cleared condition until COUNT/START is
pressed. In either case, counting starts synchronously.
15
Configure Module Mode
5. Configure Module Mode
In the Configure Module Mode the CONFIG MODULE push-button switch is illuminated, and the Model 512 can be programmed via the front-panel. Various operating
parameters may be enabled/disabled. This mode is entered from Operate Mode by the
MODE + CONFIG MODULE sequence, and returns to the Operate Mode on Abort or
on selection of “EXIT ^” from the top-level menu. Abort is defined as the MODE +
OPER sequence; it causes an immediate return to the Operate Mode. On Abort, the
currently selected item is left unchanged; all previously changed items remain in effect.
In the Configure Module Mode, the Upper and Lower displays are used to guide the
User through the programming steps to configure the Model 512 for operation. When
ENTERed from Operate Mode the message:
CONFIG
MODULE
is displayed for one second, and the Configure Module Menu is entered. The SCROLL
and ENTER buttons illuminate. The first option is displayed in the Lower display. At
this point, the choices available in the menu may be reviewed by pressing the
SCROLL button.
Configure Module Menu
(Lower Display until selected, then Upper)
EvtReset
Reset Event Counter
AutoStrt
Start Count on Reset
Recycle
Auto-Recycle Enable/Disable
Set Mode
Select Counting Mode
TimeBase
Select Standard Time Base
Up/Dn
Select Count Direction
Recall
Recall User Configuration
Save
Save User Configuration
Default
Select Power-on Default
EXIT ^
Exit to Operate Mode
To select a function, press the ENTER button while the item appears in the Lower
Display. The selected item moves to the Upper Display and the first choice in the
sub-menu appears in the Lower Display (note exception: Reset Event Counter). The
choices in the sub-menu may then be scanned using the SCROLL button. The current
16
Reset Event Counter
state of the selection will flash ON and OFF. Press ENTER to enable the selection
(“Done” will appear in the Lower Display). Select “EXIT ^” to return to the Configure
Module Menu with no change.
Reset Event Counter
Press the ENTER button while "EvtReset" is displayed in the Lower Display to reset
the Event Counter to zero.
Start Count on Reset
Normally, "AutoStrt" is OFF: after a reset, the Model 512 will wait until the start command (pressing the COUNT/STOP button, for example) is given to begin counting. If
“AutoStrt” is ON, the Model 512 will immediately start counting after a reset (it will
still be synchronized to the time base).
Press the ENTER button while ON is displayed in the Lower Display to enable
Auto-Start. Press the ENTER button while OFF is displayed in the Lower Display to
disable Auto-Start (the COUNT/STOP button must be pressed to start the counting interval).
AutoStrt Menu
(Lower Display)
ON
Start Counting after reset
OFF
Wait for Start command
EXIT ^
Return to Configure Module Menu
Auto-Recycle Enable/Disable
Press the ENTER button while ON is displayed in the Lower Display to enable
Auto-Recycle. Press the ENTER button while OFF is displayed in the Lower Display
to disable Auto-Recycle.
Recycle Menu
(Lower Display)
ON
Enable Auto-Recycle
OFF
Disable Auto-Recycle
17
Configure Module Mode
EXIT ^
Return to Configure Module Menu
Select Counting Mode
To change the Model 512 counting mode, press the ENTER button while one of the
following choices is displayed in the Lower Display. The default preset (if applicable)
is loaded. Recycle and Event Presets are not changed. If “HRT + Ctr” or “Pset + HRT”
is selected, either CH 1 or CH 2 will be disconnected, and that channel will be reprogrammed as a High Resolution Timer. If the mode change re-enables CH 1 or CH 2,
the threshold and polarity will be set to the most recently programmed values.
Note: Be sure to check the PROG PRESETS and PROG INPUTS functions after any
mode change.
SetMode Menu
(Lower Display)
SelfTest
Self-Test Mode
Tmr + Ctrs
Std Timer + Two Counters
CtrsOnly
Two Counters only
HRT + Ctr
High Resolution Timer + Counter
Pset + HRT
Preset Counter + Interval Timer
Pset + Ctr
Preset Counter + Counter
EXIT ^
Return to Configure Module Menu
Select Standard Time Base
Press ENTER while "Seconds" is displayed in the Lower Display to select Seconds as
the Standard Time Base. The numeric value of the Recycle Timer Preset (and Standard
Timer Preset) will not change; however, the interpretation will change to Minutes or
Seconds, as selected. In "HRT + Ctr Mode, selecting "Minutes" will affect only the
Recycle Timer.
TimeBase Menu
(Lower Display)
18
Seconds
Select Seconds
Minutes
Select Minutes
EXIT ^
Return to Configure Module Menu
Select Count Direction
Select Count Direction
Press the ENTER button while “Down” is displayed in the Lower Display to select
Timer Down-Counting. When the timers count DOWN, the time displayed indicates the
time remaining until End of Interval. At the end of the interval, the timer display is reset
to the Timer Preset.
Up/Down Menu
(Lower Display)
Up
Timers count UP to preset
Down
Timers count DOWN to "0"
EXIT ^
Return to Configure Module Menu
Recall User Configuration
If any configurations have been defined, they will be presented by the previously defined NAME, and may be scrolled with the SCROLL button; otherwise, only the factory default configuration, “USER0000”, and the “EXIT ^” message will appear. To
Recall a stored configuration, press ENTER while the “User Name” is displayed in the
Lower Display.
Recall Menu
(Lower Display)
USER 1
:
If defined
(Other Defined Configurations)
USER0000
Always available
EXIT ^
Return to Configure Module Menu
(Do NOT Load)
Save User Configuration
The current state of the Model 512’s Counting Mode, Preset, Input Polarity/Threshold,
etc., is saved to non-volatile memory. It may be recalled at a later time.
Save Menu
(Lower Display)
USER 1
If defined
19
Configure Module Mode
:
(other Defined Configurations)
USER ?
First Unused Slot, if any
EXIT ^
Return to Configure Module Menu
(Do NOT Save)
Use the SCROLL button to scan the names of available slots. The next unused slot (if
any) will be added to the list as “USER X”. Initially, no configurations have been
saved, so only the “USER 1” (i.e., first unused slot) and “EXIT A” messages are
available.
Select the desired slot with the ENTER button. The following message will appear:
EditName
USER ?
allowing the User to edit the name to a more easily remembered mnemonic. All eight
places of the NAME are available for editing via the LEFT, RIGHT, UP, and DOWN
cursor buttons. The current character will flash (the “space” character will flash
unseen). The LEFT/RIGHT buttons scroll the current character left and right. The
UP/DOWN buttons increment/decrement the current character through all valid
characters. It is recommended that the User# be incorporated into the name at some
point, because the ANSI/IEEE Std 488.2-1987 programming convention requires use
of numbers to save and recall User-defined configurations.
Note that a previously saved configuration can be changed to the current Model 512
configuration by selecting its name instead of “USER ?”.
When the edited name is satisfactory, press the ENTER button to save the configuration. The Model 512’s state will then be saved to non-volatile memory.
Note: If it is necessary at this point to not save to the selected slot, use the Abort sequence: MODE + OPER).
Select Power On Default
The Power-On Default determines the operating parameters of the Model 512 when
first turned on. One of the eight user configurations (if defined) or the factory default
may be selected.
20
Switch Functions
If any configurations have been defined, they will be presented by NAME; otherwise,
only “USER0000” (the factory default) and the “EXIT ^” message will appear. Scan
the available choices using the SCROLL button. The current Power-On Default (if
any) will flash. Select the new Power-On Default with the ENTER button. The selection will be saved to non-volatile memory, and at each subsequent power-on, this state
will be recalled.
Default Menu
(Lower Display)
USER 1
:
If defined
Other efined configurations
USER0000
Factory Default/Always available
EXIT ^
Return to Configure Module Menu
(Do NOT store)
Switch Functions
The phrase “Two-button sequence” refers to the MODE and RESET push-button
switches. If one of the buttons is pressed (in local mode), the “warning” lamp is lit for
two seconds. If a valid button is then pressed, the corresponding mode change/reset
operation is executed. If no valid button is pressed within two seconds, or if an invalid
button is pressed, the operation is aborted, and the lamps extinguish.
Scroll
Illuminated whenever there are valid menu options available. Use this button to scan
menu options.
Enter
Illuminated whenever there are valid menu options available. Use this button to enter
the desired state of a menu option.
Left/Right
Pressing the LEFT or RIGHT arrow buttons while in the "EditName" sub-menu scrolls
the current character left or right.
Up/Down
Pressing the UP or DOWN arrow buttons while in the "EditName" sub-menu cycles
the current character through all valid choices. Hold the button down for about a second to increase the rate.
21
Configure Module Mode
Mode + Prog Preset
Two button sequence. No effect.
Mode + Prog Inputs
Two button sequence. No effect.
Mode + Config Module
Two button sequence. No effect.
Mode + Oper
Abort. Two button sequence. Return immediately to Operate Mode.
Reset + Count/Stop
Two button sequence. No effect
Mode + Option
No effect.
Option
No effect.
22
Program Presets Mode
6. Program Presets Mode
In the Program Presets Mode, the PROG PRESET switch is illuminated. The Model
512 is in the local preset programming mode, allowing the Event Counter, Recycle
Time, and the Standard Time, High Resolution Timer, or Preset Counter presets, to be
changed. This mode is entered from Operate Mode by the MODE + CONFIG
MODULE sequence, and returns to the Operate Mode on “EXIT ^” from the top-level
menu or Abort. On Abort, the currently selected item is left unchanged; all previously
changed items remain in effect.
In “CtrsOnly” mode, no presets are available, since the Model 512 is acting as a slave.
Consequently, selecting MODE + PROG PRESET causes an immediate return to Operate Mode.
Select Preset
In the Program Presets Mode, the Upper and Lower displays are used to guide the
User through the programming steps necessary to program the appropriate presets for
the current counting mode. When first entered from Operate Mode the message:
PROG
PRESET
is displayed for one second, and the top level menu is entered. The SCROLL and
ENTER buttons illuminate. The first option is displayed in the Lower display. At this
point, the choices available in the top level may be scanned by pressing the SCROLL
button. Available presets depend on the current Counting Mode and the state of
Auto-Recycle.
Select Preset Menu
(Lower Display until selected, then Upper)
23
1: HRTA
High Resolution Timer: “HRT+Ctr”
1: PSetA
Counter Preset: “Pset+HRT”,"Pset+Ctr"
StdTmr A
StdTimerPreset: “Tmr+Ctrs”, “Self Test”
RecycleA
Auto-Recycle Time: (ex: “CtrsOnly”)
Events A
Event Counter Preset: (ex: “CtrsOnty”)
EXIT ^
Return to Operate Mode
Program Presets Mode
To select one of the presets, press the ENTER button. The selected preset mnemonic
will move to the Upper Display, and the current value of the preset will appear as an
unformatted number in the Lower Display.
The number may now be edited using the Cursor buttons. The LEFT and RIGHT buttons move the flashing cursor left and right, scrolling the display if necessary. The UP
and DOWN buttons increase/decrease the displayed number (Note: the number will
not be allowed to over-range or under-range for the given preset).
When satisfied with the new preset, press the ENTER button to store the new value
and return to the Select Preset Menu.
Switch Functions
The phrase “Two-button sequence” refers to the MODE and RESET push-button
switches. If one of the buttons is pressed (in local mode), the “warning” lamp is lit for
two seconds. If a valid button is then pressed, the corresponding mode change/reset
operation is executed. If no valid button is pressed within two seconds, or if an invalid
button is pressed, the operation is aborted, and the lamps extinguish.
Scroll
Illuminated whenever there are valid menu options available. Use this button to scroll
through menu options.
Enter
Illuminated during number programming. Use this button to enter the new preset.
Left/Right
Pressing the LEFT or RIGHT arrow buttons moves the flashing cursor left and right.
Up/Down
Pressing the UP or DOWN arrow buttons increases or decreases the displayed preset.
Mode + Prog Preset
Two button sequence. No effect.
Mode + Prog Inputs
Two button sequence. No effect.
Mode + Config Module
Two button sequence. No effect.
24
Switch Functions
Mode + Oper
Abort. Two button sequence. Returns immediately to Operate Mode. Currently displayed preset not stored.
Reset + Count/Stop
Two button sequence. No effect.
Count/Stop
No effect.
Mode + Option
No effect.
Option
No effect.
25
Program Inputs Mode
7. Program Inputs Mode
In the Program Inputs Mode, the PROG INPUTS switch is illuminated. The Input Polarity and Threshold for CH 1 and CH 2 may be selected/adjusted. This mode is entered from Operate Mode by the MODE + PROG INPUTS sequence, and returns to
the Operate Mode on “EXIT ^” from the top-level menu or Abort. On Abort, the currently selected item is left unchanged; all previously changed items remain in effect.
Select Channel
In the Program Inputs Mode, the Upper and Lower displays are used to guide the User
through the programming steps necessary to program the Counter Channel inputs.
When first entered from Operate Mode the message:
PROG
INPUTS
is displayed for one second, and the Select Channel Menu is entered. The SCROLL
and ENTER buttons illuminate. The first channel option is displayed in the Lower
display. At this point, the available channels may be scanned by pressing the SCROLL
button.
Select Channel Menu
(Lower Display until selected, then Upper)
1: Ctr1A
Change CH 1 Polarity/Threshold
2: Ctr2A
Change CH 2 Polarity/Threshold
EXIT ^
Return to Operate Mode
Note: In “HRT+Ctr” (CH 2) and “Pset+HRT” (CH 1) modes, either CH 1 INPUT or
CH 2 INPUT is internally disconnected from the front-panel connector, since
they are acting as timers. Because of this, the polarity or threshold of a channel
programmed as a High Resolution Timer cannot be changed, and will not be
displayed as choices.
Select the desired channel by pressing the ENTER button while the mnemonic is displayed in the Lower Display. The indicated channel mnemonic moves to the Upper
Display, and the Polarity Threshold Menu is entered.
26
Select Channel
Polarity Threshold Menu
(Lower Display until selected, then Upper)
Set Pola
Select Channel Polarity
Adj Thre
Adjust Channel Threshold
EXIT ^
Return to Select Channel Menu
The first option appears in the Lower Display. The various options may be scanned
using the SCROLL button. Select one using the ENTER button.
The Polarity Menu
Selecting the “Set Pola” option enters the Set Polarity Menu. The first option appears
in the Lower Display. The various options may be scanned using the SCROLL button.
The current polarity of the selected channel will flash. Select one using the ENTER
button.
Whenever the polarity is selected or reselected, the threshold for that channel is set to
the NIM logic level as a default: + 1.5 V for positive polarity, and –250 mV for negative polarity. The act of selecting the polarity, even if it is the same as currently programmed, will change the threshold to the default. The threshold may then be set to
the desired value.
Set Polarity Menu
(Lower Display)
POS (+)
Select Positive Input Polarity.
Neg (–)
Select Negative Input Polarity
EXIT ^
Return to Polarity/Threshold Menu
The Adjust Threshold Menu
Selection of the “Adj Thre” option sets up a pseudo-Operate Mode in which the selected channel’s accumulating counts are displayed in the Upper Display and the currently programmed threshold is displayed in the Lower Display. The RESET +
COUNT/STOP and COUNT/STOP buttons function normally, as in the Operate
Mode.
The threshold may now be adjusted using the cursor buttons. The LEFT and RIGHT
buttons move the flashing cursor left and right. The UP and DOWN buttons increase
or decrease the displayed threshold (Note: the threshold will not be allowed to
over-range or under-range for the selected polarity).
27
Program Inputs Mode
When satisfied with the new value, press the ENTER button to store the new threshold
and return to the Polarity Threshold Menu. If it is necessary to NOT store the new
value while editing, use the Abort sequence.
Switch Functions
The phrase “Two-button sequence” refers to the MODE and RESET push-button
switches. If one of the buttons is pressed (in local mode), the warning lamp is lit for
two seconds. If a valid button is then pressed, the corresponding mode change/reset
operation is executed. If no valid button is pressed during the two seconds, or if an invalid button is pressed, the operation is aborted, and the lamps extinguish.
Scroll
Illuminated whenever there are valid menu options available, Use this button to scroll
through menu options.
Enter
Illuminated during number programming. Use this button to enter the new preset.
Left/Right
Pressing the LEFT or RIGHT Arrow buttons to move the flashing cursor left and right.
Up/Down
Pressing the UP or DOWN Arrow buttons increases or decreases the displayed threshold.
Mode + Prog Preset
Two button sequence. No effect.
Mode + Prog Inputs
Two button sequence. No effect.
Mode + Config Module
Two button sequence. No effect.
Mode + Oper
Abort. Two button sequence. Returns immediately to Operate Mode. Currently displayed preset NOT stored.
28
Switch Functions
Count/Stop
Enables/Disables counting. If the Model 512 is counting, it stops; if it is stopped, and
has not reached preset, it starts. Gating is synchronous to the next time mark or input
event, depending on counting mode. The switch is illuminated while counting.
Reset + Count/Stop
Two button sequence. Resets all timers and counting channels, and disables counting
(does not reset Event Counter). COUNT/STOP must then be pressed to resume counting.
Mode + Option
No effect.
Option
No effect.
29
Specifications
A. Specifications
Inputs
INPUTS (CH1/CH2) – Polarity and threshold are selected through the PROG INPUTS
function; input must exceed threshold; when polarity is changed, the threshold defaults
to the appropriate NIM logic level threshold: +1.5 V (pos) or –250 mV (neg); front
panel BNC connectors.
Negative polarity: Zin=50 Ω; dc coupled; amplitude: –100 mV to –5 V; minimum
pulse width >2 ns; threshold is adjustable from –100 mV to –5.0 V; resolution =
5 mV.
Positive polarity: Zin=3 kΩ; dc coupled; amplitude: +100 mV to +10 V, minimum pulse width >20 ns; threshold is adjustable from +100 mV to +10.0 V; resolution = 5 mV.
GATES (CH1/CH2) – Accept NIM positive logic signals to enable/disable counting in
the channel. Open circuit or Vin >+2.4 V enables counting. Vin <+1.5 V disables
counting; front panel BNC connectors.
Interval In/Out
This connector controls or is controlled by the master count interval. In the counters
only mode, this connector is an input; in all other modes, it is an output; rear panel
BNC connector.
IN – Receives an external interval signal: open circuit, or V in >+2.4 V, allows
counting; Vin <+1.5 V stops counting; TTL-compatible input.
OUT – Provides a nominal +5 V during the counting interval and <+1.5 V when
counting is disabled. Isink and Isource ≈ 30 mA, maximum, for NIM positive logic
levels.
RS-232
Standard RS-232C serial communications connector; rear panel DB-25 connector.
30
Display
Display
DISPLAY – Data display features automatic formatting and leading zero suppression.
8
The display shifts to an exponential format when accumulated counts exceed 10 –1
4
counts, or displayed time is greater than 10 –1 s/min. In addition, using the high
resolution timer and displaying intervals of less than one second results in a ms or µs
display. The full display can be restored by using the LEFT/RIGHT cursor buttons.
Two front panel 8-digit alphanumeric dot-matrix displays.
Controls
CH SEL/SCROLL – In local or remote, CH SEL is used to select one channel for display from all available for that mode. In local, SCROLL is used to scroll through
menu selections during programming. Disabled in remote. Front panel pushbutton
switch with LED.
CH SEL/ENTER – In local or remote, CH SEL is used to select one channel for display from all available for that mode. In local, ENTER is used to select an item from
the menu or to enter new presets, thresholds, etc. Disabled in remote. Front panel
pushbutton switch with LED.
MODE/REMOTE – In local, pressing MODE enables the OPER, PROG PRESET,
CONFIG MODULE, and PROG INPUTS pushbuttons for two seconds. In remote, the
pushbutton is illuminated continuously to indicate computer control. Front panel
pushbutton switch with LED.
LEFT/RIGHT – In local and remote, pressing the LEFT and RIGHT buttons
deformats the display for 20 s and scans the display left and right. In local only, enters
presets and thresholds during programming. Front panel pushbutton switch with LED.
UP/DOWN – In local, used to enter presets and thresholds during programming. Front
panel pushbutton switch with LED.
OPER – In local, MODE+OPER returns the unit to normal operation from a programming mode; enables auto-formatting of displays; front panel pushbutton switch with
LED.
PROG PRESET – In local, MODE+PROG PRESET enters the Presets Programming
mode; front panel pushbutton switch with LED.
PROG INPUTS – In local, MODE+PROG INPUTS enters the Inputs Programming
Mode; front panel pushbutton switch with LED.
CONFIG MODULE – In local, MODE+CONFIG MODULE enters the Configure
Module Programming mode; front panel pushbutton switch with LED.
31
Specifications
OPTION – In local, selects available functions; front panel pushbutton switch with
LED.
RESET – In local, RESET+COUNT/STOP resets counters and timers and stops counting; front panel pushbutton switch with LED.
COUNT/STOP – In local, starts or stops counting; synchronized to timer/counter 1,
depending on the mode; front panel pushbutton switch with LED.
Performance
15
COUNT CAPACITY – Counter channels have a count capacity of 10 –1 counts. The
8
Preset Counter channel has a capacity of 10 –1 counts.
MAXIMUM COUNTING RATE – Maximum counting rate for positive inputs is 25
MHz. For negative inputs, maximum rate is greater than 250 MHz.
PULSE PAIR RESOLUTION – <40 ns for positive inputs; <4 ns for negative inputs.
TIME BASE – Two time bases are provided, depending on mode.
Standard timer: resolution is selectable for 0.01 s or min; programmable from
0.01 s or min to 99 999 999.99 s or min.
High resolution timer: resolution of 0.1 µs from 1 µs to 9.999 999 9 s; resolution
of 10 s up to 99 999 990.0 s.
TIME BASE INACCURACY – Maximum error for both time bases is ≤±0.0025% inclusive of calibration tolerance at 25 °C, operating temperature range, power supply
variation, aging, shock and vibration.
Power Requirements
32
+12 V – 110 mA
+6 V – 410 mA
–12 V – 10 mA
–6 V – 800 mA
Physical
Physical
Standard double-width NIM module; 6.86 x 22.12 cm (2.70 X 8.71 in.) per
DOE/ER-00457T.
NET WEIGHT – 1.36 kg (3.0 lb)
SHIPPING WEIGHT – 2.27 kg (5.0 lb)
Enviornmental
OPERATING TEMPERATURE RANGE – 0–50 °C.
OPERATING HUMIDITY – Up to 95%, non-condensing.
33
B. RS-232 Communications Interface
The RS-232 Interface allows the Model 512 to operate under remote computer control,
in addition to local standalone operation.
The Model 512’s rear-panel DB-25 connector connects to a personal computer communications port through a one-to-one data cable. It will also connect directly to certain terminals. Figure 3 shows the connector’s pinouts.
Figure 3 The RS-232 Connector
The RS-232 Communications Interface, where possible, utilizes the same software
commands as the IEEE-488 interface. Certain modifications are made because of the
unavailability of some functions, for example, the 488.1 Serial Poll, for which a software version of the serial poll is implemented.
34
RS-232 Communications Interface
Once initialized, the Model 512 is ready for communication with the computer via the
RS-232 Serial Interface.
References
1. ANSI/IEEE Std 488.2-1987 : 1EEE Standard Codes, Formats, Protocols, and
Common Commands (488.2).
2. Hewlett-Packard Publication 5952-0156 (Rev. 11 /87) : Tutorial Description
of the Hewlett-Packard Interface Bus.
Remote Control
Remote commands, in the form of PROGRAM MESSAGES, are sent by the controller
to the Model 512 over the RS-232 serial interface as a sequence of ASCII-coded digits. All responses, in the form of RESPONSE MESSAGES, are sent by the Model 512
to the controller as ASCII coded digits in the range 0…127 (7Fhex).
Definitions
Alpha-Numeric
An ASCII-coded character in the range ‘0’…‘9’, ‘A’…‘Z’. Lower-case characters,
‘a’…‘z’ are converted to uppercase in the Model 512.
Whitespace
The ASCII space character, ‘ ’ 32 (20hex). Also, unused control codes (in the range
0…31 [1Fhex]), and ASCII codes ≥ 128 (80hex) are treated as whitespace.
Program Message
A sequence of PROGRAM MESSAGE UNITS, separated by PROGRAM MESSAGE
UNIT SEPARATORS, and terminated by a PROGRAM MESSAGE TERMINATOR
(PMT).
Program Message Units (PMU)
Executable “commands” or “queries.”
Program Message Unit Separator
The semicolon, ‘;’.
Program Message Terminator (PMT)
The code sent by the controller to indicate that a complete message has been sent; the
Model 512 recognizes all of the following:
35
Remote Control
• LF ASCII char 10 (0Ahex) LineFeed
• CR ASCII char 13 (0Dhex) Return
• CRLF Return + LineFeed
Command
A COMMAND PROGRAM HEADER, possibly followed by a PROGRAM
HEADER SEPARATOR and one or more data elements, separated by PROGRAM
DATA SEPARATORS. A Command directs the Model 512 to perform some action,
such as changing the counting mode. It does not return a response message.
Query
A QUERY PROGRAM HEADER, followed by a “?”. A Query directs the Model 512
to perform some action, such as reading the counters, and to return the results of that
action to the controller in the form of a RESPONSE MESSAGE.
Command or Query Program Header
A DEVICE PROGRAM MNEMONIC OR COMMON COMMAND. NOTE: Command and Query headers are significant in the first 4 characters only (includes “*” for
common commands). That is, the headers may be longer, up to a recommended maximum of twelve characters. The penalty of the longer, more descriptive name is increased processing time, and increased input buffer usage.
Program Header Separator
The SPACE character or whitespace.
Program Data Separator
The comma, ‘,’.
Common Command
An ANSI/IEEE-488.2 defined command or query. It is a four character mnemonic
which begins with ‘*’, These commands are common to all devices conforming to the
488.2 Standard.
Device Program Mnemonic
A sequence of at least four characters, up to a recommended maximum of twelve, beginning with an alpha character, ‘a’…‘z’, or ‘A’…‘Z’. These are device-specific commands.
Response Message
A sequence of RESPONSE MESSAGE UNITS, separated by RESPONSE MESSAGE
UNIT SEPARATORS, and terminated by a RESPONSE MESSAGE TERMINATOR.
36
RS-232 Communications Interface
Response Message Unit (RMU)
A response by Model 512 to a Query PMU from the controller.
Response Message Unit Separator
the semicolon, ‘;’.
Response Message Terminator (RMT)
The RMT terminates the Response Message
CRLF
Return + LineFeed
End Partial Transmission (ETX)
When using the AUTO? command, this character is sent to signal the completion of
each block of data; when the last block is sent, an RMT is sent.
CRLF Return + LineFeed
Resume Transmission (XON)
Enables transmission of the Model 512 Response Message.
XON
Ctrl-Q, ASCII char 17 (11hex), DC1
Stop Transmission (XOFF)
Disables transmission; Response Message remains in the output queue until
CONTROLLER sends XON.
XOFF
Ctrl-S, ASCII char 19 (13hex), DC3
Remote Enable (REN)
Enables transmission of Model 512 Response Message.
REN
Ctrl-T, ASCII char 20 (14hex), DC4
Go To Local (GTL)
Disables transmission; Response Message remains in the output queue until
CONTROLLER sends XON.
37
Read/Write Registers
GTL
Ctrl-R, ASCII char 18 (12hex), DC2
Note: The Model 512 will generate a RESPONSE MESSAGE only if a valid, properly terminated Program Message containing a QUERY MESSAGE, has been
received. Errors are reported through the Standard Event Status Register and
Status Byte. An RMU may be returned if an error condition occurs in another
PMU within the same Program Message, but the returned data may or may not
be valid.
Input Buffer
The Model 512 Input Buffer Length is 250 bytes. Any one Program Message Unit
may be, at most, 32 characters long. The Model 512 will buffer incoming commands
until a ‘;’ or PMT is received, at which time the command will execute. Commands
are normally executed sequentially.
Output Queue
The Model 512 Output Queue Length is 250 bytes. If the Output Queue fills (XOFF is
in effect), the Model 512 will display the message:
—BUFFER—
——FULL——
then wait until one of the following events occurs:
1. The response is read by the CONTROLLER,
2. A Device Clear is executed, or
3. Power is cycled.
Compound Commands
Compound Commands as defined by ANSI/IEEE Std 488.2 are not supported by the
Model 512.
Read/Write Registers
Several User-accessible registers are contained in the Model 512: the
ANSI/IEEE-488.2 defined registers ESR, ESE, STB, and SRE, and the Model
512-specific registers MR1 and MR2.
38
RS-232 Communications Interface
Standard Event Status Register Enable (ESE)
7
6
5
4
3
2
1
0
EnPOn
EnURQ
EnCME
EnEXE
EnDDE
EnQYE
EnRQC
EnOPC
Enable Bits for ESR. Set to ‘1’ to enable status reporting for the applicable bit. All bits cleared to ‘0’ at
power-on.
Standard Event Status Register (ESR)
7
6
5
4
3
2
1
0
POn
URQ
CME
EXE
DDE
QYE
RQC
OPC
Bits are set TRUE (‘1’) if condition occurs. They are reset to ‘0’ by executing *ESR? or *CLS.
PON Power-On Status Sit; SET at power-on
CME Command Error. A syntax error, or parameter too large.
EXE Execution Error. Usually an out-of-range data error.
DDE Device Dependent Error. Usually, a non-valid command for the current Counting Mode.
QYE Query Error. Data in Output Queue has been lost due to failure to follow Message Exchange Protocol.
*OPC Operation Complete. Set when Model 512 reaches preset, if * OPC command has been executed.
URQ/RQC Not used by Model 512.
Status Byte (STB)
7
6
5
4
3
2
1
0
TAG
RQS
MSS
ESB
MAV
—
—
—
EOI
Bits are set TRUE (‘1’) if condition occurs.
TAG Identifies Status Byte in response to ENC.
RQS Request for Service. At least one of the UNMASKED bits in STB has made a ‘0’ → ‘1’ transition.
A NEW reason for service has occurred. Reset when read by ENQ.
MSS Master Summary Status. Reported via *STB?. At least one of the UNMASKED bits in STE is
TRUE.
ESB Standard Event Summary. At least one of the UNMASKED bits in ESR is TRUE.
MAV Message Available. Data is available in the Output Queue.
EOI End of Interval. The Model 512 has reached Preset. Reset on CLEA,*RST.
Service Request Enable Register (SRE)
7
6
5
4
3
2
1
0
—
X
EnESB
EnMAV
—
—
—
EnEOI
Enable Bits for STB, Set to ‘1’ to enable status reporting. All bits are cleared to ‘0’ at power-on.
39
Read/Write Registers
EnESB Set RQS in STS on ESB 0 → 1 transition.
EnMAV Set RQS in STB on MAV.
EnEOI Set RQS in STIB on End Of Interval; the Model 512 reaches Preset.
Mode Register 0 (MRO)
7
6
5
4
3
2
1
0
—
—
—
—
—
—
Down
Min
Down Timer Counting Direction
1 : Timers count DOWN
0 : Timers count UP
Min Standard Timer Timebase
1 : Standard Timebase = MINUTES
0 : Standard Timebase = SECONDS
Mode Register 1 (MR1)
7
6
5
4
3
2
1
0
—
—
—
—
Recyc
M2
M1
M0
Recyc Auto-Recycle Enable/Disable
1 : Auto-Recycle = ON
0 : Auto-Recycle = OFF
M2 M1 M0 Select Model 512 Counting Mode
0 0 1 : “Tmr +Ctrs”
0 1 0 : “CtrsOnly”
0 1 1 : “HRT+Ctr”
1 0 0 : “Pset + HRT”
1 0 1 : “Pset + Ctr”
Notes: 1. Changing Mode Register 1 bits M2…MO will force a clear, and leave the
Model 512 in the stopped state.
2. If Auto-Recycle is enabled, and the Event Counter is greater than, or equal
to, the Event Counter Preset on the next EOI, the Recycle Bit in Mode Register 2 will be reset, and the Model 512 will stop. It will then be necessary
to 1) increase the Event Preset, or reset the Event Counter. AND 2) re-enable Auto-Recycle.
40
RS-232 Communications Interface
Model 512 Instruction Set
The Model 512 Instruction Set derives from ANSI/IEEE Std 488.2-1987. All commands required by that standard are implemented. In addition, a number of device-specific commands are also implemented, using a similar format.
In the following lists:
* denotes an ANSI/IEEE Std 488.2 common command
? indicates a Query Message Unit, which will generate a response from the Model 512.
<NR1> Number without decimal point: 12345
<NR2> Number with decimal point : 123.45
<NR3> Number in Exponential Format : - 1.23E-4
<NRf> Number in Flexible Numeric Representation: i.e., either an <NR1>, <NR2>, or
<NR3>.
The Model 512 will accept all formats, as long as they are within range. When responses are generated, the replies will be in either or format, as applicable to the given
command.
<NRf> Rules
(1) An <NRf> which evaluates ≥ 100 000 000.0 will generate a Command Error.
(2) Digits past the 8th decimal place are truncated.
(3) <NRf> numbers are rounded, then range checked, according to the particular command. Out-of-range numbers at this point generate Execution Errors.
Model 512 Command Set
The Model 512 Command Set consists of several groups of commands:
(1) ANSI/IEEE Std 488-2 Common Commands, which provide a common method of
identifying devices, synchronizing data transfers and reporting status,
(2) Model 512 Set Up Commands, which provide the configuration commands to the
Model 512,
(3) Model 512 Learn Strings, which provide the current configuration information of
the Model 512, and
41
Read/Write Registers
(4) Model 512 Executable Commands and Queries, which control operation of the
module, and return data to the system controller.
ANSI/IEEE Std 488.2 Common Commands
*IDN? Identification Query
The Model 512 responds:
TENNELEC, TC 512,[S/N],[Revision]<RMT>
Where:
[S/N] is the Model 512’s serial number
[Revision] is the software revision.
Note: *IDN? must be the last query message unit in the Program Message, otherwise
a Query Error will be generated.
*LRN? Learn Setup) Query
The Model 512 responds as if the following Program Message Units had been sent:
MODE?;PRES?;RECY?;EVEN?;CHAN?
The response string contains all necessary information in the correct order to return the
Model 512 to its current state. The 512 exits this command in the cleared/stopped
state.
*CLS Clear Status Command
This command clears ESR, the E0I bit in STB, and exits any Operation Complete Active State.
*STB? Read Status Byte Query
The Model 512 responds:
<NR1>
where <NR1> , in the range 0..255, expressed in binary, represents the bit values of
the Status Byte.
*SRE <NRf> Service Request Enable Command
<NRf>, when rounded to an integer in the range, 0…255, expressed in binary, programs the bit values of Service Request Enable Register.
*SRE? Service Request Enable Query
The Model 512 responds:
<NR1>
42
RS-232 Communications Interface
where <NR1>, in the range 0…255, expressed in binary, represents the bit values of
the Service Request Enable Register.
*ESR? Standard Event Status Register Query
The Model 512 responds:
<NR1>
where <NR1>, in the range 0…255, expressed in binary, represents the bit values of
the Standard Event Status Register. Executing this command clears ESR after returning its value.
*ESE <NRf> Standard Event Status Enable Command
<NRf>, when rounded to an integer in the range 0…255, expressed in binary, programs the bit values of the Standard Event Status Enable Register.
*ESE? Standard Event Status Enable Query
The Model 512 responds:
<NR1>
where NR1 in the range 0…255, expressed in binary, represents the bit values of the
Standard Event Status Enable Register.
*WAI Wait-to-Continue Command
The Model 512 will stop executing external commands until End Of Interval is TRUE,
i.e., the Model 512 reaches preset. It will then resume execution of external commands.
*OPC Operation Complete Command
This Command causes the OPC bit in ESR to be set when End Of Interval is detected.
It should be the last command in the Program Message.
*OPC? Operation Complete Query
The Model 512 responds:
1 <RMT>
when End Of Interval goes TRUE, i.e., the Model 512 reaches preset. Must be last
command, and only query, in the Program Message.
*SAV <NRf> Save Command
<NRf> in the range 1…8, causes the Model 512 to save the current state to non-volatile memory. The User-Name is set to “USER N”, with N in the range 1…8. It
overwrites a previously saved configuration of the same number.
43
Read/Write Registers
*RCL <NRf> Recall Command
<NRf> in the range, 1…8, and previously saved, will cause the Model 512 to recall
the previous state from non-volatile memory. A request to recall an undefined configuration will result in an Execution Error.
*RST Reset Command
The reset command aborts any Operation Complete Active State, and recalls the Current User-default Configuration (if any, otherwise the factory-default configuration)
and exits in the stopped state. It does not change the Service Request Enable Register,
the Standard Event Status Enable Register, or empty the Output Queue.
*TST? Self-Test Query
The Model 512 responds:
where <NR1> is in the range 0…3. The Model 512 performs a self-test and reports the
results. The test is basically a test of the Standard Timer, High Resolution Timer, and
the Counting Channels. When NR1 is interpreted as a binary number, a ‘1’ in Bit-0 indicates that CH 1 failed, and a ‘l’ in Bit-1 indicates that CH 2 failed. A ‘1’ in both positions could also mean failure of one or both of the timebases. If a ‘0’ is returned, the
test passed. The Model 512 then exits by performing a *RST command.
Model 512 Setup Commands
MODE <NRf1>, <NRf2> Set Mode Register 0/1
<NRf1>, when rounded to an integer in the range 0…1, will access Mode Register 0 or 1.
<NRf2>, when rounded to an integer, and within the range 0…15, and interpreted as a
binary number will set the bit pattern of Mode Register 0 or 1.
Note: Changing the Counting Mode (MR1 : Bits 0…2) loads the default preset for
that mode; program the preset after changing modes. When enabling or disabling Recycle, make sure that the bit-pattern for the counting mode does not
change.
PRES NRf Set Preset Command
<NRf>, when within range, will set the Model 512 preset, according to the current
Counting Mode. The Model 512 exits this command in the reset/stopped condition.
Notes: 1. In “Tmr+Ctrs” mode, <NRf> is rounded to two decimal places and checked
within 0.0l…99 999 999.99. The Standard Timer Preset is then set.
44
Read/Write Registers
2. In “HRT+Ctr” mode, <NRf> is rounded to seven decimal places and
checked within 0.000 000 1…99 999 990.000 000 0. If <NRf> is less than
10.0, the preset will be set exactly; if it is above 10.0, it will be truncated to
the nearest 10 second increment; i.e., 10.0…, 20.0…, 30.0… sec.
The High Resolution Timer Preset is then set.
3. ln"Pset+HRT" and “Pset+ Ctr”modes,
is rounded to an integer and checked within 0_99 999 999. The Preset
Counter Preset is then set.
4. An “S” or “M” appended to the Preset NRf will be ignored: the preset will
only be checked for a valid range for the current Counting Mode.
RECY <NRf> Set Auto-Recycle Time Command
<NRf>, if within the range 0.01…600.00, will set the Model 512 Auto-Recycle Time.
It will be interpreted as minutes if the Standard Timer Timebase is MINUTES (Bit-0
in Mode Register 0 is set), otherwise it will be interpreted as seconds. An ‘S’ or ‘M’
appended to <NRf> will be ignored.
EVEN <NRf> Set Event Counter Preset Command
<NRf>, if within the range 0…99 999 999, will set the Model 512 Event Counter Preset.
CHAN <NRf1< , <NRf2> Channel Polarity/Threshold
<NRf1> , when rounded to an integer within the range 1…2, will select Channel 1 or
2. Selecting an invalid channel for the current counting mode will cause a Device Dependent Error (DDE).
<NRf2>, when evaluated within the range, +0-100 V…+10.000 V will select
POSITIVE polarity for the channel and set the threshold to the indicated value.
<NRf2>, when evaluated within the range –0.100 V…–5.000 V will select
NEGATIVE polarity for the channel and set the threshold to the indicated value.
The threshold is rounded to the nearest 5 mV increment.
Model 512 Learn Strings
“Learn Strings” are queries that return the command header along with the requested
information. The Model 512 may be set up from the front-panel, for instance, and then
queried by the controller to return its current configuration via the learn strings. These
strings may then be stored by the controller and sent to the Model 512 at a later time to
return it to the “learned” state.
45
Read/Write Registers
MODE? Read Mode Register Query
The Model 512 responds:
MODE 0,<NR1> ;MODE 1,<NR1>
where <NR1> is the integer representation of the binary bit patterns of Mode Registers
0 and 1, respectively.
PRES? Read Preset Query
The Model 512 responds:
PRES <NR1>
where <NR1> is the Counter Preset if the current Counting Mode is “Pset+Ctr” or
“Pset+HRT”,
OR
PRES <NR2>
where <NR2> is the Standard Timer Preset if the current Counting Mode is “Tmr
+Ctrs”, or is the High Resolution Timer Preset if the current Counting Mode is
“HRT+Ctr”. An ‘M’ will be appended if the Standard Timer Timebase is MINUTES,
otherwise an ‘S’ will be appended. The ‘S/M’ unit is appended only for human readability: it is not necessary when programming the preset.
RECY? Read Auto-Recycle Timer Preset Query
The Model 512 responds:
RECY <NR2>
where <NR2> is the Auto-Recycle Time. An ‘M’ will be appended if the Standard
Timer Timebase is MINUTES; otherwise an ‘S’ will be appended. The ‘S/M’ unit is appended only for human readability: it is not necessary when programming the preset.
EVEN? Read Event Counter Preset Command
The Model 512 responds:
EVEN <NR1>
where <NR1> is the Event Counter Preset.
CHAN? Read Channel Polarity and Threshold Query
The Model 512 responds (depending on Counting Mode):
CHAN2, <NR2>: “HRT+Ctr”
OR
CHAN 1, <NR2> : “Pset + HRT”
OR
CHAN 1, <NR2>; CHAN2 <NR2>
46
Read/Write Registers
Other modes where <NR2> is a positive or negative number representing the polarity
and threshold of Channel 1 or 2, respectively. A ‘V’ is appended to the threshold
value.
Model 512 Executable Commands and Queries
STAR Start Command
If the Model 512 is currently stopped and has not reached preset, this command will
cause the Model 512 to start counting. Timing interval is synchronized to the
Timers/Preset Counter, as necessary.
STOP Stop Command
If the Model 512 is currently counting, this command will cause the Model 512 to stop
counting. Timing interval is synchronized to the Timers/Preset Counter, as necessary.
CLEA Clear Counters/Timer Command
This command resets the Model 512 Timer and Counters to 0 (if “Down-counting” is
selected, the timer is set to its Preset value), and exits in the stopped state. Executing
this command clears EOI in STB.
EVTS 0 Event Counter Reset Command
Resets the Event Counter to 0.
THRE <NRf1>, <NRf2> Increment Channel Threshold Command
<NRf1>, when rounded to an integer, and within the range, 1…2, will select Channel
1 or 2. Selecting an invalid channel for the current Counting Mode causes a Device
Dependent Error (DDE).
<NR2>, when added to selected channel threshold, will increase, or decrease (closer to
0.000) if negative, the threshold by <NRf2>. Final value must be within range for current polarity; otherwise, an EXE occurs. Minimum increment/decrement is ±0.005 V.
EVTS? Read Event Counter Query
The Model 512 responds:
<NR1 >
where <NR1> is the contents of the Event Counter.
TIME? Read Time Query
The Model 512 responds:
0,<NR2>
47
Read/Write Registers
where <NR2> is the current Timer contents. The ‘0’ indicates the Timer Channel (because the Timer may be the Standard Timer (software based), the High Resolution
Timer (hardware CH 1), or the High Resolution Interval Timer (hardware CH 2). An
‘S’ or ‘M’ is appended, as applicable.
Executing this Query if the Counting Mode is *CtrsOnly" or “Pset+Ctr” will cause a
Device Dependent Error (DDE), since there are no timers in these modes. Executing
this command clears E0I in STB.
COUN? Read Counts Query
The Model 512 responds (depending on Counting Mode):
1,<NR1> : “Pset+HRT”
OR
2,<NR1> : “HRT+Ctr”
OR
1,<NR1>;2,<NR1> : All other modes
<NR1> is the current contents of the associated counting channel. Executing this command clears EOI in STB.
AUTO? Automatic Send Evts/Time/Counts on End Of Interval Query
Sending this command enables auto-recycle for the current counting mode, and clears
then starts the counters/timer. On End Of Interval, the Model 512 responds as if the
following Program Message had been sent by the Controller:
EVTS?; TIME; COUN? <PMT>
The response message is placed into the Output Queue, and the MAV bit is updated (if
enabled). If the Event Counter is less than the Event Preset, an <ETX> character is appended to the partial response, and the Model 512 delays for the Recycle Time, clears,
and starts counting again. If the Event Counter is equal to, or greater than the Event
Preset, the <RMT> is appended to the response, and Auto-Recycle is disabled and the
Model 512 stops.
This command allows the Model 512 to count repeatedly and send the information to
the controller with a minimum of message exchanges. The <ETX> may be used by the
controller to determine whether the message is the end of a partial response or the final
message in the sequence.
This command must be the last, and should be the only, query message unit in the Program Message, because the <RMT> may not be sent for a long time.
After this command is executed, any further message sent to the Model 512 before
Events = Event Preset (i.e, before <RMT> is sent) will cause a Query Error and the
AUTO? sequence will be aborted.
Device Clear will abort the AUTO? query with no error.
48
Remote Programming
Notes: 1. If the Counting Mode is “Pset+Ctr” or “CtrsOnly”, the TIME? field in the
response message will not be transmitted.
2. This command is invalid in the “CtrsOniy” mode, since the Model 512 has
no way of knowing when EOI occurs. In this case, a DDE is issued.
3. If the Output Queue fills, the Model 512 will stop counting and wait until
the controller reads the reply, or sends Device Clear, or a query error occurs.
Remote Programming
Generally, programming the Model 512 is a matter of selecting the desired counting
mode, presets, and input channel configuration.
When changing Counting Modes, the Model 512 should be set up in the following se quence (using the sequence as returned by the *LRN? query):
(1) Mode Register 0: Changing the Time Base in Mode Register 0 will not change the
Standard Timer Preset or the Recycle Timer Preset; however, both times will then be
interpreted as Seconds or Minutes, as applicable. Therefore Mode Register 0 may be
changed at any time.
(2) Mode Register 1: Changing the Counting Mode loads the default preset for that
mode, and clears the timer and counter(s). Setting the Recycle Bit in Mode Register 1,
without changing the Counting Mode does not clear the counter or change the mode.
(3) Preset: The preset must be set after changing the counting mode because changing
the mode loads the default preset for that mode. Changing the preset clears the counters and timers, and the Model 512 is stopped.
(4) Channel 1,2: When the Counting Mode is changed, Channel 1 or 2 Input may be
disabled if the NEW mode is one of the High Resolution Timers, or re-enabled if the
OLD mode was a High Resolution Timer mode, and the NEW mode defines that channel as a counter. When a channel is disabled, it is not available for programming.
When a channel is re-enabled, the polarity and threshold are set to the last stored values for that channel. It may be necessary to use the CHAN? query to determine which
channels are available, and their current setup, after changing the mode.
(5) Event and Auto-Recycle Presets. These presets may be changed at any time.
49
RS-232 Communications Interface
(6) AUTO? Query. When using the AUTO? query, set up the Model 512 in one of the
MASTER Counting Modes and clear the counters. Set up the presets and counting
channel polarity/thresholds as necessary. Set the EVEN preset to a number greater
than the contents of the Event Counter. Then send:
AUTO? <PMT>
The Model 512 will enable auto-recycle, and internally issue the STAR command to
begin counting.
When the Model 512 reaches End Of Interval, it will increment the Event Counter and
internally execute the program message:
EVTS?;TIME?;COUN?
place the response into the Output Queue, and set MAV.
If the Event Counter is less than the Event Preset, the <ETX> character will be appended to the partial response message, and the Model 512 will delay for the Recycle
Preset time, and internally execute the message:
CLEA; STAR
(The <ETX> terminator may be detected by the controller program, so that it can
know when the partial message is complete).
If the Event Counter equals, or is greater than, the Event Preset, the <RMT>, instead
of <ETX> will be appended to the response message, and the Model 512 will disable
Auto-Recycle, and stop.
Remote Enable
The Model 512 receives and executes external commands in both the LOCAL and
REMOTE state. In LOCAL, all front-panel controls are functional. In REMOTE,
front-panel programming functions and COUNT/STOP/RESET functions are disabled; however, the CH SEL buttons function normally, and the displays may be
deformatted and scanned via the LEFT/RIGHT cursor buttons.
REMOTE ENABLE via RS-232
DC4 Ctrl-T, ASCII char 20 (14hex)
REMOTE DISABLE via RS-232
DC2 CtrI-R, ASCII char 18 (12hex)
These commands take effect immediately: they are unbuffered, and do not require a
<PMT>.
50
Remote Programming
When remote operation is selected via DC4, the Model 512 enters the REMOTE state.
The MODE/REMOTE lamp illuminates continuously to indicate REMOTE state (if
the Model 512 is currently in one of the programming modes: PROG PRESET, PROG
INPUTS or CONFIG MODULE, it immediately exits to Operate Mode). The external
controller then has control.
Device Clear
To clear the Model 512 via the RS-232 link, send:
DEVICE CLEAR via RS-232
EOT
Ctrl-D, ASCII char 04 (04hex)
This command is unbuffered; it does not require a <PMT>.
On Device Clear the Model 512:
(1) Clears the Input Buffer and Output Queue
(2) Aborts *WAI, *OPC and *0PC? Actions
(3) Prepares for new command
RS-232 Polling and Status Byte
The contents of the Model 512 Status Byte (STB), with RQS in Bit-6, is available via
the RS-232 Polling function. When one of the bits: EOI (Bit-0), MAV (Bit-4), or ESS
(Bit-5) makes a ‘0’ → ‘1’ transition, a new reason for service is generated, and RQS
(Bit-6) is set TRUE, indicating the Model 512 is requesting service. TAG (Bit-7) is
SET to “tag” the Status Byte, since it is otherwise unused (all other characters that the
Model 512 sends are 127 (7F hex). The status byte thus returns a value 128…255). The
communications parameters must be set up for 8 Data Bits. The DTR signal from the
controller must be TRUE because this signal inhibits the Model 512 hardware from
transmitting.
Because the hardware Service Request function of ANSI/IEEE 488.1 is not available
through the RS-232 interface, a software version is implemented. The controller, from
time to time, sends the ENQ character to the Model 512.
Send Status Byte Immediately via RS-232
ENQ Ctrl-E, ASCII char 05 (05hex)
The Model 512 immediately (regardless of the state of XON/XOFF) returns the Status
Byte. The “tag bit” allows the controller program to detect the status byte unambiguously and take appropriate action.
51
RS-232 Communications Interface
Once the Model 512 Status Byte is read by the controller, RQS is set FALSE. A subsequent poll would then show the Model 512 not requesting service (the other bits would
remain, however).
Note: Once RQS has been acknowledged by the Serial Poll, the condition causing the
request for service must be cleared before that event can cause a new RQS. For
example, suppose an execution error (EXE) occurred, with CME, EXE, and
OPC enabled in ESE, and ESB and MAV enabled in SRE. RQS would go
TRUE on EXE, and the controller would conduct the Serial Poll and determine
that the Model 512 was requesting service. The controller must then clear ESB
by clearing ESR — *CLS or *ESR? — before another error or OPC event
could cause a new request for service, since the RQS was generated because
the ESR Summary Bit was nonzero. A subsequent MAV or EOI would normally generate a new request for service.
Handshaking : XON/XOFF and DTR
Normally, when queried via the RS-232 link, the Model 512 will begin to transmit its
response immediately. This may, depending on timing, require a full duplex arrangement. There are two ways to temporarily halt transmission of response data by the
Model 512:
Hardware: The controller sends DTR (pin 20) FALSE. This will inhibit the Model
512 transmitter (any character(s) already in the transmitter buffer will be transmitted),
and any remaining response data will stay in the Output Queue until DTR goes TRUE,
at which time sending will restart.
Note: DTR FALSE will inhibit response to the ENO (send Status Byte) command.
Software: (DTR is TRUE): XON/XOFF may be used in conjunction with ENQ, and
the MAV bit to synchronize data transmission. The controller sends XOFF to stop
transmission, or XON to re-enable transmission.
Enable Transmission via RS-232
XON Ctrl-Q, ASCII char 17 (11hex)
Disable Transmission via RS-232
XOFF Ctrl-S, ASCII char 19 (13hex)
These commands are unbuffered, and do not require <PMT>. When sending XOFF,
there may be one or two characters sent before XOFF takes effect; this is due to
double-buffering in the Model 512 serial transmitter. At power-on, XOFF is in effect.
52
Remote Programming
RS-232 Message Exchange Protocol and Query Errors
The Model 512 will not arbitrarily try to send data: it must be commanded by the controller to do so. When requesting data, the controller must:
(1) Send the device a property terminated Program Message containing a valid Query,
and,
(2) Allow the results of that query to be transmitted before sending another Program
Message.
If Model 512 transmission is inhibited with one of the handshaking methods, the
Model 512 must be enabled to transmit and the data read before sending another Program Message. Failure to do so will result in the Output Queue being cleared and a
Query Error (QYE) being generated. The Model 512 will then begin processing the
new message. Communication protocol errors — parity error, framing error, and overrun errors — are reported as QYE.
If the Model 512 is not inhibited from sending, and a QYE is generated, the Model
512 will not send the <RMT>. The resulting (partial?) response may or may not be
valid.
All errors should be cleared before proceeding. Usually it is necessary to send Device
Clear (Ctrl-D) to clear the buffers and reset the execution control, and then read the
Standard Event Status Register with *ESR? and take appropriate action.
Synchronizing Data Transfers
Data transfers should be synchronized in order to give the computer and the Model
512 time to do something else instead of continually waiting for End Of Interval or for
data to be sent.
The Model 512 incorporates a number of ways to indicate the End Of Interval, or that
the requested data is ready: *WAI, *OPC, *OPC?, and the EOI and MAV bits in the
Status Byte.
*WAI The *WAI command tells the Model 512 to stop processing external commands until it reaches End Of Interval. Note: The STAR command must be issued so
there is an Operation Pending, before executing the *WAI command. A Device Clear
(DCL or SDC) is required to abort this command. If the following *WAI is COUN?,
for instance, the response from the Model 512 to the controller is sufficient to indicate
EOI.
*OPC The *OPC command tells the Model 512 to set the OPC bit in ESR, and request service from the controller, when it reaches End Of Interval. The OPC bit in
ESE, and the ESB bit in SRE, must be enabled.
53
RS-232 Communications Interface
Note: The controller may still “talk” to the Model 512 during this time since a query
is not involved. The controller would detect 0 PC (Operation Complete) by
sending ENQ from time to time (ESB is enabled). When the ESB-bit goes
TRUE on EOI, RQS is set in the Status Byte, and the controller can then start
sending the necessary commands to dump data.
*OPC? The *OPC? command tells the Model 512 to place a ‘1’ into the Output
Queue (it will be transmitted if XON is in effect) when it reaches End Of Interval; the
MAV bit in SRE is then set (if enabled). The controller can detect this by ENQuiring
the Status Byte.
Note: Since this is a query, the controller cannot talk to the Model 512 while waiting
for End Of Interval. Until the Model 512 has responded, sending anything will
cause a Query Error.
*OPC? should be the last (and preferably the only) query in the Program Message, because the <RMT> is not sent until the ‘1’ is placed into the Output Queue.
EOI Bit The EOI bit in the status byte is set when the Model 512 reaches End Of Interval, if the EOI bit is enabled in SRE. The controller detects this by ENQuiring the
Status Byte from time to time. When EOI goes TRUE, the controller service routine
could query the Model 512 for events, time, counts information.
Note: Since a query is NOT involved, the controller can still talk to the Model 512
while waiting for End Of Interval.
Mode+Option Program Option
The Program Option function is enabled via the MODE+OPTION sequence (the
Model 512 must be in LOCAL mode). When MODE+OPTION is first pressed, the
OPTION push-button illuminates, and the message:
PROGRAM
OPTION
appears for two seconds, after which, the message:
SetUp232
appears in the upper display; the first selection of the option menu, “BaudRate”,
appears in the lower display.
SetUp232 Menu
(Upper Display)
54
Mode+Option Program Option
BaudRate
Select Baud Rate
DataBits
Select Data Sits
StopBits
Select Stop Bits
Parity
Select Parity On/Off
Even/Odd
Select Parity Even/Odd
Save
Save changes to non-volatile memory
EXIT^
Exit to Select Option Menu
Use the SCROLL button to find the desired parameter to change in the Lower Display,
then press ENTER to enter the sub-menu for the selected parameter. The parameter
name moves to the Upper Display, and the first option of the sub-menu is displayed in
the Lower Display.
When satisfied with the selections, select “Save” to store the parameters in non-volatile memory.
Use the MODE+OPER sequence to return to Operate Mode.
Select Baud Rate
Use the SCROLL button to select the new baud rate. The current value will flash. Use
ENTER to select.
BaudRate Menu
(Lower Display)
9600
4800
2400
1200
600
300
EXIT ^
Exit to SetUp232 menu
Select Data Bits
Use SCROLL to select the number of data bits to be transmitted with each byte. The
current value will flash. Use ENTER to set the number of data bits.
DataBits Menu
(Lower Display)
55
Mode+Option Program Option
8 Bits
Must use for RS-232 polling function
7 Bits
EXIT ^
Exit to SetUp232 menu
Select Stop Bits
Use SCROLL to select the number of stop bits desired. The current value will flash.
Use ENTER to set the number of stop bits.
StopBits Menu
(Lower Display)
2 Bits
1 Bits
EXIT ^
Exit to setup232 Menu
Select Parity On/Off
Use SCROLL to select parity enable/disable. The current state will flash. must be ON
to select EVEN/ODD parity. Use ENTER to enable/disable.
Parity Menu
(Lower Display)
On
Enables Parity Even/Odd Selection
Off
Disables Parity Even/Odd Selection
EXIT ^
Exit to SetUp232 menu
Select Parity Even/Odd
Use SCROLL to select Parity EVEN/ODD. The current state will flash. This selection
is available only if parity is ON. Use ENTER to set EVEN/ODD.
Even/Odd Menu
(Lower Display)
Odd
Even
EXIT ^
56
Exit to SetUp232 menu
C. Installation Considerations
This unit complies with all applicable European Union requirements.
Compliance testing was performed with application configurations commonly used for
this module; i.e. a CE compliant NIM Bin and Power Supply with additional CE compliant application-specific NIM were racked in a floor cabinet to support the module
under test.
During the design and assembly of the module, reasonable precautions were taken by
the manufacturer to minimize the effects of RFI and EMC on the system. However,
care should be taken to maintain full compliance. These considerations include:
• A rack or tabletop enclosure fully closed on all sides with rear door access
• Single point external cable access
• Blank panels to cover open front panel Bin area
• Compliant grounding and safety precautions for any internal power distribution
• The use of CE compliant accessories such as fans, UPS, etc.
Any repairs or maintenance should be performed by a qualified Canberra service
representative. Failure to use exact replacement components, or failure to reassemble
the unit as delivered, may affect the unit’s compliance with the specified EU
requirements.
57
Notes
58
Canberra (we, us, our) warrants to the customer (you, your) that for a period of ninety (90) days from the date of
shipment, software provided by us in connection with equipment manufactured by us shall operate in accordance
with applicable specifications when used with equipment manufactured by us and that the media on which the
software is provided shall be free from defects. We also warrant that (A) equipment manufactured by us shall be
free from defects in materials and workmanship for a period of one (1) year from the date of shipment of such
equipment, and (B) services performed by us in connection with such equipment, such as site supervision and
installation services relating to the equipment, shall be free from defects for a period of one (1) year from the date of
performance of such services.
If defects in materials or workmanship are discovered within the applicable warranty period as set forth above, we
shall, at our option and cost, (A) in the case of defective software or equipment, either repair or replace the
software or equipment, or (B) in the case of defective services, reperform such services.
LIMITATIONS
EXCEPT AS SET FORTH HEREIN, NO OTHER WARRANTIES OR REMEDIES, WHETHER STATUTORY,
WRITTEN, ORAL, EXPRESSED, IMPLIED (INCLUDING WITHOUT LIMITATION, THE WARRANTIES OF
MERCHANTABILITY OR FITNESS FOR A PARTICULAR PURPOSE) OR OTHERWISE, SHALL APPLY. IN NO
EVENT SHALL CANBERRA HAVE ANY LIABILITY FOR ANY SPECIAL, EXEMPLARY, PUNITIVE, INDIRECT
OR CONSEQUENTIAL LOSSES OR DAMAGES OF ANY NATURE WHATSOEVER, WHETHER AS A RESULT
OF BREACH OF CONTRACT, TORT LIABILITY (INCLUDING NEGLIGENCE), STRICT LIABILITY OR
OTHERWISE. REPAIR OR REPLACEMENT OF THE SOFTWARE OR EQUIPMENT DURING THE
APPLICABLE WARRANTY PERIOD AT CANBERRA'S COST, OR, IN THE CASE OF DEFECTIVE SERVICES,
REPERFORMANCE AT CANBERRA'S COST, IS YOUR SOLE AND EXCLUSIVE REMEDY UNDER THIS
WARRANTY.
EXCLUSIONS
Our warranty does not cover damage to equipment which has been altered or modified without our written
permission or damage which has been caused by abuse, misuse, accident, neglect or unusual physical or
electrical stress, as determined by our Service Personnel.
We are under no obligation to provide warranty service if adjustment or repair is required because of damage
caused by other than ordinary use or if the equipment is serviced or repaired, or if an attempt is made to service or
repair the equipment, by other than our Service Personnel without our prior approval.
Our warranty does not cover detector damage due to neutrons or heavy charged particles. Failure of beryllium,
carbon composite, or polymer windows, or of windowless detectors caused by physical or chemical damage from
the environment is not covered by warranty.
We are not responsible for damage sustained in transit. You should examine shipments upon receipt for evidence
of damage caused in transit. If damage is found, notify us and the carrier immediately. Keep all packages,
materials and documents, including the freight bill, invoice and packing list.
When purchasing our software, you have purchased a license to use the software, not the software itself. Because
title to the software remains with us, you may not sell, distribute or otherwise transfer the software. This license
allows you to use the software on only one computer at a time. You must get our written permission for any
exception to this limited license.
BACKUP COPIES
Our software is protected by United States Copyright Law and by International Copyright Treaties. You have our
express permission to make one archival copy of the software for backup protection. You may not copy our
software or any part of it for any other purpose.
Revised 1 Apr 03