1
Search the site
Home
Solutions
Downloads
Support
Resources
Purchase
Partners
About us
Log in
Back to documentation
Page
Discussion
Read
View source
Go
View history
Search
Axigen Standard WebMail - End-User Manual
This chapter presents the features included in the Axigen Standard WebMail interface, as well as the available
configuration options, from a user's point of view. The sub-pages of this chapter will offer details on how to connect to
the WebMail interface, manage the respective user account, add contacts to the address book, use the Calendar,
Tasks, Journal and Notes to organize activities, manage email messages and WebMail folders and share or access
other users' folders by using the Sharing options.
When accessing the Standard WebMail interface through a browser, the individual user can configure all of the
parameters relative to their respective account, except for certain limitations imposed by the administrator (in terms of
attachment size, mailbox quota, etc.).
Contents [hide]
1 Accessing / Leaving the Standard WebMail
1.1 Login
1.2 Logout
2 Finding Your Way Through the Standard
WebMail
2.1 Folders structure
2.2 Browsing through pages
Accessing / Leaving the Standard WebMail
Connecting to the Axigen WebMail
Usually, the Webmail interface should be accessed via a specific URL that is provided by the administrator of the
respective Axigen server. If you do not know the address where you can access the Webmail interface, you should
contact your mail server administrator.
To connect to the Axigen WebMail, enter the hostname or IP:port combination where your Axigen WebMail service is
running, in your browser's address bar. When accessing the WebMail from the machine on which Axigen is installed,
the default address is http://127.0.0.1:8000 .
2.3 Selecting items
2.4 Previewing messages
2.5 Searching items
2.5.1 Using the advanced search (for
messages)
3 Working with Folders in the Standard WebMail
3.1 Default folders
3.2 Custom personal folders
3.3 Public folders
3.4 Other users' folders
3.5 Managing folders (contextual menu)
3.5.1 New folder
Login
3.5.2 Rename folder
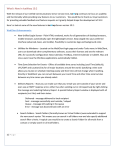
In the window displayed when accessing the Webmail URL, enter the username and password provided by the system
administrator.
3.5.4 Empty / Delete folder
3.5.3 Move folder
3.5.5 Folder sharing
3.5.6 Open other user's folders
open in browser PRO version
Are you a developer? Try out the HTML to PDF API
pdfcrowd.com
3.5.6 Open other user's folders
4 Working with Messages in the Standard
WebMail
4.1 Managing existing emails
4.1.1 Main menu actions
4.1.2 Grouping messages
4.1.3 Marking messages
4.1.4 Answering read receipt requests
4.2 Composing a new message
4.2.1 Adding addresses
4.2.2 Requesting a read receipt for a
message
4.2.3 Filling the subject and the body
4.2.4 Attaching files to the email
4.2.5 Sending the message or saving it
to "Drafts"
4.3 Reading messages
5 Working with Contacts in the Standard WebMail
5.1 Managing existing contacts
5.2 Creating or editing a contact
5.2.1 General details
5.2.2 Additional info
5.3 Importing contacts
If the respective Webmail login page is used for accessing multiple domains, then the domain selection box will be
present at the right of the username text box, as shown in the screenshot below. Select your domain from the related
box if the "select a domain" entry is present.
open in browser PRO version
Are you a developer? Try out the HTML to PDF API
6 Working with the "Personal Organizer" in the
Standard WebMail
6.1 Working with the Calendar
6.1.1 Calendar views
pdfcrowd.com
6.1.2 Managing existing events
6.1.3 Creating a new event
6.1.4 Editing recurrent events
6.1.5 Answering to invitations
6.2 Working with Tasks
6.2.1 Filtering tasks
6.2.2 Managing existing tasks
6.2.3 Creating a new task
6.2.4 Answering to tasks assignments
6.2.5 Setting the task completion
6.3 Working with Notes
6.3.1 Manage existing notes
6.3.2 Creating a new note
6.4 Working with the Journal
6.4.1 Journal views
6.4.2 Managing existing journal entries
6.4.3 Creating a new journal entry
7 Configuring Account Settings in the Standard
WebMail
7.1 Configuring Personal Data
7.1.1 General Info
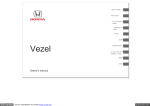
Check the "Remember me on this computer" option if you want the username to be remembered (automatically filled
in) when you will access the Webmail interface. Note that this will only happen when accessing the Webmail login page
from the same computer and the same browser that was used when this option was enabled. If your access the
WebMail from another browser or computer, the username will not be automatically filled in.
7.1.2 Personal Details
7.1.3 Your Password
7.1.4 Business Details
7.2 Changing WebMail Data Settings
7.2.1 Appearance
7.2.2 Preferences
open in browser PRO version
Are you a developer? Try out the HTML to PDF API
pdfcrowd.com
7.2.2 Preferences
7.2.3 Signature
7.3 Working with Email Filters
7.3.1 Managing existing filters
7.3.2 Sender not in AB Actions
7.3.3 Identity Confirmation
7.3.4 Creating a new filter
7.4 Setting an Out-of-Office Auto-Responder
7.5 Configuring Sharing Permissions
7.5.1 Global permissions
7.5.2 Open other user's folders
7.6 Setting RPOP Connections
7.6.1 Editing existing RPOP Connections
7.6.2 Adding new RPOP Connections
7.7 Managing the Blacklist
7.7.1 Manage existing blacklisted
addresses
7.7.2 Adding new address to blacklist
7.8 Requesting Temporary Email Addresses
7.8.1 Managing existing temporary email
addresses
If your administrator has allowed you to access the AJAX WebMail interface also, then the "Click here to switch to the
AJAX interface" will be present in the login page. Use this link to switch to the AJAX Webmail interface.
7.8.2 Generating new temporary
addresses
Logout
To close the current WebMail session, click the "Logout" link in the right upper corner of the page, next to the username and the "Settings" link.
Finding Your Way Through the Standard WebMail
The Standard Webmail interface is structured to allow quick access to the most common user actions.
In the left column, you will find:
1. A "Check email" button, which you can use to force the update of both the folder tree and the email message list with any new messages that are received.
2. A search field, which allows you to search through the existing email messages stored in your account by using either the quick search option or, for more search criteria,
the advanced search option.
3. A folder tree, which contains all the folders you have the permission to work with, regardless of their type (email folders, calendar folders etc.) or ownership (your own
folders, public folders, other users' folders).
open in browser PRO version
Are you a developer? Try out the HTML to PDF API
pdfcrowd.com
4. A mini calendar, expandable via the arrow button, which allows you to open your calendar (day view) to view or edit your appointments; this can be achieved by simply
clicking on a specific day.
5. The currently used space, calculated as percentage of the maximum allowed mailbox size.
The top-right corner of the Standard Webmail contains:
1. Your account name.
2. A "Settings" link, which you can use to access the user account configuration options.
3. A "Logout" link.
The main / central column of the Standard Webmail is used to display the content of the selected folder (e.g. an appointment list, if a calendar folder is selected, an email
message list if an email folder is selected). Each view contains specific buttons that perform actions according to the type of view displayed. An example for an email folder view
is shown in the screenshot below.
open in browser PRO version
Are you a developer? Try out the HTML to PDF API
pdfcrowd.com
Folders structure
The left column of your WebMail account displays a tree structure which contains the folders the currently exist in your account. When first accessing your account via the
Standard WebMail, the structure looks like this:
open in browser PRO version
Are you a developer? Try out the HTML to PDF API
pdfcrowd.com
The folder tree helps you browse and manage the items in your account. As you can observe in the above screenshot, each folder type has a specific associated icon.
You can right-click on a folder in the tree view to view the operations you can perform on that folder.
Browsing through pages
open in browser PRO version
Are you a developer? Try out the HTML to PDF API
pdfcrowd.com
Browsing through pages
When you have a high number of messages displayed on separate pages in the email list view, you can browse through them with the help of the page navigation buttons (go to
first, next, previous, last, or specific (by number) page) above the preview pane.
For example, if you have a large number of contacts in a specific contacts folder type, you can scroll down in each contact list page and then use the previous button, page
number or the next button to browse through all the contacts.
Selecting items
When you wish to select several items (messages, contacts, tasks or notes), you can use the following keyboard shortcuts:
Ctrl + left-click - for multiple item selection, one item at a time; generally used to select non-adjacent items;
Shift + left-click - for multiple item selection; select the first item in the list and then click on a second item to select both items and ALL of the items in between.
Generally, for the selected items, you should only use the Copy / Move / Delete actions. If you select multiple messages and click forward or reply, these actions will only be
applied for the last selected message.
Previewing messages
When selecting an email, the message body will be displayed in the preview pane, below the email list. By default, the preview pane displays horizontally the sender, recipient(s)
and date details of the email. To have them displayed vertically, press the "+" icon in front of the Subject line, as shown in the picture below.
open in browser PRO version
Are you a developer? Try out the HTML to PDF API
pdfcrowd.com
In the lower part of the preview pane, you can click the "View Source" button to open the full source of the selected email, including its headers and body, in a new tab. Click the
"Block sender" button to add the sender of the selected message to your account-level blacklist.
Searching items
You can search through the email messages stored in your account by using the quick search or the advanced search option.
Below the "Check email" button you can find the "quick search" text box. Use this to enter the desired search pattern and click the arrow button to start the search. For more
advanced search options, click the "Go to advanced search" link or access the "more actions..." menu (under the "Settings" and "Logout" links) and choose the "Advanced
Search" option.
Note: The "quick search" option w ill only search in the folder selected from your folder tree. To search in more than one folder, use the advanced search option.
The quick search results will be displayed in the same window and can be sorted by any of the fields displayed in the message list header ("From", "To", "Subject", "Date",
"Size").
Using the advanced search (for messages)
When accessing the advanced search window, choose whether the query should match all or any criteria of the specified search elements. Add as many search criteria as you
need by clicking the "add new element" link or delete them by hitting their corresponding trash bin shaped button.
open in browser PRO version
Are you a developer? Try out the HTML to PDF API
pdfcrowd.com
The full list of the criteria available for advanced search:
"Subject" - email's subject field
Options: "Contains"; "Does not contain";
"From" - sender's email address
Options: "Contains"; "Does not contain";
"Body" - the email content
Options: "Contains"; "Does not contain";
"Date" - the date the email was received
Options: "Before"; "On"; "Since";
"Sent Date" - the date the email was sent
open in browser PRO version
Are you a developer? Try out the HTML to PDF API
pdfcrowd.com
Options: "Before"; "On"; "Since";
"To" - recipients' email address
Options: "Contains"; "Does not contain";
"Cc" - the addresses found in the Cc header
Options: "Contains"; "Does not contain";
"Size" - the email message size
Options: "Larger"; "Smaller". Enter the size value in the related text box and select the measurement unit from the next drop-down box - b (bytes), kb (kilobytes) or mb
(megabytes);
"Flag" - used to find messages that have a specific flag
Options: "deleted"; "seen"; "flagged" - according to the marking used by the Standard WebMail; after selecting the desired flag, you can choose from the next drop-down box "yes"
or "no", meaning if the flag is applied or not (seen / unseen, deleted / not deleted, flagged / not flagged);
"Header" - you can define the custom header name and content for which to search
open in browser PRO version
Are you a developer? Try out the HTML to PDF API
pdfcrowd.com
Options: "Contains"; "Does not contain";
"Headers and body" - searches all headers and email content for a specific term
Options: "Contains"; "Does not contain";
"Attachment name" - used to search for emails containing attachments with a specific name
Options: "Contains"; "Does not contain";
"Anywhere" - the entire email message content (all the above criteria)
Options: "Contains"; "Does not contain";
Use the drop-down menu to select the desired search element type.
You can also establish the folders in which you want the search to be performed by clicking the "Choose folders" button and selecting them from the folder tree in the new
window. Please note that public folders are not available. The folders you choose will be displayed in the "Selected folders" section. Finally, click the "Search" button to find the
information you need.
open in browser PRO version
Are you a developer? Try out the HTML to PDF API
pdfcrowd.com
Note: The search function also supports internationalized searches. Having this feature, language-specific characters can be used w hen running a search (i.e. using diacritics).
Working with Folders in the Standard WebMail
The left column of your Standard WebMail interface displays a tree structure containing the folders that currently exist in your account. When you first access your account, the
structure looks as shown below.
open in browser PRO version
Are you a developer? Try out the HTML to PDF API
pdfcrowd.com
The folder tree view helps you browse and manage the messages in your account. Each folder type has a specific icon associated. Correspondences between the folder type
and the associated icon can be seen below.
To display the list of actions available for a specific folder, simply right-click on the required folder in the folder tree.
open in browser PRO version
Are you a developer? Try out the HTML to PDF API
pdfcrowd.com
For each top-level folder you can create custom sub-folders. The sub-folder type does not have to be the same as the top folder. As such you can have a calendar type sub-folder
created under an email type folder. An example of such a structure is shown in the below screenshot.
Default folders
When you first access your account via the Standard Webmail interface, the folder tree will contain a list of default folders which are automatically created for each account. The
default folders are depicted in the screenshot below.
open in browser PRO version
Are you a developer? Try out the HTML to PDF API
pdfcrowd.com
Note: The default folders cannot be renamed or deleted.
The default folders are organized to allow quick access to the most commonly used email folders ("Inbox", "Drafts", "Sent", "Spam", "Trash"). Continuing down the folder list, you
can access your "Contacts" folder and the "Calendar", "Tasks", "Journal" and "Notes" folders, which allow you to plan and organize your activity.
Below you will find the "Public Folders" which, when expanded, contains, by default, the "Domain Contacts" and "Public Contacts" folders, providing contact information related to
the accounts in your domain and specific contacts that are meant to be shared between the users of your domain.
Custom personal folders
From both WebMail and MS Outlook, you can create a special folder types: "Mail", "Calendar", "Tasks", "Journal", "Contacts", "Notes". Each special folder has type-specific view to
display its contents (i.e. calendar view(s) for calendar-type folders, contacts view for contact-type folders and so on).
open in browser PRO version
Are you a developer? Try out the HTML to PDF API
pdfcrowd.com
Aside from its specific view, each special folder type has a list view which consists of a list of objects in that folder. The list view has more pages so the user can view only a few
items at a time. When editing an object in the list view, the application remembers the page so that after the object is updated the position in the list is not lost.
Note: After the folder creation, the folder type cannot be modified.
For special public folders, all action buttons are displayed, regardless of the permissions. When editing an item, the action buttons in the edit pop-up are displayed or not,
depending on the permissions. For example, if the current user does not have the "Edit" (i.e. delete & create) permission, the "Save" button will not appear; moreover, all input
controls will be disabled.
open in browser PRO version
Are you a developer? Try out the HTML to PDF API
pdfcrowd.com
Public folders
Through public folders, users can share email messages, contacts, tasks etc. by simply copying and / or moving them to a public folder. Domain administrators can also
associate a certain email address with a public folder. Thus, emails can be sent directly to the public folder.
open in browser PRO version
Are you a developer? Try out the HTML to PDF API
pdfcrowd.com
While they cannot permanently delete messages from public folders, when using the Standard WebMail, users can mark the messages they choose as deleted and hide the
emails with such marks. Thus, users are not compelled to view the messages that do not interest them.
Users can also set other types of flags for their public folders, such as "Read" / "Not read" or "Flagged" / "Not flagged". These options affect the email messages of the
respective individual account, not the actual content of the public folders.
Other users' folders
Click the "Subscribe" button, in "Settings" -> "Sharing Permissions" -> "Open other user's folders" or right-click in the folder tree section and choose "Open other user's folders"
to have access to folders shared by other users. You can either type the email address in the "Shared by" field or click the "Select" button to choose it from the list of contacts in
your domain.
open in browser PRO version
Are you a developer? Try out the HTML to PDF API
pdfcrowd.com
Warning: This option works only for users in the same domain that have set one of the permissions levels (except "None").
The folder will appear in the "Other users' folders" section of your folder tree, right above the "Public Folders":
Expand the "Other users' folders" parent folder to view a list of folders corresponding to the accounts that you have opened a shared folder from. Expand each account folder to
view the available shared folders.
If you do not wish to see the folders shared by a certain user anymore, close them by right-clicking on the folder displaying the user's name (or one of its sub-folders) and
choosing the "Close user" option.
open in browser PRO version
Are you a developer? Try out the HTML to PDF API
pdfcrowd.com
Note: The actions you are allow ed to perform on other users' folders depend on the permission level that w as assigned to your account by the ow ner of the folder.
Managing folders (contextual menu)
Right-click on any folder in the folder tree (be it personal, public or shared, mail, calendar, task, journal or notes) brings up a context menu with the following options: "New
folder", "Rename folder", "Move folder", "Empty folder", "Delete folder", "Sharing", "Open (or Close) other user's folders".
While these options always appear in the context menu, they might work or not, depending on the specific permissions set on the selected folders.
When clicking on any of these options, a new pop-up window is displayed, allowing you to make the desired changes.
New folder
open in browser PRO version
Are you a developer? Try out the HTML to PDF API
pdfcrowd.com
To create a new folder, right-click on a folder from the folder tree and select the "New Folder" option. A new window will be displayed, allowing you to specify the name of the new
folder in the "Folder name" text area, the folder type ("Email", "Calendar", "Tasks", "Journal", "Notes" or "Contacts") and select its location in the folder tree. To finish, press the
"Create" button or choose "Cancel" if you have changed your mind.
Note: When you create a sub-folder, the type does not have to be the same as the parent folder. As such, you can have a calendar type sub-folder created in an email type folder.
Note: You cannot use the "~", "%" or "*" characters in the folder name. If a character that is not allow ed is used in a folder's name, during the new folder creation process, a pop-up error
w ill be displayed w hen attempting to create the folder, as show n below .
If you wish to add a new folder on the same tree level as the default folders ("Inbox", "Drafts" etc.) then select the "/" entry as the parent folder, as shown in the screenshot below.
open in browser PRO version
Are you a developer? Try out the HTML to PDF API
pdfcrowd.com
Rename folder
To rename a folder, right-click on it in the folder tree and select the "Rename folder" option. A new window will be displayed, allowing you to specify the new name of the folder.
Note: You cannot use the "~", "%" or "*" characters in the folder name.
Note: Renaming a public folder or other user's opened shared folders w ill succeed only if your user w as granted the required permissions by the actual folder ow ner. Otherw ise, an error
message w ill be displayed, as depicted below .
open in browser PRO version
Are you a developer? Try out the HTML to PDF API
pdfcrowd.com
Move folder
To move a folder, right-click on it from the folder tree and select the "Move folder" option. A new window will be displayed, allowing you to choose a new parent for the selected
folder.
Note: Moving a public folder or other user's opened shared folders w ill succeed only if your user w as granted the required permissions by the actual folder ow ner. Otherw ise, an error
message w ill be displayed, as show n in the image below .
Empty / Delete folder
To remove the entire contents of a folder, right-click on the desired folder from the folder tree and select the "Empty folder" option.
open in browser PRO version
Are you a developer? Try out the HTML to PDF API
pdfcrowd.com
Warning: When using the "Empty folder" option, the folder content will be completely removed (NOT moved to Trash)!
To delete a folder, right-click on it from the folder tree and select the "Delete folder" option.
As a result of the delete action, the folder will be, by default, moved to Trash.
Warning: If the "Settings" -> "Webmail Data" -> "Preferences" -> "Delete to Trash" option is set to "No", when you delete a folder it will permanently deleted. If this option
is set to "Yes" then when you delete a folder it will be moved to "Trash" (as a sub-folder), allowing you to recover the deleted folder, if required, by moving it from "Trash" to
another desired parent location.
Note: If the related "Settings" -> "Webmail Data" -> "Preferences" -> "Confirm empty folder" option is set to "Yes", then a pop-up w ill displayed asking for your confirmation w hen performing
an empty / delete folder action.
open in browser PRO version
Are you a developer? Try out the HTML to PDF API
pdfcrowd.com
Note: Emptying or deleting a public folder or other user's opened shared folders w ill succeed only if your user w as granted the required permissions by the actual folder ow ner. Otherw ise,
an error message w ill displayed, as illustrated below .
Folder sharing
To control a folder's sharing permissions, go to the left folder tree, right-click on it and choose the "Sharing" option.
When accessing the "Sharing" options for a folder, a list of users / groups, for which the required permissions have been previously defined, is displayed. If no permission has
been previously set the list will be blank.
open in browser PRO version
Are you a developer? Try out the HTML to PDF API
pdfcrowd.com
You can use the "My permissions" button to display your user's permissions for the selected folder. Below you can find an example of the default user permissions
corresponding to the "Public contacts" folder.
Note: Full permissions for the public folders are granted by default to the postmaster account.
Permissions act hierarchically (are inherited on the group hierarchy). Additionally, resource hierarchies (a folder being parent to another folder) also benefit from the inheritance
algorithm. Check the "Apply these permissions to subfolders" box if you want sub-folders to inherit the permissions you set.
open in browser PRO version
Are you a developer? Try out the HTML to PDF API
pdfcrowd.com
Managing existing permissions
To edit an existing set of permissions for a specific user, click the corresponding "Edit" button. To delete it hit the recycle bin shaped Delete button.
When editing each permission, it may be allowed explicitly, denied explicitly or not specified. In the "Effective Permissions" tab, you will be able to see what individual
permissions are specifically allowed or not.
Effective permissions are displayed only for already saved permissions, so any changes won't be reflected until saving.
The "Effective Permissions" tab will only display the relevant permissions after you select a user / group and it will only show updated permissions after you save your settings.
If a permission is not explicitly allowed or denied for a sub-folder, then the permission setting will be inherited from the first superior folder which has the "Apply these
permissions to subfolders" option enabled.
Adding permissions to more users
Click the "Add" button to add permissions for a specific a user or a group of users.
open in browser PRO version
Are you a developer? Try out the HTML to PDF API
pdfcrowd.com
In the "User / group name" section, enter the desired account name you wish to set sharing permissions for. The "Select" button can be used to search the address book for
accounts or groups.
You can set a predefined permission level via the "Permissions details" section. There are 6 levels to choose from:
"No access" - all permissions are denied;
"Viewer" - viewing the folder and reading its content are allowed;
open in browser PRO version
Are you a developer? Try out the HTML to PDF API
pdfcrowd.com
"Contributor" - viewing the folder, reading its content and adding items are allowed;
"Editor" - viewing the folder, reading its content, setting / clearing flags, adding items, marking items as deleted / not deleted and expunging items are allowed;
"Master" - all permissions are allowed;
"Custom" - each permission can be defined individually according to your needs.
Click on the question mark next to each explicit permission to display a short description for it.
"Viewer" level - means the selected user / group is allowed to:
View folder;
Read folder content.
"Contributor" level - means the selected user / group is allowed to:
View folder;
Read folder content;
Add items.
"Editor" level - means the selected user / group is allowed to:
View folder;
Read folder content;
Add items;
Set / clear flags;
Mark items as deleted / not deleted;
Expunge folder.
"Master" level - means the selected user / group is allowed to:
View folder;
open in browser PRO version
Are you a developer? Try out the HTML to PDF API
pdfcrowd.com
Read folder content;
Add items;
Set / clear flags;
Mark items as deleted / not deleted;
Expunge folder;
Share the read / unread status;
Add sub-folders;
Delete folder;
Manage permissions.
When selecting one of the predefined levels, "Allow" check-box associated its corresponding permissions will be automatically marked.
Note: The "Read items" and "Delete items" permissions include related sub-permissions:
The "Read items" permission allow s a user to view the folder and read its content; you can see the "Read items" sub-permissions by clicking the "+" button;
The "Delete items" permission allow s the user to mark items as deleted / not deleted and permanently delete (expunge) the folder content; use the "+" button to see the "Delete items" subpermissions.
In the "Effective permissions" tab, you will be able to see what permissions are specifically allowed or not.
open in browser PRO version
Are you a developer? Try out the HTML to PDF API
pdfcrowd.com
Effective permissions are displayed only for already saved permissions, so changes won't be reflected until saving.
The Effective Permissions tab will only display the relevant permissions after you select a user / group and it will only show updated permissions after you save your settings.
Note: Permissions for public folders can be set in the same w ay via the domain's postmaster account.
Open other user's folders
To open another user's shared folders (for which the user explicitly defined access permissions to your account), right-click on any folder in the folder tree and select "Open
other user's folders". You can also subscribe via the "Settings" -> "Sharing Permissions" tab -> "Open other user's folders" section -> "Subscribe" button.
In the new window's "Shared by" section, you can either type the email address in the text field or click the "Select" button to choose it from the contacts list in your domain.
The folder will appear in the "Other users' folders" section of your folder tree, right above the "Public Folders":
open in browser PRO version
Are you a developer? Try out the HTML to PDF API
pdfcrowd.com
If you do not wish to see the folders shared by a certain user anymore, close them by right-clicking on the folder displaying the user's name (or one of its sub-folders) and
choosing the "Close" user option.
Working with Messages in the Standard WebMail
In the central Webmail section you can find the content corresponding to a selected account folder. For an email folder view this will resemble the below screenshot.
open in browser PRO version
Are you a developer? Try out the HTML to PDF API
pdfcrowd.com
You can click on the email list column titles to sort the emails using the corresponding criterion. Click the same title link to reverse the sort order.
Managing existing emails
Main menu actions
The buttons above the email list allow you to perform the most common actions for an email message.
open in browser PRO version
Are you a developer? Try out the HTML to PDF API
pdfcrowd.com
Use the "New" button to create a new email message. The "Reply" and "Reply to All" buttons allow you to reply to a particular email message; if you select multiple messages,
the action will be applied for the last selected email. When the "Reply" action is used, the new message composer windows will have the "To" field auto-completed with the
original sender's address. When using the "Reply to all" action both the "To" and "Cc" fields will be auto-completed, in the message composer window, with the original
sender's address and all the other recipients for that message, excluding your account.
Use the "Forward" button to send a received email to a different recipient. When the "Reply", "Reply to All" or "Forward" actions are used, the new message composer window
will have the "Subject" field auto-completed with the corresponding tag ("Re" or "Fwd") and the original subject text.
The "Move" button can be used to move an email message to a different folder. When using the "Move" or "Copy" actions, a new window will be displayed, which allows you to
select the destination folder.
The "Print" button generates a window containing a printer-friendly version of the selected messages, as well as a print pop-up window.
open in browser PRO version
Are you a developer? Try out the HTML to PDF API
pdfcrowd.com
After printing is finished or canceled, the pop-up window will be closed automatically.
The "Delete" button allows you to delete selected messages. If the "Settings" -> "Webmail Data" -> "Preferences" section -> "Confirm delete mail option" is set to "Yes", a pop-up
window will ask for your confirmation when you use the "Delete" option.
If the "Settings" -> "Webmail Data" -> "Preferences" section -> "Delete to Trash" option is set to "Yes", the email(s) will be moved in the "Trash" folder. If this option is set to "No",
then the email(s) will be permanently removed.
For further actions on email messages, use the "more actions..." drop down menu, which provides additional options.
open in browser PRO version
Are you a developer? Try out the HTML to PDF API
pdfcrowd.com
Grouping messages
The "more actions..." menu allows you to group email messages by:
conversation (the grouping is made based on "In-reply-to" header, "References" header, "Thread-Topic" header, "Message Subject" in this particular order);
message subject (the grouping is made based on the email subject, including "Re" or "Fwd" tagged subjects);
open in browser PRO version
Are you a developer? Try out the HTML to PDF API
pdfcrowd.com
sender (the grouping is made based on the email's "From" address).
You can remove existing grouping via the "No grouping" action.
If any of the 'Group by' views are selected, the message list window will contain entries corresponding to the selected group criterion. Expand the respective group title, via the "+"
button, to view the messages of that group (which match the set criterion). In each 'thread group', messages are sorted by their date / time.
Marking messages
At the bottom of the email list, you can find the "Mark as" drop down box, which can be used to mark selected messages as "read" / "not read", "flagged" / "not flagged" or
"deleted" / "not deleted".
Select:
open in browser PRO version
Are you a developer? Try out the HTML to PDF API
pdfcrowd.com
"Mark as read" to set the status of the currently selected message(s) to "Read";
"Mark as not read" to set the status of the currently selected message(s) to "Not read";
"Flagged" to add a flag to the currently selected message(s);
"Not Flagged" to delete the flag for the currently selected message(s); this option is only available for previously flagged messages;
"Deleted" to mark a message as deleted;
"Not deleted" to remove a deleted mark from a certain email message.
The messages marked as read are displayed in the email list with normal formatting and the "not read" messages are displayed with Bold character formatting.
Using the "Flagged" mark will add a flag icon to the respective message(s).
If you use the "Mark as deleted" option, the previously selected email(s) will be added the specific delete property, but will not be moved to the "Trash" folder (as would be the
case when using the "Delete" button); the deleted messages will be displayed with a strike-through line in the email list of the same folder.
open in browser PRO version
Are you a developer? Try out the HTML to PDF API
pdfcrowd.com
If you wish to hide the emails marked as deleted, click the "Hide deleted" button. Once the "Hide deleted" option is enabled, the "Show deleted" button will be displayed instead,
in the central menu. If you wish to view the messages that you previously marked as deleted, click the mentioned "Show deleted" button.
Answering read receipt requests
The Standard WebMail interface allows the user to send a "Read Receipt" when reading a message that was sent with the "Request Read Receipt" option.
You can set the behavior of the application for incoming messages that have the "Request Read Receipt" header set from "Settings" -> "Webmail Data" -> "Preferences" ->
"Send read receipt". This setting has the following options:
"Always send a receipt";
"Never send a receipt";
"Ask".
When "Send read receipt" is set to "Ask", a pop-up will be displayed containing the text: "The sender of this message requested a receipt to be returned when the message is
read. Send receipt?". The options for the user are:
"Send" - a receipt is sent and the flag is set (so that the user will not be prompted again);
"Don't send" - the flag is set and no receipt is sent;
"Cancel" - no receipt is sent and the flag is not set; the user will be prompted again next time the message is opened.
open in browser PRO version
Are you a developer? Try out the HTML to PDF API
pdfcrowd.com
Composing a new message
To compose a new message, press on the "New" button. A pop-up window similar to the one below will be displayed.
open in browser PRO version
Are you a developer? Try out the HTML to PDF API
pdfcrowd.com
Adding addresses
Enter the email addresses of the recipients in the "To:" field of the message (separated by commas if multiple) or add them from your existing address book by pressing the
"Address book" button.
How to use the Address Book
The address book gives users access to the contacts defined for their account and also to public and domain contacts. First select the needed contact list, then select a specific
one. Email addresses can be added automatically to the "To", "Cc" or "Bcc" fields. To do so, click on the desired address to select it, then click the "To", "Cc" or "Bcc" button.
Press the "OK" button when you are done adding recipients or the "Cancel" button to quit.
Note: If you have a large contact list, you can use the "Find" text box to search for the desired address.
When you type an address in the "To","Cc" or "Bcc" field in the message composer window, the auto-complete function will show you a list of addresses in your address book
that match the text you have entered. Therefore, you can select the correct address and press "Enter".
How to add a different "From" address
Use a different originating email address by clicking the "Show From" link (at the right of the formatting buttons) and typing the desired address in the "From" field.
Warning: This option works only if the user (your account) has the "Send Mail as" permission from the mailbox owner, or the chosen "From" address was previously set
as an alias. For information on how to define 'Send Mail as' permissions please see the Define global permissions chapter.
How to specify the "Reply-to" / "Bcc" address
open in browser PRO version
Are you a developer? Try out the HTML to PDF API
pdfcrowd.com
To display the "Reply-to" and "Bcc" fields, click the related links in the message composer window. After the fields are displayed, you will have new links available to hide the
"Reply-to" and "Bcc" fields.
When clicking the "Show Reply-To" link, a new field will be shown, containing the email address defined in the settings window (which the user can override). If no value was
defined for this parameter in the "Settings" > "Personal Data" page, the input field will be empty.
Check all the addresses
Use the "Check addresses" button to verify the validity of the email addresses you have inserted.
Requesting a read receipt for a message
Click "Request Read Receipt" when composing a new message, so that when the email is received by your intended recipients, they are presented with an option to send a
confirmation that they read that email.
You can toggle the "Request Read Receipt" check-box in the message window between the following settings:
"Request Read Receipt";
"No Read Receipt".
To configure the general behavior regarding the request of read receipts, set the value for the "Settings" -> "Webmail Data" -> "Preferences" section -> "Request read receipt"
option to match your required default behavior.
Filling the subject and the body
Specify the subject of your message in the "Subject:" field.
Note: The "Subject" field is restricted to 256 characters.
Edit your message in the message body area. First choose the desired format for the message: "HTML" or "Text".
open in browser PRO version
Are you a developer? Try out the HTML to PDF API
pdfcrowd.com
Composing HTML messages
When composing an HTML formatted message you can use rich text (bold, italic, underline / strike-through, different font faces and sizes, colors, subscript, superscript, links,
bullets etc.). Set these options by clicking on the related icons, shown in the screenshot below.
Note: The above options are not available if you select plain text formatting for the composed message.
If a signature was previously defined for your account, via "Webmail" -> "Settings" -> "Webmail Data" tab -> "Signature" section, then when composing an email, the signature
content is automatically added at the bottom of the message.
Use the above "Settings" section to customize the default content of your signature.
Attaching files to the email
Add attachments to your message by pressing the "Attach" button from the main message composer menu. To add an attachment, press on "Browse", select the desired file
and then press on the "Upload" link.
To add multiple attachments, repeat these actions as many times as you need.
After adding one or more attachments to your message, the attachment list is displayed in the lower part of the screen. You can delete the attachments one by one, by clicking on
the corresponding "[delete]" link.
Sending the message or saving it to "Drafts"
You can save a draft of your current message at any time by pressing the "Save" button. This will save the message in the "Drafts" folder. To resume its editing at a later time,
simply access the "Drafts" folder and double-click on the message.
After you are done composing your message, click the "Send" button from the top-right section of the message composer window.
open in browser PRO version
Are you a developer? Try out the HTML to PDF API
pdfcrowd.com
Note: To have all your sent messages automatically saved in the "Sent" folder, set the "Settings" -> "Webmail Data" -> "Preferences" section -> "Save to sent" option to "Yes". This value is
set to "Yes" by default.
Reading messages
When selecting an email from the list, by clicking on it, its common headers and body will be displayed in the preview pane.
By default, the preview pane displays the sender, recipient(s) and of the email, horizontally. To have them displayed vertically, press the "+" icon in front of the subject line, as
shown in the below picture.
open in browser PRO version
Are you a developer? Try out the HTML to PDF API
pdfcrowd.com
In the vertical view, the "To" and "Cc" fields are also displayed.
In the lower part of the preview pane, you can click the "View Source" button to open the email's full source, including headers and body, in a new tab. Click the "Block sender"
button to add the sender of the selected message to your account-level blacklist.
To view a message in a separate window, double-click on it in the email list found above the preview pane.
The view message window has the same behavior and options as the preview pane.
open in browser PRO version
Are you a developer? Try out the HTML to PDF API
pdfcrowd.com
Working with Contacts in the Standard WebMail
To add new entries to your address book, access the "Contacts" folder from the folder tree. You can either add them one by one or import an existing address book.
Note: The address book files you w ish to import must be in standard CSV format - Comma Separated Values
Any newly created mailbox has access, by default, to two public contact folders, that can be found under the public folder root: "Domain contacts" and "Public contacts".
open in browser PRO version
Are you a developer? Try out the HTML to PDF API
pdfcrowd.com
The "Domain contacts" folder is read-only: no items can be modified or created in it, it cannot be deleted or renamed, no folders can be added to it, no permissions may be
changed on it.
Note: This applies for all users in the domain, including postmaster!
The content of this folder is automatically and dynamically updated by the server and contains all the email addresses for recipients in the domain.
"Public contacts" can be added, by default, only by the domain's postmaster.
Another contacts folder crated by default is "Collected addresses", which holds addresses that are automatically added to this folder, if the related options are enabled. There
are two scenarios in which addresses are automatically added to "Collected addresses":
if the related "Automatically add recipients from sent messages to Collected addresses" option is enabled via the Ajax WebMail interface;
if the "Identity Confirmation" anti-spam method is enabled, then recipients that reply to the confirmation requests will be automatically added to "Collected addresses".
Managing existing contacts
When viewing the content of a contacts folder, you can move, copy or delete the previously selected entries, by using the corresponding actions available in the "more actions..."
drop-down menu.
Note: When trying to move or copy a contact, the folder you choose as destination w ill have to be a contact folder as w ell. Otherw ise, you w ill be presented w ith an error, as show n below .
You can move, copy or delete actions several contacts at the same time, by selecting multiple items before you perform the desired action. To find out more regarding the
selection of multiple items, please see Selecting items.
open in browser PRO version
Are you a developer? Try out the HTML to PDF API
pdfcrowd.com
Contacts can be directly deleted by clicking the trash-shaped icon corresponding to the desired contact.
To send a new email to a contact in the list click the envelope-shaped icon (next to the "Delete" icon). An email composer window, having the "To" field auto-completed with the
email address of the selected contact will appear.
Click the "Details" button to see detailed information (which will be displayed in a new pop-up) regarding the selected contact.
Creating or editing a contact
To create a new contact you can either click the "New contact" button or double-click on an empty line in the contact list.
You can edit an existing contact by double-clicking on it.
open in browser PRO version
Are you a developer? Try out the HTML to PDF API
pdfcrowd.com
After this, edit the desired contact details and make sure you press the "Save & Close" button, or use the "Ctrl + Shift + S" keyboard shortcut to save the contact you have just
added or the details you have changed.
To cancel the "add" / "edit" action of the opened contact, click the corresponding "Cancel" button in the top-right section of the contact edit window.
open in browser PRO version
Are you a developer? Try out the HTML to PDF API
pdfcrowd.com
General details
In this section you can enter the most commonly used information regarding a contact.
Use the "Email", "First name" and "Last name" text fields to specify the name and email address of the new contact you want to add. To specify the contact's nickname, use the
"Nickname" field.
Additional info
The "Additional Info" tab allows you to add more details about your contact.
open in browser PRO version
Are you a developer? Try out the HTML to PDF API
pdfcrowd.com
You can specify a personal email by filling the "Personal email" field, phone numbers in the "Phone" and "Home phone" fields and the home address data in the "Home
address" field.
By using the "Business email" field, you can specify the work email address for your new contact. Use the "Business phone" and "Business address" fields to specify the office
contact details, and the "Company" field to enter your contact's company name. Finally the "Notes" text field can be used to type any additional information regarding the currently
edited contact.
Importing contacts
Press the "Import contacts" button to import external address books that were saved locally.
open in browser PRO version
Are you a developer? Try out the HTML to PDF API
pdfcrowd.com
Note: Address book files must be in CSV (Comma Separated Value) format.
Click the "Browse" button to specify the path to the desired external address book, then click on the "Import" contacts button. Should you choose to abort, press the "Cancel"
button.
Working with the "Personal Organizer" in the Standard WebMail
Having time management and mobility needs in mind, the Axigen messaging platform comes with a "Personal Organizer" module, available from Axigen's WebMail interfaces,
as well as the MS Outlook email client. The "Personal Organizer" comprises tools such as calendar, tasks, journal, notes and also offers collaboration support.
This section aims to explain how the new management tools can be used. Each of them - calendar, journal, notes, tasks - is described in a separate subsection, with all its
features and usage alternatives.
Working with the Calendar
The calendar helps users plan and schedule their work-related or personal events and provides them a clear and detailed view of their work, for an improved time management.
To access your calendar, you can either click the "Calendar" folder in the folder tree, placed on the left hand side of the Standard WebMail, or click on any day of the mini-calendar
displayed in the lower left corner of the interface.
open in browser PRO version
Are you a developer? Try out the HTML to PDF API
pdfcrowd.com
Calendar views
The upper button bar, displayed when the calendar is accessed, gives access to the following display options:
"Today" - focuses your current view (see below items) on the current day, while maintaining the already chosen view mode;
"Day" view - displays the events for one day at a time;
open in browser PRO version
Are you a developer? Try out the HTML to PDF API
pdfcrowd.com
At the top of the day view, you will see the date for which the events are displayed. The events for that day are displayed below, divided on a per-hour basis. For each event, the
"Subject" field is displayed in the list.
"Work-week" view - displays work days, Monday to Friday;
open in browser PRO version
Are you a developer? Try out the HTML to PDF API
pdfcrowd.com
The calendar view window is divided into columns corresponding to each work week day and the events are displayed for each day on a per-hour basis. For each event the
"Subject" field is displayed in the list.
"Week" view - displays the entire week, Monday to Sunday;
open in browser PRO version
Are you a developer? Try out the HTML to PDF API
pdfcrowd.com
In this view mode, the calendar view window is divided into columns corresponding to each week day and the events are displayed in each column on a per-hour basis. For
each event the "Subject" field is displayed in the list.
"Month" view - displays the events for the whole month;
open in browser PRO version
Are you a developer? Try out the HTML to PDF API
pdfcrowd.com
In the "month" view mode, the calendar view is divided into columns corresponding to each week day and rows corresponding to each week. The events are displayed in each
box. For each "all day" event, only the "Subject" field is displayed and for events scheduled between specific hours, the "Start time" (hour) and "Subject" are displayed.
Note: For the day, w ork w eek and w eek view s the first row in the calendar view table is used to display "all day" calendar events.
"List" view - displays the existing list of events.
open in browser PRO version
Are you a developer? Try out the HTML to PDF API
pdfcrowd.com
In the "list" view mode, the calendar view is divided into columns corresponding to specific event details. The events are displayed on each row and for each event, the "Subject",
"Start Date" and "End Date" are displayed. For events scheduled for an entire day, the start and end date columns will contain only the event date and the "all day" specification.
Use the trash-bin icon found in the "Delete" column to remove the related event from your calendar.
Note: In all view s the event lists are sorted based on their start date / hour.
By default, these view modes are related to the current day, week, month. To browse your calendar to other days, months, years, use the mini-calendar, displayed in the lower
left corner of the interface. To jump to next or previous months, use the "arrow" buttons at the top of the mini-calendar. To jump to the next or previous year, use the "doublearrow" buttons.
Note: Further settings that determine the behavior of the calendar need to be set in the "Settings" -> "WebMail Data" page. Each user needs to set the correct "Time Zone" and the "Week start
date", in order to have start and end times displayed correctly in their calendar.
Managing existing events
To delete an existing event, simply double-click on the desired event entry in your Calendar view and click the trash icon found in the top side menu of the event edit page.
open in browser PRO version
Are you a developer? Try out the HTML to PDF API
pdfcrowd.com
When using the "list" view, events can be deleted by clicking their corresponding delete icon.
To move an event to another time period, double-click on the event and change the start / end time. This will move the event entry to the new time period.
Existing events can be edited at any given later date. To edit an event's properties (recurrence, location, attendees etc.), double-click on the corresponding entry in your calendar,
regardless of the selected view type. After making the needed modifications, hit the "Save & Close" button.
When viewing the content of a calendar folder in "list" mode, you can move (to another calendar folder), copy or delete one or several entries you previously selected, by using the
corresponding actions available in the "more actions..." drop-down menu.
Note: When trying to move or copy a calendar entry, the folder you choose as destination w ill have to be a calendar folder type too. Otherw ise, you w ill be presented w ith an error, as you
can see below .
You can apply the move, copy or delete actions to several items at the same time, by selecting multiple events, before you perform the desired action. To find out more regarding
the selection of multiple items, please see Selecting items.
Creating a new event
To create a new event, you can use the "New event" button found in the top-left side of the calendar view, or double-click on an empty field of your calendar content view section.
Event details
open in browser PRO version
Are you a developer? Try out the HTML to PDF API
pdfcrowd.com
When creating a new event, you have to first type a subject (required) and then a location, specifying where the event will take place. You can either create an event that lasts
throughout the day, by checking the "All day event" option, or you can specify time limits for the new event. To do so, click the date and time selection boxes for both the start and
end date of your event.
Should you like to be prompted before the start of a certain event, check the "Reminder" box and set your desired time interval. You can also use the available text field to type in
any details or explanations regarding your current event. Set the events transparency to "Busy" or "Free" using the drop-down menu in the "Show time as" section. This option will
affect the resource availability, displayed in the "Free / Busy" tab. More information is available below on this page.
To save your event, press the "Save & Close" button. To abort configuring the event, hit "Cancel".
open in browser PRO version
Are you a developer? Try out the HTML to PDF API
pdfcrowd.com
Adding recurrence
To define a repeating event, hit the "Recurrence" button and configure the desired parameters.
When hitting the "Recurrence" button, a pop-up window will display the available options. You can set a start and end time for the event by clicking the respective selection boxes.
Thus, the duration of your event will be automatically set.
You can set the event to be repeated on a daily, weekly, monthly or yearly basis, according to a defined recurrence pattern. Depending on the recurrence pattern you select, you
can access more detailed options:
"Daily" - you can have the event repeated every weekday by checking the corresponding option, Every weekday, or you can have it repeated every 2,3, x days by checking the
corresponding option;
"Weekly" - you can check a certain day (Monday to Sunday) of every 1 / 2 / etc. week(s) for the recurrence;
"Monthly" - you can specify a certain day of every month (e.g. 25th of every month or every 2 months), or select from the other available options: first / second / third / fourth / last
- day / weekday / weekend day / Sunday / Monday etc. of every 1 / 2 / etc. months; for example, you can set an event that occurs on the first weekday of every month;
Note: As the number of days differs depending on the month, if you set an event for the 31st , it w ill be scheduled in the last day of each month w ith 30 or less days.
open in browser PRO version
Are you a developer? Try out the HTML to PDF API
pdfcrowd.com
"Yearly" - you can set the event to occur on a certain date of a certain month (e.g. January 25th ) or you can select from the other available options: first / second / third / fourth /
last - day / weekday / weekend day / Sunday / Monday etc. of every January / February / etc. months; for example, you can set a seminar attendance event for each first
weekend day of every March.
Finally, set the "Range of recurrence" for your event. Click the "Start" selection box to select a date. The event can be repeated incessantly if you choose the "No end date" option.
Alternately, you can have it end after a number of instances, by checking the "End after x occurrences" option and setting the desired number of repeats, or set an "End by" date
by clicking the related selection box.
When you are done setting the event recurrence, hit "OK". To abort the recurrence, hit "Cancel". For already defined recurrence details, hit "Remove Recurrence" to prevent the
event from repeating.
Inviting attendees
Use the "Invite Attendees" button to invite others to attend the event you are creating. When hitting the "Invite Attendees" button, a new text field and a "To" button are added in the
upper side of the event editing window. If you want to abort inviting process, press the "Cancel Invitation" button that replaces the initial "Invite Attendees" option.
open in browser PRO version
Are you a developer? Try out the HTML to PDF API
pdfcrowd.com
You can either type the email addresses of the persons you want to invite at the event, or you can access your existing contacts by hitting the "To" button. When accessing your
contacts using the "To" button, a new pop-up window will appear, allowing you to choose which contacts to invite, as shown below. You can also filter your contacts by type,
using one of the available options: "All contacts", "My contacts", "Public contacts" and "Domain contacts".
Select the email address(es) of the contact(s) you want to invite with a mouse click, then press the "To" button. To select several contacts, press "Ctrl" on your keyboard. To
delete a contact from the list of attendees to be invited, click their email address in the right hand pane and press "Delete" on your keyboard. When you are done selecting
attendees, press "OK" to have the email invitations sent to them. To discard the inviting process, hit "Cancel".
open in browser PRO version
Are you a developer? Try out the HTML to PDF API
pdfcrowd.com
When inviting others to take part in a certain event, the event editing window will also be modified. A new tab called attendees will be added, showing the course of action taken
by those invited. The possible statuses are "Organizer", "Accepted", "Declined", "Tentative" and "Needs action".
Checking the "Free / Busy" status of the attendees
In the "Free / Busy" tab, the attendee availability is displayed if the user editing the event has the "Read Free / Busy status" permission on the attendee's mailbox.
open in browser PRO version
Are you a developer? Try out the HTML to PDF API
pdfcrowd.com
Reminder options
To be prompted before the start of a certain event, make sure that you check the "Reminder" box when creating / editing an event and set the desired time, before the start of the
event, when the reminder pop-up will be shown.
If you have chosen to be reminded of a certain event at the specified time, a pop-up will appear at the given time and date. If no action is taken, it will reappear each time the
Standard WebMail interface is automatically refreshed. The time period depends on the refresh settings configured in the "Settings" -> "WebMail Data" page. Alternatively, you
can have the reminder postponed using the available snooze options, by choosing a repeat interval in the corresponding drop-down menu and by hitting the "Snooze" button.
open in browser PRO version
Are you a developer? Try out the HTML to PDF API
pdfcrowd.com
Warning: If the auto-refresh option is disabled, reminders will not function!
If you want to see the details of an event you are reminded of, press the "Open Item" button. To dismiss a certain event, select it and press the "Dismiss" button. Use the
"Dismiss All" button to discard all pending events.
{{Warning|Further settings that determine the calendar behavior need to be set on the "Settings" -> "WebMail Data" page. Each user needs to set the correct "Time Zone" and the
"Week start date", in order to have deadlines and start times displayed correctly in their calendar.
Editing recurrent events
If the entry you want to edit is a recurring event, you will be asked whether you want to edit the entire series or only a single instance (occurrence) of the event, as shown in the
screenshot below.
open in browser PRO version
Are you a developer? Try out the HTML to PDF API
pdfcrowd.com
Answering to invitations
If you were selected as an attendee to another user's event, you will receive an invitation email in your Inbox, prompting you with the corresponding actions, as you can see in the
image below.
To view the details of the event you are invited to attend, click on "open details". The available options are to accept the meeting, to accept it without guaranteeing attendance
("Tentative"), reject it, or propose a change in the event details.
Each time an attendee takes a certain action, other than proposing a change, the organizer receives a notification email that requires no further action to be taken.
If, on the other hand, the invited attendees have proposed changes to the event, the organizer will receive an email prompting him / her to take action. The available options are
to accept / reject changes or propose a new modification of the event specifics.
open in browser PRO version
Are you a developer? Try out the HTML to PDF API
pdfcrowd.com
When dealing with proposed changes, attendees have one more option, "Tentative", which gives them the possibility to accept the changes partially, without guaranteeing thy
will actually take part in the event.
Working with Tasks
Tasks helps users organize their work-related to-dos and collaborate with others on ongoing projects. By enabling them to permanently check the level of completion, tasks offer
a clear and detailed view of their workload. To access your tasks, click the "Tasks" folder in the left hand side tree.
open in browser PRO version
Are you a developer? Try out the HTML to PDF API
pdfcrowd.com
You can create additional tasks folders, by right-clicking on any folder in the tree, selecting "New Folder" and selecting the "Tasks" entry for the "Folder type". For further reference
on how to create new folder, consult the New folder section.
Filtering tasks
The upper button bar, displayed when the Tasks are accessed, presents you with the following filtering options:
"All tasks" - lists all your tasks;
"Uncompleted tasks" - displays the user's uncompleted tasks;
"Completed tasks" - displays the user's completed tasks.
open in browser PRO version
Are you a developer? Try out the HTML to PDF API
pdfcrowd.com
Managing existing tasks
Existing tasks can be edited at any given later date. To do so, double-click on the desired task. After making the needed alterations, hit the "Save & Close" button.
Should you like to delete the entry while you are in the editor window, press the delete icon.
To move a task to another time period, double-click on it and change the "Start Date" and / or "Due Date". This will move the entry to the new time period.
open in browser PRO version
Are you a developer? Try out the HTML to PDF API
pdfcrowd.com
You can move, copy or delete one or several (previously selected) entries, by using the corresponding options available in the "more actions..." drop-down menu.
Note: When trying to move or copy a task, the folder you choose as destination w ill have to be a tasks folder type too. Otherw ise, you w ill be presented w ith an error, as show n in the
screenshot below .
You can apply the move, copy or delete actions to several items at the same time, by selecting multiple tasks, before you perform the desired action. To find out more regarding
the selection of multiple items, please see Selecting items.
Creating a new task
Task details
When creating a new task, first type a subject in the corresponding text field, then set the task's completion deadline using the "Due Date" selection box. Use the left and right
arrows of the selection calendar to switch between months of a certain year and the double left and right arrows to switch between different years.
open in browser PRO version
Are you a developer? Try out the HTML to PDF API
pdfcrowd.com
To successfully define a time frame for the task, also configure the "Start date", using the corresponding selection box. Furthermore, you can prioritize tasks using the "Priority"
drop-down menu. Available options are: "Low", "Normal" and "High".
Should you like to be prompted before the start of a certain task, check the "Reminder" box and set your desired time interval. You can also use the available text field to type in
any details or explanations regarding your current task.
open in browser PRO version
Are you a developer? Try out the HTML to PDF API
pdfcrowd.com
Adding recurrence
By hitting the "Recurrence" button, you can set the task to be repeated on a daily, weekly, monthly, yearly basis or according to a defined recurrence pattern. Depending on the
recurrence pattern you select, you can access more detailed options:
"Daily" - you can have the task repeated every weekday by checking the corresponding option, Every weekday, or you can have it repeated every 2,3, x days by checking the
corresponding option;
"Weekly" - you can check a certain day of the week for the recurrence;
"Monthly" - you can specify a certain day of every month (e.g. 25th of every month or every 2 months), or select from the other available options: first / second / third / fourth / last
- day / weekday / weekend day / Sunday / Monday etc. of every 1 / 2 / etc. months; for example, you can set a task that occurs on the first weekday of every month;
Note: As the number of days differs depending on the month, if you set a task for the 31st , it w ill be scheduled in the last day of each month w ith 30 or less days.
open in browser PRO version
Are you a developer? Try out the HTML to PDF API
pdfcrowd.com
"Yearly" - you can set the task to occur on a certain day of a certain month (e.g. January 25th ) or you can select from the other available options: first / second / third / fourth /
last - day / weekday / weekend day / Sunday / Monday etc. of every January / February / etc. months; for example, you can set a seminar attendance task for each first weekend
day of every March.
Then set the "Range of recurrence" for your task. Click the "Start" selection box to select a date. The task can be repeated incessantly if you choose the "No end date" option.
Alternately, you can have it ended after a number of instances, by checking the "End after x occurrences" option and setting the desired number of repeats, or set an "End by"
date by clicking the related selection box.
When you are done setting the task recurrence, hit "OK". To abort the recurrence, hit Cancel. For already defined recurrence details, hit "Remove Recurrence" to prevent the task
from repeating.
Assigning tasks
When hitting the "Assign task" button, a new text field and a "To" button are added in the upper side of the task editing window. If you want to abort inviting process, press the
open in browser PRO version
Are you a developer? Try out the HTML to PDF API
pdfcrowd.com
"Cancel Assignment" button that replaces the initial "Assign task" option.
You can either type the email addresses of the persons you want to assign the task to, or you can access your existing contacts by hitting the "To" button. When accessing your
contacts using the "To" button, a new pop-up window will appear, allowing you to choose which contacts to assign the task to, as shown below. You can also filter your contacts
by type, using one of the available options: "All contacts", "My contacts", "Public contacts" and "Domain contacts".
Select the email address(es) of the contact(s) you want to have the task assigned to with a mouse click, then press the "To" button. To select several contacts, press "Ctrl" on
your keyboard. To delete a contact from the list of assignees, click their email address in the right hand pane and press "Delete" on your keyboard. When you are done selecting
assignees, press "OK" to have the email assignments sent to them. To discard the assigning process, hit "Cancel".
open in browser PRO version
Are you a developer? Try out the HTML to PDF API
pdfcrowd.com
When assigning tasks to others, the editing window will also be modified. A new tab called "Attendees" will be added, showing the course of action taken by those you have
selected. The possible statuses are "Accepted", "Declined" and "Needs action".
Reminder options
To be prompted before the start of a certain task, make sure that you check the "Reminder" box when creating / editing a task and set the desired time, before the start of the
event, when the reminder pop-up will be shown.
If you have chosen to be reminded of a certain task, at a specified time, a pop-up will appear at the given time and date. If no action is taken, it will reappear each time the
Standard WebMail interface is automatically refreshed. The time period depends on the refresh settings configured in the "Settings" -> "WebMail Data" page. Alternatively, you
can have the reminder postponed using the available snooze options, by choosing a repeat interval in the corresponding drop-down menu and by hitting the "Snooze" button.
Warning: If the auto-refresh option is disabled, reminders will not function!
open in browser PRO version
Are you a developer? Try out the HTML to PDF API
pdfcrowd.com
If you want to see the details of a task you are reminded of, press the "Open Item" button. To dismiss a certain task, click to select it, then press the "Dismiss" button. When a
task is dismissed, it is also removed from the reminders window. Use the "Dismiss All" button to discard all pending tasks.
{{Warning|Further settings that determine the tasks behavior need to be set on the "Settings" -> "WebMail Data" page. Each user needs to set the correct "Time Zone" and the
"Week start date", in order to have task deadlines and start times displayed correctly.
Answering to tasks assignments
If you have been assigned to a task by another user, you will receive an assignment email in your Inbox, prompting you to take action, as depicted below.
open in browser PRO version
Are you a developer? Try out the HTML to PDF API
pdfcrowd.com
To view the details of the assigned task, users need to click on "open details". The available options are to accept or reject the task; the organizer will receive a confirmation
email based on your choice.
Setting the task completion
To mark a task as completed, use the corresponding icon placed next to the "Assign task" button in the task editor window.
While you are in the tasks list view, you can use the delete icon appended to each task, as well as mark a task as completed by checking the box at the left of the "Subject"
column.
To keep track of the completion process, double-click on a task to open the edit window and type a percentage in the "% Complete" text field.
Working with Notes
The "Notes" tool allows you to add quick notes while working. Notes are best suited when one needs to write down something very quickly and has little time to add more
open in browser PRO version
Are you a developer? Try out the HTML to PDF API
pdfcrowd.com
details. To access your notes, click the corresponding folder in the left hand side tree.
Manage existing notes
Notes can be edited by double-clicking on them and deleted by clicking their corresponding delete icon.
When viewing the content of a "Notes" folder, you can move, copy or delete one or several (previously selected) note(s), by using the corresponding options available in the
"more actions..." drop-down menu.
open in browser PRO version
Are you a developer? Try out the HTML to PDF API
pdfcrowd.com
Note: When trying to move or copy a note, the folder you choose as destination w ill have to be a notes folder type too. Otherw ise, you w ill be presented w ith an error, as show n below .
You can apply the move, copy or delete actions to several items at the same time, by selecting multiple notes, before you perform the desired action. To find out more regarding
the selection of multiple items, please see Selecting items.
Creating a new note
When hitting the "New note" button, a small pop-up window is displayed.
Type the note in the given field and either close the pop-up window, using your browsers "x" button, or hit the "Close" button to have your note saved.
Working with the Journal
The journal allows you to add entries that help you keep track of your day-to-day tasks and actions. To access your Journal, click the corresponding folder in the left hand side
tree.
open in browser PRO version
Are you a developer? Try out the HTML to PDF API
pdfcrowd.com
You can create additional journals by right-clicking in the folder tree pane, selecting "New Folder" and selecting the "Journal" entry for the "Folder type". For further reference on
how to create new folders, consult the New folder section.
Journal views
The upper button bar displayed when the journal is accessed gives access to the following display options:
"Today" - focuses your current view (see below items) on the current day, while maintaining the already chosen view mode;
"Day" view - displays the events for one day at a time;
open in browser PRO version
Are you a developer? Try out the HTML to PDF API
pdfcrowd.com
At the top of the day view, you will see the date for which the events are displayed. The events for that day are displayed below, divided on a per-hour basis. For each event, the
"Subject" field is displayed in the list.
"Month" view - displays the events for the whole month;
open in browser PRO version
Are you a developer? Try out the HTML to PDF API
pdfcrowd.com
In the "month" view mode, the journal is divided into columns corresponding to each week day and rows corresponding to each week. The events are displayed in each box. For
each "all day" event, only the "Subject" field is displayed and for events scheduled between specific hours, the "Start time" (hour) and "Subject" are displayed.
"List" view - displays the existing list of events.
open in browser PRO version
Are you a developer? Try out the HTML to PDF API
pdfcrowd.com
In the "list" view mode, the journal view is divided into columns corresponding to specific event details. The events are displayed on each row and for each event the "Subject"
and "Start Date" are displayed. Use the trash-bin icon found in the "Delete" column to remove the related event from your journal.
Note: In all view s, the event lists are sorted based on their start date / hour.
By default, these view modes are related to the current day, week, month. To browse your journal to other days, months, years, use the mini-calendar displayed in the lower left
corner of the interface. To jump to next or previous months, use the "arrow" buttons at the top of the mini-calendar. To jump to the next or previous year, use the "double-arrow"
buttons.
Warning: Further settings that determine the journal behavior need to be set on the "Settings" -> "WebMail Data" page. Each user needs to set the correct "Time Zone"
and the "Week start date", in order to have start and end times displayed correctly in their journal.
Managing existing journal entries
Existing journal entries can be edited at any given time. To do so, select the desired entry by double-clicking on it. After making the needed alterations, hit the "Save & Close"
open in browser PRO version
Are you a developer? Try out the HTML to PDF API
pdfcrowd.com
button. Should you like to delete the entry, press the "Delete" icon added to the editing window.
When using the "List" view, journal entries can be edited by double-clicking on them, and deleted by clicking their corresponding delete icon.
To move an entry to another time period, double-click on it and change the "Start Time" and / or "Duration". This will move the event entry to the new time period.
When viewing the content of a journal folder in "list" mode, you can move, copy or delete one or several (previously selected) entries, by using the corresponding options
available in the "more actions..." drop-down menu.
Note: When trying to move or copy a journal entry, the folder you choose as destination w ill have to be a journal folder type too. Otherw ise, you w ill be presented w ith an error, as you can
see in the image below .
open in browser PRO version
Are you a developer? Try out the HTML to PDF API
pdfcrowd.com
You can apply the move, copy or delete actions to several items at the same time, by selecting multiple events, before you perform the desired action. To find out more regarding
the selection of multiple items, please see Selecting items.
Creating a new journal entry
When hitting the "New journal" button, the options relative to the new entry are displayed in a pop-up window.
To add a new entry, you have to fill in the two required fields: "Subject", referring to the entry description, and the "Type" drop-down menu. There are several available types of
entries, such as "Phone call", "E-mail Message", "Task", "Conversation", etc:
open in browser PRO version
Are you a developer? Try out the HTML to PDF API
pdfcrowd.com
Click the "Start time" selection boxes to set a starting date and time for your journal entry. In the displayed calendar, use the left and right arrows to change months of the current
year and the double right and left arrows to change the year.
Click the "Duration" selection box to specify a time frame for your journal entry. You can then edit the actual journal note in the available text field. When you are done editing the
entry, hit the "Save & Close" button. If you want to discard the journal entry, press the "Cancel" button.
Configuring Account Settings in the Standard WebMail
To access the Standard WebMail account parameters, click "Settings" (at the right upper corner of the interface, next to the Logout link). In this section, users are given access to
the following configuration tabs:
"Personal Data" - contains options relative to the user's personal details;
"WebMail Data" - gives access to settings managing the WebMail behavior;
"Filters" - gives access to filters configuration;
"Out of office autoresponder" - allows the customization of the out of office (vacation) auto-responder;
"Sharing Permissions" - allows you to grand access to your folders, allow other users to see your schedule or send emails on your behalf;
"RPOP Connections" - enables you to organize user's communication by retrieving email from other remote accounts;
"Blacklist" - allows you to define email addresses you do not wish to receive messages from;
"Temporary email" - allows you request one or more temporary email addresses (aliases).
open in browser PRO version
Are you a developer? Try out the HTML to PDF API
pdfcrowd.com
Configuring Personal Data
While on the "Personal Data" page, users can define personal details such as their first and last name, change their account password or fill in business details.
open in browser PRO version
Are you a developer? Try out the HTML to PDF API
pdfcrowd.com
General Info
To set your first and last name, use the two corresponding text fields, "First name" and "Last name". To choose a nickname, use the "Nickname" field.
Define valid "Reply-To" email address for all the messages you send (including replies and forwards) so that, when you get replies to your emails, the address set here
appears in the "To" field, replacing the one in the "From" header. When composing an email, this address can be overridden or missing if it was not defined.
Add your phone numbers in the "Phone" and "Mobile Phone" fields.
open in browser PRO version
Are you a developer? Try out the HTML to PDF API
pdfcrowd.com
Add your phone numbers in the "Phone" and "Mobile Phone" fields.
Personal Details
You can specify a personal email, for non-professional purposes, in the "Personal email" field and add a home phone and address data in the "Home address" and "Home
phone" fields.
NOTE: For the phone details, please use only alphanumeric characters or the settings will not be saved. If you will use characters that are not allowed, the settings will not be
saved.
Your Password
The password previously defined by the administrator when creating the account can be changed from the "Personal Data" page. To do so, first type the current password in the
"Old password" field, then type a new one using the "Password" field and finally confirm the new selected password in the "Retype password" field.
open in browser PRO version
Are you a developer? Try out the HTML to PDF API
pdfcrowd.com
If you enter an incorrect password in the "Old password" field, you will be presented with an error, as the one below.
Also, based on the restrictions imposed by your administrator, you might encounter errors regarding the password change policies, as the one in the below screenshot.
To find out the exact password content requirements for your account, contact your domain administrator.
Business Details
Use the "Business email", "Business phone", "Business address" and fields to specify your office contact details.
{note|For the phone details, please use only alphanumeric characters, or the settings will not be saved.}
After modifying any of these parameters, remember to press the "Save changes" button to save these changes. Use the "Cancel" button to undo the changes you have just
open in browser PRO version
Are you a developer? Try out the HTML to PDF API
pdfcrowd.com
made instead of saving them.
Changing WebMail Data Settings
When accessing the "WebMail Data" page, users have access to settings used to configure the behavior of the WebMail interface.
open in browser PRO version
Are you a developer? Try out the HTML to PDF API
pdfcrowd.com
open in browser PRO version
Are you a developer? Try out the HTML to PDF API
pdfcrowd.com
Appearance
Use the "Skin name" drop-down box to select the skin of your WebMail account. At this time three options are available: "Classic", "Coolwater" and "Webreflection".
The "Language" drop down menu allows you to select the language of the WebMail account. The Axigen Standard WebMail interface is localized in over 20 languages - growing
with each new version.
The "Messages per page" text box allows the user to specify the number of messages displayed in the message list.
The "HTML Body Filtering level" specifies which HTML filtering level will be used when displaying HTML format messages. The HTML filtering levels stand for the following:
"No Filtering" - malformed HTML content is corrected;
"Low level filtering" - executable HTML content such as JavaScript, ActiveX, Flash or Java Applets is removed and malformed HTML content is corrected; external images are
not automatically downloaded;
"Medium level filtering" - only text with style formatting and images is preserved; external images are not automatically downloaded;
"High level filtering" - only text with basic formatting (RTF style) is preserved; this means that only plain text components remain in the message; this forth level is the strictest
and may actually damage some formatting, but it is also the safest.
open in browser PRO version
Are you a developer? Try out the HTML to PDF API
pdfcrowd.com
Use the "Week start day" drop-down menu to select a day to be displayed first in the week for your calendar. To specify your "Time Zone", use the corresponding drop-down
menu.
The date field is automatically adjusted according to the defined local time zone when displaying a message (in both the message list window and the open message pop-up).
Preferences
Choose to be asked for confirmation before emptying a folder using the "Confirm empty folder" dropdown box.
Choose to ask for a confirmation when an email message is deleted using the "Confirm delete mail" dropdown box.
Use the "Delete to Trash" drop-down box to specify if deleted message should be saved to the "Trash" folder ("Yes") or permanently deleted.
To have a copy of sent messages saved in the "Sent" folder, choose the value "Yes" for the "Save to sent" parameter.
Choose whether or not to have the "Domain contacts" and "Public contacts" folders available for your use by selecting "Yes" or "No" for the corresponding options.
Set the refresh interval for your WebMail interface by typing the desired value in the "Auto-refresh interval" text field. Please note that if you set this value to 0 it means that the
option is disabled. The auto-refresh option permits the user to configure the behavior regarding the interval when the WebMail interface will be automatically populated with
newly delivered messages.
Use the "Display new email notification" drop-down box to choose if you wish to be notified when a new email arrives. When a new message will be delivered to your mailbox, if
you have the browser minimized, the task-bar will flash or, if the browser is not minimized, a pop-up will appear.
To set the default behavior regarding the request of read receipts, set the value for the "Request read receipt" option to "Yes".
You can set the behavior of the user interface for incoming messages that have a read receipt request included (set by the original sender), via the "Send read receipt"
parameter. This setting has the following options:
"Always send a receipt";
"Never send a receipt";
"Ask" - a pop-up will be displayed, allowing you to manually choose if you wish to send or not a read confirmation.
Note: The notification pop-up w ill not be displayed if your WebMail session expires or if the WebMail brow ser tab is closed.
open in browser PRO version
Are you a developer? Try out the HTML to PDF API
pdfcrowd.com
After changing any of the settings above, remember to press the "Save changes" button to save the new values.
Signature
To configure a signature that will be appended to all your outgoing emails, use the "Signature" section. The signature can be defined with either HTML content or plain text
formatting.
When composing an HTML-formatted signature, you can use rich text (bold, italic, underline / strike-through, different font faces and sizes, colors, subscript, superscript, links,
bullets etc.). Set these options by clicking on the related icons, shown in the below screenshot.
open in browser PRO version
Are you a developer? Try out the HTML to PDF API
pdfcrowd.com
Note: The above options w ill not be available if you select plain text formatting for the composed message.
Working with Email Filters
The filter wizard accessible from the "Filters" page allows users to easily create a filtering system to manage their email flow. Moreover, automatic replies can be set for all or
some of the received email messages.
When first accessing the "Filters" page, a list of the already defined filters is displayed. If no filter has been previously set, the list will be blank.
open in browser PRO version
Are you a developer? Try out the HTML to PDF API
pdfcrowd.com
The "Sender not in AB Actions" allows you to apply certain actions to messages containing recipients that are not in the address book. To enable this option just check the box in
front of it and choose either of the "Send NDR", "Move to Trash" or "Discard" options from the drop-down list.
Users can enable or disable "Identity Confirmation" filtering by checking the related box. Detailed configuration options for "Identity Confirmation" are only available in the Ajax
WebMail interface.
As part of the "Identity Confirmation" filtering and the user level spam score filtering, a set of default filters will appear in the filter list, when the corresponding options are
open in browser PRO version
Are you a developer? Try out the HTML to PDF API
pdfcrowd.com
enabled. These are shown in the below screenshot.
These filters cannot be deleted or edited. The settings for them should be only modified via the corresponding options from the Ajax WebMail interface.
Managing existing filters
To delete a filter, use the "Delete" button on the right of the respective filter. To edit an existing filter, press its corresponding "Edit" button.
To disable a filter without deleting it, un-check the box found at left of the filter name in the filter list or the box next to the "Enabled" entry, in the filter edit window.
Filters can be prioritized via the up / down arrows found in the left side of each filter entry from the filters list. The top-first filter has the highest priority. Once a message matches
a rule, it will not be filtered using the other, lower priority, filters.
open in browser PRO version
Are you a developer? Try out the HTML to PDF API
pdfcrowd.com
Sender not in AB Actions
The "Sender not in AB Actions" allows you to apply certain actions to messages containing recipients that are not in the address book. The available actions are:
"Send NDR" - the email is discarded and a non-delivery report, detailing the refusal of the original email, will be returned to the sender;
"Move to Trash" - the received message will be delivered to the "Trash" folder;
"Discard" - the message will be completely removed (not present in any folder of your mailbox); the sender will not be notified regarding this action.
Identity Confirmation
Axigen's Identity Confirmation © service is basically a challenge / response anti-spam system designed to protect your Inbox from automated, unsolicited emails (SPAM).
Enable or disable "Identity Confirmation" filtering by checking the related box in the "Settings" -> "Filters" tab.
Identity Confirmation ensures that you only have valid messages in your Inbox, messages that have been "confirmed" to be from REAL and legitimate senders.
The algorithm to achieve this is very simple:
1. A new person sends you an email message;
2. When the email arrives:
it is considered unconfirmed and consequently placed in the "Unconfirmed Messages" folder, rather than your Inbox;
an instant reply message (confirmation request), containing an "identification key", is automatically generated towards the sender in question;
the sender only needs to reply to the confirmation request, while leaving the subject intact, as it contains the "identification key".
3. when this reply email from the sender arrives, his / her original email message is automatically moved from the "Unconfirmed messages" folder to your Inbox, and the
response message is deleted.
Before you start using "Identity Confirmation", you might want to consider white-listing the email addresses from which you usually receive automated emails, (e.g. newsletters
or email-enabled Internet groups), so that they are skipped by this anti-spam system. When "Identity Confirmation" is already enabled, you might also want to open the
"Unconfirmed Messages" folder from time to time, just to check if you need to white-list any addresses that you may have missed before.
For more information on Identity Confirmation
, please visit our dedicated site section
.
Creating a new filter
Whether creating a new filter or editing an existing one, the options displayed are the same.
open in browser PRO version
Are you a developer? Try out the HTML to PDF API
pdfcrowd.com
Use the "Name" text field to specify a name for the currently defined filter. You can further select, using the corresponding check-boxes, if the messages you want to filter should
match all or any of the defined criteria.
Next, use the drop-down menu to select what conditions the messages has to meet for the filter to apply. The available options are:
1. "Subject" - the email's "Subject" field;
2. "From" - the sender's email address;
open in browser PRO version
Are you a developer? Try out the HTML to PDF API
pdfcrowd.com
3. "To" - the recipients' addresses;
4. "Cc" - the addresses found in the "Cc" header;
5. "To" or "Cc" - matches addresses found both in the "To" and "Cc" headers;
open in browser PRO version
Are you a developer? Try out the HTML to PDF API
pdfcrowd.com
6. "Body" - the email content;
7. "Size" - the email message size;
8. "Date" - the received date of the email message;
9. "Custom" - match other custom defined headers; for the Custom option you can enter the desired header name and choose the compare option and content.
Finally, use the "Actions" area to define the actions to be taken (i.e. moving, copying, deleting, or redirecting it to a certain email address etc.) for email messages that match the
specified criteria.
open in browser PRO version
Are you a developer? Try out the HTML to PDF API
pdfcrowd.com
Check the green "+" icon in the "Actions" area to add a new action;
Click the red "forbidden" icon at the right of an already existing action to remove it.
The available actions are:
1. "Move to" / "Copy to" - display an additional drop-down box, which allows you to choose the destination folder for messages that match the conditions of the filter;
Note: Only "Email" Folder types w ill be available in the folder list.
2. "Delete" - the messages that match the filter conditions will be delivered to the "Trash" folder;
3. "Discard" - the messages that match the filter conditions will be rejected; no refusal (NDR) message will be returned to the sender;
4. "Forward to" - allows you to set the destination address for the forwarded message and the email content that will be added to the original message, as well as to and
choose if the original message will be forwarded in-line or as an attachment; to do this, check the box related to the "Forward as attachment" option;
open in browser PRO version
Are you a developer? Try out the HTML to PDF API
pdfcrowd.com
5. "Redirect to" - allows you to choose the destination email address where the message will be relayed, as well as to keep a local copy of the original email, by checking
the related box.
6. "Respond" - an automatic reply will be sent to the email messages matching the defined filter; use the "Subject" and "Message" fields to define the subject and body of
the email response to be sent. You can also set the "Days between subsequent responses" option and the "Also respond to messages sent to" options (this setting will
use the same responder for other recipient addresses you may have) by editing their corresponding fields; an example of these settings is presented in the next
screenshot.
open in browser PRO version
Are you a developer? Try out the HTML to PDF API
pdfcrowd.com
7. "Change subject" - allows you to append or prepend a text to the original email subject.
When you are done configuring the filter, press the "Save changes" button.
Setting an Out-of-Office Auto-Responder
Starting with Axigen 7.x, users have a new dedicated section ("Out of office"), in the "Settings" page, that allows them to further customize an out of office (vacation) automatic
responder.
In the configuration window, check the box related to the "Turn on autoresponder" option if you want to enable the automatic responder.
open in browser PRO version
Are you a developer? Try out the HTML to PDF API
pdfcrowd.com
Optionally, you can set the days between which the autoresponder will function. To enable this, check the box related to the "Respond only between" option and set the required
time interval.
Warning: If this option is not configured, the autoresponder will function until you disable it manually.
In the "Subject" and "Message" fields, enter the desired text for the automatic message.
open in browser PRO version
Are you a developer? Try out the HTML to PDF API
pdfcrowd.com
You can choose to reply only when receiving an email from your domain or only from other domains, or - by checking both of the related options - you can choose to reply to all
the received messages (senders). The related options are "Respond to senders in my domain" and "Respond to senders not in my domain".
Set the number of days for sending subsequent replies to the same sender via the field related to "Wait _ days before responding again to the same sender." The minimum
value for this is 1 day.
You can set another recipient email address for which the auto-responder will be applied (this setting will use the same responder for other recipient addresses you may have aliases, temporary email accounts, etc.), via the "Also respond to messages sent to" option.
Save the new auto-responder configuration by clicking the "Save changes" button at the bottom of the page.
Note: The "Out of office" auto-responder w ill also appear in the "Settings" -> "Filters" list, from w here you can also enable or disable the auto-responder and set, via the arrow buttons on the
left, the priority (w hen the filter w ill be applied), in relation to other user filters defined.
An example of a configured auto-responder can be found in the next image.
open in browser PRO version
Are you a developer? Try out the HTML to PDF API
pdfcrowd.com
Configuring Sharing Permissions
In the "Sharing Permissions" tab you can access folders shared by other users, allow other users to see your schedule or send emails in your name.
open in browser PRO version
Are you a developer? Try out the HTML to PDF API
pdfcrowd.com
To allow other users to access one of your mailbox folders, go to the left folder tree, right-click on it and choose the "Sharing" option. For more details on folder sharing, please
consult the Folder Sharing section.
Starting with 7.4, the "Allow all users to view my availability" option is included. When this is enabled, all users in your domain will be able to see your "Free / Busy" status, for
example when trying to invite you to a meeting (calendar event). Also, when adding or editing permissions for a specific user, the "Read my free / busy status" entry will be
allowed and grayed out (not editable).
open in browser PRO version
Are you a developer? Try out the HTML to PDF API
pdfcrowd.com
Global permissions
To define permissions for a specific user / group, click the "+ Add" button.
To edit the permissions for an existing entry click the edit icon found in the "Options" column. In the same column, you have the trash bin icon, which you can use to delete an
entry from the permissions list.
Read my free / busy status
If a user editing a calendar event has the "Read free / busy status" permission for the attendee's mailbox, the availability is displayed.
Send emails in my name
When sending a new email message, another "From" address can be set if the user has the "Send Mail As" permission for that mailbox.
In the "Add permissions" wizard, use the "Select" button to access your address book and choose the desired user / group account. If you select a group address, then the
respective permissions will apply for all members of that group.
The "Permissions" tab allows you to allow or deny the selected user / group to read your free / busy status or send emails with your account name as the source ("From" field).
To see what the user is allowed or disallowed, go to the "Effective permissions" tab.
open in browser PRO version
Are you a developer? Try out the HTML to PDF API
pdfcrowd.com
Note: Effective permissions are displayed only for already saved permissions, so changes w on't be reflected until saving.
Open other user's folders
Click the "Subscribe" button or right-click on a folder in the tree and choose Open other user's folders to have access to folders shared by other users. You can either type the
email address in the "Shared by" field or click the "Select" button to choose it from the contacts list in your domain.
Warning: This option works only for users in the same domain that have set one of the permissions level (except None). If the other user does not have any folders
shared for your account, you will receive an error pop-up like the one below.
The folder will appear in the "Other users' folders" section of your folder tree, as shown below.
open in browser PRO version
Are you a developer? Try out the HTML to PDF API
pdfcrowd.com
If you do not wish to see the folders shared by a certain user anymore, close them by right-clicking on the folder displaying the user's name (or one of its sub-folders) and
choosing the "Close user" option.
Setting RPOP Connections
When first accessing the "RPOP Connections" tab, a list of the already defined connections is displayed. If no connections have been previously set, the list will be blank.
Editing existing RPOP Connections
To delete a RPOP connection, click the Delete icon corresponding to it. To edit a connection, click the Edit icon corresponding to its name. Whether you are adding or editing a
RPOP connection, the parameters you need to configure are the same.
open in browser PRO version
Are you a developer? Try out the HTML to PDF API
pdfcrowd.com
Adding new RPOP Connections
In order to add a new connection, press the "Add connection" link.
Specify the name or IP address of the host from which the emails are retrieved by using the "Hostname" field. To set the port on which the retrieval from the desired host is
made, use the "Port" field.
Use the "Username" and "Password" fields to specify the authentication details needed to connect for email retrieval.
Use the "Retrieval interval" field to specify the minimum interval, in minutes, between two email retrievals. Then specify a certain email folder where you want the emails stored
by using the "Folder name" field. You can also select if email messages are deleted or not from the remote server after retrieval, using the Delete on retrieval drop-down box
Note: If you w ant your emails to be stored in a folder that is not on the root level, you can use the "/" separator to specify the path to your folder (e.g. if you w ant your emails to be stored in
the "Personalmail" folder, w hich has already been created under "INBOX", the full path to your folder w ill be INBOX/Personalmail).
In the "Security" section, select from the "Encryption" drop-down menu the desired type of encryption used on the RPOP connection you are configuring. The available options are
"none", "SSL" and "TLS". Use the "Enable APOP" drop-down box to specify if you want to enable APOP authentication for the respective connection.
open in browser PRO version
Are you a developer? Try out the HTML to PDF API
pdfcrowd.com
Emails from "Yahoo Mail" or "Google Mail" accounts can now be added in a simpler way, by using the dedicated RPOP templates.
Click "Add Yahoo Mail", fill in the account name, password, set the retrieval settings and click the "Save connection" button to create a new RPOP entry containing default
configurations for the "Yahoo!" email service.
You can also create a new RPOP entry containing default configurations for the "Google Mail" service by clicking the "Add Google Mail" link. Fill in the account name, password
and set the retrieval settings.
open in browser PRO version
Are you a developer? Try out the HTML to PDF API
pdfcrowd.com
By default, a new folder is created in Inbox named 'Google mail' or 'Yahoo mail'. The user can choose not to use the default but instead pick a folder from the list (in this case no
new folder is created).
Note: For users having a Yahoo! email address, POP3 access is only available for Yahoo! Mail Plus users.
When you are done configuring these parameters, remember to press the "Save connection" button.
Managing the Blacklist
The "Blacklist" section allows you to define a list of email addresses you do not wish to receive emails from. When first accessing this page, there are no email addresses in the
list.
open in browser PRO version
Are you a developer? Try out the HTML to PDF API
pdfcrowd.com
Note: In Standard WebMail's email list, you can use the "Block sender" button to add an address to the blacklist.
Manage existing blacklisted addresses
If you entered an email address by accident or you do not wish to block it anymore, click its corresponding delete button.
Adding new address to blacklist
To add an address to the "Blacklist", type it in the "Email:" text field and click the "Add" button.
Note: More options for the "Blacklist" functionality are available in the Ajax WebMail interface. Use the "Blacklist" in the Ajax WebMail if you w ant to add w ildcards to substitute a part of the
email address (e.g. *@example.com).
open in browser PRO version
Are you a developer? Try out the HTML to PDF API
pdfcrowd.com
Requesting Temporary Email Addresses
When accessing the "Temporary Email" tab, you can request one or more temporary email addresses (or aliases). These addresses can be used for publishing on the Web for example, by subscribing it to various newsletter services.
Webmail-settings-tempadd.jpg
Managing existing temporary email addresses
A temporary email address can be manually deleted by clicking the trash-bin icon next to it; alternatively, you can let it automatically expire after a predefined period. The validity
period, as well as the number of temporary email addresses you can request are set by the server administrator at domain or account level and cannot be modified by the user.
Webmail-settings-temp-del.jpg
Generating new temporary addresses
When you click the "Generate" button, Axigen automatically creates and activates a random alias (out of letters and numbers, in the same domain as the user). As long as the
addresses exist, they are treated as account aliases, meaning that emails sent to those email addresses will be received in the user's Inbox.
Webmail-settings-tempadd-generate.jpg
This page w as last modified on 9 March 2011, at 16:32.
This page has been accessed 21,774 times.
open in browser PRO version
Are you a developer? Try out the HTML to PDF API
pdfcrowd.com
Privacy policy
About Axigen Wiki Disclaimers
Products & solutions: Linux Mail Server | ISP Email Hosting | Mail Server for ISP | Business Mail Server | Free Mail Server
Popular w ebinars: SaaS: Cluster vs. Cloud | Exchange Alternative | Hosted Hosting | Data Retention Compliance
Axigen is a powerf ul, award-winning Windows & Linux mail serv er. A f ree mail serv er
sof tware is av ailable f or immediate download and adds f ree support serv ices, as well
as the business mail serv er solution, which also includes f eatures like personal
organizer, antiv irus, anti-spam or adv anced security policies. The carrier-class ISP mail
serv er solution completes the Axigen product range, with optional clustering support &
delegated administration.
open in browser PRO version
Are you a developer? Try out the HTML to PDF API
© Copyright 2005-2013 Axigen Messaging
All rights reserved
Privacy Copyright Site Map
Sales Line (US):
Sales Line (UK):
eStore
+1 (773) 598 5800
+44 (0) 207 193 2470
Contact
pdfcrowd.com