1
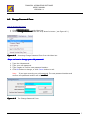
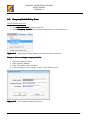
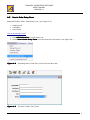
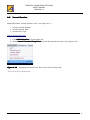
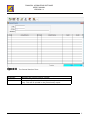
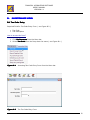
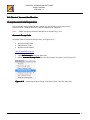
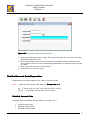
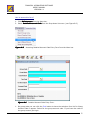
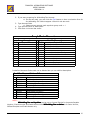
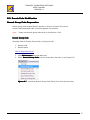
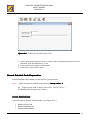
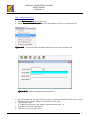
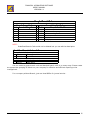
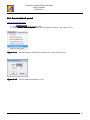
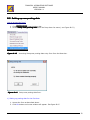
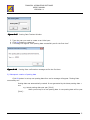
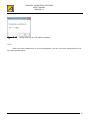
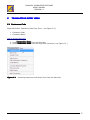
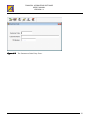
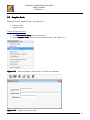
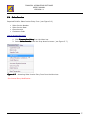
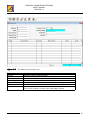
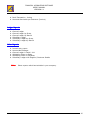
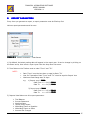
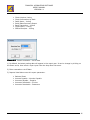
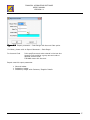
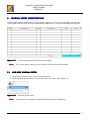
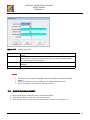
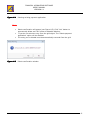
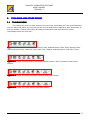
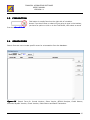
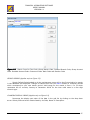
F
FINANCIAL ACCOUNTING SOFTWARE
USER’S MANUAL
VERSION 1.1
FINANCIAL ACCOUNTING SOFTWARE
USER
USER’’S MANUAL
VERSION 1.1
Aldreme
i
FINANCIAL ACCOUNTING SOFTWARE
USER’S MANUAL
VERSION 1.1
F
AUTHOR
Aldreme
Certified Public Accountant
Member Philippine Institute of Certified Public Accountant
(PICPA – Manila Chapter)
Computer Programmer
Independent Software Developer
Aldreme
ii
FINANCIAL ACCOUNTING SOFTWARE
USER’S MANUAL
VERSION 1.1
F
PREFACE
PURPOSE:
This User’s Manual contains information and instruction that will help the users
in the operation of Aldreme Financial Accounting Software (Version 1.0)
APPLICATION FEATURES:
•
•
•
•
•
•
•
•
Save time with efficient Bookkeeping work essentials.
Check for common accounting errors.
Increase the security of your company’s data with password option, and let user’s
change their own password.
Helps you get to your information faster, it simplifies everyday tasks so you get the
right work done.
Run reports or export to Excel for further analysis
Run in a Multi user environment for 20 users or more
Control users access on particular menus
Easy to install
Aldreme Financial Accounting Software is one-of-a-kind accounting software for its
capabilities and its content. This software contains the essential needs of various business
establishment to use for making a good management decision. Get up to speed with
generating accounting reports such as Journal Entry, Trial Balance, Income Statement,
Balance Sheet, Working Paper, General Ledger and Subsidiary Ledger.
Aldreme Financial Accounting Software is the most recommended software by Certified
Public Accountant for office use of different business establishment. It's simple, yet workable.
Aldreme
iii
FINANCIAL ACCOUNTING SOFTWARE
USER’S MANUAL
VERSION 1.1
F
SYSTEM REQUIREMENT
Aldreme Financial Accounting Software has the following minimum system requirements:
Aldreme
�
Processor
�
RAM
�
Available Hard Disk Space
�
Video
�
Operating System
Windows Me, Later
Pentium class
64 MB (recommended: 128 MB or higher)
115 MB
800 x 600, 256 colors (recommended: High Color 16-bit)
Windows 98, Microsoft Windows 2000, Windows NT 4.0,
iv
F
FINANCIAL ACCOUNTING SOFTWARE
USER’S MANUAL
VERSION 1.1
TABLE OF CONTENTS
AUTHOR……………………………………………………………………………………………………………………………..ii
PREFACE…………………………………………………………………………………………………………………………….iii
SYSTEM REQUIREMENTS………………………………………………………………………………………….…….. iv
TABLE OF CONTENTS…………………………………………………………………………………………………..…..v
INSTALLATION AND DEINSTALLATION……………………………………………………………………………..….….. 1
A. ADMINISTRATION MENU…………………………………………………………………………………………….…… 2
A.1
HOW TO LOGIN…………………….……………………………………………………………………2
A.2
CHANGE PASSWORD FORM………………………………………………………..…………… 3
A.3
COMPANY DETAILS ENTRY FORM……………….…………………………………………… 4
A.4
CLEAN UP FILES……………………………………………………………….……………………….5
A.5
USERS CODE ENTRY FORM……………………………………………………………….……..6
A.6
JOURNAL VOUCHER…………………………………………………………………………………. 8
B. MAINTENANCE MENU……………………………………………………………………………………………….……… 10
B.1
TAX CODE ENTRY FORM…………………………………………………………………………… 10
B.2
CHART OF ACCOUNT MODIFICATION……………………………………………………… 11
B.2.1 GROUP ACCOUNT CODE PREPARATION…………………………… 11
B.2.2 DETAILED ACCOUNT CODE PREPARATION……………………… 12
B.3
BRANCH CODE MODIFICATION…………………………………………………….………….15
B.3.1 GROUP BRANCH CODE PREPARATION………………….….……… 15
B.3.2 DETAILED BRANCH CODE PREPARATION………………………… 16
B.4
SEARCH DEFAULT PERIOD……………………………………………………….……………… 19
B.5
SETUP NEW POSTING DATE……………………………………………………..….………….20
C. TRANSACTION ENTRY MENU………………………………………………………………………………..………… 23
C.1
CUSTOMERS CODE ENTRY FORM………………………………………………..…………. 23
C.2
BANK CODE ENTRY FORM…………………………………………………………….…………. 25
C.3
SUPPLIER CODE ENTRY FORM…………………………………………………..……………..26
C.4
SALES INVOICE……………………………………………………………………………..………… 27
C.5
OFFICIAL RECEIPTS/ COLLECTIONS………………………………………………………..29
C.6
CREDIT MEMOS………………………………………………………………………..……………… 31
C.7
ACCOUNTS PAYABLE VOUCHER……………………………………………………..………. 33
C.8
CHECK VOUCHERS………………………………………………………………………………….. 35
C.9
DEBIT MEMOS……………………………………………………………………………..………….. 37
C.10 BANK TRANSACTION……………………………………………………………..……………….. 39
D. PRINT REPORT FORM…..…………………………………………………………………………………..……………..41
E. REPORT PARAMETERS………………………………………………………………………….…………………………. 45
F. JOURNAL ENTRY MODIFICATION…………………………………………………………..………………………. 53
G. APPLICATION OF COLLECTIONS………………………………………………………..………………………….. 56
H. PAYMENT APPLICATION…………………………………………………………………………………..……………… 59
I. TOOLBARS AND OTHER FORMS…………………………………………………………….……………………….. 62
I.1
TOOLBAR MENU………………………………………………………………..…………………….. 62
I.2
TOOLBARS AND ITS FUNCTIONS….………………………………….……………………..63
I.3
FIND BUTTON………………………………………………………………..………………………….64
I.4
SEARCH FORMS………………………………………………………………………………………… 64
Aldreme
v
FINANCIAL ACCOUNTING SOFTWARE
USER’S MANUAL
VERSION 1.1
F
EASY INSTALLATION AND DEINSTALLATION
Aldreme Financial Accounting Software is an easy to install accounting software. To install you
only need to download and extract AFAS, that’s all. There are no changes to the Windows registry
and it’s not necessary to edit any configuration files.
1. When you purchase Aldreme Financial Accounting Software and successfully downloaded
AFAS.EXE file.
2. Double click on the AFAS.EXE and uncompress the file in the other directory file folder.
3. Create shortcut for the program:
• Right click on the aldreme.exe
• Choose Send To
• Choose Desktop (create shortcut)
• Rename the shortcut. (e.g. AFAS_CompanyName)
4. For Multiple Companies:
• Copy the folder according to the number of companies using the program. Rename
each folder (e.g. AFAS_Company1, AFAS_Company2, …).
• Create a distinct shortcut of “aldreme.exe” for each company folder ( See
Procedure No. 3). Rename each shortcut (e.g. AFAS_Company1,
AFAS_Company2, …).
5. For Multi User Environment:
• Share the folder where the program was extracted.
a. If you have a various company. Select the folder of the company(s) you
want to share.
• Mapped to the sharing terminal or workstation. Refer to Windows Help on how to
mapped a shared folder.
6. Load the program by clicking on the created desktop “shortcuts”.
NOTE:
If you decide that Aldreme Financial Accounting Software (AFAS) isn’t needed any
more just delete the directory and it’s completely removed from your system.
Aldreme
1
FINANCIAL ACCOUNTING SOFTWARE
USER’S MANUAL
VERSION 1.1
F
A.
ADMINISTRATION MENU
A.1
How to Login
Every time you open up the application from the start menu or by simply double
clicking the application icon on the Desktop. A Log-in Form (see Figure A.1) will appear.
Select your name as a system user from the drop-down list. Enter your password then click
OK button to have access to the program. Every user requires a password to avoid
unauthorized access and changes to the database.
Figure A.1
The Login Form
NOTE:
On opening the program for the first time. Select the Default Employee Name “ALDREME”.
The default password is “aldreme”.
After successfully login. We recommend that you should change the name of the default
employee, and its password.
Aldreme
2
FINANCIAL ACCOUNTING SOFTWARE
USER’S MANUAL
VERSION 1.1
F
A.2 Change Password Form
How to access this form?
1. Click Administration from the Menu bar.
2. Select Change Password from the Drop-down list menu ( see Figure A.2 )
Figure A.2
Accessing Change Password Form from the Menu bar.
Steps on how to change your old password.
1.
2.
3.
4.
Type the old password.
Type your new password.
Type it again to Confirm new password textbox.
Click OK button to change, or click Cancel button to exit.
Note: If you type correctly your old password. The new password textbox and
confirm new password textbox will be enabled
enabled.
Figure A.3
Aldreme
The Change Password Form.
3
FINANCIAL ACCOUNTING SOFTWARE
USER’S MANUAL
VERSION 1.1
F
A.3
Company Details Entry Form
How to access this form?
1. Click Administration from the Menu bar.
2. Select Company Details from the Drop-down list menu ( see Figure A.4 )
Figure A.4
Accessing Company Details Entry Form from the Menu bar.
Steps on how to change company details.
1.
2.
3.
4.
Type new company name.
Type company address.
Type TIN number of the company.
Click OK button to save change, or click Cancel button to exit.
Figure A.5
Aldreme
The Company Details Entry Form.
4
FINANCIAL ACCOUNTING SOFTWARE
USER’S MANUAL
VERSION 1.1
F
A.4
Clean up files
How to access this form?
1. Click Administration from the Menu bar.
2. Select Clean up files from the Drop-down list menu ( see Figure A.6 )
Figure A.6
Accessing Clean up files Form from the Menu bar.
Figure A.7
The Clean up database form.
Aldreme
5
FINANCIAL ACCOUNTING SOFTWARE
USER’S MANUAL
VERSION 1.1
F
A.5
User's Code Entry Form
Required Field for User's Code Entry Form ( see Figure A.9 )
•
•
•
Employee ID
Last Name
User Group
How to access this form?
1. Click Administration from the Menu bar.
2. Select User's Code Entry Form from the Drop-down list menu ( see Figure A.8 )
Figure A.8
Accessing User's Code Entry Form from the Menu bar.
Figure A.9
The User's Code Entry Form.
Aldreme
6
F
EMP. ID/NO
LAST NAME
FIRST NAME
TITLE
GROUP
FINANCIAL ACCOUNTING SOFTWARE
USER’S MANUAL
VERSION 1.1
Identifies the unique number for the user.
Identifies the Last Name of the user.
Identifies the First Name of the user.
Identifies the Title or position of the user.
Identifies the Group work of the user.
� Accounting Manager
� Accounting Analyst
� Accounting Officer
� Data Encoder
Group field will give user a full or limited access
to the Menu bars and reports.
NOTE:
If new user/s were added their default password is “aldreme”. Allow users to change and set
their own password.
Aldreme
7
FINANCIAL ACCOUNTING SOFTWARE
USER’S MANUAL
VERSION 1.1
F
A.6
Journal Voucher
Required Field for Journal Voucher Form ( see Figure A.11 )
•
•
•
Journal Voucher Number
Journal Voucher Date
Journal Entry Type
How to access this form?
1. Click Administration from the Menu bar.
2. Select Journal Voucher Entry Form from the Drop-down list menu ( see Figure A.10 )
Figure A.10
Accessing Journal Voucher Entry Form from the Menu bar.
See Journal Entry Modification…
Aldreme
8
F
Figure A.11
JV Number
JV Date
REMARKS
Aldreme
FINANCIAL ACCOUNTING SOFTWARE
USER’S MANUAL
VERSION 1.1
The Journal Voucher Form.
Identifies the journal voucher number.
Identifies the journal voucher transaction date.
Comments or explanation for the particular journal voucher
entry. This will be printed in the journal entry report.
9
FINANCIAL ACCOUNTING SOFTWARE
USER’S MANUAL
VERSION 1.1
F
B.
MAINTENANCE MENU
B.1 Tax Code Entry
Required Field for Tax Code Entry Form. ( see Figure B.2 )
•
•
Tax Code
Tax Description
How to access this form?
1. Click Maintenance from the Menu bar.
2. Select Tax Code from the Drop-down list menu ( see Figure B.1 )
Figure B.1
Accessing Tax Code Entry Form from the Menu bar.
Figure B.2
The Tax Code Entry Form.
Aldreme
10
FINANCIAL ACCOUNTING SOFTWARE
USER’S MANUAL
VERSION 1.1
F
B.2 Chart of Account Modification
Group Account Code Preparation
Group account code created doesn't appear on the selection list of account for
journal entries. Detailed account is the one appears for selection.
Note:
Please use group account code which is divisible by 1,000.
Account Group Code
Required Field for Account Group Code ( see Figure B.4 )
•
•
•
Account Group Code
Classification Code
Account Group Name
How to access this form?
1. Click Maintenance from the Menu bar.
2. Select Account Group Code from the Drop-down list menu ( see Figure B.3 )
Figure B.3
Aldreme
Accessing Account Group Code Entry Form from the Menu bar.
11
FINANCIAL ACCOUNTING SOFTWARE
USER’S MANUAL
VERSION 1.1
F
Figure B.4
Account Group Code Entry Form.
1. Type group code you wish to create. We recommend that use a numeric character
type and divisible by 1,000.
2. On the classification code, you can click the Find button to have a selection form
list to appear. Select for the corresponding classification on what account you want
to create.
3. Type group account name or description.
4. Click save in the tool bar menu.
Detailed Account Code Preparation
Detailed account code created will be used for journal entries.
Note:
Please use an account code equals to Group code + 1
eg. If Group code is 01000, you may use 01001, 01002,
01003, ... for detailed account code to be uniform.
Detailed Account Code
Required Field for Detailed Account Code ( see Figure B.6 )
•
•
•
Aldreme
Account Group Code
Detailed Account Code
Detailed Account Name
12
FINANCIAL ACCOUNTING SOFTWARE
USER’S MANUAL
VERSION 1.1
F
How to access this form?
1. Click Maintenance from the Menu bar.
2. Select Detailed Account Code from the Drop-down list menu ( see Figure B.5 )
Figure B.5
Accessing Detailed Account Code Entry Form from the Menu bar.
Figure B.6
Detailed Account Code Entry Form.
1. On group code you can click the Find button to have the selection form list for Group
Account Code to appear. Select for the group account code. If you know the code of
the group account just type.
Aldreme
13
FINANCIAL ACCOUNTING SOFTWARE
USER’S MANUAL
VERSION 1.1
F
2. If you were preparing for Witholding Tax Account
� On the tax code, you can click the Find button to have a selection form list
for Witholding Tax Code to appear. Select for the tax code.
3. Type Account Code
� Please use an account code equals to group code + 1
4. Type Account name or description.
5. Click Save in the tool bar menu.
Sample Chart of Accounts
Group Accounts
Code
Account Name
01000 Cash in Bank
Detailed Accounts
Code
Account Name
01001 Cash in Bank - Banco de Oro
01002 Cash in Bank - Metrobank
01003 Cash in Bank - PNB
02000 Accounts Receivable
02001
02002
Accounts Receivable - Trade
Accounts Receivable - Non-Trade
03000 Advances
03001
03002
03003
03004
Advances
Advances
Advances
Advances
-
Mr. Lee
Mr. Bernabe
Employees
Others
Predefined Accounts Code could not be deleted but you can edit its description.
Predefined Account Code as follows:
Group Account Code
Code
Group Account Name
90000
Merchandise Inventory
91000
Retained Earnings
92000
Witholding Taxes on Payables
93000
Witholding Taxes on Sales
Detailed Account Code
Code
Detailed Account Name
90001
Merchandise Inventory
91001
Retained Earnings
92001
Witholding Taxes on Payables
93001
Witholding Taxes on Sales
NOTE:
Witholding Tax on Payables can be use on Journal Entries for Accounts Payable
Voucher, Check Voucher and Debit Memos while Witholding Tax on Sales is for Sales Invoice,
Official Receipts and Credit Memos only.
Aldreme
14
FINANCIAL ACCOUNTING SOFTWARE
USER’S MANUAL
VERSION 1.1
F
B.3 Branch Code Modification
Branch Group Code Preparation
Branch group code created doesn't appear on the list of branch for journal
entries. Branch detailed code is the one appears for selection.
Note:
Please use branch group code which is divisible by 1,000.
Branch Group Code
Required Field for Branch Group Code ( see Figure B.8 )
•
•
Branch Code
Branch Name
How to access this form?
3. Click Maintenance from the Menu bar.
4. Select Branch Group Code from the Drop-down list menu ( see Figure B.7 )
Figure B.7
Aldreme
Accessing Branch Group Code Entry Form from the Menu bar.
15
FINANCIAL ACCOUNTING SOFTWARE
USER’S MANUAL
VERSION 1.1
F
Figure B.8
Branch Group Code Entry Form.
1. Type branch group code you wish to create. We recommend that use a numeric
character type and divisible by 1,000.
2. Type branch group name or description.
3. Click save in the tool bar menu.
Branch Detailed Code Preparation
Branch detailed code created is to be used for journal entries.
Note:
Please use branch detailed code equals to Group code + 1
Eg. Branch group code is 01000, use 01001, 01002, 01003,...
for detailed branch code to be uniform.
Branch Detailed Code
Required Field for Branch Detailed Code ( see Figure B.10 )
•
•
•
Aldreme
Branch Group Code
Branch Detailed Code
Branch Detailed Name
16
FINANCIAL ACCOUNTING SOFTWARE
USER’S MANUAL
VERSION 1.1
F
How to access this form?
1. Click Maintenance from the Menu bar.
2. Select Branch Detailed Code from the Drop-down list menu ( see Figure B.9 )
Figure B.9
Accessing Branch Detailed Code Entry Form from the Menu bar.
Figure B.10
Branch Detailed Code Entry Form.
1. On group code you can click the Find button to have the selection form list for Group
Branch Code to appear. Select for the group branch code.
2. Type Branch Code
� Please use a branch code equals to group branch code + 1
3. Type Branch name or description.
4. Click Save in the tool bar menu.
Aldreme
17
FINANCIAL ACCOUNTING SOFTWARE
USER’S MANUAL
VERSION 1.1
F
Sample Branch Code
Branch Group Code
Code Branch Group Name
01000 Robinson
Branch Detailed Code
Code
Branch Detailed Name
01001 Robinson - Ermita
01002 Robinson - Pampanga
01003 Robinson - Angeles
02000 Super Malls
02001
02002
SM Manila
SM Quiapo
NOTE:
Predefined Branch Code could not be deleted but you can edit its description.
Predefined Branch Code as follows:
Group Branch Code
Code
Group Branch Name
99000
Head Office
Detailed Branch Code
Code
Detailed Branch Name
99001
Head Office
You can create a group branch code and detailed branch code in so many ways. Please create
an appropriate grouping of branch on your company for effective and efficient reporting to the
management.
For a company without Branch, just use Head Office for journal entries…
Aldreme
18
FINANCIAL ACCOUNTING SOFTWARE
USER’S MANUAL
VERSION 1.1
F
B.4 Search default period
How to access this form?
1. Click Maintenance from the Menu bar.
2. Select Search default period from the Drop-down list menu ( see Figure B.11 )
Figure B.11
Accessing Search Default Period Entry Form from the Menu bar.
Figure B.12
Search Default Period Entry Form.
Aldreme
19
FINANCIAL ACCOUNTING SOFTWARE
USER’S MANUAL
VERSION 1.1
F
B.5 Setting up new posting date
How to access this form?
1. Click Maintenance from the Menu bar.
2. Select Setup new posting date from the Drop-down list menu ( see Figure B.13 )
Figure B.13
Figure B.14
Accessing Setup new posting date entry form from the Menu bar.
Setup new posting date form.
1) Setting up posting date for the first time
1. Access the form as described above.
2. Click OK button and a new window will appear. See figure B.15
Aldreme
20
FINANCIAL ACCOUNTING SOFTWARE
USER’S MANUAL
VERSION 1.1
F
Figure B.15
Posting Date Textbox Window.
3. Type the year you want to create as an initial year.
4. Click OK button to create/set.
5. A message will appear “New posting date successfully set for the first time”.
Figure B.16
Posting Date confirmation message set for the first time.
2) Subsequent creation of posting date
Click OK button in set up new posting date form and a message will appear “Posting Date
successfully set”.
Posting date was automatically created. It was generated by the latest posting date +
one.
e.g. Latest posting date was year [2010]
When you set up for a new posting date. A new posting date will be year
[2011]…
Aldreme
21
F
Figure B.17
FINANCIAL ACCOUNTING SOFTWARE
USER’S MANUAL
VERSION 1.1
Posting Date set up confirmation message.
NOTE:
When you have created three or more posting dates, you can only enter transactions for the
two latest posting dates.
Aldreme
22
FINANCIAL ACCOUNTING SOFTWARE
USER’S MANUAL
VERSION 1.1
F
C.
TRANSACTION ENTRY MENU
C.1 Customers Code
Required Field for Customers Code Entry Form. ( see Figure C.2 )
•
•
Customers Code
Customers Name
How to access this form?
3. Click Transaction Entry from the Menu bar.
4. Select Customers Code from the Drop-down list menu ( see Figure C.1 )
Figure C.1
Aldreme
Accessing Customers Code Entry Form from the Menu bar.
23
F
Figure C.2
Aldreme
FINANCIAL ACCOUNTING SOFTWARE
USER’S MANUAL
VERSION 1.1
The Customers Code Entry Form.
24
FINANCIAL ACCOUNTING SOFTWARE
USER’S MANUAL
VERSION 1.1
F
C.2 Bank Code
Required Field for Bank Code Entry Form( see Figure C.4 )
•
•
Bank Code
Bank Name
How to access this form?
1. Click Transaction Entry from the Menu bar.
2. Select Bank Code from the Drop-down list menu ( see Figure C.3 )
Figure C.3
Accessing Bank Code Entry Form from the Menu bar.
Figure C.4
Aldreme
The Bank Code Entry Form.
25
FINANCIAL ACCOUNTING SOFTWARE
USER’S MANUAL
VERSION 1.1
F
C.3 Supplier Code
Required Field for Supplier Code ( see Figure C.6 )
•
•
Supplier Code
Supplier Name
How to access this form?
1. Click Transaction Entry from the Menu bar.
2. Select Supplier Code from the Drop-down list menu ( see Figure C.5 )
Figure C.5
Accessing Supplier Code Entry Form from the Menu bar.
Figure C.6
Aldreme
Supplier Code Entry Form.
26
FINANCIAL ACCOUNTING SOFTWARE
USER’S MANUAL
VERSION 1.1
F
C.4 Sales Invoice
Required Field for Sales Invoice Entry Form ( see Figure C.8 )
•
•
•
•
Sales Invoice Number
Sales Invoice Date
Gross Amount
Customers Code
How to access this form?
1. Click Transaction Entry from the Menu bar.
2. Select Sales Invoice from the Drop-down list menu ( see Figure C.7 )
Figure C.7
Accessing Sales Invoice Entry Form from the Menu bar.
See Journal Entry Modification…
Aldreme
27
FINANCIAL ACCOUNTING SOFTWARE
USER’S MANUAL
VERSION 1.1
F
Figure C.8
The Sales Invoice Entry Form.
SI Number
SI Date
Gross Amount
Sales Discount
Bank Charge
Customer Code
SO Number
Remarks
Aldreme
Identifies sales invoice number
Identifies sales transaction date
Sales invoice gross amount
Discount for the particular sales transaction
Identifies bank charges if any
Identifies customer whom sales transaction was being made
Identifies sales order number
A brief description on the sales transaction entry made.
This will be printed in journal entry and ledger reports.
28
FINANCIAL ACCOUNTING SOFTWARE
USER’S MANUAL
VERSION 1.1
F
C.5 Official Receipts/ Collection
Required Field for Official Receipt Form ( see Figure C.10 )
•
•
•
Official Receipt Number
Official Receipt Date
Customers Code
How to access this form?
1. Click Transaction Entry from the Menu bar.
2. Select Official Receipts/ Collections from the Drop-down list menu ( see Figure C.9 )
Figure C.9
Accessing Official Receipts Entry Form from the Menu bar.
See Journal Entry Modification and Application of Collection…
Aldreme
29
F
Figure C.10
OR Number
OR Date
OR Amount
Customer Code
Remarks
Aldreme
FINANCIAL ACCOUNTING SOFTWARE
USER’S MANUAL
VERSION 1.1
The Official Receipt/ Collection Entry Form.
Identifies Official Receipt number
Identifies collection date
Identifies collected amount
Identifies customer whom collection will applied
A brief description on the collection entry.
This will be printed in journal entry and ledger reports.
30
FINANCIAL ACCOUNTING SOFTWARE
USER’S MANUAL
VERSION 1.1
F
C.6 Credit Memos
Required Field for Credit Memo Entry Form ( see Figure C.12 )
•
•
•
•
Reference Number
CM Date
CM Amount
Customers Code
How to access this form?
1. Click Transaction Entry from the Menu bar.
2. Select Credit Memos from the Drop-down list menu ( see Figure C.11 )
Figure C.11
Accessing Credit Memos Entry Form from the Menu bar.
See Journal Entry Modification and Credit Memo Amount Application/ Application of Collection …
Aldreme
31
FINANCIAL ACCOUNTING SOFTWARE
USER’S MANUAL
VERSION 1.1
F
Figure C.12
The Credit Memos Entry Form.
Reference Number
CM Date
CM Amount
Customer Code
Remarks
Aldreme
A unique number for the transaction entry made.
Identifies Credit Memo date
Identifies Credit Memo amount
Identifies customer for this Credit Memo will applied.
A brief description with regards to the credit memo.
This will be printed in journal entry and ledger reports.
32
FINANCIAL ACCOUNTING SOFTWARE
USER’S MANUAL
VERSION 1.1
F
C.7 Accounts Payable Voucher
Required Field for Accounts Payable Voucher Form ( see Figure C.14 )
•
•
•
•
Voucher Number
Voucher Date
Amount Due
Supplier Code
How to access this form?
1. Click Transaction Entry from the Menu bar.
2. Select Accounts Payable Voucher from the Drop-down list menu ( see Figure C.13 )
Figure C.13
Accessing Accounts Payable Voucher Form from the Menu bar.
See Journal Entry Modification…
Aldreme
33
FINANCIAL ACCOUNTING SOFTWARE
USER’S MANUAL
VERSION 1.1
F
Figure C.14
The Accounts Payable Voucher Form.
Voucher Number
Voucher Date
Amount Due
Delivery Receipt No.
Sales Invoice No.
PO Number
Supplier Code
Particulars
Explanation
Aldreme
Identifies Voucher number
Identifies Voucher date
Identifies Amount Due
Identifies Supplier Delivery Receipt Number
Identifies Supplier Invoice Number
Identifies Purchase Order Number
Identifies supplier to whom purchase transaction was being made.
A note to details the information of the transaction entry made.
This will be printed on Accounts Payable Voucher report form.
A brief description with regards to the accounts payable voucher.
This will be printed in journal entry and ledger reports.
34
FINANCIAL ACCOUNTING SOFTWARE
USER’S MANUAL
VERSION 1.1
F
C.8 Check Voucher
Required Field for Check Voucher Form ( see Figure C.16 )
•
•
•
•
•
•
Check Voucher Number
Check Voucher Date
Supplier Code
Bank Code
Check Amount
Check Number
How to access this form?
1. Click Transaction Entry from the Menu bar.
2. Select Check Voucher from the Drop-down list menu ( see Figure C.15 )
Figure C.15
Accessing Check Voucher Form from the Menu bar.
See Journal Entry Modification and Payment Application…
Aldreme
35
F
Figure C.16
CV Number
CV Date
Supplier Code
Bank Code
Check Number
Check Amount
Particulars
Remarks
FINANCIAL ACCOUNTING SOFTWARE
USER’S MANUAL
VERSION 1.1
The Check Voucher Form.
Identifies Check Voucher number
Identifies Check Voucher date
Identifies supplier whom payment will be made
Identifies bank where cash payment will came from
Identifies Check Number
Identifies Check Amount
A note to details the information of the transaction entry made.
This will be printed on Check Voucher report form.
A brief description with regards to the Check Voucher.
This will be printed in journal entry and ledger reports.
TIPS
Use Check Number for your Check Voucher Number for easy monitoring of check usage and
issuances.
Aldreme
36
FINANCIAL ACCOUNTING SOFTWARE
USER’S MANUAL
VERSION 1.1
F
C.9 Debit Memos
Required Field for Debit Memo Entry Form ( see Figure C.18 )
•
•
•
•
DM Number
DM Date
DM Amount
Supplier Code
How to access this form?
3. Click Transaction Entry from the Menu bar.
4. Select Debit Memos from the Drop-down list menu ( see Figure C.17 )
Figure C.17
Accessing Debit Memos Entry Form from the Menu bar.
See Journal Entry Modification and Debit Memo Amount Application/ Payment Application…
Aldreme
37
F
Figure C.18
DM Number
DM Date
Supplier Code
DM Amount
Particulars
Remarks
Aldreme
FINANCIAL ACCOUNTING SOFTWARE
USER’S MANUAL
VERSION 1.1
The Debit Memos Entry Form.
Identifies Debit Memo number
Identifies Debit Memo date
Identifies supplier whom payment/debit memos will be made
Identifies Debit Memo Amount
A note to details the information of the transaction entry made.
This will be printed on Debit Memo report form.
A brief description with regards to the Debit Memo.
This will be printed in journal entry and ledger reports.
38
FINANCIAL ACCOUNTING SOFTWARE
USER’S MANUAL
VERSION 1.1
F
C.10
Bank Transaction
Required Field for Bank Transaction Entry Form ( see Figure C.20 )
•
•
•
•
Reference Number
Transaction Date
Amount
Bank Code
How to access this form?
1. Click Transaction Entry from the Menu bar.
2. Select Bank Transaction from the Drop-down list menu ( see Figure C.19 )
Figure C.19
Accessing Bank Transaction Entry Form from the Menu bar.
See Journal Entry Modification…
Aldreme
39
FINANCIAL ACCOUNTING SOFTWARE
USER’S MANUAL
VERSION 1.1
F
Figure C.20
The Bank Transaction Entry Form.
Reference Number
Transaction Date
Amount
Bank Code
Remarks
Aldreme
A unique number for the transaction entry made
Identifies transaction date
Identifies related amount for the bank transaction made
Identifies Bank account involved in the transaction
A brief description with regards to the Bank Transaction.
This will be printed in journal entry and ledger reports.
40
FINANCIAL ACCOUNTING SOFTWARE
USER’S MANUAL
VERSION 1.1
F
D.
PRINT REPORT FORM
How to access print report form?
1. Click File from the Menu bar.
2. Select Print Reports... from the Drop-down list menu ( see Figure 1.1 )
Figure D.1
Accessing Print Report Form from the Menu bar.
Figure D.2
The Print Report Form
Aldreme
41
FINANCIAL ACCOUNTING SOFTWARE
USER’S MANUAL
VERSION 1.1
F
Steps on how to print a report?
1.
2.
3.
4.
Select the report you want to print by clicking it.
Click Run Button to execute.
Complete the report parameter which appear
Click OK Button to print the report, or click Close Button to Exit.
Note:
You can double click the report you want to print from the list to execute.
Printing options
•
•
•
Click Print Preview option to print report on Screen.
Click Send to Printer option to print report directly to the printer.
Click Send to Excel option to convert report to Excel Format.
List of reports can be generated.
Trial Balance
�
�
�
�
�
�
Trial
Trial
Trial
Trial
Trial
Trial
Balance
Balance
Balance
Balance
Balance
Balance
- Concise
- Detailed
(Group) - Concise
(Group) - Detailed
(Branch) - Concise
(Branch) - Detailed
Income Statement
�
�
�
�
�
�
Income
Income
Income
Income
Income
Income
Statement
Statement
Statement
Statement
Statement
Statement
- Concise
- Detailed
(Group) - Concise
(Group) - Detailed
(Branch) - Concise
(Branch) - Detailed
Balance Sheet
�
�
�
�
�
�
Balance
Balance
Balance
Balance
Balance
Balance
Aldreme
Sheet
Sheet
Sheet
Sheet
Sheet
Sheet
- Concise
- Detailed
(Group) - Concise
(Group) - Detailed
(Branch) - Concise
(Branch) - Detailed
42
FINANCIAL ACCOUNTING SOFTWARE
USER’S MANUAL
VERSION 1.1
F
Working Paper
�
�
�
�
�
�
Working
Working
Working
Working
Working
Working
Paper
Paper
Paper
Paper
Paper
Paper
- Concise
- Detailed
(Group) - Concise
(Group) - Detailed
(Branch) - Concise
(Branch) - Detailed
NOTE:
Paper Size is Legal…
Listing Reports
�
�
�
�
�
�
�
�
Tax Code Listing
Account Code Listing – Group
Account Code Listing - Detailed
Branch Code Listing - Group
Branch Code Listing - Detailed
Customers Code Listing
Bank Code Listing
Supplier Code Listing
Accounts Payable
�
�
�
�
�
�
�
�
�
�
�
Accounts Payable Voucher
Check Voucher
Debit Memos
Check Voucher Listing
Debit Memo – Listing
Check information - By Bank
Accounts Payable Voucher - in Detail
Accounts Payable - Voucher Payable
Accounts Payable - Supplier
Transaction Listing - By Supplier
Accounts Payable per Supplier (Voucher)
Sales Reports
�
�
�
�
�
�
�
�
�
Retail Sales Summary Report
Sales Invoice Summary Report
Official Receipts – Summary
Credit Memo Summary
Official Receipts – Listing
Credit Memo – Listing
Accounts Receivable - Invoice
Accounts Receivable - Customer
Transaction Listing By Customer
Aldreme
43
FINANCIAL ACCOUNTING SOFTWARE
USER’S MANUAL
VERSION 1.1
F
� Bank Transaction - Listing
� Accounts Receivable per Customer (Invoice)
Ledger Reports
�
�
�
�
�
�
General Ledger
General Ledger by Group
General Ledger by Branch
Subsidiary Ledger
Subsidiary Ledger by Group
Subsidiary Ledger by Branch
Other Reports
�
�
�
�
�
�
Journal entry report
Account Net Changes
General Ledger in Detail - ALL
Witholding Taxes on Sales
Witholding Taxes on Payables
Subsidiary Ledger with Supplier/ Customer Details
Note:
Aldreme
Select reports which best suitable in your company.
44
FINANCIAL ACCOUNTING SOFTWARE
USER’S MANUAL
VERSION 1.1
F
E.
REPORT PARAMETERS
Every time you generate a report, a report parameter must be filled up first.
Various report parameters and its uses.
Figure E.1
Report parameter – Date Range
1) By default, the latest posting date will appear in the report year. It can be change by clicking on
the down arrow, then select a report year from the drop-down list menu.
2) Type Dates on the Textbox next to Label “From” and “To”.
NOTE:
�
�
�
Date “From” must be less than or equal to Date “To”
Year for Transaction Date “From” and “To” must be equal to Report Year
Maximum Date Range was 31 days.
e.g.
1) Report year is 2009
2009
Date From >>> 01/01/2009
2009
Date To
>>> 01/31/2009
2) Report year is 2010
2010
Date From >>> 12/16/2010
2010
Date To
>>> 12/31/2010
3) Reports listed below use this report parameter.
�
�
�
�
�
�
�
Aldreme
Trial Balance
Income Statement
Working Paper
Journal Entry Report
Witholding Taxes on Payables
Witholding Taxes on Sales
Account Net Changes
45
FINANCIAL ACCOUNTING SOFTWARE
USER’S MANUAL
VERSION 1.1
F
�
�
�
�
�
�
�
Check Voucher Listing
Check Information by Bank
Debit Memo – Listing
Retail Sales Summary Report
Bank Transaction – Listing
Credit Memo – Listing
Official Receipts – Listing
Figure E.2
Report parameter – As Of Date
1) By default, the latest posting date will appear in the report year. It can be change by clicking on
the down arrow, then select a report year from the drop-down list menu.
2) Enter transaction cut-off date.
3) Reports listed below uses this report parameter.
�
�
�
�
�
Aldreme
Balance Sheet
Account Payable – Voucher Payable
Accounts Payable – Supplier
Accounts Receivable – Invoice
Accounts Receivable - Customers
46
FINANCIAL ACCOUNTING SOFTWARE
USER’S MANUAL
VERSION 1.1
F
Figure E.3
Report parameter – Date Range with Account Code option
For Dates, please refer to Report Parameter – Date Range
For Account Code
Print specific account code entered in the text box
Account Code could be a group account code or
detailed account code.
If BLANK means ALL Account.
Report uses this report parameter
�
�
�
Aldreme
General Ledger
Subsidiary Ledger
Subsidiary Ledger with Customer/ Supplier Details
47
FINANCIAL ACCOUNTING SOFTWARE
USER’S MANUAL
VERSION 1.1
F
Figure E.4
Report parameter – Date Range with Account Code and Branch Code option.
For Dates, please refer to Report Parameter – Date Range
For Account Code
For Branch Code
Print specific account code entered in the text box
Account Code could be a group account code or
detailed account code.
If BLANK means ALL Account.
Print specific branch code entered in the text box
Branch Code could be a group branch code or
detailed branch code.
If BLANK means ALL Branch
Report uses this report parameter
�
�
�
�
Aldreme
General Ledger By Group
General Ledger By Branch
Subsidiary Ledger By Group
Subsidiary Ledger By Branch
48
FINANCIAL ACCOUNTING SOFTWARE
USER’S MANUAL
VERSION 1.1
F
Figure E.5
•
•
•
Report parameter – Date Range with Group Account Code option.
For Dates, please refer to Report Parameter – Date Range
Group Account Code is required. If you live the Code BLANK, a “Nothing to print” message
will appear.
Report uses this report parameter
o GENERAL LEDGER IN DETAIL – ALL
NOTE:
This report parameter is the same as that for General Ledger and Subsidiary Ledger. The
difference is that account code is required while for GL/SL is not.
Figure E.6
Aldreme
Report parameter – Date Range with Supplier Code option.
49
FINANCIAL ACCOUNTING SOFTWARE
USER’S MANUAL
VERSION 1.1
F
•
•
•
For Dates, please refer to Report Parameter – Date Range
Supplier Code is required. If you live the Code BLANK, a “Nothing to print” message will
appear.
Report uses this report parameter
o TRANSACTION LISTING BY SUPPLIER
Figure E.7
•
•
•
Report parameter – As Of Date with Supplier Code option.
For Date, please refer to Report Parameter – As Of Date
Supplier Code is required. If you live the Code BLANK, a “Nothing to print” message will
appear.
Report uses this report parameter
o ACCOUNTS PAYABLE PER SUPPLIER (VOUCHER)
Figure E.8
Report parameter – Number Range.
1) Type Number on the Textbox next to Label “From” and “To”.
NOTE:
� Number “From” must be less than or equal to Number “To”
� Maximum Number Range was 50.
Aldreme
50
FINANCIAL ACCOUNTING SOFTWARE
USER’S MANUAL
VERSION 1.1
F
2) Reports listed below use this report parameter.
�
�
�
�
�
�
�
Figure E.9
•
•
•
Accounts Payable Voucher
Check Voucher
Debit Memos
Accounts Payable Voucher in Detail
Sales Invoice Summary Report
Credit Memo Summary
Official Receipts Summary
Report parameter – Date Range with Customer Code option.
For Dates, please refer to Report Parameter – Date Range
Customer Code is required. If you live the Code BLANK, a “Nothing to print” message will
appear.
Report uses this report parameter
o TRANSACTION LISTING BY CUSTOMER
Aldreme
51
FINANCIAL ACCOUNTING SOFTWARE
USER’S MANUAL
VERSION 1.1
F
Figure E.10
•
•
•
Report parameter – As Of Date with Customer Code option.
For Date, please refer to Report Parameter – As Of Date
Customer Code is required. If you live the Code BLANK, a “Nothing to print” message will
appear.
Report uses this report parameter
o ACCOUNTS RECEIVABLE PER CUSTOMER (INVOICE)
Aldreme
52
FINANCIAL ACCOUNTING SOFTWARE
USER’S MANUAL
VERSION 1.1
F
F. JOURNAL ENTRY MODIFICATION
Journal entry made is displayed in the Grid object (Figure F.1). Every time you add a journal entry,
it will appear into the grid, or when you delete an existing entry, it will be removed from the grid.
Figure F.1
Note:
F.1
The grid object displays journal entries made.
If you have many entries, you can view by clicking on to the ScrollBar.
ADD NEW JOURNAL ENTRY
1. Click Journal (down arrow ) from the toolbar menu.
2. Click Add new journal entry from the drop-down list menu. (See figure F.2)
Figure F.2
Note:
Aldreme
Add new journal entry
An entry form will appear. Complete the data and click Add Button.
53
FINANCIAL ACCOUNTING SOFTWARE
USER’S MANUAL
VERSION 1.1
F
Figure F.3
Entry
Account Code
Branch Code
Amount
Journal entry form
Click the down arrow, select whether your entry creating is debit or
credit.
If you know the account code, just type, or click on the Find Account
Code Button to locate for the account code you want. Lookup window
for Chart of Account will appear.
Branch or Section where in the transaction arises which is to be
charged.
Value correspond to the entry you've created.
Note:
1. The entry you've made will appear onto the grid after clicking on the Add
button.
2. Click Clear button to clear all data you've made and input a new.
3. Click Exit button if you've done making an entry.
F.2
DELETE JOURNAL ENTRY
1. On the grid object, select the entry you want to delete.
2. Click journal (down arrow) from the toolbar menu.
3. Click "Delete journal entry" from the drop-down list menu. (see Figure F.4)
Aldreme
54
FINANCIAL ACCOUNTING SOFTWARE
USER’S MANUAL
VERSION 1.1
F
Figure F.4
Deleting existing journal entry
NOTE:
•
•
•
Delete confirmation will appear (see Figure F.5). Click "Yes" button to permanently delete
and "No" button to abandon deletion.
If you do not select an entry from the grid object. The "Delete journal entry" option will
be disabled.
The entry you've deleted must be automatically removed from the grid.
Figure F.5
Aldreme
Delete confirmation window
55
FINANCIAL ACCOUNTING SOFTWARE
USER’S MANUAL
VERSION 1.1
F
G.
APPLICATION OF COLLECTIONS
Details of collection application made are displayed in the Grid object (Figure G.1). Every
time you add an application entry, it will appear into the grid, or when you delete an existing
application entry, it will be removed from the grid.
Figure G.1
The grid object displays details of application made.
Note:
If you have many application entries, you can view by clicking on to the ScrollBar.
G.1
APPLY COLLECTION
1. Click Receipts (down arrow ) from the toolbar menu.
2. Click Apply Collection from the drop-down list menu. (See figure G.2)
Figure G.2
Note:
Aldreme
Apply Collection
An entry form will appear. Complete the data and click Add Button.
56
FINANCIAL ACCOUNTING SOFTWARE
USER’S MANUAL
VERSION 1.1
F
Figure G.3
Collected amount application entry form.
1. If you know the SI Number where you going to apply collection, just type. If not, click Find
button then select from the records displayed. When selected its details will be displayed, its
current balance will be computed and displayed as well.
2. Enter applied amount.
3. Applied amount should not be greater than the current SI Balance.
4. Click Add button to apply.
NOTE:
• The entry you've made will appear onto the grid after clicking on the Add button.
• Click Clear button to clear all data you've made and input a new.
• Click Exit button if you've done making an entry.
G.2
DELETE EXISTING APPLICATION
1. On the grid object, select the entry you want to delete.
2. Click Receipts (down arrow) from the toolbar menu.
3. Click "Delete existing application " from the drop-down list menu. (see Figure G.4)
Figure G.4
Aldreme
Deleting existing application
57
FINANCIAL ACCOUNTING SOFTWARE
USER’S MANUAL
VERSION 1.1
F
NOTE:
•
•
•
Figure G.5
Aldreme
Delete confirmation will appear (see Figure G.5). Click "Yes" button to permanently
delete and "No" button to abandon deletion.
If you do not select an entry from the grid object. The "Delete existing collection"
option will be disabled.
The entry you've deleted must be automatically removed from the grid.
Delete confirmation window
58
FINANCIAL ACCOUNTING SOFTWARE
USER’S MANUAL
VERSION 1.1
F
H.
PAYMENT APPLICATION
Application of payment made is displayed in the Grid object (Figure H.1). Every time you add a
payment application, it will appear into the grid, or when you delete an existing payment application
entry, it will be removed from the grid.
Figure H.1
The grid object displays application payment made.
Note: If you have many payment application entries, you can view by clicking on to the
ScrollBar.
H.1
ADD NEW PAYMENT APPLICATION
1. Click Payment (down arrow ) from the toolbar menu.
2. Click Add new payment application from the drop-down list menu. (See figure H.2)
Figure H.2
Note:
Aldreme
Add new payment application
An entry form will appear. Complete the data and click Add Button.
59
FINANCIAL ACCOUNTING SOFTWARE
USER’S MANUAL
VERSION 1.1
F
Figure H.3
Find voucher payable number
1. If you know the APV Number where you going to apply payment, just type. If not, click Find
button then select from the records displayed. When selected its details will be displayed, its
current balance will be computed and displayed as well.
2. Enter applied amount.
a. Applied amount should not be greater than the current APV Balance.
3. Click Add button to apply.
Note:
•
•
•
H.2
The entry you've made will appear onto the grid after clicking on the Add
button.
Click Clear button to clear all data you've made and input a new.
Click Exit button if you've done making an entry.
DELETE PAYMENT APPLICATION
1. On the grid object, select the entry you want to delete.
2. Click Payment (down arrow) from the toolbar menu.
3. Click "Delete payment application" from the drop-down list menu. (see Figure H.4)
Aldreme
60
FINANCIAL ACCOUNTING SOFTWARE
USER’S MANUAL
VERSION 1.1
F
Figure H.4
Deleting existing payment application
Note:
•
•
•
Figure H.5
Aldreme
Delete confirmation will appear (see Figure H.5). Click "Yes" button to
permanently delete and "No" button to abandon deletion.
If you do not select an entry from the grid object. The "Delete payment
application" option will be disabled.
The entry you've deleted must be automatically removed from the grid.
Delete confirmation window
61
FINANCIAL ACCOUNTING SOFTWARE
USER’S MANUAL
VERSION 1.1
F
I.
I.1
TOOLBARS AND OTHER FORMS
TOOLBAR MENU
The toolbar will gives you easy access to the menu-bar commands you’ll use most frequently.
You will notice that when you move the mouse over the buttons they appear to raise themselves up
from the toolbar. Toolbar menu which are always located at the left top side of the screen
immediately below the menu bar.
Figure I.1 Toolbar for Tax Code, Group Branch Code, Detailed Branch Code, Group Account Code,
Detailed Account Code, Customer Code, Bank Code, Supplier Code and User’s Code Entry Forms.
Figure I.2 Toolbar for Sales Invoice, Accounts Payable Voucher, Bank Transaction and Journal
Voucher.
Figure I.3 Toolbar for Official Receipts/ Collection and Credit Memos.
Figure I.4 Toolbar for Check Voucher and Debit Memos.
Aldreme
62
FINANCIAL ACCOUNTING SOFTWARE
USER’S MANUAL
VERSION 1.1
F
I.2
TOOLBAR AND ITS FUNCTION
Close
Close active window
Delete
Remove current record from the database
permanently.
Open
Journal
Open existing record with
Search Window.
Add or remove a journal entry.
New
Receipts
Creates blank record where in
you can enter new data.
Add or remove collection details.
Save
Payment
Save current record into the
database.
Aldreme
Add or remove payment application.
63
FINANCIAL ACCOUNTING SOFTWARE
USER’S MANUAL
VERSION 1.1
F
I.3
FIND BUTTON
Find button is usually found on the right side of a textbox.
Use as if you don’t know on what will you going to type in the textbox,
you have an option to click on to the Find button, then select a record
from the Search Form.
I.4
SEARCH FORM
Search form are use to locate specific record or a transaction from the database.
Figure I.5 Search Form for Journal Voucher, Sales Invoice, Official Receipts, Credit Memos,
Accounts Payable Voucher, Check Voucher, Debit Memos and Bank Transaction.
Aldreme
64
F
FINANCIAL ACCOUNTING SOFTWARE
USER’S MANUAL
VERSION 1.1
Figure I.6 Search Form for Tax Code, Group Branch Code, Detailed Branch Code, Group Account
Code, Detailed Account Code, Customers Code, Bank Code and Supplier Code
SEARCH PERIOD (Applies only on Figure I.5)
Search Default Period setted up in the maintenance menu will be the first period to be search
in the database and displayed. Change its values then click the Search button to redisplay records
which correspond to your new search period. Valid range for the month is from 1 to 12 which
represents the 12 months, January to December. While for the Year valid value is a four digit
numeric type.
CHANGING DISPLAY ORDER (Applies only on Figure I.6)
Rearrange the display sort order of the data in the grid list by clicking on the drop down
arrow. Select preferred order of data listed by its Code, Name or Description.
Aldreme
65
FINANCIAL ACCOUNTING SOFTWARE
USER’S MANUAL
VERSION 1.1
F
FINDING TEXT
Click on to the Find button and a text window will appear (see figure I.7). Type text you’ve
wanted to find then click OK button to search or click Cancel to discard search. Text will be search on
individual record and stop searching every time find match. Click Next button to continue searching
on the succeeding records. Search end when end-of-file message appeared. Click OK button to
select the highlighted record from the grid list or click Cancel to exit.
Figure I.7 Search text window
NOTE:
Double click record in the grid list also selects record.
DEFAULT COLUMNS
Default columns displayed in the Grid list.
Figure I.5
Transaction Date
Reference Number
Amount
Remarks
Figure I.6
Assign Code
Name or Description
Aldreme
66