1
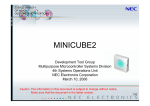
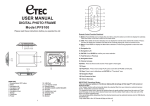
www.prolight.co.uk
TRANSCENSION
6-CHANNEL DMX DIMMER PACK
(order code: BOTE40)
USER MANUAL
DMX DIMMER
SAFETY
WARNING
FOR YOUR OWN SAFETY, PLEASE READ THIS USER MANUAL CAREFULLY
BEFORE YOUR INITIAL START-UP!
CAUTION!
Keep this equipment away from rain,
moisture and liquids.
SAFETY INSTRUCTIONS
Every person involved with the installation, operation & maintenance of this
equipment should:
Be competent
Follow the instructions of this manual
CAUTION! TAKE CARE USING THIS EQUIPMENT!
HIGH VOLTAGE-RISK OF ELECTRIC SHOCK!!
Before your initial start-up, please make sure that there is no damage caused during
transportation. Should there be any, consult your dealer and do not use the equipment.
To maintain the equipment in good working condition and to ensure safe operation, it is
necessary for the user to follow the safety instructions and warning notes written in this
manual.
Please note that damages caused by user modifications to this equipment are not
subject to warranty.
DMX DIMMER
SAFETY
IMPORTANT:
The manufacturer will not accept liability for any resulting damages caused
by the non-observance of this manual or any unauthorised modification to the
equipment.
•
•
•
•
•
•
•
•
•
•
•
•
•
•
•
Never let the power-cable come into contact with other cables. Handle the
power-cable and all mains voltage connections with particular caution!
Never remove warning or informative labels from the equipment.
Do not open the equipment and do not modify the equipment.
Do not switch the equipment on and off in short intervals, as this will
reduce the system’s life.
Only use the equipment indoors.
Do not expose to flammable sources, liquids or gases.
Always disconnect the power from the mains, when equipment is not in
use or before cleaning! Only handle the power-cable by the plug. Never
pull out the plug by pulling the power-cable.
Make sure that the available voltage is between 220v/240v.
Make sure that the power-cable is never crimped or damaged. Check
the equipment and the power-cable from time to time.
If the equipment is dropped or damaged, disconnect the mains power
supply immediately. Have a qualified engineer inspect the equipment
before operating again.
If the equipment has been exposed to drastic temperature fluctuation
(e.g. after transportation), do not switch it on immediately. The arising
condensation might damage the equipment. Leave the equipment
switched off until it has reached room temperature.
If your product fails to function correctly, discontinue use immediately.
Pack the unit securely (preferably in the original packing material), and
return it to your Prolight dealer for service.
Only use fuses of same type and rating.
Repairs, servicing and electric connection must only be carried out by a
qualified technician. THIS UNIT CONTAINS NO USER SERVICEABLE
PARTS…
WARRANTY; One year from date of purchase.
OPERATING DETERMINATIONS
If this equipment is operated in any other way, than those described in this manual, the
product may suffer damage and the warranty becomes void.
Incorrect operation may lead to danger e.g.: short-circuit, burns, electric shocks, lamp
failure etc.
Do not endanger your own safety and the safety of others!
Incorrect installation or use can cause serious damage to people and property!
DMX DIMMER
DESCRIPTION
FEATURES
Digital 6-channel dimmer pack
• DMX Dimming pack for professional use.
• Single-phase or 3-phase
• 6 x 10 A / 6 x 20 A
• DMX-control or analogue control possible.
• DMX-starting address can be adjusted on the equipment.
• Synchronisation of several dimmer packs possible via DMX
• Adjustable lamp pre-heat.
• Information via LED’s and LCD display
• Automatic circuit breaker on all channels.
Front view
1.
2.
3.
4.
5.
6.
7.
8.
9.
Circuit Breaker
DMX control LED
Channel LED’s
LCD-display
Channel-buttons
Menu-button
Up-button
Down-button
Esc-button
DESCRIPTION
DMX DIMMER
SETUP
Rear view
10. DMX-input socket
11. DMX-output socket
12. Analogue-sockets
13. Cable outlets
14. Power Input
SETUP
Analogue
Connect your light controller to the Analogue Input socket.
The wiring of the 8-pin DIN-socket is as follows:
1. Channel 1
2. Channel 2
3. Channel 3
4. Channel 4
5. Channel 5
6. Channel 6
7. Ground
8. Not connected.
DMX DIMMER
OUTPUTS
DMX
Only use a stereo shielded cable and 3-pin XLR plugs and connectors to connect the
controller with the equipment.
Configuration of the XLR-connection:
DMX-output
XLR mounting-socket:
DMX-input
XLR mounting-plug:
If you are using controllers with this configuration, you can connect the DMX-output of the controller
directly with the DMX-input on the equipment. If you wish to connect DMX-controllers with other
XLR-outputs, you need to use adapter-cables.
Building a serial DMX-chain.
Connect the DMX-output of the first unit in the DMX-chain with the DMX-input of the next unit.
Always connect one output with the input of the next unit until all units are connected.
Addressing
Set the required DMX-address via the Control Board.
DMX-512 Control
Addressing
Set the required DMX-address via the Control Board.
Special Note: Line termination:
• When longer runs of cable are used, you may need to use a terminator on the last unit to
avoid erratic behavior.
Figure 4
Termination reduces signal
transmission problems and
interference. It is always
advisable to connect a DMX
terminal, (resistance 120 Ohm
1/4W) between Pin 2 (DMX-) and
Pin 3 (DMX+) of the last fixture
Using a cable terminator (part number CABL90) will decrease the possibilities
of erratic behavior.
DMX DIMMER
ADDRESSING
Outputs
Output of the Dimmer is via the terminal blocks located behind the plate on the rear panel.
Connect the load via the pole connectors. The maximum load per channel is 4600 W. Please note
that the maximum current of 120 A must never be exceeded.
Connection with the mains.
DANGER!
The electric connection must only be carried out by a
qualified electrician!
The wiring of the connection-cables is as follows:
Cable
Black
Brown
Grey
Blue
Yellow/Green
Pin
Live 1
Live 2
Live 3
Neutral
Earth
International
L1
L2
L3
N
The earth must be connected!
If the equipment is to be directly connected to the local power supply network, an isolation switch
with a minimum opening of 3 mm at every pole has to be included in the permanent electrical
installation.
The equipment must only be connected with an electric installation carried out in compliance with
the IEC-standards. The electric installation must be equipped with a Residual Current Device
(RCD) with a maximum fault current of 30 mA.
OPERATION
Manual dimming
Regardless of the menu settings and DMX signal, you can dim the channels manually by pressing
the Channel buttons (5).
After you have connected the equipment to the mains, the dimmer pack is ready for use.
First, the software version id is indicated on the display. The DMX LED flashes repeatedly. After selftesting, you are in the main menu.
DMX DIMMER
DISPLAY
Display
1
1
2
3
4
5
6
The display indicates the channel levels.
The current channel is indicated by the first
bar.
The other channel levels are indicated by the
other six bars.
Use the buttons below the display to navigate
through the different menus.
How to navigate through the menu
Start your dimmer pack and press MENU after the self-test. The display indicates:
Auto
Use the UP and DOWN-buttons to select one of the 5 sub-menus of the dimmer pack.
Auto, Pha Corr, DMX address, Preheating and Curve
Enter one of the menus by pressing the MENU-button.
Use the UP and DOWN-buttons to set the parameters.
Exit the individual menu by pressing the ESC-button.
Note! The underscore on the display indicates your current position in the menu.
DMX fail
Press MENU to enter the first sub-menu, Auto. The display indicates the current mode.
Auto
Prog08
Use the UP and DOWN-buttons to select either Hold, Analogue or one of 12 built-in programmes.
Hold:
Saves the DMX signal received last.
Press ESC button to return to the main menu.
Analogue:
signals.
Selects the analogue control of the dimmer pack. DMX signals have priority to analogue
Press ESC to return to the main menu.
Progxx:
Selects a built-in programme. DMX signals have priority to built-in programmes.
(DMX-LED flashes)
Press MENU to return to the main menu or press ESC to set the speed between
00.1S – 20.0 S with the UP and DOWN buttons for the selected programme.
Press ESC repeatedly to return to the main menu.
DMX DIMMER
NAVAGATION
Pha Corr
Press MENU to enter the second sub-menu, Pha Corr. The display indicates the current mode.
Pha Corr
Yes
Use the UP and DOWN-buttons to select either Yes or No.
Yes:
No:
Activates the phase correction.
De-activates the phase connection.
Press ESC to return to the main menu.
Dmx addr
Press MENU to enter the third sub-menu, Dmx addr. The display indicated the current
Dmx addr
Block
Use the UP and DOWN-buttons to select either Single or Block and press MENU.
Single:
Set a starting address (001 – 512) for the six channels individually.
Several channels can share the same address.
Block:
Set one starting address (001 – 512) for all six channels.
Sub-menu Single
Chan[1]
[023]
First use the UP and DOWN buttons to set a channel. Press MENU and then set the starting address
of the respective channel with the UP and DOWN-buttons.
Press ESC once to set another channel or press ESC repeatedly to return to the main
menu.
Sub-menu block
Start
[044]
Use the UP and DOWN-buttons to set the starting address for all six channels.
Press ESC repeatedly to return to the main menu.
DMX DIMMER
NAVAGATION
Preheating
Press MENU to enter the fourth sub-menu, Preheat. The display indicates the current mode.
Preheat
All
Use the UP and DOWN-buttons to select either All or Single and press MENU.
All:
Single:
Preheat all channels.
Preheat an individual channel.
Sub-menu All
All
044%]
Set a value with the UP and DOWN-buttons between 000% - 050%. Press ESC to return to the
main menu.
Sub-menu Single
Chan[1]
[023%]
First use the UP and DOWN-buttons to set a channel. Press MENU and then set a value with the
UP and DOWN-buttons between 000% - 050%.
Press ESC once to set another channel or press ESC repeatedly to return the main menu.
Curve
Press MENU to enter the final sub-menu, Curve. The display indicates the current mode.
Curve
Linear
Use the UP and DOWN-buttons to select either Linear, Switch or Square.
Press ESC to return to the main menu.