1
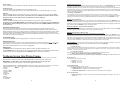
USER MANUAL
DIGITAL PHOTO FRAME
Model:PF9100
1
11
2
12
3
4
5
6
13
7
8
9
10
15
14
16
Please read these instructions before you operate the unit
Remote Control Function Explained
1) Mode: Press MODE once to display the clock time, press this button a 2nd time to display the calendar,
Press this button a 3rd time to return to the main menu.
2) OSD: Press OSD (On Screen Display) once to display the root file name and the file number. Press a
2nd time to display the resolution and date of the currently playing file. Press a 3rd time to exit.
3) Menu: Press MENU to display the Main Menu selections. Press during playback to return the main
menu.
1
4) Navigation Up
234 5 6 78 9
5) Navigation Left
6) ENTER: Press ENTER to confirm your menu selection
16
17
11
10
13
16
12
7) Fast Reverse or Previous
8) Navigation Down
9) Volume Increase
10) Mute: Press to silence audio sound. Press again to hear again.
11) Power
18
15 14
12) Play/Pause: Press once to begin PLAY, press a 2nd time to PAUSE current play.
13) Stop: Press to end a slideshow and ENTER the "Thumbnail" view.
14) Navigation Right
15) Fast Forward or Next
16) Volume Decrease
MAIN UNIT
1. Snooze/Alarm OFF button
2. Mode
3. Navigation left
4. Navigation right
5. Navigation up
6. Navigation down
7. Return
8. Play/Enter
9. Power
10. USB Port
11. LCD display screen
12. Remote sensor
13. SD/MMC/XD/MS CARD READER
14. DC jack
15. Headphones Jack
16. Hanging holes
17. Speakers
18. Bracket
1
IMPORTANT Operational Notes:
-You can view your photos in Full-Screen (taking full advantage of this large"9" LCD screen) or
Auto-Fit modes
-The "Delete" function will permanently delete the selected files from your internal or external memory
device. Deleted files cannot be retrieved.
-To change the frame color, remove the existing frame by gently pulling it away from the main unit. Then
insert the pegs on the rear of the desired frame color into the rubber insert holes on the main unit of the
player and press together firmly.
-You cannot play photo slideshows from the internal memory and an external memory card or USB device
simultaneously.
-Only video files in the .AVI format will play on this unit.
2
USB port
Insert a USB data device into the USB port to enjoy photo, audio, or .AVI video & movie files. To safely
remove the USB device from the port- press STOP, then press MENU and the Main Menu Interface
will appear. Now you can safely remove the USB device from the USB port.
PHOTO (View Photos)
Press the NAVIGATION buttons and select the PHOTO option, press ENTER to confirm this
selection. The Photo Frame will read the internal memory or the connected USB or
SD/MMC/XD/MS memory device for several seconds and will begin to play through each picture
automatically one by one. During playback press PLAY/PAUSE to pause, to resume playback
press PLAY/PAUSE again. Use the 8 or 7 buttons on the remote to skip forward or backward
through the playing photos.
- Viewing "Thumbnails"
When playing photos, press the STOP button at any time to view small versions (called
"Thumbnails") of each photo will appear on the screen, you can select a thumbnail to begin
playing in full scale by using the NAVIGATION buttons and then pressing ENTER to play.
SD/MMC/XD/MS
Insert an SD/MMC/XD/MS card into the card reader slot to enjoy photo, audio, or video files.
To safely remove the SD/MMC/XD/MS card from the reader slot - press STOP, then press MENU and
the Main Menu Interface will appear. Now you can safely remove the SD/MMC/XD/MS card from the
card reader slot.
MUSIC (Playing Music)
Using the NAVIGATION buttons, select Music from the Main Menu and press ENTER to confirm
the selection and the player will begin to play music files automatically. Browse the menu that
appears on the screen and use the NAVIGATION UP/DOWN buttons to highlight a desired music
file, and then press ENTER to play the selected file.
SNOOZE/ALARM OFF button
When the alarm sounds there are two options for turning the alarm off, regular OFF and Snooze.
1) To turn the alarm off the alarm off, press and hold the SNOOZE/ALARM OFF button for 3 seconds to
disable the alarm function. If you want to sleep for an additional five minutes after the alarm sounds, lightly
press and release the SNOOZE/ALARM OFF button to activate the snooze function and the alarm will
sound again after about five minutes. Press and hold the SNOOZE /ALARM OFF button to end the snooze
cycle and turn the alarm completely off.
PHOTOS / MUSIC - (Play Photos with Music)
Using the NAVIGATION buttons, select Photo & Music from the Main Menu and press ENTER to
start your photo slideshow with music playing simultaneously.
Power supply
Plug one end of the 9V AC adaptor into the DC input jack, then plug the other end into AC wall outlet.
Headphone jack
For private listening, plug headphones into the headphone jack.
CAUTION: Listening at high volume for an extended period of time could cause damage to your ears.
PLAY/ENTER button
Press the Play/ENTER button to begin playback or confirm a menu selection.
NAVIGATION buttons
The Navigation buttons on the rear of the unit and the Remote Control are identified by , , , and . Use
these buttons to move through the all of the Menu selections. As you move through the Menu selections
stop when the Menu selection of your choice is highlighted.
ENTER button
The ENTER button on the Remote Control is used to confirm your Menu selections. The
"PLAY/ENTER"button on the rear of the unit can also be used to confirm your selections. When the Menu
selection of your choice is highlighted press the ENTER button to confirm your selection.
To Begin Using this Photo Frame
Turn the Power ON to the Photo Frame unit by pressing Power button on the rear of the unit or on the
Remote Control. When the Power turns ON the Main Menu of the Photo Frame will be seen.
MAIN MENU- The Main Menu is the default starting point after turning the unit "ON" .
The Main Menu screen shows the ten main function options listed below.
Insert a USB data device or SD/MMC/XD/MS card into the reader / ports on the rear of the unit. Use the
NAVIGATION buttons , , , and to select one of the following Main Menu functions.
1. Photo
2. Music
3. Photo & Music
4. Movie (Video)
5. Setup
6. Calendar
7. Clock
8. Alarm
9. Copy/Delete
10. Favorite
3
MOVIE (Play Video or Movie Files)
This Photo Frame will only play .AVI format video or movie files.
Using the NAVIGATION buttons, select Movie from the Main Menu and press ENTER to confirm
the selection and the player will begin to play movie files automatically. Browse the menu that
appears on the screen and use the NAVIGATION UP/DOWN buttons to highlight desired movie
file, then press ENTER to play selected file. Press and hold the 8 or 7 buttons on the remote
control to Fast Forward, or Fast Reverse through the video or movie file.
SETUP MENU - To choose the interval times, transition effects, and play modes for your photos,
highlight the SETUP selection from the MAIN Menu and press ENTER .
A.) Photo Settings
a. Interval TimeChoose the interval time and transition effects for your photo slideshow. There are several time
interval options to choose from between photo changes: 5 seconds, 10 seconds, 15 seconds, 30
seconds, 1 minute, and 3 minutes.
b. Transition EffectSelect one of the 16 transition effects to insert between changing photos
c. Show Type- Full-Screen or Auto-Fit Viewing modes
Your photos can be viewed in Full-Screen (taking full advantage of this large 9 "LCD screen) or in Auto-Fit
B.) Auto-Play
The options of auto play include
a. photo- on or off
b. music - on or off
c. movie - on or off.
C.) Display Setup
The options of Display Setup include
a. LCD Brightness : to adjust LCD Brightness settings.
b. LCD Contrast: to adjust LCD Contrast settings.
c. LCD Color Saturation: to adjust the LCD Color Saturation settings.
D.) Custom Setup
a. OSD Language : to select the On Screen Display languages of English, French, and
Spanish
4
b. Style : to select one of four different screen display styles
c. Media : To select the data source for the photos you want to play: Built-in 1GB memory,
USB Device, SD/MMC/MS/XD Device
d. Default : select READ to restore the Photo Frame to the factory settings.
e. Set Time: sets the time on the Photo Frame clock.
Use the NAVIGATION LEFT/RIGHT buttons to highlight the time you want to set then use
NAVIGATION
UP/DOWN button to adjust the time. Press ENTER to confirm the time. To exit the time setting
mode use the NAVIGATION LEFT buttons to back out of the Set Time option and return to the
Setup Menu choices. To change the clock from AM to PM (or vice-versa) increase or decrease the
hour setting past 12.
E.) Exit
Select the EXIT option to exit from the Setup Menu
Notes:
-When the photos are playing, pressing the OSD button will show the details of your photo:
resolution and Date,
-When viewing photos you can rotate a photo: left 90 ° , rotate right 90 ° flip horizontally or vertically
by pressing the NAVIGATION
buttons.
-To rotate thumbnails photos, scroll down to the bottom of the screen, highlight the "Rotate" button
and press ENTER to confirm. Using the NAVIGATION buttons, highlight the photo to rotate and
press ENTER and the photo will rotate 90 ° . Repeat until you have completed rotating all of the
thumbnail photos of your choice. The rotated photo will be saved in memory for larger screen
viewing. Select "Reset" from the bottom of the screen to restore the photo to its' original view.
Select "Return" to return back to the thumbnail mode.
CALENDAR
Use the NAVIGATION buttons to select CALENDAR from the main menu and press ENTER to confirm.
The calendar will be shown on the display. Adjust the year first by using the NAVIGATION buttons, scroll
up to the 7or 8 symbols at the top of the screen, and press ENTER one time for each year of adjustment
(to move/forward back 3 years, press the ENTER button 3 times). Next use the NAVIGATION buttons to
adjust the month by scrolling up to the | or }. symbols at the top of the screen and press ENTER one time
for each month of adjustment. Lastly use the NAVIGATION buttons to scroll down and select the date,
press ENTER to confirm. The date must be confirmed by pressing ENTER or the year and month changes
will not be saved. Exit this function by pressing the MENU button.
Use the NAVIGATION buttons and select COPY/DELETE from the main menu, press ENTER to confirm.
Select the type of files you want to Copy or Delete from the menu choices: Photo, Music, Photo/Audio,
Movie, or All - press ENTER. The File Manager will appear. The left-side will list the; internal 1GB memory
and any other memory devices currently in use. (Note: your external memory device must be plugged into
the Photo Frame prior to selecting COPY/DELETE from the main menu or the memory device will not be
recognized for this function.)
Use the NAVIGATION buttons to select the memory device to copy or delete files from and press ENTER.
Use the NAVIGATION buttons to move through the folders and files on the right-side of the File Manager.
(To view files inside of a folder, select the folder and press ENTER and the files will be displayed on the
right-side). To select a file, press ENTER and the selected file will be highlighted. Continue this file
selection process until all of your choices have been made. After the final file has been selected, press the
NAVIGATION-Right button to ENTER the "Edit" function - press ENTER and there are three options to
choose from; Copy, Delete, and Return.
COPY: Highlight COPY and press ENTER. Use the NAVIGATION buttons to highlight the destination
memory device and folder you wish to copy the selected files to and press ENTER. Press the
NAVAGATION- Right button and choose "Paste" from the menu. The files will be copied into the selected
destination and the screen will show the transfer progress until completed.
DELETE: Highlight DELETE and press ENTER and all of the selected files will be deleted.
NOTE: -The "Delete" function will permanently delete the selected files from your internal or
external memory device. Deleted files cannot be retrieved.
FAVORITE
This main menu selection plays only the files that have been copied and stored on the large 1GB
internal memory.
Use the NAVIGATION buttons, select FAVORITE and press ENTER to begin playing only the files
that have been copied into the internal memory. During playback press PLAY/PAUSE to pause, to
resume playback press PLAY/PAUSE again.
CLOCK
Use NAVIGATION buttons to select CLOCK Function and press ENTER to confirm, then the current time
will be shown on the screen in big characters, and the current date, month, year and week will be shown
under the time in small characters.
ALARM
Use NAVIGATION buttons to select the ALARM function. Press ENTER and you can now access the
Alarm options.
The Alarm options are as follows: Enable: (Turn the alarm ON or OFF)
Set Time: Select this option to set the alarm time and press ENTER to confirm and exit the alarm setting.
The alarm will now sound at the preset time.
COPY/DELETE
Select this menu option to COPY files from one memory device to another. Example: to COPY the
files from a USB device to the 1GB internal memory or vice-versa.
SELECTING THE FILES TO COPY OR DELETE
NOTE: -The "Delete" function will permanently delete the selected files from your internal or
external memory device. Deleted files cannot be retrieved.
5
6
ETEC LIMITED 90-DAY WARRANTY
We warrant this product to be free from defects in material and workmanship under normal use for a 90day period after purchase. We will repair or replace the unit free of charge should it become defective
under this warranty, providing you submit proof of purchase (sales slip) along with the unit and all
accessories.
During the initial 90-day period after original purchase, we will service or exchange, at no charge. To
obtain warranty service or replacement within the duration of the 90-day warranty, return the product
freight prepaid to the address below.
ETEC USA
823 Old Settlers Trail
Suite 100
Hopkins, Minnesota 55343
Please enclose a copy of the sales receipt with the date of purchase and provide a detailed description of
the problem. Failure to enclose required information will result in delay of your shipment. Please allow 4-6
weeks for product service or replacement.
This warranty does not cover any product, which has been subject to damage due to an act of nature,
misuse, neglect, accident, abuse, commercial use, or modification of, or to, any part of the product,
including the antenna. Damage to external devices such as speakers and other memory devices are not
covered nor is the cost incurred in shipping the unit for warranty repair. Under no circumstances shall
ETEC USA, be liable for any loss (direct, indirect, incidental, foreseen, unforeseen, special or
consequential) or for any damage arising out of, or in connection with, the use of this product.
UNDER NO CIRCUMSTANCES WILL ETEC USA BE LIABLE FOR ANY INCIDENTAL OR
CONSEQUENTIAL DAMAGES.
This warranty does not cover re-manufactured units, or product sold 'As Is'.
This warranty is valid only in the United States and grants specific legal rights.
7