1
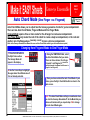
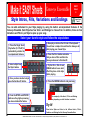
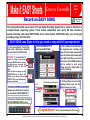
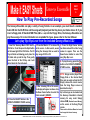
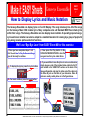
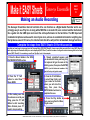
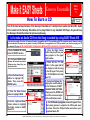
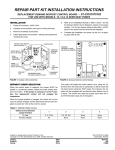
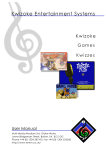
Make it EASY Sheets
Genesys Ensemble
Audio Guide
Track 1
How to Use the EASY SHEETS
The Genesys Ensemble EASY Sheets were created to give you the basic steps needed to start having fun with your new
instrument. The diagram below will help you understand how to get the most out of the EASY Sheets. We at Generalmusic
appreciate your purchasing the Genesys Ensemble and are committed to providing support materials for this and our other
instruments in the future.
MAKE IT EASY!
Good words to
live by when
designing such a
feature-packed
Digital Ensemble
Piano.
The engineers at
Generalmusic
have done a great
job of combining
a sophisticated
instrument with
an easy to use
interface
These EASY Sheets
were created by:
Wm. David McMahan
Nat’l Product Support Mgr.
Generalmusic USA
If you have questions about or
a suggestion for future EASY
Sheet’s, you can e-mail Dave
at:
[email protected]
#
This is the Title area
In this area you will find a brief description of the feature(s) that will
be learned by following the particular EASY Sheet
This is the
EASY Sheets’s
page number
This is the track
number from the
acco m pan ying
Audio Guide CD
pertaining to each
EASY Sheet.
This area contains specific information related to the steps below
Other important information pertaining to the EASY Sheet may be found in this box
Here you will find the steps to follow
to complete the EASY Sheet. Steps
are numbered in RED and are
enclosed in BLUE boundaries.
NOTES: Are enclosed in black
boundaries like this one
When necessary, references to the
Genesys Ensemble User’s Manual will
be made. We have tried to keep that to
a minimum as much as possible.
GENERALMUSIC CORP. 1164 Tower Lane Bensenville, IL 60106 phone (630) 766-8230 fax (630) 766-8281 www.Generalmusic.us
When needed,
graphics are
included to
reinforce the
steps in the
EASY Sheets.
Make it EASY Sheets
Genesys Ensemble
EASY Sheet INDEX
EASY Sheet 1
EASY Sheet 2
EASY Sheet 3
EASY Sheet 4
EASY Sheet 5
EASY Sheet 6
EASY Sheet 7
EASY Sheet 8
EASY Sheet 9
EASY Sheet 10
EASY Sheet 11
Selecting Sounds to Play
Playing with a Style
Auto Chord Mode (One Finger -vs- Fingered)
Style Intros, Fills, Variations and Endings
Record an EASY SONG
How To Play Pre-Recorded Songs
How to Display Lyrics and Music Notation
Using the Microphone
Singing a Song with Vocal Harmony
Making an Audio Recording
How To Burn a CD
GENERALMUSIC CORP. 1164 Tower Lane Bensenville, IL 60106 phone (630) 766-8230 fax (630) 766-8281 www.Generalmusic.us
Make it EASY Sheets
Genesys Ensemble
Selecting Sounds to Play
EASY
Sheet
1
Audio Guide
Track 2
Sounds in the Genesys are grouped by specific types of instruments into what is called Preset Families.
There are 16 different Preset Family Groups each with 16 Sounds to play. This adds up to a total of 256
Presets that you can choose from. There is also an additional 256 User Locations if you want to create
your own Presets. {refer to Creating and Editing Sound Presets in the User Manual}
Let’s Select the Stereo Grand Piano from the Piano Preset Families Group
1. Press the Piano Preset Families Button
The Display will look like this
2. Press Soft Button ‘A’ located at the upper left side
of the display to select the Stereo Grand Piano Preset
Learn-A-Word: Soft Buttons are called soft because the
software of the instrument assigns different functions
to them depending on what mode you have accessed.
Try It!
Select Sounds from other Preset Families Groups by pressing the
desired Preset Families Button and Soft Buttons and discover the
versatility of the Genesys Ensemble Digital Piano
GENERALMUSIC CORP. 1164 Tower Lane Bensenville, IL 60106 phone (630) 766-8230 fax (630) 766-8281 www.Generalmusic.us
Make it EASY Sheets
Genesys Ensemble
EASY
Sheet
2
Playing with a Style
Audio Guide
Track 3
By using the eight main Style Families buttons and the Previous/Next Page buttons, you have access to
256 Pre-Programmed Accompaniment Styles.These Styles feature 8 full back-up tracks. Each Style
includes
4
different
Intros,
Fill-In's,
Variations
and
Endings
to
choose
from.
(refer to the ‘Style Intro’s, Fills, Variations and Endings’ Easy Sheet)
Let’s select the Style named Shake from the Rock Family
1. Press the Single Touch Play
button to automatically activate
the accompaniment features.
5. Now press the
START/STOP button
and a drum beat will
start playing.
2. Press the Rock
Style Families Group
button.
6. Now play a chord on the left end of the keyboard and you will hear the entire band join in.
3. Press the NEXT PAGE button to
select page 2 of the Rock Family.
The Display will look like this
4. Press Soft
Button ‘C’ to
select the Shake
Style. Notice
that the chosen
style becomes
highlighted
when selected.
Note: You might notice the the sound on the right end of the keyboard
has changed. This is a feature of Single Touch Play (from in step 1).
You can always select a new sound from the PRESET FAMILIES as
described in the EASY SHEET #1 Selecting Sounds to Play.
Play
7. If you want to adjust the Tempo of your
song, simply rotate the TEMPO/DATA Dial to
the left to make your song slower or to the
right to make your song faster.
8. When you are finished playing, press the START/STOP
button to end the playback of your song.
Try It!
Select Styles from other Style Families Groups by pressing the desired
Style Families button, Page button and Soft buttons and and find your
favorite styles. As you listen to various styles, try to think of songs that
you could play along with those styles.
GENERALMUSIC CORP. 1164 Tower Lane Bensenville, IL 60106 phone (630) 766-8230 fax (630) 766-8281 www.Generalmusic.us
Make it EASY Sheets
Auto Chord Mode
Genesys Ensemble
(One Finger -vs- Fingered)
EASY
Sheet
3
Audio Guide
Track 4
Auto Chord Mode allows you to adjust how the Genesys generates chords for your accompaniment.
There are two Auto Chord Modes; Fingered Mode and One Finger Mode.
Fingered Mode requires three or more notes for the Arranger to create an accompaniment.
One Finger Mode only needs the root of the chord to create a major accompaniment, or the root and
another note 3 halfsteps above (musically correct) to hear a minor accompaniment.
(Refer to the Genesys Ensemble User Manual for more on Auto Chord Mode and the types of chords/notes accepted)
Changing from Fingered Mode to One Finger Mode
1. Press the Edit button in
the Style Tools section.
The Arrange Mode will
appear in the display.
3. Using the TEMPO/DATA dial, select
the Auto Chord Mode that you desire.
There are three choices; One Finger,
Fingered 1 and Fingered 2. (refer to the
Genesys Ensemble User Manual for differences in
Fingered 1 and Fingered 2)
2. Use the Cursor Keys to highlight
the upper Auto Chord Mode value if
it is not already selected.
4. Once you have selected the Auto Chord Mode of your
choice, press the Style Tools Edit button to return to the
main screen.
Note: This Auto Chord Mode setting is remembered when
you turn the Genesys Ensemble off. So the Mode that you
choose will remain until you repeat steps 1 -4 to change
the Auto chord Mode again.
GENERALMUSIC CORP. 1164 Tower Lane Bensenville, IL 60106 phone (630) 766-8230 fax (630) 766-8281 www.Generalmusic.us
Make it EASY Sheets
Genesys Ensemble
EASY
Sheet
4
Style Intros, Fills, Variations and Endings
Audio Guide
Track 5
You can add excitement to your Style playing by using the built-in accompaniment features of the
Genesys Ensemble. Each Style has four Intro’s and Endings to choose from. In addition, there are four
Variations and Fill-In’s per Style to spice up your song.
Select your favorite style and follow the steps below
1. Press the Single Touch
Play button (S.T. PLAY) to
automatically activate the
accompaniment features.
2. Select a Style from
the Style Families
5. Now play a chord on the left end of the keyboard.
You will hear a simple Intro and then the Genesys will
start playing your chosen Style.
6. Press the FILL> button and notice
that you hear a Fill-In and then the
Genesys advances to Variation #2.
7. Try the FILL<, FILL<> and
BREAK buttons to see what
effect they have on the style
that is playing.
3. Once you have selected a style,
press the Variation #1 button.
4. Press the INTRO and SYNCRO
buttons so they light up meaning
you have activated the feature.
8. Press the ENDING button to end your song.
The complexity of the Intro’s, Fill-In’s and Endings
vary depending on which Variation is selected.
Try It!
Select other Styles and listen to the different Intro’s, Fill-In’s,
Variations and Endings that the Genesys Ensemble offers.
GENERALMUSIC CORP. 1164 Tower Lane Bensenville, IL 60106 phone (630) 766-8230 fax (630) 766-8281 www.Generalmusic.us
Make it EASY Sheets
Genesys Ensemble
Record an EASY SONG
EASY
Sheet
5
Audio Guide
Track 6
The Genesys Ensemble has a built-in 32 Track Digital Recording System that is similar in function to a
computer-based sequencing system. If that sounds complicated, don’t worry. We have included a
special recording mode called EASY SONG. As the name implies, EASY SONG helps you record great
sounding songs with little effort.
EASY SONG uses Styles to help you create a song with full accompaniment
1. First press Single Touch Play
and select a Style and a Variation
as described in EASY Sheet #4.
4. Press Soft Button ‘F5’ to
select New EASY SONG.
OPTIONAL: If you would like to
adjust the Tempo of the Style,
press the ENTER button to display
the Main Screen and press the
START/STOP button to hear the
Style.
While the Style is playing, use the
TEMPO/DATA dial to adjust the
Tempo to your liking. Then press
START/STOP to end playback and
continue with step 2.
2
2. Press the INTRO and SYNCRO
buttons to activate these features
as described in EASY SHEET #4.
5. Play a note(s) on the left side of
the keyboard and recording will
begin. Play the chord changes with
your left hand and the melody with
your right hand. When you are finished, press the ENDING button to
add an ending to your song.
Finally, press the Stop button to
end the recording.
The Display will look like this
NOTE:
The Style Name
will reflect your
chosen Style.
6. The Song Player screen will be
displayed. Now press the Play
button to hear your song.
3. Press the Record button to display
the RECORDING STUDIO screen.
Congratulations!
You’ve just recorded your first song.
GENERALMUSIC CORP. 1164 Tower Lane Bensenville, IL 60106 phone (630) 766-8230 fax (630) 766-8281 www.Generalmusic.us
Make it EASY Sheets
Genesys Ensemble
EASY
Sheet
6
How To Play Pre-Recorded Songs
Audio Guide
Track 7
The Genesys Ensemble can play a variety of song formats. As an example, you could insert a standard
Audio CD into the CD-R Drive and the songs will playback just like they do on your home stereo. Or, if you
insert a floppy disk of Standard MIDI Files (SMF or .mid) into the Floppy Drive, the Genesys Ensemble can
play these songs. For more information on acceptable file types, please refer to the User Manual.
Let’s play ‘Bye Bye Love’ from the included Genesys Music CD2
1. Insert the ‘Genesys Music CD2’ into the
CD-R drive. To do this press the Eject button
on the lower right of the CD-R drive. The CD
Tray will slide out allowing you to place the
CD, label side up into the tray. Then gently
press the front of the CD tray and it will
retract back into the instrument.
3. Press Soft Button ‘C’ to choose CD
as the source. In other words, we are
telling the Genesys that we want to
play songs off of the CD.
6. To play the song, press the Play
button in the SONG PLAYER/REC
STUDIO section.
4. After choosing CD as the source,
the display will appear as above. Use
the Down Cursor button to select the
Folder named K_EVERLY.
2. Press the SELECT button in the
SONG PLAYER/REC STUDIO section.
5. Press the Right Cursor button
two times and wait for a list of song
names to appear. Then use the
Down Cursor button to select the
song ‘Bye Bye Love’.
NOTE: Songs can be played from
Floppy Disk or the internal Hard
Drive just as easily as from the CD.
Simply choose the correct source
from the Song Player screen as
described in step 3 .
Up to 64 songs can be loaded into
the Genesys Ensemble’s internal
memory for easy recall. Simply
choose RAM (Random Access Memory)
as the source in the Song Player
screen.
Please refer to the Users Manual on how to
load songs into internal memory.
GENERALMUSIC CORP. 1164 Tower Lane Bensenville, IL 60106 phone (630) 766-8230 fax (630) 766-8281 www.Generalmusic.us
Make it EASY Sheets
Genesys Ensemble
How to Display Lyrics and Music Notation
EASY
Sheet
7
Audio Guide
Track 8
The Genesys Ensemble can display lyrics on it’s LCD Display if the song includes lyrics. All of the songs
on the Genesys Music CD2 include lyrics. Many companies who sell Standard MIDI Files include lyrics
within their songs. The Genesys Ensemble can also display music notation of specially prepared songs.
Lyrics and music notation can also be output to a standard television for viewing by a group of people for
sing-along, karaoke parties and other functions.
We’ll use ‘Bye Bye Love’ from EASY Sheet #6 for this exercise
1. Once you have completed steps 1 -5
5 of
EASY Sheet #6 How To Play Pre-Recorded Songs
you will be ready to continue.
2a. To display the Lyrics, press the Lyrics button.
3. Now press the Play button in the
SONG PLAYER/REC STUDIO to hear the
song and see the Lyrics and/or Score.
4. If you would like to view the lyrics or score on a television,
simply plug one end of the included video cable into the TV
jack located in the VIDEO OUT section on the back of the
Genesys Ensemble and plug the other end of the cable into
the Video IN jack on the back of your television. Video IN
jacks are usually coded yellow as in the figure below.
2b. For music notation, press the Score button.
GENERALMUSIC CORP. 1164 Tower Lane Bensenville, IL 60106 phone (630) 766-8230 fax (630) 766-8281 www.Generalmusic.us
Make it EASY Sheets
Genesys Ensemble
Using the Microphone
EASY
Sheet
8
Audio Guide
Track 9
The Genesys Ensemble comes with a professional level microphone that plugs into the mic input of the
instrument which allows you to sing along with pre-recorded songs or your own playing. A second input
is also available for connecting other instruments into the amplification system of the Genesys Ensemble.
As an example, a friend could plug a guitar into the second input and play along with you.
Adjusting the Input Sensitivity (Gain) of the Microphone Input
1. First, make sure that the MIC and GENIUS
volume sliders are in their lowest positions.
2. The microphone input is located on the
back of the instrument. Plug the microphone
cable into the input labeled MIC/L.
3. Once the microphone is plugged in, turn the mic ON by
moving the slider switch located on the mic to the ON position (toward the head of the mic).
4. A one time adjustment needs to be made to the MIC input
so that a proper level is achieved. To set this level, press the
Effects button in the Vocal Genius section.
5. While watching the display and
speaking into the microphone, slowly
rotate the center GAIN knob clockwise.
This adjustment knob is located in the
AUDIO IN section on the back panel of
the Genesys Ensemble.
NOTE: Don’t be alarmed that you don’t hear your voice through the
speakers. You are going to turn the Mic volume up in just a moment.
6. While performing step 5 you will
notice that the VU meter is moving to
the right as you speak. Adjust the
GAIN until the VU meter appears as in
figure 1a. If you turn the GAIN up too
far, the input will peak as in figure 1b
which will result in distortion.
7. Press the EFFECTS button to exit
the current screen. Now press the
ON/OFF button to turn the mic on.
While speaking into the mic, slowly
raise the MIC volume slider until a
comfortable volume is reached.
The microphone is now ready to use. EASY Sheet #9
will show you how to begin having fun using the mic.
GENERALMUSIC CORP. 1164 Tower Lane Bensenville, IL 60106 phone (630) 766-8230 fax (630) 766-8281 www.Generalmusic.us
Make it EASY Sheets
Genesys Ensemble
Singing a Song with Vocal Harmony
EASY
Sheet
9
Audio Guide
Track 10
The Vocal Genius feature of the Genesys Ensemble has the ability to create up to four vocal harmony
parts based on what you sing or even speak into the microphone. The harmony parts can be created
automatically while playing with a style, or ‘on the fly’ harmonies can be accomplished by playing the
desired harmonies in real-time from the keyboard. Also, many of the songs that are included on the
Genesys Music CD2 have built-in harmonies. All you have to do is supply the lead vocal part.
Let’s sing the Everly Brother’s hit ‘Bye Bye Love’
1. Complete steps 1-5
5 of EASY Sheet #6
How to Play Pre-Recorded Songs.
Songs
2. Complete steps 1 and 2a of EASY Sheet #7
How to Display Lyrics and Music Notation.
Notation
3. Complete steps 1-6 of EASY Sheet #8
Using the Microphone.
Microphone
4. Press the Play button in the SONG PLAYER/
REC STUDIO section. You should now hear the
song ‘Bye Bye Love’ start to play.
5. Now it’s time to start having fun. When you
sing into the microphone, you will hear your
voice through the Genesys Ensemble’s speaker
system along with the music.
Playback will stop when the song reaches the
end or by pressing the Stop button in the SONG
PLAYER/REC STUDIO section.
Now let’s add some Harmony
7. Press the HARMONY button
located in the VOCAL GENIUS
section. Harmony is activated
when the red LED within the
button is illuminated.
7. Play the song again, but as you sing this
time, turn up the Vocal Genius Harmony by
raising the GENIUS volume slider and listen to
the authentic Everly Brother’s style harmonies
created by the Vocal Genius.
Some songs actually tell the Vocal Genius to create the proper
pitch for the lead vocal as well as the harmonies. Play this
song again but this time turn the MIC volume all the way down.
Now simply speak the words in time with the song and you will
hear both the lead and harmony vocal parts.
GENERALMUSIC CORP. 1164 Tower Lane Bensenville, IL 60106 phone (630) 766-8230 fax (630) 766-8281 www.Generalmusic.us
Make it EASY Sheets
Genesys Ensemble
Making an Audio Recording
EASY
Sheet
10
Audio Guide
Track 11
The Genesys Ensemble’s internal hard disk drive can function as a Digital Audio Recorder and is surprisingly easy to use. Play live or along with a MIDI file or an Audio CD, even connect another instrument
like a guitar into the LINE input and record the entire performance to the hard drive. The MIC input and
included microphone can be used to record your voice, a brass or woodwind instrument or anything else
that produces sound. Of course, the internal hard disk drive will perform all standard storage functions.
Complete the steps from EASY Sheet’s 6-9 for this exercise
Now that you know how to play songs from the Genesys Music CD2 (EASY Sheet 6), choose a song that you would like to sing (EASY Sheet 8)
and/or play along with. Remember that lyrics can be displayed (EASY Sheet 7) and that a number of songs also include harmony parts for the Vocal
Genius (EASY Sheet 9). For consistency, we will use ‘Bye Bye Love’ in the examples.
1. Press the Record button in the SONG
PLAYER/REC STUDIO section.
4. ‘Record completed’ appears and
you are asked to name your song. Use
the keyboard to type the name at the
blinking cursor, then press the ENTER
button. (use the letters and numbers at the
back of the keys to type the name)
2. Press the ‘C’ Soft
button to select New
Stereo WAVE.
3. After making sure that
the volumes are set to your
liking, press the ‘F1’ Soft
Button to start recording.
When finished press ‘F1’
again to stop recording.
5. Press the ‘G’ Soft Button
to select New Folder and
type a name for the folder
where you will store this
song, then press the
ENTER button two times to
complete the save.
6. Press the Play button to
hear your song from the Wave
Player screen.
GENERALMUSIC CORP. 1164 Tower Lane Bensenville, IL 60106 phone (630) 766-8230 fax (630) 766-8281 www.Generalmusic.us
Make it EASY Sheets
Genesys Ensemble
How To Burn a CD
EASY
Sheet
11
Audio Guide
Track 12
One of the most unique features of the Genesys Ensemble is it’s ability to burn audio and data CD’s. Audio
CD’s created on the Genesys Ensemble can be played back in any standard CD Player. As you will see,
the Genesys Ensemble makes the process quite easy.
Let’s make an Audio CD from the Song recorded by using EASY Sheet #10
A note about recordable CD media. The Genesys Ensemble is compatible with CD-R (recordable) and CD-RW (re-writable) media. However, be aware
that most standard CD players are not capable of reading CD-RW media. It is suggested to use CD-R type media if you intend on playing your CD
in a standard CD player. NOTE: PLEASE INSERT THE BLANK CD-R MEDIA BEFORE STARTING THE FOLLOWING PROCEDURE.
1. Press the MAKE CD button
in the CD STUDIO section.
Note: The Cursor, ENTER and Soft
Buttons will be used in most of the
following steps though they are
not pictured here.
2. Press the Down Cursor
button to highlight CD
Audio. Then press the
ENTER button.
3. Press the Down Cursor
button to highlight WAVE.
4. Use the Right and Down
Cursor buttons to highlight
the folder created in EASY
Sheet #10.
5. Press the Right Cursor
button and you will see your
song appear in the upper
right window.
6. Press the the ‘F1’ Soft
Button to the upper right of
the display to Add the song
to the CD layout. Then press
the ‘F4’ Soft Button to Create
your CD.
7. A screen will appear displaying the current settings
for the CD Burner, DO NOT
CHANGE THESE SETTINGS.
Simply press the ENTER button at this screen and again
at the confirmation screen.
8. The CD Create in progress screen will appear. Once
the burning process is complete, the CD tray will open
and close. Press the CD Eject button and remove your
completed Audio CD.
GENERALMUSIC CORP. 1164 Tower Lane Bensenville, IL 60106 phone (630) 766-8230 fax (630) 766-8281 www.Generalmusic.us