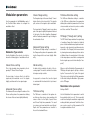
1
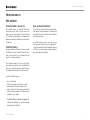
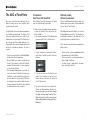
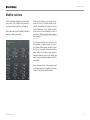
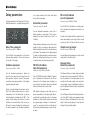
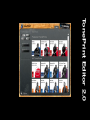
TonePrint Editor 2.0 About this manual 1 New features in this version 2 Welcome! 3 Getting started 4 The ABC of TonePrints 6 Using TonePrint Library 8 Using TonePrint Editor 11 Modifier sections 15 Modulation parameters 16 Delay parameters 19 Reverb parameters 21 Updating TonePrint Editor 23 Frequently asked questions 23 Getting support 23 TonePrint Editor 2.0 TonePrint Editor 2.0a About this manual About this manual This manual will help you learn understanding and operating TonePrint Editor (and all the TC pedals you can control with it). This manual is only available as a PDF download from the TC Electronic website. You can print this manual, but we encourage you to use the PDF version, which has both internal and external hyperlinks. E.g., clicking the TC Electronic logo in the upper left corner of each page will take you to the table of contents. If you want to jump right in, click into an interface section in the illustration to the right to go directly to the corresponding section of this manual. To get the most from this manual, please read it from start to finish, or you may miss important information. To download the most current version of this manual, visit the web page http://www.tcelectronic.com/support/manuals/ The TonePrint Editor interface. Click a section to learn more about it. TonePrint Editor 2.0 TonePrint Editor 2.01 New features in this version New features in this version TonePrint Editor version 2.0 Save and load TonePrints The original version of TonePrint Editor was an instant success. But of course, there is always room for improvement. We have listened to TonePrint fans and added new features that makes working with TonePrints even more intuitive and fun. This is without a doubt the most requested feature. Many users have asked us for a feature that would allow them to save their best TonePrints and reuse them later. TonePrint Library No more hunting for that perfect reverb or delay TonePrint! Access all TonePrints from TC Electronic’s vast archive for your pedal(s) from an easy to use, intuitive interface. So we listened, we coded – and now you can save your own TonePrints on your computer. Access both standard TonePrint templates and up to 100 of your own creations using an intuitive drop-down menu in the Editor. The TonePrint Library is your one stop effects shop, giving you direct access to TonePrints that have been created by top artists, effect aficionados and product specialists all over the world. Use the TonePrint Library to… – – – – browse TonePrints filter by instrument, product type or artist mark personal favorites for quick access watch “making of” videos and read about the ideas and stories behind a TonePrint before sending it to your pedal. ! TonePrint Editor’s Library will update itself over the Internet – no need to manually download new TonePrints! TonePrint Editor 2.0 TonePrint Editor 2.02 Welcome! Welcome! So… what’s in a TonePrint? TonePrint Editor’s resumé What you will need We should probably start by telling you what TonePrint actually means. – Use TonePrint Editor to build your own custom version of renowned TC Effects from scratch. – Enjoy complete control over all effect para meters and effect behavior – it’s your vision, sound. – Customize knob functions and knob ranges to suit your needs and sounds. – Use an intuitive, slider-based interface. –Audition your sonic creations in real-time. Make changes on the fly and listen to results immediately. – Works with both PC and Mac. – Last but not least… –A TonePrint-enabled effects pedal. –An instrument and an amplifier so you can play and listen to your sonic creations. –A computer running Microsoft Windows or Apple’s OS X (i.e., a Mac). – PC requirements: Windows XP (with SP2), Vista, Win 7 or Windows 8 – Mac requirements: An Intel-based Mac running OS X version 10.5 or higher –A USB cable (type A Male to Mini B Male) to connect your computer and your TonePrintenabled TC product. –An Internet connection to download the most current TonePrints to your local TonePrint Library (You can still create and modify TonePrints and use previously downloaded TonePrints without an Internet connection). TonePrint means… signature effects. These are custom-built versions of classic TC effects, available for our TonePrint pedals. But we’re not talking simple presets here – we’re way past that! TonePrints are custom-tuned sounds, built by the best of the best in modern music from the ground up – with every parameter, knob range and effect value up in the air! We have asked the very best guitarists and bass players to give us their personal take on TC effects as they use them live and in the studio, and they have come up with sounds that truly represent their personality, their sonic DNA. TonePrint Editor is absolutely free! TC customers have been able to download, use and enjoy these TonePrints for years. But now it’s time for a new chapter. Now it is your turn to create your very own signature effects. Take a TC pedal, take a TonePrint, take TonePrint Editor – and make it your own. TonePrint Editor 2.0 TonePrint Editor 2.03 Getting started Getting started Ready… Set… TonePrint! If you haven’t already done so, download the latest TonePrint Editor software from: – Set up your TC pedal as you normally would: – Connect your instrument to the audio in jack(s) of the pedal, – connect the audio out jack(s) of the pedal to your amp and – connect the pedal to a power supply. – Make sure you’ve got a basic sound (and a sound level) you’re comfortable with, with the effect bypassed. – Turn the effect on. – Connect your pedal to your computer using a type A Male to Mini B Male USB cable. Please note that you can only connect and control one TonePrint-enabled product at a time, even if your computer has multiple USB ports. – Using its Type Selector, switch your pedal to the TonePrint slot you want to use. – Open TonePrint Editor on your computer. When you open TonePrint Editor on your computer, it will download and cache software updates and TonePrint data and then present you with the Library view. http://tcelectronic.com/toneprint-editor/ TonePrint Editor software is free. Install TonePrint Editor. – To install the PC (Windows) version, simply move the .exe file you downloaded to a location on your hard disk. – To install the Mac (OS X) version, open the .DMG file you downloaded. From the disk image, copy TonePrint Editor.app to your application folder or any other location where you can easily find it. ! Please note that an Internet connection is required for downloading the most current TonePrints. TonePrint Editor – Library view Using the Library is described in the “Using TonePrint Library” section of this manual. TonePrint Editor 2.0 TonePrint Editor 2.04 Getting started – Now click on the “Editor” tab on top of the window. Editor and Library tabs When you have a a TonePrint-enabled TC device connected to your computer, TonePrint Editor should automatically detect that device and show you a graphical representation of its parameters on screen. ! If you see a splash screen saying that you should connect a TonePrint pedal, your pedal has not been detected. Make sure it is powered up and connected to your computer via USB. TonePrint Editor 2.0 TonePrint Editor 2.05 The ABC of TonePrints The ABC of TonePrints Precautions: Don’t lose that TonePrint! Different pedals, different parameters Once your pedal has been detected, you are ready to create your very own TonePrints. Here is how it basically works: When editing TonePrints, there are two things that you should always keep in mind: No two TonePrint-enabled pedals are alike – but different pedal types share certain parameters such as “Speed” and “Depth”. TonePrint Editor exposes the internal parameters of a TonePrint-enabled pedal. The sliders of the editor user interface allow you to create a customized version of a renowned TC effect that you can call your own. From subtle variations to extreme modifications that will fundamentally alter an effect’s character and behavior: The choice is yours! – Use the on-screen sliders of TonePrint Editor to adjust the effect’s parameters. – Every TonePrint you create or modify can be stored to the currently connected TonePrintenabled TC effect pedal or to your computer, so you can recall it later. –The TonePrint Library gives you direct access to the many TonePrints that have been created by your favorite artists and guitar effect aficionados all over the world. Drill down by instrument type, mark TonePrints as favorites and learn more about the stories behind the artists and their sonic creations! 1.When you are done editing, always remember to store your TonePrint. You can store the current TonePrint to… 1.the currently connected TC TonePrint pedal by pressing the “Store to Pedal” button or 2.to your computer by pressing the “Store” button in the TonePrints section of the user interface. With delay and reverb TonePrints, you can also add modulation to the effect. The interface for reverb/delay modulation is the same as for the pedals dedicated to modulation effects. This is why this manual has three parameter-related sections: – The first section covers all modulation-related parameters in TonePrint Editor. – The second section covers all parameters related to delay TonePrints. – The third section is dedicated to all parameters of reverb TonePrints. ! If you do not store your TonePrint to your pedal or the computer, you will lose your creation when you disconnect or power off your TC effect pedal. 2.You can use the knobs on your pedal in real-time, and the parameters will follow onscreen, but whatever you do: Don’t change the Type Selector away from the TonePrint slot, and do not disconnect power while editing without saving your TonePrint first. TonePrint Editor 2.0 TonePrint Editor 2.06 The ABC of TonePrints Multiple TonePrint pedals – one editor to rule them all Pedal serial and software version information Your sound: There’s a template for that! You own more than one TonePrint-enabled pedal? That’s great! Just connect the pedal you want to configure to your computer using a USB cable, and the user interface will update immediately. When a TonePrint-enabled pedal is connected to your computer and you click the small “i” icon in the lower left corner of the TonePrint Editor window, a dialog box will show the following information: We know: Going from a handful of knobs on a pedal to a screen full of sliders can be a bit tricky, and you may be intimidated by the idea of creating a TonePrint from scratch. This is why we have provided you with Template TonePrints. However, please note that no matter how many USB ports your computer has, you can only access one TonePrint-enabled pedal at a time. – – – – These templates allow you to load a base TonePrint and customize it instead of starting with a blank slate. These templates are great for sketching out quick ideas, infusing your own concepts, tweaks and preferences. If you are new to effects and sound design, they will also give you an idea of how a typical effect is set up. You can connect and disconnect pedals to your computer via USB even while TonePrint Editor is running. To edit TonePrints and store a TonePrint to a pedal, the pedal must be connected to a power supply. No power is supplied to the pedal via your computer’s USB port. Device serial number Device firmware build number TonePrint Editor software version number TonePrint Editor software build number. Finally, if you got a bit overexcited and you find that you are stuck with a TonePrint that just doesn’t sound or work as it should, a Template TonePrint can be your get-out-of-jail-free card. TonePrint Editor 2.0 TonePrint Editor 2.07 Using TonePrint Library The TonePrint Library gives you direct access to TC Electronic’s vast TonePrint archive without having to go through the TC website or the TonePrint smartphone apps. This chapter describes how you can use this powerful tool effectively. Selecting the TonePrint Library Using TonePrint Library Using the TonePrint Selector The TonePrint Editor’s Library comes with more than 150 beautiful and exciting TonePrints, and new TonePrints are being added all the time. With so many great effects to choose from, it’s easy to get overwhelmed. This is why the Library’s TonePrint Selector section has several features that allow you to “zoom in” on that perfect TonePrint for your next song. Click the “Library” tab on top of the TonePrint Editor window to access the Library. Click the “Library” tab to access the TonePrint Library – Guitar or bass? Two buttons in the TonePrint Selector allow you to narrow down the selection by instrument. – Chorus, Delay, Reverb, Vibrato? You can narrow down the Library view to the effect type of the currently connected TonePrint pedal. ! If you own a custom TC pedal not listed in the product drop-down menu, see “Finding TonePrints for your custom TC pedal”. – Use the “Select artist” drop-down menu to only show the creations of your favorite guitar hero or bass magician. – The Library allows you to “bookmark” your preferred TonePrints, and clicking the “Favorites” button will narrow down the Library view to these favorite TonePrints. Of course, all these Selectors can be combined, so e.g. showing all Flashback Delay TonePrints created by Dave Stewart will only take two clicks. TonePrint Selector in the TonePrint Editor Library Please note that certain combinations of Selectors may yield no results. In this case, broaden your search by setting one or more Selectors to “All”. TonePrint Editor 2.0 TonePrint Editor 2.08 Using TonePrint Library Sending a TonePrint to your pedal Selecting TonePrints by category Selecting TonePrints by product type Once you have spotted a TonePrint you would like to try in the “Search Results” list, just click its icon, and you will be taken to that TonePrint’s page. This page sports a large and friendly “Send to Pedal” button, which does exactly what it says. Click the buttons in the TonePrint Selector section of the screen to select which TonePrints should be displayed: “All”, “Favorites”, “Guitar” or “Bass”. Right below the four selector buttons, there is a drop-down menu allowing you to select a particular TC Electronic effect pedal type. Once you have made your selection, the “Search Results” part of the TonePrint Library window will show all TonePrints for this effect pedal type. ! Favorites are explained in the Marking TonePrints as favorites section. The “Search Results” part of the TonePrint Library window will immediately reflect your choice. Click this button to send the TonePrint to the currently connected pedal ! If the “Send to Pedal” button is grayed out, no TonePrint-enabled pedal supporting this TonePrint type is currently connected to your computer, or TonePrint Editor wasn’t able to detect the pedal. See “My pedal isn’t detected” To return from a selected TonePrint to the Library view, click the “Back to Search” button in the TonePrint Selector section. Please note that the “Guitar” and “Bass” Selectors refer to the instrument that a particular TonePrint was created for. Accordingly, you might just see this as a recommendation to follow or ignore. One bass player’s tricked-out Vortex Flanger TonePrint may work perfectly for a guitar solo… Finding TonePrints for your custom TC pedal If you own… – an Alter Ego Delay or – a Transition Delay, you will find TonePrints for your pedal by selecting “Flashback” as product type. If you own… – a Trinity Reverb or – an Arena Reverb, you will find your TonePrints by selecting “Hall of Fame Reverb” as product type. If you own a Gravy Chorus, you will find your TonePrints by selecting “Corona Chorus” as product type. TonePrint Editor 2.0 TonePrint Editor 2.09 Using TonePrint Library Selecting TonePrints by artist Marking TonePrints as favorites This menu will allow you to browse the impressive roster of artists who have created TonePrints for TC’s effect pedals. Choices, choices! The larger the TonePrint Library, the harder it is to remember where that fun retro plate reverb or tripped-out delay you used on stage last week came from… ! Please note that selecting an artist in the “Select artist” drop-down menu will reset the “Select product” drop-down menu to “All”, and vice versa. Favorites to the rescue! When you have selected a TonePrint that you would like to keep on the top shelf of your TonePrint Library… just click the large “star” icon. The star icon will turn from gray to gold, indicating this TonePrint is now a favorite. TonePrint marked as Favorite Next time you want to access your favorites, just click the “Favorites” button in the TonePrint Selector, and you will only see TonePrints you have “starred” before. To remove a TonePrint from the Favorites, simply click its star again. TonePrint Editor 2.0 TonePrint Editor 2.010 Using TonePrint Editor Using TonePrint Editor Load, Store and the TonePrints drop-down menu Storing TonePrints on your computer The TonePrint Editor allows you to create your own TonePrints and store them either in the currently connected TonePrint-enabled pedal or on your computer. When you have created a TonePrint or modified an existing TonePrint as described on the following pages of this manual, you will probably want to save your masterpiece. When storing TonePrints on your computer, you don’t need to fiddle with dialog boxes and the folders on your hard disk: Your TonePrints are stored at the bottom of the TonePrints dropdown menu, so they are easily accessible. To save the current TonePrint to your computer, press the “Store” button in the TonePrints section. The “Store your TonePrint” dialog Either select the name of an existing User TonePrint from the list to overwrite it or enter a new name, then click the “Store” button. The “Store” button in the TonePrints section of the TonePrint Editor A dialog box will allow you to select either an existing User TonePrint to overwrite or store your creation under a new name. User TonePrints in the TonePrints drop-down menu You can store and access up to 100 TonePrints in the User TonePrints part of the TonePrints drop-down menu. Storing a TonePrint as a new entry TonePrint Editor 2.0 TonePrint Editor 2.011 Using TonePrint Editor TonePrint Templates Returning to template defaults Router section As described earlier, TonePrint Templates are a great way of starting your personal sound creation, as they give you time-proven defaults for all parameters. If you find that you have reached a dead end when editing, you can simply click the “Load” button next to the TonePrints drop-down menu to reset the currently selected template to its default values. This will reset all knob assignments, modifier curves and parameter values to the defaults stored in this template. Kill Dry parameter To recall a template, select it from the “Templates” section of the drop-down menu in the “TonePrints” section of the editor. Please note that selecting a template will immediately override all changes you might have made to knob assignments, modifier curves and parameter values. Settings: Off/On Use the Kill Dry parameter to define wether your instrument’s dry, unprocessed signal should pass through the pedal. Setting Kill Dry to On will mute the dry signal of your instrument. This is especially useful for reverse delay effects and vibrato effects – but you may find other, creative uses for this parameter. The “Templates” section of the TonePrint drop-down TonePrint Editor 2.0 TonePrint Editor 2.012 Using TonePrint Editor Knob Selection section Assigning parameters to a knob In the knob selection section, you can assign different functions to your pedal’s knobs, so they control exactly what you want them to control. – Start by selecting a knob in the Knob Selection section. The selected knob will be highlighted. – Select one of the three yellow, red and blue “LEDs”. The selected LED will be highlighted. – Select a parameter you want to control from the drop-down menu to the left of the LED. But there’s more here than simple 1:1 assignments! You can assign two or even three functions to one knob, allowing you to change multiple parameters by using just one control. This allows for very efficient control and dramatic changes, if this is what you want to achieve. Knob Selection section of the TonePrint Editor for Hall of Fame Mini Reverb. This pedal has only one knob, which can still control up to three parameters. Finally, you can scale and limit the way a knob controls a parameter you have assigned to it using the Modifier display. Knob Selection section of the TonePrint Editor for a Flashback Delay. Select a knob by clicking it, then select parameters from the three drop-down menus to define the parameters this knob should control. Let’s say that a parameter that you want to control has a range from 0 to 100 %. Turning the respective knob to the minimum position will set the parameter to 0 %, and the maximum position represents 100 %. But what if the “sweet spot” lies between 25 and 50 %? With TonePrint Editor, you decide what parameter range you want to control, and how the knob’s position should affect it. If you want to, you can even use the knob range left of the center position to go from 0 to 100 % – and then back to 25 % when turning the knob all the way clockwise. – Turn the knob to see its current position highlighted in the graphical “Peak Performance” interface. As you can see, you can assign up to three parameters to a knob. The currently selected parameter will be highlighted in the display, with the other parameters still visible in the background. Scaling the selected parameter is described in the next section of this manual. TonePrint Editor 2.0 TonePrint Editor 2.013 Using TonePrint Editor Modifier display In the upper left part of the TonePrint Editor window is small graphical interface where effect values assigned to the currently selected knob are represented by “peaks” and “valleys”. This display is your key to understanding and controlling the way your pedal’s knobs control effect parameters. To modify the curve, you can either drag one of the circle-shaped control points of the modifier curve, or you can select one of the numerical values shown right below the display and enter the desired value manually. As you can set the modifier curve separately for each of the three parameters that each knob can control, you could make a knob on your pedal increase one parameter’s value as you turn it clockwise while decreasing another parameter’s value at the same time. Before you can define the relationship between knob positions and parameter values, you have to select the parameter in the Knob Selection section. Once you have selected a parameter, the modifier curve for that parameter will be shown in the Modifier display. By default, this is a straight line from the parameter’s lowest value in the lower left corner to the maximum value in the upper right corner. We suggest playing your instrument and turning the currently selected knob to get a better understanding of the way that knobs and modifier curves interact. TonePrint Editor 2.0 TonePrint Editor 2.014 Modifier sections Modifier sections Use the parameters displayed in the right-handside section of the TonePrint Editor window to set the parameters that define your TonePrint. This is the heart of your TonePrint – the place where you define your sound. Please note that what you are seeing here depends on the type of TonePrint pedal connected. With a modulation-only pedal, you will only see the “Modulation” section. Reverb and delay pedals will also show a Modulation section, as described in “Different pedals, different parameters” (page 6). If you have worked with effect processors (either hardware or software) before, this part of the TonePrint Editor window should look familiar. This is an elegant, slider-based interface with a “what you see is what you get” approach: Change a parameter, and both the display and what you are hearing will immediately reflect the new setting. In the following sections of this manual, we will present and explain the parameters of the three sections: Delay, Reverb, and Modulation. TonePrint Editor 2.0 TonePrint Editor 2.015 Modulation parameters Use the parameters in the Modulation part of the TonePrint Editor window to configure the modulation effect. Modulation parameters Classic Flanger setting TriChorus Alternative setting The flanger belongs to the same “family” of modulation effects as the chorus effect. The signal is split, and one of the signals is pitch modulated. The TriChorus Alternative setting is a variation of the TriChorus setting where the parameters defining the modulation parameters of the three chorus modules are tuned to produce a wilder and “less controlled” Chorus effect. The characteristic “flanging” sound occurs when part of the signal is slightly delayed and fed back to the input of the effect algorithm. Experiment with the Feedback parameter to get a feeling for the achievable effects. Advanced Flanger setting Use the Modulation Type selector to select between the following types of modulation effects: The Advanced Flanger setting is a variation of the Flanger setting where the parameters defining the flanger effect are tuned slightly differently. Classic Chorus setting Vibrato setting This is the standard chorus inspired by the le gendary TC Stereo Chorus Flanger. A vibrato effect modulates the pitch of the incoming signal. The result is similar to the vibrato technique used by vocalists. Modulation Type selector The basic idea of a chorus effect is to split the signal and pitch-modulate one of the signals slightly, and then mix the two signals again. Advanced Chorus setting The Advanced Chorus setting is a variation of the Chorus setting where the parameters defining the chorus effect are tuned slightly differently. As opposed to a chorus effect, no direct signal is combined with the vibrato effect’s pitch-modulated signal. TriChorus setting The TriChorus is a variation of the regular chorus that uses three stereo chorus modules with various offsets for the Depth, Speed, Phase and Chorus Delay time parameters. The result is a unique, very broad and lush sound. Speed, Depth and Time parameters are identical to those in the standard Chorus. TZFlanger (“Through zero”) setting The TZF Mode Flanger emulates the original way of creating a flange effect where two identical pieces of audio material were played back simultaneously on two tape decks and then mixed on a third deck. The “flanging” effect was achieved by slowing down and speeding up the two decks at different times. An essential part of this setup is the unique phase cancellation occurring when the two signals pass each other in time (the “zero point”). When you set the Modulation Type parameter to TZFlanger, the input signal is split up so that delay line 1 becomes the “dry” part of the signal. This is why you should set the Kill dry parameter to On when setting the Modulation Type parameter to TZFlanger. Modulation Active parameter Settings: On/Off Use the Modulation Active parameter to switch the modulation effect on or off. This is especially useful for activating the modulation engine when working with delay and reverb TonePrints. However, you also need to set this parameter to On for regular modulation effects. TonePrint Editor 2.0 TonePrint Editor 2.016 Through-Zero-Flanger parameter Parameter range: 0 to 1023 When you set the Modulation Type parameter to TZFlanger, delay line 1 becomes the “dry” part of the signal. In that case, use the Through-ZeroFlanger parameter to set the level ratio between delay line 1 and delay line 2. Speed parameter Parameter range: 61.5 mHz (Millihertz) to 20 Hz Use the Speed parameter to set the speed of the chosen modulation effect. As setting of 1 Hz means that one modulation cycle takes one se cond. Depth 1 parameter Parameter range: 0 to 100 % Modulation parameters TZFlanger mode, the Depth 2 parameter specifies the intensity of the second flange module. Output Level parameter The value represents the amplitude of the second waveform modulating the signal. Use the Output Level parameter to set the overall output level for the modulation effect. Depth 3 parameter Delay Time 1 parameter Parameter range: 0 to 100 % Parameter range: 0.1 to 50 ms The Depth 3 parameter is only applicable when you have set Modulation Type to TriChorus. As described earlier, a chorus or flanger is basically a delay being modulated by an LFO. Use the Delay Time 1 parameter to change the length of that delay. A typical chorus uses delay times around 10 ms, while a flanger uses delays around 5 ms. In TriChorus mode, the Depth 3 parameter specifies the intensity of the third chorus module. The value represents the amplitude of the third waveform modulating the signal. HiCut parameter Parameter range: 20 Hz to 20 kHz Use the Depth 1 parameter to specify the intensity of the effect. The value represents the amplitude of the waveform modulating the signal. Parameter range: -100 to 0 dB Although this is not how a chorus is normally used, you may enjoy the “slap-back” sound resulting from longer Delay Time values in the 30 to 50 ms range. Delay Time 2 parameter When you have set Modulation Type to TZFlanger, you should set the Depth 1 parameter to a value lower than Depth 2. Use the HiCut parameter to reduce the high-end frequencies in the modulation effect. Try using this parameter if you feel the effect is too dominant in your sound and turning down the Mix or Output Level parameters doesn’t attenuate the effect as intended. Depth 2 parameter Mix parameter Parameter range: 0 to 100 % Parameter range: 0 to 100 % In TriChorus mode, the Delay Time 2 parameter specifies the length of the delay for the second chorus module. The Depth 2 parameter is only applicable when you have set Modulation Type to TriChorus or TZFlanger. Use the Mix parameter to set the relationship between the level of the dry signal and the level of the modulation effect. If you have set Kill dry in the Router section to On, this parameter has no effect. In TZFlanger mode, the Delay Time 2 parameter specifies the length of the delay for the second flange module. In TriChorus mode, the Depth 2 parameter specifies the intensity of the second chorus module. In Parameter range: 0.1 to 50 ms The Delay Time 2 parameter is only applicable when you have set Modulation Type to TriChorus or TZFlanger. TonePrint Editor 2.0 TonePrint Editor 2.017 Delay Time 3 parameter Parameter range: 0.1 to 50 ms Modulation parameters Vib. Ramp Time parameter (Shaker Vibrato only) Parameter range: 1 to 5000 ms The Delay Time 3 parameter is only applicable when you have set Modulation Type to TriChorus. In TriChorus mode, the Delay Time 3 parameter specifies the length of the delay for the third chorus module. Feedback parameter Parameter range: -100 to 100 % The Vib(rato) Ramp Time parameter is only available and editable when a Shaker Vibrato pedal is connected. The Vibrato Ramp effect is a subtype of the vibrato effect where the effect is latched – i.e., the effect will only be applied when you press and hold the pedal’s footswitch. The Vibrato Ramp Time parameter sets the time that is required for the vibrato effect to build up. Use the feedback parameter to define the amount of the signal that is fed back from the modulation module’s output to its input. Experiment with the Feedback parameter to get a feeling for the effects you can achieve. Feedback HiCut parameter Parameter range: 20 Hz to 20 kHz Use the Feedback HiCut parameter to attenuate the high-end frequencies of the resonance created with the Feedback parameter. TonePrint Editor 2.0 TonePrint Editor 2.018 Delay parameters Use the parameters in the Delay part of the TonePrint Editor window to configure the delay effect. Delay parameters or by simply turning off the effect until things have settled down again. Saturation parameter Parameter range: 0 to 24 dB Use the Saturation parameter to add a bit of signal saturation to your delays. This is recommended if you want to add a touch of “grit” to a TonePrint. Delay Time parameter Parameter range: 0 to 7000 ms Use the Delay Time parameter to set the time between delay repetitions. This is also known as the “length” of the delay. Feedback parameter Parameter range: 0 to 120 % Using saturation will bring you closer to the sonic qualities of old school analog or tape delay units with the slight distortion that occurs when driven a bit harder. The saturation of the delayed signal is similar to playing through a cranked-up amp. Hitting the strings harder will give you a more overdriven delay sound than playing softly. FB HiCut (Feedback High-Cut) parameter FB LoCut (Feedback Low-Cut) parameter Parameter range: 20 Hz to 20 kHz Use the FB LoCut (Feedback Low-Cut) parameter to attenuate the frequencies below the set frequency. As with the Feedback High-Cut parameter, the delays may blend in more nicely with the overall sound if you “thin out” the effect at the low end. Output Level parameter Parameter range: -100 to 0 dB Use the Output Level parameter to set the overall output level for the delay effect. Dynamic Delay Sensitivity parameter Parameter range: -50 to 0 dB Parameter range: 20 Hz to 20 kHz Use the Feedback parameter to define the amount of the signal that is fed back from the delay module’s output to its input. This parameter defines how many repetitions of the original signal the delay will create. Please use high settings with extreme caution. Due to the Spillover feature, there is no way to immediately cut off the delay when you get an internal feedback at settings above 100 %. This means that the delays will increase in volume until there is severe distortion. If this occurs, you will need to reduce feedback by turning down the knob assigned to the Feedback parameter, Use the FB HiCut (Feedback High-Cut) parameter to attenuate the frequencies over the set frequency for the delayed signal, resulting in a more “analog” sound that in many cases that will blend in better with the overall sound. With digital technology, every delay can be a precise reproduction of the input signal. But especially with long delay times, this is not always desirable, as these pristine delays may disturb the original signal, resulting in a “washed-out” sound. To compensate for this, use the high-cut filter, thereby emulating analog or tape style delay units. The Dynamic Delay is a feature that was initially introduced in the well-recognized TC 2290. It allows the dynamics of the input signal’s level to actively alter the delay output level, leaving the source signal clear and undisturbed while you play. The Dynamic Delay delicately complements your performance. Use the Dynamic Delay Sensitivity parameter to set a “level limit”. If what you are playing is louder than this setting, it will dampen the level of the delay. If what you are playing is softer than this setting, the delay will be audible. TonePrint Editor 2.0 TonePrint Editor 2.019 Delay parameters You will notice that dynamic delays work great with almost every kind of delay – from analog tape echoes to pristine 2290 sounds. Damping parameter Parameter range: 0 to 100 dB Use the damping parameter to set the amount of attenuation that should occur when the input signal is higher than the level limit you have set with the Dynamic Delay Sensitivity parameter. Release Time parameter Parameter range: 20 to 1000 ms Use the Release Time parameter to set how fast the attenuation of the delay repetitions is released once the input signal falls below the limit you have set with the Dynamic Delay Sensitivity parameter. Reverse Delay Time parameter Parameter range: 50 to 7000 ms Originally, reverse delay effects were created by recording a signal on tape, then flipping (reversing) the tape and playing it backwards. Use the Reverse Delay Time parameter to emulate this reverse tape delay effect. This parameter defines how long a signal is being recorded before the virtual tape is “flipped over” and played back. TonePrint Editor 2.0 TonePrint Editor 2.020 Reverb parameters Use the parameters in the Reverb section of the TonePrint Editor window to configure the reverb effect. Reverb parameters PreDelayLong parameter HiFactor parameter Parameter range: 0 to 100 ms Parameter range: -25 to 25 The PreDelayLong parameter is only applicable when the Pre-Delay switch on the pedal has been set to the “Long” setting. Use the HiFactor parameter to emphasize or attenuate the selected HiColor value. Use the PreDelayLong parameter to define a short Delay placed between the direct signal and the Reverb’s diffuse field. Use the PreDelayLong parameter to keep the source material clear and undisturbed from the scattered diffuse field of the Reverb arriving shortly after. Use the Mod On/Off parameter to switch modulation of the reverb signal on or off. Diffuse parameter Decay parameter Parameter range: 0.01 to 20 s Use the Decay parameter to set the decay time of the Reverb in seconds. The decay time is usually associated with the time it takes the diffuse field of a reverb to decay to -60 dB. PreDelayShort parameter Parameter range: 0 to 100 ms The PreDelayShort parameter is only applicable when the Pre-Delay switch on the pedal has been set to the “Short” setting. Use the PreDelayShort parameter to define a short delay placed between the direct signal and the Reverb’s diffuse field. Use the PreDelayShort parameter to keep the source material clear and undisturbed from the scattered diffuse field of the Reverb arriving shortly after. Parameter range: -50 to 50 Use the Diffuse parameter to fine-tune the density of the reverb’s diffuse field. It allows you to reduce flutter in the diffuse field to an absolute minimum. LoColor parameter Mod On/Off parameter The algorithm designers at TC have adjusted the diffuse field part of the reverb to be as smooth and natural sounding as possible. Adding in modulation to the reverb tail allows for interesting effects that can be refined using the Modulation Rate and Modulation Depth parameters. Modulation Rate parameter Parameter range: -25 to 25 Use the Modulation Rate parameter to offset the speed of the LFO that is being used to modulate the Reverb. Parameter range: -50 to 50 Use the LoColor parameter to adjust the low frequency spectrum of the output signal. This can be used for altering the overall color of the reverb. HiColor parameter This parameter only has an effect when you have set the Mod On/Off switch to On. Modulation Depth parameter Parameter range: -25 to 25 Parameter range: -50 to 50 Use the Modulation Depth parameter to offset the intensity of the modulation that is applied to the reverb. Use the HiColor parameter to adjust the high frequency spectrum of the output signal. This can be used for altering the overall color of the reverb. This parameter only has an effect when you have set the Mod On/Off switch to On. TonePrint Editor 2.0 TonePrint Editor 2.021 Early parameter Parameter range: -24.5 to 0.0 dB Use the Early parameter to set the output level of the “early reflections” part of the reverb algorithm. – Increase the Early parameter’s value to emphasize the definition of the simulated room. – Decrease the Early parameter’s value to set focus on the diffuse part of the algorithm. When Early is set to a low value, the reverb effect will mainly consist of the reverb “tail”. Reverb parameter Parameter range: -24.5 to 0 dB Use the Reverb parameter to set the Output level of the diffuse field part of the reverb algorithm. Decrease the Reverb parameter’s value to emphasize the early reflections and thereby the definition of the simulated room. Dynamix Mode switch Reverb parameters that will help control the reverb level in two different modes – Positive and Inverse. Off setting Disables the Dynamix Mode and gives you a regular Reverb setting as you know it. Positive mode When you set the Dynamix Mode switch to Positive and the level of the input signal exceeds the Dynamix Threshold limit, the reverb will be dampened. If the input signal falls below the Dynamix Threshold limit, the reverb will return. Inverse mode When you set the Dynamix Mode switch to Inverse and the level of the input signal exceeds the Dynamix Threshold limit, the reverb will be audible. If the input signal falls below the Dynamix Threshold limit, the reverb will be dampened. Dynamix Threshold parameter Parameter range: -50 to 0 dB Parameter settings: Off / Positive / Inverse Dynamix is a unique feature inherited from the legendary TC 2290 delay. Dynamix allows you to control the level of the reverb via the dynamics of the input signal. This creates a very vivid effect that interacts with your style of playing and choice of dynamics. This parameter is only applicable when Dynamix Mode is set to Positive or Inverse. The Dynamix Threshold acts as a “level limit”. When the threshold is crossed, the reverb will either appear or dampen in accordance with the following parameters: Dynamix Mode, Dynamix Damp, Dynamix Attack and Dynamix Release. Dynamix Damp parameter Parameter range: -60 to 0 dB This parameter is only applicable when Dynamix Mode is set to Positive or Inverse. Use the Dynamix Damp parameter to set the attenuation that will be applied to the reverb when the input signal rises above (Positive mode) or falls below (Inverse mode) the Dynamix Threshold setting. Dynamix Attack parameter Parameter range: 0 to 1.000 s This parameter is only applicable when Dynamix Mode is set to Positive or Inverse. Use the Dynamix Attack parameter to set the attack time (the build-up phase) of the Reverb Envelope. Dynamix Release parameter Parameter range: 0 to 1.000 s This parameter is only applicable when Dynamix Mode is set to Positive or Inverse. Use the Dynamix Release parameter to set the release time (the decay) of the Reverb Envelope. The most gated and unnatural effects are obtained using short Release settings. For a typical eighties-style sound, Dynamix Release should be set between 0 and 100 ms. Using the Dynamix Threshold parameter (see below), you can set a “level limit” for your input TonePrint Editor 2.0 TonePrint Editor 2.022 Updating TonePrint Editor If you download a newer version of TonePrint Editor for OS X or Windows, you can simply replace the previously installed version. Frequently asked questions “My pedal isn’t shown under ‘Select product’ in the Library” See “Finding TonePrints for your custom TC pedal”. The ‘Send to Pedal’ button for the selected TonePrint is disabled If the “Send to Pedal” button is disabled (grayed out), no TonePrint-enabled pedal supporting this TonePrint type is currently connected to your computer, or TonePrint Editor wasn’t able to detect the pedal. See “My pedal isn’t detected”. Getting support Getting support “My pedal isn’t detected” Sometimes, a TonePrint pedal connected to your computer may not be detected. Clicking the Editor tab will only show a screen asking you to connect a TonePrint pedal. If you still have questions about the product after reading this manual, please get in touch with TC Support: In that case, please try the following steps: http://www.tcelectronic.com/support/ – Make sure you have the most current version of TonePrint Editor. ! All TonePrint pedals are supported by the same software – there is no need to download or keep several versions of TonePrint Editor for your TonePrint-enabled pedals. – Make sure your TonePrint pedal’s style selector is set to “TonePrint”. – Press the pedal’s footswitch. – Power the pedal off and on again. –Disconnect and reconnect the USB cable from your computer to your TonePrint pedal. Try another cable. – Quit and restart TonePrint Editor. –Check if there is a newer version for your TonePrint pedal’s firmware (the built-in software of the pedal). You will find firmware updates on the “Support” page for your pedal on the TC Electronic website. TonePrint Editor 2.0 TonePrint Editor 2.023 Getting support TonePrint Editor 2.0 TonePrint Editor 2.024