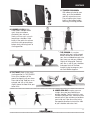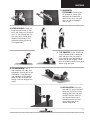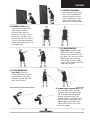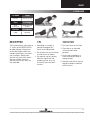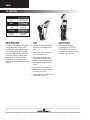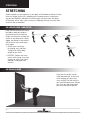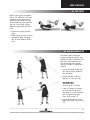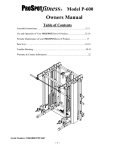
1
Exercise Anywhere. Anytime.
Copyright © 2010 by Ari Zandman-Zeman
All rights reserved. Except as permitted under the U.S. Copyright Act of 1976, no part of this publication
may be reproduced, distributed, or transmitted in any form or by any means, without the prior written
permission of Rubberbanditz, LLC.
Printed in the USA
Table of Contents
Glossary................................................................................................................... 3-7
General Tips.................................................................................................................8
Beginner Routines................................................................................................. 10-13
Intermediate Routines........................................................................................... 14-17
Advanced Routines............................................................................................... 18-21
Chest................................................................................................................... 25-28
Biceps.................................................................................................................. 29-32
Back................................................................................................................... 33-36
Triceps................................................................................................................. 37-42
Shoulders............................................................................................................. 43-47
Legs................................................................................................................... 48-53
Stretching............................................................................................................. 54-56
Core Strength....................................................................................................... 57-63
2
glossary
GLOSSARY
The following terms will help you decipher how to perform the exercises in the manual. If you find
that you still have uncertainties after reviewing this glossary, please feel free to contact us on our
website at www.rubberbanditz.com or by email at [email protected].
General Terms
WRAP: To secure the
middle of a band in
place by doubling it
around an object. Try
to position the ends
of the band as close
together as possible
to prevent them from
slipping.
STABILIZE: To secure
one end of a band in
place by inserting an
object through to limit
that side’s mobility.
FASTEN: To secure one
end of a band in place
by circling the band
around an object and
then pulling one end
through the other.
LOOP: To circle the
band around an object
for the purpose of
raising the resistance by
shortening the band’s
exposed length.
WIDE GRIP: Spacing
your hands far apart
when performing an
exercise.
NARROW GRIP:
Spacing your hands
close together when
performing an exercise.
UNDERHAND GRIP:
Grasping the BAR/
STICK, handgrips, or
band with your palms
facing up.
OVERHAND GRIP:
Grasping the BAR/
STICK, handgrips, or
band with your palms
facing down.
3
glossary
Accessories
HAND GRIPS: Clip in and
attach to band via carabiner.
ANKLE GRIPS: Clip in and
attach to band via carabiner.
HAND STRAPS: Join ends together around band(s) with Velcro strip. Use to prevent irritation
between skin and band.
DOOR STRAP: Open door and insert strap between door and frame. Then, close door and wrap or
fasten band through strap. Adjust position anywhere between door and frame.
NOTE: Door strap is not recommended for use below doors, on hollow doors and where there is a wide gap
between door and frame.
4
glossary
Fitness Terms
REPETITIONS (REPS): The completion of one full motion called for by a
particular exercise.
SET: The amount of reps you do at one given time before resting.
LIFT: The specific exercise you perform. Examples of lifts are: FLAT BENCH PRESS, SQUAT,
MILITARY PRESS. This term is used interchangeable with ¨exercise¨.
ROUTINE: The group of exercises you perform in one workout.
BAR/STICK: This can be anything that is straight and narrow enough to wrap your hands
around. The material doesn´t matter as long as the weight of the item does not impede
your ability to easily lift it. Examples may include, but are not limited to: broom or mop
stick, tree branch, metal shaft, or a pole.
HANDGRIPS: Cushioned attachments for the bands available for a more comfortable grip.
ENDS: The part of the band that is convenient to grasp or insert an attachment to when
the band is doubled over (we do recognize that circular bands have no true ends).
GRASP: A generic term meaning to, ¨hold the bar, handgrip, or band ends in your hand.¨
ANCHOR POINT (A.P.): The exact location where you wrap, stabilize, fasten, or loop
a band to a fixed object. Adjusting the anchor point will normally result in a change of
resistance: the further you are from the A.P., the higher the resistance, while the closer
you are to the A.P., the lower the resistance.
POST: This is a very broad term that encompasses anything you could attach a band to for
the purpose of creating resistance on the opposite end. Examples may include, but are not
limited to: your feet, back, a tree, bedpost, pillar, support beam, or your door strap. How
and where you attach a band to a post is what determines your anchor point.
FRONT POST: A post located in front of you when performing a lift.
REAR POST: A post located behind you when performing a lift.
OVERHEAD POST: A post located anywhere above your head when
performing a lift.
SIDE/LATERAL POST: A post located at your side.
HOLDS: The option of wide, narrow, overhand, or underhand grips you can choose
to use for any given exercise.
MUSCLE FATIGUE (Also: failure, exhaustion): The point in the set where you
can’t lift an additional repetition without cheating. Upon reaching your point of
exhaustion, you can always try and muster out partial reps, which are less than full
range-of-motion repetitions.
HIGH-INTENSITY TRAINING: An exercise philosophy we advocate that suggests exerting
yourself by performing as many repetitions as you can until you reach failure in each set.
5
glossary
NEGATIVES: A controlled muscle resistance that involves fighting the regression portion
of the exercise. In contrast to conventional repetitions, which normally begin at the easiest
point before peaking (concentric movement) and then returning back to the easiest point
(eccentric movement), negatives begin at the peak of the repetition (after the concentric
movement) and slowly resist the retreat back to starting position (isometric movement).
It has been suggested that this portion of the exercise stimulates the most muscle and is
therefore responsible for the greatest growth.
STATIC ISOMETRIC CONTRACTION TRAINING: Instead of performing a complete
repetition, hold your rep at the point of maximum resistance until your muscles fatigue.
These extended reps can be performed once or multiple times to make up a set. The
difference between this and negatives, is that with static contraction you are holding the
resistance in one place, where as with negatives you are slowly retreating back to
starting position.
DROP SET: A double set where you complete a full set, and then immediately lower the
resistance to do a second “drop set” of the same lift to further exhaust your muscles.
SUPERSET: Doing two different lifts for two different muscle groups back-to-back.
For example, doing one set of a chest lift, and then immediately doing a set of bicep
exercises before resting. While you are working out one muscle, the other muscle has
time to rest and recover. This will keep up your workout intensity, speed up your workout,
and leave your muscles exhausted afterwards. This is great for the split routines and
circuit training routines.
STAGGERED SETS: Sets of a non-related exercise or activity infused into your workout
routine. Staggered sets can be anything you want to include in your workout such as:
push-ups, pull-ups, stretching, yoga, core exercises, or homework.
An additional bonus of working out with exercise bands is that you can spread out your
workout over the course of a few hours if necessary. Short doses of exercise can be
rewarding anytime, even if done intermittently between chapters, commercials, meetings,
or traffic lights. Stagger exercise into life! Please note that ACSM advocates working out
for at least 25 minutes for a true benefit.
COMPOUND EXERCISE: An exercise that requires more than one joint movement at a
time to perform the lift. These exercises work various muscle groups at the same time
and should be done often for strength development. In contrast, lifts that concentrate on
one muscle group at a time are known as isolation exercises. Examples of compound
exercises include: BENCH PRESS, PUSH-UPS, PULLDOWNS, ROWS, DIPS, MILITARY
PRESS, SQUATS, LUNGES, and DEADLIFTS.
MUSCLE CONFUSION: Continuously modifying your routines to prevent muscles plateaus
(making minimal gains). Altering your routines periodically is very important. In addition
to selecting different exercises, you can also modify the resistance and perform more
or less reps accordingly. Integrating negatives, static contraction training, drop sets, and
supersets are great ways to vary your workout.
6
glossary
RESISTANCE TUTORIAL
WHICH BAND TO USE
There are no clear-cut rules for how to manipulate your bands or which bands you should be
using. Your selection should be based on your personal workout goals. For trimming down
and muscle toning, a lighter resistance with higher repetitions will probably serve you best. If
your goal is to build muscle mass, try using a higher resistance and doing fewer repetitions.
With any resistance level you choose, do as many repetitions as you can until muscle fatigue
during each set.
RAISING AND LOWERING RESISTANCE
Towards the beginning, you may find it frustrating as you try to figure out how to position
the bands and yourself in a way that is both comfortable and provides the right amount
of resistance. Don’t get frustrated, with experience comes the ease of resistance
maneuverability. There are several ways to adjust the resistance in order to meet your
personal needs:
1.DISTANCE FROM ANCHOR POINT
As a rule of thumb, the farther you position yourself from the anchor point, the more
resistance you will impose on the bands. The closer you position yourself, the less
resistance you will impose on the bands.
2.INTERLOCK AT MIDPOINT
If you find that your post is too thick or high for your intended use, you can easily link two
bands together by crossing them at their midpoints, so that you are left with a new anchor
point and a lower overall resistance.
3.LOOPING
Another option to raise the band’s resistance is to reduce the band´s length. Try looping
the band around your foot, bar, or post to shorten the length of the band.
4.DOUBLING UP
If using one band provides you with a comfortable range of motion but is obviously too
easy, add another band.
5.FASTENING OPTIONS: These allow subtle resistance modifications.
• FASTENED INSIDE: When the band is fastened around a post so that the free hanging
end of the band is positioned on the side of the post closest to your body.
• FASTENED OUTSIDE: When the band is fastened around a post so that the free hanging
end of the band is positioned on the side of the post farthest from your body.
6.ATTACHMENTS
You always have different alternatives to choose from in how you perform each exercise.
Grip attachments will change the feel of each lift. Inserting a bar will balance the
resistance on both hands and looping the band around the bar will increase the resistance
of the lift. Handgrips and ankle straps will alleviate tension on your hands and feet
while lengthening your distance from the anchor point, effectively lowering the overall
resistance. The door strap can be used to perform virtually any workout with most doors.
7
general tips
GENERAL TIPS
tempo Example
• Start with a low resistance to acquaint yourself with the exercise
and allow for adequate adaptation.
BENCH PRESS - Beginner
Routine - tempo: 3-2-4
• Begin each set with the bands lightly stretched, providing minimal
resistance. In order to maintain constant resistance for an optimal
workout, do not release any repetition past this point of minimal
resistance until your set is complete.
3) You should slowly count
to three while pushing
arms from starting position
to the point of maximum
resistance.
• Don’t completely lock out your joints to prevent unnecessary strain or
pressure.
• Try to keep your body still with your abdominal muscles and restrict
all movement to the target muscle group during an exercise.
• Keep your wrists straight to avoid placing tension in the wrong
areas.
To verify that your wrists remain straight, you shouldn’t see any
wrinkles
on your wrists from bending your hand.
• Keep your weight centered over your feet and your head centered
over your shoulders. Monitor yourself to verify that you are never
leaning too far over your feet.
• Adjusting the anchor point height will shift the resistance.
• Always try to add at least one more repetition (with good form) or
a little more resistance to continually challenge yourself. Prove to
yourself that
you are getting stronger!
• Pay close attention to your tempo to control your workout time
and encourage proper form. Your tempo will greatly affect your rep
count
and your workout intensity.
• If at any point during your workout you begin to feel fatigued, dizzy,
or have physical discomfort, you should stop immediately and
consult a physician. Individuals with a preexisting health
complication
or injury should consult a physician and/or physical therapist before
using our bands.
8
2) Hold for a two count
at the point of maximum
resistance.
4) Count to four while
slowly returning back to
starting position.
* For a shorter workout you
can increase your tempo
to exhaust your muscles
quicker and lower your rep
count.
routines
WHOLE BODY WORKOUT ROUTINES:
This section is designed to guide you through total body strength
training routines. The objective is to familiarize yourself with the bands
while slowly toning and strengthening all of your primary muscles
during each routine. The Beginner Routines should be used as a
starting point and an introduction to this type of resistance training.
You will know when you are ready to progress to the Intermediate
Routines after the first 3-6 weeks, when you can keep your body
balanced and aligned during each exercise. This includes: keeping
your back straight, your shoulders back, and your knees slightly
bent. Protecting your joints and perfecting your form are essential for
properly strengthening your muscles.
Continue on to the Advanced Routines once you are comfortable
with all the Intermediate Routines and can feel the burn in the target
muscles that you are exercising. Your body will naturally want to take
the path of least resistance by trying to allow other muscles outside of
the target muscle group to help compensate. Your job is to focus on
the target muscle group of an exercise and channel the resistance to
that area only.
During the Advanced Routines, work one arm or one leg at a time to
further isolate specific muscles and enhance your body’s stability.
9
routines
BEGINNER WHOLE BODY WORKOUT #1
2 SETS / 15-25 REPS
2-3 TIMES PER WEEK
FOR 3-6 WEEKS
TEMPO: 3-2-3
-If you do 20 reps and don’t
feel fatigued, its too light.
NOTE: Please refer to the
EXERCISE INDEX for helpful
tips and variations on the
following exercises.
1.RESISTED KICKS: With
the band taut and your leg
extended slightly back,
squeeze your hamstrings and
kick your leg forward. Face
the opposite direction and kick
your leg back when finished.
Then turn to each side and
kick your leg laterally out and
across your body.
2.PUSH-UPS: Twist the band over and
create an ‘X’ similar to the BENCH
PRESS to avoid slippage. Place
palms on the floor slightly wider than
shoulder width apart, just below your
shoulders. Slowly lower yourself until
your chest almost touches the floor
then push yourself back up until
arms are fully extended. Rest knees
on the floor for assistance.
3.SEATED ROWS: With your arms
extended forward, squeeze your
shoulder blades together as you
pull the band back as far as you
can toward your stomach.
4.LATERAL RAISES: With your
arms slightly bent by your side,
raise your arms laterally until
your hands are at head level.
Hold briefly at the top before
returning to starting position.
10
routines
5.TRICEPS PUSHDOWN:
With elbows planted by your
sides, push the band down
and fully extend your arms.
Pause and flex your triceps
briefly at the bottom before
returning to starting position.
6.BANDBELL CURLS: With
hands about shoulder width
apart, keep your elbows
planted by your side and
slowly curl arms up in an arch
toward your shoulders. Hold
briefly at the point of maximum
resistance and squeeze biceps
before slowly releasing back to
starting position.
7.THE CRUNCH: In a supine
position with your hands cupped
loosely behind your head or with
your arms extended forward, raise
your knees up and your tailbone
slightly off the ground. Contract
your abs as you lift your shoulders
and upper back off the floor;
imagine trying to compress your
abs and tailbone together.
8.THE TWIST: Begin in the same
starting position as THE CRUNCH.
Raise your shoulders off the
ground and gently pull your torso
from side to side. Hold your arms
outward and still as they hover
slightly above the floor while your
torso shifts.
9.LOOSE ARM-ONY: Keeping your arm
straight, lean your torso toward your
outside shoulder. Feel the stretch in your
shoulder and upper back. Afterward, pivot
around so that your outside arm becomes
your inside arm. Now lean while facing
the opposite direction to stretch the front
of your shoulder and outer chest.
11
routines
BEGINNER WHOLE BODY WORKOUT #2
2 SETS / 15-25 REPS
2-3 TIMES PER WEEK
FOR 3-6 WEEKS
TEMPO: 3-2-3
-If you do 20 reps and don’t
feel fatigued, its too light.
1.LEG PRESS: Stabilize one
band around each shoulder
and under the opposite foot.
With your knees bent in close
to your chest, push your legs
out to a full extension.
NOTE: Please refer to the
EXERCISE INDEX for helpful
tips and variations on the
following exercises.
2.FLAT PRESS: Grasp one end
in each hand with palms facing
away from you and push your
arms horizontally away from
your body. Keep your hands
aligned with your chest.
3.LAT PULLDOWNS: With
arms extended up, squeeze
your shoulder blades together
and slowly pull the band
down towards your chest until
your elbows are fully bent.
4.FRONT RAISES: With
arms slightly bent by your
side, alternate raising
each arm up in front of
you or raise both arms up
simultaneously. Hold briefly
at the point of maximum
resistance before returning
back to starting position.
12
routines
5.KICKBACKS: In a bent-over
position with your elbows
bent at a 90° angle, pull the
band(s) back until your arms
are fully extended behind you.
Keep your elbows fixed by
your sides.
6.ALTERNATE CURLS: Grasp
an end in each hand with
palms facing each other and
alternate pulling one hand
across your torso toward the
opposite breast. Lift one band
at a time to isolate each bicep.
7.THE SIDE BEND: Fasten the
band to a side post and grasp
the end in hand. Slowly bend
from side to side at your waist.
Keep your active arm and back
straight the whole time.
8.THE BICYCLE: Rotate by
bringing one elbow to the
opposite knee, then kicking that
leg forward and bringing your
other elbow to the opposite
knee. Keep your core tight!
9.LOWER BACK LUBRICATOR:
Wrap one or multiple band(s)
around a front post. Keep your
feet planted and slowly bow
down, drop your buttocks and
extend your arms forward.
Unlock your hip joints and feel
the stretch in your lower back.
Slowly wiggle your buttocks
from side to side to stretch your
entire lower back region.
13
routines
INTERMEDIATE WHOLE BODY WORKOUT #1
2 SETS / 15-20 REPS
3 TIMES PER WEEK
FOR 3-6 WEEKS
TEMPO: 2-1-3
-If you do 20 reps and don’t
feel fatigued, its too light.
NOTE: Please refer to the
EXERCISE INDEX for helpful
tips and variations on the
following exercises.
1.LUNGES: With one end of a
band stabilized under your foot
and around both shoulders,
take one giant pace forward
and lower yourself until the
opposite knee almost touches
the ground. Push yourself up
through your front thigh; step
your front leg back to starting
position.
2.FLAT PRESS: Grasp one end
in each hand with palms facing
away from you and push your
arms horizontally away from
your body. Keep your hands
aligned with your chest.
3.BENT-OVER ROWS: Wrap one
band around elevated foot or
front post, bend over slightly at
the hips and grasp an end in
each hand. Starting with your
arms extended, pull the band
toward your abdomen.
4.SKIERS: With your arms
extended forward, pull your
arms back as far as you can.
Keep your arms straight and
your torso still.
14
routines
5.HORIZONTAL
EXTENSIONS: Grasping the
bar or band in front of your
forehead, push forward in a
semi-circular arch until your
arms are fully extended in
front of you.
6.REVERSE CURLS: Grasp the
band with both hands at your
waist and slowly curl the band
up in an arch toward your chin
with your palms facing down.
Squeeze your biceps at the
top before returning back to
starting position.
7.THE SQUEEZE: Fasten, stabilize or
wrap a band around an overhead
post and grasp the free end(s) in
each hand by your forehead or on
either side of your temples. Bend
over at the waist and pull your torso
down using your core.
8.THE SUPERMAN: Lie in a
prone position with your arms
extended in front of you. In one
fluid motion, raise your legs
and shoulders off the ground.
Keep abs tight to absorb the
tension. See how long you can
hold it.
9.RELAXALATOR: Grasp the
free end(s) in each hand and
bend over at the waist while
keeping your back and arms
straight. Feel the stretch in
your mid and upper back.
Spread your arms out and
slowly lower your torso
toward the ground.
15
routines
INTERMEDIATE WHOLE BODY WORKOUT #2
2 SETS / 15-20 REPS
3 TIMES PER WEEK
FOR 3-6 WEEKS
TEMPO: 2-1-3
-If you do 20 reps and don’t
feel fatigued, its too light.
1.ASSISTED SQUATS: Secure
the ankle grips in place or
stabilize the band under each
heel and then wrap the middle
around your lower back. Push
yourself up through your heels
to an upright position.
NOTE: Please refer to the
EXERCISE INDEX for helpful
tips and variations on the
following exercises.
2.FLYES: Twist the band over
and create an ‘X’. Bring
arms together in a semicircular hugging motion while
squeezing pecs together.
Imagine trying to touch your
elbows together in front of you.
Touch your hands together or
bring one over the other.
3.LAT PULLDOWNS: Grasp
one side of a band in both
hands with arms extended
above head and pull your
arms down laterally as you
stretch the band. Squeeze
your shoulder blades
together as you slowly pull
the band down.
4.UPRIGHT ROWS: Stabilize
one band under both feet,
forming a triangle with the
band. With your hands close
together, raise the band up
from your waist toward your
chin, keeping hands close to
your body.
16
routines
routines
5.KICKBACKS: Starting with
your elbows bent at a 90°
angle, pull the band back until
your arms is fully extended
behind you. Keep your elbow
fixed by your sides.
6.CABLEBAND CURLS: With
arms extended, pull the bands
toward the temples of your head
or your chest. Hold briefly at the
top, as if doing a biceps pose,
before slowly returning to starting
position. Perform with one post if
you don’t have two.
7.THE ROLL: Bend your knees
and bring them as close to
your chest as you can without
raising your pelvis. Then lift
your hips and glutes off the
floor and roll your legs forward
as you bring your knees to
your shoulders.
8.THE OBLIQUATORY: Lie flat
on your side with your knees
bent and your feet tucked in.
Cup your hands behind your
head and raise your shoulders
and upper back vertically off the
floor by squeezing your oblique
muscles. Hold briefly before
returning to starting position.
Alternate sides when finished.
9.LEG LIBERATOR: Keeping
your leg straight, slowly
pull it forward toward your
head. Every time your leg
advances, hold it briefly until
your body readjusts before
pulling further. After slowly
pulling your leg forward to
the farthest point possible,
pull it to one side using
the same technique. Finish
by pulling your leg to the
opposite side.
17
routines
routines
ADVANCED WHOLE BODY WORKOUT #1
2 SETS / 12-20 REPS
3-4 TIMES PER WEEK
FOR 3-6 WEEKS
TEMPO: 1-2-3
-If you do 20 reps and don’t
feel fatigued, its too light.
NOTE: Please refer to the
EXERCISE INDEX for helpful
tips and variations on the
following exercises.
1.SQUATS: Stabilize one band
under both feet and around
shoulders. Unlock your hips,
drop your butt down as if to sit
on a chair, and slowly squat
down until your thighs are
parallel to the floor. Without
bouncing at the bottom, push
yourself up through your heels
back to an upright position.
2.INCLINE PRESS: With your
elbows out, push your arms
up at a 45° angle.
3.STRAIGHT ARM
PULLDOWNS: With arms
extended up and hands
about shoulder width apart,
pull the bar/band down
toward your waist.
4.CABLEBAND LATERALS:
Grasp the band with your arm
extended across your body and
pull the band across your torso
until your arm is extended out
to the side. Slowly return to
starting position while keeping
the band taut.
18
routines
routines
5.TRICEPS PUSHDOWN:
With elbows planted by your
sides, push the band down
and fully extend your arms.
Pause and flex your triceps
briefly at the bottom before
returning to starting position.
6.BANDBELL CURLS: With
hands about shoulder width
apart, keep your elbows
planted by your side and
slowly curl arms up in an arch
toward your shoulders. Hold
briefly at the point of maximum
resistance and squeeze biceps
before slowly releasing back to
starting position.
7.THE WOODCHOPPER
(high-low): Lock both hands
around the band (or handgrip)
and pull arms diagonally across
your body. Twist your torso while
keeping your abs contracted,
back straight and arms fixed in
a slightly bent position. Alternate
sides when finished.
8.THE WOODCHOPPER
(low-high): Lower the
anchor point height and pull
the band across your body
diagonally upward. Alternate
sides when finished.
9.LOWER BACK LUBRICATOR: Wrap
one or multiple band(s) around a
front post. Keep your feet planted
and slowly bow down, drop your
buttocks and extend your arms
forward. Unlock your hip joints and
feel the stretch in your lower back.
Slowly wiggle your buttocks from
side to side to stretch your entire
lower back region.
19
routines
routines
ADVANCED WHOLE BODY WORKOUT #2
2 SETS / 12-20 REPS
v3-4 TIMES PER WEEK
FOR 3-6 WEEKS
TEMPO: 1-2-3
-If you do 20 reps and don’t
feel fatigued, its too light.
NOTE: Please refer to the
EXERCISE INDEX for helpful
tips and variations on the
following exercises.
1.STRAIGHT-LEG DEADLIFT:
Keeping your legs straight,
bend over from the waist until
you feel a slight stretch in
your hamstrings, then contract
your thighs and slowly raise
yourself back up to a standing
position. Keep your arms and
back straight.
2.DECLINE PRESS: Grasp an
end or the bar in each hand
and push down at a 45° angle.
3.LAT PULLDOWNS: With arms
extended up, squeeze your
shoulder blades together and
slowly pull the band down
towards your chest until your
elbows are fully bent.
4.MILITARY PRESS:
Stabilize one band under
each foot with the ends
close to your heels. With
arms out laterally and
elbows bent at 90°, push
up until your arms are
extended above your head.
20
routines
routines
5.VERTICAL EXTENSIONS:
Stabilize bands as close
to your heels as possible.
Grasp the bands behind your
head with elbows bent and
push the bands up through
a semi-circular arch to a full
arm extension.
6.CROSSBAND CURLS: Cross
the bands in front of you by
inserting one band through
the other and grasp an end in
each hand. Curl the bands out
laterally toward your shoulders.
Squeeze your biceps at the
top before releasing back to
starting position.
7.THE PLANK: Rest yourself on your
forearms and toes while your body
stays straight as a board. Compress
your core region by rolling your
tailbone in and squeezing your
inner thighs; imagine bringing your
pelvis to your spine. See how long
you can bare it!
8.THE SIDE BRIDGE: After doing THE
PLANK in a raised prone position,
rotate over onto one side and balance
yourself on your forearm and inside
foot. Keep your body straight and
your upper arm lightly resting on your
thigh or extended up in the air for a
challenge. Hold for as long as you can.
Alternate sides when finished.
9.LOOSE ARM-ONY: Keeping your
arm straight, lean your torso toward
your outside shoulder. Feel the
stretch in your shoulder and upper
back. Afterward, pivot around so
that your outside arm becomes your
inside arm. Now lean while facing the
opposite direction to stretch the front
of your shoulder and outer chest.
21
routines
Other routines available at
rubberbanditz.com
CIRCUIT TRAINING
SPLIT ROUTINES
Fitness can be divided into five
main categories: aerobic fitness,
muscular strength, muscular
endurance, flexibility, and body
composition. This section aims
to develop your body in each of
these categories.
These routines are designed to
build muscle mass, as opposed
to encouraging weight loss. Each
muscle group is exercised more
extensively in each routine but
less frequently per week. This
is an optional workout regimen
that is geared towards athletic
training and advanced workout
enthusiasts. Beginners are
advised to start with the WHOLE
BODY WORKOUT ROUTINES to
gain familiarity with the exercises
before switching to a different
routine style.
The key objective is to maintain
a high intensity for the duration
of your routine. Move swiftly
from one exercise to the next
taking as little rest time as
possible. When it comes to
shedding pounds, no workout is
more conducive to that goal than
circuit training.
Training all the major muscles
groups in one routine revs up
activity in all the muscle cells,
which increases the metabolic
rate for up to 48-hours after
exercising. This means you will
actually burn calories while
sitting around doing nothing
after your workout.
22
RUBBERBANDITZ PILATES:
“RUBBERlates”
We have provided a series of
exercises that aim to build core
strength, flexibility, muscle
strength, joint stability and
enhance the economy of motion
while creating a sleek body and
a flat abdomen. We integrated
resistance band training
techniques for a well-rounded
workout that even Joseph Pilates
(founder of Pilates) himself would
be proud of.
Try to superset (refer to glossary)
all of your sets to maintain a
high intensity, expedite your
workout, and leave your muscles
exhausted afterwards. Try to limit
your rests to a quick breather
only between sets after you have
completed a superset.
The main focus of these routines
is to develop the “Powerhouse,”
also known as “the girdle of
strength.” This is the area
between the bottom of your rib
cage and the line across your
hips, an area too often neglected.
These muscle areas include: hips,
abs, obliques, diaphragm, lower
back, and pelvis.
The split routines are designed
so that while you are working
out one of the focused muscle
groups, the other is resting
and should be fresh for every
alternating set.
Regardless of your age,
physical condition, or gender,
“Rubberlates” is an effective
routine for stabilization and
strength training. Yes, manly men,
this means you too!
explanations
MIX & MATCH SECTION:
Once you feel completely comfortable with all the exercises, you are
ready to start designing your own workout routines based on your own
personal workout objectives.
Changing your routines from time to time is very important. Keeping
the body guessing is one of the keys to success. Alternating routines
prevents the body from hitting plateaus, and ensures continued
success with your workout. Here are a few things to keep in mind:
Example
LAT PULLDOWN (upper lats)
and SEATED ROW (lower
lats)
or FRONT RAISES (front
deltoids) and LATERAL
RAISES (lateral deltoids)
1.For a total body routine, start with your biggest muscle groups and work down to your small muscle
groups (vertical loading). The sequence should generally be: legs, chest, back, shoulders, triceps, biceps,
and core. Make sure to include stretching exercises as well. Stretching before (after warm-up) and after
your workout is advised.
2.Aim for a total of 18-24 sets in your routine. A comprehensive routine should consist of anywhere
between 6-12 different exercises.
3.Use higher resistance and do fewer reps to build more muscle mass. Use lower resistance and do more
reps for muscle toning. Keep in mind that bulking up requires a calorie surplus in your diet. Trimming
pounds requires a calorie deficit, and to maintain your weight requires caloric intake equilibrium.
4.If you select multiple exercises that target the same muscle group, choose ones that target different
areas of that muscle group.
5.Whatever routine you design, STICK TO IT!!!
Here are a few suggestions
to consider when designing a
balanced split routine:
CHEST: Perform at least one
press (i.e. FLAT, INCLINE or
DECLINE BENCH). If you select
multiple presses, stagger them
so that you are not doing one
after the other (ex: FLAT BENCH,
to FLYES, then INCLINE BENCH).
This will give your pecs a small
amount of rest time and enable
you to utilize them for the next
press.
BICEPS: Do at least two
lifts where your arms are
positioned in front of your body
(i.e. BANDBELL, HAMMER,
ALTERNATE, or REVERSE CURLS)
and one lift where your arms
are out laterally from your body
(i.e. CABLEBAND CURLS or
CROSSBAND CURLS).
BACK: Include at least one
variation of the LAT-BAND
PULLDOWN
along with one variation of the
SEATED BAND-ROWS or BENT
OVER BAND-ROWS.
TRICEPS: Perform at least
one variation of the TRICEPS
PUSHDOWN. DIPS and
KICKBACKS are great definition
exercises as well.
SHOULDERS: No one single
exercise can target all three areas
(front, lateral, rear) at the same
time. Therefore, it is important to
select exercises that will cover all
three areas during your routine.
The MILITARY PRESS is perhaps
the most fundamental strength
training shoulder exercise.
LEGS: SQUATS are one of the
most dynamic exercises to
increase muscle mass, power,
and strength in your lower body.
This exercise recruits muscles
from all over the body to work
collectively, and is perhaps the
best exercise you can do to
hone many leg muscles at once.
LUNGES are also a great way to
harden your legs and glutes.
STRETCHING: Integrate
stretching regularly into your
workout routines according to
what feels best for you. Try to
stretch before (after warm-up)
and after your routine.
CORE: Core exercises should
be done as often as your time
permits. This is an area that is
very often underworked. Two to
three times per week is sufficient
and slightly more is okay so long
as you allow for recovery.
23
exercise index
Lift Name
As loosely defined by traditional
workout terminology
Target
CAPITALIZED - target muscle(s)
signifies primary muscle(s) used;
lower case signifies secondary
muscle(s) used
Post
A.P. Height
REAR - behind you
SIDE - out laterally
OVERHEAD - above you
LOW - below waist level
Roughly, how high the band should
be fixed relative to your body
A.P. = Anchor Point
(Please note that many glossary
terms are italicized.)
Position
Grip Options
UPRIGHT = standing position BOLD GRIP OPTIONS signify our
SUPINE = lying on your back
recommendation
PRONE = lying on your stomach ALL = any grip option can function
Reference the following list to see what exercises fall under each muscle group.
CHEST
FLAT BENCH PRESS
INCLINE BENCH PRESS
DECLINE BENCH PRESS
PUSH-UPS
FLYES
PULLOVER
BACK
LAT PULLDOWNS
SEATED ROWS
BENT OVER ROWS
STRAIGHT ARM PULLDOWNS
REVERSE FLYES
DEADLIFT
BICEPS
BANDBELL CURLS
HAMMER CURLS
ALTERNATE CURLS
CONCENTRATION CURLS
REVERSE CURLS
CABLEBAND CURLS
CROSSBAND CURLS
TRICEPS
KICKBACKS
TRICEPS PUSHDOWN
DIPS
HORIZONTAL EXTENSIONS
ANIMALS
CLOSE GRIP PUSH-UPS
LATERAL EXTENSIONS
VERTICAL EXTENSIONS
OVERHEAD EXTENSIONS
WRAPPED SHOULDER
EXTENSION
24
SHOULDERS
MILITARY PRESS
FRONT RAISES
LATERAL RAISES
UPRIGHT ROWS
REVERSE FLYES
CROSSBAND LATERALS
SKIERS
ISOLATION ROTATIONS
SHRUGS
LEGS
SQUATS
LUNGES
LEG PRESS
LEG EXTENSIONS
STRAIGHT-LEG DEADLIFT
GOOD MORNINGS
LEG CULRS
CALF RAISES
HIP ABDUCTOR/ADDUCTOR
RESISTED KICKS
CHEst
CHEST: PECTORALIS (PECS)
Chest workouts concentrate on three areas: the upper, middle, and
bottom. Keep your back straight, abs tight, and focus on utilizing
your chest muscles for the following exercises. You will naturally work
out your triceps when working out your chest. If you do not feel the
resistance in the targeted area, try readjusting the anchor point (A.P.)
height and/or your proximity to it. Remember to hold your rep at the
point of maximum resistance for a few moments before returning back
to starting position for a challenge (Static Contraction Training). Have
a blast!
1. Flat Bench Press
Lift Name
Target
Flat Bench Press
Pecs
Post
A.P Height
Rear
Shoulder Blade
Level
Position
Grip Options
Upright, Supine,
Or Seated
Bar, Freehand,
Handgrips
DESCRIPTION
tips
variations
Grasp one end in each hand with
palms facing away from you and
push your arms horizontally away
from your body. Keep your hands
aligned with your chest.
• Start with elbows out 90°
from your body and keep back
straight.
1.Fasten two bands to rear post.
• Keep arms tucked by your
sides to engage triceps and
inner chest; keep arms farther
from your body to engage
deltoids and outer chest (use a
wide or narrow grip).
• Finish with 2-5 negative reps
(refer to glossary) by slowing
the regression to starting
point to fully exhaust pectoral
muscles.
2.Wrap band behind your back
and under shoulder blades
(twist the band over and create
an X to prevent band from
sliding up your back).
3.Position band inside or outside
of your arms; wear a protective
layer of clothing if positioned
outside.
25
CHEst
chest
2. incline Bench Press
Lift Name
Target
INCLINE BENCH
PRESS
UPPER PECS
Post
A.P Height
Rear
LOWER BACK LEVEL
Position
Grip Options
UPRIGHT, SUPINE,
OR SEATED
ALL
DESCRIPTION
With your elbows out, push
your arms up at a 45° angle.
tips
variations
• Concentrate on remaining
within a constant line of
maximum resistance.
1.See FLAT BENCH PRESS
• Take a step forward away from
the A.P. to increase resistance.
• Keep the rest of your body still
by restricting all movement to
chest and arms.
• Finish set with 2-5
negative reps.
3. Decline Bench Press
Lift Name
Target
DECLINE BENCH
PRESS
LOWER PECS
Post
A.P Height
Rear
SHOULDER LEVEL
Position
Grip Options
UPRIGHT, SUPINE,
SEATED
ALL
DESCRIPTION
tips
variations
Grasp an end in each hand and
push band down at a 45° angle.
• Keep pectoral muscles tight
and forearms parallel to the
band throughout lift.
1.See FLAT BENCH PRESS
• Do not arch your back.
• Finish sets with negative reps.
26
CHEst
4. Push-ups
Lift Name
Target
PUSH-UPS
PECS, triceps, lats
Post
A.P Height
REAR
(around back)
UNDER SHOULDER
BLADES
Position
Grip Options
PRONE
FREEHAND
DESCRIPTION
tips
variations
Twist the band over and create an
‘X’ similar to the BENCH PRESS
to avoid slippage. Place palms
on the floor slightly wider than
shoulder width apart, just below
your shoulders. Slowly lower
yourself until your chest almost
touches the floor then push
yourself back up until arms are
fully extended.
• Keep body as straight as
possible throughout the
exercise (including head).
1.Rest your knees on the floor.
• Do not lock arms out at the top
to avoid stress on elbows.
• Do negative reps by slowing
down the regression and
speeding up the ¨push-up¨
to exhaust chest and back
muscles.
2.Place feet on an elevated
surface to work lower
pectorals.
3.Draw hands and elbows in
closer toward your body to
engage triceps.
4.Spread hands farther apart to
engage shoulders and outer
chest muscles.
27
chest
5. Flyes
Lift Name
Target
FLYES
PECS
Post
A.P Height
SIDE, FRONT or REAR
CHEST LEVEL
Position
Grip Options
UPRIGHT, SEATED,
SUPINE
HANDGRIPS, FREEHAND
DESCRIPTION
Twist the band over and create
an ‘X’. Bring arms together in
a semi-circular hugging motion
while squeezing pecs together.
Imagine trying to touch your
elbows together in front of you.
Touch your hands together or
bring one over the other.
tips
variations
• Keep elbows slightly bent in a
fixed position.
1.Standing between two posts
(distance apart can vary) or to
the side of one, grasp end(s)
and pull bands together. Step
forward to raise resistance.
2.Raise A.P. height and bring
hands together with downward
diagonal motion to engage
upper pecs.
3.Lower A.P. height and bring
hands together with upward
diagonal motion to engage
lower pecs.
• Imagine trying to pop a pingpong ball between your pecs.
• Puff chest out slightly to
stretch pecs.
• Hold rep at the point of
maximum resistance for a
challenge (Static Contraction
Training).
6. pullover
DESCRIPTION
tips
With arms extended above your
head, push the band down in an
arch in front of you. Lower arms
until the bands gently touch your
shoulders before returning to
starting position.
• Squeeze pecs during descent
to avoid compensation from
back and shoulder muscles.
• Maintain arms in a fixed, bent
position.
• Move hands closer together for
a challenge.
• You can bend your knees,
squat down, or sit for comfort
but keep your back straight.
28
Lift Name
Target
PULLOVER
PECS, lats, rear delts
Post
A.P Height
OVERHEAD
OVERHEAD
Position
Grip Options
UPRIGHT,
SEATED
BAR, HANDGRIPS,
FREEHAND
variations
1.LATS FOCUS: Transfer
resistance to your lats by
squeezing shoulder blades
together while lowering arms.
Straighten arms as much as
possible.
2.Use multiple bands.
biceps
BICEPS BRACHII (BICEPS): and FOREARMS
Fully extend and contract your arms to get the entire range of
motion for each biceps exercise. Remember to maintain constant
tension on bands by not lowering you arms below the minimum
point of resistance; this prevents your biceps from resting during
the set. Keep your wrists straight and your elbows in a fixed
position to help channel the resistance to your biceps. Try adjusting
the A.P. height or your distance from the post to alter the resistance.
As with most exercises, keep your abs tight and back straight for
core stability.
7. bandbell curls
Lift Name
Target
BANDBELL CURLS
BICEPS
Post
A.P Height
LOW
UNDER FEET
Position
Grip Options
UPRIGHT
BAR, HANDGRIPS,
FREEHAND
DESCRIPTION
tips
variations
With hands about shoulder
width apart, keep your elbows
planted by your side and slowly
curl arms up in an arch toward
your shoulders. Hold briefly at
the point of maximum resistance
and squeeze biceps before
slowly releasing back to starting
position.
• Position bands under toes.
1.Wrap or stabilize one band to
a front or low post to change
the resistance (i.e. wrapping
one band under a door that is
perpendicular to your body).
• Refrain from arching your back
or swaying body forwards or
backwards.
• Experiment by moving hands
closer and farther apart.
2.21´s: Perform seven reps from
starting position to the halfway
point (arms bent at a 90º
angle), then seven reps raising
the bar from the halfway
point up to a full curl (hands
near shoulders), and finally
seven full reps from starting
position to a full curl. Increase
or decrease the number of
repetitions depending on
workout objectives.
29
biceps
8. hammer curls
Lift Name
Target
HAMMER CURLS
BICEPS
Post
A.P Height
LOW
FOOT LEVEL
Position
Grip Options
SEATED, UPRIGHT
HANDGRIPS, FREEHAND
DESCRIPTION
tips
variations
With both arms by your sides,
curl your right arm in an arch
to your right shoulder. Squeeze
your right bicep at the top
before returning back to starting
position. Repeat with left arm
when finished.
• Keep abs tight and wrists
straight.
• Maintain constant tension on
both bands, even while one
arm is resting.
• Slowly lift and lower each arm
to prevent momentum from
swinging your arms upward.
1.Twist your wrist up so that your
palm faces your shoulder at
the top of the movement.
2.Wrap one band under both
feet and grasp an end in each
hand to raise the resistance.
3.Stabilize the band(s) to a low
front or rear post.
9. Alternate curls
Lift Name
Target
ALTERNATE CURLS
BICEPS
Post
A.P Height
FRONT
KNEE LEVEL
Position
Grip Options
UPRIGHT, SEATED
HANDGRIPS,
FREEHAND
DESCRIPTION
tips
variations
Grasp an end in each hand with
palms facing each other and
alternate pulling one hand across
your torso toward the opposite
breast. Lift one band at a time to
isolate each bicep.
• Bend knees slightly and
keep elbows tucked by your
side.
• Maintain at least minimal
resistance on each arm
while resting.
• Avoid using momentum to
assist in the curl.
1.Perform seated with band
wrapped around a front post.
2.Use two bands fastened to two
front posts.
30
biceps
10. concentration curls
Lift Name
Target
CONCENTRATION
CURLS
BICEPS
Post
A.P Height
FRONT
FOOT-SHIN LEVEL
Position
Grip Options
SEATED
HANDGRIPS,
FREEHAND
DESCRIPTION
tips
variations
Curl your hand toward your
shoulder while your elbow rests
on your inner thigh. Squeeze
your biceps at the top before
slowly returning back to starting
position. Repeat with opposite
arm when finished.
• Do not bend your wrist for
assistance.
• If you don’t feel tension in
biceps, try re-angling chair or
adjusting A.P. height.
• Keep elbow firmly planted on
thigh.
1.Sit on the floor instead of a
chair.
11. reverse curls
Lift Name
Target
REVERSE CURLS
BICEPS, forearms
Post
A.P Height
LOW
UNDER FEET
Position
Grip Options
UPRIGHT, SEATED
BAR, HANDGRIPS,
FREEHAND
DESCRIPTION
tips
variations
Grasp the band with both hands
at your waist and slowly curl
the band up in an arch toward
your chin with your palms facing
down. Hold your contraction
momentarily at the top before
returning back to starting
position.
• Keep wrists straight, shoulders
down and elbows by your side.
• If seated, keep legs straight.
• Use a bar to lower the
resistance and balance the
weight distribution.
• To raise the resistance, spread
feet farther apart or loop the
band.
1.Loop one band around each
foot or interlock two bands at
their midpoint.
31
biceps
12. cableband curls
Lift Name
Target
CABLEBAND CURLS
BICEPS
Post
A.P Height
SIDE or
FRONT
HEAD LEVEL
Position
Grip Options
SEATED, UPRIGHT
HANDGRIPS,
FREEHAND
DESCRIPTION
tips
variations
With arms extended, pull the
bands toward the temples of
your head, chest or shoulders.
Hold briefly at the top, as if doing
a biceps pose, before slowly
returning to starting position.
Perform with one post if you don’t
have two.
• Keep your upper arms
stationary.
1.Alternate sides: raise your
right hand to your head (or
chest) and hold it stationary
until you bring your left hand
to your head. Lower your right
hand while your left arm stays
flexed. Repeat.
• Take a step back to
raise resistance.
• Alter the A.P. height for a
different feel.
• If using two posts, the distance
between posts can vary widely
according to availability (see
video for ideas).
2.Experiment by sitting, standing
or kneeling.
13. crossband curls
Lift Name
Target
CROSSBAND CURLS
BICEPS
Post
A.P Height
LOW
UNDER FEET
Position
Grip Options
UPRIGHT, SEATED
HANDGRIPS,
FREEHAND
DESCRIPTION
tips
variations
Cross the bands in front of you
by inserting one band through
the other and grasp an end in
each hand. Curl the bands out
laterally toward your shoulders.
Squeeze your biceps at the top
before releasing back to starting
position.
• Keep abs tight and elbows
stationary by your side.
1.Position your arms more to
the front or farther out laterally
from your body.
32
• Force your arms outward
laterally while maintaining
constant tension in biceps.
• You may feel some resistance
in your shoulders.
2.Point palms downward to
engage forearms.
3.Use a low front post.
back
BACK: LATISSIMUS DORSI (LATS)
and RHOMBOIDES
Protect your lower back by keeping your abs tight and your back
straight. Squeeze your shoulder blades together behind you to
engage lat muscles.
Hold the contraction momentarily at the point of maximum resistance
before returning to starting position. Inserting a bar will lower the
resistance and help balance the weight distribution. This shouldn’t be
back-breaking work, so start
with low resistance to ensure proper form!
14. lat pulldowns
Lift Name
Target
LAT PULLDOWNS
LATS, traps
(mid/upper back)
Post
A.P Height
OVERHEAD
OVERHEAD
Position
Grip Options
UPRIGHT, SEATED
BAR, HANDGRIPS,
FREEHAND
DESCRIPTION
tips
variations
With arms extended up, squeeze
your shoulder blades together
and slowly pull the band down
towards your chest until your
elbows are fully bent.
• Relax your arms and lead with
elbows. Keep the rest of your
body motionless.
1.Explore your range of grip
options: wide or close grip
combined with either overhand
or underhand holds.
• A close grip will engage
rhomboid muscles and an
underhand grip will also
engage biceps.
• A high post may allow you to
stand where a low post may
require you to sit, kneel, or
take a staggered stance with
one foot in front of the other.
• Change your approach
periodically for a well-rounded
workout.
2.Lean forward and pull the
bands down behind your head.
3.Lean back and pull the bands
down toward your chest.
4.No A.P: grasp one side of a
band in both hands with arms
extended above head and pull
your arms down laterally as
you stretch the band.
33
back
15. seated rows
Lift Name
Target
SEATED ROWS
LATS
(mid & low back)
Post
A.P Height
FRONT
BELLY BUTTON LEVEL
Position
Grip Options
SEATED
ALL
DESCRIPTION
With your arms extended forward,
squeeze your shoulder blades
together as you pull the band
back as far as you can toward
your stomach.
variations
tips
• Don’t let your arms and
shoulders do all the work.
• Keep your torso still, knees
slightly bent, chest out and
back straight.
• Tighten your abs and try not to
rock back and forth.
1.Pull one arm back at a time or
both simultaneously.
2.Insert a bar for different grip
combinations (close/wide and
overhand/underhand).
3.Use two bands to lower the
resistance- either around each
foot or interlocked at their
midpoints.
16. bent over rows
Lift Name
Target
BENT OVER ROWS
LATS
(mid back)
Post
A.P Height
FRONT
KNEE LEVEL
Position
Grip Options
BENT OVER
ALL
DESCRIPTION
tips
variations
Wrap one band around elevated
foot or front post, bend over
slightly at the hips and grasp an
end in each hand. Pull the band
toward your abdomen.
• Keep abs tight and upper
body still.
1.Use a different front post.
• Lift your chest to maintain the
natural arch in your back.
• Pull hands toward stomach to
engage lower lats; pull hands
in higher toward chest to
engage upper lats.
• Experiment with different grip
options and A.P. heights.
34
back
17. straight arm pulldowns
Lift Name
Target
STRAIGHT ARM
PULLDOWNS
LATS (upper back),
delts
Post
A.P Height
FRONT
OVHERHEAD
Position
Grip Options
tips
variations
UPRIGHT, SEATED
BENT OVER,
BAR, HANDGRIP,
• Keep shoulder blades drawn
tightly together, elbows slightly
bent in a fixed position and
wrists straight.
1.Explore different grip options.
FREEHAND
DESCRIPTION
With arms extended up and
hands about shoulder width
apart, pull the bar/band down
toward your waist.
• Be creative with your
positioning- stand on a platform,
kneel, sit or bend over at the
waist to adjust your height; lower
yourself to raise the resistance.
2.Interlock bands at their
midpoints when using a
high overhead post to lower
resistance.
• Take a small step forward
or backward to modify your
‘pulldown’.
18. reverse flyes
DESCRIPTION
tips
With arms extended
forward, pull your arms
back in a circular motion
as far as you can.
• Focus on pinching your
shoulder blades together.
• Keep elbows fixed in a slightly
bent position and arms
elevated at the same height.
Lift Name
Target
REVERSE FLYES
LATS (upper back),
DELTOIDS (rear)
Post
A.P Height
FRONT
SHOULDER LEVEL
Position
Grip Options
UPRIGHT, SEATED
HANDGRIPS,
FREEHAND
variations
1.Use a lower A.P. and pull the band
back at a slightly upward angle.
2.Use a higher A.P. and pull the band
back at a slightly downward angle.
3.No A.P: Grasp one band in both hands.
Starting with hands close together,
replicate the same movement by
pulling your arms back and hands
apart as if trying to touch your elbows
together behind your back.
35
back
19. deadlift
Lift Name
Target
DEADLIFT
LATS (lower back),
hams, glutes, core
Post
A.P Height
LOW
UNDER FEET
Position
Grip Options
UPRIGHT BENT OVER
BAR, HANDGRIP,
FREEHAND
DESCRIPTION
tips
variations
In a bent-over position with palms
facing your body, pull yourself
up with your core and raise your
chest until you are in an upright
position. Keep arms by your side
and back straight. Slowly lower
torso back to starting position
by pulling your hips back and
keeping your shoulders over your
ankles.
• All body movement should
originate by bending at the
hips.
1.Keep legs completely
straight for the STRAIGHT
LEG DEADLIFT, to exercise
hamstring and glute muscles.
(Refer to Legs Section.)
• Keeps abs tight to prevent
strain on lower back.
• Hips, lower back and abs
should work together like a
crane that comfortably pulls
you up and lowers you into
place.
• Use your arms as hooks to
hold the band or bar without
assisting in the lift.
• Keep your back straight and
knees slightly bent.
36
triceps
TRICEPS: TRICEPS BRACHII
Tricep muscles are composed of three heads: lateral head, long head,
and medial head – hence the TRI in triceps. Target your triceps more
acutely by keeping your wrists straight and elbows planted in a fixed
position with your upper arms still. Maintain constant tension on
bands by not regressing past the minimum point of resistance so your
muscles don’t get a break until after the set. During your set, take
your time and flex your triceps for a few moments at the point of
maximum resistance before returning back to starting position. If you
don’t feel the resistance in your triceps, try readjusting the A.P. and/
or your distance from the post. Finally, keep your abs tight and back
straight to protect and stabilize your core. TRI it, baby!
20. triceps pushdown
Lift Name
Target
TRICEPS PUSHDOWN
TRICEPS
Post
A.P Height
FRONT
OVERHEAD
Position
Grip Options
UPRIGHT,
BENT OVER
BAR, HANDGRIPS,
FREEHAND
DESCRIPTION
tips
variations
With elbows planted by your
sides, push the band down and
fully extend your arms. Pause
and flex your triceps briefly at
the bottom before returning to
starting position.
• Resist the urge to put any body
weight into the pushdown.
1.Wrap band over the top of
an open door positioned
perpendicular to your body.
• Position your feet in a
staggered stance or side-byside.
• Lower yourself to raise the
resistance.
2.Experiment with different grip
options: underhand grip will
engage forearms.
3.Turn your back to face away
from the A.P.
37
triceps
21. kickbacks
Lift Name
Target
KICKBACKS
TRICEPS
Post
A.P Height
FRONT
KNEE LEVEL
Position
Grip Options
BENT OVER
HANDGRIPS,
FREEHAND
DESCRIPTION
tips
variations
In a bent-over position with your
elbows bent at a 90° angle, pull
the band(s) back until your arms
are fully extended behind you.
• Keep elbows fixed by your side
to engage triceps, avoiding
help from deltoids.
1.Wrap one band around a front
post for higher resistance.
• Keep feet close together with
torso still and back straight for
balance.
2.Alternate one arm at a time to
isolate each side.
• Take a step back to raise
resistance.
22. dips
DESCRIPTION
tips
Place two chairs of equal height
across from each other about
3-5ft (1-1.5 m) apart. Place
your hands shoulder-width apart
behind you on one chair and
maintain your balance as you
prop your feet up on the other
chair. Slowly lower your body
until you descend to a 90° bend
in your arms, and then push
yourself back up to starting
position.
• Raise your body in one vertical
line during the ascent and
descent.
38
• Keep your back as close as
possible to the chair behind
you.
• Aside from arms, keep the rest
of your body motionless.
• Do not go much lower after
elbows reach a 90° angle to
avoid injury.
Lift Name
Target
DIPS
TRICEPS, pecs
Post
A.P Height
SHOULDERS
NONE
Position
Grip Options
SUPINE
FREEHAND
variations
1.Cross feet at ankles to
minimize leg movement.
2.If you don’t have two chairs of
the same height, use any two
stationary objects (i.e. bench/
table/bed). Rest feet on the
higher stationary object for an
extra challenge.
triceps
23. horizontal extensions
Lift Name
Target
HORIZONTAL
EXTENSIONS
TRICEPS
Post
A.P Height
REAR
HEAD LEVEL
Position
Grip Options
HANDGRIPS,
UPRIGHT, BENT OVER BAR,
FREEHAND
DESCRIPTION
tips
variations
Grasping the bar or band in front
of your forehead, push forward
in a semi-circular arch until your
arms are fully extended in front
of you.
• Bend your knees slightly.
1.Wrap one band around an
overhead post and assume a
bent-over position with the A.P.
directly above your head.
• Space the band ends wider
apart to increase resistance.
• Keep upper arms stationary to
isolate triceps.
24. animals
DESCRIPTION
tips
Grasp the bar/band with your hands • Don’t let your back or chest
shoulder-width apart and bend
compensate – use your
over at the hips so that your head
triceps!
is under the A.P. While maintaining • This is a difficult lift, so start
your arms locked in a 90º angle,
with a low resistance, increasing
pull the bar down in a circular path
gradually as you maintain proper
in front of your body.
form.
Lift Name
Target
ANIMALS
TRICEPS
Post
A.P Height
REAR
OVERHEAD
Position
Grip Options
BENT OVER
BAR, HANDGRIP,
FREEHAND
variations
1.If using a high overhead post
interlock two bands at their
midpoints.
39
triceps
25. close grip push-ups
Lift Name
Target
CLOSE GRIP
PUSH-UPS
TRICEPS, pecs
Post
A.P Height
REAR
(around back)
UNDER SHOULDER
BLADES
Position
Grip Options
PRONE
FREEHAND
DESCRIPTION
tips
Position yourself in push-up
• Point toes down to help
position with hands closer to
maintain your balance.
your body in order to isolate your • Remove the band to lower
triceps. Twist a band over, creating
resistance.
an X, and wrap it around your
back. Start by lying flat on your
stomach with your hands just
under your pecs. Push yourself up
to a full arm extension.
26. lateral extensions
variations
1.Place knees on the ground and
form a triangle between your
torso, arms and the floor.
2.Position your hands closer
together for a challenge.
3.Hold yourself up in a
motionless position, with
your body off the ground for
an added challenge (static
resistance training).
Lift Name
Target
LATERAL
EXTENSIONS
TRICEPS
Post
A.P Height
OVERHEAD
OVERHEAD
Position
Grip Options
UPRIGHT, SEATED,
BENT OVER
HANDGRIPS,
FREEHAND
DESCRIPTION
tips
Grasp band with arms bent and
palms facing out. Bend over
slightly at the hips and push the
band down laterally away from
your body in a semi-circular arch
while keeping your upper arms
still.
• Puff your chest out to isolate
1.Face palms toward your body
triceps.
to engage forearms.
• Experiment by pushing the band
down at different angles from
your body.
• If you feel pain in your shoulders,
bring your elbows more toward
the front of your torso.
40
variations
triceps
27. vertical extension
Lift Name
Target
VERTICAL
EXTENSION
TRICEPS
Post
A.P Height
REAR
FEET
Position
Grip Options
UPRIGHT, SEATED
BAR, HANDGRIPS,
FREEHAND
DESCRIPTION
tips
variations
Stabilize bands as close to your
heels as possible. Grasp the
bands behind your head with
elbows bent and push the bands
up through a semi-circular arch
to a full arm extension.
• Keep upper arms motionless
beside your head to isolate
triceps.
• Keep your back straight, abs
tight and knees slightly bent.
1.Sit up on your knees and
wrap a band around your
shins.
2.No A.P. - grasp one end of
a band behind you with your
elbow pointed upward. Grasp
the middle of the same band
with your opposite hand
behind your back. Extend
your upper arm up while
securing the band in place
with the opposite hand.
3.Position elbows out laterally
from your body or pointed in
front of you.
41
triceps
28. overhead extensions
Lift Name
Target
OVERHEAD
EXTENSIONS
TRICEPS
Post
A.P Height
REAR
NECK LEVEL
Position
Grip Options
HANDGRIPS,
BENT OVER, SEATED BAR,FREEHAND
DESCRIPTION
tips
variations
Begin in a bent over position with
feet staggered and legs hip-width
apart. Push the band forward in a
horizontal line above your head to
a full arm extension.
• Keep your upper arms and
torso completely motionless.
1.Use an overhand/underhand or
wide/narrow grip.
• The farther you lean forward,
the more tension you will feel
in your upper back.
2.Interlock two bands at their
midpoints or fasten two bands
to a rear post.
• Step forward or adjust A.P.
height to alter resistance.
29. wrapped shoulder extension
Lift Name
Target
WRAPPED SHOULDER
EXTENSION
TRICEPS
Post
A.P Height
REAR
SHOULDER BLADE
LEVEL
Position
Grip Options
UPRIGHT, SEATED
BAR, FREEHAND
DESCRIPTION
tips
variations
Wrap one band around your back
and under your shoulder blades.
Grasp an end in each hand. With
elbows bent, extend your arms as
you push the ends forward.
• Make sure the band is twisted
over, forming an “X” behind
you to avoid slippage.
1.Move elbows inwards or
outwards.
42
• Keep upper arms still.
• Wear a protective layer of
clothing to prevent the band
from irritating your skin.
shoulders
SHOULDERS: DELTOIDS (DELTS)
and TRAPEZIUS (TRAPS)
Deltoids consist of three main areas: front (anterior), lateral (medial)
and rear (posterior). Start with a low resistance to enhance
your form and avoid injury. Inserting a bar will help to balance the
resistance and offer more control. Maintain at least minimal
resistance on the bands at all times for a more efficient workout and
to minimize the shock to your muscles when beginning
the subsequent rep. Hold your rep briefly at the point of maximum
resistance
for a challenge (Static Contraction Training). If you don’t feel the
resistance in your targeted muscle group, readjust the A.P. and/or your
distance from the post. As with most exercises, keep your abs tight
and back straight to protect and stabilize your core. You will feel
great after your workout if you can shoulder the load.
30. military press
Lift Name
Target
MILITARY PRESS
DELTIODS
(front, medial), traps
Post
A.P Height
LOW
UNDER FEET
Position
Grip Options
UPRIGHT, SEATED
ALL
DESCRIPTION
tips
variations
Stabilize one band under each
foot with the ends close to your
heels. With arms out laterally and
elbows bent at 90°, push up until
your arms are extended above
your head.
• Keep back straight and abs
tight to avoid lower back
strain.
1.Lift one band at a time, moving
arms in opposition to isolate
each deltoid.
• Take a wider stance or loop
the bands to raise resistance.
2.Seated: Fasten two bands on
either side of you or wrap one
band under a low post.
• Use a bar to balance and lower
overall resistance.
3.Raise bands in a straight line
behind your head to engage
trap muscles.
43
shoulders
31. front raises
Lift Name
Target
FRONT RAISES
DELTOIDS (front)
Post
A.P Height
LOW
FOOT LEVEL
Position
Grip Options
UPRIGHT
ALL
DESCRIPTION
tips
With arms slightly bent by your
side, alternate raising each arm
up in front of you or raise both
arms up simultaneously. Hold
briefly at the point of maximum
resistance before returning back
to starting position.
• Keep elbows slightly bent in a
fixed position.
• Do not rock your torso back
and forth.
• Maintain at least minimal
resistance on both bands at
all times.
variations
1.Raise arms simultaneously or
alternate arms, raising one
arm while lowering the other
(arms should pass each other
at the halfway point).
2.Stabilize one band under both
feet.
3.Fasten one or two bands to a
low rear post.
4.3-Way: Alternate by raising the
bands directly in front of you
(FRONT RAISE), out to your sides
(LATERAL RAISES), and 45°
outward away from your body.
32. lateral raises
Lift Name
Target
LATERAL RAISES
DELTOIDS (medial),
traps
Post
A.P Height
LOW
UNDER FEET
Position
Grip Options
UPRIGHT, BENT OVER
HANDGRIPS,
FREEHAND
DESCRIPTION
tips
With arms slightly bent by your
side, alternate raising each arm
out laterally or raise both arms
up simultaneously. Hold briefly at
the point of maximum resistance
before returning back to starting
position.
• Keep elbows slightly bent in a
fixed position.
44
• Do not rock your torso back
and forth.
• Maintain at least minimal
resistance on both bands at
all times.
variations
1.Stabilize one band under both
feet.
2.Fasten one or two bands to a
low rear post.
3.3-Way: Alternate by raising the
bands directly in front of you
(FRONT RAISE), out to your sides
(LATERAL RAISES), and 45°
outward away from your body.
shoulders
33. upright rows
Lift Name
Target
UPRIGHT ROWS
DELTOIDS, lats, traps
Post
A.P Height
LOW
UNDER FEET
Position
Grip Options
UPRIGHT
BAR, FREEHAND,
HANDGRIPS
tips
DESCRIPTION
variations
• Lead with your elbows as you lift.
Stabilize one band under both
• Your back and trap muscles will
feet, forming a triangle with the
naturally want to assist your
band. With your hands close
deltoids.
together, raise the band up from
your waist toward your chin,
• This should be a smooth motion
keeping hands close to your body.
without any jerking
1.Use a different low front
post to lower or shift the
resistance.
2.Stabilize one band under
each foot.
• Spread feet apart or loop band to
raise resistance.
34. cableband laterals
Lift Name
Target
CABLEBAND
LATERALS
DELTOIDS (rear)
Post
A.P Height
LATERAL
CHEST LEVEL
Position
Grip Options
UPRIGHT, BENT OVER
HANDGRIPS,
FREEHAND
DESCRIPTION
tips
variations
Grasp the band with
your arm extended
across your body and
pull the band across
yourself until your arm
is extended out to the
side. Slowly return to
starting position while
keeping the band taut.
• Maintain elbows fixed in a
slightly bent position.
1.Lower the A.P. height and raise your arm
across your body at a slightly upward angle.
• Keep your arm parallel to
the ground.
2.Raise the A.P. height and lower your arm
across your body at a slightly downward
angle.
• Angle yourself toward or away
from A.P. to modify resistance. 3.Fasten two bands to two lateral posts
and perform exercise with both arms
• Take a wider stance to
simultaneously.
maintain balance.
• Cross the bands (one through the other)
to avoid friction.
45
shoulders
35. skiers
Lift Name
Target
SKIERS
DELTOIDS (rear)
Post
A.P Height
FRONT
KNEE LEVEL
Position
Grip Options
BENT OVER
HANDGRIPS,
FREEHAND
DESCRIPTION
tips
variations
With your arms extended
forward, pull your arms back as
far as you can. Hold briefly at
the point of maximum resistance
before returning to starting
position.
• Maintain arms as straight as
possible to direct the tension
to your shoulders instead of
triceps.
• Roll your shoulders forward to
engage rear deltoids.
1.Use one band to significantly
raise resistance.
36. isolation rotations
Lift Name
Target
ISOLATION
ROTATIONS
DELTOIDS,
rotator cuff
Post
A.P Height
LATERAL or
OVERHEAD
BELLYBUTTON LEVEL
Position
Grip Options
UPRIGHT, SEATED
HANDGRIPS,
FREEHAND
DESCRIPTION
tips
variations
Start with your shoulder
facing the A.P. and your
elbow bent at 90° by
your side. Pull the band
horizontally across your body.
Then turn around and pull the
band across your body in the
opposite direction using the
same hand. Alternate sides
when finished.
• Keep your elbow planted by
your side and your forearm
parallel to the ground.
• Hold your upper arm in place
with the other hand to limit
movement.
1.ROTATOR CUFF: Fasten or wrap
band around a front post with A.P.
height around chest level; pull arms
back in a circular motion while
keeping upper arm parallel to floor.
2.Fasten a band to an overhead post;
pull forearm down in a circular
motion (instead of backward).
• Any variation can use two
bands to engage both arms
simultaneously.
46
shoulders
37. shrugs
Lift Name
Target
SHRUGS
TRAPS
Post
A.P Height
LOW
UNDER FEET
Position
Grip Options
UPRIGHT, SUPINE
BAR, HANDGRIPS,
FREEHAND
DESCRIPTION
tips
variations
With your arms by your sides,
raise your shoulders as high as
you can. Hold the contraction for
several seconds at the top, and
then slowly lower your arms back
to starting position.
• Maintain arms as straight as
Keep your back straight, abs
tight and knees slightly bent.
• Pull your shoulders up toward
your ears.
• Squeeze your shoulders
together behind you as you
raise them up; don’t roll them
forwards or backwards at the
top.
1.Insert a bar between the ends
behind you.
2.Fasten two bands to two low
front or lateral posts.
3.Do fewer repetitions, but
hold each rep at the point
of maximum resistance for
as long as possible (Static
Contraction Training).
4.WRIST CURLS: Using
handgrips, curl the grips
up and down your hands to
contract your forearms at the
top of your SHRUG.
• Do this variation in
conjunction with SHRUGS or
on its own.
47
legs
LEGS: QUADRICEPS (QUADS), HAMSTRINGS
(HAMS), CALVES, BUTTOCK (GLUTES), and HIPS
Always protect your knees! Don’t lock them out during any exercise
to avoid excess strain. Start with a low resistance to enhance your
form and encourage proper muscle development. Keep the bands
taut by staying within the constant line of resistance so that your leg
muscles never get a rest until after your set. Perform each exercise
slowly to prevent momentum from speeding up your repetitions. Stay
conscious of your breathing patterns to help maintain a consistent
tempo, especially for more challenging lifts; exhale during the difficult
portion and then inhale while returning back up to starting position.
Last but not least... keep those abs tight and that back straight!
Squats are a great all-around exercise for legs.
38. squats
Lift Name
Target
SQUATS
QUADS, hams, glutes
Post
A.P Height
LOW
UNDER FEET
Position
Grip Options
UPRIGHT
BAR, HANDGRIPS,
FREEHAND
DESCRIPTION
tips
variations
Stabilize one band under
both feet and around
shoulders. Unlock your
hips, drop your butt down
as if to sit on a chair, and
slowly squat down until
your thighs are parallel to
the floor. Without bouncing
at the bottom, push
yourself up through your
heels back to an upright
position.
• Keep feet slightly wider than
shoulder width apart with all body
weight on heels.
• You should feel tension in thighs and
buttocks, not the knees or back.
• Drop your buttocks lower for an
added challenge.
• Knees should not extend past your
toes; if they do, you are leaning too
far forward.
• Arch your back slightly inward and
pinch your shoulder blades together.
• Point your toes outward to engage
inner thigh muscles; point toes
inward to engage outer thighs.
• Focus eyes on a specific point in
front of you to help your balance.
1.Two bands: Stabilize one band
under each foot with the other
end crossed over your body
and stabilized around the
opposite shoulder. Insert a bar
and rest it on your shoulders
behind your neck.
2.Extend your arms up and hold
the band(s) above your head to
increase resistance.
3.One leg: Place one foot on a
chair behind you and SQUAT
down with the other leg.
48
legs
39. lunges
Lift Name
Target
LUNGES
QUADS, hams, glutes
Post
A.P Height
LOW
UNDER FOOT
Position
Grip Options
UPRIGHT
FREEHAND
DESCRIPTION
tips
With one end of a band
stabilized under your foot
and around both shoulders,
take one giant pace forward
and lower yourself until
the opposite knee almost
touches the ground. Push
yourself up through your
front thigh; step your front
leg back to starting position.
• At the bottom of the LUNGE, your front 1.Wrap a band under your lead
knee should be bent so that it blocks
foot and grasp the ends in
your line of vision to your front foot, but
each hand.
is not bent past your foot.
2.Bring trailing leg forward to
• Your lead foot should stay flat on the
lead leg as you come up and
ground until lifted back up to the rear foot.
gradually walk forward. This
works well without bands since
• Longer strides target glutes; shorter
you can easily alternate sides
strides target quads.
as you walk. Hold any heavy
• Engage hamstrings by keeping the
object during the workout for a
trailing leg as straight as possible as
challenge.
you go down.
• LUNGE slowly to intensify the workout.
variations
40. leg press
Lift Name
Target
LEG PRESS
QUADS
Post
A.P Height
REAR
BACK/SHOULDER
Position
Grip Options
SUPINE
ANKLE STRAPS,
FREEFOOT
DESCRIPTION
tips
variations
Stabilize one band around each
shoulder and under the opposite
foot. With your knees bent in
close to your chest, push your
legs out to a full extension.
• Maintain constant tension on
the bands.
• Loop the bands around your
feet to raise the resistance.
• Unite bands with a clip or twist
them in the middle to minimize
the friction against your legs.
1.Stabilize one band under
both feet and around both
shoulders.
2.Lower band(s) from your
shoulders down toward your
lower back for a more vertical
press.
49
legs
41. leg extensions
DESCRIPTION
With the bands positioned on the
inside of your legs, elevate your
knee to raise your foot off the
ground. Slowly kick your foot out
until your leg is fully extended.
Contract your quad muscle before
slowly returning back to starting
position. Perform with your other
leg when finished so you don’t
walk funny later.
Lift Name
Target
LEG EXTENSIONS
QUADS
Post
A.P Height
REAR
SHIN LEVEL
Position
Grip Options
SEATED
ANKLE STRAPS,
HANDGRIPS, FREEFOOT
tips
variations
• Keep knee elevated so that
your foot never touches the
ground.
• Position chair farther from A.P.
to increase resistance.
• Place a rolled-up towel or
pillow under your thigh to prop
up your leg.
1.Double Leg: Prop both legs up
off the ground and extend both
legs simultaneously.
2.Upright: Raise knee and
extend leg forward. Touch any
stationary object for balance.
42. good mornings
Lift Name
Target
GOOD MORNINGS
HAMS, glutes,
hips, core
Post
A.P Height
LOW
UNDER FEET
Position
Grip Options
BENT OVER
FREEHAND
DESCRIPTION
tips
Start with your feet a little
closer together than shoulderwidth apart and your toes
pointing slightly inward. Bend
at the hips and lower yourself
until your torso is nearly parallel
to the floor. Contract your abs,
glutes and leg muscles as
you pull yourself back up to a
standing position.
• The sensation should be like
having a hinge in your hips with 1.Lower the band from behind
your neck down to your
no movement occurring below
shoulder blades or upper back
the hips (same as DEADLIFTS).
to shift the resistance.
• Keep legs and back straight with
shoulder blades locked together.
• Ascend and descend slowly for
greater control.
• Drop torso lower for an additional
challenge.
50
variations
legs
43. straight-leg deadlift
Lift Name
Target
STRAIGHT-LEG
DEADLIFT
HAMS, glutes,
hips, core
Post
A.P Height
LOW
UNDER FEET
Position
Grip Options
UPRIGHT
BAR, FREEHAND
HANDGRIPS,
DESCRIPTION
tips
variations
Keeping your legs straight,
bend over from the waist until
you feel a slight stretch in your
hamstrings, then contract your
thighs and slowly raise yourself
back up to a standing position.
• Tighten your abs and squeeze
your glutes.
• Keep legs straight to direct
resistance to hamstrings
instead of lower back.
• Lock shoulder blades together
to help straighten your back.
• See DEADLIFT in the BACK
section for other helpful hints.
1.STRAIGHT LEG DEADLIFT
targets hamstrings; DEADLIFT
targets lower back.
44. leg curls
Lift Name
Target
LEG CURLS
HAMS
Post
A.P Height
REAR
KNEE LEVEL
Position
Grip Options
PRONE
ANKLE STRAPS,
HANDGRIPS, FREEFOOT
DESCRIPTION
tips
variations
Bend your knees slightly to make
the band taut. Pull your feet
in toward your buttocks, then
release back to starting position.
• Raise the A.P. height to engage
your lower hamstrings.
• Keep thighs flexed and bands
taut so that hamstrings are
never completely resting.
1.Stabilize two bands to a rear
post and attach each band to a
separate foot.
2.UPRIGHT LEG CURLS: Fasten
one band to a low front post
and attach the other end to
your foot. Facing the post,
keep your knees together as
you curl your leg up, forming a
90° angle at the knee.
51
legs
45. calf raises
Lift Name
Target
CALF RAISES
CALVES
Post
A.P Height
LOW
UNDER FEET
Position
Grip Options
UPRIGHT, SEATED
ANKLE STRAPS,
FREEFOOT
DESCRIPTION
tips
variations
Stand on a stair or any
elevated surface with your
heels extending off the back.
Raise your ankles up as high
as you can by pushing up
with your toes. Flex your calf
muscles at the top before
lowering yourself back to
starting position.
• Keep your entire body still.
• Stabilize bands under toes to
secure them in place.
• Balance yourself by touching
any stationary object.
• Extend your heels farther
off the edge for a more
challenging exercise.
• Point toes inward or outward
and position feet closer or
further apart to engage all
areas of calf muscles.
1.Two Bands: Stabilize one band
under each foot and around
the opposite shoulder for more
resistance.
2.Seated Single Leg: Stabilize
both ends of one band around
the same foot with the middle
wrapped around the same
knee, isolating each calf
muscle.
3.Seated Double Leg: Wrap one
band around both knees and
stabilize the ends under each
foot.
46. hip abductor/adductor
DESCRIPTION
tips
Wrap one band around both
knees and stabilize the ends
under each foot. While keeping
your ankles together, slowly
spread your knees as far apart as
possible.
• Squeeze hips while slowly
spreading and closing legs.
• Distance feet farther apart,
position feet in closer toward
your body, or prop feet up
on any object to shift the
resistance.
• Loop bands around feet to
raise resistance.
52
Lift Name
Target
HIP ABDUCTOR/
ADDUCTOR
HIPS, thighs
Post
A.P Height
LOW
KNEE LEVEL
Position
Grip Options
SEATED
ANKLE STRAPS,
FREEFOOT
variations
1.See RESISTED KICKS
variations.
legs
47. resisted kicks
Lift Name
Target
RESISTED
KICKS
GLUTES, hips, hams
Post
A.P Height
FRONT, rear, side
SHIN LEVEL
Position
Grip Options
UPRIGHT
ANKLE STRAP,
HANDGRIP, FREEFOOT
DESCRIPTION
tips
variations
With the band taut and your
leg extended slightly forward,
squeeze your glutes and kick your
leg backwards. Repeat with the
other leg.
• Keep your leg straight and
push from ankle.
• Touch any stationary object for
balance.
• Stand tall on your supporting
leg.
1.Face the opposite direction
and kick your leg forward.
2.ABDUCTOR: Turn 45° so
that band is attached to your
outside leg (farthest from
A.P.). Kick your leg out laterally
toward the opposite side.
3.ADDUCTOR: Attach band to
your inside leg (closest to
A.P.). Kick your leg laterally
across the body until it is fully
extended to the opposite side.
4.SEATED ABDUCTOR or
ADDUCTOR: Perform from a
seated position on the floor.
Keep legs straight and
push from ankle for every
variation.
53
stretching
STRETCHING
Stretching opens up passageways in your body so that blood can better circulate
and carry oxygen to muscles, speeding up the recovery process and enhancing your joint flexibility and optimal muscle lengths. We have taken the liberty
of renaming, and in some cases naming, the following stretches to make them
easier for you to remember.
48. lower back lubricator
Keep your feet planted and slowly
bow down, drop your buttocks
and extend your arms forward.
Unlock your hip joints and feel the
stretch in your lower back. Slowly
wiggle your buttocks from side to
side to stretch your entire lower
back region.
• Stretch your hamstrings
by keeping arms and back
straight and shifting body
weight to your heels.
• REVERSE: Perform the same
stretch while facing away from
the post to stretch your chest,
shoulders, and upper back
muscles.
49. Relaxalator
Grasp the free end(s) in each
hand and bend over at the waist
while keeping your back and
arms straight. Feel the stretch in
your mid and upper back. Spread
your arms out and slowly lower
your torso toward the ground.
54
stretching
50. Loose Arm-Ony
Keeping your arm straight, lean
your torso toward your outside
shoulder (away from A.P.). Feel
the stretch in your shoulder and
upper back. Afterward, pivot
around so that your outside arm
becomes your inside arm. Now
lean away from the A.P. while
facing the opposite direction to
stretch the front of your shoulder
and outer chest.
• Repeat on opposite side
when finished.
51. wicked chicken wing
Grasp one band behind your back
in both hands with one elbow
pointing upward and the other
pointing downward. Slowly try to
work your hands together.
• If you pull the band up or
down, you should feel a stretch
in your shoulders or triceps,
respectively.
52. neck stup
Wrap a band behind your neck
and gently pull each end down
with your hands while slowly
raising your head upward, then
slowly tilt your head from side to
side. Start with a low resistance.
55
stretching
53. leg liberator
Keeping your left leg straight, slowly
pull it forward toward your head.
Every time your leg advances, hold
it briefly until your body readjusts
before pulling further. After slowly
pulling your leg forward to the
farthest point possible, pull it to the
left side using the same technique.
Then grasp the band with your right
hand and slowly pull your left leg
across to your right side.
• Keep your shoulders pinned to the floor.
• Repeat with right leg when finished.
• Maintain stability in your hips, keep your
leg straight, and keep your back flat on
the floor.
54. quad-lity
While lying on your side, loop
one band around your outside
foot. Next, wrap the band around
your shoulder and grasp the
free end in hand. Slowly pull the
band forward, forcing your thigh
backward.
• Breathe regularly as you slowly
relieve the stiffness and relax
your quadriceps.
• Straighten leg to engage your
hip flexor.
55. ankle motionizer
Loop band(s) around the foot
of your extended leg and grasp
the other end. Slowly rotate your
ankle around in circles as you
resist the force imposed by the
band.
• This will loosen and strengthen your ankle, ultimately helping to
minimize the risk of and/or rehabilitate ankle injuries.
• Fasten the free end of the band to a post at different angles or have
someone pull the band from various directions away from your
ankle to shift the resistance.
56
• Try these in an upright
position.
core strength
CORE STRENGH: ABDOMINALS (ABS),
OBLIQUES, LOWER BACK
A strong core ensures the
physique you want and protects
your lower back, but also makes
your whole body feel stronger,
more limber and better balanced.
Strengthening your core is
important since every body
movement should stem from
this region. High intensity and
attention to detail are the keys to
a sound core workout. Dig down
to the core of your being and go
hard while keeping great form!
ABS
56. the squeeze
Fasten, stabilize or wrap a band
around an overhead post and
grasp the free end(s) in each
hand by your forehead or on
either side of your temples. Bend
over at the waist and pull your
torso down using your core.
• Keep your back straight as you
lower your head toward the
floor.
VARIATIONS
1.Perform upright, seated or
kneeling. Pull with abs, keep
back straight and bend only
at your waist.
2.Obliques: Alternate pulling
your torso down from side to
side.
• Avoid pulling the band down
with your arms.
• Squeeze your abs at the
bottom before ascending back
to starting position.
57. the raise
Wrap one band under both feet
and grasp the ends in each hand.
Raise your legs and hold in a
static position.
• Keep back flat on the floor.
• Keep abs tight to avoid lower
back pain.
• If uncomfortable, place hands
under glutes to support your
torso.
57
core strength
58. the scissor kick
Stabilize one band around each
foot and shoulder. Hold legs
slightly off the ground and make
small up-and-down scissor-like
motions as you lift each leg up to
a 45° angle from the hips before
lowering back down.
• Place hands under buttocks
for support.
59. the crunch
In a supine position with your
hands cupped loosely behind your
head or with your arms extended
forward, raise your knees up
and your tailbone slightly off
the ground. Contract your abs
as you lift your shoulders and
upper back off the floor; imagine
trying to compress your abs and
tailbone together.
• You don’t need to lift your
entire back off the ground to
feel the burn, just get your
shoulder blades about an inch
or two (2-5 cm) off the ground.
• Give an extra squeeze at the
top for a total contraction
before slowly lowering back to
starting position.
• Perform the descent portion
of the rep just as slowly and
deliberate as the ascent.
• Avoid pulling your head
forward with your hands or
using your back to propel
yourself forward.
58
VARIATIONs
1.Twist your torso to each side
and rotate touching one elbow
to the opposite knee.
2.Raise and hold your torso
where it burns as long as
you can (Static Contraction
Training).
core strength
60. the bicycle
Rotate by bringing one elbow to the
opposite knee, then kicking that leg
forward and bringing your other
elbow to the opposite knee. Keep
your core tight!
VARIATIONs
1.Stabilize a band around each foot
with the middle wrapped around
your back.
2.Fasten two bands together as
illustrated in the video.
3.To increase resistance, wrap one
band around your lower back and
stabilize the ends around each foot.
61. the roll (reverse crunch)
Bring your legs to your torso instead
of vice versa. From a supine position,
bend your knees and bring them as
close to your chest as you can without
raising your pelvis. Then lift your hips
and glutes off the floor and roll your
legs forward as you bring your knees to
your shoulders.
• Squeeze your abs throughout the
movement for maximum contraction.
• Keep knees bent at the same angle
during your set.
• For a challenging addition, after
bringing knees to shoulders, raise
your legs straight up in the air, hold
briefly while balancing yourself on
your shoulders and upper back.
VARIATION:
1.HIP THRUSTS: keep your
legs perpendicular to
floor (pointed straight up)
and raise only hips and
glutes off the floor while
squeezing abs.
62. the plank
Rest yourself on your forearms
and toes while your body stays
straight as a board. Compress
your core region by rolling your
tailbone in and squeezing your
inner thighs; imagine bringing
your pelvis to your spine. See
how long you can bare it!
59
core strength
OBLIQUES
63. the side bridge
After doing THE PLANK in a
raised prone position, rotate over
onto one side and balance yourself on your forearm and inside
foot. Hold for as long as possible.
Keep your body as straight as
possible and your upper arm
lightly resting on your thigh or
extended up in the air for an
added challenge. Alternate sides
when finished.
• Count how many seconds you
can hold this pose to measure
progress.
VARIATIONS
1.Balance yourself up on your
hand instead of forearm.
2.Stabilize a band between
inside foot and outside
shoulder for a challenge.
64. the obliquatory
Lie flat on your side with your
knees bent and your feet tucked
in. Cup your hands behind your
head and raise your shoulders
and upper back vertically off the
floor by squeezing your oblique
muscles. Hold this position for
a few moments before slowly
returning to starting position.
Alternate sides when finished.
60
core strength
65. the twist
Begin in the same starting position as THE CRUNCH. Raise your
shoulders off the ground and
gently pull your torso from side
to side. Hold your arms outward
and still as they hover slightly
above the floor while your torso
shifts.
• Keep back straight and abs
tight.
• Move slowly to make sure that
momentum does not guide
you; let your obliques do the
work.
66. the woodchopper
Lock both hands around the
band (or handgrip) and pull arms
diagonally across your body. Twist
your torso while keeping your
abs contracted, back straight
and arms fixed in a slightly bent
position.
• Center your body weight over
your feet and your head over
your shoulders.
• Rotate shoulders and hips
together as a unit with abs.
VARIATION
Raise or lower A.P. height:
1.A low A.P. height will require
you to pull the band across
your body at an upward angle;
pull at a downward angle
when using a high A.P.
2.Pull band horizontally across
body when using a chest-level
A.P.
61
core strength
LOWER BACK
67. the superman
Lie in a prone position with your
arms extended in front of you. In
one fluid motion, raise your legs,
chest, shoulders and arms off the
ground. Keep abs tight to absorb
the tension.
VARIATIONS:
1.Place your hands on the
ground with elbows bent,
similar to PUSH-UP position.
2.Point your arms back toward
legs and pinch shoulder blades
together behind you.
68. the hyperextension
Wrap one band around a front
post with the A.P. height around
bellybutton level. Pull your torso
back until your back is almost flat
against the floor and then hold.
Slowly return to starting position.
• Keep your arms and back
straight with abs firmly
contracted.
• Use bar or handgrips to ease
the pressure on your hands.
62
core strength
69. the side bend
Wrap a band under your foot
and grasp both ends in the same
hand. Slowly bend from side to
side at your waist. Keep your
active arm and back straight the
whole time.
VARIATION
Fasten the band to a side post
instead of wrapping it around
your foot.
70. the aligner
Insert your right leg into one band
up to your groin, wrap the same
band around your stomach and
then around your back, and then
insert your right arm. Stabilize the
band around your right shoulder.
You should feel resistance pulling
your right shoulder back. Stabilize
another identical-sized band
around your left leg, then wrap it
in front of you, behind you, and
insert your left arm.
• Keep abs tight and maintain
good posture as the bands
draw your shoulders back and
open your chest.
• Wear a thick shirt or protective
layer to prevent irritation.
63
DISCLAIMER
There are inherent risks in any physical activity and resistance training is no exception. The exercises
in this manual and any other exercise programs may result in injury. To reduce the risk of injury, consult
your physician before beginning this exercise program. The advice presented is in no way intended as
a substitute for medical consultation. Rubberbanditz, LLC. disclaims any liability from and in connection
with this program. As with any exercise program, if at any point during your workout you begin to feel
fatigued, dizzy, or have physical discomfort, you should stop immediately and consult a physician.
EXCEPT AS EXPLICITLY SET FORTH IN OUR WRITTEN WARRANTY, THERE ARE NO WARRANTIES,
EXPRESS OR IMPLIED, WITH RESPECT TO RUBBERBANDITZ PRODUCTS. RUBBERBANDITZ, LLC
EXPRESSLY EXCLUDES AND DISCLAIMS ANY IMPLIED WARRANTY OF MERCHANTABILITY AND
ANY WARRANTIES OF FITNESS FOR A PARTICULAR PURPOSE, APPLICATION OR USE. UNDER
NO CIRCUMSTANCES WILL RUBBERBANDITZ, LLC BE LIABLE FOR SPECIAL, INCIDENTAL OR
CONSEQUENTIAL DAMAGES, WHETHER SUCH DAMAGES ARE SOUGHT IN CONTRACT, IN TORT
(INCLUDING BUT NOT LIMITED TO NEGLIGENCE AND STRICT LIABILITY) OR OTHERWISE, AND
RUBBERBANDITZ, LLC’S LIABILITY SHALL IN NO EVENT EXCEED THE PURCHASE PRICE OF THE
RUBBERBANDITZ PRODUCTS ON WHICH SUCH LIABILITY IS BASED.
64