1
file:///C|/Documents%20and%20Settings/dquick/My%20Documents/Visual%20Studio%20Projects/FretWorxHelp/Introduction.htm
Previous
FretWorxTM
Next
TM
Introducing FretWorx
TM
FretWorx
is designed to help you be a better musician, whatever your level of experience.
TM
FretWorx makes it easy to visualize fundamental or advanced scales and chords to help you
improve your knowledge of the stringed instruments you play.
Use FretWorx
TM
with almost any fretted or fingered stringed instrument to:
●
See the notes of any scale in any position
See the notes of any chord in any position
Compare the notes of any chord to the notes of any scale
View a catalog of common fingerings for each:
❍ Chord
❍ Scale
❍ Arpeggio
Hear an example of each fingering for:
❍ Chords
❍ Scales
❍ Arpeggios
Copy selected fingerings and paste them into other applications
●
Find the names of chords you create with the Chord Lab
●
●
●
●
●
TM
You choose the instrument definition included with your copy of FretWorx
definition defines:
●
●
●
●
●
●
TM
. Each instrument
The number of strings or courses the instrument uses
The tuning of each string or course
The sound used to play chord examples
A comprehensive set of common scales
A comprehensive set of common chords
A catalog of fingerings for the common chords, scales, and arpeggios
TM
Just load a new instrument definition to use FretWorx for more than one instrument.
Inexpensive instrument definitions are available for many stringed instruments including guitar,
file:///C|/Documents%20and%20Settings/dquick/My%20Doc...ual%20Studio%20Projects/FretWorxHelp/Introduction.htm (1 of 2)11/1/2005 4:23:21 PM
file:///C|/Documents%20and%20Settings/dquick/My%20Documents/Visual%20Studio%20Projects/FretWorxHelp/Introduction.htm
bass guitar, baritone guitar, mandolin, ukulele, and even two handed tapping instruments.
Alternate tunings are available for many instruments.
TM
If FretWorx doesn’t already contain your favorite tunings, chord fingerings, or scales, just add
them yourself. Unlike books and most chord finder programs, you can customize and expand
FretWorx
●
●
●
●
●
●
TM
several ways:
Define new instruments
Create new tunings
Experiment with unusual scales
Create new chords
Create new chord fingerings for:
❍ Chords
❍ Scales
❍ Arpeggios
Select different preview sounds
TM
You can learn to use FretWorx
in just a few minutes and replace dozens of chord books with
a faster, easier, and more powerful alternative. Welcome to FretWorx
See Also
TM
!
Previous
TM
Getting help in FretWorx
, Installing FretWorx
Next
TM
, Support and on-line resources
file:///C|/Documents%20and%20Settings/dquick/My%20Doc...ual%20Studio%20Projects/FretWorxHelp/Introduction.htm (2 of 2)11/1/2005 4:23:21 PM
file:///C|/Documents%20and%20Settings/dquick/My%20Documents/Visual%20Studio%20Projects/FretWorxHelp/Installation.htm
FretWorxTM
Previous
Next
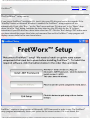
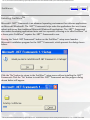
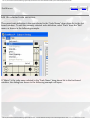
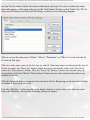
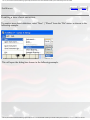
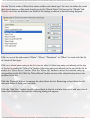
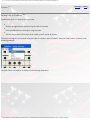
The FretWorx™ setup menu
If you have a FretWorx™ installation CD, inset it into your CD drive and wait a few seconds. If the
"AutoPlay" feature of Microsoft Windows is enabled, the FretWorx™ setup program will run
automatically. If not, click "Run..." on the "Start" menu and type "D:\setup.exe" in the "Open:" dropdown list in the "Run" dialog. Substitute the drive letter for your CD drive for the "D" in these
instructions if your CD drive has a drive letter other than "D". Click the "Run" dialog's "OK" button once
you have entered the proper drive letter and command line and the FretWorx™ setup program will
display a menu similar to the one shown below:
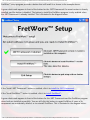
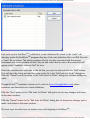
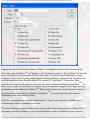
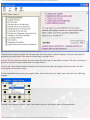
FretWorx™ requires a recent version of Microsoft's .NET Framework in order to run. The FretWorx™
setup program automatically checks your system for the correct version. If it is not found, the
file:///C|/Documents%20and%20Settings/dquick/My%20Docu...sual%20Studio%20Projects/FretWorxHelp/Installation.htm (1 of 3)11/1/2005 4:23:22 PM
file:///C|/Documents%20and%20Settings/dquick/My%20Documents/Visual%20Studio%20Projects/FretWorxHelp/Installation.htm
FretWorx™ setup program provides a button that will install it as shown in the example above.
A green check mark appears in front of the button for the .NET Framework if a recent version is already
installed, and the button is disabled. The button to install the FretWorx program is only enabled when
the .NET Framework is already installed. This is illustrated in the diagram below.
If the "Install .NET Framework" button is enabled, click it to install the .NET Framework .
If the "Install FretWorx™" button is enabled, click it to install FretWorx™ .
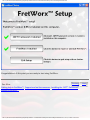
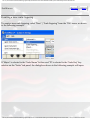
A green check mark appears in front of the buttons for the .NET Framework and the FretWorx program
when both are installed successfully. You can still click this button to repair FretWorx if some of its
components are accidentally deleted, or to uninstall FretWorx. This is illustrated in the diagram below.
file:///C|/Documents%20and%20Settings/dquick/My%20Docu...sual%20Studio%20Projects/FretWorxHelp/Installation.htm (2 of 3)11/1/2005 4:23:22 PM
file:///C|/Documents%20and%20Settings/dquick/My%20Documents/Visual%20Studio%20Projects/FretWorxHelp/Installation.htm
Congratulations! At this point you are ready to start using FretWorx.
See Also
Previous
Getting help in FretWorx™, Support and on-line resources, Installing the .NET™ Framework,
Installing FretWorx™
file:///C|/Documents%20and%20Settings/dquick/My%20Docu...sual%20Studio%20Projects/FretWorxHelp/Installation.htm (3 of 3)11/1/2005 4:23:22 PM
Next
file:///C|/Documents%20and%20Settings/dquick/My%20Documents/Visual%20Studio%20Projects/FretWorxHelp/InstallDotNet.htm
Previous
FretWorxTM
Installing FretWorx
Next
TM
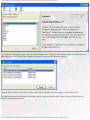
Microsoft's .NET™ Framework is an advanced operating environment for software applications
on Microsoft Windows®. The .NET™ Framework helps make the applications that use it more
robust and secure than traditional Microsoft Windows® applications. The .NET™ Framework
also makes developing applications faster and less expensive, allowing us to offer FretWorx™ at
a lower price. FretWorx™ requires the .NET™ Framework to run.
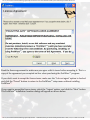
Pressing the "Install .NET Framework" button on the FretWorx™ setup menu launches
Microsoft's installation program for the .NET™ Framework, which presents the dialog shown
below.
Click the "No" button to return to the FretWorx™ setup menu without installing the .NET™
Framework. Click the "Yes" button to install the .NET™ Framework and the progress dialog
shown below will appear.
file:///C|/Documents%20and%20Settings/dquick/My%20Doc...al%20Studio%20Projects/FretWorxHelp/InstallDotNet.htm (1 of 5)11/1/2005 4:23:22 PM
file:///C|/Documents%20and%20Settings/dquick/My%20Documents/Visual%20Studio%20Projects/FretWorxHelp/InstallDotNet.htm
When the progress dialog is complete, the .NET™ Framework license dialog will appear, as
shown below.
Read the license agreement to make sure you agree with its terms before accepting it.
If you don't want to accept the license terms, make sure the "I do not agree" option is checked
and click the "Cancel" button to return to the FretWorx™ setup menu without installing the .
NET™ Framework. Since FretWorx requires the .NET™ Framework to run, you will be unable to
install FretWorx™.
If you want to accept the license terms, select the "I agree" option, and click the "Install" button.
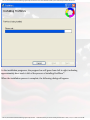
The .NET™ Framework installation progress dialog will appear as shown below.
file:///C|/Documents%20and%20Settings/dquick/My%20Doc...al%20Studio%20Projects/FretWorxHelp/InstallDotNet.htm (2 of 5)11/1/2005 4:23:22 PM
file:///C|/Documents%20and%20Settings/dquick/My%20Documents/Visual%20Studio%20Projects/FretWorxHelp/InstallDotNet.htm
As the installation progresses, the progress bar will grow from left to right, indicating
approximately how much is left of the process of installing the .NET™ Framework. Information
about what the installation program is doing and approximately how much time is remaining
appears in the box below the progress bar. The time remaining depends on the speed of your
system and is only an estimate.
file:///C|/Documents%20and%20Settings/dquick/My%20Doc...al%20Studio%20Projects/FretWorxHelp/InstallDotNet.htm (3 of 5)11/1/2005 4:23:22 PM
file:///C|/Documents%20and%20Settings/dquick/My%20Documents/Visual%20Studio%20Projects/FretWorxHelp/InstallDotNet.htm
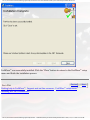
When the installation process is complete, the following dialog will appear.
The .NET™ Framework was successfully installed. Click the "OK" button to return to the
FretWorx™ setup menu and continue the installation process.
file:///C|/Documents%20and%20Settings/dquick/My%20Doc...al%20Studio%20Projects/FretWorxHelp/InstallDotNet.htm (4 of 5)11/1/2005 4:23:22 PM
file:///C|/Documents%20and%20Settings/dquick/My%20Documents/Visual%20Studio%20Projects/FretWorxHelp/InstallDotNet.htm
See Also
Previous
Next
Getting help in FretWorx™, Support and on-line resources, FretWorx™ setup menu,
Installing FretWorx™
file:///C|/Documents%20and%20Settings/dquick/My%20Doc...al%20Studio%20Projects/FretWorxHelp/InstallDotNet.htm (5 of 5)11/1/2005 4:23:22 PM
file:///C|/Documents%20and%20Settings/dquick/My%20Documents/Visual%20Studio%20Projects/FretWorxHelp/InstallFretWorx.htm
Previous
FretWorxTM
Installing FretWorx
Next
TM
Pressing the "Install FretWorx™" button on the FretWorx™ setup menu launches the installation
program for FretWorx™, which presents the dialog shown below.
Click the "Cancel" button to return to the FretWorx™ setup menu without installing FretWorx™.
Click the "Next" button to install FretWorx™ and the FretWorx™ license dialog will appear, as
shown below.
file:///C|/Documents%20and%20Settings/dquick/My%20Doc...%20Studio%20Projects/FretWorxHelp/InstallFretWorx.htm (1 of 6)11/1/2005 4:23:23 PM
file:///C|/Documents%20and%20Settings/dquick/My%20Documents/Visual%20Studio%20Projects/FretWorxHelp/InstallFretWorx.htm
Read the license agreement to make sure you agree with its terms before accepting it. This is a
copy of the agreement you accepted on-line when purchasing the FretWorx™ program.
If you don't want to accept the license terms, make sure the "I do not agree" option is checked
and click the "Cancel" button to return to the FretWorx™ setup menu without installing
FretWorx™.
If you want to accept the license terms, select the "I agree" option, and click the "Next" button.
The FretWorx™ installation location dialog will appear as shown below.
file:///C|/Documents%20and%20Settings/dquick/My%20Doc...%20Studio%20Projects/FretWorxHelp/InstallFretWorx.htm (2 of 6)11/1/2005 4:23:23 PM
file:///C|/Documents%20and%20Settings/dquick/My%20Documents/Visual%20Studio%20Projects/FretWorxHelp/InstallFretWorx.htm
The FretWorx™ installation location dialog displays the default installation location in the
"Folder" edit box. You change the default location by typing over it, or you can click the
"Browse..." button to select a new location using a Windows Explorer style dialog box.
Click the "Disk Cost..." button to display a dialog that shows how much disk space is needed to
install FretWorx™. If the prerequisites (DirectX® and the .NET™ Framework) are already
installed, FretWorx™ requires less than fifteen megabytes of disk space.
Some people have more than one user account setup on their computer. For example, the
account they use for normal work and an administrator account with special privileges. If you
want to use FretWorx™ under account names other than the one you are logged in under when
installing FretWorx™, select the "Everyone" option. Otherwise, select the "Just me" option.
file:///C|/Documents%20and%20Settings/dquick/My%20Doc...%20Studio%20Projects/FretWorxHelp/InstallFretWorx.htm (3 of 6)11/1/2005 4:23:23 PM
file:///C|/Documents%20and%20Settings/dquick/My%20Documents/Visual%20Studio%20Projects/FretWorxHelp/InstallFretWorx.htm
Click the "Back" button to return to any of the previous dialogs if you need to make changes.
Click the "Cancel" button to return to the FretWorx™ setup menu without installing FretWorx™.
If you are ready to install FretWorx™, click the "Next" button. The installation progress dialog
will appear as shown below.
file:///C|/Documents%20and%20Settings/dquick/My%20Doc...%20Studio%20Projects/FretWorxHelp/InstallFretWorx.htm (4 of 6)11/1/2005 4:23:23 PM
file:///C|/Documents%20and%20Settings/dquick/My%20Documents/Visual%20Studio%20Projects/FretWorxHelp/InstallFretWorx.htm
As the installation progresses, the progress bar will grow from left to right, indicating
approximately how much is left of the process of installing FretWorx™.
When the installation process is complete, the following dialog will appear.
file:///C|/Documents%20and%20Settings/dquick/My%20Doc...%20Studio%20Projects/FretWorxHelp/InstallFretWorx.htm (5 of 6)11/1/2005 4:23:23 PM
file:///C|/Documents%20and%20Settings/dquick/My%20Documents/Visual%20Studio%20Projects/FretWorxHelp/InstallFretWorx.htm
FretWorx™ was successfully installed. Click the "Close" button to return to the FretWorx™ setup
menu and finish the installation process.
See Also
Previous
Next
Getting help in FretWorx™, Support and on-line resources, FretWorx™ setup menu,
Installing the .NET Framework ,
file:///C|/Documents%20and%20Settings/dquick/My%20Doc...%20Studio%20Projects/FretWorxHelp/InstallFretWorx.htm (6 of 6)11/1/2005 4:23:23 PM
file:///C|/Documents%20and%20Settings/dquick/My%20Documents/Visual%20Studio%20Projects/FretWorxHelp/Navigate.htm
Previous
FretWorxTM
Next
Navigating in FretWorxTM
TM
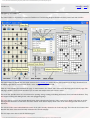
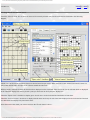
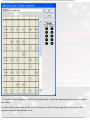
The main window is the primary work area in FretWorx
. The following diagram illustrates the basic parts of the main window.
The main window is divided into two major sections; the fret board grid used to display note positions on the finger board and a set
of tabbed pages that let you work with chords, scales, arpeggios and the Chord Lab.
Click on a tab to display the associated tab page. In this illustration, the "Chord" tab is active and is displaying the chord tab page. Each
tab page contains a set of controls that allow you to work with subject of the tab when it is active.
The menu bar provides access to a set of menus for opening, saving, creating, and editing instrument, chord, and scale definitions. They
also support creating and editing chord, scale, and arpeggio fingerings.
The note display controls are located directly below the fret board grid. Check the "Scale" check box to display scale notes on the fret
board grid and uncheck it to hide them. Check the "Chord" check box to display chord notes on the fret board grid and uncheck it to
hide them.
The selected scale name label identifies the name of the scale currently selected in the "Scale" tab page. The selected chord name label
identifies the name of the chord currently selected in the "Chord" tab page.
The next topic shows how to use the fret board grid.
file:///C|/Documents%20and%20Settings/dquick/My%20Doc.../Visual%20Studio%20Projects/FretWorxHelp/Navigate.htm (1 of 2)11/1/2005 4:23:24 PM
file:///C|/Documents%20and%20Settings/dquick/My%20Documents/Visual%20Studio%20Projects/FretWorxHelp/Navigate.htm
Previous
See Also
Next
The fret board grid, Viewing scales on the fret board, Viewing chords on the fret board, Comparing chords and scales, Getting help
TM
in FretWorx
, Support and on-line resources
file:///C|/Documents%20and%20Settings/dquick/My%20Doc.../Visual%20Studio%20Projects/FretWorxHelp/Navigate.htm (2 of 2)11/1/2005 4:23:24 PM
file:///C|/Documents%20and%20Settings/dquick/My%20Documents/Visual%20Studio%20Projects/FretWorxHelp/FretBoard.htm
Previous
FretWorxTM
Next
The fret board grid
The fret board grid is the main tool for visualizing scales, chords, and the relationships
TM
between them in FretWorx
grid.
. The following diagram illustrates the basic parts of the fret board
The fret board grid is made up of lines that represent strings, frets and the spaces between frets.
Frets are represented by lines that cross the width of the finger board from left to right. The
spaces between frets are numbered from 1 to 24 with fret numbers on the left edge of the
file:///C|/Documents%20and%20Settings/dquick/My%20Doc...Visual%20Studio%20Projects/FretWorxHelp/FretBoard.htm (1 of 2)11/1/2005 4:23:24 PM
file:///C|/Documents%20and%20Settings/dquick/My%20Documents/Visual%20Studio%20Projects/FretWorxHelp/FretBoard.htm
finger board. For stringed instruments that do not have frets, such as the cello, the spaces
between the frets correspond to positions on the neck.
Strings are represented by lines that run the length of the finger board from top to bottom, one
for each of the current instrument's strings. For right-handed instruments, strings are usually
numbered from right to left. In the diagram above the string labeled "E" on the right is known as
the first string and the string labeled "E" on the left is known as the sixths string.
The nut is located at the top of the finger board and corresponds to the nut, or string guide, at
the end of the instrument's neck farthest from its body.
A set of string labels, one for each string, are located above the nut. Each string label shows the
note that sounds when you play the corresponding open string.
TM
You can make the FretWorx window smaller to make it easier to use with other
programs. It's not possible to view all 24 frets when the window is small, so a scroll bar is
located just to the right of the fret board grid. You can move the scroll bar up and down to
look at any part of the finger board.
The next topic shows how to view scales on the fret board.
Previous
See Also
Next
Viewing scales on the fret board, Viewing chords on the fret board, Comparing chords and
TM
scales, Getting help in FretWorx
, Support and on-line resources
file:///C|/Documents%20and%20Settings/dquick/My%20Doc...Visual%20Studio%20Projects/FretWorxHelp/FretBoard.htm (2 of 2)11/1/2005 4:23:24 PM
file:///C|/Documents%20and%20Settings/dquick/My%20Documents/Visual%20Studio%20Projects/FretWorxHelp/ViewScales.htm
FretWorx TM
Previous
Next
Viewing scales on the fret board
Check the "Scale" check box to show the notes of the currently selected scale on the fret board as illustrated in the following diagram.
Scale notes in the current scale are shown on the fret board as solid circles with a letter printed inside.
In the diagram above, an "F" is shown within a solid circle in the upper left-hand corner of the fret board. The circle covers the string
labeled "E" and is in the center of fret space "1". This is the note you would produce by holding down the low E string on a guitar at the
space between the nut and the first fret.
When a scale is selected, the notes for that scale are displayed on the fret board. Scale intervals for the selected scale are displayed in
the "Intervals" display box and any scale synonyms are shown in the "Synonyms" display box.
Select the name of the scale you want to see from the "Scale Name" listbox .
file:///C|/Documents%20and%20Settings/dquick/My%20Doc...isual%20Studio%20Projects/FretWorxHelp/ViewScales.htm (1 of 2)11/1/2005 4:23:24 PM
file:///C|/Documents%20and%20Settings/dquick/My%20Documents/Visual%20Studio%20Projects/FretWorxHelp/ViewScales.htm
This list box is designed to make selecting a scale name fast and easy. The box contains a list of all available scale names categorized by
type. Click one of the type buttons to display the first scale of that type at the top of the list. Use the up and down buttons on the
scroll bar to move the list up or down by one entry. Click in the open area of the scroll bar to move the list up or down a full page at a
time, or drag the scroll bar's "thumb" up and down to move the list rapdily. Click on a name in the list to highlight it and make it the
current selection.
Select the key of the scale you want to see from the "Scale Key" key selector.
The key selector is layed out just like the notes on a piano keyboard. Click on any of the key buttons to select the desired key, which
appears indented as the selected key. The black keys are divided in half to support sharps and flats. Sharp keys are above and to the
right of their natural key and flat keys are below and to the left of their natural key. If in doubt, hover the mouse pointer over a key
and a tool tip will appear showing its full name.
When the scale key changes, the notes on the fret board change to match the selected scale key.
The root note of the scale has the same name as the scale's key. For example, a C major chord scale's root is a "C" note.
The notes of a scale are drawn in black. You can display the root note of the scale in a different color to make them stand out on
the fret board. For example, the root notes in these examples are drawn in steel blue.
Select the color your want to draw the root note of the scale in from the "Root Color" combo box, as shown in the diagram at the top
of the page.
The next topic shows how to view fingerings for the selected scale.
Previous
See Also
TM
Viewing scale fingerings, Creating a new scale definition, Edit the selected scale definition, Getting help in FretWorx
line resources
file:///C|/Documents%20and%20Settings/dquick/My%20Doc...isual%20Studio%20Projects/FretWorxHelp/ViewScales.htm (2 of 2)11/1/2005 4:23:24 PM
Next
, Support and on-
file:///C|/Documents%20and%20Settings/dquick/My%20Documents/Visual%20Studio%20Projects/FretWorxHelp/ViewScaleForms.htm
FretWorxTM
Previous
Next
Viewing scale fingerings
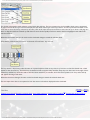
Scale fingerings for the currently selected scale name and scale root are displayed in the "Scale Fingerings" list box, as shown in the
diagram below. Make a selection in the list box and the selected fingering is displayed in the "Selected Fingering" panel.
Scale fingerings use the diagram type common to most scale books. Two examples of scale fingering diagrams are illustrated below.
file:///C|/Documents%20and%20Settings/dquick/My%20Do...%20Studio%20Projects/FretWorxHelp/ViewScaleForms.htm (1 of 3)11/1/2005 4:23:25 PM
file:///C|/Documents%20and%20Settings/dquick/My%20Documents/Visual%20Studio%20Projects/FretWorxHelp/ViewScaleForms.htm
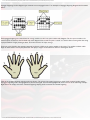
Each scale fingering uses vertical lines for strings, with five to 22 fret spaces within each diagram. The fret space numbers for each
fret space are listed on the left-hand side of the diagram next to each fret space. A small "o" is drawn above a string when the string is
played without a finger pressing it down. These are known as an open strings.
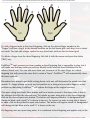
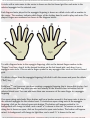
Fingered notes played in the scale fingering are drawn as black circles with a number in the center. The numbers indicate which finger
of either hand is used to play each note. The player's fingers are numbered as shown in the diagram below.
Click on a scale fingering with the mouse to select it. The selected scale fingering is drawn with a heavier border and the scale
fingering notes are highlighted on the fret board grid. Non-root note are highlighted in white and root notes in a lighter version of the
root note color, as shown in the following example. Right-click in the empty area of the "Selected Fingering" display panel to unselect
the selected fingering.
file:///C|/Documents%20and%20Settings/dquick/My%20Do...%20Studio%20Projects/FretWorxHelp/ViewScaleForms.htm (2 of 3)11/1/2005 4:23:25 PM
file:///C|/Documents%20and%20Settings/dquick/My%20Documents/Visual%20Studio%20Projects/FretWorxHelp/ViewScaleForms.htm
The next topic demonstrates how to listen to an example of the way the selected scale fingering should sound.
Previous
See Also
Next
Creating a new scale fingering definition, Edit the selected scale fingering definition, Listening to scale fingering examples , Getting help
TM
in FretWorx
, Support and on-line resources
file:///C|/Documents%20and%20Settings/dquick/My%20Do...%20Studio%20Projects/FretWorxHelp/ViewScaleForms.htm (3 of 3)11/1/2005 4:23:25 PM
file:///C|/Documents%20and%20Settings/dquick/My%20Documents/Visual%20Studio%20Projects/FretWorxHelp/ListenScaleForms.htm
Previous
FretWorxTM
Next
Listening to scale fingering examples
TM
You can use FretWorx
to hear how scale fingerings sound through your computer's speakers.
When a scale fingering is selected, the "Scale" button and "Tempo" slider are enabled as shown
in the example below.
Click the "Scale" button to hear how the scale fingering would sound if the notes of the scale
were played from the lowest note to the highest note. The "Tempo" slider has five setting which
control how fast the notes are played. The left most setting is slowest and the right most setting
is fastest.
TM
FretWorx
uses the sound designated in the current instrument definition to play scale
fingering examples.
The next topic explains how to view chords in FretWorx
See Also
TM
.
Previous
Viewing scale fingerings, Edit the selected instrument definition, Getting help in FretWorx
Support and on-line resources
Next
TM
,
file:///C|/Documents%20and%20Settings/dquick/My%20Docume...al%20Studio%20Projects/FretWorxHelp/ListenScaleForms.htm11/1/2005 4:23:25 PM
file:///C|/Documents%20and%20Settings/dquick/My%20Documents/Visual%20Studio%20Projects/FretWorxHelp/ViewChords.htm
FretWorxTM
Previous
Next
Viewing chords on the fret board
Check the "Chord" check box to show the notes of the currently selected chord on the fret board as illustrated in the following
diagram.
Chord notes of the current chord are shown on the fret board as open circles. When the notes of the selected chord are the same as a
note of the selected scale, the open circle is drawn around the scale note.
When a chord is selected, the notes for that chord are displayed on the fret board. Chord intervals for the selected chord are displayed
in the "Intervals" display box and any chord synonyms are shown in the "Synonyms" display box.
Check the "Open notes" checkbox to display open chord notes on the fret board and uncheck it to hide them.
Check the "Interval names" checkbox to display interval names at the top of each chord note displayed on the fret board and uncheck
it to hide them and display only chord note circles.
Select the name of the chord you want to see from the "Chord Name" listbox .
file:///C|/Documents%20and%20Settings/dquick/My%20Doc...isual%20Studio%20Projects/FretWorxHelp/ViewChords.htm (1 of 2)11/1/2005 4:23:25 PM
file:///C|/Documents%20and%20Settings/dquick/My%20Documents/Visual%20Studio%20Projects/FretWorxHelp/ViewChords.htm
This list box is designed to make selecting a chord name fast and easy. The box contains a list of all available chord names categorized
by type. Click one of the type buttons to display the first chord of that type at the top of the list. Use the up and down buttons on the
scroll bar to move the list up or down by one entry. Click in the open area of the scroll bar to move the list up or down a full page at a
time, or drag the scroll bar's "thumb" up and down to move the list rapdily. Click on a name in the list to highlight it and make it the
current selection.
When the chord name changes, the circles on the fret board change to match the selected chord.
Select the key of the chord you want to see from the "Chord Root" key selector.
The key selector is layed out just like the notes on a piano keyboard. Click on any of the key buttons to select the desired root, which
appears as the selected key. The black keys are divided in half to support sharps and flats. Sharp keys are above and to the right of their
natural key and flat keys are below and to the left of their natural key. If in doubt, hover the mouse pointer over a key and a tool tip
will appear showing its full name.
When the chord root changes, the notes on the fret board change to match the selected chord root.
The next topic shows how to set options for how the notes of a chord are displayed on the fret board.
Previous
See Also
TM
Creating a new chord, Editing the selected chord, View chord fingerings, Getting help in FretWorx
file:///C|/Documents%20and%20Settings/dquick/My%20Doc...isual%20Studio%20Projects/FretWorxHelp/ViewChords.htm (2 of 2)11/1/2005 4:23:25 PM
Next
, Support and on-line resources
file:///C|/Documents%20and%20Settings/dquick/My%20Documents/Visual%20Studio%20Projects/FretWorxHelp/ViewChordForms.htm
FretWorxTM
Previous
Next
Viewing chord fingerings
Chord fingerings for the currently selected chord name and chord root are displayed in the "Chord Fingerings" display panel, as shown
in the diagram below.
Chord fingerings use the diagram type common to most chord books. Two examples of chord fingering diagrams are illustrated below.
file:///C|/Documents%20and%20Settings/dquick/My%20Do...%20Studio%20Projects/FretWorxHelp/ViewChordForms.htm (1 of 3)11/1/2005 4:23:26 PM
file:///C|/Documents%20and%20Settings/dquick/My%20Documents/Visual%20Studio%20Projects/FretWorxHelp/ViewChordForms.htm
Each chord fingering uses vertical lines for strings, with five fret spaces across each diagram. The fret space number for each fret space
is listed on the left-hand side of the diagram next to each fret space. Below each string, the chord fingering displays the note names of
each note sounded in the chord fingering. A small "x" is drawn above a string and no note name appears below it when it is muted or
not played. These are known as muted strings. A small "o" is drawn above a string when the string is played without a finger pressing it
down. This is known as an open string.
A barre occurs when one finger holds down more than one note. In the chord fingering on the left side of the example above, the first
finger holds down both the first and second strings and is shown with a barre symbol connecting the notes.
Fingered notes played in the chord fingering are drawn as black circles with a number in the center. The numbers indicate which finger
of either hand is used to play each note. The player's fingers are numbered as shown in the diagram below.
Click on a chord fingering with the mouse to select it. The selected chord fingering is drawn with a heavier border and the chord
fingering notes are highlighted on the fret board grid. Non-root note are highlighted in white and root notes in a lighter version of the
root note color, as shown in the following example.
file:///C|/Documents%20and%20Settings/dquick/My%20Do...%20Studio%20Projects/FretWorxHelp/ViewChordForms.htm (2 of 3)11/1/2005 4:23:26 PM
file:///C|/Documents%20and%20Settings/dquick/My%20Documents/Visual%20Studio%20Projects/FretWorxHelp/ViewChordForms.htm
The next topic shows how to listen to an example of how the selected chord fingering should sound.
Previous
See Also
Next
Creating a new chord fingering definition, Edit the selected chord fingering definition, Listening to chord fingering examples , Getting
TM
help in FretWorx
, Support and on-line resources
file:///C|/Documents%20and%20Settings/dquick/My%20Do...%20Studio%20Projects/FretWorxHelp/ViewChordForms.htm (3 of 3)11/1/2005 4:23:26 PM
file:///C|/Documents%20and%20Settings/dquick/My%20Documents/Visual%20Studio%20Projects/FretWorxHelp/ListenChordForms.htm
Previous
FretWorxTM
Next
Listening to chord fingering examples
TM
You can use FretWorx
to hear how chord fingerings sound through your computer's
speakers. When a chord fingering is selected, the "Chord" and "Arpeggio" buttons are enabled as
shown in the example below.
Click the "Chord" button to hear how the chord fingering would sound if it was strummed on
the instrument. Click the "Arpeggio" button to hear the notes of the chord played one after the
other, from the lowest note to the highest note.
TM
FretWorx
uses the sound designated in the current instrument definition to play chord
fingering examples.
The next topic describes how to view arpeggio fingerings in FretWorx
See Also
TM
.
Previous
TM
Viewing chord fingerings, Edit the selected chord fingering, Getting help in FretWorx
Support and on-line resources
Next
,
file:///C|/Documents%20and%20Settings/dquick/My%20Docume...al%20Studio%20Projects/FretWorxHelp/ListenChordForms.htm11/1/2005 4:23:26 PM
file:///C|/Documents%20and%20Settings/dquick/My%20Documents/Visual%20Studio%20Projects/FretWorxHelp/ViewArpForms.htm
FretWorxTM
Previous
Next
Viewing arpeggio fingerings
The first step in viewing arpeggio fingerings is to select the chord name and root the arpeggio is based on.
When a chord for the arpeggio is selected, the arpeggio intervals for the selected chord are displayed in the "Intervals" display box and
any arpeggio synonyms are shown in the "Synonyms" display box.
Select the name of the chord you want to see arpeggio fingerings for from the "Arpeggio Name" list box .
This list box is designed to make selecting a chord name fast and easy. The box contains a list of all available chord names categorized
file:///C|/Documents%20and%20Settings/dquick/My%20Do...al%20Studio%20Projects/FretWorxHelp/ViewArpForms.htm (1 of 4)11/1/2005 4:23:26 PM
file:///C|/Documents%20and%20Settings/dquick/My%20Documents/Visual%20Studio%20Projects/FretWorxHelp/ViewArpForms.htm
by type. Click one of the type buttons to display the first chord of that type at the top of the list. Use the up and down buttons on the
scroll bar to move the list up or down by one entry. Click in the open area of the scroll bar to move the list up or down a full page at a
time, or drag the scroll bar's "thumb" up and down to move the list rapdily. Click on a name in the list to highlight it and make it the
current selection.
Select the root of the chord you want to see arpeggios for using the "Arpeggio Key" key selector.
The key selector is layed out just like the notes on a piano keyboard. Click on any of the key buttons to select the desired root, which
appears as the selected key. The black keys are divided in half to support sharps and flats. Sharp keys are above and to the right of their
natural key and flat keys are below and to the left of their natural key. If in doubt, hover the mouse pointer over a key and a tool tip
will appear showing its full name.
Arpeggio fingerings for the currently selected arpeggio name and arpeggio root are displayed in the "Fingerings" list box, as shown in
the diagram below. Make a selection in the list box and the selected fingering is displayed in the "Selected Fingering" panel.
file:///C|/Documents%20and%20Settings/dquick/My%20Do...al%20Studio%20Projects/FretWorxHelp/ViewArpForms.htm (2 of 4)11/1/2005 4:23:26 PM
file:///C|/Documents%20and%20Settings/dquick/My%20Documents/Visual%20Studio%20Projects/FretWorxHelp/ViewArpForms.htm
Arpeggio fingerings use the diagram type common to most arpeggio books. Two examples of arpeggio fingering diagrams are illustrated
below.
Each arpeggio fingering uses vertical lines for strings, with five to 22 fret spaces within each diagram. The fret space numbers for
each fret space are listed on the left-hand side of the diagram next to each fret space. A small "o" is drawn above a string when the string
is played without a finger pressing it down. These are known as an open strings.
Fingered notes played in the arpeggio fingering are drawn as black circles with a number in the center. The numbers indicate which
finger of either hand is used to play each note. The player's fingers are numbered as shown in the diagram below.
Click on an arpeggio fingering with the mouse to select it. The selected arpeggio fingering is drawn with a heavier border and the
arpeggio fingering notes are highlighted on the fret board grid. All notes are highlighted in white as shown in the following example.
Right-click in the empty area of the "Selected Fingering" display panel to unselect the selected fingering.
file:///C|/Documents%20and%20Settings/dquick/My%20Do...al%20Studio%20Projects/FretWorxHelp/ViewArpForms.htm (3 of 4)11/1/2005 4:23:26 PM
file:///C|/Documents%20and%20Settings/dquick/My%20Documents/Visual%20Studio%20Projects/FretWorxHelp/ViewArpForms.htm
The next topic demonstrates how to listen to an example of the way the selected arpeggio fingering should sound.
Previous
See Also
Next
Creating a new arpeggio fingering definition, Edit the selected arpeggio fingering definition, Listening to arpeggio fingering examples ,
TM
Getting help in FretWorx
, Support and on-line resources
file:///C|/Documents%20and%20Settings/dquick/My%20Do...al%20Studio%20Projects/FretWorxHelp/ViewArpForms.htm (4 of 4)11/1/2005 4:23:26 PM
file:///C|/Documents%20and%20Settings/dquick/My%20Documents/Visual%20Studio%20Projects/FretWorxHelp/ListenArpForms.htm
Previous
FretWorxTM
Next
Listening to arpeggio fingering examples
TM
You can use FretWorx
to hear how arpeggio fingerings sound through your computer's
speakers. When an arpeggio fingering is selected, the "Arpeggio" button and "Tempo" slider are
enabled as shown in the example below.
Click the "Arpeggio" button to hear how the arpeggio fingering would sound if the notes of the
arpeggio were played from the lowest note to the highest note. The "Tempo" slider has five
setting which control how fast the notes are played. The left most setting is slowest and the
right most setting is fastest.
TM
FretWorx
uses the sound designated in the current instrument definition to play arpeggio
fingering examples.
The next topic explains how to compare chords, scales, and arpeggios in FretWorx
See Also
TM
Previous
.
Next
TM
Viewing arpeggio fingerings, Edit the selected arpeggio fingering, Getting help in FretWorx
Support and on-line resources
file:///C|/Documents%20and%20Settings/dquick/My%20Docume...sual%20Studio%20Projects/FretWorxHelp/ListenArpForms.htm11/1/2005 4:23:26 PM
,
file:///C|/Documents%20and%20Settings/dquick/My%20Documents/Visual%20Studio%20Projects/FretWorxHelp/CompareChordsAndScales.htm
FretWorxTM
Previous
Next
Comparing chords, scales, and arpeggios
There are hundreds of excellent books on music theory and harmony. You can use FretWorx
with any of these books to help you visualize the following on your instrument:
TM
●
Where the notes of a scale are on the finger board
●
Where the notes of a chord are on the finger board
●
How the notes of a selected chord relate to the notes of a selected scale
●
How the notes of a selected arpeggio fingering relate to the notes of a selected chord or
scale.
The diagram below shows how a C Major chord maps over a C Major scale.
file:///C|/Documents%20and%20Settings/dquick/My%20Do...o%20Projects/FretWorxHelp/CompareChordsAndScales.htm (1 of 5)11/1/2005 4:23:27 PM
file:///C|/Documents%20and%20Settings/dquick/My%20Documents/Visual%20Studio%20Projects/FretWorxHelp/CompareChordsAndScales.htm
As shown in the diagram above, the root note of the chord and the scale are both C and all of
the chord notes fall within the scale.
The diagram below shows how a G Major chord maps over a C Major scale.
file:///C|/Documents%20and%20Settings/dquick/My%20Do...o%20Projects/FretWorxHelp/CompareChordsAndScales.htm (2 of 5)11/1/2005 4:23:27 PM
file:///C|/Documents%20and%20Settings/dquick/My%20Documents/Visual%20Studio%20Projects/FretWorxHelp/CompareChordsAndScales.htm
As shown in the diagram above, the root note of the chord and the scale are now different,
even though all of the chord notes fall within the scale.
The diagram below shows how a G Minor chord maps over a C Major scale.
file:///C|/Documents%20and%20Settings/dquick/My%20Do...o%20Projects/FretWorxHelp/CompareChordsAndScales.htm (3 of 5)11/1/2005 4:23:27 PM
file:///C|/Documents%20and%20Settings/dquick/My%20Documents/Visual%20Studio%20Projects/FretWorxHelp/CompareChordsAndScales.htm
As you can see in the diagram above, the root note of the chord and the scale are now
different, and the minor third of the chord (A#) is not a member of the C Major scale.
TM
FretWorx
lets you easily move from one chord to another any where on the fret board. This
can help you find smoother voice leadings when move from one chord to another in a given
position on the neck. At any point, you can select a chord, scale, or arpeggio fingering to see
how it maps to the fret board.
The next topic shows how to copy images of chord, scale, and arpeggio fingerings and paste
file:///C|/Documents%20and%20Settings/dquick/My%20Do...o%20Projects/FretWorxHelp/CompareChordsAndScales.htm (4 of 5)11/1/2005 4:23:27 PM
file:///C|/Documents%20and%20Settings/dquick/My%20Documents/Visual%20Studio%20Projects/FretWorxHelp/CompareChordsAndScales.htm
them into other programs.
See Also
Previous
Next
Viewing scales on the fret board, Viewing chords on the fret board, Viewing chord fingerings,
TM
Viewing scale fingerings, Viewing arpeggio fingerings, Getting help in FretWorx
on-line resources
, Support and
file:///C|/Documents%20and%20Settings/dquick/My%20Do...o%20Projects/FretWorxHelp/CompareChordsAndScales.htm (5 of 5)11/1/2005 4:23:27 PM
file:///C|/Documents%20and%20Settings/dquick/My%20Documents/Visual%20Studio%20Projects/FretWorxHelp/CopyPaste.htm
FretWorxTM
Previous
Next
Copying fingerings to other applications
You can copy an image of any chord, scale, or arpeggio fingering and paste it into any other
application that supports bit map images. Examples of a few compatible programs include
Microsoft Word®, Microsoft® Paint, Corel Draw®, Adobe Illustrator®, Paint Shop Pro®, and
many others.
When ever you select a chord, scale, or arpeggio fingering, the "Copy" menu is enabled. Select
"Copy" from the "Edit" menu to copy an image of the selected fingering to the Windows
clipboard, as shown in the following example. You can also use the Windows short-cut keys "Ctrl
+C" by holding down the ""Ctrl" key and pressing the "C" key to accomplish the same result.
Once you have copied the image to the clibboard, switch to the other application, click your
mouse pointer at the place in the document you want the image to appear, and select "Paste"
from that application's "Edit" menu to paste the image into the document. Most applications
also support the Windows short-cut keys "Ctrl+V", which allows you to hold down the "Ctrl"
key and press the "V" key to paste items from the clipboard.
The "Copy" menu is always disabled until there is a selected fingering.
file:///C|/Documents%20and%20Settings/dquick/My%20Doc...Visual%20Studio%20Projects/FretWorxHelp/CopyPaste.htm (1 of 2)11/1/2005 4:23:27 PM
file:///C|/Documents%20and%20Settings/dquick/My%20Documents/Visual%20Studio%20Projects/FretWorxHelp/CopyPaste.htm
The next topic describes how to use the Chord Lab
TM
to find the names of chords you create.
Previous
See Also
Next
Viewing chord fingerings, Viewing scale fingerings, Viewing arpeggio fingerings, Getting help
TM
in FretWorx
, Support and on-line resources
file:///C|/Documents%20and%20Settings/dquick/My%20Doc...Visual%20Studio%20Projects/FretWorxHelp/CopyPaste.htm (2 of 2)11/1/2005 4:23:27 PM
file:///C|/Documents%20and%20Settings/dquick/My%20Documents/Visual%20Studio%20Projects/FretWorxHelp/ChordLab.htm
Previous
FretWorxTM
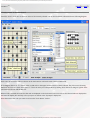
Finding chord names with the Chord Lab
TM
Use the Chord Lab
Next
TM
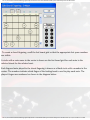
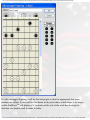
when you know the notes or fingering of a chord but don't know its name. Click the "Chord Lab" tab in the main
window to activate the Chord Lab
TM
, as shown below.
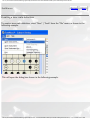
If you know the chord fingering, use the mouse to drag finger indicators from the "Fingers" toolbox and drop them onto the desired
positions on the fretboard grid for fingered notes. Click the open string buttons on the fretboard grid to add an open string note to the
chord.
Each fingered note played in the chord fingering is drawn as a black circle with a number in the center. The numbers indicate which
finger of the fretting hand is used to play each note. The player's fingers are numbered as shown in the diagram below.
file:///C|/Documents%20and%20Settings/dquick/My%20Doc.../Visual%20Studio%20Projects/FretWorxHelp/ChordLab.htm (1 of 3)11/1/2005 4:23:27 PM
file:///C|/Documents%20and%20Settings/dquick/My%20Documents/Visual%20Studio%20Projects/FretWorxHelp/ChordLab.htm
To add a fingered note to the chord fingering, click on the desired finger number in the "Fingers" tool box, drag it to the desired location
on the fret board grid, and drop it on a chord note circle. You can add a finger symbol to any chord note circle on the fret board grid.
To delete a finger from the chord fingering, left-click it with the mouse and press the delete ("Del") key. To remove an open string note,
click it again.
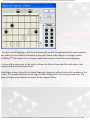
The example below shows a fingering added to the fretboard grid.
Each time you add a note to the fretboard grid the "Selected Notes" control tracks which unique note names are part of your chord. In
the example above, there are five fingered notes, but only four selected notes because the notes on the fifth string at the third fret and
third string at the fifth fret are both "C" notes. When you add a new note the check box next to the note name in the "Selected Notes"
file:///C|/Documents%20and%20Settings/dquick/My%20Doc.../Visual%20Studio%20Projects/FretWorxHelp/ChordLab.htm (2 of 3)11/1/2005 4:23:27 PM
file:///C|/Documents%20and%20Settings/dquick/My%20Documents/Visual%20Studio%20Projects/FretWorxHelp/ChordLab.htm
control is checked. When you remove the last fingering of a note in the "Selected Notes" control the check is removed from the check
box next to the note name.
TM
Each time a check is added to or removed from the "Selected Notes" control the Chord Lab examines all of the chord definitions in the
current instruments chord list for potential matches. All matches are listed in the "Chords with Selected Notes" list view, with full matches
first followed by partial matches. A full match ( ) occurs when the checked notes in the "Selected Notes" control matches every note in
the chord definition. A partial ( ) match exists when notes in the chord match all of the checked notes in the "Selected Notes" control
but the chord has additional notes that are not yet matched. The example fingering shown above has two full matches listed in the
"Chords with Selected Notes" list view. These are followed by nine partial matches where the notes in the fingered chord are a sub-set of
the the chords.
Click the note names in the "Selected Notes" control to add or remove them from the proposed chord definition when you don't know
or need a specific fingering. Once you've found a chord name that matches the notes you want, use the "Chords" tab to find a fingering
that works for you.
The next topic shows how to customize your copy of FretWorx
TM
.
Previous
See Also
Next
Viewing chords on the fret board, Viewing chord fingerings, Editing the list of chords, Viewing scales on the fret board, Comparing
TM
chords and scales, Getting help in FretWorx
, Support and on-line resources
file:///C|/Documents%20and%20Settings/dquick/My%20Doc.../Visual%20Studio%20Projects/FretWorxHelp/ChordLab.htm (3 of 3)11/1/2005 4:23:27 PM
file:///C|/Documents%20and%20Settings/dquick/My%20Documents/Visual%20Studio%20Projects/FretWorxHelp/Customization.htm
Previous
FretWorxTM
Next
TM
Customizing FretWorx
TM
FretWorx
work on.
is designed to let you change and extend it to fit the way you work and what you
TM
If FretWorx doesn’t already contain your favorite tunings, chords, arpeggios, or scales, just
add them yourself. Unlike books and most chord finder programs, you can customize and
expand FretWorx
●
●
●
●
TM
several ways:
TM
Define new instruments - You can use FretWorx to define any stringed instrument that
has up to ten individual or sets of fingered strings, fretted or fretless.
Create new tunings - Creating a new tuning for an existing instrument is as easy as
opening the instrument definition, changing its tuning, and saving it with a new name.
TM
Experiment with unusual scales - Create your own scales. FretWorx supports any scale
based on a 12-tone chromatic octave.
Create new chords - Musicians often create unusual chords that sound great but aren't
TM
●
necessarily found in chord books. Use FretWorx to create your own catalog of unusual
chords.
Create new chord, scale, and arpeggio fingerings - There is usually more than one way to
finger a chord, scale, or arpeggio and one way is not always best for everyone. Use
TM
●
●
●
FretWorx to create a catalog of fingerings that work best for your style of playing.
Edit the list of chords - You can add or remove chords from the selection list and arrange
them in any order.
Edit the list of scales - You can add or remove scales from the selection list and arrange
them in any order.
Select different sounds - You can select the sound you prefer for previewing fingerings
from a list that covers plucked, picked, and bowed instruments.
TM
You can learn to use FretWorx in just a few minutes and replace dozens of chord books with
a faster, easier, and more powerful alternative.
The next topic describes how to create a new instrument definition in FretWorx
TM
.
file:///C|/Documents%20and%20Settings/dquick/My%20Doc...al%20Studio%20Projects/FretWorxHelp/Customization.htm (1 of 2)11/1/2005 4:23:55 PM
file:///C|/Documents%20and%20Settings/dquick/My%20Documents/Visual%20Studio%20Projects/FretWorxHelp/Customization.htm
Previous
See Also
Next
Create or edit an instrument definition, Open an instrument definition, Save an instrument
definition, Create or edit a chord definition, Open a chord definition, Create or edit a scale
definition, Open a scale definition, Create or edit a chord fingering, Create or edit a scale
fingering, Create or edit an arpeggio fingering, Edit the list of chords, Edit the list of scales,
TM
Getting help in FretWorx
, Support and on-line resources
file:///C|/Documents%20and%20Settings/dquick/My%20Doc...al%20Studio%20Projects/FretWorxHelp/Customization.htm (2 of 2)11/1/2005 4:23:55 PM
file:///C|/Documents%20and%20Settings/dquick/My%20Documents/Visual%20Studio%20Projects/FretWorxHelp/NewInstrument.htm
FretWorxTM
Previous
Next
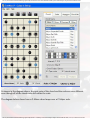
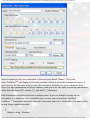
Creating a new instrument definition
To create a new instrument definition, select "New" | "Instrument" from the "File" menu, as
shown in the following example.
This will open the dialog box shown in the following example.
file:///C|/Documents%20and%20Settings/dquick/My%20Doc...al%20Studio%20Projects/FretWorxHelp/NewInstrument.htm (1 of 8)11/1/2005 4:23:56 PM
file:///C|/Documents%20and%20Settings/dquick/My%20Documents/Visual%20Studio%20Projects/FretWorxHelp/NewInstrument.htm
Enter the name for the new instrument in the text box labeled "Name:". This is the
TM
name FretWorx will display in the main window's title bar when this instrument is open. It
also becomes the file name used to store the instrument definition on your computer's hard
drive. Use any combination of letters, numbers, and spaces for the name, but avoid punctuation
other than the sharp ('#'), comma (','), and dash ('-') characters.
Each instrument definition must have a unique name. If you use multiple tunings for an
instrument, it is easiest to have a standard way to name your instruments. Standard
TM
FretWorx instrument definitions place the instrument name first, followed by the name of the
tuning. Some examples include:
●
Guitar 6 string - Standard
file:///C|/Documents%20and%20Settings/dquick/My%20Doc...al%20Studio%20Projects/FretWorxHelp/NewInstrument.htm (2 of 8)11/1/2005 4:23:56 PM
file:///C|/Documents%20and%20Settings/dquick/My%20Documents/Visual%20Studio%20Projects/FretWorxHelp/NewInstrument.htm
Guitar 6 string - Open G
●
Guitar 6 string - Guitar Craft
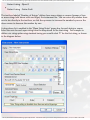
The text box labeled "Number of Strings:" defines how many strings or courses (groups of two
or more strings held down with one finger) the instrument has. You can enter any number from
one to ten directly in the text box, or click the up arrow to increase the number by one or the
down arrow to decrease the number by one.
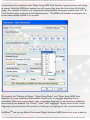
A drop-down list is enabled in the "Open String Notes" group box for each string or course.
Select the note for each open string from the drop-down list for that string. For example to
define a six string quitar using standard tuning you would select "E" for the first string, as shown
in the diagram below.
file:///C|/Documents%20and%20Settings/dquick/My%20Doc...al%20Studio%20Projects/FretWorxHelp/NewInstrument.htm (3 of 8)11/1/2005 4:23:56 PM
file:///C|/Documents%20and%20Settings/dquick/My%20Documents/Visual%20Studio%20Projects/FretWorxHelp/NewInstrument.htm
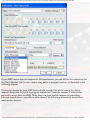
A drop-down list is enabled in the "Open String MIDI Note Numbers" group box for each string
or course. Select the MIDI note number for each open string from the drop-down list for that
string. For example to define a six string quitar using standard tuning you would select "50 - D 1" for the first string, as shown in the diagram below. This MIDI note number corresponds to a
D one octave below middle C on a piano.
The controls for "Number of Strings", "Open String Notes", and "Open String MIDI Note
Numbers" are only enabled until you define chord, scale, or arpeggio fingerings for an
instrument. When you create chord, scale, or arpeggio fingerings for an instrument definition,
these controls are disabled. The "Chord", "Scale", and "Arpgeggio" display boxes in the "Active
Fingerings" group box show the quantity of each type of fingering for the current instrument.
TM
FretWorx
can use any Musical Instrument Digital Interface (MIDI) devices on your system to
file:///C|/Documents%20and%20Settings/dquick/My%20Doc...al%20Studio%20Projects/FretWorxHelp/NewInstrument.htm (4 of 8)11/1/2005 4:23:56 PM
file:///C|/Documents%20and%20Settings/dquick/My%20Documents/Visual%20Studio%20Projects/FretWorxHelp/NewInstrument.htm
let you play audible examples of selected chord, scale, and arpeggio fingerings. All available
MIDI devices are listed in the "Selected Device" drop-down list within the "Fingering Preview
Sound" group box. Select the device you want to use for this instrument from the drop-down
list.
TM
There are two ways to select sounds in FretWorx ; General MIDI patch names and patch
numbers. If your MIDI device supports the General MIDI (GM) specification. or one of its
extensions (GS, XG), you can select sounds by name using the controls on the "General Midi"
tab. The Microsoft GS Wavetable SW Synth that ships with Microsoft Windows® is an example
of a MIDI device that supports the GM specification.
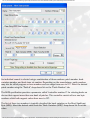
The "Instrument Family" drop-down list provides 16 categories of instrument sounds. Select a
category from this list and a list of the sounds available in that category are made available in
TM
the "Instrument Name" drop-down list. To change the sound FretWorx uses to play selected
chord forms for this instrument, select a sound from the "Instrument Name" drop-down list, as
shown in the following example.
file:///C|/Documents%20and%20Settings/dquick/My%20Doc...al%20Studio%20Projects/FretWorxHelp/NewInstrument.htm (5 of 8)11/1/2005 4:23:56 PM
file:///C|/Documents%20and%20Settings/dquick/My%20Documents/Visual%20Studio%20Projects/FretWorxHelp/NewInstrument.htm
If your MIDI device does not support the GM specification, you can still use the controls on the
the "Patch Number" tab to select sounds using patch or program numbers, as illustrated in the
following diagram.
The owners manual for your MIDI device should provide a list of the sounds the device
supports along with the patch or program number and "controller number 0" information
required to access them via MIDI. While there is a great deal of variation in terminology
between manufacturers, especially in older devices, the following information should cover
most modern devices.
file:///C|/Documents%20and%20Settings/dquick/My%20Doc...al%20Studio%20Projects/FretWorxHelp/NewInstrument.htm (6 of 8)11/1/2005 4:23:56 PM
file:///C|/Documents%20and%20Settings/dquick/My%20Documents/Visual%20Studio%20Projects/FretWorxHelp/NewInstrument.htm
An individual sounds is selected using a combination of three numbers; patch number, bank
variation number, and bank tone set number. Depending on the manufacturer, patch numbers
may also be called program or tone numbers and can range from zero to 127. Select the desired
patch number using the "Patch #" drop-down list on the "Patch Number" tab.
The MIDI specification provides a parameter called "controller number 0" for selecting banks on
devices that support more than one bank of patches. This controller consists of two one byte
numbers which both support values from zero to 127.
The first of these two numbers is typically described the bank variation or the Most Significant
Byte (MSB). Select the desired value from the "Bank Variation (MSB)" drop-down list to set this
value.
file:///C|/Documents%20and%20Settings/dquick/My%20Doc...al%20Studio%20Projects/FretWorxHelp/NewInstrument.htm (7 of 8)11/1/2005 4:23:56 PM
file:///C|/Documents%20and%20Settings/dquick/My%20Documents/Visual%20Studio%20Projects/FretWorxHelp/NewInstrument.htm
The second of these two numbers is typically known as the bank tone set or the Least Signifigant
Byte (LSB). Select the desired value from the "Bank Tone Set (LSB) drop-down list to set this
value.
Some devices, especially older models may only have one bank of sounds. In this case, the bank
variation and bank tone set are almost always zero.
TM
The next topic describes how to edit an instrument definition in FretWorx
.
Previous
See Also
Next
Open an instrument definition, Edit an instrument definition, Save an instrument definition ,
TM
Getting help in FretWorx
, Support and on-line resources
file:///C|/Documents%20and%20Settings/dquick/My%20Doc...al%20Studio%20Projects/FretWorxHelp/NewInstrument.htm (8 of 8)11/1/2005 4:23:56 PM
file:///C|/Documents%20and%20Settings/dquick/My%20Documents/Visual%20Studio%20Projects/FretWorxHelp/EditInstrument.htm
FretWorxTM
Previous
Next
Edit the selected instrument definition
To edit the currently selected instrument definition, select "Instrument" from the "Edit" menu, as
shown in the following example.
If "Guitar 6 String" is the current instrument, this will open the dialog box shown in the
following example.
file:///C|/Documents%20and%20Settings/dquick/My%20Doc...l%20Studio%20Projects/FretWorxHelp/EditInstrument.htm (1 of 8)11/1/2005 4:23:56 PM
file:///C|/Documents%20and%20Settings/dquick/My%20Documents/Visual%20Studio%20Projects/FretWorxHelp/EditInstrument.htm
TM
Edit the instrument name in the text box labeled "Name:". This is the name FretWorx will
display in the main window's title bar when this instrument is open. It also becomes the file
name used to store the instrument definition on your computer's hard drive. Use any
combination of letters, numbers, and spaces for the name, but avoid punctuation other than
the sharp ('#'), comma (','), and dash ('-') characters.
Each instrument definition must have a unique name. If you use multiple tunings for an
instrument, it is easiest to have a standard way to name your instruments. Standard
TM
FretWorx instrument definitions place the instrument name first, followed by the name of the
tuning. Some examples include:
●
Guitar 6 string - Standard
file:///C|/Documents%20and%20Settings/dquick/My%20Doc...l%20Studio%20Projects/FretWorxHelp/EditInstrument.htm (2 of 8)11/1/2005 4:23:56 PM
file:///C|/Documents%20and%20Settings/dquick/My%20Documents/Visual%20Studio%20Projects/FretWorxHelp/EditInstrument.htm
Guitar 6 string - Open G
●
Guitar 6 string - Guitar Craft
The text box labeled "Number of Strings:" defines how many strings or courses (groups of two
or more strings held down with one finger) the instrument has. You can enter any number from
one to ten directly in the text box, or click the up arrow to increase the number by one or the
down arrow to decrease the number by one.
A drop-down list is enabled in the "Open String Notes" group box for each string or course.
Select the note for each open string from the drop-down list for that string. For example to
define a six string quitar using standard tuning you would select "E" for the first string, as shown
in the diagram below.
file:///C|/Documents%20and%20Settings/dquick/My%20Doc...l%20Studio%20Projects/FretWorxHelp/EditInstrument.htm (3 of 8)11/1/2005 4:23:56 PM
file:///C|/Documents%20and%20Settings/dquick/My%20Documents/Visual%20Studio%20Projects/FretWorxHelp/EditInstrument.htm
A drop-down list is enabled in the "Open String MIDI Note Numbers" group box for each string
or course. Select the MIDI note number for each open string from the drop-down list for that
string. For example to define a six string quitar using standard tuning you would select "50 - D 1" for the first string, as shown in the diagram below. This MIDI note number corresponds to a
D one octave below middle C on a piano.
The controls for "Number of Strings", "Open String Notes", and "Open String MIDI Note
Numbers" are only enabled until you define chord, scale, or arpeggio fingerings for an
instrument. When you create chord, scale, or arpeggio fingerings for an instrument definition,
these controls are disabled. The "Chord", "Scale", and "Arpgeggio" display boxes in the "Active
Fingerings" group box show the quantity of each type of fingering for the current instrument.
TM
FretWorx
can use any Musical Instrument Digital Interface (MIDI) devices on your system to
file:///C|/Documents%20and%20Settings/dquick/My%20Doc...l%20Studio%20Projects/FretWorxHelp/EditInstrument.htm (4 of 8)11/1/2005 4:23:56 PM
file:///C|/Documents%20and%20Settings/dquick/My%20Documents/Visual%20Studio%20Projects/FretWorxHelp/EditInstrument.htm
let you play audible examples of selected chord, scale, and arpeggio fingerings. All available
MIDI devices are listed in the "Selected Device" drop-down list within the "Fingering Preview
Sound" group box. Select the device you want to use for this instrument from the drop-down
list.
TM
There are two ways to select sounds in FretWorx ; General MIDI patch names and patch
numbers. If your MIDI device supports the General MIDI (GM) specification. or one of its
extensions (GS, XG), you can select sounds by name using the controls on the "General Midi"
tab. The Microsoft GS Wavetable SW Synth that ships with Microsoft Windows® is an example
of a MIDI device that supports the GM specification.
The "Instrument Family" drop-down list provides 16 categories of instrument sounds. Select a
category from this list and a list of the sounds available in that category are made available in
TM
the "Instrument Name" drop-down list. To change the sound FretWorx uses to play selected
chord forms for this instrument, select a sound from the "Instrument Name" drop-down list, as
shown in the following example.
file:///C|/Documents%20and%20Settings/dquick/My%20Doc...l%20Studio%20Projects/FretWorxHelp/EditInstrument.htm (5 of 8)11/1/2005 4:23:56 PM
file:///C|/Documents%20and%20Settings/dquick/My%20Documents/Visual%20Studio%20Projects/FretWorxHelp/EditInstrument.htm
If your MIDI device does not support the GM specification, you can still use the controls on the
the "Patch Number" tab to select sounds using patch or program numbers, as illustrated in the
following diagram.
The owners manual for your MIDI device should provide a list of the sounds the device
supports along with the patch or program number and "controller number 0" information
required to access them via MIDI. While there is a great deal of variation in terminology
between manufacturers, especially in older devices, the following information should cover
most modern devices.
file:///C|/Documents%20and%20Settings/dquick/My%20Doc...l%20Studio%20Projects/FretWorxHelp/EditInstrument.htm (6 of 8)11/1/2005 4:23:56 PM
file:///C|/Documents%20and%20Settings/dquick/My%20Documents/Visual%20Studio%20Projects/FretWorxHelp/EditInstrument.htm
An individual sounds is selected using a combination of three numbers; patch number, bank
variation number, and bank tone set number. Depending on the manufacturer, patch numbers
may also be called program or tone numbers and can range from zero to 127. Select the desired
patch number using the "Patch #" drop-down list on the "Patch Number" tab.
The MIDI specification provides a parameter called "controller number 0" for selecting banks on
devices that support more than one bank of patches. This controller consists of two one byte
numbers which both support values from zero to 127.
The first of these two numbers is typically described the bank variation or the Most Significant
Byte (MSB). Select the desired value from the "Bank Variation (MSB)" drop-down list to set this
value.
file:///C|/Documents%20and%20Settings/dquick/My%20Doc...l%20Studio%20Projects/FretWorxHelp/EditInstrument.htm (7 of 8)11/1/2005 4:23:56 PM
file:///C|/Documents%20and%20Settings/dquick/My%20Documents/Visual%20Studio%20Projects/FretWorxHelp/EditInstrument.htm
The second of these two numbers is typically known as the bank tone set or the Least Signifigant
Byte (LSB). Select the desired value from the "Bank Tone Set (LSB) drop-down list to set this
value.
Some devices, especially older models may only have one bank of sounds. In this case, the bank
variation and bank tone set are almost always zero.
TM
The next topic describes how to open an existing instrument definition in FretWorx
.
Previous
See Also
Next
Creating a new instrument definition, Open an instrument definition, Save an instrument
definition , Getting help in FretWorx
TM
, Support and on-line resources
file:///C|/Documents%20and%20Settings/dquick/My%20Doc...l%20Studio%20Projects/FretWorxHelp/EditInstrument.htm (8 of 8)11/1/2005 4:23:56 PM
file:///C|/Documents%20and%20Settings/dquick/My%20Documents/Visual%20Studio%20Projects/FretWorxHelp/OpenInstrument.htm
FretWorxTM
Previous
Next
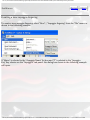
Open an existing instrument definition
To open an existing instrument definition, select "Open Instrument" from the "File" menu, as
shown in the following example.
This will open the dialog box shown in the following example.
file:///C|/Documents%20and%20Settings/dquick/My%20Doc...l%20Studio%20Projects/FretWorxHelp/OpenInstrument.htm (1 of 3)11/1/2005 4:23:56 PM
file:///C|/Documents%20and%20Settings/dquick/My%20Documents/Visual%20Studio%20Projects/FretWorxHelp/OpenInstrument.htm
TM
Select an instrument definition file and click the "Open" button to open it. FretWorx
the new instrument definition and return you to the fretboard grid window which is
reconfigured to use the selected instrument definition.
will load
Click the "Cancel" button to close the dialog and return to the fret board window without
selecting a new instrument definition.
TM
The sub-directory FretWorx uses to store instrument definition files is set automatically during
installation and does not need to be changed for normal operation. However,
TM
TM
FretWorx does provide a way to change it for advanced users. FretWorx uses a standard
directory selection dialog whose operation should be familiar to advanced users.
The next topic describes how to save the current instrument definition in FretWorx
TM
.
file:///C|/Documents%20and%20Settings/dquick/My%20Doc...l%20Studio%20Projects/FretWorxHelp/OpenInstrument.htm (2 of 3)11/1/2005 4:23:56 PM
file:///C|/Documents%20and%20Settings/dquick/My%20Documents/Visual%20Studio%20Projects/FretWorxHelp/OpenInstrument.htm
Previous
See Also
Next
Creating a new instrument definition, Edit the selected instrument definition, Save an instrument
definition , Getting help in FretWorx
TM
, Support and on-line resources
file:///C|/Documents%20and%20Settings/dquick/My%20Doc...l%20Studio%20Projects/FretWorxHelp/OpenInstrument.htm (3 of 3)11/1/2005 4:23:56 PM
file:///C|/Documents%20and%20Settings/dquick/My%20Documents/Visual%20Studio%20Projects/FretWorxHelp/SaveInstrument.htm
Previous
FretWorxTM
Next
Save the selected instrument definition
To save the currently selected instrument definition, select "Save Instrument" from the "File"
menu, as shown in the following example.
FretWorx
TM
will save any changes to the currently selected instrument definition.
The next topic describes how to save the current instrument definition with a new name in
FretWorx
TM
.
Previous
See Also
Next
Creating a new instrument definition, Edit the selected instrument definition, Open an existing
instrument definition, Save an instrument definition with a new name, Getting help
TM
in FretWorx
, Support and on-line resources
file:///C|/Documents%20and%20Settings/dquick/My%20Docume...sual%20Studio%20Projects/FretWorxHelp/SaveInstrument.htm11/1/2005 4:23:56 PM
file:///C|/Documents%20and%20Settings/dquick/My%20Documents/Visual%20Studio%20Projects/FretWorxHelp/SaveInstrumentAs.htm
FretWorxTM
Previous
Next
Save the selected instrument definition with a new name
To save the currently selected instrument definition, select "Save Instrument As" from the "File"
menu, as shown in the following example.
This will open the dialog box shown in the following example.
file:///C|/Documents%20and%20Settings/dquick/My%20Doc...20Studio%20Projects/FretWorxHelp/SaveInstrumentAs.htm (1 of 3)11/1/2005 4:23:57 PM
file:///C|/Documents%20and%20Settings/dquick/My%20Documents/Visual%20Studio%20Projects/FretWorxHelp/SaveInstrumentAs.htm
Select a new name for the instrument definition file and click the "Save" button to save it under
TM
the new name. FretWorx will save the instrument definition under the new name, update the
title, and return you to the fretboard grid window.
TM
This is the name FretWorx will display in the main window's title bar when this instrument is
open. It also becomes the file name used to store the instrument definition on your computer's
hard drive. Use any combination of letters, numbers, and spaces for the name, but avoid
punctuation other than the sharp ('#'), comma (','), and dash ('-') characters.
Each instrument definition must have a unique name. If you use multiple tunings for an
instrument, it is easiest to have a standard way to name your instruments. Standard
TM
FretWorx instrument definitions place the instrument name first, followed by the name of the
tuning. Some examples include:
●
Guitar 6 string - Standard
file:///C|/Documents%20and%20Settings/dquick/My%20Doc...20Studio%20Projects/FretWorxHelp/SaveInstrumentAs.htm (2 of 3)11/1/2005 4:23:57 PM
file:///C|/Documents%20and%20Settings/dquick/My%20Documents/Visual%20Studio%20Projects/FretWorxHelp/SaveInstrumentAs.htm
Guitar 6 string - Open G
●
Guitar 6 string - Guitar Craft
Click the "Cancel" button to close the dialog and return to the fret board window without
selecting a new instrument definition.
TM
The sub-directory FretWorx uses to store instrument definition files is set automatically during
installation and does not need to be changed for normal operation. However,
TM
TM
FretWorx does provide a way to change it for advanced users. FretWorx uses a standard
directory selection dialog whose operation should be familiar to advanced users.
The next topic describes how to create a new scale definition in FretWorx
See Also
TM
.
Previous
Next
Creating a new instrument definition, Edit the selected instrument definition, Open an existing
TM
instrument definition, Save an instrument definition, Getting help in FretWorx
on-line resources
, Support and
file:///C|/Documents%20and%20Settings/dquick/My%20Doc...20Studio%20Projects/FretWorxHelp/SaveInstrumentAs.htm (3 of 3)11/1/2005 4:23:57 PM
file:///C|/Documents%20and%20Settings/dquick/My%20Documents/Visual%20Studio%20Projects/FretWorxHelp/NewScale.htm
FretWorxTM
Previous
Next
Creating a new scale definition
To create a new scale definition, select "New" | "Scale" from the "File" menu, as shown in the
following example.
This will open the dialog box shown in the following example.
file:///C|/Documents%20and%20Settings/dquick/My%20Doc.../Visual%20Studio%20Projects/FretWorxHelp/NewScale.htm (1 of 3)11/1/2005 4:23:57 PM
file:///C|/Documents%20and%20Settings/dquick/My%20Documents/Visual%20Studio%20Projects/FretWorxHelp/NewScale.htm
Replace the "Default template" text in the text box labeled "Name:" with the name for the
TM
new scale. This is the name FretWorx will display in the fret board window's "Scale Name"
list box for every instrument. It also becomes the file name used to store the scale definition on
your computer's hard drive. Use any combination of letters, numbers, and spaces for the name,
but avoid punctuation other than the sharp ('#'), comma (','), and dash ('-') characters. One
TM
definition of a scale will work for every key for every instrument defined in FretWorx . In
other words, onlly one definition of a major scale is required to support all 12 keys on every
instrument you can define in FretWorx
scales that are included in FretWorx
already done.
TM
TM
. Before you create a new scale, be sure to review that
to avoid using the same name or duplicating work that is
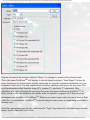
Select the appropriate type for the scale from the "Type" drop-down list. Available types include
major, minor, dominant, and other.
file:///C|/Documents%20and%20Settings/dquick/My%20Doc.../Visual%20Studio%20Projects/FretWorxHelp/NewScale.htm (2 of 3)11/1/2005 4:23:57 PM
file:///C|/Documents%20and%20Settings/dquick/My%20Documents/Visual%20Studio%20Projects/FretWorxHelp/NewScale.htm
The Scale dialog provides a checkbox for each step of the chromatic scale. If you want an
interval included in your scale definition, check its checkbox. If you want an interval excluded
from your scale definition, remove the check from its checkbox. Intervals are added to the
"Intervals" display box when you check a checkbox and removed when you uncheck one.
Music reference materials often use many different terms, abbreviations, and notations to
identify the same scale. Enter these alternative names for the scale you want to define in the
"Synonyms" text box. These will appear in the "Synonymns" display box in the "Scales" tab panel
in the main window when someone selects the scale you've defined.
Click the "OK" button to save any changes and return to the fret board window.
Click the "Cancel" button to discard any changes you've made, and return to the fret board
window.
TM
The next topic describes how to edit the currently selected scale definition in FretWorx
Previous
See Also
.
Next
Edit the selected scale definition, Open an existing scale definition , Getting help
TM
in FretWorx
, Support and on-line resources
file:///C|/Documents%20and%20Settings/dquick/My%20Doc.../Visual%20Studio%20Projects/FretWorxHelp/NewScale.htm (3 of 3)11/1/2005 4:23:57 PM
file:///C|/Documents%20and%20Settings/dquick/My%20Documents/Visual%20Studio%20Projects/FretWorxHelp/EditScale.htm
FretWorxTM
Previous
Next
Edit the selected scale definition
The current scale definition is the one selected in the "Scale Name" drop-down list in the fret
board window. To edit the currently selected scale definition, select "Scale" from the "Edit"
menu, as shown in the following example.
If "Major" is the scale name selected in the "Scale Name" drop-down list in the fret board
window, the dialog box shown in the following example will open.
file:///C|/Documents%20and%20Settings/dquick/My%20Doc...Visual%20Studio%20Projects/FretWorxHelp/EditScale.htm (1 of 3)11/1/2005 4:23:57 PM
file:///C|/Documents%20and%20Settings/dquick/My%20Documents/Visual%20Studio%20Projects/FretWorxHelp/EditScale.htm
Replace the text in the text box labeled "Name:" to change the name of the selected scale.
TM
This is the name FretWorx will display in the fret board window's "Scale Name" list box for
every instrument. It also becomes the file name used to store the instrument definition on your
computer's hard drive. Use any combination of letters, numbers, and spaces for the name, but
avoid punctuation other than the sharp ('#'), comma (','), and dash ('-') characters. One
TM
definition of a scale will work for every key for every instrument defined in FretWorx . In
other words, onlly one definition of a major scale is required to support all 12 keys on every
instrument you can define in FretWorx
scales that are included in FretWorx
already done.
TM
TM
. Before you create a new scale, be sure to review that
to avoid using the same name or duplicating work that is
Select the appropriate type for the scale from the "Type" drop-down list. Available types include
major, minor, dominant, and other.
file:///C|/Documents%20and%20Settings/dquick/My%20Doc...Visual%20Studio%20Projects/FretWorxHelp/EditScale.htm (2 of 3)11/1/2005 4:23:57 PM
file:///C|/Documents%20and%20Settings/dquick/My%20Documents/Visual%20Studio%20Projects/FretWorxHelp/EditScale.htm
The Scale dialog provides a checkbox for each step of the chromatic scale. If you want an
interval included in your scale definition, check its checkbox. If you want an interval excluded
from your scale definition, remove the check from its checkbox. Intervals are added to the
"Intervals" display box when you check a checkbox and removed when you uncheck one.
Music reference materials often use many different terms, abbreviations, and notations to
identify the same scale. Enter these alternative names for the scale you want to define in the
"Synonyms" text box. These will appear in the "Synonymns" display box in the "Scales" tab panel
in the main window when someone selects the scale you've defined.
Click the "OK" button to save any changes and return to the fret board window.
Click the "Cancel" button to discard any changes you've made, and return to the fret board
window.
The next topic describes how to create a new chord definition in FretWorx
See Also
TM
.
Previous
TM
Creating a new scale definition, Editing the list of scales , Getting help in FretWorx
and on-line resources
Next
, Support
file:///C|/Documents%20and%20Settings/dquick/My%20Doc...Visual%20Studio%20Projects/FretWorxHelp/EditScale.htm (3 of 3)11/1/2005 4:23:57 PM
file:///C|/Documents%20and%20Settings/dquick/My%20Documents/Visual%20Studio%20Projects/FretWorxHelp/EditScaleList.htm
FretWorxTM
Previous
Next
Edit the scale list
You can modify the list of scale names that appears in the "Scale Name" list box on the "Scales"
tab. You can change the order of the types of scales and the order that each scale appears in the
list within each type. You can remove scales from the list and add new pre-defined scales from
scale definition files.
Select "Scale list" from the "Edit" menu to edit the scale list, as shown in the following example.
The "Edit Scale List Order" dialog box shown in the following example will open.
file:///C|/Documents%20and%20Settings/dquick/My%20Doc...al%20Studio%20Projects/FretWorxHelp/EditScaleList.htm (1 of 5)11/1/2005 4:23:58 PM
file:///C|/Documents%20and%20Settings/dquick/My%20Documents/Visual%20Studio%20Projects/FretWorxHelp/EditScaleList.htm
Use the "Set the order in which Scale Types are displayed" list view to define the order that scale
types appear in the "Scale Name" list box on the "Scales" tab. This list view uses the top third of
the dialog, as shown in the following diagram.
Click on an entry in the list view to select it. Select any entry not already at the top of the list to
enable the "Move Up" button. Select any entry not already at the end of the list to enable the
"Move Down" button. Click the "Move Up" button to move the selected entry up one position
in the list. Click the "Move Down" button to move the selected entry down one position in the
list.
file:///C|/Documents%20and%20Settings/dquick/My%20Doc...al%20Studio%20Projects/FretWorxHelp/EditScaleList.htm (2 of 5)11/1/2005 4:23:58 PM
file:///C|/Documents%20and%20Settings/dquick/My%20Documents/Visual%20Studio%20Projects/FretWorxHelp/EditScaleList.htm
Use the "Set the order of Scale List entries within each scale type" list view to define the order
that scales appear within each scale type in the "Scale Name" list box on the "Scales" tab. This list
view uses the bottom two thirds of the dialog, as shown in the following diagram.
Click on one of the tabs named "Major", "Minor", "Dominant", or "Other" to work with the list
of scales of that type.
Click on a scale name entry in the list view to select it. Select any entry not already at the top of
the list to enable the "Move Up" button. Select any entry not already at the end of the list to
enable the "Move Down" button. Click the "Move Up" button to move the selected entry up
one position in the list. Click the "Move Down" button to move the selected entry down one
position in the list.
Click the "Remove" button to remove the scale from the list. Removing a scale from the list does
not delete it from your hard disk.
Click the "Add New" button to add a scale back to the list at a later time or to add new scales
from scale definition files and the following dialog will appear.
file:///C|/Documents%20and%20Settings/dquick/My%20Doc...al%20Studio%20Projects/FretWorxHelp/EditScaleList.htm (3 of 5)11/1/2005 4:23:58 PM
file:///C|/Documents%20and%20Settings/dquick/My%20Documents/Visual%20Studio%20Projects/FretWorxHelp/EditScaleList.htm
TM
Each scale used in FretWorx
is defined in a scale definition file stored in the "scales" sub-
TM
directory under the FretWorx program directory. Each scale definition file is an XML file with
a ".scale" file extension. This dialog compares the list of scales associated with the current
instrument with those available on disk. Any on-disk scales that are not in the current list will
appear in the "Available Scales to Add" list view.
Check the check box for each scale in the list that you want to add and click the "Add" button.
This will close the dialog and add the scales to the list in the "Edit Scale List Order" dialog box.
Click the "Cancel" button to return to the "Edit Scale List Order" dialog box without adding any
scales.
TM
Thoughtful Arts maintains a forum on it's web site (www.thoughtfularts.com) where
customers can download new chord definitions.
Click the "Save" button in the "Edit Scale List Order" dialog box to save any changes and return
to the main window.
Click the "Cancel" button in the "Edit Scale List Order" dialog box to discard any changes you've
made, and return to the main window.
The next topic describes how to create a new scale fingering in FretWorx
TM
.
file:///C|/Documents%20and%20Settings/dquick/My%20Doc...al%20Studio%20Projects/FretWorxHelp/EditScaleList.htm (4 of 5)11/1/2005 4:23:58 PM
file:///C|/Documents%20and%20Settings/dquick/My%20Documents/Visual%20Studio%20Projects/FretWorxHelp/EditScaleList.htm
See Also
Previous
Next
Creating a new scale definition, Open an existing scale definition , Getting help in FretWorx
Support and on-line resources
TM
file:///C|/Documents%20and%20Settings/dquick/My%20Doc...al%20Studio%20Projects/FretWorxHelp/EditScaleList.htm (5 of 5)11/1/2005 4:23:58 PM
,
file:///C|/Documents%20and%20Settings/dquick/My%20Documents/Visual%20Studio%20Projects/FretWorxHelp/NewScaleForm.htm
FretWorxTM
Previous
Next
Creating a new scale fingering
To create a new scale fingering, select "New" | "Scale fingering" from the "File" menu, as shown
in the following example.
If "Major" is selected in the "Scale Name" list box and "D" is selected in the "Scale Key" key
selector on the "Scales" tab panel, the dialog box shown in the following example will open.
file:///C|/Documents%20and%20Settings/dquick/My%20Do...al%20Studio%20Projects/FretWorxHelp/NewScaleForm.htm (1 of 4)11/1/2005 4:23:58 PM
file:///C|/Documents%20and%20Settings/dquick/My%20Documents/Visual%20Studio%20Projects/FretWorxHelp/NewScaleForm.htm
To create a scale fingering, scroll the fret board grid so that the appropriate fret space numbers
are visible.
A circle with a note name in the center is drawn on the fret board grid for each note in the
selected scale for the selected root.
file:///C|/Documents%20and%20Settings/dquick/My%20Do...al%20Studio%20Projects/FretWorxHelp/NewScaleForm.htm (2 of 4)11/1/2005 4:23:58 PM
file:///C|/Documents%20and%20Settings/dquick/My%20Documents/Visual%20Studio%20Projects/FretWorxHelp/NewScaleForm.htm
Each fingered note played in the scale fingering is drawn as a black circle with a number in the
center. The numbers indicate which finger of the fretting hand is used to play each note. The
player's fingers are numbered as shown in the diagram below.
To add a fingered note to the scale fingering, click on the desired finger number in the "Fingers"
tool box, drag it to the desired location on the fret board grid, and drop it on a scale note
circle. You can add a finger symbol to any scale note circle on the fret board grid.
To delete a finger from the scale fingering, left-click it with the mouse and press the delete
("Del") key.
TM
FretWorx
can't prevent you from creating a scale fingering that is impossible to play, but it
will make sure that any notes you add are actually in the selected scale definition for the
selected scale root. You can add more than one occurance of the same finger to a scale
fingering.
If an open string note looks like a button and has a border around it, that open note is also in
the selected scale for the selected root. To include an open string note in the scale fingering,
click on the desired open note button. The button will appear pushed in, its background will
change to black, and a small "o" is drawn in the nut. To remove or mute a string that is shown
as open, click on the pushed in open note button. The button will appear raised, its background
will change to light blue, and a small "x" is drawn in the nut.
If a fingering uses any open string notes, it is considered a fixed fingering and applies only to the
root for the selected scale. If a fingering has no open notes, it is considered a moveable
fingering. One moveable fingering works for all twelve roots for a given scale definition and is
file:///C|/Documents%20and%20Settings/dquick/My%20Do...al%20Studio%20Projects/FretWorxHelp/NewScaleForm.htm (3 of 4)11/1/2005 4:23:58 PM
file:///C|/Documents%20and%20Settings/dquick/My%20Documents/Visual%20Studio%20Projects/FretWorxHelp/NewScaleForm.htm
automatically transposed as the root changes.
Click the "OK" button to save any changes and return to the main window. FretWorx
add the new scale fingering to the scale form panel.
TM
will
Click the "Cancel" button to discard any changes you've made, and return to the main window.
The next topic describes how to edit the currently selected scale fingering definition in
FretWorx
TM
.
Previous
See Also
Next
Edit the selected scale fingering definition , Creating a new scale definition, Edit the selected
scale definition, Getting help in FretWorx
TM
, Support and on-line resources
file:///C|/Documents%20and%20Settings/dquick/My%20Do...al%20Studio%20Projects/FretWorxHelp/NewScaleForm.htm (4 of 4)11/1/2005 4:23:58 PM
file:///C|/Documents%20and%20Settings/dquick/My%20Documents/Visual%20Studio%20Projects/FretWorxHelp/EditScaleForm.htm
FretWorxTM
Previous
Next
Edit the selected scale fingering
This menu option is enabled when a scale fingering is selected and has its border highlighted in
the "Selected Fingering" panel on the "Scales" tab panel. Select "Scale fingering" from the "Edit"
menu to edit the currently selected scale fingering, as shown in the following example.
If "Major" is selected in the "Scale Name" list box, "C" is selected in the "Scale Key" key
selector on the fret board window, and the "Form 1 open" scale fingering is selected, the dialog
box shown in the following example will open.
file:///C|/Documents%20and%20Settings/dquick/My%20Doc...al%20Studio%20Projects/FretWorxHelp/EditScaleForm.htm (1 of 4)11/1/2005 4:23:58 PM
file:///C|/Documents%20and%20Settings/dquick/My%20Documents/Visual%20Studio%20Projects/FretWorxHelp/EditScaleForm.htm
To edit a scale fingering, scroll the fret board grid so that the appropriate fret space numbers are
visible. If you scroll the fret board to the point that a visible finger is no longer visible,
TM
FretWorx will display a "+" indicator at the end of the scroll bar showing the direction you
should scroll to make it visible.
file:///C|/Documents%20and%20Settings/dquick/My%20Doc...al%20Studio%20Projects/FretWorxHelp/EditScaleForm.htm (2 of 4)11/1/2005 4:23:58 PM
file:///C|/Documents%20and%20Settings/dquick/My%20Documents/Visual%20Studio%20Projects/FretWorxHelp/EditScaleForm.htm
A circle with a note name in the center is drawn on the fret board grid for each note in the
selected scale for the selected root.
Each fingered note played in the scale fingering is drawn as a black circle with a number in the
center. The numbers indicate which finger of the fretting hand is used to play each note. The
player's fingers are numbered as shown in the diagram below.
To add a fingered note to the scale fingering, click on the desired finger number in the "Fingers"
tool box, drag it to the desired location on the fret board grid, and drop it on a scale note
circle. You can add a finger symbol to any scale note circle on the fret board grid.
To delete a finger from the scale fingering, left-click it with the mouse and press the delete
("Del") key.
TM
FretWorx
can't prevent you from creating a scale fingering that is impossible to play, but it
will make sure that any notes you add are actually in the selected scale definition for the
selected scale root. You can add more than one occurance of the same finger to a scale
fingering.
If an open string note looks like a button and has a border around it, that open note is also in
the selected scale for the selected root. To include an open string note in the scale fingering,
click on the desired open note button. The button will appear pushed in, its background will
change to black, and a small "o" is drawn in the nut. To remove or mute a string that is shown
as open, click on the pushed in open note button. The button will appear raised, its background
will change to light blue, and a small "x" is drawn in the nut.
file:///C|/Documents%20and%20Settings/dquick/My%20Doc...al%20Studio%20Projects/FretWorxHelp/EditScaleForm.htm (3 of 4)11/1/2005 4:23:58 PM
file:///C|/Documents%20and%20Settings/dquick/My%20Documents/Visual%20Studio%20Projects/FretWorxHelp/EditScaleForm.htm
If a fingering uses any open string notes, it is considered a fixed fingering and applies only to the
root for the selected scale. If a fingering has no open notes, it is considered a moveable
fingering. One moveable fingering works for all twelve roots for a given scale definition and is
automatically transposed as the root changes.
Click the "OK" button to save any changes and return to the main window. FretWorx
add the new scale fingering to the scale fingering panel.
TM
will
Click the "Cancel" button to discard any changes you've made, and return to the main window.
The next topic describes how to create a new chord definition in FretWorx
TM
.
Previous
See Also
Next
Creating a new scale fingering definition, Creating a new scale definition, Edit the selected scale
TM
definition, Getting help in FretWorx
, Support and on-line resources
file:///C|/Documents%20and%20Settings/dquick/My%20Doc...al%20Studio%20Projects/FretWorxHelp/EditScaleForm.htm (4 of 4)11/1/2005 4:23:58 PM
file:///C|/Documents%20and%20Settings/dquick/My%20Documents/Visual%20Studio%20Projects/FretWorxHelp/NewChord.htm
FretWorxTM
Previous
Next
Creating a new chord definition
To create a new chord definition, select "New" | "Chord" from the "File" menu, as shown in the
following example.
This will open the dialog box shown in the following example.
file:///C|/Documents%20and%20Settings/dquick/My%20Do...Visual%20Studio%20Projects/FretWorxHelp/NewChord.htm (1 of 3)11/1/2005 4:23:58 PM
file:///C|/Documents%20and%20Settings/dquick/My%20Documents/Visual%20Studio%20Projects/FretWorxHelp/NewChord.htm
Replace the "Chord template" text in the text box labeled "Name:" with the name for the
TM
new chord. This is the name FretWorx will display in the fret board window's "Chord
Name" list box for every instrument. It also becomes the file name used to store the chord
definition on your computer's hard drive. Use any combination of letters, numbers, and spaces
for the name, but avoid punctuation other than the sharp ('#'), comma (','), and dash ('-')
characters. One definition of a chord will work for every key for every instrument defined in
FretWorx
TM
. In other words, onlly one definition of a major chord is required to support all 12
keys on every instrument you can define in FretWorx
TM
. Before you create a new chord, be
sure to review that chord definitions that are included in FretWorx
name or duplicating work that is already done.
TM
to avoid using the same
Select the appropriate type for the chord from the "Type" drop-down list. Available types
include major, minor, dominant, and other.
The Chord dialog provides a checkbox for each possible chord interval up to a Major 13th. If
you want an interval included in your chord definition, check its checkbox. If you want an
file:///C|/Documents%20and%20Settings/dquick/My%20Do...Visual%20Studio%20Projects/FretWorxHelp/NewChord.htm (2 of 3)11/1/2005 4:23:58 PM
file:///C|/Documents%20and%20Settings/dquick/My%20Documents/Visual%20Studio%20Projects/FretWorxHelp/NewChord.htm
interval excluded from your chord definition, remove the check from its checkbox. Intervals are
added to the "Intervals" display box when you check a checkbox and removed when you
uncheck one.
Music reference materials often use many different terms, abbreviations, and notations to
identify the same chord. Enter these alternative names for the chord you want to define in the
"Synonyms" text box. These will appear in the "Synonymns" display box in the "Chords" or
"Arpeggios" tab panels in the main window when someone selects the chord you've defined.
Click the "OK" button to save any changes and return to the fret board window.
Click the "Cancel" button to discard any changes you've made, and return to the fret board
window.
TM
The next topic describes how to edit the currently selected chord definition in FretWorx
Previous
See Also
.
Next
Edit the selected chord definition, Open an existing chord definition , Getting help
TM
in FretWorx
, Support and on-line resources
file:///C|/Documents%20and%20Settings/dquick/My%20Do...Visual%20Studio%20Projects/FretWorxHelp/NewChord.htm (3 of 3)11/1/2005 4:23:58 PM
file:///C|/Documents%20and%20Settings/dquick/My%20Documents/Visual%20Studio%20Projects/FretWorxHelp/EditChord.htm
FretWorxTM
Previous
Next
Edit the selected chord definition
The current chord definition is the one selected in the "Chord Name" drop-down list in the fret
board window. To edit the currently selected chord definition, select "Chord" from the "Edit"
menu, as shown in the following example.
If "Major" is the chord name selected in the "Chord Name" drop-down list in the fret board
window, the dialog box shown in the following example will open.
file:///C|/Documents%20and%20Settings/dquick/My%20Doc...Visual%20Studio%20Projects/FretWorxHelp/EditChord.htm (1 of 3)11/1/2005 4:23:59 PM
file:///C|/Documents%20and%20Settings/dquick/My%20Documents/Visual%20Studio%20Projects/FretWorxHelp/EditChord.htm
Replace the text in the text box labeled "Name:" to change the name of the selected chord.
TM
This is the name FretWorx will display in the fret board window's "Chord Name" list box for
every instrument. It also becomes the file name used to store the chord definition on your
computer's hard drive. Use any combination of letters, numbers, and spaces for the name, but
avoid punctuation other than the sharp ('#'), comma (','), and dash ('-') characters. One
TM
definition of a chord will work for every key for every instrument defined in FretWorx . In
other words, onlly one definition of a major chord is required to support all 12 keys on every
instrument you can define in FretWorx
TM
. Before you create a new chord, be sure to review
that chord definitions that are included in FretWorx
duplicating work that is already done.
TM
to avoid using the same name or
Select the appropriate type for the chord from the "Type" drop-down list. Available types
include major, minor, dominant, and other.
The Chord dialog provides a checkbox for each possible chord interval up to a Major 13th. If
you want an interval included in your chord definition, check its checkbox. If you want an
file:///C|/Documents%20and%20Settings/dquick/My%20Doc...Visual%20Studio%20Projects/FretWorxHelp/EditChord.htm (2 of 3)11/1/2005 4:23:59 PM
file:///C|/Documents%20and%20Settings/dquick/My%20Documents/Visual%20Studio%20Projects/FretWorxHelp/EditChord.htm
interval excluded from your chord definition, remove the check from its checkbox. Intervals are
added to the "Intervals" display box when you check a checkbox and removed when you
uncheck one.
Music reference materials often use many different terms, abbreviations, and notations to
identify the same chord. Enter these alternative names for the chord you want to define in the
"Synonyms" text box. These will appear in the "Synonymns" display box in the "Chords" or
"Arpeggios" tab panels in the main window when someone selects the chord you've defined.
Click the "OK" button to save any changes and return to the fret board window.
Click the "Cancel" button to discard any changes you've made, and return to the fret board
window.
The next topic describes how to the list of chord definitions in FretWorx
TM
.
Previous
See Also
Next
Creating a new chord definition, Open an existing chord definition , Getting help
TM
in FretWorx
, Support and on-line resources
file:///C|/Documents%20and%20Settings/dquick/My%20Doc...Visual%20Studio%20Projects/FretWorxHelp/EditChord.htm (3 of 3)11/1/2005 4:23:59 PM
file:///C|/Documents%20and%20Settings/dquick/My%20Documents/Visual%20Studio%20Projects/FretWorxHelp/EditChordList.htm
FretWorxTM
Previous
Next
Edit the chord list
You can modify the list of chord names that appears in the "Chord Name" list box on the
"Chords" tab. You can change the order of the types of chords and the order that each chord
appears in the list within each type. You can remove chords from the list and add new predefined chords from chord definition files.
Select "Chord list" from the "Edit" menu to edit the chord list, as shown in the following
example.
The "Edit Chord List Order" dialog box shown in the following example will open.
file:///C|/Documents%20and%20Settings/dquick/My%20Doc...al%20Studio%20Projects/FretWorxHelp/EditChordList.htm (1 of 5)11/1/2005 4:23:59 PM
file:///C|/Documents%20and%20Settings/dquick/My%20Documents/Visual%20Studio%20Projects/FretWorxHelp/EditChordList.htm
Use the "Set the order in which Chord Types are displayed" list view to define the order that
chord types appear in the "Chord Name" list box on the "Chords" tab. This list view uses the top
third of the dialog, as shown in the following diagram.
Click on an entry in the list view to select it. Select any entry not already at the top of the list to
enable the "Move Up" button. Select any entry not already at the end of the list to enable the
"Move Down" button. Click the "Move Up" button to move the selected entry up one position
in the list. Click the "Move Down" button to move the selected entry down one position in the
list.
file:///C|/Documents%20and%20Settings/dquick/My%20Doc...al%20Studio%20Projects/FretWorxHelp/EditChordList.htm (2 of 5)11/1/2005 4:23:59 PM
file:///C|/Documents%20and%20Settings/dquick/My%20Documents/Visual%20Studio%20Projects/FretWorxHelp/EditChordList.htm
Use the "Set the order of Chord List entries within each chord type" list view to define the order
that chords appear within each chord type in the "Chord Name" list box on the "Chords" tab.
This list view uses the bottom two thirds of the dialog, as shown in the following diagram.
Click on one of the tabs named "Major", "Minor", "Dominant", or "Other" to work with the list
of chords of that type.
Click on a chord name entry in the list view to select it. Select any entry not already at the top
of the list to enable the "Move Up" button. Select any entry not already at the end of the list to
enable the "Move Down" button. Click the "Move Up" button to move the selected entry up
one position in the list. Click the "Move Down" button to move the selected entry down one
position in the list.
Click the "Remove" button to remove the chord from the list. Removing a chord from the list
does not delete it from your hard disk.
Click the "Add New" button to add a chord back to the list at a later time or to add new chords
from chord definition files and the following dialog will appear.
file:///C|/Documents%20and%20Settings/dquick/My%20Doc...al%20Studio%20Projects/FretWorxHelp/EditChordList.htm (3 of 5)11/1/2005 4:23:59 PM
file:///C|/Documents%20and%20Settings/dquick/My%20Documents/Visual%20Studio%20Projects/FretWorxHelp/EditChordList.htm
TM
Each chord used in FretWorx
is defined in a chord definition file stored in the "chords" sub-
TM
directory under the FretWorx program directory. Each chord definition file is an XML file
with a ".chord" file extension. This dialog compares the list of chords associated with the current
instrument with those available on disk. Any on-disk chords that are not in the current list will
appear in the "Available Chords to Add" list view.
Check the check box for each chord in the list that you want to add and click the "Add" button.
This will close the dialog and add the chords to the list in the "Edit Chord List Order" dialog
box. Click the "Cancel" button to return to the "Edit Chord List Order" dialog box without
adding any chords.
TM
Thoughtful Arts maintains a forum on it's web site (www.thoughtfularts.com) where
customers can download new chord definitions.
Click the "Save" button in the "Edit Chord List Order" dialog box to save any changes and return
to the main window.
Click the "Cancel" button in the "Edit Chord List Order" dialog box to discard any changes
you've made, and return to the main window.
The next topic describes how to create a new chord fingering in FretWorx
TM
.
file:///C|/Documents%20and%20Settings/dquick/My%20Doc...al%20Studio%20Projects/FretWorxHelp/EditChordList.htm (4 of 5)11/1/2005 4:23:59 PM
file:///C|/Documents%20and%20Settings/dquick/My%20Documents/Visual%20Studio%20Projects/FretWorxHelp/EditChordList.htm
Previous
See Also
Next
Creating a new chord definition, Open an existing chord definition , Getting help
TM
in FretWorx
, Support and on-line resources
file:///C|/Documents%20and%20Settings/dquick/My%20Doc...al%20Studio%20Projects/FretWorxHelp/EditChordList.htm (5 of 5)11/1/2005 4:23:59 PM
file:///C|/Documents%20and%20Settings/dquick/My%20Documents/Visual%20Studio%20Projects/FretWorxHelp/NewChordForm.htm
FretWorxTM
Previous
Next
Creating a new chord fingering
To create a new chord fingering, select "New" | "Chord fingering" from the "File" menu, as
shown in the following example.
If "Major" is selected in the "Chord Name" list box and "D" is selected in the "Chord Root" key
selector on the "Chords" tab panel, the dialog box shown in the following example will open.
file:///C|/Documents%20and%20Settings/dquick/My%20Do...al%20Studio%20Projects/FretWorxHelp/NewChordForm.htm (1 of 4)11/1/2005 4:23:59 PM
file:///C|/Documents%20and%20Settings/dquick/My%20Documents/Visual%20Studio%20Projects/FretWorxHelp/NewChordForm.htm
To create a chord fingering, scroll the fret board grid so that the appropriate fret space numbers
are visible.
A circle with a note name in the center is drawn on the fret board grid for each note in the
selected chord for the selected root.
Each fingered note played in the chord fingering is drawn as a black circle with a number in the
center. The numbers indicate which finger of the fretting hand is used to play each note. The
player's fingers are numbered as shown in the diagram below.
file:///C|/Documents%20and%20Settings/dquick/My%20Do...al%20Studio%20Projects/FretWorxHelp/NewChordForm.htm (2 of 4)11/1/2005 4:23:59 PM
file:///C|/Documents%20and%20Settings/dquick/My%20Documents/Visual%20Studio%20Projects/FretWorxHelp/NewChordForm.htm
To add a fingered note to the chord fingering, click on the desired finger number in the
"Fingers" tool box, drag it to the desired location on the fret board grid, and drop it on a chord
not circle. You can add a finger symbol to any chord note circle on the fret board grid.
To delete a finger from the chord fingering, left-click it with the mouse and press the delete
("Del") key.
TM
FretWorx can't prevent you from creating a chord fingering that is impossible to play, but it
will make sure that any notes you add are actually in the selected chord definition for the
selected chord root. You can add more than one occurance of the same finger to a chord
fingering, but only across the same fret to create a "barre". FretWorx
the barre symbols.
TM
will automatically draw
No matter how many fingers hold a string down, only one will determine the actual note that
sounds. If a finger already exists at any fret position on a string and you add a finger to a new
position on that string, FretWorx
TM
will replace the finger at the original position.
If an open string note looks like a button and has a border around it, that open note is also in
the selected chord for the selected root. To include an open string note in the chord fingering,
click on the desired open note button. The button will appear pushed in, its background will
change to black, and a small "o" is drawn in the nut. To remove or mute a string that is shown
as open, click on the pushed in open note button. The button will appear raised, its background
will change to light blue, and a small "x" is drawn in the nut.
If a fingering uses any open string notes, it is considered a fixed fingering and applies only to the
file:///C|/Documents%20and%20Settings/dquick/My%20Do...al%20Studio%20Projects/FretWorxHelp/NewChordForm.htm (3 of 4)11/1/2005 4:23:59 PM
file:///C|/Documents%20and%20Settings/dquick/My%20Documents/Visual%20Studio%20Projects/FretWorxHelp/NewChordForm.htm
root for the selected chord. If a fingering has no open notes, it is considered a moveable
fingering. One moveable fingering works for all twelve roots for a given chord definition and is
automatically transposed as the root changes.
Click the "OK" button to save any changes and return to the main window. FretWorx
add the new chord fingering to the chord form panel.
TM
will
Click the "Cancel" button to discard any changes you've made, and return to the main window.
The next topic describes how to edit the currently selected chord fingering definition in
FretWorx
TM
.
Previous
See Also
Next
Edit the selected chord fingering definition , Creating a new chord definition, Edit the selected
chord definition, Getting help in FretWorx
TM
, Support and on-line resources
file:///C|/Documents%20and%20Settings/dquick/My%20Do...al%20Studio%20Projects/FretWorxHelp/NewChordForm.htm (4 of 4)11/1/2005 4:23:59 PM
file:///C|/Documents%20and%20Settings/dquick/My%20Documents/Visual%20Studio%20Projects/FretWorxHelp/EditChordForm.htm
FretWorxTM
Previous
Next
Edit the selected chord fingering
This menu option is enabled when a chord form is selected and has its border highlighted in the
"Chord Fingerings" group box on the fret board window. The selected chord fingering's border
is highlighted To edit the currently selected chord fingering, select "Chord fingering" from the
"Edit" menu, as shown in the following example.
If "Major" is selected in the "Chord Name" drop-down list, "G" is selected in the "Chord Root"
drop-down list on the fret board window, and the corresponding chord fingering is selected,
the dialog box shown in the following example will open.
file:///C|/Documents%20and%20Settings/dquick/My%20Do...l%20Studio%20Projects/FretWorxHelp/EditChordForm.htm (1 of 4)11/1/2005 4:23:59 PM
file:///C|/Documents%20and%20Settings/dquick/My%20Documents/Visual%20Studio%20Projects/FretWorxHelp/EditChordForm.htm
To edit a chord fingering, scroll the fret board grid so that the appropriate fret space numbers
are visible. If you scroll the fret board to the point that a visible finger is no longer visible,
FretWorx
TM
will assume it is no longer needed and remove it from the chord fingering.
A circle with a note name in the center is drawn on the fret board grid for each note in the
selected chord for the selected root.
Each fingered note played in the chord fingering is drawn as a black circle with a number in the
center. The numbers indicate which finger of the fretting hand is used to play each note. The
player's fingers are numbered as shown in the diagram below.
file:///C|/Documents%20and%20Settings/dquick/My%20Do...l%20Studio%20Projects/FretWorxHelp/EditChordForm.htm (2 of 4)11/1/2005 4:23:59 PM
file:///C|/Documents%20and%20Settings/dquick/My%20Documents/Visual%20Studio%20Projects/FretWorxHelp/EditChordForm.htm
To add a fingered note to the chord fingering, click on the desired finger number in the
"Fingers" tool box, drag it to the desired location on the fret board grid, and drop it on a chord
note circle. You can add a finger symbol to any chord note circle on the fret board grid.
To delete a finger from the chord fingering, left-click it with the mouse and press the delete
("Del") key.
TM
FretWorx can't prevent you from creating a chord fingering that is impossible to play, but it
will make sure that any notes you add are actually in the selected chord definition for the
selected chord root. You can add more than one occurance of the same finger to a chord
fingering, but only across the same fret to create a "barre". FretWorx
the barre symbols.
TM
will automatically draw
No matter how many fingers hold a string down, only one will determine the actual note that
sounds. If a finger already exists at any fret position on a string and you add a finger to a new
position on that string, FretWorx
TM
will replace the finger at the original position.
If an open string note looks like a button and has a border around it, that open note is also in
the selected chord for the selected root. To include an open string note in the chord form, click
on the desired open note button. The button will appear pushed in, its background will change
to black, and a small "o" is drawn in the nut. To remove or mute a string that is shown as open,
click on the pushed in open note button. The button will appear raised, its background will
change to light blue, and a small "x" is drawn in the nut.
If a fingering uses any open string notes, it is considered a fixed fingering and applies only to the
file:///C|/Documents%20and%20Settings/dquick/My%20Do...l%20Studio%20Projects/FretWorxHelp/EditChordForm.htm (3 of 4)11/1/2005 4:23:59 PM
file:///C|/Documents%20and%20Settings/dquick/My%20Documents/Visual%20Studio%20Projects/FretWorxHelp/EditChordForm.htm
root for the selected chord. If a fingering has no open notes, it is considered a moveable
fingering. One moveable fingering works for all twelve roots for a given chord definition and is
automatically transposed as the root changes.
Click the "OK" button to save any changes and return to the main window. FretWorx
add the new chord fingering to the chord form panel.
TM
will
Click the "Cancel" button to discard any changes you've made, and return to the main window.
The next topic describes how to create a new arpeggio fingering in FretWorx
TM
.
Previous
See Also
Next
Creating a new chord fingering definition, Creating a new chord definition, Edit the selected
chord definition, Getting help in FretWorx
TM
, Support and on-line resources
file:///C|/Documents%20and%20Settings/dquick/My%20Do...l%20Studio%20Projects/FretWorxHelp/EditChordForm.htm (4 of 4)11/1/2005 4:23:59 PM
file:///C|/Documents%20and%20Settings/dquick/My%20Documents/Visual%20Studio%20Projects/FretWorxHelp/NewArpForm.htm
FretWorxTM
Previous
Next
Creating a new arpeggio fingering
To create a new arpeggio fingering, select "New" | "Arpeggio fingering" from the "File" menu, as
shown in the following example.
If "Major" is selected in the "Arpeggio Name" list box and "C" is selected in the "Arpeggio
Key" key selector on the "Arpeggios" tab panel, the dialog box shown in the following example
will open.
file:///C|/Documents%20and%20Settings/dquick/My%20Do...sual%20Studio%20Projects/FretWorxHelp/NewArpForm.htm (1 of 4)11/1/2005 4:24:00 PM
file:///C|/Documents%20and%20Settings/dquick/My%20Documents/Visual%20Studio%20Projects/FretWorxHelp/NewArpForm.htm
To create an arpeggio fingering, scroll the fret board grid so that the appropriate fret space
numbers are visible.
A circle with a note name in the center is drawn on the fret board grid for each note in the
selected arpeggio for the selected root.
file:///C|/Documents%20and%20Settings/dquick/My%20Do...sual%20Studio%20Projects/FretWorxHelp/NewArpForm.htm (2 of 4)11/1/2005 4:24:00 PM
file:///C|/Documents%20and%20Settings/dquick/My%20Documents/Visual%20Studio%20Projects/FretWorxHelp/NewArpForm.htm
Each fingered note played in the arpeggio fingering is drawn as a black circle with a number in
the center. The numbers indicate which finger of the fretting hand is used to play each note. The
player's fingers are numbered as shown in the diagram below.
To add a fingered note to the arpeggio fingering, click on the desired finger number in the
"Fingers" tool box, drag it to the desired location on the fret board grid, and drop it on a
arpeggio note circle. You can add a finger symbol to any arpeggio note circle on the fret board
grid.
To delete a finger from the arpeggio fingering, left-click it with the mouse and press the delete
("Del") key.
TM
FretWorx
can't prevent you from creating a arpeggio fingering that is impossible to play, but
it will make sure that any notes you add are actually in the selected arpeggio definition for the
selected arpeggio root. You can add more than one occurance of the same finger to a arpeggio
fingering.
If an open string note looks like a button and has a border around it, that open note is also in
the selected arpeggio for the selected root. To include an open string note in the arpeggio
fingering, click on the desired open note button. The button will appear pushed in, its
background will change to black, and a small "o" is drawn in the nut. To remove or mute a
string that is shown as open, click on the pushed in open note button. The button will appear
raised, its background will change to light blue, and a small "x" is drawn in the nut.
If a fingering uses any open string notes, it is considered a fixed fingering and applies only to the
root for the selected arpeggio. If a fingering has no open notes, it is considered a moveable
file:///C|/Documents%20and%20Settings/dquick/My%20Do...sual%20Studio%20Projects/FretWorxHelp/NewArpForm.htm (3 of 4)11/1/2005 4:24:00 PM
file:///C|/Documents%20and%20Settings/dquick/My%20Documents/Visual%20Studio%20Projects/FretWorxHelp/NewArpForm.htm
fingering. One moveable fingering works for all twelve roots for a given arpeggio definition
and is automatically transposed as the root changes.
Click the "OK" button to save any changes and return to the main window. FretWorx
add the new arpeggio fingering to the arpeggio form panel.
TM
will
Click the "Cancel" button to discard any changes you've made, and return to the main window.
The next topic describes how to edit the currently selected arpeggio fingering definition in
FretWorx
TM
.
Previous
See Also
Next
Edit the selected arpeggio fingering definition, Creating a new chord definition, Edit the selected
chord definition, Getting help in FretWorx
TM
, Support and on-line resources
file:///C|/Documents%20and%20Settings/dquick/My%20Do...sual%20Studio%20Projects/FretWorxHelp/NewArpForm.htm (4 of 4)11/1/2005 4:24:00 PM
file:///C|/Documents%20and%20Settings/dquick/My%20Documents/Visual%20Studio%20Projects/FretWorxHelp/EditArpForm.htm
FretWorxTM
Previous
Next
Edit the selected arpeggio fingering
This menu option is enabled when a arpeggio fingering is selected and has its border highlighted
in the "Selected Fingering" panel on the "Arpeggios" tab panel. Select "Arpeggio fingering" from
the "Edit" menu to edit the currently selected arpeggio fingering, as shown in the following
example.
If "Major" is selected in the "Arpeggio Name" list box, "C" is selected in the "Arpeggio Key" key
selector on the fret board window, and the "Form 1 open" arpeggio fingering is selected, the
dialog box shown in the following example will open. For this tutorial, we have unselected the
open "G" to show how unselected open notes appear in the editor.
file:///C|/Documents%20and%20Settings/dquick/My%20Doc...sual%20Studio%20Projects/FretWorxHelp/EditArpForm.htm (1 of 4)11/1/2005 4:24:00 PM
file:///C|/Documents%20and%20Settings/dquick/My%20Documents/Visual%20Studio%20Projects/FretWorxHelp/EditArpForm.htm
To edit a arpeggio fingering, scroll the fret board grid so that the appropriate fret space
numbers are visible. If you scroll the fret board to the point that a visible finger is no longer
TM
visible, FretWorx will display a "+" indicator at the end of the scroll bar showing the
direction you should scroll to make it visible.
file:///C|/Documents%20and%20Settings/dquick/My%20Doc...sual%20Studio%20Projects/FretWorxHelp/EditArpForm.htm (2 of 4)11/1/2005 4:24:00 PM
file:///C|/Documents%20and%20Settings/dquick/My%20Documents/Visual%20Studio%20Projects/FretWorxHelp/EditArpForm.htm
A circle with a note name in the center is drawn on the fret board grid for each note in the
selected arpeggio for the selected root.
Each fingered note played in the arpeggio fingering is drawn as a black circle with a number in
the center. The numbers indicate which finger of the fretting hand is used to play each note. The
player's fingers are numbered as shown in the diagram below.
To add a fingered note to the arpeggio fingering, click on the desired finger number in the
"Fingers" tool box, drag it to the desired location on the fret board grid, and drop it on a
arpeggio note circle. You can add a finger symbol to any arpeggio note circle on the fret board
grid.
To delete a finger from the arpeggio fingering, left-click it with the mouse and press the delete
("Del") key.
TM
FretWorx
can't prevent you from creating a arpeggio fingering that is impossible to play, but
it will make sure that any notes you add are actually in the selected chord definition for the
selected chord root. You can add more than one occurance of the same finger to a arpeggio
fingering.
If an open string note looks like a button and has a border around it, that open note is also in
the selected arpeggio for the selected root. To include an open string note in the arpeggio
fingering, click on the desired open note button. The button will appear pushed in, its
background will change to black, and a small "o" is drawn in the nut. To remove or mute a
string that is shown as open, click on the pushed in open note button. The button will appear
raised, its background will change to light blue, and a small "x" is drawn in the nut.
file:///C|/Documents%20and%20Settings/dquick/My%20Doc...sual%20Studio%20Projects/FretWorxHelp/EditArpForm.htm (3 of 4)11/1/2005 4:24:00 PM
file:///C|/Documents%20and%20Settings/dquick/My%20Documents/Visual%20Studio%20Projects/FretWorxHelp/EditArpForm.htm
If a fingering uses any open string notes, it is considered a fixed fingering and applies only to the
root for the selected arpeggio. If a fingering has no open notes, it is considered a moveable
fingering. One moveable fingering works for all twelve roots for a given arpeggio definition
and is automatically transposed as the root changes.
Click the "OK" button to save any changes and return to the main window. FretWorx
add the new arpeggio fingering to the arpeggio fingering panel.
TM
will
Click the "Cancel" button to discard any changes you've made, and return to the main window.
The next topic describes how to exit FretWorx
TM
.
Previous
See Also
Next
Creating a new arpeggio fingering definition, Creating a new chord definition, Edit the selected
chord definition, Getting help in FretWorx
TM
, Support and on-line resources
file:///C|/Documents%20and%20Settings/dquick/My%20Doc...sual%20Studio%20Projects/FretWorxHelp/EditArpForm.htm (4 of 4)11/1/2005 4:24:00 PM
file:///C|/Documents%20and%20Settings/dquick/My%20Documents/Visual%20Studio%20Projects/FretWorxHelp/Exit.htm
Previous
FretWorxTM
Exit FretWorx
TM
TM
To exit FretWorx
, select "Exit" from the "File" menu, as shown in the following example.
If there are no unsaved changes, FretWorx
TM
will exit.
If there are unsaved changes, the dialog box shown in the following example will appear.
Click the "Cancel" button to stop exiting and return to the fret board window.
TM
Click the "No" button to discard any changes and exit FretWorx
without saving them.
file:///C|/Documents%20and%20Settings/dquick/My%20Documents/Visual%20Studio%20Projects/FretWorxHelp/Exit.htm (1 of 2)11/1/2005 4:24:00 PM
Next
file:///C|/Documents%20and%20Settings/dquick/My%20Documents/Visual%20Studio%20Projects/FretWorxHelp/Exit.htm
Click the "Yes" button to save your changes. See the "Save the selected instrument definition with a new name" topic for detailed
instructions.
The next topic describes how to get help in the FretWorx
TM
program.
Previous
See Also
TM
Getting help in FretWorx
, Support and on-line resources
file:///C|/Documents%20and%20Settings/dquick/My%20Documents/Visual%20Studio%20Projects/FretWorxHelp/Exit.htm (2 of 2)11/1/2005 4:24:00 PM
Next
file:///C|/Documents%20and%20Settings/dquick/My%20Documents/Visual%20Studio%20Projects/FretWorxHelp/GettingHelp.htm
Previous
FretWorxTM
Getting help in FretWorx
FretWorx
TM
Next
TM
, gives you three ways to get help:
●
Browse through the user manual using the table of contents.
●
Select predefined terms and topics using the index.
●
Use the search tools to find topics that contain specific words of phrases.
To browse through the user manual using the table of contents, select "Contents" from the "Help" menu, as shown in the
following example.
The help viewer will appear, as shown in the following illustration.
file:///C|/Documents%20and%20Settings/dquick/My%20Doc...sual%20Studio%20Projects/FretWorxHelp/GettingHelp.htm (1 of 8)11/1/2005 4:24:01 PM
file:///C|/Documents%20and%20Settings/dquick/My%20Documents/Visual%20Studio%20Projects/FretWorxHelp/GettingHelp.htm
On the left side of the help viewer window is the Navigation pane. It contains three navigational tabs: the "Contents"
tab, the "Index" tab, and the "Search" tab.
●
●
●
To browse through the table of contents, click the "Contents" tab. The table of contents is an expandable list of
important topics.
To see a list of index entries, click the "Index" tab, and then type a word or scroll through the list.
To locate every occurrence of a word or phrase that may be contained in a help file, click the "Search" tab, and
then type the word.
On the right side of the window is the Topic pane. It displays the selected help topic, or the default help topic. You can
click on any topic in the table of contents, any index entry, or search results entry to see its help topic here.
The third pane is the toolbar, which is located below the help window title bar.
Two buttons are located on the right side at the top and end of each help topic, as shown in the examples above and
below.
file:///C|/Documents%20and%20Settings/dquick/My%20Doc...sual%20Studio%20Projects/FretWorxHelp/GettingHelp.htm (2 of 8)11/1/2005 4:24:01 PM
file:///C|/Documents%20and%20Settings/dquick/My%20Documents/Visual%20Studio%20Projects/FretWorxHelp/GettingHelp.htm
Click the "Next" button to display the next topic after the current topic in table of contents. The text in the button is
greyed out on the last topic in the manual because there is no topic after it.
Click the "Previous" button to display the topic before the current topic in the table of contents. The text in the button is
greyed out on the first topic because there is no topic before it.
To view topics that contain related information, click the title of any topic that appears under the words, "See Also,"
which appears at the end of a topic.
To Select predefined terms and topics using the index, select "Index" from the "Help" menu, as shown in the following
example.
The help viewer appears, with the "Index" tab selected within the Navigation pane as illustrated below.
file:///C|/Documents%20and%20Settings/dquick/My%20Doc...sual%20Studio%20Projects/FretWorxHelp/GettingHelp.htm (3 of 8)11/1/2005 4:24:01 PM
file:///C|/Documents%20and%20Settings/dquick/My%20Documents/Visual%20Studio%20Projects/FretWorxHelp/GettingHelp.htm
To see a list of index entries, type a word or scroll through the list. Topics are often indexed under more than one entry.
When this occurs, the "Topics Found" dialog will appear, as shown in the following example.
Click the topic in the list you want to display, then click the "Display" button to display it in the Topic pane.
To use the search tools to find topics that contain specific words or phrases, select "Search" from the "Help" menu, as
shown in the following example.
file:///C|/Documents%20and%20Settings/dquick/My%20Doc...sual%20Studio%20Projects/FretWorxHelp/GettingHelp.htm (4 of 8)11/1/2005 4:24:01 PM
file:///C|/Documents%20and%20Settings/dquick/My%20Documents/Visual%20Studio%20Projects/FretWorxHelp/GettingHelp.htm
The help viewer appears, with the "Search" tab selected within the Navigation pane as illustrated below.
To use full-text search
1. Click the "Search" tab, if it's not already visible, and then type the word or phrase you want to find.
2. Click the "List Topics" button, select the topic you want from the "Select topic:" list, and then click the "Display"
button.
To highlight words in searched topics
When searching for words in help topics, you can have each occurrence of the word or phrase highlighted in
the topics that are found.
To highlight all instances of a search word or phrase, click "Options" on the toolbar, and then click "Search
Highlight On" from the drop-down list.
Notes
file:///C|/Documents%20and%20Settings/dquick/My%20Doc...sual%20Studio%20Projects/FretWorxHelp/GettingHelp.htm (5 of 8)11/1/2005 4:24:01 PM
file:///C|/Documents%20and%20Settings/dquick/My%20Documents/Visual%20Studio%20Projects/FretWorxHelp/GettingHelp.htm
●
●
To turn off this option, click "Options" on the toolbar, and then click "Search Highlight Off" from the
drop-down list.
If you are viewing a long topic, only the first 500 instances of a search word or phrase will be
highlighted.
Searching for help topics
A basic search consists of the word or phrase you want to find.
The basic rules for formulating queries are as follows:
●
●
●
●
Searches are not case-sensitive, so you can type your search in uppercase or lowercase characters.
You may search for any combination of letters (a-z) and numbers (0-9).
Punctuation marks such as the period, colon, semicolon, comma, and hyphen are ignored during a
search.
Group the elements of your search using double quotes or parentheses to set apart each element. You
cannot search for quotation marks.
To find words similar to your search term
This feature enables you to include minor grammatical variations for the phrase you search. For example, a search
on the word "add" will find "add," "adds," and "added."
1. Click the "Search" tab, type the word or phrase you want to find, and then select the "Match similar words"
check box.
2. Click the "List Topics" button, select the topic you want, and then click the "Display" button.
Note
●
This feature only locates variations of the word with common suffixes. For example, a search on the word
"add" will find "added," but it will not find "additive."
To search only the last group of topics you searched
This feature enables you to narrow a search that results in too many topics found. You can search through
your results list from previous search by using this option.
1. On the "Search tab", check the "Search previous results" check box.
2. Click the "List Topics" button, select the topic you want, and then click the "Display" button.
Notes
●
●
If you want to search through all of the files in a help system, the "Search previous results" check box
must be cleared.
The "Search" tab will open with this check box selected if you previously used this feature.
An "About Box" is a standard dialog box for Microsoft Windows® programs that displays copyright, version, and licensing
information about the program.
To see the FretWorx
TM
about box, select "About FretWorx" from the "Help" menu as shown in the following example.
file:///C|/Documents%20and%20Settings/dquick/My%20Doc...sual%20Studio%20Projects/FretWorxHelp/GettingHelp.htm (6 of 8)11/1/2005 4:24:01 PM
file:///C|/Documents%20and%20Settings/dquick/My%20Documents/Visual%20Studio%20Projects/FretWorxHelp/GettingHelp.htm
The about box appears, as illustrated below.
You will see your name and registration information displayed in the "This product is licensed to" group box.
Click the "OK" button to close the about box.
To copy a help topic
1.
2.
3.
4.
5.
In the Topic pane, right-click the topic you want to copy, and then click "Select All" on the pop-up menu.
Right-click again, and then click "Copy" on the pop-up menu. This copies the topic to the Clipboard.
Open the document you want to copy the topic to.
Position your cursor where you want the information to appear.
On the fret board window's "Edit" menu, click "Paste".
Note
●
If you want to copy only part of a topic, select the text you want to copy, right-click, and then click
"Copy" on the pop-up menu.
file:///C|/Documents%20and%20Settings/dquick/My%20Doc...sual%20Studio%20Projects/FretWorxHelp/GettingHelp.htm (7 of 8)11/1/2005 4:24:01 PM
file:///C|/Documents%20and%20Settings/dquick/My%20Documents/Visual%20Studio%20Projects/FretWorxHelp/GettingHelp.htm
To print the current help topic
Right-click a topic, and then click Print on the pop-up menu.
Note
●
If you print from the "Contents" tab (by right-clicking an entry, and then clicking "Print" on the pop-up
menu) you will see options to print only the current topic, or the current topic and all subtopics.
To hide or show the Navigation pane
On the toolbar, click "Hide" or "Show" to close or display the Navigation pane, which contains the
"Contents", "Index", and "Search" tabs.
Note
●
If you close the Help Viewer with the Navigation pane hidden, it will appear that way when you
open the Help Viewer again.
TM
The next topic describes how to get support and access on-line resources on the FretWorx
web site.
See Also
Support and on-line resources
file:///C|/Documents%20and%20Settings/dquick/My%20Doc...sual%20Studio%20Projects/FretWorxHelp/GettingHelp.htm (8 of 8)11/1/2005 4:24:01 PM
Previous
Next
file:///C|/Documents%20and%20Settings/dquick/My%20Documents/Visual%20Studio%20Projects/FretWorxHelp/Support.htm
Previous
FretWorxTM
Support and on-line resources for FretWorx
Next
TM
You can e-mail support questions directly to [email protected]. All e-mail questions
and answers are also posted to the on-line forum in order to share them with other
TM
FretWorx
customers.
You can read the latest news at www.thoughtfularts.com.
Previous
See Also
Next
TM
Getting help in FretWorx
file:///C|/Documents%20and%20Settings/dquick/My%20Documents/Visual%20Studio%20Projects/FretWorxHelp/Support.htm11/1/2005 4:24:01 PM
file:///C|/Documents%20and%20Settings/dquick/My%20Documents/Visual%20Studio%20Projects/FretWorxHelp/Acknowledgements.htm
Previous
FretWorxTM
Next
Acknowledgements
Thoughtful Arts would like to thank the following people who provided valuable input during
TM
the development and testing of FretWorx
better product.
. Because of their efforts FretWorx
TM
is a much
Mark Colburn
Dan Finnell
Nathaniel Gunod
Don Mock
Justin Quick
Jay Roberts
Richard Hale Shaw
Louis "Rundio" Sinclair
David Smolover
Jeff Steinmetz
Previous
See Also
Next
TM
Getting help in FretWorx
file:///C|/Documents%20and%20Settings/dquick/My%20Docum...l%20Studio%20Projects/FretWorxHelp/Acknowledgements.htm11/1/2005 4:24:01 PM