1
REST and Web Service architectures
IN ACTION
Jos Dirksen
SAMPLE CHAPTER
MANNING
SOA Governance in Action
by Jos Dirksen
Chapter 4
Copyright 2013 Manning Publications
brief contents
PART 1 INTRODUCTION ........................................................... 1
1
■
Introducing SOA governance
2
■
3
Setting up the SOA governance environment 27
3
■
Using a case study to understand SOA governance
60
PART 2 DESIGN-TIME POLICIES ............................................... 79
4
■
Service design and documentation policies
5
■
Security policies
6
■
Testing, performance, and the cloud 156
81
116
PART 3 RUNTIME POLICIES ................................................... 187
7
■
Using tools for runtime governance
8
■
189
Lifecycle support and discovering resources
9
■
Integrating SOA governance tools with existing tools and
technologies 235
212
Part 2
Design-time policies
I
n this second part of the book we’ll look at three different categories of policies that can be applied during design time. We’ll start by looking at policies that
deal with service design and documentation. In this category we’ll examine the
following policies:
■
SSD_POL_1: Create self-documenting services.
■
SSD_POL_2: Reuse existing message standards.
■
SSD_POL_3: Design for reusability.
■
SSD_POL_4: Support multiple versions of services.
Besides documentation policies that can be applied during design time, there
are also a number of security-related policies that can be applied during this
phase. In this part we’ll look at the set of security policies, as shown in the following list:
■
SEC_POL_1: Encrypt a communications channel for sensitive data.
■
SEC_POL_2: Validate message integrity and non-repudiation.
■
SEC_POL_3: Use a centralized identity system for authentication.
■
SEC_POL_4: Use a centralized identity system for authorization.
■
The last chapter in this part of the book looks at how you can effectively
test your service and use metrics to define the quality of your code, as well
as how you can design and implement a service that can run in a cloud:
PER_POL_4: Run services in the cloud.
TST_POL_1: Enforce code quality and test coverage.
■
■
Service design and
documentation policies
This chapter covers
■
Making your services self-documenting
■
Reusing existing standards and definitions
■
Increasing service reusability
■
Versioning your services
If you want to create services that can be easily used by your consumers, you need
to provide good documentation and versioning strategies. If you don’t have these
in place, you’ll either not get anybody to use your service or, with the first upgrade,
scare your existing consumers away with breaking changes. When you keep good
documentation, versioning, and reuse in mind during the development phase of
your service, you make it a lot easier on your consumers; they have a clear set of
documentation on how your service should be used and also know the consequences of a version change.
In this chapter we’ll discuss a number of design-time-related policies that can
help you in this area. I’ll start by quickly introducing the policies we’ll be discussing
in this chapter, and after that we’ll discuss each of these policies in detail, using the
case study from chapter 3. A quick overview and short explanation of these policies
is shown in table 4.1.
81
82
CHAPTER 4
Table 4.1
Service design and documentation policies
Service design and documentation policies
Policy name
Description
Create self-documenting
services.
It’s important for your consumers to have good documentation for the
services they want to use. Often this documentation is in a separate
document they need to read before the service interface makes sense.
With this policy I’ll show you that most of the functionality a service
provides can be described by the service itself, without the need for
extensive external documentation.
Reuse existing message
standards.
An often-seen antipattern is the “Not invented here” pattern. Instead
of using standards (or de facto standards), organizations, especially IT
groups, have the tendency to reinvent the wheel. In this policy implementation you’ll see how easy it is to reuse existing standards in REST
and WS-* environments.
Design for reusability.
When you design a service, it would be nice if this service could be
reused by other services and consumers. In the section dealing with
this policy, I’ll present a set of common guidelines and practices that
can help you in creating a service that can be more easily reused.
Support multiple versions of
services.
The final policy we’ll discuss in this chapter deals with versioning. A
service isn’t static. During its lifetime, bugs will be fixed and functionality will be added or removed. The contract of a service will change.
Having a good versioning strategy will help you minimize the impact
these changes have on your consumers.
In the next section you’ll see how to comply with the self-documenting service policy
and how to create self-documenting services.
4.1
Complying with the self-documenting service policy
During the last couple of years we’ve been moving from an application-oriented way
of software development to a more service-oriented approach. More and more functionality is offered through third-party services that you can include into your own
applications. This also means that instead of customers receiving a large user manual
for the application they just bought, they now need to know how to use a specific service. Because people usually don’t want to read through hundreds of pages of documentation, make sure your services are self-documenting and require minimal
additional documentation. In the ideal situation the consumer of your service should
know how to use this service by just looking at its contract. For WS-* based services this
usually means examining the WSDL, and for REST-based services, the messages used
should explain how to use the service.
In this section I’ll first show you how to design a REST-based service in such a way
that a user can determine how to use the service just by looking at the response messages. After that you’ll learn how you can create a well-documented WS-* service by
using the standard WSDL constructs. Because it’s also always nice to have a simple
description of the API you provide (for instance, on your website), I’ll also show you
Complying with the self-documenting service policy
83
how to write/create some basic HTML API documentation for your REST- and WS-*
based services. First, we’ll look at the REST service.
4.1.1
Documenting a REST-based service
Chapter 3 showed you the product portfolio for the OpenGov organization. One of
the products it provides is a mobile application that can be used to instantly register a
complaint when a user spots some graffiti or sees trash scattered around the park.
This complaint is instantly sent to the correct department of their municipality, and
they can send out the cleaning crews. In the next couple of paragraphs we’ll look at
the REST/JSON–based service that this app uses to register the complaints. A simplified scenario of how this app works is shown in figure 4.1.
In figure 4.1 the GovMobile app uses the REST/JSON–based ReportService to register these complaints. Each complaint will be registered as a report for further processing. Besides the mobile application that creates these reports, there’s also a civil
worker shown, who can delete reports, update their status, and mark the reports as
invalid or duplicate.
What does this service look like? How should it be called? What data should be
sent to create a report? We’re describing a REST-based service here, so it’s important
to start by looking at the resource we’re dealing with. Before we start with the resource
description, though, we’ll quickly look at the functionality this service should provide.
This service needs to
■
■
■
■
■
■
Provide functionality to add new reports from the GovMobile application
Allow a citizen to add URLs of photos of the complaint/report
Offer search functionality so that users can search for reports in a specific vicinity
Let the user add comments to a specific report
Give the civil worker the option to relate a report to other reports
Provide the civil worker basic CRUD functionality to manage the various reports
As you’ll see further on in this section, when you use REST a lot of this functionality
doesn’t need specific documentation, because it can be mapped to the standard
Figure 4.1
A citizen uses a mobile app to access a service provided by OpenGov.
84
CHAPTER 4
Service design and documentation policies
HTTP verbs. The most important part when creating REST services is the resource, so
we’ll start with that.
ANALYZING THE REPORT RESOURCE
With REST you don’t focus on operations and remote procedures. Instead you look at
a resource and use the standard HTTP operation to modify this resource. For this service you’re working with a report resource. This means that if you know the location
of a resource—its uniform resource identifier (URI)—you don’t need documentation
for the basic functionality. With REST you can be sure that when you know the location of a resource, you can use the following:
■
HTTP GET method to retrieve a resource
■
HTTP PUT method to add a resource
■
HTTP DELETE method to delete a resource
■
HTTP POST method to update a resource
If you start the ReportService from the chapter 3 examples you can retrieve a
resource by executing a HTTP GET method on the following URL: http://local
host:9002/opengov/reports/{report-id}. If you open this URL and replace {report-id}
with report-1, you’ll be shown the report identified by that id. This report resource is
shown in listing 4.1, which also includes the HTTP headers. In one of these headers,
this resource’s Content-Type is defined as application/vnd.opengov.org.report
+json. This tells the consumer that the resource they’re looking at is of a custom type
vnd.opengov.org.report and the format used is json.
Listing 4.1
Report-1 in JSON format
HTTP/1.1 200 Ok
Date: Wed, 12 Feb 2011 17:18:11 GMT
Content-Type: application/vnd.opengov.org.report+json;charset=UTF-8
{"report": {
"self": "report-1",
"status": "New",
"location": "Corner of ninth street",
"x-coordinate": 52.34,
"y-coordinate": 4.34,
"description": "There is ugly graffiti
sprayed on the mailbox at the corner
on ninth street",
"date": "25-11-2010",
"time": "15:46"
"images": [
{"href": "images/image1.png"},
{"href": "images/image2.png"}
],
"related":[
{"href": "../report-4"},
{"href": "../report-7"},
{"href": "../report-9"}
]
b
Which report you’re
dealing with
c
Images related
to this report
d
Reports related
to this report
85
Complying with the self-documenting service policy
"links": [
{"relation": "invalidation",
"href": "http://localhost:9002/opengov/invalidations/"},
{"relation": "duplication",
"href": "http://localhost:9002/opengov/duplications/"}
{"relation": "relation",
"href": "http://localhost:9002/opengov/relations/"}
]
"comments": []
}
f
e
Operations
that can be
executed on
this report
Comments added
to this report
}
We’re talking about self-documenting services in this section, so before we continue,
take a good look at listing 4.1 and see if you can understand what’s shown there. You
can probably determine how to add and remove new image locations to/from this
report and how to add and remove report relations. By looking a bit closer at this
example, you’ll see how easy it is to make REST/JSON services self-documenting. If you
look at the first annotation in the code B, you’ll see a key with the name self. The
value of this key is used to uniquely identify this resource. If you get a list of reports
from a search query, you can use this id to directly access or modify a report. If you
look at c, you’ll see a list of image hrefs. With REST you’re working with resources. If
you wanted to access such an image, you could do so by following its relative URL:
http://localhost:9002/opengov/reports/report-1/images/image-1 for the first image
in the list and http://localhost:9002/opengov/reports/report-1/images/image-2 for
the second image in the list. Because these images are also resources, you can modify
them the same way as you can with this report. You can use the basic HTTP verbs to
retrieve, add, delete and update this image.
LOOKING AT REFERENCED RESOURCES
What else can you learn from the resource shown in listing 4.1? The d annotation in
the code shows reports that are related to this report. For example, another piece of
graffiti may be found across the street from the piece that has already been reported.
This can be useful when the city hires a cleaning crew to remove the graffiti. It can tell
them to clean not only the graffiti from this specific report but also from those related
to it. For the related reports you follow the same principle as you did for the images. If
you want to access the resource, follow the relative URL and you’ll find the related
report. So far we’ve only looked at basic REST functionality where you have resources
that you can modify by using the HTTP GET, PUT, DELETE, and POST verbs, but how do
you tell your service consumer which other actions can be executed on this resource?
USING LINKS TO SHOW WHICH OPERATIONS CAN BE EXECUTED ON THIS RESOURCE
Listing 4.1 specified a number of links e. These links are basic URLs that point to a
specific resource. In this example they point to a relation, duplication, and
invalidation resource. This resource can be accessed in the same manner as other
REST resources; this time, though, you don’t create or update the resource but
execute a specific action. In this example you can mark a specific report as invalid by
86
CHAPTER 4
Service design and documentation policies
submitting a PUT request, with the report as its content, to the URL specified by the
invalidation relation (http://localhost:9002/opengov/invalidations/). This
same principle can be applied to the relation and duplication links.
More on links: Atom and RDF
The use of links isn’t something new. The <link> tag is specified in the HTML 4 standard and is used to link a specific web resource to another resource. Generally, though,
you won’t see it used much in standard web pages. It was used a lot by some feed
protocols. One of the best known is Atom. The Atom Syndication Format is a simple
XML-based format that can be used to define web feeds. One of the interesting features of this format is the use of the <link> tag. The self link we used in this documentation example is defined as a standard relation in the Atom specification.
Besides the self type, Atom also specifies relations such as edit, alternative,
and more. If you need to publish data in a specific format, Atom would be a good choice.
More information on Atom can be found in the relevant RFCs: http://tools.ietf.org/
html/rfc4287 and http://tools.ietf.org/html/rfc5023.
Besides the relations defined in the Atom specification, there’s a different standard
that focuses exclusively on describing the semantics of resources. This is called the
Resource Description Framework (RDF). With RDF you describe all kinds of information
regarding a resource. You have a standard way of describing who the author is, when
the resource was published, and so on. If you have a strict set of relations between
various resources, you can use RDF to describe this information in a standard way.
RDF is a W3C standard, so a lot of information on RDF can be found on the W3C pages
at http://www.w3.org/RDF/.
So far the REST service is pretty much self-explanatory. What is missing, though, and
where additional documentation is required, is a description of the resources themselves. What does a report look like, which fields are required, what does a comment
look like? In this example, if you wanted to add a comment f, you could determine
from the listing that you need to PUT a comment message to the /reports/report-1/
comments/ URL. But what does this message look like? If you’d used XML instead of
JSON, you could have used an XML schema to define what the resources look like.
With JSON, however, there isn’t a standard way (not including WADL, because it isn’t
used in practice), to describe what the JSON messages look like. What you usually see
is that with a JSON-based REST service, a simple HTML or plain-text description for the
different resources is provided in a human-readable format.
CREATING HUMAN-READABLE DOCUMENTATION
As you’ve seen before you don’t need to document everything. What you should
describe are the following items:
■
URLs used to access or search for a report
■
Links relations that describe how various resources are linked together
Media types that are used by this service
■
Complying with the self-documenting service policy
87
Let’s make such a description for this service. The first thing you describe is the URL
on which this service can be accessed:
URLs:
http://localhost:9002/opengov/reports?location=xPos,yPos&radius=r
Submit a GET request to this URL to search for reports. You can optionally
specify a location and a radius to only return reports for a specific
area. If no location and radius are specified, the first 100 reports,
sorted by date (newest first), are returned. The reports that are
returned have the application/vnd.opengov.org.report+json media type.
xPos: x-coordinate of the location. Accepts GPS coordinates.
yPos: y-coordinate of the location. Accepts GPS coordinates.
r: radius to search for in meters.
You can see that you’ve provided a search function with which reports for a specific location can
be retrieved. You also specify the media type of the report you’re returning. A media type
should specify exactly what type of resource you’re dealing with. In the previous example you
defined a media type of application/vnd.opengov.org.report+json. The first part of
this media type, application, defines the category the media type belongs to. There are a
couple of commonly used categories such as application, audio, image, message, text, and
video. You can use these categories to indicate the general type of the resource. application
is a rather general category that’s used for multipurpose resources. The second part of this
media type starts with vnd. This indicates that you’re using a vendor-specific resource. There
isn’t a standard for the resource you’re defined, so it’s good practice to indicate this with the
vnd prefix, which means that you created your own custom media type. The next part of the
media type, opengov.org.report, indicates that you’re working with a report resource. This
identifier uniquely indicates the type of resource this is. Finally you have the postfix +json. This
postfix tells your consumers that the format in which the resource is sent is JSON.
This makes it easier for the consumers to work with your responses, because they know
exactly what the service returns.
The next item in your list is to describe the links:
Links:
self: identifies the current resource. This (relative) URL can be used to
directly access or modify a report.
http://localhost:9002/opengov/invalidations/: This URL can be used to
invalidate this resource. Use an HTTP PUT operation on this URL with
media type application/vnd.opengov.org.invalidation+json.
http://localhost:9002/opengov/duplications/: This URL can be used to mark a
report as a duplicate. Use an HTTP PUT operation on this URL with media
type application/vnd.opengov.org.duplication+json.
http://localhost:9002/opengov/relations/: This URL can be used to relate two
reports to each other. Use an HTTP PUT operation on this URL with media
type application/vnd.opengov.org.invalidation+json.
The last thing you need to do is describe the resources themselves. If you’d used XML you would
have mentioned where the schema could be found that describes a specific media type. In this
88
CHAPTER 4
Service design and documentation policies
case you just describe the properties of the media types. If some elements should be sent in a specific format (for example, a date) or elements are required, this is the place to describe it:
Media types:
application/vnd.opengov.org.report+json
- status: The status of this report
- location: Readable description of the location of this report
- etc.
With these items described you have enough documentation for your consumers to use your
service. As you’ve seen, a REST service by itself doesn’t need much documentation. Because
you’re using REST, the consumers already have a good idea how your resources can be
accessed, modified, and deleted. It’s important, though, if you want a good, self-describing service that requires a minimal amount of additional documentation, to keep the following items
in mind:
■
■
■
■
■
Follow the basic REST principles for the HTTP PUT, GET, DELETE, and POST operations.
Use href/links when linking to other resources. It doesn’t matter if you use relative
links or absolute links for this, although relative links are more flexible should you relocate your resource.
Use media types to inform your consumers of the type of resource they’re dealing with.
Use links with a specific relation property to tell your consumers what they can do with
this resource.
Add a simple description of the URLs, media types, and links that are supported by your
service.
A complete description of this service can be found in the source code for chapter 4. Look in the
Self-Documenting-Service-REST project supplied with the book. In the next section you’ll
again create a self-documenting service, but this time you’ll document a WS-* based service.
4.1.2
Documenting a WS-* based service
Documenting a WS-* based service is easier than describing a REST-based service. For a
WS-* based service there’s a standard format in which contracts are defined. This contract, a standard WSDL, already provides a good technical description of what operations the service offers and how the service can be accessed, all from a technical point
of view. What you need to do is add human-readable documentation that explains
how your service should be used, what the operations do, and any special information
regarding the request and response messages.
For this example you’ll take a use case from the GovForms application. In chapter 3
I showed you that this application, among other functionality, allows citizens to
apply for specific permits (building permits, commercial permits, and the like). The
GovForms application uses a WS-* based service to communicate with the permits system, as shown in figure 4.2.
Complying with the self-documenting service policy
89
Figure 4.2 A citizen
uses the GovForms
application to apply
for a permit.
Describing WS-* based services can quickly get verbose because of all the XML, so for
this example we’ll focus on a single operation that’s provided by this permit system:
the addPermit operation.
THE WSDL FOR THE PERMITSERVICE
In this section we’ll look the various parts of a WSDL and how you can document these
parts. Before diving into the details, a quick sidestep on how to add documentation to
a WSDL is in order. If you look at the XML of a WSDL file you’ll see lots of different elements: definitions, types, bindings, ports, services, messages, and so on. These
are all elements in the http://schemas.xmlsoap.org/wsdl/ namespace. For all these
elements you can add documentation like this:
<wsdl:documentation>
..
</wsdl:documentation>
Anything entered between the wsdl:documentation tag is treated as documentation.
The only restriction is that the content needs to be valid XML. Besides elements from
this namespace, in a WSDL you’ll also find type definitions, either using an inline
schema or included from an external XSD file. If you have complex types in your schemas, it’s good practice to document these. For schemas this is done like this:
<xsd:annotation>
<xsd:documentation>
...
</xsd:documentation>
</xsd:annotation>
With these two elements you can describe all the elements from a WSDL. Table 4.2
shows the different parts of the WSDL you should document.
Table 4.2
Parts of a WSDL that should be documented
WSDL section
wsdl:definitions
How to describe
This is the main element of a WSDL. Here you should describe in a humanreadable way what the service does and the functionality it provides. If your service requires special authentication or other requirements, this is the place to
put it.
90
CHAPTER 4
Table 4.2
Service design and documentation policies
Parts of a WSDL that should be documented (continued)
WSDL section
How to describe
wsdl:types
In this section all the XSD types used throughout the WSDL are defined. When
you include many different schemas, it’s important to give an overview here of
the various included schemas and the types they provide. In this element you
often have simple wrapper elements for compliance to the document/literal/
wrapped messaging style.
xsd:*
In a WSDL you use an XML schema to define the XML messages that are sent
and received by your service. When you start documenting these types in your
WSDL, you should also add XSD-specific information for the complex types. If
you have a type definition where it isn’t clear from the name or the definition
how it can be used, you should add documentation. Most often, though, an
XSD provides enough information without the need for extra documentation.
wsdl:porttype
This is the interface of the service you provide. You should document this service as you would an interface when you’re programming.
wsdl:operation
For each operation you should describe what the operation does, because from
the WSDL definition the user can determine how the operation can be
accessed but not how it should be used.
Let’s look at a couple of the points mentioned in table 4.2 using the PermitService,
part of the PermitSystem from figure 4.2, as an example. I’ll show you an example for
a wsdl:porttype and for a wsdl:operation, because those are the most important
items to document in a WSDL. You shouldn’t write technical documentation; rather,
you should describe how the service works from a functional perspective, because the
standard elements from a WSDL already describe the technical part of how the service
should be called. See the following listing.
Listing 4.2
Example of how to describe a wsdl:porttype and a wsdl:operation
<wsdl:portType name="PermitService">
<wsdl:documentation>
<p>The PermitService porttype defines the operations provided by the
PermitService. This portType defines the following operations that
can be used to interact with the PermitService:</p>
<ul>
<li>getPermit: returns a permit based on a permitID</li>
<li>submitPermit: add a new permit. When the permit is added a unique
permit ID is returned.</li>
</ul>
</wsdl:documentation>
<wsdl:operation name="getPermit">
<wsdl:documentation>
<p>With the getPermit you can retrieve stored permits. This operation
is called with a permitID and if the permitID is found, the
corresponding Permit is returned. If no permit can be found for the
id, or the permitID is in the incorrect format, a fault message
Complying with the self-documenting service policy
91
will be returned. This fault message will contain the details of
why the error occurred.</p>
</wsdl:documentation>
<wsdl:input message="tns:getPermitRequest"/>
<wsdl:output message="tns:getPermitResponse"/>
<wsdl:fault name="fault" message="tns:getPermitFault">
</wsdl:operation>
</wsdl:portType>
Using WADL and JSON schema for describing resources
In this section we talked about WSDL and XML schemas. You might wonder why there
isn’t something like that for the REST/JSON space. Actually, there is something similar
for REST. For describing a REST contract there’s a standard called WADL, and for
describing JSON messages there’s something called JSON.
Neither has been widely adopted by the REST and JSON communities. Why is that?
If you look at WADL (http://www.w3.org/Submission/wadl/), you’ll see the similarity
between a WADL and a WSDL. This is also something a lot of people in the REST
space aren’t happy with. With a WADL you describe an RPC-based style of interacting
with a resource. This doesn’t match well with the resource-oriented style REST promotes. Besides that, WSDLs are often used as a base for generating the plumbing
code needed to interact with WS-* based services. With REST an easy-to-use interface
is already provided, and with a couple of easy GET and POST calls you can already
explore a service. The JSON schema was also not that well received within the JSON
community. The JSON community wants to avoid the heavyweight specifications that
define the WS-* stacks. They want to keep it simple and to the point.
The idea is that JSON requests and responses should be self-documenting, and the
way you use a REST service to access or modify resources should follow the basic
RESTful principles.
With this functional and technical description, you have a good self-describing service. For the REST example I provided a simple text-based version of this documentation. By adding the documentation to the WSDL itself, you don’t have such a simple
readable document that can be used as documentation. Users of this service will have
to dive into the WSDL and find the information from there, which isn’t practical.
Luckily, though, there are some tools that can help in generating readable documentation from a WSDL.
GENERATING DOCUMENTATION FROM THIS WSDL
A WSDL is an XML file, so you can use XSLT to transform your WSDL to a simple text or
HTML file that can be used as documentation. You aren’t the first with these requirements, so you don’t have to write this XSLT from scratch. The XSLT you use can be
downloaded from http://code.google.com/p/wsdl-viewer/.
92
CHAPTER 4
Figure 4.3
Service design and documentation policies
WSDL as shown in the browser after the wsdl-viewer.xsl XSLT has been applied
Using this XSLT you can generate an HTML overview of this service. An example of
this is shown in figure 4.3.
There are different ways to apply an XSLT to an XML document. For this example
you’ll use the standard functionality browsers support. If you put an XSLT declaration
at the top of an XML file and open it in a browser, the browser will apply this XSLT and
show you the results. To see this in action you need to add this to the top of the WSDL:
<?xml-stylesheet type="text/xsl" href="wsdl-viewer.xsl"?>
The href attribute points to the relative location of the XSLT to apply. In this case you
need to download the wsdl-viewer.xsl file from the previously mentioned site and put
it in the directory where your WSDL is located. After you’ve downloaded the XSLT and
added the code fragment, you can open the WSDL in your browser and see the WSDL
documentation, as shown in figure 4.3. From your browser save this file as HTML; in
the next section you’ll add this document to your repository for easy reference.
4.1.3
Adding documentation to the service repository
Now that you have the documentation, what should you do with it? Send it along
when you get a new consumer of your service? Store it on a shared drive? What you
need is some way to register this document so that you can reference it from your service and also be able to access it programmatically if you want to automatically publish
the latest version to a website. If you store this documentation in your service repository, you can do all this. The steps to do this are simple. Start up the SOA Service
Complying with the self-documenting service policy
Figure 4.4
93
Service List shows the two services you just added
registry and go to the address https://localhost:9443. This will redirect you to the
login page, where you can log in using admin/admin. The first thing you’ll do is register the two services you’ve worked with in this section. Click the Add Service button,
and you’ll be shown a large form where you can fill in all kinds of information. For
now fill in the name of the service and its namespace. For the WS-* based service use
PermitService as the name and urn:govforms:wsdl:permit:service-1.0 for the
namespace. Scroll down and click the Save button to store this service. You could have
also uploaded the WSDL for the WS-* based service, which would have created this service automatically. We’ll show you how to do this later on, but for now having a service
is enough.
For the REST-based service you’ll use ReportService as the name and http://
localhost:9002/opengov/reports as the namespace. You use the URL as the
namespace because in REST a resource’s URL should uniquely identify the location of
a resource. This means you won’t run into any naming conflicts, and REST services can
be registered in a consistent manner. After you’ve added both services, click the List
Services button, and you’ll be shown an overview like the one in figure 4.4.
You have your services in the repository (we’ll dive deeper into the specific configuration for services later on in this chapter), and the next step is to add the documentation for these services. As you’ve probably noticed, there isn’t an Add Document
button. You can, however, add arbitrary content to the repository. Click the Browse
button in the Resources menu. This will show you a tree-based view of all the
resources in the repository. In this tree navigate to the /_system/governance resource
and click the Governance link. This will show the details of the Governance resource.
The governance resource is the parent resource under which all the services, policies,
WSDLs, and schemas are stored. Here you’ll create a new collection, where you’ll store
the documentation.
On the /_system/governance screen click the Add Collection button. You’ll be
shown a small form. As name enter Documentation, and set Media Type to Not Specified. Then click the Add button. In figure 4.5 you can see what this folder looks like
after you’ve added the Documentation resource.
94
CHAPTER 4
Service design and documentation policies
Figure 4.5 The _system/
governance resource after adding
the Documentation collection
This Documentation resource is where you’ll add your service documentation. Open
the Documentation resource and click the Add Resource button. Here you’re shown a
form with different methods you can use to add content to the repository. As the
method use Upload Content From File. Click Choose File and browse to where you
stored the HTML from the WS-* documentation example. Click Add and the resource
will be added. If you open this resource, you can now download it, edit it, add metadata, and do all the things you can do to other resources in the registry. There’s one
more thing to do: make sure you know which documentation belongs to which service. For this you need to relate the PermitService resource and this Documentation
resource to each other.
Open the Documentation resource you just created, and on the right side you’ll
see an Associations tab, as shown in figure 4.6. In this tab click the Add Association
button.
As Type enter Documents, because this resource
documents the service. For the Path click the browse
button and navigate to the PermitService you
added earlier. Click the Add button to create the
association. Now you’ll see a direct link to the
PermitService resource from this resource. To
finish adding the documentation, use this same
method to also create an association back from the
service to the Documentation resource, and repeat
this exercise for the REST service and its documenFigure 4.6 Add an association to the
tation. You now have two centrally registered serPermitService
vices with associated documentation.
Following existing standards and definitions
95
Before we move on to the next policy, let’s quickly recap why you created this documentation in this manner. In chapter 3 we defined a number of policies. The one we
discussed in this section, SSD_POL_1, has the following statement:
“All services, REST and WS-* alike, must be self-documenting. There shouldn’t be the need
for extensive manuals on how to use the services we provide.”
With the approach outline in this section, you can comply with this policy. In the
next section we’ll look at the policy that specifies that we should follow existing standards if they’re available.
4.2
Following existing standards and definitions
There are many standards that you can use to make your work easier. If you follow existing standards and definitions, other people will better understand how to use your service, and it will be easier to integrate various services. Note that when I say standards
here, I mean standards in the broadest sense of the word. They can be anything from
internal standards and industry standards to specific W3C or OASIS standards.
In this section we’ll look at how you can comply with policy in two different ways.
We’ll first look at how you can use an XSD in a WS-* service and in a REST service.
After that we’ll look at a different kind of standard: a standard way you can define a
search interface by following the OpenSearch specification.
4.2.1
Including an existing XML schema in a WSDL
When your service is used in a domain where standards are available, it’s a good idea to
follow those standards. This will make it easier for your consumers to understand what
your service does and will increase its interoperability. For instance, if your service has
to deal with electronic invoices and purchase orders, you can decide to define a format
yourself or use the Universal Business Language (UBL) standard. UBL (http://
www.oasis-open.org/committees/ubl) was created to serve as a standard way to do business electronically. It defines a set of XML schemas and processes that you can freely
use in your own applications. In this section I’ll show you how easy it is to reuse existing
message definitions in your services. I’ll first show you how to do this in a WS-* based
service where you can directly import the message definitions in the WSDL. After that
I’ll show you how you can return an XML response from a REST service that’s defined
by an existing message definition. In chapter 3 I described the OpenDataService. With
the OpenDataService consumers can retrieve all different kinds of information from
the various systems offered by OpenGov. One of the information sources this service
returns describes specific road events such as road works, traffic light failures, and traffic jams. You could define your own model for these messages, but a little research
shows that, at least in the UK, there’s already a standard defined for these kinds of messages. This message definition describes the various types of road events that can occur
and how they should be reported. You can find this message definition at the following
URL: http://interim.cabinetoffice.gov.uk/govtalk/schemasstandards.aspx. I’ve also
included them in the source folder for chapter 4.
96
CHAPTER 4
Service design and documentation policies
Figure 4.7 The RoadEvent message
that you’ll reuse in your services
In the RoadEventMessage-v1.0.xsd schema you can find the RoadEventStructure
complex type. I’ll show you how to use this specific type in your services. Figure 4.7
shows some more detail about this type.
For a WS-* based service all messages and operations are defined in a WSDL. In
the following couple of paragraphs I’ll show you how to reuse this schema in your own
service. To test this you’ll create a simple FindRoadWorks operation in a new service
called RoadWorksService. The WSLD elements required for this operation are shown
in the following listing.
Listing 4.3
Import the
external
schema
b
The WSDL that includes the external schema
<wsdl:types>
<xsd:schema targetNamespace="urn:opengov:wsdl:roadworks:types-1.0"
<xsd:import
namespace="http://www.govtalk.gov.uk/LocalGovernment/RoadEventMessage"
schemaLocation="../xsd/RoadEventMessage-v1.0.xsd"/>
<xsd:element name="FindRoadWorks">
<xsd:complexType>
<xsd:sequence>
<xsd:element name="status" type="xsd:string"/>
</xsd:sequence>
</xsd:complexType>
</xsd:element>
<xsd:element name="FindRoadWorksResponse">
<xsd:complexType>
<xsd:sequence>
<xsd:element name="roadEvents"
type="rw:RoadEventStructure"
minOccurs="0" maxOccurs="unbounded"/>
</xsd:sequence>
</xsd:complexType>
</xsd:element>
</xsd:schema>
</wsdl:types>
<wsdl:message name="FindRoadWorks">
<wsdl:part element="tns:FindRoadWorks" name="parameters"/>
</wsdl:message>
c
Define the
input message
d
e
Define the
response
Use external
type
97
Following existing standards and definitions
<wsdl:message name="FindRoadWorksResponse">
<wsdl:part element="tns:FindRoadWorksResponse" name="parameters"/>
</wsdl:message>
<wsdl:portType name="ServiceWhichIncludes">
<wsdl:operation name="FindRoadWorks">
<wsdl:input message="tns:FindRoadWorksRequest"/>
<wsdl:output message="tns:FindRoadWorksResponse"/>
</wsdl:operation>
</wsdl:portType>
f
Define the
operation
Listing 4.3 shows the important parts of this WSDL. The first step is to import the
external schema B and refer to the namespace in which the types in that schema are
defined. This namespace is defined in the root element of your own WSDL (not
shown) so that you can easily refer to it from your message definitions. Now that you
have access to the types defined in this external schema, you can use them in your service. You do this by referencing this external type e in the response message d. This
response message and the request message c are then used to define the messages
that serve as input for your operation f. This is all that is needed to reuse an existing
schema in a WSDL.
If you generate code based on this WSDL, you can directly use the elements from
this external schema in your service implementation. As an example of what you can
generate, a Java interface for this service is shown in the following listing.
Listing 4.4
Generated interface showing the externally defined type
@WebService(targetNamespace = "urn:opengov:wsdl:roadworks:types-1.0",
name = "RoadWorksService")
@XmlSeeAlso({uk.gov.govtalk.people.addressandpersonaldetails.ObjectFactory.
class, uk.gov.govtalk.people.persondescriptives.ObjectFactory.class,
uk.gov.govtalk.people.bs7666.ObjectFactory.class, ObjectFactory.class,
uk.gov.govtalk.core.ObjectFactory.class,
uk.gov.govtalk.localgovernment.roadeventmessage.ObjectFactory.class})
public interface ServiceWhichIncludes {
@WebResult(name = "roadEvents", targetNamespace = "")
@RequestWrapper(localName = "FindRoadWorks", targetNamespace =
"http://www.example.org/ServiceWhichIncludes/", className =
"org.example.servicewhichincludes.FindRoadWorks")
@WebMethod(operationName = "FindRoadWorks", action =
"http://www.example.org/ServiceWhichIncludes/FindRoadWorks")
@ResponseWrapper(localName = "FindRoadWorksResponse", targetNamespace =
"http://www.example.org/ServiceWhichIncludes/", className =
"org.example.servicewhichincludes.FindRoadWorksResponse")
public java.util.List<uk.gov.govtalk.localgovernment.roadeventmessage.
➥ RoadEventStructure> findRoadWorks(
@WebParam(name = "status", targetNamespace = "")
java.lang.String status
);
}
If you create an implementation of this service and call it from soapUI (using the provided soapUI project you can find in the chapter 4 sources), you’ll get the following
98
CHAPTER 4
Service design and documentation policies
result from a simple status query (namespaces removed for clarity), which uses the
information from the external referenced schema:
<soap:Envelope
xmlns:soap="http://schemas.xmlsoap.org/soap/envelope/">
<soap:Body>
<ns2:FindRoadWorksResponse>
<roadEvents
Status="Active" UniqueReference="REF-1303239979330">
<ns3:StartTime Estimated="no">
<ns3:Date>2011-04-19+02:00</ns3:Date>
<ns3:Time>21:06:19.328+02:00</ns3:Time>
</ns3:StartTime>
<ns3:EndTime Estimated="no">
<ns3:Date>2011-04-19+02:00</ns3:Date>
<ns3:Time>21:06:19.330+02:00</ns3:Time>
</ns3:EndTime>
<ns3:Publisher>
<ns3:OrganisationName>OpenGov</ns3:OrganisationName>
<ns3:OrganisationSectionName>Traffic
department</ns3:OrganisationSectionName>
<ns3:SystemName>GovTraffic</ns3:SystemName>
</ns3:Publisher>
<ns3:Promoter>
<ns3:OrganisationName>OpenGov</ns3:OrganisationName>
<ns3:OrganisationId>OP-1</ns3:OrganisationId>
</ns3:Promoter>
<ns3:Restriction
TrafficManagementCode="RoadClosure"
Type="TrafficLightFaults">
<ns3:Description>Road closed
because of traffic
lights failure</ns3:Description>
</ns3:Restriction>
</roadEvents>
</ns2:FindRoadWorksResponse>
</soap:Body>
</soap:Envelope>
Reusing existing XML schemas in a WS-* based service isn’t that difficult. If you’ve
included the schemas correctly in your WSDL, you can reference them for your messages and use those messages in your service. Even though for a REST service there
isn’t a WSDL you can use to include external schemas, you can use the same schemas
to generate code that you can use directly in your REST service implementation.
4.2.2
Using an existing XML schema in a REST resource
As you’ve seen earlier in this chapter with REST, you don’t (usually) have a contract
that defines what the operations look like. This isn’t a big issue. In the previous example we used Maven to generate Java code from the WSDL definition. If you want to
know how that’s done, look at the pom.xml file for that example. What are also generated are JAXB classes for all the different types defined by this schema. In this section
we’ll look at how you can use these JAXB classes as a response message for a REST call.
Following existing standards and definitions
99
For this example you’ll create a REST service that returns a list of road works. If a GET
request is made to the /opengov/roadworks/{status} URL, you want to receive an XML
result that looks like the result you got from your SOAP service in the previous section.
Doing this is easy. The following listing shows all the code that’s required to implement this service.
Listing 4.5
REST service that returns road events
@Service
@Path("/opengov/roadworks/{status}")
public class RoadWorksService {
@GET
@Produces("application/govtalk.localgovernment.roadeventmessage+xml")
public RoadEventMessage findRoadWorks(@PathParam("status")
String status) {
RoadEventMessage result = new RoadEventMessage();
result.getRoadEvent().
addAll(RoadWorksUtil.findRoadEvents(status));
return result;
}
}
In this listing you don’t do anything special to return this message as XML. The REST
implementation you use for these examples (JAX-RS using CXF) will automatically
marshal the RoadEventMessage you return to XML. You can use SOAP-UI to test this
service with the test project I’ve provided. You can also open your browser and navigate to http://localhost:9001/opengov/roadworks/new, and the result will be
returned in your browser.
In the last two sections we looked at how to reuse existing message definitions.
This is something you often see when working in the WS-* space. In the REST world,
however, WSDLs and schemas aren’t used that much. What you do see more and more
in the REST space is a more loosely based definition. In the next section, we’ll look at
how you can create a REST-based search engine using one of the available standards in
that domain: the OpenSearch.org standard. You’ll use this specification to offer a
standard-based search engine to search through the road works registered in the
RoadWorksService.
4.2.3
Using a REST-based search definition
A common requirement for websites and applications is that they need to provide an
interface that can be used to search through the resources provided by this interface.
eBay offers functionality to search through auctions; Amazon allows you to search
through their catalog of books, music, movies, and much more. It would be nice if
this search functionality could be offered in a standard manner that would integrate
with your browser. If you follow the OpenSearch specification, you can easily accomplish this.
100
CHAPTER 4
Figure 4.8
Service design and documentation policies
Integrating OpenSearch in the web browser and searching your service from there
The OpenSearch specification describes a number of simple formats you can use
to describe a search engine. This specification, which can be found at http://
www.opensearch.org, defines a standard way to expose your search functionality and
describe what the search results should look like. This is all defined in a standard format so that clients (such as browsers) can read this file and provide custom search
functionality based on this information. In section 4.2.1 we looked at reusing existing
XML schemas and showed a service that could be used to manage road works. In this
section you’ll create an OpenSearch-based search definition that can be used to
search information directly from the browser.
You want to create a service that allows you to search based on the type of roadwork so that, for instance, you can query for all the traffic light failures. The result
should look like figure 4.8.
To get all this to work, take the following steps:
1
2
3
Provide an OpenSearch-based description file. This file describes the interface
clients can use to query your service.
Create a service that can process the search requests and return these results in
the format specified by the OpenSearch specification.
Install this OpenSearch search engine in your client (in this case you’ll use
Firefox) and test to see if you can search.
An OpenSearch-based description file is an XML file that describes how your service
should be queried. The following listing shows the description of your search engine.
Listing 4.6
OpenSearch-based description of a custom search engine
<?xml version="1.0" encoding="UTF-8"?>
<OpenSearchDescription
The name of
xmlns="http://a9.com/-/spec/opensearch/1.1/"
the search
xmlns:moz="http://www.mozilla.org/2006/browser/search/">
engine
<ShortName>RoadWorks</ShortName>
<Description>A simple search engine that returns a
Human-readable
list of roadworks</Description>
description
<InputEncoding>utf-8</InputEncoding>
<Url type="text/html"
The type of content you’ll be returning
b
c
d
101
Following existing standards and definitions
template="http://localhost:9002/opengov/roadworks/?q={searchTerms}" />
</OpenSearchDescription>
The URL to send
the query to
e
In listing 4.6 you specify the name of your search engine B; this is the name you’ll see
in the drop-down box in your browser. You can also specify a human-readable description for your service c that can be used by OpenSearch clients to show to the user. If
you want to use this in a browser, you need to provide a query URL the browser can
use. A browser requires a URL of the type text/html d. If you used this from an RSS
reader, you could have a specific URL that would return the results in Atom or RSS format. For the text/html URL you also need to specify how this service should be called.
In e you specify the URL on which your service needs to listen. In e you can also see
the {searchTerms} parameter. This parameter will be replaced with the content from
the search box. If you want to search anything, you need a service that can be queried.
For this you’ll create a simple JAX-RS–based service, as shown in the following listing.
Listing 4.7
The service that handles the search request
@Service
@Path("/opengov/roadworks/")
public class RoadWorksSearchService {
@GET
@Produces("text/html")
public Response searchRoadWorks(
@QueryParam("q") String query) {
b
c
The URL this service
is listening on
Map the q parameter
of the URL to the
query String
...
return Response.ok().entity(resultAsString).build();
}
}
Listing 4.7 shows the implementation of your search service. This is a simple REST service B that maps the GET method to the searchRoadWorks operation. In this operation you use the query parameter q c as input for your search. After the search you
make a text/html String and return the result.
The final step is registering this search engine in your browser. For this example
I’ve used Firefox, but the scenarios for other browsers are pretty much the same. The
OpenSearch specification provides a standard way in which browsers can discover new
search engines. If you put a specific link in the top of a webpage, browsers will see this
and allow you to add a search engine. For this example I’ve created a simple HTML
page with the following content.
Listing 4.8
The web page that registers this OpenSearch provider
Define this link
<html>
as a search link
<head>
<link rel="search"
type="application/opensearchdescription+xml"
Media type
of this line
102
CHAPTER 4
Service design and documentation policies
title="RoadWorks"
Name of the search engine
href="./opensearch-specification.xml">
<meta http-equiv="Content-Type" content="text/html; charset=UTF-8">
<title>Roadworks search</title>
Location of this
</head>
search engine
<body>
Use the roadworks search from your browser’s search screen
</body>
</html>
If you open the web page from listing 4.8 in your browser (you can launch the web
server from the sources in this chapter), you’ll see the screen shown in figure 4.9.
Figure 4.9
The web page is rendered as a normal web page in your browser.
Because of the link in this webpage, Firefox has detected that this website provides a
search engine following the OpenSearch standards. To use this search engine, click
the downward-pointing arrow next to the search box. This will give you the option to
add a RoadWorks search engine. If you click this option, as shown in figure 4.10, the
search engine will be added to the list of search engines your browser supports.
Now you can search directly from your browser in the RoadWorksSearchService,
and you’ll be presented with results like those shown in figure 4.8.
Not all big parties provide an OpenSearch–based description of their services, but
there’s an open source project at https://github.com/graudeejs/opensearch that
Figure 4.10
Add your custom search engine to the list of browser-supported search engines.
Creating a reusable service
103
provides OpenSearch-based descriptions of over 50 services such as eBay, DuckDuckGo, and Yahoo!.
Having a standard-based search engine as an access point to your service is a good
way to improve the reusability of your service. In the following section I’ll present you
with a couple of guidelines that can help you in making your service more reusable.
4.3
Creating a reusable service
Our next policy states that we should create services that are reusable. In the previous
chapter we have many services that could be reused. For instance, we could centralize
the storage of information in a reusable service. Many books have been written on
how you can create services that can be reused by other services or applications. In
this section I won’t go into specific details of how you can design and implement a
reusable service, but I’ll give you a set of guidelines and best practices that can help in
creating services that are reusable.
4.3.1
Define the correct level of granularity
If you look at a set of services you’ll probably notice that services provide different levels of granularity. You can have anything from services that allow you to modify a single property of an entity in your system to services that allow you to apply for a
mortgage. Now why is this granularity important? The granularity of a service defines
how easily it can be reused. Fine-grained services can often be more easily reused than
coarse-grained services. Let’s look at the different types of services you can define:
■
■
■
Process services—Process services are the coarsest-grained services. These kinds
of services most often offer services or products to their consumers. For
instance, you can have a process service that handles the sale of a house. In this
scenario the tax system needs to be updated, the homeowner’s system needs to
be updated, and a lot more systems are involved in this transaction. A process
service will call other process services and business services to accomplish its
task. When you’re thinking about orchestration, you’re probably talking about
a process service.
Business services—A business service provides a single, specific business function
for a system. In the previous example, a business service would be a service that
you can use to update information in a tax system.
Technical services—The finest-grained services are the technical services. A technical service provides a small piece of functionality to other services. An example of this could be a service that allows you to update a Person entity in the
database, send an email, or call a legacy backend.
If you want to improve the reusability of your services, you can get some quick wins by
looking at the technical services. These are often services that can be easily reused by
the business services or by other technical services and that are often duplicated
throughout the organization. If you set up a SOA registry (like the WSO2 registry) and
104
CHAPTER 4
Service design and documentation policies
get all the services registered, you can quickly track any duplication in your service
portfolio and perhaps remove the duplication.
4.3.2
Decoupling the transport layer from the logical layer
One of the best ways to make sure your services can be reused is to decouple the technical transport layer from the implementation
of the business logic. Figure 4.11 shows a
logic layer that can be accessed by multiple
remoting technologies.
If you keep the business logic of your service separated from the technical communication details, you can create additional
Figure 4.11 Decouple the remoting
remoting interfaces if needed and reuse your
implementations from the logic of a service.
existing business logic.
In figure 4.12 you can see the responsibilities of these two layers. The remoting
layer takes care of any protocol negotiations and message transformation and then
connects to the business logic using the internally provided interface.
4.3.3
Service discovery
When you want other consumers to use your service, it’s important that they can easily
find your service. This can be done in many different ways. You can give your consumers access to your repository and let them browse through the services registered
there. That way they can quickly find what they’re looking for and manually configure
their clients. There are also other options. The WSO2 service registry provides a
simple-to-use client that your consumers can use to access the repository programmatically. In section 4.1.2 you created documentation for the PermitService and added
this along with the service to the repository. In the next few pages I’ll show you how
you can search for this resource using two different methods:
■
Searching for specific tags—When you have a lot of services and resources and
you’re interested in a specific kind of resource, it’s useful to search based on
Figure 4.12
The responsibilities of the remoting layer and the logic layer
105
Creating a reusable service
■
tags. For this example you’ll tag the PermitService and its documentation and
we’ll show you how you can locate these resources.
Finding services that are linked—In section 4.1.2 you also linked the documentation to the PermitService. In this example I’ll show you how you can follow
this link through the WSO2 client.
Before you can start searching on specific tags, you first need to add a tag to
the service and the documentation. To
do this, open the WSO2 registry console (https://localhost:9443) and use
the Resources > Browse functionality to
navigate to the HTML documentation.
On the lower right-hand side you have
the option to add tags. For this exam- Figure 4.13 Add a tag with the name
ple add a tag with the name Example- ExampleTag to a resource.
Tag. This is shown in figure 4.13.
After you’ve added this tag, browse to the PermitService (or follow the association) and also tag the service with this tag. You now have two resources in your repository with the tag ExampleTag. Using the WSO2 client you can now locate these
resources. The interesting part of this example is shown in the following listing.
Listing 4.9
Use the WSO2 client to search for tagged resources
WSRegistryServiceClient client = initialize();
b
TaggedResourcePath[] resources =
client.getResourcePathsWithTag("ExampleTag");
for (int i = 0; i < resources.length; i++) {
String resourcePath = resources[i].getResourcePath();
Resource foundResource = client.get(resourcePath);
// Do stuff with your resource
}
c Search for tag
the found
d Get
resource path
e
Get the client
Get the resource
In listing 4.9 you search for a specific resource based on tags. To do this you need to
get a reference to a client B, and with that client you can use the getResourcePathWithTag method to search, case insensitive, for resources with a certain tag. With
the full resourcePath d you can retrieve the resource e and, for instance, automatically create a client or show the documentation.
Another nice feature of the WSO2 registry is that it’s easy to follow any associations
made from one resource to another. In a previous example you created an association
between a service and its documentation. The code in the next listing shows how you
can follow this association.
Listing 4.10 Use the WSO2 client to follow a resource association
b
Association[] associations = client.getAllAssociations
Get associations
("/_system/governance/Documentation/PermitService.wsdl.html");
106
CHAPTER 4
Service design and documentation policies
for (Association association
System.out.println("Type: "
System.out.println("To: " +
System.out.println("From: "
}
: associations) {
+ association.getAssociationType());
association.getDestinationPath());
+ association.getSourcePath());
c
Show
associations
You use the getAllAssociations operation B to retrieve all the associations for a
specific resource. You can now easily iterate over these associations to show them c. If
you run the previous example you’ll see output similar to this:
Type: Documents
To: /...services/urn:govforms:wsdl:permit:service-1/0/PermitService
From: /...governance/Documentation/PermitService.wsdl.html
These are two of the large number of operations provided by this client. An overview
of the available operations can be found in the Javadocs for this client, which you can
find at http://wso2.org/project/registry/3.5.0/docs/apidocs/org/wso2/registry/
app/RemoteRegistry.html.
4.3.4
Versioning, documentation, and using standards
If you want to create a reusable service, the other policies we’ve talked about in this
chapter already help you with this. Let’s look a bit closer at these policies and how
they help with reusability:
■
■
■
Create self-documenting services—When you want your service to be reused, people
need to be able to find this service and easily understand what it does. For this,
good documentation is important. If you combine this documentation with a
central SOA repository, it will be easy for consumers to find out what your service does.
Support multiple versions of services—It’s not just important to get new consumers
to use your service. It’s also important to keep these consumers using your service. If you change too much in your service and break the service of your existing consumers, there’s a good chance—especially after this happens a couple of
times—that they’ll try to find another service or workaround. If you apply good
versioning practices, you can minimize the impact on your consumers and
inform them beforehand if a chance of breaking is coming.
Reuse existing message standards—When consumers start looking for a service to
use, there’s a much better chance they’ll use your service if that service follows
the standards models used in your organization. This avoids the need for specific model transformations and minimizes the integration effort.
Before we look at how to version services, here’s a final note on service reusability. As
you’ve seen in this section, you can make your service more reusable by applying a set
of simple practices. One thing we skipped here is that besides these technical efforts,
service reusability is affected by how your organization is organized. If other departments use your service, you’ll need to be able to bill them accordingly; they might
expect specific uptimes for which you might need to buy additional hardware. If your
107
How to version services
organization doesn’t have processes in place for these kinds of requirements, service
reusability is hard to set up. In the third part of this book we’ll look a bit closer at how
you can gain insight into the usage of your service. This can help you get support for
reusing services within your organization.
4.4
How to version services
One of the policies we discussed in chapter 3 deals with versioning. Services evolve,
new functionality gets added, and old functionality is removed. Suppose you want to
change your services, but you have many different clients. In that case you need to be
careful that you don’t break their applications through a change in your service. In
this section we’ll look at how you can apply versioning to services. We’ll start with a
WS-* based service where versioning can be applied on the contract level, and after
that we’ll look at how you can apply versioning to a REST service, while still following
the core REST principles.
4.4.1
Versioning a WS-* based service
When you want to version a WS-* based service you need to look at the contract provided by this service. Luckily for WS-* based services, all contract information is
defined in a WSDL. In this section we’ll look at what kind of changes you can expect,
whether they’re breaking or nonbreaking changes, and how you can change your version numbering accordingly. We’ll start with the nonbreaking API changes. These are
shown in table 4.3.
Table 4.3
Nonbreaking API changes for a WSDL-based service
Type of change
Description
Adding new operations
When you add a new operation to a WSDL, your current consumers don’t
need to change anything. The messages and operations they currently use
aren’t changed.
Adding new XML
schema types
When you add new operations, you often also need to add new XML schema
types. As long as you don’t change existing or referenced XML schema types,
this won’t break backward compatibility.
There are also a number of changes you can’t make without breaking backward compatibility. These types of changes are listed in table 4.4.
Table 4.4
Breaking API changes for a WSDL-based service
Type of change
Description
Removing an operation
When you remove an operation, you break backward compatibility. Consumers expect the operation to be there.
Renaming an operation
Renaming an operation is nothing more than removing an existing operation
and adding a new one. This is also a breaking operation.
108
CHAPTER 4
Table 4.4
Service design and documentation policies
Breaking API changes for a WSDL-based service (continued)
Type of change
Description
Changing the parameters
If you change the parameters of your service, in WSDL terms this would
mean changing the input and output elements of your operations. Your
consumer won’t be able to invoke these operations without changing their
client code.
Changing an XML
schema type
When you change an XML schema type, you could break backward compatibility. This depends on how strictly the client and the server check the XML
they receive. Generally speaking, adding optional elements to existing
sequence elements is allowed and is also often used. Other changes
should be avoided to maintain backward compatibility.
Now that I’ve defined what breaking and nonbreaking changes are, let’s see what the
implications are for versioning. The simplest way to version a WS-* based service is by
adding a version number to the relevant parts of the WSDL. You’ll use two different
levels of versioning: major versioning and minor versioning. You’ll use the following
format for this: <servicename>.<major>.<minor>. The major number will be
increased if you make a change that isn’t backward compatible, and you’ll increase
the minor number when you have a backward-compatible change. This means that
consumers know when they need to rewrite their client and when they can keep using
their existing client. In the next section we’ll look at how to apply this to a WSDL.
As an example for this policy we’ll use the GovPortal application from chapter 3.
Through this application OpenGov offers all kind of information to its citizens (see
figure 4.14).
Through this portal OpenGov also offers information on the garbage pickup
schedule. For this, the City Information System retrieves information from a dedicated garbage collection service. In the rest of this section we’ll look at how this service can be versioned.
WS-* BASED VERSION NUMBERING GUIDELINES AND BEST PRACTICES
A WSDL contains a number of constructs on which you can apply versioning, including XSD definitions, service definitions, various namespaces, and interface definitions.
On which element do you define your versions? Let’s look at a number of best practices for this:
■
Put the major and minor version numbers in the WSDL filename: The first thing to
do is make sure the filename of the WSDL reflects the correct version number.
Figure 4.14 GovPortal
provides a website where all
relevant information
regarding a city can be found.
How to version services
■
109
You should use both the major and the minor version numbers for this. The
WSDL is the contract you have with your consumer, and there should be no
ambiguity about which version the client is using. This means that a WSDL for
the garbage collection service should have the following name: garbagecollection-service-v3.2.wsdl.
Use only major version numbering for WSDL target namespace: The major version
number changes only when there’s an incompatible, breaking change. The
minor version number can change when there’s a nonbreaking change; for
instance, when you add an operation. If you embed the minor version number
in the WSDL target namespace, you’ll get into trouble with your consumers. If
you change the namespace, the XML messages that are sent across the line will
have a changed namespace. This also means that any schema that’s used by
these messages shouldn’t change its namespace in case of a compatible change.
In such cases your consumers will have to update their clients even though the
actual data sent over the line hasn’t changed, only their namespace.
So you should do this
<wsdl:definitions name="garbage-collection-service-v3"
targetNamespace="urn:govforms:wsdl:garbage-collection:service-v3">
and not this
<wsdl:definitions name="garbage-collection-service-v3.2"
targetNamespace="urn:govforms:wsdl:garbage-collection:service-v3.2">
It’s also good practice to have the name of the service reflect the major version
number. This once again indicates to the consumer that as long as the major
version stays the same, they don’t have to change anything on the client side.
Another approach, which is often used for schemas, is using a year/month
combination for versioning. In this way, you can always directly see which version you’re using, the date it’s released, and which other services belonged to
this same release. But this introduces a big issue with backward-compatible
changes because even in the event of a compatible change, namespaces and service names change, and this will cause clients to fail.
■
Apply version numbers when adding a new operation: In table 4.3 I mentioned that
adding an operation is a nonbreaking change. For nonbreaking changes you
only have to increase the minor version number. If you add an operation to a
WSDL, you usually need to add the following: wrapper types for the standard
document/literal/wrapped style, messages referring to the added wrapper
types, and the operation definition itself. For traceability it’s good to apply
major and minor version numbering to the wrapper types and to the operation.
For the messages themselves you don’t do this, because this will then conflict
with the document/literal/wrapped guidelines. The following paragraphs will
show you the changes that need to be made. The next listing shows the wrapper
110
CHAPTER 4
Service design and documentation policies
elements that are needed when you add a new operation. This operation allows
you to get a garbage collection schedule based on a specific ID.
Listing 4.11 Major and minor versioning on wrapper elements for a new operation
<xsd:schema
targetNamespace=
"urn:govforms:xsd:garbage-collection:service:types-3.3"
xmlns:types="urn:govforms:xsd:garbage-collection:types-1.0"
b
Namespace with
new version
>
<xsd:import schemaLocation="./garbage-collection-service-types.xsd"
namespace="urn:govforms:xsd:garbage-collection:types-1.0" />
<xsd:element name="getGarbageCollectionSchedule">
<xsd:complexType>
<xsd:sequence>
<xsd:element name="in" type="types:sheduleID">
</xsd:element>
</xsd:sequence>
</xsd:complexType>
</xsd:element>
<xsd:element name="getGarbageCollectionScheduleResponse">
<xsd:complexType>
<xsd:sequence>
<xsd:element name="out" type="types:shedule" />
</xsd:sequence>
</xsd:complexType>
</xsd:element>
...
</xsd:schema>
c
d
New request
wrapper
New response
wrapper
In listing 4.11 you add a version number to this specific schema B. This allows
you to see in the WSDL which version introduced these specific types (c and
d). When you add an operation you also need to change the interface, or
portType, of your service. You create a new portType, which contains the old
operations and the newly added one. This portType will reflect the version of
this service in its name. An example of this is shown in the following listing.
Listing 4.12 Create a new portType when adding an operation
b
<wsdl:portType name="GarbageCollectionService_v3_3">
New version of portType
<wsdl:operation name="getAllSchedules">
<wsdl:input message="tns:getAllSchedulesRequest" />
Old operation
<wsdl:output message="tns:getAllSchedulesResponse" />
</wsdl:operation>
New operation
<wsdl:operation name="getGarbageCollectionSchedule">
<wsdl:input message="tns:getGarbageCollectionScheduleRequest"/>
<wsdl:output message="tns:getGarbageCollectionScheduleResponse"/>
</wsdl:operation>
</wsdl:portType>
c
d
111
How to version services
■
In listing 4.12 you define a new portType B. In the name of the portType you
explicitly define the major and minor version numbers. In this portType you
add the old operation c and the new operation d. When generating code
you’ll get different services for different versions, while still maintaining backward compatibility.
Reflect version information in the service and endpoint: The final part where you
need to show the version information is in the service definition in the WSDL
and in the URL that’s used to call the service. For the service you’ll follow the
same principle as you did for the portType definition. You create a new service
and binding for each version of the service. The name of the binding should
reflect the specific portType this binding is defined for, and the name of the
service should also contain both the major and minor version numbers. You
also want to show the version of a service in the URL used to access that service.
This means you can have multiple major versions running next to each other
and gradually phase out older major versions. An example how to do this is
shown in the next listing.
Listing 4.13 Create a new service for each portType
b
<wsdl:service name="GarbageCollectionService_v3_2">
Old service
<wsdl:port binding="tns:GarbageCollectionService_v3_2"
name="GarbageCollectionServiceSOAP">
Old portType
<soap:address location=
Show major version in URL
➥ "http://localhost:9001/garbageservice/v3" />
</wsdl:port>
</wsdl:service>
<wsdl:service name="GarbageCollectionService_v3_3">
New service
<wsdl:port binding="tns:GarbageCollectionService_v3_3"
New portType
name="GarbageCollectionServiceSOAP">
<soap:address location=
Show major version in URL
➥ "http://localhost:9001/garbageservice/v3" />
</wsdl:port>
</wsdl:service>
c
f
d
e
f
Listing 4.13 shows two service definitions. The 3.2 version b points to the old
portType c. The new service d points to the new portType e. In this listing
you can also see that you don’t change the URL where the service is running f
because it’s only a minor change. If you were to make a breaking change, you’d
also increase the version number used in the URL.
If you follow these steps, you get a service that can be easily versioned, allows
you to add operations, and can provide backward compatibility.
4.4.2
Versioning a REST service
For the REST service, for which you use JSON as the message format, we’ll start once
again by looking at breaking and nonbreaking API changes. After that I’ll show you a
112
CHAPTER 4
Service design and documentation policies
set of best practices that can help you in versioning REST-based services. The nonbreaking API changes for a REST-based service are shown in table 4.5.
Table 4.5
Nonbreaking API changes for a REST-based service
Type of change
Description
Adding new link relations
If you want to add new links to specific resources, you won’t break your API.
The current clients of your service will ignore these new links.
Adding new properties
If you add new, nonmandatory properties to your resource, nothing changes
for the clients. They will ignore these new properties and continue working
in the same manner. If you add a property that’s mandatory, you’ll have to
create a new version of the resource.
Adding extra information to your REST resource doesn’t break anything. The problems start when you remove items from your resource. The most common changes
that result in API breaking changes are shown in table 4.6.
Table 4.6
Breaking API changes for a REST-based service
Type of change
Description
Removing properties
If you remove a property from your resource, you can break existing clients.
These clients might depend on this property.
Changing properties
When you change an existing property, for example, rename it or change its
child properties, you might break some clients.
Removing link relations
If you remove links to other resources, you change your resource. This is an
incompatible change.
Changing link relations
Renaming or altering link relations can also break clients. They might
depend on a specific name for a relation.
If you look back at the WS-* based services, you can see that we applied a versioning
scheme there based on minor and major version numbers. A minor version number
increase indicated a nonbreaking API change, and a major version number increase
indicated a breaking API change. This minor version number increment was possible
because of the way a WSDL is organized. You can define multiple services and portTypes all listening to the same (major address versioned) endpoint. For a REST-based
service, however, this is different. A resource is identified by a specific URI, and you
can use the basic HTTP verbs to modify this resource. But you can’t have two versions
of the same PUT operation or have the same resource identified by two different URIs.
So having a separate version number for minor nonbreaking changes won’t work. For
REST-based services you need to follow these two rules:
■
■
For a breaking change, increase the version number.
For a nonbreaking change, keep the same version number and just change the
resource.
How to version services
113
Let’s look at a set of best practices that can help you in versioning your REST-based
resources.
REST-BASED VERSION NUMBERING GUIDELINES AND BEST PRACTICES
One of the big differences between REST and WS-* is that for WS-* you have a contract
you can use to define specific versions and associated operations and types. For REST
you have no such thing. That, and the fact that for REST you use a resource-centric
way of communication instead of a remote procedure–oriented one, makes it hard to
define a single place to store the versioning information. For REST there are three
generally accepted approaches to handling versioning. In this section I’ll discuss these
three options and show you my personal favorite:
■
Use media types to indicate the version of the resource you’re working with: In section
4.1.1 we looked at how to make a self-documenting REST service. In that section
I explained that with the media type you can indicate what type of resource
you’re dealing with. Let’s assume you have a REST service where you can query
a specific URL to retrieve the times your garbage is picked up. Let’s look at the
request and the response for this resource.
Request:
GET /opengov/garbageschedule?location=Main%20Street HTTP/1.1
Accept: application/vnd.opengov.org.garbageschedule+json
Response:
HTTP/1.1 200 OK
Content-Type: application/vnd.opengov.org.garbageschedule+json
{"schedule"
"self": "schedule-2423",
"dayOfWeek": "Monday",
"oddOrEvenWeeks": "Odd"}
In both the request and the response you can see that you specify your own custom media type. As I explained in section 4.1.1, you use this to identify the
resource you’re interested in and the type of resource that’s returned. If you have
backward-compatible changes, you can keep this media type the same. In the
example of garbage pickup times, we’re still talking about a specific schedule,
even if you add extra information about the route the garbage truck takes. This
is a change that doesn’t break your clients, so there’s no need to change your
media type. If you have a breaking change—for instance, if you don’t specify the
dayOfWeek as a text value anymore but as an integer in the range of 1 to 7—you
have a change that can possibly break your clients. In this case you should indicate that a different version of the same resource is returned. Media types provide the perfect mechanism for this. To indicate that you return a different
version, you just add a version number to the media type. So your original mediatype will become
application/vnd.opengov.org.garbageschedule-v1+json
114
CHAPTER 4
Service design and documentation policies
and the new one will have its version increased to
application/vnd.opengov.org.garbageschedule-V2+json
With the addition of this version number, your clients can now request
resources for a specific version by using the Accept header. If your client wants
to receive version v2, they can put the following in the Accept HTTP header:
Accept: application/vnd.opengov.org.garbageschedule-v2+json
This will return the v2 version of the resource. Consumers can now decide
when to change to a new version by increasing this header in their client applications. If you want to remove support for an older version of a service, you
could return the following HTTP code, 303 (See other), to indicate how and
where the new resource can be accessed.
■
Add a qualifier to indicate the required version: An alternative way to look at REST
resource versioning is to use a specific qualifier, which is a short name/value
pair you add to the Accept and Content-Type fields. This qualifier can be
used to indicate the version of the resource you want to receive. Let’s look at
the request and response from the previous example, but this time with a
qualifier:
Request:
GET /opengov/garbageschedule?location=Main%20Street HTTP/1.1
Accept: application/vnd.opengov.org.garbageschedule+json;v=1
Response:
HTTP/1.1 200 OK
Content-Type: application/vnd.opengov.org.garbageschedule+json;v=1
{"schedule"
"self": "schedule-2423",
"dayOfWeek": "Monday",
"oddOrEvenWeeks": "Odd"}
As you can see, this example added a v=1 qualifier. This qualifier indicates the
version of the resource you’re expecting. This can be used in the same manner
as the media-type approach you saw in the previous section.
■
Add the version in the URL: The final option you have, which is one discouraged
by the REST community, is adding the version information in the URL. So
instead of requesting this schedule at http://localhost:9001/opengov/garbage
schedule/schedules/schedule-2423, you request this resource at a URL that
already contains the version you’re interested in: http://localhost:9001/
opengov/v1/garbageschedule/schedule-2423.
Looking at the same example again gives us this:
Request:
GET /opengov/v1/garbageschedule?location=Main%20Street HTTP/1.1
Accept: application/vnd.opengov.org.garbageschedule+json
Summary
115
Response:
HTTP/1.1 200 OK
Content-Type: application/vnd.opengov.org.garbageschedule+json
{"schedule"
"self": "schedule-2423",
"dayOfWeek": "Monday",
"oddOrEvenWeeks": "Odd"}
The advantage of this approach is that it’s easy to understand and to use. Each
version has its own unique URL, and changing from one version to the other
can be done by incrementing the version number in the URL.
The main problem with this versioning scheme is that it goes against the core
REST principles. A resource should be uniquely identified by its URL. When
using this approach you have two instances of the same resources, schedule2423, that can be identified by different URLs, a specific URL for each version of
the resource you support.
I personally think the media-type approach is the most clean and RESTful way to handle
versioning. All information about the current resource is transferred using its media
type, as it should be. This approach also forces you to use custom media types for your
resources, which make it clearer to the clients what kind of resource they’re dealing
with. If you’re working in an environment where custom media types can’t be supported, the next-best thing is using a qualifier. This keeps the basic tenant of REST intact
and allows you to apply versioning without custom media types. I personally wouldn’t
use the URL-based approach, even though it’s probably the easiest one to apply.
4.5
Summary
■
■
■
■
■
■
■
■
■
■
Creating a self-documenting service is different for REST- and WS-* based
services.
REST is self-documenting through the use of links and relations.
WS-* based services are documented through a WSDL.
For both types of services, HTML or text documentation is a welcome addition.
It’s easy to reuse existing XML schemas in REST and WS-* based services when
you use Java code generation.
With the OpenSearch.org standard you can create search engines in a standardbased manner.
Reusability of a service is difficult to accomplish.
With a couple of guidelines and the policies discussed in this chapter, you can
improve the reusability of your service.
Versioning is an important part of service design.
The most important part of versioning and service evolution is to keep backward compatibility in mind.
SOA/ENTERPRISE
SOA Governance IN ACTION
SEE INSERT
Jos Dirksen
overnance is a serious word for a simple idea—defining
processes, roles, and expectations for a software project.
It’s especially important in SOA where you have multiple
stakeholders, competing requirements, and complex integration
tasks. Good SOA governance blends established best practices,
strong management and monitoring tools, and the flexibility to
embrace new technologies and patterns.
G
SOA Governance in Action shows developers how to apply governance concepts and implementation practices to achieve success
in SOA projects. You’ll learn practical techniques like building
a metadata repository using WSO2 Registry or a custom monitoring dashboard using Bamos BAM. You’ll also explore other
supporting tools, such as using OpenAM, to implement security
related policies. Along the way, you’ll explore the nuances of
writing policies that work for the project and click with your
corporate culture.
What’s Inside
Service design, security, testing, and performance
● Self documenting services, auditing, and running in a cloud.
● Supporting best practices with open source tools
● Examples using both REST and WS-*
●
Written for business application developers. Familiarity with
Java and BPMN is helpful but not required.
Jos Dirksen is a software architect with extensive experience
applying open source tools to integration and governance
challenges. He is coauthor of Open Source ESBs in Action.
To download their free eBook in PDF, ePub and Kindle formats, owners
of this book should visit manning.com/SOAGovernanceinAction
MANNING
$49.99 / Can $52.99
[INCLUDING eBOOK]
“
Not the first book, but
probably the best … a
hands-on approach.
”
—Roy Prins, CIBER Netherlands
“
If you want to mitigate the
risk of project failure,
read this book.
”
”
—Tray Scates, Unisys Corporation
“
Succeeds in teaching
without lecturing.
“
—Jason Coates
Acclimation Pty Ltd
Now there’s no need
to fear the G-word!
”
—David Dossot
coauthor of Mule in Action
“
Recommended—the code
is clear and easy to follow.
”
—Hemant Bedekar, HireRight Inc.


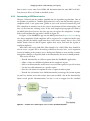
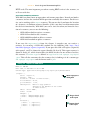
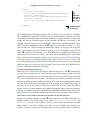
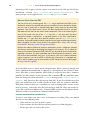
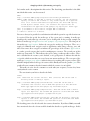
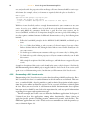
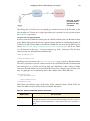

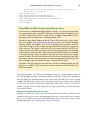
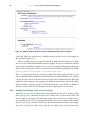
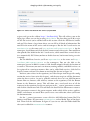
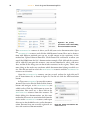
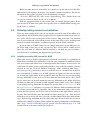


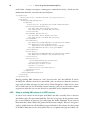
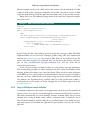
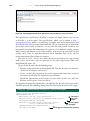
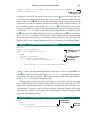
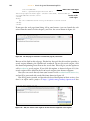
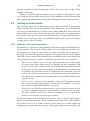
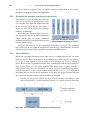


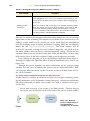
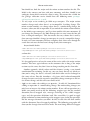

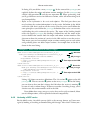

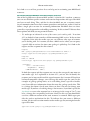

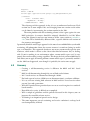


![[In]Sight User Guide - Regional Australia Institute](http://vs1.manualzilla.com/store/data/006869990_1-7c0e7afba9e4f1981156fce7684759c4-150x150.png)