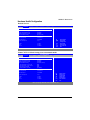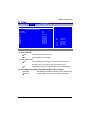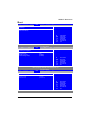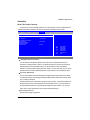
1
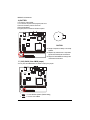
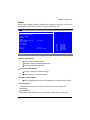
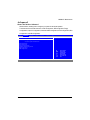
MNNM1PI Intel® mini-ITX Motherboard USER’S MANUAL Intel® mini-ITX Motherboard Rev. 1001 * The WEEE marking on the product indicates this product must not be disposed of with user's other household waste and must be handed over to a designated collection point for the recycling of waste electrical and electronic equipment!! * The WEEE marking applies only in European Union's member states. Copyright © 2010 GIGA-BYTE TECHNOLOGY CO., LTD. All rights reserved. The trademarks mentioned in the manual are legally registered to their respective companies. Notice The written content provided with this product is the property of Gigabyte. No part of this manual may be reproduced, copied, translated, or transmitted in any form or by any means without Gigabyte's prior written permission. Specifications and features are subject to change without prior notice. Product Manual Classification In order to assist in the use of this product, Gigabyte has categorized the user manual in the following: For detailed product information and specifications, please carefully read the "Product User Manual". For detailed information related to Gigabyte's unique features, please go to "Technology Guide" section on Gigabyte's website to read or download the information you need. For more product details, please click onto Gigabyte's website at www.gigabyte.com.tw MNNM1PI Motherboard Table of Content Item Checklist ........................................................................................ 4 Chapter 1 Introduction ............................................................................ 5 1-1Considerations Prior to Installation ........................................................ 5 1.2 Features Summary ................................................................................ 6 1.3 Motherboard Components .................................................................... 8 Chapter 2 Hardware Installation Process ............................................... 9 2-1: Installing Memory Module .................................................................... 9 2-2: Connect ribbon cables, cabinet wires, and power supply ................ 10 2-2-1 : I/O Back Panel Introduction ................................................................................ 10 2-3: Connectors Introduction & Jumper Setting........................................ 13 Chapter 3 BIOS Setup ......................................................................... 22 Main ........................................................................................................... 24 Advanced ................................................................................................... 25 CPU Configuration ........................................................................................................... 26 IDE Configuration ............................................................................................................. 27 Super IO Configuration .................................................................................................... 30 Hardware Health Configuration ....................................................................................... 33 ACPI Configuration .......................................................................................................... 36 USB Configuration .......................................................................................................... 38 PCI/PnP ...................................................................................................... 40 Boot ............................................................................................................ 41 Security ...................................................................................................... 43 Chipset ....................................................................................................... 45 North Bridge Configuration .............................................................................................. 46 South Bridge Configuration ............................................................................................. 47 Onboard Peripheral Configuration .................................................................................. 48 Exit ............................................................................................................. 49 3 Introduction Item Checklist The MNNM1PI motherboard I/O Shield Kit CD for motherboard driver & utility Power cable x 1 B4P/S4P Cable x 1 Optional Power Adapter x 1 * The items listed above are for reference only, and are subject to change without notice. 4 MNNM1PI Motherboard Chapter 1 Introduction 1-1 Considerations Prior to Installation Preparing Your Computer The motherboard contains numerous delicate electronic circuits and components which can become damaged as a result of electrostatic discharge (ESD). Thus, prior to installation, please follow the instructions below: 1. Please turn off the computer and unplug its power cord. 2. When handling the motherboard, avoid touching any metal leads or connectors. 3. It is best to wear an electrostatic discharge (ESD) cuff when handling electronic components (CPU, RAM). 4. Prior to installing the electronic components, please have these items on top of an antistatic pad or within a electrostatic shielding container. 5. Please verify that the power supply is switched off before unplugging the power supply connector from the motherboard. Installation Notices 1. Prior to installation, please do not remove the stickers on the motherboard. These stickers are required for warranty validation. 2. Prior to the installation of the motherboard or any hardware, please first carefully read the information in the provided manual. 3. Before using the product, please verify that all cables and power connectors are connected. 4. To prevent damage to the motherboard, please do not allow screws to come in contact with the motherboard circuit or its components. 5. Please make sure there are no leftover screws or metal components placed on the motherboard or within the computer casing. 6. Please do not place the computer system on an uneven surface. 7. Turning on the computer power during the installation process can lead to damage to system components as well as physical harm to the user. 8. If you are uncertain about any installation steps or have a problem related to the use of the product, please consult a certified computer technician. Instances of Non-Warranty 1. 2. 3. 4. 5. 6. Damage due to natural disaster, accident or human cause. Damage as a result of violating the conditions recommended in the user manual. Damage due to improper installation. Damage due to use of uncertified components. Damage due to use exceeding the permitted parameters. Product determined to be an unofficial Gigabyte product. 5 Introduction 1.2 Features Summary Form Factor CPU 170mm x 170mm Mini ITX form factor, 8 layers PCB. Supports single Intel® D410 processor Chipset Supports DMI x4 Intel® NM10 2 x DDR2 DIMM socket Supports up to 4GB 800 memory Supports 1.8V DDR2 DIMMs ITE IT8721F Super I/O Expansion Slots Supports 1 PCI slot 32-Bit/33MHz Supports 1 mini card slot (PCI-E x1/ USB 2.0) SATA Controller On-Board Graphic Intel® NM 10 Build in Intel® GMA 3150 On-Board Sound Shared system memory up to 384MB Relteak® ALC662 chipset Internal Connector Supports HD 6 channel 1 x 24-pin ATX power connector 1 x 4-pin ATX power connector 2 x SATA connectors 3 x Serial connectors (COM) 1 x front audio connector 2 x USB 2.0 connectors for additional 4 ports by cable 1 x front panel connecctor 1 x DIO panel connecctor 1 x System fan cable connector 1 x CPU fan cable connector P/S 2 Keyboard and Mouse connectors 1 x Parallel port 1 x VGA port 1 x COM port 4 x USB 2.0 ports 1 x LAN RJ45 port1 1 HD Audio jacks (Line-out / MIC-in / Line-in) can configure 6 channel output by utility Enhanced features with CPU Vcore, +12V, VCC3 (3.3V) , CPU Temperature, and System Temperature values viewing CPU/System Fan Revolution Detect Memory I/O Control Rear Panel I/O Hardware Monitor 6 MNNM1PI Motherboard On-Board LAN CPU shutdown when overheat Realtek 8111DL GbE LAN controller BIOS Supports WOL, PXE AMI BIOS on 8Mb SPI Flash ROM External Modem wake up Supports S1, S3, S4, S5 under Windows Operating System Wake on LAN (WOL) Supports 4-pin Fan controller Additional Features 7 Introduction 1.3 Motherboard Components R_USB LPT ITE IT8721F DIO COMB MIN_CARD ATX_12V F_USB1 COMC Intel NM10 F_USB2 SYS_FAN CPU COMD PCI 8111DL BIOS DDRII1 DDRII2 BATTERY ATX F_PANEL 8 CPU_FAN F_AUDIO KB MS COMA JP5 USB_LAN ALC662 AUDIO VGA Hardware Installation Process Chapter 2 Hardware Installation Process 2-1: Installing Memory Module Before installing the memory modules, please comply with the following conditions: 1. Please make sure that the memory is supported by the motherboard. It is recommended to use the memory with similar capacity, specifications and brand. 2. Before installing or removing memory modules, please make sure that the computer power is switched off to prevent hardware damage. 3. Memory modules have a foolproof insertion design. A memory module can be installed in only one direction. If you are unable to insert the module, please switch the direction. The motherboard supports DDR2 memory module, whereby BIOS will automatically detect memory capacity and specifications. The memory module only can be inserted in one direction. Installation Steps: 1. Insert the DIMM memory module vertically into the DIMM slot, and push it down. 2. Close the plastic clip at both edges of the DIMM slots to lock the DIMM module. Table 1. Supported DIMM Module Type Size 256MB 512MB 1GB 2GB Organization 8MB x 8 x 4 bks 16MB x 16 x 4bks 16MB x 8 x 4bks 32MB x 16 x 4bks 32MB x 8 x 4bks 64MB x 16 x 4bks 32MB x 8 x 4bks 64MB x 16 x 4bks RAM Chips/DIMM 8 16 8 16 8 16 8 16 9 MNNM1PI Motherboard 2-2: Connect ribbon cables, cabinet wires, and power supply 2-2-1 : I/O Back Panel Introduction 10 Hardware Installation Process PS/2 Keyboard and PS/2 Mouse Connector To install a PS/2 port keyboard and mouse, plug the mouse to the upper port (green) and the keyboard to the lower port (purple). / / Parallel Port/ COM Port/ VGA Port This connector supports 1 standard COM port and 1 Parallel port. Device like printer can be connected to Parallel port ; mouse and modem etc can be connected to Serial port. USB Before you connect your device(s) into USB connector(s), please make sure your device(s) such as USB keyboard, mouse, scanner, zip, speaker...etc. have a standard USB interface. Also make sure your OS supports USB controller. If your OS does not support USB controller, please contact OS vendor for possible patch or driver updated. For more information please contact your OS or device(s) vendors. LAN Port The LAN port provides Internet connection of Gigabit Ethernet with data transfer speeds of 10/100/1000Mbps. Line In The default Line In jack. Devices like CD-ROM, walkman etc. can be connected to Line In jack. Line Out (Front Speaker Out) The default Line Out (Front Speaker Out) jack. Stereo speakers, earphone or front surround speakers can be connected to Line Out (Front Speaker Out) jack. MIC In The default MIC In jack. Microphone must be connected to MIC In jack. 11 MNNM1PI Motherboard LAN LED Description LED2 (Green/Orange) LED1 (Yellow) Name Color Condition Description LED1 Green Green ON BLINK LAN Link / no Access LAN Access - OFF OFF Idle 10Mbps connection Green OFF ON Port identification with 10 Mbps connection 100Mbps connection Green Yellow BLINK ON Port identification with 100Mbps connection 1Gbps connection Yellow BLINK Port identification with 1Gbps connection LED2 12 Connector Introduction 2-3: Connectors Introduction & Jumper Setting 11 12 2 5 6 7 8 10 9 3 4 13 14 16 17 1 15 1. ATX 2. ATX_12V 9. F_USB1 (Fornt USB cable connector) 10. F_USB2 (Fornt USB cable connector) 3. SATAII1 (SATA cable connector) 4. SATAII2 (SATA cable connector) 11. F_AUDIO 12. DIO (Digtal I/O connector) 5. COMB 6. COMC 13. CPU_FAN 14. SYS_FAN 7. COMD 8. JP5 (COM Power Source jumper) 15. F_PANEL 16. BATTERY 17. CLR_CMOS 13 Connector Introduction 1/2/3 ) ATX1/ATX_12V (24-pin/4-pin ATX power connectors) With the use of the power connector, the power supply can supply enough stable power to all the components on the motherboard. Before connecting the power connector, please make sure that all components and devices are properly installed. Align the power connector with its proper location on the motherboard and connect tightly. The ATX_12V power connector mainly supplies power to the CPU. If the ATX_12V power connector is not connected, the system will not start. Caution! Please use a power supply that is able to support the system voltage requirements. It is recommended that a power supply that can withstand high power consumption be used (350W or greater). If a power supply is used that does not provide the required power, the result can lead to an unstable system or a system that is unable to start. If you use a power supply that provides a 24-pin ATX power connector, please remove the small cover on the power connector on the motherboard before plugging in the power cord; otherwise, please do not remove it. 4 3 14 2 1 Pin No. Definition 1 2 GND GND 3 4 +12V +12V MNNM1PI Motherboard 1 12 24 13 Pin No. 1 Definition 3.3V 2 3 3.3V GND 4 5 +5V GND 6 7 +5V GND 8 9 Power Good 5V SB(stand by +5V) 10 11 +12V +12V(Only for 24-pin ATX) 12 3.3V(Only for 24-pin ATX) Pin No. Definition 13 14 3.3V -12V 15 16 GND PS_ON(soft On/Off) 17 18 GND GND 19 20 GND -5V 21 22 +5V +5V 23 24 +5V (Only for 24-pin ATX) GND(Only for 24-pin ATX) 3/ 4 ) SATAII 1/2 (Serial ATA cable connectors) SATA 3Gb/s can provide up to 300MB/s stransfer rate. Please refer to the BIOS setting for the SATA 3Gb/s and install the proper driver in order to work properly. 1 1 7 7 Pin No. 1 2 3 4 5 6 7 15 Definition GND TXP TXN GND RXN RXP GND MNNM1PI Motherboard 5/6/7 ) COMB/COMC/COMD (Serial cable connectors) COMC COMB COMD COMB Pin No. 1 2 3 4 5 6 7 8 9 10 2 10 1 9 Definition NDCDBNRXDB NTXDBNDTRBGND NDSRBNRTSBNCTSBNRIBNC Pin No. 1 2 3 4 5 6 7 8 9 10 COMC 1 2 COMD 9 10 9 10 Definition NDCD3NRXD3 NTXD3NDTR3GND NDSR3NRTS3NCTS3NRI3_CNC 16 1 2 Pin No. 1 2 3 4 5 6 7 8 9 10 Definition NDCD4NRXD4 NTXD4NDTR4GND NDSR4NRTS4NCTS4NRI4_CNC MNNM1PI Motherboard 8 ) JP5 (Power COM selection jumper) 1 2 9 10 RI Default +5V +5V Pin No. Definition 1 2 IO_12V IO_12V 3 4 COM_NRIC COM_NRID 5 6 IO_VCC IO_VCC 7 8 COM_NRIC COM_NRID 9 10 NRICNRID- +12V COM_C Close Close Close Close PIN 9 7_9 pin 5_7 pin 3_5 pin 1_3 pin COM_D Close Close Close Close PIN 9 8_10pin 6_8 pin 4_6 pin 2_4 pin 17 MNNM1PI Motherboard 9/10 ) F_USB1/F_USB2 (Front USB cable connectors) Be careful with the polarity of the front USB connector. Check the pin assignment carefully while you connect the front USB cable, incorrect connection between the cable and connector will make the device unable to work or even damage it. For optional front USB cable, please contact your local dealer. 2 10 1 9 F_USB1 Pin No. 1 Definition Power F_USB2 Pin No. 1 Definition Power 2 3 Power FUSBP4- 2 3 Power FUSBP6- 4 5 FUSBP5FUSBP4+ 4 5 FUSBP7FUSBP6+ 6 7 FUSBP5+ GND 6 7 FUSBP7+ GND 8 9 GND No Pin 8 9 GND No Pin 10 NC 10 NC 11) F_AUDIO1 (Front AUDIO connector) If you want to use Front Audio connector, you must remove 5-6, 9-10 Jumper. In order to utilize the front audio header, your chassis must have front audio connector. Also please make sure the pin assigment on the cable is the same as the pin assigment on the MB header. To find out if the chassis you are buying support front audio connector, please contact your dealer. 18 2 10 1 9 Pin No. 1 2 3 4 5 6 7 8 9 10 Definition MIC_L GND MIC_R -ACZ_DEC Line_R GND Faudio_JD No Pin Line_L GND Connector Introduction 12 ) DIO (Digtal I/O connector) Pin No. 1 2 3 4 5 6 7 8 1 2 7 8 Definition VCC3 VCC3 VCC3 VCC3 ATX_3VSB ATX_3VSB ATX_3VSB GND 13/14 ) CPU_FAN/SYS_FAN (CPU fan/System fan cable connectors) The cooler fan power connector supplies a +12V power voltage via a 3-pin/4-pin(CPU_FAN) power connector and possesses a foolproof connection design. Most coolers are designed with color-coded power connector wires. A red power connector wire indicates a positive connection and requires a +12V power voltage. The black connector wire is the ground wire (GND). Remember to connect the CPU/system fan cable to the CPU_FAN/SYS_FAN connector to prevent CPU damage or system hanging caused by overheating. 1 CPU_FAN SYS_FAN 19 Pin No. 1 2 3 4 Definition GND 12V Sense Control Connector Introduction 15 ) F_Panel (2X5 Pins Front Panel connector) Please connect the power LED, PC speaker, reset switch and power switch of your chassis front panel to the F_PANEL connector according to the pin assignment above. Pin No. 1. 2. 3. 4. 5. 6. 7. 8. 9. 10. Signal Name HD+ MSG+ HDMSGRESPW+ RES+ PWACTACT+ 2 10 1 9 Description Hard Disk LED Signal anode (+) Message LED Signal anode (+) Hard Disk LED Signal cathode(-) Message LED Signal cathode(-) Reset Button anode (+) Power Button Signal cathode(-) Reset Button cathode(-) Power Button Signal anode (+) LAN active LED Signal cathode(-) LAN active LED Signal anode (+) 20 MNNM1PI Motherboard 16 ) BATTERY If you want to erase CMOS... 1.Turn OFF the computer and unplug the power cord. 2.Remove the battery, wait for 30 second. 3.Re-install the battery. 4.Plug the power cord and turn ON the computer. CAUTION Danger of explosion if battery is incorrectly replaced. Replace only with the same or equivalent type recommended by the manufacturer. Dispose of used batteries according to the manufacturer’s instructions. 17 ) CLR_CMOS (Clear CMOS jumper) You may clear the CMOS data to its default values by this jumper. 1 1-2 close: Normal operation (Default setting) 1 2-3 close: Clear CMOS 21 MNNM1PI Motherboard Chapter 3 BIOS Setup BIOS (Basic Input and Output System) includes a CMOS SETUP utility which allows user to configure required settings or to activate certain system features. The CMOS SETUP saves the configuration in the CMOS SRAM of the motherboard. When the power is turned off, the battery on the motherboard supplies the necessary power to the CMOS SRAM. ENTERINGSETUP When the power is turned on, press the <DEL> button during the BIOS POST (Power-On Self Test) will take you to the CMOS SETUP screen. You can enter the BIOS setup screen by pressing "Ctrl + F1". CONTROLKEYS <> Move to previous item <> Move to next item <> Move to the item in the left hand <> Move to the item in the right hand <Esc> Main Menu - Quit and not save changes into CMOS Status Page Setup Menu and Option Page Setup Menu - Exit current page and return to Main Menu <+/PgUp> Increase the numeric value or make changes <-/PgDn> Decrease the numeric value or make changes <F1> General help, only for Status Page Setup Menu and Option Page Setup Menu <F2> Change color <F3> Change color <F4> Reserved <F6> Reserved <F7> Discard Changes <F8> Reserved <F9> Load the Optimized Defaults <F10> Save all the CMOS changes 22 MNNM1PI Motherboard GETTINGHELP Main Menu The on-line description of the highlighted setup function is displayed at the bottom of the screen. Status Page Setup Menu / Option Page Setup Menu Press F1 to pop up a small help window that describes the appropriate keys to use and the possible selections for the highlighted item. To exit the Help Window press <Esc>. Select the Load Setup Defaults item in the BIOS Exit Setup menu when somehow the system is not stable as usual. This action makes the system reset to the default settings for stability. Main This setup page includes all the items in standard compatible BIOS. Advanced This setup page includes all the items of Phoenix BIOS special enhanced features. (ex: Auto detect fan and temperature status, automatically configure hard disk parameters.) PCI/PnP Use this menu to for advanced PCI/PnP settings. Boot This setup page include all the items of first boot function features. Security Change, set, or disable password. It allows you to limit access the system and setup. Chipset Northbridge and Southbridge additional features configuration. Exit There are five options in this selection: Exit Saving Changes, Exit Discarding Changes, Load Optimal Defaults, Load Failsafe Defaults, and Discard Changes. 23 MNNM1PI Motherboard Main Once you enter AMI BIOS Setup Utility, the Main Menu will appear on the screen. Use arrow keys to select among the items and press <Enter> to accept or enter the sub-menu. Main Advanced PCIPnP Boot BIOS SETUP UTILITY Security Chipset Exit System Overview AMI BIOS Version: MNM1PIS.f2a/08.00.15 Build Date: 05/20/10 ID: 1IPT9000 Processor Intel(R) Atom(TM) CPU K410 Speed: 1666MHz @ 1.66GHz System Memory Size: 2054MB System Time System Date [10:10:58] [Fri 06/11/2010] +Tab F1 F10 ESC Select Screen Select Item Change Field Select Field General Help Save and Exit Exit v02.61 (C) Copyright 1985-2006, American Megatrends, Inc. BIOS Information Version: displays the BIOS version. Build Date: displays the BIOS established date. ID: displays the BIOS ID information. Processor Information CPU Type: displays the installed CPU type. Speed: displays the installed CPU speed. Memory Information Size: The BIOS determines how much available memory is present during the POST. System Time The time is calculated based on the 24-hour military time clock. Set the System Time (HH:MM:SS) System Date Set the System Date. Note that the “Day” automatically changed after you set the date. 24 MNNM1PI Motherboard Advanced About This Section: Advanced With this section, allowing user to configure your system for advanced operation. The advanced menu includes sub-menu of CPU Configuration, IDE Configuration, Floppy Configuration, Super IO Configuration, Hardware Health Configuration, ACPI Configuration, MPS Configuration, and USB Configuration. Main Advanced PCIPnP Boot BIOS SETUP UTILITY Security Chipset Exit Advanced Settings WARNING: Setting wrong values in below sections may cause system to malfucntion. CPU Configuration IDE Configuration Super IO Configuration Hardware Health Configuration ACPI Configuration USB Configuration +Tab F1 F10 ESC v02.61 (C) Copyright 1985-2006, American Megatrends, Inc. 25 Select Screen Select Item Change Field Select Field General Help Save and Exit Exit MNNM1PI Motherboard CPU Configuration Main Advanced PCIPnP Boot BIOS SETUP UTILITY Security Chipset Exit CPU Configuration Module Version: 3F.15 Manufacturer: Intel Intel (R) Atom(TM) CPU K410 Frequency :1.66GHz FSB :666MHz Cache L1 :24KB Cache L2 :512KB Ratio Actual Vaule : 10 @ 1.66GHz Max CPUID Value Limit Execute-Disable Bit Capability [Disabled] [Enabled] +Tab F1 F10 ESC Select Screen Select Item Change Field Select Field General Help Save and Exit Exit v02.61 (C) Copyright 1985-2006, American Megatrends, Inc. CPU Information This category includes all the information of CPU manufacturer, type, Frequency, FSB, L1/ L2 Cache, Ratio Status, and Ratio actual value Please note that setup menu options will be variable depends on the type of CPU. Max CPUID Value Limit When the computer is booted up, the operating system executes the CPUID instruction to identify the processor and its capabilities. Before it can do so, it must first query the processor to find out the highest input value CPUID recognizes. This determines the kind of basic information CPUID can provide the operating system. The maximum CPUID input value determines the values that the operating system can write to the CPUID's EAX register to obtain information about the processor. Enabled Enable Max CPUID Value Limit. Disabled Disable Max CPUID Value Limit. (Default setting) Execute-Disable Bit Capability Enabled Enable Execute Disable Bit Capability. (Default setting) Disabled Disable Execute-Disable Bit function. 26 MNNM1PI Motherboard IDE Configuration Main Advanced PCIPnP Boot BIOS SETUP UTILITY Security Chipset Exit IDE Configuration Configure SATA as [IDE] Primary IDE Master Secondary IDE Master IDE Detect Time Out (Sec) [35] +Tab F1 F10 ESC Select Screen Select Item Change Field Select Field General Help Save and Exit Exit v02.61 (C) Copyright 1985-2006, American Megatrends, Inc. Confiure SATA as ACHI When set to AHCI, the SATA controller enables its AHCI functionality. However, its RAID functions will be disabled and you won't be able to access the RAID setup utility at boot time. IDE When set to IDE, the SATA controller disables its RAID and AHCI functions and runs in the IDE emulation mode. You won't have access to the RAID setup utility. (Default setting) Disabled Disable the device. Primary IDE Master, Slave The category identifies Serial ATA and IDE types of hard disk that are installed in the computer. System will automatically detect HDD type. Note that the specifications of your drive must match with the drive table. The hard disk will not work properly if you enter improper information for this category. Hard drive information should be labeled on the outside device casing. Enter the appropriate option based on this information. TYPE Not Installed: No device is installed. 27 MNNM1PI Motherboard Auto: Set parameters automatically. (Default setting) CD-ROM: Use for ATAPI CD-ROM drives or double click [Auto] to set all HDD parameters automatically. ARMD: Use ARMD drive is installed here. LBA/Large Mode Configure the device type in the specific IDE channel support LBA Mode. Disabled: Disable LBA/Large Mode. Auto: Auto configuration. (Default setting) Block (Multi-Sector Transfer) Configure the information of Multi-Sector Transfer Mode. Disabled: The data transfer from and to the device occurs one sector at a time. Auto: The data transfer from and to the device occurs multiple sectors at a time if the device supports it. (Default setting) PIO Mode This feature allows you to set the PIO (Programmed Input/Output) mode for the two IDE devices (Master and Slave drives) attached to that particular IDE channel. Disabled: Disable PIO Mode. Auto: Auto configuration. (Default setting) DMA Mode Configure the DMA mode of the device in the specific IDE channel. Auto: Auto configuration. (Default setting) S.M.A.R.T Mode This option enables/disables support for the hard disk's S.M.A.R.T. capability. The S.M.A.R.T. (Self Monitoring Analysis And Reporting) technology is supported by all current hard disks and it allows the early prediction and warning of impending hard disk disasters. Enabled: Enable S.M.A.R.T Mode. Disabled: Disable S.M.A.R.T Mode. Auto: Auto configuration. (Default setting) 28 MNNM1PI Motherboard 32Bit Data Transfer Configure the 32Bit Data Transfer rate. Enabled: Enable 32Bit Data Transfer rate. Disabled: 32Bit Data Transfer rate. Auto: Auto configuration. (Default setting) IDE Detect Time Out (Sec) Configure the IDE star unit command timeout. Desfault setting is 35 seconds. 29 MNNM1PI Motherboard Super IO Configuration Main Advanced PCIPnP Boot BIOS SETUP UTILITY Security Chipset Exit Configure ITE8721 Super IO Chipset Serial Port1 Address Serial Port2 Address Parallel Port Address Parallel Port Mode Parallel Port IRQ Eup lot6 Serial Port3 Address Serial Port4 Address [3F8/IRQ4] [2F8/IRQ3] [378] [Normal] [IRQ7] [Disabled] [3E8] [2E8] +Tab F1 F10 ESC Select Screen Select Item Change Field Select Field General Help Save and Exit Exit v02.61 (C) Copyright 1985-2006, American Megatrends, Inc. When Parallel Port Mode is set to ECP Main Advanced PCIPnP Boot BIOS SETUP UTILITY Security Chipset Exit Configure ITE8721 Super IO Chipset Serial Port1 Address Serial Port2 Address Parallel Port Address Parallel Port Mode ECP Mode DMA Channel Parallel Port IRQ Eup lot6 Serial Port3 Address Serial Port4 Address [3F8/IRQ4] [2F8/IRQ3] [378] [ECP] [DMA3] [IRQ7] [Disabled] [3E8] [2E8] +Tab F1 F10 ESC Select Screen Select Item Change Field Select Field General Help Save and Exit Exit v02.61 (C) Copyright 1985-2006, American Megatrends, Inc. Serial Port 1/2 Address 3F8/IRQ4 Enable serial port1 and set IO address to 3F8/IRQ4. (Default setting for Serial Port1) 2F8/IRQ3 Enable serial port1 and set IO address to 2F8/IRQ3. (Default setting for Serial Port2) 3E8/IRQ4 Enable serial port1 and set IO address to 3E8/IRQ4. 2E8/IRQ3 Enable serial port1 and set IO address to 2E8/IRQ3. Disabled Disable Serial Port 1/2. 30 MNNM1PI Motherboard Parallel Port Address 378 Enable parallel port and set IO address to 378. (Default setting) 278 Enable parallel port and set IO address to 278. 3BC Enable parallel port and set IO address to 3BC. Disabled Disable parallel port. Paralle Port Mode This function allows you to select the the onboard parallel port transfer mode. Normal Normal operation.(Default setting) EPP Enhanced Parallel Port ECP Extended Capabilities Port. ECP+EPP Both Enhanced Parallel Port and Extended Capabilities Port. ECP Mode DMA Channel This option is only available if the setting for the Parallel Port Mode option is ECP and EPP+ECP. This option sets the DMA channel used by parallel port. Options DMA0, DMA1, DMA3. Default setting is DMA3. NOTE!! This item will pops up when Parallel Port Mode is set to ECP and EPP+ECP. Paralle Port IRQ IRQ7 Set IO address to IRQ7. (Default setting) IRQ5 Set IO address to IRQ5. Eup Lot6 EuP Lot 6 is a standard for reduced power consumption in idle mode. Disabled Disable Eup Lot6 function.(Default setting) Enabled Enable Eup Lot6 function. Serial Port 3/4 Address 2F8 Enable serial port1 and set IO address to 2F8. 2E8 Enable serial port1 and set IO address to 2E8. (Default setting for Serial Port 3) 2E0 Enable serial port1 and set IO address to 2E0. (Default setting for Serial Port 4) 31 MNNM1PI Motherboard Disabled Disable Serial Port 3/4. Serial Port 3/4 IRQ IRQ3 Set IO address to IRQ3. IRQ4 Set IO address to IRQ4. IRQ9 Set IO address to IRQ9. IRQ10 Set IO address to IRQ10. (Default setting for Serial Port 3) IRQ11 Set IO address to IRQ11. (Default setting for Serial Port 4) 32 MNNM1PI Motherboard Hardware Health Configuration Default Screen Main Advanced PCIPnP Boot BIOS SETUP UTILITY Security Chipset Exit Hardware Health Configuration CPU FAN Stop Warning System FAN Stop Warning Hardware Health Function CPU FAN Mode Setting [Enabled] [Disabled] [Enabled] [Full On mode] System Temperature CPU Temperature : 33oC/91oF : 46oC/114oF CPU FAN Speed System FAN Speed : 4166 RPM : N/A +3.30V Vcore +12.0V : 1.520 V : 3.344 V : 12.288 V +Tab F1 F10 ESC Select Screen Select Item Change Field Select Field General Help Save and Exit Exit v02.61 (C) Copyright 1985-2006, American Megatrends, Inc. When CPU FAN Mode Setting is set to Automatic mode Main Advanced PCIPnP Boot BIOS SETUP UTILITY Security Chipset Exit Hardware Health Configuration CPU FAN Stop Warning System FAN Stop Warning Hardware Health Function CPU FAN Mode Setting CPU FAN Temp. Limit of OFF CPU FAN Temp. Limit of Start CPU FAN Start PWM Slope PWM of CPU FAN [Enabled] [Disabled] [Enabled] [Automatic mode] [000] [020] [070] [0.5 PWM] System Temperature CPU Temperature : 33oC/91oF : 46oC/114oF CPU FAN Speed System FAN Speed : 4166 RPM : N/A +3.30V Vcore +12.0V : 1.520 V : 3.344 V : 12.288 V +Tab F1 F10 ESC v02.61 (C) Copyright 1985-2006, American Megatrends, Inc. 33 Select Screen Select Item Change Field Select Field General Help Save and Exit Exit MNNM1PI Motherboard When CPU FAN Mode Setting is set to PWM Manually mode Main Advanced PCIPnP Boot BIOS SETUP UTILITY Security Chipset Exit Hardware Health Configuration CPU FAN Stop Warning System FAN Stop Warning Hardware Health Function CPU FAN Mode Setting CPU FAN PWM Control [Enabled] [Disabled] [Enabled] [PWM Manually mode] [255] System Temperature CPU Temperature : 33oC/91oF : 46oC/114oF CPU FAN Speed System FAN Speed : 4166 RPM : N/A +3.30V Vcore +12.0V : 1.520 V : 3.344 V : 12.288 V +Tab F1 F10 ESC Select Screen Select Item Change Field Select Field General Help Save and Exit Exit v02.61 (C) Copyright 1985-2006, American Megatrends, Inc. CPU Fan Stop Warning Enabled Enable CPU Fan Stop Warning Function. (Default setting) Disabled Disable CPU Fan Stop Warning Function. System Fan Stop Warning Enabled Enable System Fan Stop Warning Function. Disabled Disable System Fan Stop Warning Function. (Default setting) Hardware Health Function Enabled Enable Hardware Health Function. (Default setting) Disabled Disable Hardware Health Function. CPU FAN Mode Setting Automatic Mode CPU FAN Temp. Limit of OFF FAN will stop when temperature is lower than the “OFF” limit. User can define the limit value. Minimum temperature is 0oC Maximum temperature is 127oC. CPU FAN Temp. Limit of Start FAN spins in a start PWM value when temperature exceeds a start limit. User can define the limit value. 34 MNNM1PI Motherboard FAN start PWM value.User can define the limit value. CPU FAN Start PWM Minimum PWM value is 0 MaximumPWM value is 255. Slope PWM of CPU FAN The PWM value is subject to the temperature inputs by inear changing. PWM Manually Mode CPU FAN PWM Control PWM Duty Cycle control. Minimum PWM value is 0 MaximumPWM value is 255. CPU Temperature/System Temperature Display the current CPU temperature, and system temperature. CPU FAN Speed/ System FAN Speed Display the current CPU, system, and power fan speed. Voltage Monitor: +3.30V/Vcore/+12.0V Detect system's voltage status automatically. 35 MNNM1PI Motherboard ACPI Configuration Main Advanced PCIPnP Boot BIOS SETUP UTILITY Security Chipset Exit ACPI Settings Suspend Mode ACPI Version Features ACPI APIC support Resume On RTC Alarm epost Video on S3 Resume [Auto] [ACPI v3.0] [Enabled] [Disabled] [No] +Tab F1 F10 ESC Select Screen Select Item Change Field Select Field General Help Save and Exit Exit v02.61 (C) Copyright 1985-2006, American Megatrends, Inc. Suspend Mode S1 (POS) Enables the system to enter the ACPI S1 (Power on Suspend) sleep state. In S1 sleep state, the system appears suspended and stays in a low power mode. The system can be resumed at any time. S3 (STR) Enables the system to enter the ACPI S3 (Suspend to RAM) sleep state In S3 sleep state, the system appears to be off and consumes less power than in the S1 state. When signaled by a wake-up device or event, the system resumes to its working state exactly where it was left off. Auto Auto configuration. (default setting) ACPI Version Features Configure ACPI version features. Options available: ACPI v1.0, ACPI v2.0, and ACPI v3.0. Default setting is ACPI v3.0. ACPI APIC Support Enabled Enable ACPI APICsupport. (Default setting) Disabled Disable ACPI APICsupport. 36 MNNM1PI Motherboard Resume On RTC Alarm You can set "Resume by Alarm" item to enabled and key in Data/time to power on system. Disabled Disable this function. (Default setting) Enabled Enable alarm function to POWER ON system. If RTC Alarm Lead To Power On is Enabled. Date (of Month) Alarm : Everyday, 1~31 Time (hh: mm: ss) Alarm : (0~23) : (0~59) : (0~59) 37 Advanced Settings WARNING: Setting wrong values in below sections may cause system to malfucntion. CPU Configuration IDE Configuration Super IO Configuration Hardware Health Configuration ACPI Configuration USB Configuration MNNM1PI Motherboard USB Configuration Main Advanced PCIPnP Boot BIOS SETUP UTILITY Security Chipset Exit USB Configuration Module Version USB Device Enabled: 1 Drive Legacy USB Support USB Keyboard Legacy Support USB Mouse Legacy Support USB Storage Device Support 2.24.3-13.4 [Enabled] [Enabled] [Enabled] [Enabled] USB Mass Storage Device Configuration USB Keyboard Legacy Support Mouse Keyboard Legacy Support USB Storage Device Support +Tab F1 F10 ESC [Enabled] [Enabled] [Enabled] Select Screen Select Item Change Field Select Field General Help Save and Exit Exit v02.61 (C) Copyright 1985-2006, American Megatrends, Inc. Main Advanced PCIPnP Boot BIOS SETUP UTILITY Security Chipset Exit USB Mass Storage Device Configuration USB Mass Storage Reset Delay Device#1 Emulation Type USB Keyboard Legacy Support Mouse Keyboard Legacy Support USB Storage Device Support [20 Sec] silicon-power [Auto] [Enabled] [Enabled] [Enabled] +Tab F1 F10 ESC v02.61 (C) Copyright 1985-2006, American Megatrends, Inc. 38 Select Screen Select Item Change Field Select Field General Help Save and Exit Exit MNNM1PI Motherboard Legacy USB Support Auto Auto detection. Enabled Enable Legacy USB device. (Default setting) Disabled Keep USB devices available only for EFI applications. USB Keyboard Legacy Support Enabled Enable USB Keyboard Legacy Support. (Default setting) Disabled Disable USB Keyboard Legacy Support. USB Mouse Legacy Support Enabled Enable USB Mouse Legacy Support. (Default setting) Disabled Disable USB Mouse Legacy Support. USB Storage Device Support Enabled Enable USB Storage DeviceSupport. (Default setting) Disabled Disable USB Storage Device Support. USB Mass Storage Device Configuration NOTE!! This item will pops up when USB Mass Storage Device is populated. USB Mass Storage Reset Delay Numbers of seconds POST waits for the USB mass storage device after start unit command. Options 10 Seconds, 20 Seconds, 30 Seconds, 40 Seconds. Default setting is 20 Seconds. NOTE!! This item will pops up when USB Mass Storage Device is populated. Device# Displays the manuafacturer information of the inserted USB mass storage device. Emulation Type If this item set to Auto, USB devices less than 538MB will be emulated as Floppy and remaining as hard drive, Forced FDD option can be used to force a HDD formatted drive to boot as FDD. (Ex. ZIP drive) Options Auto, Floppy, Forced FDD, Hard Disk, CDROM. Default setting is Auto. 39 MNNM1PI Motherboard PCI/PnP Main Advanced PCIPnP Boot BIOS SETUP UTILITY Security Chipset Exit Advanced PCI/PnP Settings WARNING: Setting wrong values in below sections may cause system to malfunction. Clear NVRAM Plug & Play O/S [No] [No] IRQ3 IRQ4 IRQ5 IRQ7 IRQ9 IRQ10 IRQ11 IRQ14 IRQ15 [Available] [Available] [Available] [Available] [Available] [Available] [Available] [Available] [Available] +Tab F1 F10 ESC Select Screen Select Item Change Field Select Field General Help Save and Exit Exit v02.61 (C) Copyright 1985-2006, American Megatrends, Inc. Clear NVRAM Yes Clear NVRAM during system boot. No Normal operation. (Default setting) Plug & Play O/S Yes Let the operating system configure Plug and Play (PnP) devices not required for boot if your system has a Plug and Play system. No Let the BIOS configure all the devices in the system. (Default setting) IRQ3/IRQ4/IRQ5/IRQ7/IRQ9/IRQ10/IRQ11/IRQ14/IRQ15 Available Specified IRQ is available to be used by PCI/PnP. (Default setting) Reserved Specified IRQ is reserved for use by Legacy ISA devices. 40 MNNM1PI Motherboard Boot Main Advanced PCIPnP Boot BIOS SETUP UTILITY Security Chipset Exit Boot Settings Boot Settings Configuration Boot Device Priority +Tab F1 F10 ESC Select Screen Select Item Change Field Select Field General Help Save and Exit Exit v02.61 (C) Copyright 1985-2006, American Megatrends, Inc. Main Advanced PCIPnP Boot BIOS SETUP UTILITY Security Chipset Exit Boot Settings Configuration Quick Boot Bootup Num-Lock Wait for ‘F1’ If Error Hit ‘DEL’ Message Display [Enabled] [On] [Enabled] [Enabled] +Tab F1 F10 ESC Select Screen Select Item Change Field Select Field General Help Save and Exit Exit v02.61 (C) Copyright 1985-2006, American Megatrends, Inc. Main Advanced PCIPnP Boot BIOS SETUP UTILITY Security Chipset Exit Boot Device Priority 1st Boot Priority 2nd Boot Priority 3rd Boot Priority [Removable Dev.] [CD/DVD] [Hard Drive] +Tab F1 F10 ESC v02.61 (C) Copyright 1985-2006, American Megatrends, Inc. 41 Select Screen Select Item Change Field Select Field General Help Save and Exit Exit MNNM1PI Motherboard Quick Boot Enabled Allow BIOS to skip certain tests while booting. (Default setting) Disabled Normal operation during system boot. BootupNumLock This option allows user to select power-on state for NumLock. On Enable NumLock. (Default setting) Off Disable this function. Wait for ‘F1’ If Error Enabled Enable Wait for ‘F1’If Error. (Default setting) Disabled Disable this function. Hit ‘DEL’ Message Display Enabled Enable Hit ‘DEL’ Message Display. (Default setting) Disabled Disable this function. Boot Device Priority This field determines which type of device the system attempt to boot from after BIOS Post completed. Specifies the boot sequence from the available devices. If the first device is not a bootable device, the system will seek for next available device. 42 MNNM1PI Motherboard Security About This Section: Security In this section, user can set either supervisor or user passwords, or both for different level of password securities. In addition, user also can set the virus protection for boot sector. Main Advanced PCIPnP BIOS SETUP UTILITY Security Chipset Boot Exit Security Settings Supervisor Password User Password : Not Installed : Not Installed Change Supervisor Password User Access Level Change User Password Clear User Password Password Check [Full Access] [Setup] +Tab F1 F10 ESC Select Screen Select Item Change Field Select Field General Help Save and Exit Exit v02.61 (C) Copyright 1985-2006, American Megatrends, Inc. Set Supervisor Password You can install and change this options for the setup menus. Type the password up to 6 characters in length and press <Enter>. The password typed now will clear any previously entered password from the CMOS memory. You will be asked to confirm the entered password. Type the password again and press <Enter>. You may also press <Esc> to abort the selection and not enter a specified password or press <Enter> key to disable this option. Set User Password You can only enter but do not have the right to change the options of the setup menus. When you select this function, the following message will appear at the center of the screen to assist you in creating a password. Type the password up to 6 characters in length and press <Enter>. The password typed now will clear any previously entered password from the CMOS memory. You will be asked to confirm the entered password. Type the password again and press <Enter>. You may also press <Esc> to abort the selection and not enter a specified password. User Access Level User Access Privilege configuration. 43 MNNM1PI Motherboard Full Access Fully authorization for User accessing the setup utility.. (Default setting) No Access Prevents User access to the setup utility. Limited Allows only limited fields to be changed such as Date and Time. View Only Allows access to the setup utility but the fields can not be changed. NOTE!! This item will pops up when Suervisor Password is set. Password Check Setup Check the password while invoking setup. (Default setting) Always Check the password while invoking setup as well as on each boot. NOTE!! This item will pops up when Suervisor Password is set. 44 MNNM1PI Motherboard Chipset Main Advanced PCIPnP Boot BIOS SETUP UTILITY Security Chipset Exit Advanced Chipset Settings North Bridge Configuration South Bridge Configuration Onboard Peripherals Configuration +Tab F1 F10 ESC v02.61 (C) Copyright 1985-2006, American Megatrends, Inc. 45 Select Screen Select Item Change Field Select Field General Help Save and Exit Exit MNNM1PI Motherboard North Bridge Configuration Main Advanced PCIPnP Boot BIOS SETUP UTILITY Security Chipset Exit North Bridge Chipset Configuration Internal Graphics Mode Select DVMT Mode Select DVMT/FIXED Memory [Enabled, 8MB] [DVMT Mode] [256MB] +Tab F1 F10 ESC Select Screen Select Item Change Field Select Field General Help Save and Exit Exit v02.61 (C) Copyright 1985-2006, American Megatrends, Inc. Internal Graphics Mode Select Select the amount of system memory used by the internal graphic device. Option available: Enable 1MB, Enable 4MB, and Enabled 8MB. Default setting is Enable, 8MB. DVMT Mode Select DVMT Mode Selection. Option available: Fixed Mode, and DVMT Mode. Default setting is DVMT Mode. DVMT Fixed Memory Select DVMT Pre-Allocated (Fixed) Graphics Memory size used by the Internal graphics device. Option available: 128MB, 256MB, and Maximum DVMT . Default setting is 256MB. 46 MNNM1PI Motherboard South Bridge Configuration Main Advanced PCIPnP Boot BIOS SETUP UTILITY Security Chipset Exit South Bridge Configuration HDA Controller [Auto] Restore on AC Power Loss [Power Off] +Tab F1 F10 ESC Select Screen Select Item Change Field Select Field General Help Save and Exit Exit v02.61 (C) Copyright 1985-2006, American Megatrends, Inc. HDA Controller Auto Enable onboard HDA device. (Default setting) Disabled Disable onboard HDA device. Restore on AC Power Loss This option provides user to set the mode of operation if an AC / power loss occurs. Power On System power state when AC cord is re-plugged. Power Off Do not power on system when AC power is back. (Default setting) Last State Set system to the last sate when AC power is removed. 47 MNNM1PI Motherboard Onboard Peripheral Configuration Main Advanced PCIPnP Boot Onboard LAN Controller LAN Option ROM MAC Address : BIOS SETUP UTILITY Security Chipset Exit [Enabled] [Disabled] 00-E0-4C-68-00-12 +Tab F1 F10 ESC v02.61 (C) Copyright 1985-2006, American Megatrends, Inc. Onboard LAN Controller Enabled Enable onboard LAN device. (Default setting) Disabled Disable onboard LAN device. LAN Option ROM Enabled Enable LAN Option ROM. Disabled Disable LAN Option ROM. (Default setting) 48 Select Screen Select Item Change Field Select Field General Help Save and Exit Exit MNNM1PI Motherboard Exit Main Advanced PCIPnP Boot BIOS SETUP UTILITY Security Chipset Exit Exit Options Save Changes and Exit Discard Changes and Exit Discard Changes Load Optimal Defaults +Tab F1 F10 ESC Select Screen Select Item Change Field Select Field General Help Save and Exit Exit v02.61 (C) Copyright 1985-2006, American Megatrends, Inc. About This Section: Exit Once you have changed all of the set values in the BIOS setup, you should save your changes and exit BIOS setup program. Select “Exit” from the menu bar, to display the following sub-menu. Save Changes and Exit This option allows user to exit system setup with saving the changes. Press <Enter> on this item to ask for the following confirmation message: Pressing ‘Y’ to store all the present setting values the user made in this time into CMOS. Therefore, when you boot up your computer next time, the BIOS will re-configure your system according data in CMOS. Discard Changes and Exit This option allows user to exit system setup without changing any previous settings values in CMOS. The previous selection remain in effect. This will exit the Setup Utility and restart your computer when selecting this option. Discard Changes Select this item and press Enter to discard any changes you have made without leaving the setup utility. Load Optimal Default Press Enter a dialog box asked if you want to restore optimal settings for all the items in the Setup utility. Press the Y key to indicate Yes, and then press Enter to restore the optimal settings. 49