1
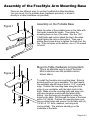
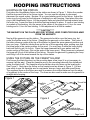
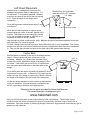
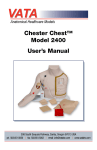
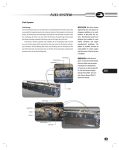
HoopMaster Instructions
Midwest Products Inc.
W194 N11665 McCormick Dr.
Germantown, WI 53022
www.hoopmaster.com
Station Adjustment
The HoopMaster station is pre-assembled when you receive it. It can be adjusted to
three different angles for hooping. When you receive the station, it will be flat. This
position can be used for hooping items like towels and blankets. You would load the
garments onto the station like a silk screen press operator. Position the station on your
table so that the top of the station is closest to you. Then pull the garment over the
station. It may take some time to get used to hooping this way, but this saves a lot of
extra motion in the hooping process because you do not have to reach up and over the
station to pull the shirt on.
To adjust the station angle, simply remove
the wing nut and thumb screw from each side
of the station bottom. You may find this
easier if you flip the station over so that it is
upside down. Then adjust the bracket to the
new position and replace the thumb screw
and wing nut.
If you do not want to hoop flat, then the best setting is the middle angle. To hoop this
way, you would position the station on the table so that all of the markings are right side
up. The high angle is not as good because it makes you bend your wrists to far back to
push the hoop down. This will cause more strain on your wrists over time. We only offer
this angle for a few customers that like to hoop this way.
If you have any questions or problems please give us a call.
Midwest Products, Inc.
W194 N11665 McCormick Dr. Germantown, WI 53022
Page 1 of 5
Phone: 262-257-0930 Fax: 262-257-0934 Website: www.hoopmaster.com
Assembly of the FreeStyle Arm Mounting Base
There are two different ways to use the FreeStyle Arm Mounting Base.
You can mount it to the portable base (hardware provided), or mount it
directly to a table (Hardware not provided).
Figure 1
Assembly on the Portable Base
Place the sides of the portable base on the table with
the bends towards the inside. Then place the
mounting base on top of the sides. Use the 1.25"
1/4x20 bolts and nuts to attach the top to the sides.
Hand tighten the nuts on the bottom. Then use a
phillips head screw driver to tighten the bolts from the
top. If the nut spins on the bottom, use a 7/16 wrench
to hold it.
Mount to Table (hardware not provided)
Figure 2
This is an alternate way to mount the base.
Most customers use the portable version
shown above
To install the freestyle arm mounting base. Select a
desired position on your worktable. For best results
the worktable should have at least a 1-1/2“ overhang
edge. Position the mounting base along the front
edge of your worktable, with the black knob to the
back. Make sure the mounting bolts and wing nuts
will have clearance underneath the table before
drilling. Use the base as a template to locate the
holes on the table. Drill through the holes of the base
with a 1/4” drill bit. Position the mounting base over
the pre-drilled holes and secure it to the table with (4)
1/4-20 x 2 1/2” bolts, washers, and wing nuts
(not-provided). The washers should go on the
underside of the table.
Page 2 of 5
HOOPING INSTRUCTIONS
HOOPING ON THE STATION
First place the HoopMaster fixture on the station as shown in Figure 1. Notice the number
that the document hole in the fixture circles. You can use this number to document
placement for repeat orders. Number 19 is a good starting point for the fixture. Adjust the
outer ring of your hoop for the thickness of material you are hooping. Next place the outer
ring in the HoopMaster fixture. Lift the magnetic flaps and place the backing material over
the outer ring. Lower the flaps to hold the backing material in place. If more or less holding
is needed on the backing, turn the screw in the center of the magnet out ¼ turn for more
holding and in ¼ turn for less holding. A little adjustment is all that is needed.
******CAUTION******
THE MAGNETS ON THE FLAPS ARE VERY STRONG, KEEP COMPUTER DISKS AWAY
FROM THE MAGNETS
Next pull the garment over the station. The garment should be over the lower ring, but
under the flexible arms of the fixture. Straighten the garment on the station. Take note of
the letter reference guide at the top of the station to repeat the same garment position next
time you hoop. Place the tubular hoop on the top of the supporting arms, making sure that
the hoop locks in the center position on the arms. You may have to slide the hoop slightly
back and forth to get it to lock in. Press the hoop downward with your palms near the
center section of the hoop. (Not on the ends of the hoop arms). When pressure is released,
the hoop will lift out of the bottom of the fixture. Remove the garment by grasping the hoop
and lifting it off of the arms towards the top of the station.
USING THE FIXTURE ON THE FREESTYLE ARM
First loosen the black thumbnut on the mounting base a few turns (it is not necessary to
remove it all the way). Place the freestyle arm on the mounting base with the slotted part
under the black knob. The freestyle arm should then drop into place on the locating pin.
See Figure 2. Next place the fixture on the freestyle arm as shown in Figure 3. You are
now ready to use the freestyle arm for cap backs, sleeves, bags, and other small Items.
The engraved lines on the fixture are used to measure the vertical distance from the edge
of a garment to the center of the hoop. The lines are also used to make sure the garment is
straight while hooping.
Figure 1
Slot
Thumb Nut
FreeStyle
Arm
Mounting
Base
Document
Hole
Locating
Pin
Figure 2
FreeStyle Arm
On Mounting Base
Figure 3
Page 3 of 5
Pocket Alignment Guide
The pocket alignment guide is to assist you in aligning logos with pockets, horizontal
stripes, or vertical stripes. This is done by placing the pocket guide inside of the top
hoop. The pocket guide should lock in place square with the hoop. Then press the hoop
down against the garment and use the grid to accurately align the pocket or stripe. It is
also a great tool for lining up text to existing logos. The pocket guide is only available for
some hoop sizes at this time.
T-Square
The T-square is used on the fixture when it is on the freestyle arm. The T-square is to
assist you in measuring the horizontal distance from the edge of a garment to where the
center of a logo is to be embroidered. It is screwed into the 2 brass thread inserts on
the fixture. Adjust the T-Square by sliding it from side to side. Place the desired
measurement that you want to use over the center line of the fixture. Then tighten the
two thumb screws to hold the T-square in place. Do not over tighten. To use the
T-square pull the part of the garment you want to measure from to the end of the
T-square by the zero. Then pull the edge of the garment parallel to one of the fixture
lines.
Backing Material Size
We suggest using pre-cut backing with your
Maximum Size
HoopMaster fixture. To find the correct size backing
for your fixture you will have to measure for the
minimum and maximum size you can use. For the
maximum size, open the magnetic flaps, then
measure from one side of the fixture to the other
and from the hinge of one flap to the hinge of the
other flap. These dimensions are the maximum size
you should order. The minimum size is figured by
measuring between the magnets. You want to make
Minimum Size
Figure 4
sure the backing will be able to cover all of the
magnets. See Figure 4.
Please watch our online videos for more detailed instructions.
If you have any other questions feel free to contact us at:
1-800-900-0741 or 262-257-0930
Visit our web site at www.hoopmaster.com for new product releases
9/2/11
Page 4 of 5
Part names
These are pictures of parts that may have been included in your kit. Use this sheet if you
need to call and discuss parts that you have or need to get. **These parts are not included
with every order, most are optional.**
Optional Items
I
H
G
F
E
D
C
B
A
T-square
4 3
2 1
8 7
1
6 5
12 1
2
3
16 1 1 10 9
4
20 1 5 14 13
1
5
24 23 9 18 17
5 62 3 4
22 21
6
28 2
9 10 7 8
7
32 31 7 26 25
11 12
30 28
13
8
17 18 14 15 16
9
1
9
21 22
10
20
(4) 1/4-20 x 1.25"
Bolts for Mounting
Base and (4) nuts
23 2
25
29 30 26 27 28 4
31 32
Station
Jacket Back
or
Full Front
Fixture
Mounting Base
Top
Fixture
Mounting Base
Bottom
FreeStyle Arm
Mighty Hoops
(5.5” shown)
Pocket Alignment
Guide
Adjustable Mighty Hoop Fixture
Online Video Training go to
www.hoopmaster.com and www.mightyhoop.com
If you do not have high speed internet
please call for a copy of our DVD
Normal HoopMaster systems do not include hoops, you use your existing hoops.
If you ordered Mighty Hoops, then you can use them with special fixtures, or without fixtures.
7/22/13
Page 5 of 5
HoopMaster
Limited Warranty
Midwest Products, Inc. warrants this product to be free from any defects in material
and/or workmanship for a period of one (1) year from the date of the original sale.
This warranty is only valid to the original retail purchaser. Midwest Products, Inc.
agrees to repair and/or replace any part found to be defective by us, without charge,
provided that the unit(s) or part(s) is/are returned to us with transportation charges
prepaid. Replacement parts supplied during the product warranty period are
warranted only for the balance of the original product warranty period. In no event
shall Midwest Products, Inc. be liable for any loss profits, incidental, indirect, special
or consequential damages under any circumstances, or for expenses occasioned by
the use of any defective product.
This warranty does not cover damages resulting from accident, misuse or abuse,
lack of reasonable care, the affixing of any attachment not provided by Midwest
Products, Inc., any alterations to the product or improper handling, installation and/or
maintenance. This warranty is VOID unless any repair necessary is made by
Midwest Products, Inc., by one of its authorized distributors, or by a third-party under
the express written permission of Midwest Products Inc.
The obligation of Midwest Products, Inc. under this warranty is limited to repair or
replacement of the product in accordance with the terms of this warranty. If repair or
replacement is not a viable alternative, Midwest Products, Inc.'s liability shall be
limited to reimbursement of the original invoice price of any goods that it does not
repair or replace.
There are no warranties offered by Midwest Products, Inc. other than those herein
described. Coverage under this limited warranty does not include incidental or
consequential damages.
Midwest Products, Inc.
W194 N11665 McCormick Dr.
Germantown, WI 53022
Phone 262-257-0930
Fax 262-257-0934
www.hoopmaster.com
10-23-01
HoopMaster Logo Placement
Here are some starting numbers I know some of our customers use. Please remember,
these are only a starting point for the fixture. Placement will change for different brands and
sizes of garment as well as different sizes of logos.
Small
Medium
Large
XL
2XL
3XL
Ladies
C - 11
C - 11
C - 15
C - 15
E - 20
E - 20
Mens
C - 15
C - 15
E - 19
D or E 20
F - 20
F - 24
We suggest that you use the guide on the next page to figure out where the logo should be
placed on your first shirt. Then, put a chalk mark or piece of tape on your first shirt where you
want the logo. Next put the inner ring & backing material in your fixture. Then pull your shirt
over the station until your seams hit the top of the station. Adjust your fixture so the center of
the hoop is over the mark when you push the hoop down. Then look at the number the
fixture is circling and the letter the top of the collar is pulled down to. The letter is very
important because it sets the height of the logo on the shirt. You can then document the
letter and number for future jobs. You can usually use this same setting for three sizes of
shirts. Start with the middle size for your setup and then you can usually go to one size
larger and one size smaller. Example, if you have Medium, Large, and XL shirts. Make your
mark on the Large and get your fixture set up. You should be able to do the Medium and the
XL at the same placement. If you go up or down 2 sizes from where you started you will
probably want to mark a shirt and check the placement again. 19 is a good starting point for
a lot of shirts but you really have to check the first set. Once you have the placement for a
logo on a certain brand of shirt it is very easy to setup. You can not make a generic chart that
will fit all brands of shirts and all logos. Shirts and logo size vary to much as well as
customer preference.
If you need any more information, please give us a call.
Midwest Products Inc.
1-800-900-0741
For more information on placement go to
www.helenhart.com
Here you will find information on two books written by Helen Hart Momsen. These books are true
reference books that will be welcome on the shelf of any embroidery business, large or small, new or
established. One entire chapter of Stitching by Design is devoted to logo placement on almost any type of
garment you will embroider.
Page 1 of 2
Left Chest Placement
Measure down in a straight line from where the
shoulder seem and the collar or ribbing meet. 7-9"
for men and 5-7" for women's garments. Measure
over from the center of the shirt to that line (usually
4-5"). Place the center of the design at the
intersection.
Distance from join of shoulder
seem and collar is 5-7" (women)
7-9" (Men)
For a child's garment measure down about 5" and
over about 3"
4 to 5" over from center
When the shirt has no placket or other structure
measure down the center of the shirt, parallel to the
first line. Then measure to the vertical line (usually
4-5"). You can make a template of a placket out of
cardboard or plastic to use as a marker.
Use the snaps or button on jackets as a guide. Between the second and third snap/button works well.
Use the bottom of a V-neck as a guide.
To place a design on the left and right chest use the document grid on your HoopMaster. First find the
placment on one side, then note the number the fixture is circling and the letter the shirt is pulled down
to. Then use the same number and letter on the other side of the garment when hooping.
Center Back
Back placement is dictated by the size of the designs and the
jacket. Close the jacket and place it face down on the
worktable. Measure 3 to 4 inches from the seam at the
bottom of the collar. Add half the height of the design to find
the center. It will usually turn out to be 8 to 10 inches down
from the center back collar seam to the center point of the
design.
8-10" to
Center
3-4 inches
LOGO
HERE
For a child's jacket the center will usually fall between 5 and 8
inches down from the collar. A distance of 2.5 inches from the
collar to the top of the design is a good rule of thumb. Add half
the height of the design to find the center of the embroidery.
As with any design placement, use a model or a mannequin to
verify your decisions. An actual size sew out placed on the
back is a good way to visualize the finished product.
Placement for this guide provided by Helen Hart Momsen
For more information on placement go to
www.helenhart.com
Here you will find information on two books written by Helen Hart Momsen. These books are true
reference books that will be welcome on the shelf of any embroidery business, large or small, new or
established. One entire chapter of Stitching by Design is devoted to logo placement on almost any type of
garment you will embroider.
Page 2 of 2