1
Preparing the Accessory
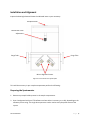
1. Place the accessory into the sample compartment. Using the 3/32” wrench provided, loosen the
screws on the two purge seal tubes located on the sides of the accessory. Push the tubes toward the
side walls of the spectrometer. This will seal the accessory in the sample compartment. Purge tubing
provided with the instrument can be connected on the front of the accessory for purging the
accessory housing.
2. Place the accessory in the sample compartment. Some configurations of the accessory include their
own instrument sample compartment mounting plate. This plate may be secured in place without
requiring access to the inside of the accessory.
3. If your accessory does not contain an instrument sample compartment baseplate, remove the front
cover of the accessory. This cover is held in place by six thumbscrews. Inside the accessory are two
mirror mounts and a base fixing position. Tighten the screw in place.
Alignment of the Accessory
1. Place the gold-coated alignment mirror onto the top surface of the accessory with the mirror
surface facing down.
T
2. Set up the FTIR software to alignment or monitor mode and note the size of the interferogram. Turn
the focus adjust micrometer to raise and lower the sample stage to achieve maximum throughput.
The gap between the sample plate and body of the accessory should be about ¼”.
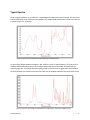
Figure 4. Typical throughput curve obtained with a gold mirror as sample. The background was
the instrument open beam without any accessories. Typical throughput of a well-aligned UpIR
should be better than 40% T.
PN 350-044000-02
P a g e |5