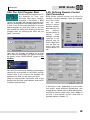
1
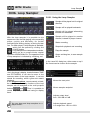
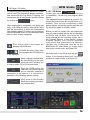
RC V3
RCP-1001
RCP-2001-A
RCP-2001-B
BPM Studio 4 Pro
1
2
BPM Studio
Content
Content
Introduction
1
1.01.
1.02.
1.03.
About this manual .......................................
System requirements ..................................
Package contents ........................................
8
8
9
The installation of software
and of remote control units
2
2.01.
2.02.
2.03.
2.04.
2.05.
2.06.
Software installation ....................................
Connection of remote control units ...............
Hardware reset ............................................
The First Program Start ...............................
Defining Remote Control Unit Parameters ....
Defining Driver and Audio Parameters ........
9
12
12
13
13
14
Description of the program
3
3.01.
The Program Window of BPM Studio ....... 16
3.02.
Player ........................................................ 17
3.02.1.
3.02.2.
3.02.3.
3.02.4.
3.02.5.
3.02.6.
Basic Functions ..........................................
Working with DirectCue keys .......................
Pitch and Master Tempo .............................
Fine Adjustment of Sliders ...........................
Realtime BPM Counter ...............................
The Player Window .....................................
17
18
18
19
19
20
3.03.
3.03.1.
3.03.2.
3.03.3.
Playlist .......................................................
Basic Functions .........................................
Waitlist, Single List Mode ............................
Ajustable Column Width and Content ........
21
21
22
23
3.04.
Preview Player ........................................... 14
3.05.
3.05.1.
3.05.2.
3.05.3.
3.05.4.
3.05.5.
File- and Playlist archive ...........................
File Archive ................................................
Playlist Archive ............................................
Playlist History Function ..............................
Adjustable Column Width and Content ........
Sorting Order ..............................................
22
24
26
26
27
27
3.06.
Loop Sampler ........................................... 28
3.06.1. Using the Loop Sampler ............................. 28
3.06.2. The Loop Sampler display .......................... 29
3.07.
Sample Player
...................................... 29
3.07.1. Editing Samples, and Assigning to keys ...... 30
3
BPM Studio
Content
Content
Description of the program
3
3.08.
Sample Editor ........................................... 31
3.08.1. Sample Block functions .............................. 31
3.08.2. Sample Channel functions ......................... 31
3.09.
Cross Fader ............................................... 33
3.10.
3.10.1.
3.10.2.
3.10.3.
BPM Counter .............................................
Monitor Player of BPM Counter ..................
BPM determining in manual mode ..............
BPM determining in automatic mode ..........
34
34
35
35
3.11.
3.11.1.
3.11.2.
3.11.3.
3.11.4.
3.11.5.
3.11.6.
3.11.7.
File Editor .................................................
Loading and displaying a title .......................
Adjusting display range ...............................
Marking ranges, and exporting into files .......
Adjusting volume and pitch .........................
The Toolbar .................................................
Functions of different markers .....................
Working with Cue Points ..............................
36
36
36
37
37
37
37
38
3.12.
File Info Box ............................................... 39
3.13.
3.13.1.
3.13.2.
3.13.3.
3.13.4.
3.13.5.
Mixer ..........................................................
Audio channels ............................................
The Equalizer ..............................................
Loading and storing equalizer settings .........
Recoder .....................................................
Compressor/Limiter (AGC) .........................
3.14.
MP3 Stream Modul
.................................. 46
3.15.
CD-Player / CD Writer ...............................
3.15.1. CD-Reader .................................................
3.15.2. Encoding Audio-CDs ...................................
3.15.3. CDDB-Query ...............................................
3.15.4. Copying Audio CDs (Ripping) ......................
3.15.5. "CD at once" Mode of theCD Player ............
3.15.6. Encoder .....................................................
3.15.7. CD-Writer ...................................................
3.15.8. Creating Audio-CDs ....................................
3.15.9. Creating Daten-CDs ...................................
3.15.10. System test in test mode ............................
3.15.11. Deleting CD-RW's .......................................
4
40
40
41
41
42
43
48
48
48
49
49
50
50
51
52
53
54
54
BPM Studio
Content
Content
Description of the program
3
3.16.
3.16.1.
3.16.2.
3.16.3.
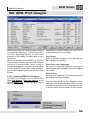
BPM Print Designer .................................
Starting BPM Print Designer ........................
Export list window .......................................
Print preview window ...................................
55
55
56
58
3.17.
BPM Studio Server Components ............. 60
3.18.
BPM Studio File Formats .......................... 61
3.19.
3.19.1.
3.19.2.
3.19.3.
3.19.4.
3.19.5.
3.19.6.
3.19.7.
3.19.8.
3.19.9.
Program Options ......................................
Presets .......................................................
Options .....................................................
Audio I/O ....................................................
Storing ........................................................
CDDA-Copy .................................................
CD-Writer ...................................................
Remote Control ...........................................
User Administration .....................................
Server components .....................................
62
62
63
65
67
68
70
73
75
76
3.20.
3.20.1.
3.20.2.
3.20.3.
3.20.4.
3.20.5.
3.20.6.
3.20.7.
Additional Functions .................................
Normalize Function ......................................
Suchen Dialog .............................................
Monitor Functions ........................................
The BPM Database .....................................
The PreAmp Function (Limiter) ...................
The Backup- and Update Functions .............
Interface for Visualisation Plugins ...............
77
77
77
77
78
78
78
78
3.21.
3.21.1.
3.21.2.
3.21.3.
User Administration .................................
In General ...................................................
User specific settings .................................
Example Configurations ..............................
79
79
79
81
3.22.
3.22.1.
3.22.2.
3.22.3.
Network Functions ...................................
Adressing MP3 files ....................................
Network File Archives ..................................
Example Configuration .................................
82
82
83
85
5
BPM Studio
Content
Content
First Steps with
BPM Studio Software
4
4.01.
Where can I get MP3 files? ...................... 86
4.02.
How can I play MP3 files? ......................... 86
4.03.
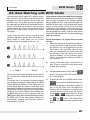
Beat-Matching with BPM Studio ............... 87
4.04.
4.04.1.
4.04.2.
4.04.3.
4.04.4.
4.04.5.
4.04.6.
4.04.7.
How do I work with Playlists? .................
Adding titles to a Playlist ............................
Modifying the title order ...............................
Storing a Playlist .........................................
Loading a Playlist from hard drive ...............
Drag&Drop functionality of Playlists ............
Adding a Playlist to the Archive ...................
Loading a Playlist from the Archive
into a player ................................................
4.04.8. Merging a Playlist to an already loaded list ..
4.04.9. Adding title sequences of a Playlist
to an already loaded list ..............................
4.04.10. Screening titles ............................................
89
89
89
90
90
90
90
91
91
91
91
4.05.
Creating Fades between titles .................. 92
4.06.
How can I change title information? ......... 94
4.07.
Ripping and Archiving of Audio-CDs ....... 95
4.08.
4.08.1.
4.08.2.
4.08.3.
How do I use the Sampler most efficient?
Single Play .................................................
Scratch Mode ..............................................
Configuring the Sample Player ....................
98
98
99
99
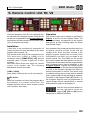
ALCATech RC Units:
Remote Control RC V3
5
5.01.
5.02.
5.03.
RC V3 view ................................................ 100
RC V3 description ....................................... 101
RC V3 and fader start .................................. 104
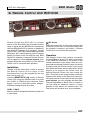
Remote Control RCP-1001
6
6.01.
6.02.
6.03.
RCP-1001 view ........................................... 106
RCP-1001 description ................................. 107
RCP-1001 and fader start ............................ 112
Remote Control
RCP-2001 A+B8
7
7.01.
7.02.
7.03.
RCP-2001-A front view ............................... 113
RCP-2001-B front view .............................. 114
RCP-2001 reverse view .............................. 114
6
BPM Studio
Content
Content
Professional work
with the Remote Control
RCP-2001
Appendix
8
9
7.04.
7.05.
RCP-2001 description ................................. 115
RCP-2001 and fader start ........................... 122
8.01.
8.01.1.
8.01.2.
8.01.3.
8.01.4
8.01.5.
8.01.6.
8.01.7.
8.01.8.
Working with Loop Player .........................
Recording and reproduction of the loop .......
Recording using AutoLoop function .............
Loop storing ................................................
Loop storing by a DirectCue key ..................
Loop storing by a Sample Player key ...........
Deleting of the Loop Player .........................
Editing a Loop .............................................
Beat-Stepping .............................................
124
124
125
126
126
126
126
127
127
8.02.
8.02.1.
8.02.2.
8.02.3.
8.02.4.
8.02.5.
8.02.6.
8.02.7.
8.02.8.
Working with DirectCue buttons ..............
Define a standard Cue-Point .......................
Editing of a Cue-Point .................................
Beat-Stepping ..............................................
Storing of a Cue-Point by a DirectCue key ...
Setting DirectCue Points on-the-fly ..............
Editing of DirectCue Points .........................
Deleting of DirectCue Points .......................
Deleting of all DirectCue Points
and the Loop Player ....................................
130
130
130
131
131
132
132
132
132
8.03.
Beat-Stepping
.......................................... 133
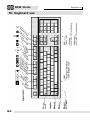
9.01.
Keyboard use .............................................. 134
9.02.
Tips and instructions ................................... 136
9.03.
Support, Contakt ........................................ 137
9.04.
Glossary
.................................................... 138
7
BPM Studio
Congratulations to your
purchase of BPM Studio!
With BPM Studio software and control units from
ALCATech, you have exceptional systems for
audio editing and administration at your
disposition. With your purchase, you have chosen
to follow a completely new way in multimedia
applications. BPM studio is a next generation
audio-player, providing all new ways of playing,
editing, and archiving audio files. These systems
have been developed explicitly for dance clubs
and DJs, although, due to their wide spectrum of
features, they are utilized in many other areas as
well. Currently BPM Studio is the only software
on the market, capable of playing and archiving
different audio file formats to the extend it does.
An unparalleled feature is the opportunity to
conveniently control the system with 19” rack
mount control units. An experienced Team of DJs
has tested this software in professional use, while
still in it’s development phase. It is subject to
frequent quality control, and improvement. A
modern design, ergonomic user interface, and the
remote control units allow for save handling even
under most difficult circumstances. You will be
surprised about the many new opportunities BPM
Studio will offer you, regardless if you are an entrylevel user or a professional. To ensure that you
will be able to take advantage of the programs
extensive features, and work effectively with it, it
is highly recommended that you thoroughly study
this manual. BPM Studio is available as
professional level MP-3 DJ software, supporting
remote control operation by one or more 19”
controllers. Different controllers are available,
distinguishing themselves by different numbers
of available features, and price. You can determine
the version you have purchased, by checking the
sticker on your box. Also available in this product
family is BPM Studio Gastro, ( a six fold MP-3
player, capable of serving audio output to six
independent areas of a building) and a personal
edition. More information about this product is
available on our web page, or at your nearest retail
store.
8
Introduction
1.01. About this Manual
The BPM Studio Manual provides detailed
information about operating soft- and hardware.
It is intended to help you with your initial phase of
working with this system, and to provide answers
to frequently asked questions. It is recommended
to install the software before studying this manual.
To do so, follow the instructions in the following
chapter. Also, this chapter covers system
requirements, and delivered supply. This manual
requires you to be familiar with your operating
systems major functions and conventions, as well
as knowing how to use your mouse. Bold and
underlined terms are covered more extensively
at another part of the manual. This part of the
manual covers functions of different control units.
Please be aware that not all functions are
available at all control units.
1.02. System Requirement
To use BPM Studio you need the following
IBM compatible Pentium® PC at least III-700
128 MB RAM (better are 512 MB)
20 MB available hard drive space
for program files
SVGA graphics adapter with a minimum
resolution of 1024x768
16 Bit sound card (better a professional
multichannel sound card)
40x CD-ROM Drive
Windows® 98, Windows® ME,
Windows® 2000 or Windows® XP
Parallel port LPT1 or USB Port for dongle
Serial port COM 1 or 2
(if an ALCATech RC unit is used)
Installation
1.03. Supply
Please make sure that following parts are
present:
1. BPM Studio Pro CD
2. Dongle (Hardware Copy Protection for
printer port LPT1 (or USB Port, optionally)
3. Manual
4. Registering post card
5. RC unit with, depending on box sticker, with
- Power supply unit
- serial cable
BPM Studio
3.) Insert your installation CD into your CD-ROM
drive.
4.) If your PC has auto notify enabled, the
installation program will now be started. If this
isn’t the case, choose run in your Windows start
menu, and enter: ”D:\setup”, D representing your
CD-ROM drives drive letter.
5.) Now the setup for the main application,
additional modules, and the online manuals will
start.
2.1. Software Installation
This program needs to be installed to your hard
drive from your CD. It can not be executed directly
from CD. Whenever working with BPM Studio, the
supplied dongle needs to be installed to your
computers printer port LPT1 (or USB Port)
If you are installing an upgrade to version
4, you must install into the original
directory, if you want to further use the
file archive and user administration
settings. Please refer to paragraph 10 of
this chapter.
1.) Plug the supplied dongle into the printer port
LPT1 (or USB Port) of your PC. (If you have
already installed a printer on this port, simply link
your dongle between printer cable and your PC’s
printer port.)
2.) If you have purchased BPM Studio together
with a 19” control unit, connect it to a serial port,
(COM1, COM2), using the supplied serial cable.
Also connect your unit with the power supply unit
to a wall outlet. Read also 2.2., Connecting the
control unit
Choose install BPM Studio to start the installation.
6.) Clicking [YES] will confirm the installation. You
can still abort at this point. If you confirm,
installation files will be copied to your hard drive.
7.) Now setup will prompt you to ensure that no
other applications are running during the
installation process. At this point too, you still have
the option to abort the installation, by clicking on
[CANCEL]
9
BPM Studio
Installation
9.) At this point register your version of Dongle
Server Tools to your name by entering your first
and last name and, if applicable, your companies
name. Click [NEXT] to confirm.
10.) Now, optionally, you can specify a path for
the program files, other than the default. It is
recommended though to use the default path,
since this simplifies possible support questions
later on. The path to the default directory is:
c:\program files\alcatech\BMP Studio Pro.
8.) If you proceed by clicking [next], setup will
display the ALCATech end user license
agreement
Please read it carefully and only continue the
installation process if you agree to adhere to
the license terms. Confirm you agree with the
license agreement by clicking the [YES]
button.
If you install an upgrade from BPM Studio
light, or Home, and you want to keep using
your file archive and user administration
settings, you have to install the upgrade into
the old directory. If
this is the case,
specify the path by
using
the
[BROWSE] button.
(e.g. C:\program
files\alcatech\BPM
Studio Home).
If you are not sure
where these files
are located, you can
determine the path the working directory by right
clicking on the BMP Studio icon on your desktop,
and choosing “properties”. The field TARGET
indicates the location of these files. By clicking
[NEXT] you can proceed to the next step.
10
Installation
11.) The following dialog box confirms that new
entries have been created into the Windows start
menu for BPM Studio LE, and other useful links.
BPM Studio
13.) Upon completing this process, according
entries will be added to your Windows registry,
and program shortcuts will be created in the start
menu:
Please be patient at this point, since this may
take a little while
14.) In order to complete and apply changes made
to your system, a Windows restart is now required.
You also have the option to cancel and restart
the system later, this is not recommended though.
Of course you have the option to use another,
already existing group, or to rename this entry.
You can always go back by clicking the [BACK]
button.
12.) The unpacked program files will now be
copied to your hard drive, according to the
previously defined parameters. Throughout this
process you will continuously be informed about
installation progress, and remaining storage
capacity of your hard drive
After a system reboot several shortcuts will be
added to the windows start menu.
Also, a BPM Studio icon has been created on
the desktop. Now you can start BPM Studio for
the first time.
11
BPM Studio
Installation
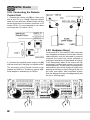
2.02. Connecting the Remote
Control Unit
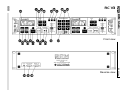
1.) Connect the control unit [38] to a free serial
port of your PC (e.g. COM2) using the supplied
cable. You may also use a different cable, as long
as the length does not exceed a maximum of 15
meters (45 ft.). It is recommended to use cables
not longer than 10 meters. (30 ft.)
2.03. Hardware Reset
2.) Connect the supplied power supply unit [39]
with the control unit, and plug in to a power outlet.
The connection of the Remote Control is also
possible by USB Port. Therefore a special USBserial adapter is available by ALCATech.
12
Control units RCV-1001 and RCP-2001 come with
own integrated processors and firmware. Should
stable operation ever be disrupted by external
influence, the control unit can be restarted by
pushing the reset button. If the software is running,
it will automatically detect if the control unit has
proceeded it’s internal boot process, and resume
normal operation. To reset, push in sequence the
track-selector and cue key of player A and B. Upon
pushing the last key (cue key of player B) the unit
will reset, and reboot. After completed system
boot, the display will show a message stating that
the unit is working again.
Installation
2.04. The First Program Start
Double click the program icon on
the desktop or, from your
windows start menu choose:
programs -> ALCATech -> BPM
Studio. The program will now start, and ask if you
want the small player to be default player for MP3 files. If you do not want the player to be your
default program for such files, click no. You can
also prevent this dialog from showing at the next
program start, by checking the “don’t ask me
again” check box.
BPM Studio
2.05. Defining Remote Control
Unit Parameters
BPM Studio remote control units allow for
variable, individual settings. Thus, for example,
the pitch slider
can be used
either to adjust
the pitch value or,
alternatively as
the
player’s
volume control. To
adjust
such
settings, choose
“options” in the
players pop up
menu (Right click
into the play list
area), and click
on the control unit
tab.
Upon this, the program will search for all local
MP-3 files on your system, The search result will
be shown in the “HARD DRIVE” group in File
Archive.
Now the PC’s serial ports defined in the program
options will be scanned for ALCATech remote
control units. If one is found, the program will
announce so. Now you can start your work.
Read our step-by-step instructions how to get
familiar with the hard- and software, and how to
create file and play lists.
In this tab you can, depending on your control
unit model, make different adjustments, and
modifications. Please refer to detail descriptions,
ALCATech remote control units, from chapter 6
on later in this manual, for this. Also refer to
program options, chapter 3.7.
13
BPM Studio
2.06. Defining Driver and Audio
parameters
BPM studio offers extensive features, and
therefore requires more system resources than
simpler MP-3 players like WinAMP™ for example.
The capability of playing 10 MP-3 files
simultaneously, or various channel signal output
for example, demand a well configured PC.
Further BPM Studio offers extensive possibilities
to manipulate audio engine settings. The audio
engine represents the core of BPM Studio, and
is responsible for highest quality play backs with
shortest possible remote control latency intervals.
Therefore make sure of the following:
1.) Every sound card in your system must have
it’s own, assigned IRQ. This interrupt can not be
shared with other system components.
2.) Also the serial port used to connect the remote
control unit must have it’s own, unshared interrupt.
3.) Background programs, like real time virus
scanners, power- and print management, etc.
should be deactivated.
4.) For utmost compatibility to various different
sound cards, BPM Studio provides various
different driver models:
Kernel driver: 4..13ms, this driver is definitely
the fastest
Direct Sound driver: 20..30ms, when emulating
drivers up to150..300ms (!)
MME Wave driver: 70..180ms, depending on
buffer size, and program chosen options
ASIO/EASI driver: 20..50ms, latency is usually
defined manually in the ASIO drivers program
options
Installation
This suggests to prefer the Kernel, or Direct
Sound driver, since both work on the kernel level
of the operating system, and therefore operate
rather independent from the systems user
resource. The ASIO, and Wave drivers also work
rather stable, and are especially suitable for
background music, like in dance schools,
restaurants, etc. BPM Studio supports Wave
drivers, since they are available for almost any
sound card, and usually provide smooth
operation. Normally they are also deployable
under Windows NT.
Direct Sound Driver:
This is the fastest and most stable common driver.
Depending on hardware outfit, it allows switching
from Cue to Play within 20 to 30ms. For the
demanding DJ, who is very conscious about
mixing on single-beat level accuracy, utilizing the
Cue/Play- and loop functions to accomplish this,
this driver is essential. Although, if your sound
card is compatible with the kernel driver, it should
be preferred, since it has even shorter latency
intervals while still maintaining stability.
Kernel Driver:
This device driver, developed by ALCATech,
addresses the sound card on a very low kernel
mode level. Due to the very high priority kernel
drivers have within the system, they provide
shortest latency intervals from 4..13ms, while still
maintaining system stability. The kernel driver
utilizes common driver functionalities like direct
sound for example, and therefore supports many
different cards, even models that, for the reason
of unavailable direct sound drivers, had to be used
with ASIO wave drivers, and therefore tended to
produce drop outs.
Ex version 4.2 the Kernel driver is also able to
operate under Windows® 2000 and Windows® XP.
So, this operating systems can be used as full
multimedia systems, too.
Especially the new DirectCue, and loop
functions require minimal latency
intervals, and fastest reaction times.
Therefore you should try to keep
latency and buffer size to a minimum.
14
Installation
ASIO Driver:
This driver developed by Steinberg, serves as
interface for many multi channel sound cards. It
is usually a bit slower than direct sound driver,
and, in user mode, tends to drop out, if system
resources are low. For the most practical
operations, where background music is the only
objective, they work sufficiently well and stable
though. Usually latency is anywhere between 6
and 50ms, and can usually be adjusted in the
driver options. To avert drop outs when using BPM
Studio, latency should be set to 20..46ms. The
best value is usually determined by trying out.
Some tested cards have been reported to operate
unstable, when used with this driver.
EASI driver:
This drivers, developed by Ematic, performance
in regards of stability, and functionality equals the
ASIO drivers. As a matter of fact, it was developed
as Ematics answer to Steinberg’s ASIO. All
statements made about the ASIO, can be applied
to the EASI as well, since these two drivers hardly
differ at all, although the Ematic driver is only
sporadically supported, and therefore is of almost
no importance.
Wave driver (wave out):
This is a very stable driver that can be used
instead of direct sound drivers, although it has
higher latency times. On multi channel cards not
supporting direct sound, or ASIO drivers, this is
the only possibility though, to address different
channels separately. This driver is well suitable
for background music, but hardly for live DJs at
all. Latency times are located between 120 and
200ms.
BPM Studio
All important audio engine, and sound driver
settings are defined on the “Audio IO” tab, located
in the program options.
Read in the according chapter 3.7. How to adjust
BPM Studio’s sound card utilization to fit your
needs.
Should you encounter problems playing titles with
BPM Studio try at first to change the following
parameters.
Size of BPM Studio’s internal buffer. Change this
value if you occasionally experience dropouts
when playing titles, or the players don’t start right.
Size of the drivers buffer. Change this value if
you can not achieve clean audio playback. (This
value can only be edited when using wave drivers.
Lowest Latency
BPM Studio operates with smallest buffer sizes,
and latency times. Deactivate this check box if
you experience difficulties with your sound card.
This option enables you to manually enter the
latency interval of your driver. If necessary
increase this value until you achieve clean
playback.
Select the driver most suitable for your needs res.
available for your sound card in BPM Studio. If
you should encounter difficulties in using BPM
Studio, change the driver type.
To use BPM Studio’s monitor functions,
you have to perform a sound card test.
Further information about this can be
found in the according chapter: Monitor
functions.
15
BPM Studio
The Program Window
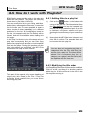
3.01. The Program Window of BPM Studio
The program window contains following modules:
Player A
Player B
Play list for player A
Play list for player B
Sample Player
BPM File Archive
The lower and center areas (play list, and file
archive) are multi functional.
The center are, containing both play lists, can be
switched to single play list, or wait list view.
The lower area displays optionally either file
archive, mixer, or CD-player/ripper. Read the
referring sections on how to switch to the
according sub modules.
The following chapter covers structure, and
functionality of these modules in detail. To quickly
get into working with BPM Studio, we recommend
the step-by-step instructions in chapter 4.
The appearance of the program window can be changed completely. (Skin support) In
program options (Chapter 3.18.), choose a skin you like. On the ALCATech website,
(www.alcatech.com) a “design-pack” with tools and hints for your own skin creation is
available for download.
16
BPM Studio
Player
3.02. Player
If a title has been ripped using the CDat-once feature, Chapter 3.15..5, you
can navigate with the right muse button,
and the track keys within this title.
Loop/Search keys:
3.2.1. Basic Functions
The player controls playback of audio files and
one or more CD-ROM drives, if audio CDs are
inserted. Besides the functions of a analog CD
players, a vast number of additional features is
available, which are only achievable by utilizing a
PC. Structure and ergonomic design allow for
professional use, and make readjusting from
commercial double-CD-players easy.
All titles can easily be inserted and played from a
play list, or a BPM file archive by drag&drop.
Also simply double clicking on it in the according
play list, can load, and start playing a title. Further,
it is possible to start a title from your hard drive
over the pop up menu.
Also at the remote control unit (only RCP 1001
and 2001), by using the track selector button, titles
can be selected and started.
Left mouse button: Player will
go into loop mode, if mouse
button remains pressed, search speed will
continuously be increased.
Right mouse button: Player will go into loop
mode, if mouse button remains pressed, player
will continue search at constant speed. If the
search keys are used with the right mouse button
during regular play mode, they behave like
common fast forward and fast back keys.
Play mode (switch):
Single play stops the player at the end
of the current title, otherwise the next
title will be started immediately.
Loop, repeats current title indefinitely
Shuffle, plays titles in random order
Track Keys:
Jumps to the beginning of the title If title
has played less than two seconds,
jumps to previous title.
Jumps to the next title in the play list.
Position
slider.
Tempo, switches between pitch and
master speed
Main functions:
Play / Pause: When switching from
pause to play, the main cue-point will
be newly set. When the player is
running, pressing the right mouse
button will slow it down, if the player is stopped,
right clicking will accelerate it. (BRAKE function.)
17
BPM Studio
Stops the player, and repositions to
current cue point. When holding this
button for 2 sec., it can reposition
either to current cue point, or title
start.
Plays title from last cue point on.
Optionally, the alternative cue point
function can be activated in the program
options. This will cause the player to
play as long as the CUP key remains
held. Upon releasing it, the player will
reposition back to the cue point.
3.02.2. Working with DirectCue buttons
DirectCue buttons offer the ability to start a title
from up to 6 cue point positions on, by pressing a
button. The cue points can optionally be placed
on the player display via the pop up menu. A light
blue dot, indicates that a cue point has been
assigned to a particular button.
Player
3.02.3 Pitch, and Master Speed
With these two functions the playback
speed of a title is manipulated, and
subsequently, the BPM value. Pitch
function, contrary to master speed
also raises the audio frequency. These
two functions are used for title speed
adjustment when mixing. The
universal buttons
and
,
can be programmed for different
variation ranges. Assigned by default are:
Pitch:
A: +/- 8%, B: +/- 16%, and C: +/- 24%
Master Tempo:
A: +/- 4%, B: +/- 8%, and C: +/- 12%
Switches pitch function on or of for this
particular player
Pitch Bend,
continuously
decreases
speed
Pitch
Bend
continuously
increases
speed
BPM Match, assumes the BPM value of
the other player
with right muse button:
Title will be faded out, and if single play
option is off, the next title in play list will start.
An orange dot indicates the cue point currently
loaded into the player.
To save any given position within a title as cue
point, click on the M icon in the display, and
subsequent click a cue point button, to assign
the marked position to it. With the X icon, cue
points can be deleted, using the same procedure.
You’ll find a detailed description in chapter 4. First
Steps.
18
DirectCue points will not be loaded,
when in auto-fade mode. Please DO
NOT use this mode if you want to use
stored DirectCues.
BPM Studio
Player
3.02.4. Fine Adjustment of Sliders
3.02.5. Real Time BPM Counter
When you click on the scale beside a slider, the
pitch range will be changed continuously in 0.1%
increments. Thus, depending on mouse pointer
position, a value can in- and decreased by very
fine nuances.
Both players automatically calculate the exact
BPM value of a title, if no value is indicated in the
titles ID3-tag. Via pop up menu, ranges from
50..100, 75..150, 100..200, and 150..300, are
available, and can easily be inserted into the titles
ID3-tag, so that it is not necessary anymore to
determine a title’s BPM rate with a separate
counter. By clicking [RESET] in the pop up menu,
the counter will anew determine the BPM rate,
which is useful, for example, to check applied
modifications to the ID3-tag.
Player popup menu
Remove a title from the player
Load a file directly into the player
Retrieves file information
Starts the file editor
Starts the BPM counter
Opens the search dialog box
Applies the normalize function on this title
Exports this title as WAVE or MP-3
Change title information in the ID3-tag
Deletes all defined cue points, fades and playcounter
Starts the BPM print designer
Opens the program options dialog
19
BPM Studio
3.02.6 The Player Window
In general, the player window is divided in two
areas. To the upper left hand area, a titles position
within a play list is indicated (TRACK) The center
area indicates optionally either past play time
(ELAPSED), or remaining play time (REMAIN)
You can easily switch between these two modes
by either clicking in the area, or on the
[TIME] button. You can also switch by
pressing the according button on the
remote control unit.
Player
OFF (very efficient on resources)
Standard balance display
32 Frequencies display with peak levels
32 Frequencies display without peak levels
64 Frequencies display with peak levels
10 seconds before play time elapses, this
display will start to blink in red, thus
indicating the upcoming end of this title.
64 Frequencies display without peak levels
The top right area optionally indicates the BPM
of a particular title (this information is retrieved
out of he titles ID3-tag), or it’s pitch value. As
before, here you can also define these settings
by simply clicking into the area.
The bottom left area shows a resource meter
(audio data buffer size), followed by a spectrum
analyzer. In this display the following modes are
available, to be switched also by mouse click into
the display area:
Amplitude, chronological
Scrolling title and performer information
The pop up menu allows you to switch between
spectrum analyzer, and cue point buttons menu
20
BPM Studio
Play List
3.03. The Play List
The following functions are also available:
Creates an empty play list
Loads an existing play list
Stores a created list to your hard drive.
Adds a title to a play list
3.03.1. Basic Functions
Every player has an individual play list. Play lists
are used to conveniently arrange everything from
small title sequences, up to whole event orders.
Within the play list, title, performer, BPM, and play
length of an audio file are displayed. The blue bar
marks a title. All play lists can be stored as play
list files. (*.lst)
Generally there are three ways to insert titles into
a play list: The pop up menu’s [load] function, with
Deletes an title from a list.
Marks all titles in a list
Opens the File Info Box
The right hand play list areas consists of a status
window, and the monitor player status window
functions can be switched to display with a mouse
click.
drag&drop out of an archive, or with the
button. The title sequence can also be
manipulated, by using drag&drop. A red arrow
assists in this task.
Titles can be send to the player by either
drag&drop functionality, or the pop up menu in
the player itself. Depending on program settings,
the title will then either automatically start, or be
loaded, and pause. Die ability to store play lists,
allows you to create complete event orders, for
events, music genres, show interludes and more.
Even importing play lists of other software, like
for example WinAMP™ is possible. BPM Studio
imports the *.m3u, and *.pls formats.
Titles already in use by
the player, (minimum
1 min.) are marked in red.
Displays how many titles are in
a particular playlist
Indicates the overall play time of a list
Indicates the remaining play time of a list
Due to the ability to store play lists with their
according crossfader effects, you can create
complete event orders, for events, music genres,
show interludes and more. The actual titles
though, are only saved once on your system, even
if they appear in different play lists. Read also
chapter Crossfader about how to assign pre
defined cross fading effects to titles, or to generate
own fades.
21
BPM Studio
Play List
3.03.2 Wait List, Single List Mode
Aside from the possibility to have different play
lists for every player, there is another display
variation, the wait list. In this mode, both play lists
are merged to one. With crossfader functions
and
you can switch between single
list display (play list mode) and dual list display
(wait list mode) When switching from dual to single
list display, files will be merged in a comb pattern.
When switching back from single to dual mode
titles will be arranged in a “even – odd” pattern to
the left and right, beginning with title A. Odd
numbered titles will be assigned to player A, even
numbered titles to player B.
Pop Up menu for play list
Load title into player
Play Title in Monitor Player
Remove title from play list
Delete title from hard drive
Add title to play list
Show File Info Box for marked file
Starts the file editor
Starts the BPM counter for this file
Opens the search dialog
Starts the normalize function
Exports a chosen file into WAVE, or MP-3 format
Exchange the artist or title in the ID-3 tag
deletes cue points, fades, and play counter
Starts the BPM Print Designer
Open program options dialog
22
Play List, Preview Player
3.03.3. Adjustable Column Width
and Content
The columns in the play list can freely be resized,
or assigned to fields of the ID-3 tag. For example
you can display annotations in place of the
version, and reduce the column width for artist.
To change a column’s width, point the mouse
pointer into the head row between to columns. It
will change into a bi-directional arrow. Now click,
hold, and move to your liking.
BPM Studio
The content of a column can be changed as
follows:
Right click into the head row of the column you
want to change.
Here
you
can
choose what content
should be displayed
in this column. With
the “Align” function,
you can set the
justification of this
column to left or
right.
With “Reset”, you
can restore the
default settings. This
is especially useful if
a column has accidentally been deleted.
Drag&Drop:
Refer to chapter 4.4. (How to work with play lists),
for a detailed description of BPM Studios
drag&drop functionality.
3.4. Preview Player
Preview players are
used to screen titles,
marked in the play list.
If the “double click loads
player” is disabled in program options, a simple
double click on a play list entry will start or stop
the preview player. To the right of the player a
small peak level indicator is located.
The player’s display optionally indicates elapsed
time, remaining time, or number of titles in play
list.
Preview player controls:
Jump to previous list title
Play
Stop
Jump to next list title
Position slider
Actual play time
The archives preview player can also be
controlled with the sample player keys <,
0, and >. Where < serves as BACK, > as
FORWARD, and 0 as START, and STOP
23
BPM Studio
File- and playlist archive
3.5. File- and playlist archive
The many available features of the file and play
list archive make it a ideal tool to manage your
titles, play lists, and programs, and program
archives.
3.05.1 File Archive
By clicking the
button in the lower area
of mixer, and CD player interface, you can change
into the archive mode. The master archive,
containing all mp-3 files on your system can be
accessed with the
button. Here titles
This can also be accomplished by using File
Archive’s pop up menu. Once available files have
been imported, they can conveniently be dragged,
and dropped within categories. (Be reminded
though that this will only change a files list
position, not it’s location on your hard drive!) This
allows convenient, most simple sorting, and
archiving of your titles.
Also by dragging and dropping, audio files are
added to, and positioned in play lists. More
functions are available with following buttons:
removes marked files
can be categorized by genre, release date, dance
style or other criteria. BPM Studio does not limit
the number of categories, and sub categories to
be created. They will be displayed in the left-hand
window of file archives. The right hand window
shows the content of these categories, like titles,
performers, BPM (if available), and play time.
selects all files in a list
When creating categories, do not use special
characters like / or \. Windows will interpret these
as sub-directories, which may cause difficulties.
opens the File Info Box
The buttons
and
inverts the selection
cancels the selection
automatic sorting
opens title search dialog
allow you to import
titles from your hard drives into these categories.
When creating categories, do not use
special characters like / or \. Windows will
interpret these as sub-directories, which
may cause difficulties.
24
Automatic sorting creates a new file
archive structure with all ar tists as
categories, and CD names as sub
categories. Clicking on this button again
will switch back to the previous view.
BPM Studio
File- and playlist archive
Pop up menu in category list
Creates a new category
Adds a new sub category
Removes a category
Renames the category
Delete a category’s content
Display all categories
Closes all categories
Opens the search dialog
Adds files to a certain category
Updates the archive (See additional functions)
Back up / restore your files
Starts the normalize function
Activate/deactivate automatic sort function
Starts the BPM Print Designer
Open program options dialog
Pop up menu in both archives title lists
Plays with monitor-player
Remove title from list
Delete title from hard drive
Add titles
Opens the File Info Box
Opens the file editor
Starts BPM Counter
Opens the search dialog
Starts the normalize function
Export file as wave or MP3
Resets Cue, fades, play counter
Starts BPM Print Designer
Open program options dialog
25
BPM Studio
File- and playlist archive
3.05.2 Play list Archive
The play list archive is used to conveniently
manage play lists of, for example, events,
programs, or artists. All play lists can be stored
in flexible categories. Loading complete play lists
into the player is accomplished by using the same
drag & drop functionality as with a single title.
You can access the play list archive by clicking
on
(If you want to access play list
archive from Mixer or Player, you have to switch
to archive mode first by clicking
Not like in file archive, the title sequence will not
be changed, and titles can be positioned at
multiple locations if they are to be played more
than once. With dragging and dropping, parts of
play lists can be copied and pasted in another
list, or as new selection. Buttons in the lower row
of the archive, function the same as buttons
described in 3.5.1.
3.05.3. Play List History Function
BPM Studio automatically creates a “PLAYED
SONGS” category. In this category play logs will
be created containing information about what
titles have been played on a particular date. This
allows you to analyze successful events, and to
reuse parts of them at another occasion – simply
by dragging and dropping. Also, printing of lists
of played titles for license royalty payments, or
event promoter billing, are no problem with BPM
Print Designer.
Pop up menu of Category list
Create new category
Add new play list
Remove category, or play list
Rename category, or play list
Delete content of category
Show all sub-categories
Close all sub-categories
Open search dialog
Add files to list
Start BPM Print Designer
Open Program Options Dialog
26
BPM Studio
File- and playlist archive
Monitor switch for player A
and B. If the monitor player
has it’s own sound card
assigned, and monitor functions are enabled in
the systems options ( I/O register tab), player A
and B output can be configured on monitor out.
In the right lower
corner of the file
archive a status
display, and another preview player, for screening
of selected titles, can be found. In the status
display the number of titles in the current play list
is indicated.
3.05.4. Adjustable column width,
and contents
(File Archive and Play List Archive)
The columns in the play list can now be assigned
to ID3 tag fields, and resized. For example, assign
annotations to the field that displays the version
number, or resize the column for the artist’s name.
This way you can configure File Archive to best
suit your needs.
To change a column width, move your mouse
pointer over the line between two columns in the
head row of a play list. The mouse pointer will
change into a bi-directional arrow. Click and hold,
and move the line to your liking.
The information a column contains can be
changed as follows: Right click the column you
wish to modify in the head row, a pop up menu
will appear.
In this pop up
menu chose what
information your
column
is
supposed
to
display.
The
“ALIGNMENT”
option allows you
to choose the
c o l u m n s
justification, right
or left aligned.
With “RESET”,
you can restore
the
default
settings. This is particularly useful, if a column
has been deleted by accident.
3.05.5. Sorting Order
(Only File Archive)
Titles in File Archive are arranged in alphabetical
order. By double clicking into a head row, titles
will arranged in order of this columns content. A
little arrow in the head row marks this column.
27
BPM Studio
Loop Sampler
3.06. Loop Sampler
3.06.1. Using the Loop Sampler
Sample will be played into it’s original
direction
Sample will be played backwards
Sample will be played alternating
forward and backward
With the loop sampler it is possible to clip
sequences from the title playing in the according
player, quickly and efficiently; for fur ther
processing like editing, playing, or storing for later
use. For each player, a loop sampler is available,
which can be opened by clicking the
[LOOP] button.
Loop samplers are independent modules,
which do by no means hinder regular
operation of BPM Studio Pro. The operation mode
of loop samplers is indicated by a blinking, red
Sample will be played to monitor
channel, instead of player channel
Starts recording
Stops both playback and recording
Plays the sample
Opens a dialog box, to save sample
as file
In the “save file” dialog box, either wave or mp-3
file format can be chosen for the sample
dot in the player’s display, located between TIME
and PITCH/BPM. It can also be seen in the
resource meter of the loop sampler. A red dot
stands for recording, while a green dot means
playback.
In the program options, remote control unit tab,
the record, stop, and play functions of the loop
sampler can be assigned to the multi purpose
buttons
and
. Thus it is possible to
control loop samplers, without having to display
them.
Moves the start point
Moves samples endpoint
Adjusts output level
from –99.9 dB to 0 dB
You can drag and drop samples on a
player button.
28
Adjusts playback speed
in a range from –20% to +20%
BPM Studio
Sample Player
By utilizing the “+” and “-“ buttons, values can be
adjusted with millisecond accuracy. Adjustments
can also be made by utilizing the keyboard. The
tab key switches back and forth between the four
controllers. Cursor keys change values in
millisecond steps, and page up and /down apply
10-millisecond-steps.
3.06.2. The Loop Sampler Display
This display is divided in three parts. To the lower
left a resource meter for the sample buffer can
be found. The sample buffer is a reserved RAM
area of limited size. When exceeding this limit,
which is indicated by the resource meter, reaching
100%, the sample will randomly loop through, and
only the last recorded part not exceeding the
available, reserved memory will be recorded.
The display to the top right represents the sample
graphically. The display right below it shows the
following parameters:
- current volume
- current pitch
- Time difference between start of the
sample anddefined insertion point (P-IN)
- Time difference between start of the
sample and defined ending point. (P-OUT)
If you want to use the sample at a later
time, you have to save it to disk. When
dragging a sample on the player, and
dropping it, a merely temporary file will
be created.
3.07. Sample Player
The sample player can
manage up to 9 samples,
which are available for
immediate playback by
clicking the according
button.
A three color LED indicates
the player’s status. Green
stands for READY, the
sample player is ready to
go, orange stands for ready
in scratch mode. A red LED
indicates that the sample
player is loading data.
While loading, playback is
not possible.
The sample player consists of nine, numbered
buttons. Each one can be assigned to a particular
sample. The maximum sample length depends
on available RAM. If a button has a sample
assigned, the number on it appears raised. When
clicking this button, the assigned sample will be
played. When “SINGLE PLAY” in the program’s
pop up menu is deactivated, simultaneous
playback of more than one sample is possible.
Sample player has two different playback modes.
In start/stop mode, clicking on the button will start
the sample. Clicking on it again will stop it. When
in SCRATCH MODE, a button click will start the
sample, and every subsequent click will start it
anew. You can switch between these two modes
either in the pop up menu, or with the keyboards
scroll key.
The VOLUME control of the sample player allows
adjusting output volume independently from the
two player’s volume. With the PITCH control, the
sample’s playback speed can be smoothly
adjusted. By right clicking on the control you can
reset to the zero position.
29
BPM Studio
With the two
and
Sample Player
buttons, the sample
player output can be assigned to either player A,
or player B. This is only necessary though, if the
sample player does not have it’s own sound card
assigned, res., if only two output channels are
available. (Depending on hard and software outfit
of your system) When both players are used with
one sound card, these buttons are of no
importance. In the pop up menu a LOOP function
can be activated, that will play the sample until
the assigned number key is clicked again. The
pop up menu is opened by right clicking a number
key (
3.07.1. Editing Samples, and Assigning
them to Keys
There are two different ways to assign a sample
to a number key. Either in the pop up menu, or by
dragging it from a play list or the BPM File Archive,
or with the sample editor.
If a sample exceeds the allowable file length of
20 seconds, it will automatically be reduced to
the allowable value when loaded.
).
Please be aware that you need at least
128 MB RAM, if you want to assign full
50 second length samples to all nine
channels.
Sample Player Popup Menu
Play sample (equivalent to clicking the button)
Activates / deactivates the loop function for this sample
Loads a audio file directly from your hard drive for this key
Removes assignment for this key
Deletes complete sample block 1 to 9
Opens File Info Box
Opens the File Editor
Opens the Sample Editor
Prevents simultaneous playback of several samples
Switches between scratch mode, and Start/Stop mode
Opens the Program Options Dialog
30
BPM Studio
Sample Editor
3.08. Sample Editor
The sample editor allows editing of all 9 channels
of the sample player. It is possible to make
adjustments like LOOP, VOLUME, PITCH FADE
IN, and FADE OUT.
The nine channels form a sample block, in which
any number, or all adjustments can be saved
as*.SMP-file by using the
button.
Deletes all files in the open
sample block
Adopts all current settings, and
closes the editor window.
Closes the sample editor,
discarding all current settings
3.08.1 Sample Block Functions
3.08.2 Sample Channel Functions
The buttons, located at the window’s bottom, refer
to the whole sample block.
Following settings will be adjusted for each
sample individually:
Opens a dialog box for loading
of previously saved sample
blocks
When LOOP function is active, (see also
sample player pop up menu) the sample
will be played in an endless loop.
Opens save dialog box
31
BPM Studio
Volume adjustment for
this sample
Pitch value adjustment
for this sample in a
range from –20% to
+20%
Defining the fade in time for this file
between 0 and 5 sec. (Depending on
file size)
Defining the fade out time for this file
between 0 and 5 sec. (Depending on
file size)
Sample Editor
Plays the sample on the monitor channel
Opens a dialog box for loading samples
into the sample channel. Previously
loaded file will be replaced.
Opens the File Editor, for even more
ways of manipulating this file. (Refer
to Editing MP-3 Files in file editor)
Use Sample Editor to save files that have
previously been assigned a key in the
sample block out of Loop Sampler.
All these functions can be easily reset to 0 by
right clicking into the green display, or on the
controls. All adjustments can be performed while
playing a file.
Popup Menu in Sample Editor
Plays a sample (same as clicking on PLAY button)
Activates / deactivates loop function for this button
Load a sample from harddisk
Deletes settings for this channel
Opens File Info Box for this file
Opens the File Editor for this sample
More information, current sound card test results, program updates, and frequently asked
questions can be found on our web site at www.alcatech.de
32
Cross Fader
BPM Studio
3.9. Cross Fader
The Cross-Fader is used
to fade between player A,
and player B. It can be set
to either manual, or
automatic mode. The
automatic mode can be
switched on and off, by
clicking the
button.
When automatic mode is
active, the fader will by
itself fade to the other
player, at the end of a title.
The fade sequence can
be adjusted in the pop up
menu of Cross-Fader, via
predefined fades, or by
moving the pre set red and blue curve with your
mouse pointer. Dragging and dropping assigns
a fade to a title. It will always be assigned to the
title’s end. All subsequent titles in the play list will
now have the same fade effect assigned; up the
point where another effect is assigned to a title.
Titles in the play list with assigned fades are
marked with a blue underline. If a already
assigned fade is supposed to be modified, the
edited fade needs to be reconfirmed by dragging
and dropping again. This prevents unwanted
overwriting of already assigned fades. All fades
will be stored in the play list file.
A red, blinking button, in the upper left-hand
corner of the display indicates active auto mode.
It will automatically be deactivated as soon as
the buttons [CUE], [CUE/PLAY], or [START/
STOP] are clicked in either player. With the
button, the fade can be initiated ahead of time,
by using the current titles assigned fade.
When auto mode is not active, fade is initiated by
clicking the
button, it will be executed with
the predefined settings shown in the display. This
way it will always use the predefined settings, and
not the settings assigned to a particular file.
switches to single list view.
The fade duration is adjusted with the FADE TIME
control, where as, it is important to mind that this
refers to the whole time frame. Meaning, if the
window isn’t completely filled, the real fade time
shortens accordingly.
Adjusting fade time
A manually controlled fade can be created with
the MANUAL FADE control
Fader between player A and B
To the top right of the display, the balancing of
both channels while fading can be observed. The
vertical white line indicates the actual position
on the time axis.
In single play list mode,
the
Cross-Fader
appears in a modified
layout. Since this mode
is normally used during
auto fading, six pre
defined fade settings
have been added to
choose from. Also the
sliders allow for more
accurate adjustment. In
the bottom are you can switch back to dual list
button.
view by clicking the
33
BPM Studio
Cross Fader, BPM Counter
When using the MANUAL FADE control, the set fade mode is disregarded
Pop Up menu in Cross-Fader
Default fade mode
Fade modes 1 to 6
Arrests the display res. the edit field of Cross-Fader
Switches between clock, and fader interface
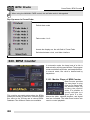
3.10. BPM Counter
In automatic mode, the base beat of a title is
determined by utilizing special filters. The program
measures these frequencies, and analyzes them.
In manual mode, the value is determined by
keystrokes.
3.10.1. Monitor Player of BPM Counter
This module accurately determines the BPMs
(beats-per-minute) of a title and, if desired, saves
this value to the ID3-tag and a internal BPMDatabase. Two different modes are available.
34
Beat Counter provides
it’s own player to play
titles to be measured,
the Monitor-Player. By
utilizing the position
slider it is possible to
quickly navigate to a
given point in a title.
Above the slider, elapsed playtime, and signal
level are indicated. The lower three buttons are
used to control playback.
BPM Studio
BPM Counter
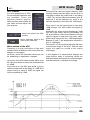
3.10.2. BPM Determining in Manual Mode
Switch
counter
to
manual. Start the title in
Monitor-Player.
Since it can happen that a title can not be correctly
displayed with a standard filter (e.g. red area
doesn’t blink, but stays red), this filter can be
modified. To do so, activate [Filter Correction] in
the lower left corner of the filter window.
The space key on your
keyboard will function as
trigger. Press it at every
occurring base beat.
The program now
counts every base
beat, indicating so by
a red, blinking field. If
no
input
is
recognized for more than two seconds, the
counter will reset to 0.
Watch the displayed BPM value. Once it stops
increasing, you can leave the BPM counter by
clicking the [OK] button. The determined value
will be entered into the BPM database, and
displayed in the play list
Upon starting analyzing, you can now adjust the
filter frequency range, so that the red area will
blink exactly once per beat, and thus will provide
clean results.
The horizontal bar can be modified in position,
and width, thus changing the filter curve. The
ver tical slider changes the filter intensity
(Amplitude). The so created frequency range will
be displayed visually.
After this process is complete the determined
values will be entered into the ID3 tag, added to
the internal BPM Database, and indicated in the
play list.
3.10.3. BPM Determining in Auto Mode
Switch counter to Auto.
Confirm by either clicking
the [star t] button, or
starting a title in Monitor Player. The module will
now analyze the title using the same procedure
as the automatic beat counters in the players.
Independent of these though, the beat of a title
will be filtered, and analyzed. Now watch the BPM
display, and the red area. When the shown value
does not increase anymore, and the blinking is
completely synchronized with the title’s beat, it
can be assumed that the beat value has been
accurately determined.
35
BPM Studio
File Editor
3.11. File Editor
With the file editor it is possible to cut sequences
out of a file, or to set cue points with single beat
accuracy. All applied settings like volume, pitch
control, cue in, and cue out will be detected by
the players and applied, and can also be saved
in Play Lists.
3.11.1. Loading and displaying a Title
Once loaded the file will be graphically displayed.
The field editor consists of two windows, of which
the lower one always displays the file in it’s whole
length. This way you always have a complete
overview of the file, and are able to quickly
navigate within it. The top window is used to edit,
set cue- start- and endpoints, or to select a certain
area for export to a file.
When loading an audio file for the first time,
initially, peaks will be created, and saved.
3.11.2. Adjusting Display Range
This procedure does not make any changes to
the file, it remains in it’s original condition. Peaks
will be stored on the local hard drive. In program
options, you can define if these peaks are to be
deleted after your done working with the program
(more storage efficient), or if they should be saved.
(More time efficient)
36
There are two ways of modifying the top part of
the window:
Either adjust
the width, or
move
the
area bar back
and
for th
between the
BPM Studio
File Editor
bottom, and upper window. The upper window
always shows the area, marked in the lower
window.
When marking areas
with the magnifying
function by right
clicking and moving the
mouse pointer, the
inverted area will be
magnified,
and
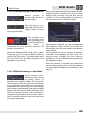
displayed in both windows. The area selection can
be made on both windows.
By double clicking into the inverted area you can
switch between zoomed and overall view.
The Toolbar
Stops playback in file editor
Starts playback in file editor
Jumps to beginning of selected area. If
no area selected, jumps to title start, if
playback is stopped, sets locator back
to title start
Plays marked area in a endless loop
Assigns magnifier function to right
mouse button
3.11.3. Marking ranges, and exporting
into files
Displays the audio file in wave format
Deactivate the magnifier function
Displays audio file as dots
, and mark
an area in the upper or lower window by holding
right mouse button and moving. The marked area
will appear red. To
modify keep right
mouse
button
pressed, to open pop
up menu, with options
like zoom, play, and
save as *.wav or
*.mp3 single right click. Save as file, if you wish
to work with selection at a later point.
3.11.5. Functions of different markers
The file editor recognizes four different markers,
which can be used to mark different positions or
areas within an audio file. All markers can be
edited via pop up menu in the in the marker row,
or moved with the mouse pointer.
3.11.4. Adjusting volume and pitch
The volume control
allows to set output
volume between –20 to
0 dB
The pitch range can be
modified by +/- 20%
The red locator – indicates the current play
and pause positions, and can equals the position
sliders in players, and Monitor Players. This
marker can be positioned by left click.
The + and – keys allow fine adjusting these values.
They will be saved, and applied when loading file
into player. The set pitch value will be added on
top of the value the player is set for.
37
BPM Studio
File Editor
The blue entrance and end markers –
mark the beginning and end of a title. They, also,
can be moved either with the mouse pointer, or
via pop up menu. Once placed, the position slider
in the players will use these markers as new start
and endpoint of a title.
The yellow cue point markers – indicate cue
points. They also can be moved with the mouse
pointer. Via the pop up menu in the marker row,
additional cue points can be inserted
The blue cue point marker – indicates the
Since players have only one CUE and CUP
button, one of these points will be defined as
standard cue
point. This
point will be
used
as
d e f a u l t
whenever CUE or CUP is clicked. To manage cue
points, the file editors cue point list, in the upper
right corner is used. Here the cue points are listed
with their exact location (1/1000sec. Accuracy)
The current cue point is marked with a blue bar.
When playing the title in the field editor, this bar
travels, and always indicates the last passed cue
point.
active cue point. The active point is defined by
either in the cue point list to the top right, the pop
up menu, or the CUP button in the player.
Adds a cue point
Deletes selected cue point
3.11.7. Working with cue points
A cue point is a position within a title recognized
by players as start point. The CUE button in
players navigates to these points, and the CUP
button starts playback from this point on. (Equal
to CUE and PLAY) The file editor can assign up
to nine cue points within each title.
Defines selected cue point as standard
Plays title form selected cue point on, places
locator to selected cue point
Ex version 4.2 of BPM Studio the cue points defined within the File Editor are also
wrapped as DirectCue points when loading the title.
Marker Row Popup Menu
Defines current cuepoint as standard
Deletes current cuepoint
Places start marker at this position
Places endmarker at this position.
38
File Info Box
BPM Studio
3.12. File Info Box
The “GENRE”
field generates a
drop down menu,
allowing you to
assign titles to
different styles.
This way you can
categorize titles,
which allows for
convenient searching later on.
The File Info Box allows editing the entire ID3
tag. In the program options you can choose to
save this information in the new ID3v3 format, or
to keep the old ID3 format. If the File Info Box is
opened from multiple selections, an additional
drop down menu appears, allowing you to select,
and edit particular titles.
If you want to change an entry for all selected
titles mark the related checkbox for this entry and
confirm with OK.
Confirms changes
Cancels without saving changes
Retrieves additional information if
the file has been ripped from CD
by using CD-at-once. This button
only appears if the whole CD has been ripped as
one title
Starts the BPM Counter for that
title
Opens this title in file editor.
39
BPM Studio
Mixer
3.13. Mixer
The Mixer contains of four components, which
are displayed as pairs. In standard view, to the
left the audio channels are located, and the
equalizer to the right. In the master channel (sum
of all audio signal sources) a Compressor /
limiter module (AGC – Automatic-Gain-Control)
can be switched into the channel, by clicking the
button, below the master volume control.
Optionally the equalizer display can be replaced
with the recorder by clicking the
button.
The mixer merges all internal, and external audio
sources. For players A and B, and the CD-ROM
drive frequency ranges can be adjusted and
corrected. The AGC is responsible for a steady,
constant output level, and prevents through a
limiter overload of the connected PA system. With
the Recorder it is possible to record the audio
signal from an external audio source (MIC or
LINE IN). Recordings can also be done from the
currently loaded program of both players.
Recordings can be saved as either *.mp3 or *.wav
files, or they can also be sent to a streaming
server.
3.13.1. Audio Channels
Level indicators can be turned off in the
program options. This saves system
resources.
40
The audio mixer has four internal
stereo inputs (Players A and B,
CD-ROM drive, and Sampler),
and two stereo outputs (Master,
Monitor). The recorder supports
two sound card inputs (MIC and
LINE IN). The level control allows
adjusting the volume for every
single stereo channel separately.
A level indicator to the right of
the control indicates the volume.
The dB values of the individual
channels are indicated to the top
right. Using the panning field to the top right, the
channel balance can be shifted. A right click
resets to zero. Channels can be muted by clicking
the [MUTE] button.
BPM Studio
MIxer
Each input channel’s monitor button (Players A
and B, CD-ROM, and Sampler), allows to route
the audio signal through the MONITOR output
channel, where it can be played independently
from titles currently played by the players. This
requires of course that the monitor options are
enabled in the program options, and that the
monitor has disposition over it’s own sound card.
To the left of the channel designation beat displays
for every input channel can be found. The
MASTER-Output controls the overall volume of
all four input channels. Located close by, is the
AGC Module button, indicating by a little LED in
it’s center if it is active or not.
All control can be reset to a value of –1.0dB by
simply right clicking on them.
permanently, the overall amplification of the
equalizer is set to high, which can cause
distor tions. In this case it is recommended
activate the PREAMP (Limiter) function, or to
make according adjustments to the equalizer
settings.
The to start the recorder click on the
button
3.13.3. Loading and Storing Equalizer
Settings
BPM Studio supports loading and saving of as
many different equalizer settings as you like. Also,
predefined templates are available. To manage
your settings use the “Presets” function in the
equalizer’s pop up menu.
3.13.2. The Equalizer
The equalizer is used to adjust and correct
frequency ranges of Players A, B, and the CD
player. Individual player settings can be opened
by clicking buttons
, and be
activated and deactivated by clicking
. The
controls allow to adjust every single one of all 14
frequency ranges individually. These settings are
graphically displayed in a curve, located in the
display above the controls. By right clicking into
button, this curve
the display, or a click on the
will be reset to linear frequency ranges.
If the red OVERFLOW LED comes one
41
BPM Studio
Mixer
The Equalizer Popup Menu
Limiter function
Signal Subsidizing
Opens the equalizer settings menu
Resets settings back to zero
Displays the Program Options
3.13.4. Recorder
in WAVE or MP3 format, a dialog box will appear
asking you to define name, and in what directory
this file should be saved.
automatically
starts recording, if a predefined input starts to
receive audio data.
The
button in the equalizer opens the
recorder. The MIC and LINE controls are used to
manipulate two input signals of any sound card.
Too choose a sound card use the controls pop
up menu. Also, the MP3-Stream-Module can be
chosen there. The RECORD IN control is used to
manipulate the overall recording, and transmitting
level.
The
button starts recording, res.
transmitting. The
button allows to
adjust recording levels before doing so. The
current recording is marked by a red dot, and a
counting elapsed time counter (
).
Ends recording. If you have recorded
42
In the menu point “RECORDING FORMAT” you
can determine to what file type your audio data
is to be converted. Available are WAVE format
(resource efficient), MP3 file (storage capacity
efficient), MP3 Stream to a streaming server, or
output to a Visualizations Plugins interface.
Streaming module and visualization interface are
subject another point in this manual. The
button leads back to equalizer.
BPM Studio
Mixer, AGC
Recorder Popup menu
Select sound card for recording
Select file format fore recording
Dialog for program options
Save settings
Opens search dialog
System functions
Exit BPM Studio
To record a current program, all virtual devices need to be assigned to the same, duplex
capable, sound card. The windows mixer settings for this card need to be set on enable
WAVE recording and LOOP functions. And this card needs to be chosen as recording
device in the RECORDER field.
3.13.5. Compressor/Limiter (AGC)
Especially when recording MP3 files serious
differences in volume level may occur. Reason
for this are usually differently mastered CDs, or
deferring encoding parameters, when different
encoding software is used. The AGC module
compensates these differences in real time, and
provides a stable audio output signal. The module
can be adjusted in three level-, and two time
parameters.
The AGC-Modul is developed primary for
using with background music or predefined playlists. So this module will be
work only in Autofade Mode in the current
program version.
43
BPM Studio
AGC
Threshold
(Adjustment level –60 to 0 dB)
This parameter defines the trigger level of the
control. Soft passages or silence at the beginning
and end of a title will not be changed to avoid
negative impact on a titles total dynamic. This
also prevents unwanted increasing and amplifying
of unwanted background noise.
Limiter
(Adjustment level –18 to 0 dB)
The limiter restricts levels at very short reaction
time. It’s purpose is to restrict the signal level, to
protect devices in the following signal course like
external mixers, cross overs, output stages, and
speakers from over modulation and overloading.
Below it’s predefined trigger level it stays inactive.
Target
(Adjustment level –21 to -3 dB)
This is the predefined target output level. AGC
will try to raise or lower every level that is louder
or quieter than the threshold level.
Input / Output
(Adjustment level –12 to 12 dB)
These two controls allow a linear adjustment of
input and output signal. The displayed bars
represent signal level before and after the change.
Scope
(Adjustment level 0 to 21 dB)
This value defines the max. amplification or
diminution, thus defining the intensity of the
control. If, for example, a peak level exceeds more
than the scope value over the target, it will only
be decreased by the max. Scope value.
Attack
(Adjustment level from 1 to 500ms)
With this parameter the latency of this control can
be adjusted. Peak levels lasting shorter than this
value, will not be recognized by the AGC.
Release
(Adjustment level 1 to 500ms)
This parameter defines how long it takes for the
intervention to abate res. how long it takes to go
back to regular output level.
The Limiter also allows to restrict very
short peak levels, which the AGC would
not address, since the AGC response time
is way shor ter than the duration of
exposure it would take to overmodulate,
or even damage equipment.
44
Displays within the AGC Module
The display within the AGC modules consists of
the compressor display (left), and the limiter
display (right). If the amplification indicator is
positioned in the center, the signal
loops through the AGC module
without modification. If the indicator
travels below the zero level, the input
signal is too strong, and is weakened
by the module in accordance with
predefined parameters. Vice Versa,
the signal will be amplified, if the
indicator travels above the zero level.
The red bar in the top right hand
corner indicates the trigger level of
the limiter. The peak level at the
AGC’s signal output is marked in
yellow. As long as this marker moves
below the red area, no modifications
will be applied. Should this marker touch the red
area, the signal will rapidly be lowered to the
defined maximum peak level.
The AGC only works in the auto fade
mode. Even if the AGC is active, it will not
be of any effect if auto fade is not active.
BPM Studio
AGC
AGC Presets
For quick deployment of AGC,
five pre defined parameter sets
are available. These are
adjusted situation specific.
Select a preset most suitable for
your need, and fine adjust it for
your purpose.
starts and stops the AGC
module
Mixer switches back to the
mixer audio channels.
Work method of the AGC
Following is a quick description of the work
method of AGC at different input levels. (See also
diagram on next page)
All shown values are standard values and can
be, depending on application, changed.
Up to point A the AGC does not take effect, since
the input level does not reach the threshold level
of –42dB.
From point A on, the AGC gets active, trying to
raise the output level to the target of –15dB since
scope is set to a value of 15dB, the signal can
only be amplified by 15dB.
From point B on, the input signal is less den 15dB
(Scope) smaller than the target, and the AGC is
now able to define the output level to accurately
–15dB. The volume difference between point B,
and point C will be balanced out, since in any
case the deviation is less than the 15dB scope.
From point C on the input signal is more than
15dB stronger. The AGC lowers the signal by
15dB.
Meanwhile the output signal exceeds the 10dB
limit set by the limiter, and will immediately cut
off. At point D then, the volume difference of input
signal to target is lower than the scope value,
and the AGC can level to the –15dB target again.
Between E and F, the amplification reaches it’s
limit of 15dB again.
From point F on, the input level will again fall short
of the action range of the AGC, and the input
signal will again be routed to the output
unchanged.
In this diagram it is assumed that changes are
made without delay. If according values are
defined for attack and release, the controls triggerand fade behavior is delayed accordingly.
45
BPM Studio
MP3 Streaming Modul
3.14. MP3 Streaming Modul
This module allows you to directly send an MP3
stream
in
an
internal network, or
to a streaming
ser ver
in
the
Inter net.
The
streaming module appears automatically, if you
select “Streaming” in the recorders pop up menu.
You can hide the module by clicking in its top
right corner, and reopen it by clicking the
according icon in the task bar. Anyway, it stays
active as long “Streaming” is selected as
recording format in the recorders pop up menu.
In this field the file format for the stream can be
defined. Please select these settings in
consideration of your available bandwidth.
With the two SET buttons settings for server and
file format can be defined. These settings have
to match the settings of the stream-server.
Currently supported protocols are Shoutcast and
Icecast.
This field indicates the current server. The set
button opens the server settings dialog, where
various configurations can be created and stored.
PROFILES:
Allows naming and saving of different
configurations
SERVER:
Define URL: or IP Address of the selected stream
server
PORT, PASSWORD:
Are also to be defined in accordance with the
stream server’s settings.
46
BPM Studio
MP3 Streaming Modul
Use the check marks to select the desired transfer
protocol Shoutcast and Icecast are currently used
by the stream server providers shoutcast.com and
icecast.com. These are free for noncommercial
use. More information can be obtained on the
according web sites. The following informations
are used to publish your “radio station” in server
directories.
If the two [AUTO]-checkboxes are marked, the
actual title and URL will be adopted from BPM
Studio (provided auto fade is active) and the
server settings dialog, and entered into the
directory.
Opens the web browser and
navigates to the servers status
page
Establishes connection to the
server
Terminates the connection to
the stream server. (This should
always be done before exiting
if you have checked the “Public Server” check
box.
BPM Studio)
Send Meta info causes title- and artist name to
be sent along
This information is sent parallel to your MP-3
stream. You can enter e.g. the title of your show,
and your web URL:
Even with marked AUTO checkbox,
title information will only be sent
properly, if auto fade mode is active.
47
BPM Studio
CD Player / CD Writer
3.15. CD Player / CD Writer
The CD player / CD-writer provides all functions
necessary to work with CDs. Here, reading in
CDs, and compressing to MP3 for mat is
accomplished. You can also burn titles on CD-Rs
as audio CD to be played with conventional CD
players, or as data CD for back up purposes.
To do so, three different modules are available:
,
and
, with buttons located in the center
area of the CD player.
):
With this module, also called CD Player, you can
use your CD-ROM drive as fully functional audio
CD player. All functions like Pitch, Master-Speed,
Pitch Bend, Cue-Points, etc. are available without
restrictions. The playback can be routed through
a separate sound card channel, and will be treated
as separate audio channel in the mixer. Also, MP3
files can be played with this player. Simply drag a
title out of a Play List or archive, and drop it on
the CD player; and use it this way conveniently
as Monitor Player!
3.15.1. CD-Reader (
Whenever an audio track is loaded in
one of the players the CD ROM drive
will be locked. It can be unlocked by
either choosing “Remove” in the
players pop up menu, or by pressing
the eject button.
48
The Play List and the player module are similar
in structure and handling to the two main players
and the Play Lists.
The CD-Reader also functions as device for
reading in audio CDs, and copying them to hard
drive. Read also in chapter 4 step-by step
instructions for copying, and compressing audio
CDs.
3.15.2. Encoding audio CDs
Generally encoding (compressing into MP3
format) can be done in two different ways. Either
by saving an audio file in WAVE format and later
on conversion or by immediate compression to
MP3 while reading in. This choice is made in the
Program Options, on the register tab CDDA-Copy
/ Configuration /
. If this
checkbox is marked, copying and encoding will
be done in a one step process. When
compressing large numbers of audio CDs it is
recommended to read all of these in, in highspeed mode as wave format, and then batch
compress them in Encoder Mode over night, for
example.
The CD Player also supports MP3, and
WAVE formats, thus, it can be used as
third MP3 player, or as convenient
preview player.
BPM Studio
CD Player / CD Writer
3.15.3. CDDB-Query
3.15.4. Copying Audio CDs (Ripping):
Upon inserting an audio CD in the CD-ROM drive,
the titles in the Play List will appear as numbered
After successful CDDB query all CD titles will be
displayed in the Play List.
tracks. Now click the
button.
Provided so configured in windows, the PC will
connect to the Internet, logs on to the CDDB
(database for administration of title information
of audio CDs) and attempts to find information
about the inserted CD.
If successful the information will be transmitted,
and displayed in the Play List. These informations
will also be saved on your PC, so that they’ll be
available when this CD is inserted again.
If no information has been available for this CD
in the CDDB database, you can now enter it
manually in the File Info Box.
Now mark the titles to be read in with the lefthand check box, and click on
Query for several CDs (Batch-Function):
As soon as an audio CD is inserted, BPM Studio
will store the CD code. With the next CDDB query,
it will be attempted to retrieve all information, for
CDs not yet identified. You can save time, by
inserting audio CDs, wait till their track numbers
are displayed, and then click on the CDDB query
button
All marked titles will now be read in. Progress is
displayed in a status window.
. Now all title lists of these
CDs (if available) will be retrieved, and be
available when the CD is inserted again. After
completion the Internet connection will be
terminated. You can also establish the connection
manually via the pop up menu of the CDDB –
button. On the CDDA-Copy register tab in
Program Options different CDDB servers can be
selected.
Information downloaded from the
CDDB server will be stored by BPM
Studio, and will be available without
being online.
It is mandatory to enter title information
manually, or to download it from CDDB,
BEFORE titles are being ripped.
Otherwise BPM Studio can only use
CD-Code, and track numbers as file
name.
49
BPM Studio
CD Player / CD Writer
If the “encode during copy” function, on the CDDA
register tab of Program Options is active, read
in titles will immediately compressed into the MP3
format, and stored in the according folder. This
folder can be defined in the “storing” register tab
in Program Options.
After successful encoding all titles will
automatically be listed in the “NEW FILES” or
“NEUE DATEIEN” category of file archive. For
more clearness a subfolder for the current date
will be created. (See picture on top of page)
3.15.5. “CD at once” Mode of CD player
The “CD at once” mode allows to rip and archive
a whole CD as one single title. This is useful if
you, for example, want to read in a mixed CD
seamlessly, to replay it as a single title later on.
Also when reading in particular albums, of which
the title order needs to stay unchanged, it makes
sense to read in the CD in one piece. To do so
start the copying process with the pop up menu
(right mouse button) of the
button.
whole title list of the original CD can be displayed,
provided it has been ripped with the “CD-at-once”
mode.
It is also possible to select single titles with the
Player or the remote control unit (only RCP-1001
and 2001) directly.
If you click the track buttons of Player with the
right mouse button, the next title (or previous)
within one of these “CD-at-once” titles will be
started.
Equally you can use the track selector buttons
[12] of the remote control units RCP-1001, and
RCP-2001 to navigate within one of these CDat-once tracks by pushing, and turning it at the
same time. The subtitles will then shown in the
VFD display
3.15.6. Encoder (
All titles will be ripped as single track, and also
added to the file archive as single title.
But information about single titles won’t be lost!
The button “MORE”, in the File Info Box, the
50
):
The encoder converts WAVE files Info the MP3
format. Here you will find all previously read in
audio-CDs, if you do not have activated the
“COPY/ENCODE” option in the Program Options,
before ripping. Also, the encoder can convert
other, already present WAVE files, that have been
ripped with other programs. Simply drag them out
f the Windows Explorer, and drop them on the
encoder Play List, or, add with the
button.
BPM Studio
CD Player / CD Writer
For screening, and controlling also the CD Player
can be used. The files can be played, controlled,
and edited with the File-Editor. Following, the
marked part will be transferred to the MP3 format
by clicking the
button.
After compression is completed, you’ll find a new
entry in the BPM file archive under NEW FILES
with the actual date, in which the compressed
files are being stored. This folder can be renamed
with the RENAME button, or you can assign those
titles to other present categories.
Eject button opens and closes the
selected CD-ROM drive.
CD-ROM Selection field. Here
you can select the CD-ROM drive
to be displayed.
Starts copying selected titles.
By right clicking you can open
a pop up menu, allowing you
to copy a whole CD as CD-at-once track
3.15.7. CD-Writer (
):
Produce your own audio CDs with your own mix
or compilation - all with only one program: BPM
Studio.
The integrated burner supports all common CD
writers and media. Even burning MP3 files is no
problem. Thus you can conveniently create
backup copies, and quickly transfer play lists with
the according tracks to another system.
Before you start to create CDs, we recommend
that you make yourself familiar with the handling
of CD-R's, and CD-RW's. Also check the CD
Writer settings on the according register tab in
the Program Options. In this manual, chapter
Program Options, you'll find all impor tant
instructions and explanations to optimally
configure your CD Recorder. Once set up, the
BPM Studio CD writer allows you to very simply
and quickly create Audio- and Data-CDs.
Generally start a new CD project with the
button. In the following dialog you can decide
whether to create a Data- or a Audio-CD:
Starts the CDDB-Inquiry. The
right click pop up menu allows
you to manually establish a
connection to the Internet, if a connection is
available in the Windows system settings.
(Only active in the Encoder)
Starts the encoding procedure
for selected titles.
51
BPM Studio
3.15.8. Creating Audio CDs
Select this mode if you want to create a CD that
can be played with any common CD player or
changer. The maximum play length depends on
the type of media you use, and vary between 74
and 80 minutes.
After confirming the dialog box by clicking
[OK] the selected CD format will be
displayed in the track list status bar.
Place the media to be recorded into the
Recorder. The CD status indicator below
the track list gives you information about
this media, and the
Recorder itself.
Now you can load any title or whole Play
Lists in the writers track list. This can be
done in different ways
1.)
Drag & Drop from the from Play Lists, file
archive, or Play List archive.
2.)
Via the clipboard, with “copy” and “paste”
(Ctrl – C / Ctrl – V)
3.)
With the
CD Player / CD Writer
(Pay attention not to exceeding the media’s
maximum play length when assembling the title
list. If you do, an according message will warn
you before the write process.)
The title order can be modified by Drag&Drop.
Start writing with the
button. In the
following dialog fields, progress can be monitored,
and modified.
At first, the Cue-Sheet will be created. It contains
information that will be written onto the media
parallel to the audio data, such as starting points,
title length and (if the Recorder supports this
function) CD text information. Upon completion,
a dialog with the calculated data will appear.
button you can load any Play
List present on the hard drive.
4.)
With the
button you can selected
tracks directly from your hard drive.
The status bar to the left indicates overall length
of the CD. Additionally a status bar below the track
list displays the remaining capacity of the media.
It is not necessary to convert MP3 files
into the WAVE format. All tracks can be
loaded into the writer as MP3s.
Decompression is done in real time
during the burn process.
52
Here you can check if all the data is correct, if so
confirm with [next] and start the writing process.
Of course you can still abort with [cancel]
Please avoid writing CDs over a network.
If you use BPM Studio in a network, the
CD Writer should be local, with the MP3
or WAVE files to be burned.
BPM Studio
CD Player / CD Writer
The following status windows keeps you informed
about the whole writing process
Now insert the media into the Recorder. The CD
status window to the right below the status bar
indicates, as when creating audio
CDs, the contents of the CD, and
the Recorder.
Now you can load selected titles, complete Play
Lists into the Recorder.
This can be done in various ways:
After successfully writing the CD, the drives slide
will open, and you can take out .the CD
3.15.9. Creating data CDs
Select this mode if you would like to copy MP3
files already present on your system to a CD, that
can later on be played on a PC with a standard
CD ROM drive installed. Thus, you can back up
files easily, or transfer them to another computer.
The maximum available drive capacity depends
on the used media, and usually varies between
650 to 700 MB.
Start a new CD project by clicking the
1.)
Drag & Drop from the from Play Lists,
file archive, or Play List archive.
2.)
Via the clipboard, with “copy”
and “paste” (Ctrl – C / Ctrl – V)
3.)
With the
button you can load
any Play List present on the hard drive.
4.)
With the
button you can selected
tracks directly from your hard drive.
The status bar to the left shows how much storage
space on the media is already in use. Additionally
a status bar to the right below the track list
indicates the required disk space. (Pay attention
not to exceed the media’s maximum play length
when assembling the title list. If you do, an
according message will warn you before the write
process.)
button. In the following dialog box select ‘DataCD”
Please make sure that with BPM Studio
only work you authored, or work of which
you are explicitly allowed by author or
someone in lieu, will be copied. Otherwise
you might commit the offense of copyright
fraud, which is a federal felony, or be held
liable by the author, or designated people
in lieu of.
The selected mode will be indicated in the status
bar to the left.
53
BPM Studio
CD Player / CD Writer
Start the writing process by clicking the
button. In the following dialog field you can control
the progress and manipulate the writing process.
Explanations of the according dialog boxes can
be found in the previous chapter “Audio-CD”
3.15.10. Systemtest in test mode
If you star t the writing process with the
button, it will only be simulated. Your
computer will perform all actions that it would
perform in a real write, with the exception that
the laser will be disabled. This is very useful to
test the system performance. The media will not
be changed in this mode.
3.15.11. Deleting CD-RW’s
(If supported by the Recorder)
If a CD-RW (CD rewriteable) already containing
data is inserted into the drive, you can delete this
data by clicking the
button.
Adding another Session:
(Data CD only)
You can add data to an unfinished media that
contains data already, in a new session. To do
so, the “import session” function on the CD-Writer
register tab in Program Options must be enabled.
When inserting such a media, the used storage
capacity will be indicated in the status bar.
Eject button opens the tray of the selected
Recorder.
Select Recorder field. Select here
which Recorder is to be used.
54
Important Note
A list of all supported CD Recorders can be found
in the version history, which is delivered with every
version of BPM Studio.
Please have understanding for the fact that we
can not support every CD Recorder on the market.
This is not the objective of BPM Studio, and it
does not claim to be a full-featured CD recording
program. Much more BPM Studio is primarily a
DJ system for live performing.
Please make sure that in case of problems with
burning CDs the first step should bee to reduce
the speed. Not every media can record at any
speed. Anyway you should disable auto load for
every available CD player; otherwise problems
may arise, especially when burning CDs.
Should there be any further problems consult the
following website:
http://www.disc4you.de/kompendien/cd/
(German)
http://www.brennmeister.com/articles/aspi/
(German)
http://www.ncf.carleton.ca/~aa571/aspi.htm
(English)
http://www.goldenhawk.com/firmware_body.html
(English)
We recommend paying especial attention to sites
concerning firmware upgrades, and ASPI drivers.
BPM Studio
BPM Print Designer
3.16. BPM Print Designer
Need to print a Play List? Need a printed summary
of a particular category, or complete archive? A
list of titles played last Saturday to report to the
promoter, or the GEMA? A taker asks for your
repertoire?
All this is no problem with the BPM Print Designer!
Printouts can be fitted to any need with extensive
selections of sorting orders, and a variety of
possible adjustments. Of course print previews
are also possible. To use lists in other programs,
they can be saved as text files, as well as in other
formats.
3.16.1. Starting BPM Print Designer
The BPM Print Designer can be started from
within File Archive, Play List Archive, or the
different Play Lists via the according pop up
menu entries.
Depending on selected category or Play List, up
to three selections can be made:
Print Group:
Titles of selected category will be adopted into
Print Designer for printout,
Print Group with Subgroups:
All titles in a selected category, including all
subcategories will be adopted into Print Designer
for printout.
Print Archive:
All titles of all categories, and subcategories will
be adopted into Print Designer
Now the main screen of Print Designer will be
displayed, with all selected titles. Here you have
the opportunity to make various adjustments, and
to choose which title information is to be printed.
55
BPM Studio
3.16.2. Export List Window
Selecting Fields to be Printed:
First select all fields that are to appear on the
printout. To do so, open the pull down menu
BPM Print Designer
Adjusting column width:
In the head row, click on the marker between two
columns:
Keep the mouse button pressed, and move the
pointer sideways.
And select the desired fields of the ID3 tag.
Change order of columns:
The head row of the title column can be dragged,
and inserted at a selected position:
Thus you can adjust the order of columns to your
liking.
By clicking into the bottom right corner
of BPM Print Designer, and holding the
mouse button, you can adjust the
window size of the main screen.
56
Thus the separator between two columns can be
moved, and the column width is adjusted.
Automatically adjust column width:
If you check the
checkbox, all
columns will be adjusted to the longest entry in
this column.
Selection of sorting order:
The titles to be printed can be sorted by any or
several columns. For a simple sort, by only one
column, just click on the head row of the column.
This row will be marked with a little arrow. With
another click in this column you can switch
between ascending, and descending order. The
arrow will indicate the selected order.
Another way to select the column by which to
sort is the pull down menu.
BPM Studio
BPM Print Designer
Multiple sorting:
Use this feature to define your sorting order by
more than one column. When check box
is selected, the arrow to indicate
sorting order changes to yellow, and will be
marked with a 1. Now you can select more
columns by holding down the ‘SHIFT” key, and
clicking on the selected columns. Additional
arrows will then be numbered in consecutive
order.
Exporting lists to file:
BPM Print Designer offers the
ability to export lists in various
formats for further processing
with other programs. For a list of available file
formats see screenshot. In the dialog box file
name, and target folder are entered. The pulldown
menu determines the file format.
The list will now be sorted by column 1, and
subsequently by column 2, and so on. Thus you
can, for example sort a list by artist, and within
the artist sort by release date. (See screenshot)
Modifying printout fonts:
The “FONT” button opens a
window in which, windows
compliant” font, style, size, and
color can be selected.
Print preview:
The “PREVIEW” button allows you
to switch between the main
screens column view, and the print
preview. When in preview mode, more features
are available to finish the document. Also a zoom
function is available.
Exiting BPM Print Designer:
The [EXIT] button exits the
module. All made adjustments,
and modifications in the Print
Designers options will be stored, and available
at next start. This makes it easy to print different
categories in the same design.
57
BPM Studio
BPM Print Designer
3.16.3. Print preview window:
The print preview is used to manipulate the overall
layout, and additional, useful information can be
added to the list.
Zoom functions:
Page layout adjustment, and additional
functions:
The “Settings” button opens a
fourfold toolbox. Here, the
following settings can be
adjusted:
Downsize the view in
steps
Register tab
“Page”:
Enlarge the view in steps
Direction: Define
if page is to be
printed on as
landscape
or
portray.
Zooms on whole Page
Zooms to fit page width
Navigating within several print pages:
Jumps to first Page
Jumps to previous page
Jumps to next page
Jumps to last page
58
Page setup: Here
the margins are
defined. You have
the possibility to
choose a measurement unit of your choice.
Stretch: List will be adjusted to the overall
page width.
BPM Studio
BPM Print Designer
Register tab
“Layout”:
Show title
Select if a page title
should be printed.
The following fields
you can enter a page
title, and choose a
font.
This button defines the justification of
the page title. (Aligned left, aligned
center, aligned right)
Show margins
Show margins in preview.
Show grid lines
Prints the lines between columns and rows of a
list.
Register
tab
“Head row”:
On
this
tab
settings for the
head rows of all
pages
are
entered. Analog to
this, on the forth
register tab the
footer settings are
defined.
Show Header
Select this check box if a head row should be
printed on every page. In the following fields, text
and font for this head row can be entered.
This button defines the justification of
the head row. (Aligned left, aligned
center, aligned right)
Additionally to the regular text, four
variables fields are available, which
will be updated while printing
{PAGES} automatically adds page numbers
{NUMPAGES} adds the number of pages
{DATE} Adds the current date
{TIME} Adds current time
Show Header Line
Prints a line between the head row and the page
title. In the following fields you can define color
and width of this line.
Register tab
“Footer”:
On this tab the
parameters for the
footer are entered.
Show footer:
Select this check
box if footer
should be printed
on every page. In
the
following
fields, text and font for this footer can be entered.
59
BPM Studio
This button defines the justification of
the footer. (Aligned left, aligned
center, aligned right)
Additionally to the regular text, 4 four
variables fields are available, which
will be updated while printing
{PAGES} automatically adds page numbers
{NUMPAGES} adds the number of pages
{DATE} Adds the current date
{TIME} Adds current time
Show Footer Line
Prints a line between the page content and the
footer. In the following fields you can define color
and width of this line.
BPM Print Designer, Server Components
Start printing:
The “PRINT” key starts
the print out. Before this
though, you can enter how
many pages, and copies of the document you
need.
The “Close’ button will lead you back to the export
list window, in case you wish to
make changes there.
If possible avoid printing and audio
playback at the same time. If the selected
printer should not be ready when the
printout is started, the windows time-out
may cause the playback to stop, and
interrupt communication with the remote
control unit.
3.17. BPM Studio Server Components
The BPM Studio server components are a
universal interface to control the most software
functions remotely. This functionality has been
developed mainly to be able to cross platform with
other programs. Since the interface is based on
open standards though, control is available via
standard protocols like HTTP or Telnet. This
enables you to control different workstations (PCs
with BPM Studio installed) that are located in
different rooms. If the server component is
activated (Register tab “Server” in Program
Options) BPM Studio will establish an HTTP- and
a Telnet-Server. The HTTP-server port and the
Telnet port are freely configurable. Be aware
though, that when controlling a component over
60
a network the reaction time on a released signal
may be delayed.
Both servers make many important functions
available via a command prompt or also as a URL.
Complete documentation is provided on the BPM
Studio Webser ver at http://localhost:port/
cmds.html
Please have understanding for the fact that only
limited support is available when implementing
this interface, especially in ver y specific
implementation cases.
BPM Studio
BPM Studio File Formats
3.18. BPM-Studio File Formats
This chapter is supposed to give you a better
understanding of the file formats, and endings
supported by BPM Studio. Some of them can be
deleted, for others it is recommended to leave
them on your hard drive.
*.~*:
Tilde files are created automatically as back ups
of all files of File- and Play List Archive. (Either
when exiting the program, or, when auto save is
active, every 15 minutes.
*.grp, *.idx, *.gps, *.plg, *.lst:
These files are used for the file- Play List archive.
The *.gps, and *.idx files contain information about
the structure of File- and Play List archive. For all
titles in a major category of the File Archive, a
[category name].grp file will be created containing
all title information for this category. The Play List
categories can be found in the *.plg files, and the
Play Lists are stored as *.lst files. These are
compatible with the directly store- and loadable
Play Lists.
*.scn:
Scan files will be created when needed by BPM
Studio to position exactly in VBR files or very long
MP3 files. They should not be deleted for:
eq.eqp:
File for equalizer presets
Bpm.set:
Encrypted file for user information
*.bml, colors.cfg:
This file contains the skins for BPM Studio. The
bitmaps are contained in the *.bml files, colors
are defined in the file colors.cfg.
*,cut:
The cut format is available in the editors export
function. In this case it is not the marked area
that will be saved, but the Cue-Points, and marker
information as links. Information that would
otherwise only be available in the Play List or the
file archive can be backed up separately this way.
1.)
The Cue-Points will not be restored correctly
since BPM Studio can’t jump to the exact
position, which can cause a “jump” after
addressing the Cue-Point.
2.)
The *.scn files in auto play mode would have
to be generated anew, to determine the
actual lenght of the title.
*.mem:
Files for the saved files for the sampler functions
of all files. (A.B.Exit-Loop)
*.cue:
Files for the Cue-Points of each file.
*.mem and *.cue files can be deleted. Of course
all Cue-Points of a loop will be lost, it still can be
useful to clean up every once in a while though
*.sdd:
Files for the peak files of the wave editor. They
serve the editor in navigating in, and loading of
files. These files can be deleted, the loading will
take longer though.
61
BPM Studio
Program Options
3.19. Program Options
From
any
given pop up
menu
via
options, the
programs basic settings can be opened. These
are split in 8 different areas, which can be selected
on the 8 different register tabs.
Presets – Language and Internet options
Options - General settings
Audio I/O – Sound card configuration
Storing – Defining directories
CDDA-Copy – Adjusting CD parameters
CD-Writer – Settings for CD-Recorder
Remote Control Unit – Configuring the remote
control unit
User – User administration
Server – Server components configuration
3.19.1 Preset –
Language and Internet
options
Language Pack:
Select here your language
preference. Should your
language not yet be
supported by BPM Studio
you can, provided you’re
interested, order our SDK
language pack, and create a
translation for your language.
Skin Pack:
Here you can select a skin.
The list will display all
available skins compatible
with this version of BPM
Studio installed in the folder
...\BPM Studio\Skins\. The
download area of the
ALCATech
website,
information about new or
updated skins can be obtained.
Pitch Range:
Defines the pitch area for sliders. This value will
be overwritten when clicking on one of the three
pitch area buttons. (see also 3.2./ player)
Bend Speed:
Defines the pitch bend area
62
Match Speed:
Defines the time for BPM match
Brake Speed:
Defines the time for the Brake function
Navigation:
Not all register tabs will
be shown, use these
buttons to navigate back
and forth
Program Options
BPM Studio
3.19.2. Options –
General Settings
Load Wave Files
Scans for WAVE files at
program starts, and loads
such files
Load Sub Directories
Program will load all
subsequent directories of a
selected folder
Soft Pitch and Bend
Changes
Allows for smooth operation
of the sliders, and simulates
the inertia of a vinyl album
when using pitch bend.
Double Click loads
Player
When double clicking a title in a Play List it will
not be loaded into the preview player, but into
the main player.
Ask before loading a player
Performs a security inquiry before the next title
will be loaded
optimize title transitions in auto fade mode. This
function will only work properly, if the title has
been edited with the normalize function from
version 4 on.
Check Play Lists when loading
When loading a Play List, presence of all list titles
on the hard drive will be confirmed.
Reload File in Single Play Mode
If Single Play is activated, the current track
will be repeated on end
Show Playlist Columns
Shows vertical lines in head rows, and Explorer
Blink Display before file is done
10 sec. prior to the end of the current title, the
display will blink in red.
Show Mixer Levels
Activates level indicator in Mixer. (Requires some
system resources)
Use Normalization if file is normalized
When check box is activated the settings of
the normalized audio file will be used;
otherwise they will be disregarded.
Show Mixer beats
Activates beat indicator in Mixer
Use Silence Detection in AutoPlay
When activated, possible silence at the end
of the title will be skipped. This is done to
Remove Files from Playlist if played
The title will automatically removed from the Play
List, once played.
63
BPM Studio
Auto Cue (Skip Silence)
Possible silence at the beginning of the title will
be skipped
Auto BPM
Activates the automatic beat counter in the payers
Auto Save
All settings and the state of the file archive will
be stored every 15 minutes
Alternate Bitmap Drawing
Use this option if you experience problems with
your display, for example the slider look distorted.
Change Screen Resolituin on Startup
At program start, the windows monitor resolution
will automatically be set to 800x600
Delete Editor Peakfiles
At program end the peak files generated by File
Editor will be deleted.
Scan VBR files
Activate this checkbox to enable exact positioning
in files with variable bit rates
Save ID3 tags
This program modifies the ID3 tag of the original
MP3 File
Write ID3v3 tags
The program writes the ID3 tag with the version
3. (It will not be accessible by older MP3 players
anymore)
Lock Main Window Position
The position of the program’s main window on
the screen will be locked
Show Tooltips
Activates the “hints” function (Requires some
system resource)
64
Program Options
Alternate Cue-Play function
With this function activated, the player will play
as long as the CUP button is held. Once released,
the player will jump back to the Cue-Point.
Cue-Memory Directstart
Upon clicking a DirectCue button the player will
immediately be started with the Cue-Point, res.
with the stored loop. When this checkbox is not
selected, and the player is in pause res. cue, CuePoints will merely be loaded into the player and
will not start until the [PLAY/PAUSE] res. the
[EXIT/LOOP] button is clicked. If the player is
on, in any case a DirectCue button will start the
title
Start as exclusive shell application
With this function, BPM Studio will be the
exclusive application under Windows. Upon
activating, a reset will be initiated, after which
BPM Studio will be the exclusive application.
Aggressive refresh
This option causes a quicker display of the level
indicator, the spectrum analyzer, and the title
scrolling. On systems of lesser performance
system resources can be freed, by deactivating
this mode.
Ask before removing a file
When activated, a confirmation will be required
before a title is removed from the player
Hidden menus
This option causes all pop up menus to be
reduced to the important functions. The complete
menu can be viewed though by clicking on the
last entry. If this is not selected, all entries will be
shown.
Create Data Backup
If this checkbox is selected, BPM Studio creates
a backup of the current File- and Playlist Archive
at each startup. By this way the last 10 program
startups are stored. Those backup files can be
used for restore by the Backup Function. The files
are located in the program folder under Data/
Backup.
Program Options
BPM Studio
3.19.3. Audio I/OConfiguring the Sound
Card
Driver
Here the device driver is
selected (Direct Sound),
WAVE, ASIO, EASI, or Kernel
driver), the settings of the
ASIO driver can be configured
right here.
Monitor
Defines on which sound card,
res. which channel the preview
player output will be assigned
Player A, Player B, Sampler,
CD-Player:
Via the pull down menu every
device can have a sound card
res. a stereo channel of multi
channel sound card assigned.
Below the selected output channel the actual
latency time of the according driver is indicated
Buffer Size
Defines the size of the WAVE Out buffer. The
higher the value, the higher the program stability.
It takes a little bit longer to write into the buffer
though, which can be noticed by short delays
when switching from Cue to Play, and back
Soft Fades
BPM Studio fades all audio signals in, and out,
smoothly before any audio title or cue. Thus it
prevents possible disturbing noises / crackling.
Use Monitor
Activates the mixer monitor-function of the sound
card/s. Prior to activating, the sound card test
needs to be performed.
Preload Size
Size of the internal playback buffer. Manipulate
this value if you experience dropouts during
playing, or the players don’t start clean.
Lowest Latency
The Kernel Driver operates with a very small
buffer, and shortest latency times. Deactivate this
function if you experience playback difficulties,
or drop outs with your sound card.
Auto-Cue Level
Here the trigger level for the auto cue function
(skip silence at title beginning) can be defined.
This value can be set from –inf (absolute silence)
to –30 dB (a quiet level).
Starts the sound card test. More information is
provided in the Monitor-Functions
65
BPM Studio
Program Options
(Only if Kernel Driver has been selected) Opens
the dialog for latency adjustment:
ASIO-Driver settings
(Only if ASIO driver is selected) With the config
buttons, located beside the pulldown menus of
the virtual devices you can access the ASIO
Driver settings for a particular device.
Select the audio driver:
Select the driver to modify
Driver Latency
Here you can manipulate the driver’s latency
times. For a minimal delay between a button being
pushed, and the reaction of the sound card;
meaning, for a rapid response of the Cue-, Play, and Direct Cue buttons and Loop functions, this
value should be kept as small as possible. Only
increase this value if you experience problems
with playback.
66
Please refer also to chapter 2.5 / Adjusting
audio parameters!
Program Options
BPM Studio
3.19.4. Storing Defining directories
Default Search Directory
In this folder all relevant
application data will be
stored. That for example
would be the default Play List
s, the categories, and
subcategories of the File
Archive, Sample-Block
information, the equalizer
presets, and the CDDB title
information of previously
read in CDs. It is
recommended not to change
this folder. If you want to
access this file archive from
another version of BPM
Studio, the folder needs to
open to “file sharing”
Directory for the Ripper
In this folder the WAVE files to be compressed
will be stored temporarily. This path can lead
to another, bigger hard drive. For example if
you would like to rip several CDs first and then
encode them in one process. (See also CDDA
options – copying, encoding)
Directory for MP3 encoding
In this folders the MP3 files will be stored after
compression. It is recommended to create a
separate folder (e.g. C:\MP3) in which all titles
will be stored. This will make it easy to upgrade
the system later on with additional hard drives.
BPM Studio automatically scans all logical
drives for present titles, if the original path
should not be present anymore.
Directory for recorded files
Default folder for WAVE- and MP3 files for the
Recorder. If an extended mix is to be recorded in
WAVE format, the file can easily exceed several
GBs. For this, you can specify another folder on
another hard drive.
Filenames
Here the filename, which later on will be
generated by programs, will be defined. It is
recommended to keep default values.
In case you have a large file archive of already
present files without ID3 tags, and want to read it
into BPM Studio, you can change the assignment
temporarily.
The possible adjustments on this register tab are
of increasing impor tance when user
administration, and network functionality become
involved. Please refer to the according chapters
in the manual, for more information.
67
BPM Studio
Program Options
3.19.5. CDDA Copy
Defining CDDA- and
compression parameters
Block Count
Number of blocks on a media, that
will be read if the CD-ROM drive is
accessed.
Read CD Text Infos
Audio CDs that have text on them,
will be read (will not work with older
Audio CDs, or on older CD ROM
drives
Force Generic (NT)
Activate this option if you are having
problems under Windows NT with
a possibly loaded ASPI driver
Encode during Copy
Select this option if you want to read in audio
CDs directly and convert them into MP3s, without
temporarily storing them.
Otherwise the ripper module will merely write files
in the WAVE format, and copy them to their
prospective folder. The conversion into the MP3
format will then be done in the encoder mode of
the CD player / ripper.
CDDB Server
Here you can define the desired CDDB server.
With a click on “GET LIST” the mirror server list
will be loaded, and then the desired mirror server
can be selected. When having problems with
cddb.cddb.com try freecddb.freecddb.org.
Your email settings
To register with a CDDB server, your email
address is required
CD-ROM
Select here the CD-ROM drive, for which
adjustments are to be made.
Copy Mode: Burst Copy
Read and write access will be performed
simultaneously
Copy Mode: Normal
Alternating read and write access will be
performed
Copy Mode: Sector synchronization
In this mode an exact repositioning of the reader
head is guaranteed in case the information flow
should be interrupted. This is the safest mode,
but also the slowest copy method.
68
Program Options
CD Type
Here you can select out of the list of your CDROM drives. This setting is only necessary when
you are experiencing problems while reading in
CDs, and “AutoDetect” does not solve the
problem.
Internal MP3 Code
When encoding, BPM Studio’s own internal code
is used (Recommended). If additional codes are
installed on your PC, they can also be selected
here.
BPM Studio
Format
This selection field shows all audio compression
codes available on a system. The BPM Studio’s
own supplied MPEG Layer 3.
Format Options
Here the quality of the compression is defined.
(Depending on file format). It should be at least a
128 kBit/s, 44,100 Khz stereo.
Write RIFF Wave
Writes a MP3-Wave-File, that is compressed, but
can still be played on most Windows players.
69
BPM Studio
Program Options
3.19.6. CD Writer
Adjusting Recorder Parameters
CD-ROM
Select a Recorder out of a list of all
Recorders available in the system.
The following six checkboxes
indicate which functions are
supported by the selected Recorder.
Functions not supported by the
selected Recorder will be displayed
in gray. (Inactive)
Speed
Here the burner speed is defined.
MAX adjusts the speed to the
maximum possible on the selected
Recorder. Decrease the speed if
you frequently receive errors
caused by the performance of your
system, or the used media.
Record Track-at-once
Track-at-once (TAO) is a writing method that for
once (similar to disc-at-once) burns single session
discs, and for the other (mainly) can be used to
create multi session discs – which would actually
not be able with DAO per definition. With TAO the
laser will be switched off after writing each
particular track, moved to the PMA to update the
temporary table of contents, repositioned to the
end point of the previously burned track, and
switched back on to continue.
Record Disc-at-once
Disc at Once is the writing method of choice when
creating professional Audio-CDs and masters for
commercial mass production. With this method a
CD will be burned within one single session, and
then closed. The laser writes without interruption
the Lead-in with the table of contents, all tracks,
and eventually the Lead-out. (This explains why
a unusable through write interruption disc appears
to be containing all tracks, even if the mistake
occurred during the first track. The table of
contents has been written first, thus the player
“thinks” the listed tracks are really on the media.)
70
Record MCN and ISRCs
The ISRC-Code (“Inter national Standard
Recording Code”) identifies a recording (in
general this means a track). In principal therefor
every track of a CD should have a ISRC code,
which identifies it uniquely. This protocol is only
mastered by newer CD burners.
Record CD Text
A procedure developed by Sony® and Phillips®.
With CD text audio players of the newest
generation are capable of displaying name of
artist, name of current title, and even annotations.
The information of the ID3 tag will be added onto
the media, if the Recorder supports this function
Example of CD-ROM drives capable of reading
out CD-Text*:
-
Plextor PX-40TS (SCSI)
Sony CD-ROM CDU 711 (SCSI)
Teac CD-524-EA-B (IDE)
Teac CD-532-E-A (IDE)
Teac CD-532-E-B (IDE)
Teac CD-540 (IDE)
BPM Studio
Program Options
Following CD Recorders are currently capable
to read and write CD-Text*:
-
Teac 56S/58S later than Firmware 1.0j
(SCSI)
Plexwriter 4220 later than Firmaware 1.02
(SCSI)
Plexwriter 8220 (SCSI)
Ricoh 7040 later than Firmware 1.20 (SCSI
& ATAPI)
Ricoh 7060 later than Firmware 1.20 (SCSI
& ATAPI)
Sony 948S later than Firmware 1.0h (SCSI)
Sony CDX 100 / 110 / 120 / 130 / 140 / 145
HP 8100 / 8110 / 8200 / 8210 / 9100 / 9110
(Same vendor as Sony)
To find regular CD players capable of reading CDText, visit your local consumer electronics store.
Record on Rewriteable Discs
The Recorder supports writing on CD-RWs. Media
that can be reused.
Record with Burn Proof
Burn Proof is a procedure developed by Sanyo®
in which throughout the whole process of burning
the Recorder’s internal buffer is monitored. When
system performance becomes slow, or even
critical, the drive notices that a buffer underrun is
unavoidable – and stops the burning procedure
at a suitable location. This gives the buffer time
to reload, the data is compared and synchronized,
and the writing process continues right after
where it stopped. This averts the media to become
unusable, if the data throughput should be
interrupted again.
Import Sessions
Sessions already present on the CD will be
imported, the CD may not be finished though.
Select this option if you want to write more data
on a multi session CD. Important! When writing
on a multi session CD without activated import,
all previous sessions will be destroyed.
CD-ROM/XA
The CD-ROM/XA is a mixture of the specifications
for CD-I, CD-ROM mode 2, and the current format
for data CDs. Deactivate this option if you are
having problems reading in the CDs created with
BPM Studio. Some older CD-ROM drives do not
support this format. When writing multi session
CDs, this format is a requirement in most
recorders.
Close Disc
Finalizes the CD after the burn procedure. Older
CD-ROM drives can not read Data-CDs if they
are not finalized. Audio CDs will always be
finalized in general, since here it is not possible
to write on the CD in several sessions.
Burn Proof
Activates the burn proof function of the recorder.
(if any) Buffer underrun errors will be averted, and
the burn process will be faster.
Eject Disc from Recorder
If this option is selected, the tray of the drive will
automatically be opened when the burning
process is complete.
Test Mode
When in test mode, writing will only be simulated.
All functions of a “real” burn will be performed,
with the exception that the laser is switched of.
Thus the media will not be changed or damaged.
This mode is used for troubleshooting, to avoid
to many plain media will turn out as scrap. Keep
the function “Eject Disc from Recorder” activated,
since many Recorders only allow another
recording on the same media if it has been
removed, put back into the device, and scanned
back in anew.
* no Guarantee
71
BPM Studio
Pregap (sec)
Here define the pause between tracks of a audio
CD. For data CDs this function is obsolete.
File / Disc Caching
By using File / Disc caching, buffer underrun
errors are mostly history. Also it allows for a more
efficient use of the processor and other system
reasources.
Program Options
Full to Empty Ratio (%)
Setting of data size to be read in, before the cache
has to be refilled. If the ratio is 86% to 15% for
example, the cache will be filled to a 100%, and
after 15% of the data have been purged, refilled
to a 100% again. (This cycle will be repeated,
until no data to be cached is present anymore.) It
has been proofed that this method is more
efficient than trying to keep the cache filled to a
100% at any given time.
File/Disc Caching Options
Enable Caching
Enables File/Disc Caching
Cache Size (MB)
Select cache size in MB. (Minimum is 1MB, max.
is 32MB)
Recommended cache sizes depending on
available RAM:
RAM
64MB
128MB
256MB
Rec. Cache Size
2 to 4 MB
4 to 8 MB
8 to 16 MB
Please do not exceed the maximum cache size.
This could cause performance to decrease even
more, than it would without activated caching
72
CPU priority Level
Selects the processor priority level of the cache
process. For 99% of all systems the “normal”
setting can be maintained.
A ver y extensive and clearly arranged
documentation about CD-Rs, CD-RWs, Recorder,
and file for mats can be found at http://
www.disc4you.de/kompendien/cd/
Please pay attention also to troubleshooting
hints in chapter 3.15. CD Player / CD Writer of
this Manual!
Program Options
BPM Studio
3.19.7. Remote Control
Configuring external control
units
On this register tab the
connected control units will be
adjusted to your needs.
Depending on how deployed,
(local PC / DJ Case, portable PC,
or notebook) hardware outfit
(number of sound cards,
hardware audio outfit), and type
of remote control unit, different
functions can be assigned to the
sliders, and multi purpose
buttons. The level of adjustability
depends on the type of the
connected remote control unit.
Additional information can be
found in the chapters of each
particular unit.
Connecting 2 remote control
units:
BPM Studio PRO can be
operated with two remote control
units simultaneously. Thus, the
same system can be accessed
from two different rooms. For
each control unit separate
options are available, like COM port, etc. Of
course very control unit needs it’s own serial port.
The two tabs to the lower left you can select
options for control units 1 and 2:
When using two control units whit sliders, one of
them must always be dedicated as master
, the sliders of the other unit will stay
inactive. When combining a unit with sliders with
a unit with pitch wheels, only sliders will work.
The pitch wheels of the other unit will be disabled.
When combining two units with pitch wheels, no
restrictions apply, therefore this solution should
be preferred.
Available control units can freely be combined
with each other. Although, under cer tain
circumstances, restrictions can arise from the fact
that the sliders on the control units can not be
automatically used.
RC Active
Should always be enabled at the connected
remote control unit. If so, the program will check
on star t up if the unit is connected, and
operational.
73
BPM Studio
Program Options
Selecting a COM port:
Defines on which port the unit
will be connected during the
initial installation.
Level Meters
(only RC V3) Shows level indicator in RC display.
(Uses some system resource)
Slider A, Slider B
Select here which functions you wish to assign
to the sliders of the two players. (Not with RCP2001-B).
Activate this checkbox if a
external mixer is connected
to the fader start socket [36] or [37], and the
players should be started automatically when
blending in a particular channel (Only RCP-1001
/ 2001)
Slider C
(Only RC V3) is the slider of the sample player.
Three functions are available: Sampler Pitch,
Sampler Volume, and Manual Fade A/B. When
setting as manual fader, crossfades between
player A, and player B can be performed even
without external mixer.
Switches A, B, C
Define here the functions of the multi purpose
buttons of the two players. (Only RC V3) These
settings also apply for the two players in the
program!
Adjust Sliders
Activate this option when you have problems with
the sliders. (Only RC V3)
Text Scrolling
Activates title scrolling in display
(Needs some system resource)
74
Activate this checkbox if a
external mixer is connected
to the fader start socket [36] or [37], and the
players should be stopped automatically when
blending in a particular channel. Should this
checkbox stay activated, the players will keep
playing, even if the mixer controls are pulled down.
(Only RCP-1001 / 2001)
Activate this option if you
would like to use the pulse
start socket of the remote control unit. (Only RCP1001 / 2001)
(only RC V3) With this button the
remote control unit sliders are
calibrated. To do so place the 3 sliders into their
center position and click on CALIBRATE. The
slider position will be defined to 0.
Program Options
BPM Studio
3.19.8.
User Administration
A detailed description of
these features can be
found at a later point in this
manual later.
With the user administration,
several users can work in the
same system at different
times, without influencing
each other. Each user has
his own program settings, for
example play lists, file
archives, skin (program
appearance),
Program
Options, or the assignment
of virtual devices to particular
sound card channels.
Further all modules can be
activated/deactivated, user
specifically. Each user can
have his own File Archive, or
access the (write protected) Master Archive.
The user administration is activated by creating
the first new user, or by creating a password for
the administrator. From this point on a password
inquiry will be performed at any every program
start. The password field can also be left blank
though.
Separate Settings
Settings for this user will be administrated
separately in the Program Options
Seperate File Archive
User obtains own File Archive
File Archive read only
The user is not authorized to change the file
archive (with no regards on if he has his own
archive, or uses the administrators)
Playlists read only
User can not save play lists
Enable delete files
User is authorized to use “Delete file from
harddisk”
Enable program termination
The user is authorized to close BPM Studio (if
inactive, the administrator password is required)
Enable Ripper/Encoder up to
Enable
Encoder
Here BPM Studio modules can be activated, res.
deactivated for this user.
Enable Options
User is authorized to change Program Options
(regardless on if he uses his own, or the system
administrators.
75
BPM Studio
Program Options
3.19.9.
Server components
Further informations about
this feature can be found in
the chapter BPM Studio
Server Components.
The server components of
BPM Studio offer functions
that allow to remotely control
the program via WebBrowser, or Telnet. On this
register tab the most
impor tant parameters for
both servers are defined. We
recommend maintaining the
preset settings, as long as
they do not cause conflicts
with other PCs or Servers in
the network.
Telnet Port:
Here the port number for the Telnet server is
defined. Default is 23
HTTP Port:
Here the port number for the HTTP Server is
defined. Default is 80. If the server is active,
access to the PC with a web browser is possible.
This is done, in the best case scenario, by
entering http:// -followed by the IP address of the
computer.
If access is to be gained on the same computer,
on which the program is installed, you can enter
“localhost” instead of the IP address.
HTTP Doc path:
The HTTP server will make this folder as main
directory publicly available. It can contain
proprietary information, e.g. web pages with
control functions for BPM Studio
76
HTTP Default Doc:
Define the file that will be displayed as start page
if the user enters merely the IP address of the
computer into his browser, without specifying a
particular file.
If this checkbox is selected, both servers will be
activated and BPM Studio is accessible, and can
be controlled from every PC connected to the
network. Provided appropriate measurements
have not been taken against this.
BPM Studio
Additional Functions
3.20. Additional Functions
3.20.1. Normalize Function
Via the pop up menu in File Archive and the
different play lists, the normalize-function can be
activated. Use this function if a title playback is
either too loud, or too quiet. If you activate this
function in the categories window, all titles present
on the system will be normalized. With large
archives this procedure can take several days (!),
therefore must only be applied to a title once. If
new titles are added, this function will be applied,
already normalized titles will not be scanned again
though, which speeds up the procedure
considerably.
During normalization the Peak- and RMS Values
of all titles are determined, and a average value
for the titles volume is calculated. Upon this the
loudest and most quiet title are known, and based
on these values titles will be adjusted later on.
Very quiet titles will be amplified, and very loud
ones will be reduced in their volume. The dynamic
mostly stays unchanged, since only one
amplification factor is applied and no dynamic
adjustment.
3.20.2. Search Dialog
The search dialog is also accessible via the pop
up menu in BPM File Archive or the
button
in the file lists. Here you can perform your search
according to the following search criteria: BPM
range, artist, title, title version and album. The
search term or text string will always be compared
exactly with the list entries. But you can also use
wildcards. Here some examples: WEST* will find
all titles with WESTBAM, WESTERNHAGEN, etc.
*HAGEN will find all titles like WESTERNHAGEN,
NINA HAGEN, etc.
*EN* finds all titles containing an EN, e.g. DEN
HARROW, or X-PERIENCE.
If the search was successful, a new folder
SEARCH RESULTS will be created in BPM File
Archive in which the search results will be listed.
If this folder should exits already, all files in it will
be overwritten.
3.20.3. Monitor Functions
For professional use of BPM Studio the monitor
functions are essential. While a title in Player A,
B, the Sample Player or the CD Player is played
over the PA System, it is possible to listen to, or
prescreen any other given external or internal
signal source via headphone to e.g. screen titles,
place Cue-Points, determinate the BPMs of a
particular title, or equal out BPMs. The basic
requirement for this is at least one additional
sound card, or multiple channel sound card, to
assign the monitor channels if BPM Studio to a
dedicated audio channel.
The monitor functions have to be enabled in the
Program Options on the register tab Audio I/O.
In the monitor area, a dedicated sound card will
be assigned to the monitor channel. The following
virtual devices utilize the monitor channel:
- All Preview-Players in the Play Lists and the
BPM File Archive
- The preview player of the BPM Counter
- The monitor switch in the
main program
- The monitor buttons in the Mixer
The volume of the monitor channel is adjusted
with the MONITOR control, in the Mixer
77
BPM Studio
Before the monitor functions can be used a sound
card test, and synchronization need to be
perfor med. Otherwise differing sample
frequencies would cause runtime differences
between monitor channel and player when
playing. To synchronize sound cards proceed as
follows:
First select the desired driver. (Synchronization
is necessary with Direct Sound, WAVE, and
KERNEL driver. )
Then click on the button “Test Sound Card”. Each
Sound Card will now be tested for 1 min. BPM
Studio then analyzes the results, and
synchronizes the Sound Cards. This test needs
to be performed separately for WAVE and Direct
Sound Driver, if both are to be used.
3.20.4. The Program internal BPM
Database
BPM Studio disposes over it’s own database, in
which the BPM values of all titles are stored. A
basic supply of BPM values is included. Additional
titles will be added through the File Info Box, or
the BPM Counter.
Whenever you add a new title to the system, the
program checks if a BPM value is already
available, and assigns it to the file.
If a new MP3 file is loaded, that has a BPM Value
in it’s ID3 tag already, then this tag will be adopted
into the internal BPM database. If a value is
already determined for this title, it will be updated.
3.20.5. The
(Limiter)
Additional Functions
3.20.5. The back-up- and Update
functions
Via the pop up menus of the Group window and
the File Archive you can access the BackUp and
Update function.
The back up Function allows you to create a
backup copy of the entire File Archive in a
predefined folder. From there it can be restored
later on. With this method a copy of the File
Archive can be transferred to another PC also.
The Update-Function offers two options.
“Search Hard Drive” scans the entire system,
including all connected network drives for playable
titles, and lists them under NEW FILES + date.
“Update Archive” removes all titles no longer
present out of the File Archive, and lists all new
titles in the NEW FILES category.
3.20.7. Interface for Visualization
Plugins
Via the Recorder pop up menu the interface for
WinAMP Visualization Plugins can be activated.
In a list, the in the folder \BPM
Studio\Studio\Plugin installed plugins are listed.
Some of these plugins can be configured within
the range of their functions. To do so, click on the
button “Configure” and make the desired
adjustments. To compensate for resource
problems the “Priority” control is uses. ALCATech
GmbH does not guarantee that BPM Studio will
work with these Plugins.
PreAmp-Function
Within the equalizer the PreAmp function can be
activated. This is recommended if the red
“OVERFLOW” LED stays on permanently. This
means the overall amplification is to high, which
may cause distortions.
More information about current sound card tests, program updates, and answers to frequently
asked questions can be found on our website www.alcatech.de
78
User Administration
BPM Studio
3.21. User Administration
Defining Login and Logout passwords
In the “Login password” and “Logout” fields the
passwords for program start, end exiting the
program are defined. A password for exiting the
program is usually not necessary though. If the
field is left blank, no inquiry will be performed
when exiting
Switching the active (logged in) users
Only exiting, and restarting BPM Studio can
switch the active user. At the new program start,
the other username needs to be selected.
3.21.2. User specific settings
3.21.1. In General
This section explains the work method of the BPM
Studio user administration. Example
configurations can be found at the end. The user
administration enables different users to work at
the same system independently. Additionally it is
possible to assign different levels of access.
Especially when more than one version of BPM
Studio is in use in a network environment, the
network functions and the user administration
develop a synergistic effect and offer extensive
administration possibilities. Please see also
“Network functions”.
Activating the User Administration
To activate the user administration either a new
user is created with the “NEW” button, or a
password is defined for the system administrator.
From this point on, a username and password
inquiry is performed whenever the program is
started. The password can be omitted.
The “User” register tab is divided into the global
settings for a selected user, (left column), and
the access restrictions for the BPM Studio
modules (right column).
Separate Settings
When this checkbox is activated, all settings on
the 6 register tabs in the Program Options will be
stored separately. This can be done if the user
logs on under his user name, and then defines
his own settings in the Program Options. This is
only possible though, if the “Options” Checkbox,
in the right column of the user administration, is
selected. This offers the opportunity that the user
adjusts these settings once (or the administrator
logged on under the users name), and the
administrator then locks access to the Program
Options.
Other possible utilization is to serve different
sound card settings. (Channel assignment or
flexible configurations / notebook installations)
79
BPM Studio
Separate File Archive
When this checkbox is marked off, a own File
Archive will be created for this user. The user can
configure this archive independently from the
Master File Archive (which is maintained by the
administrator) to his liking. If so though, he is
responsible for backups, and actualization. For
this the File Archive Function in the group
windows pop up menu can be used.
In network installations the users archive can be
stored also on the server, or the Master File
Archive of this server will be displayed for this
user (read only). See also Network-Functions.
If this is the case, the user can store his file
archive also on the server. Or the Master File
Archive can be displayed for this user. (Read only)
File Archive read only
This option is pretty much self-explanatory. If this
checkbox is marked, the user will not be able to
make modifications to the File Archive. This
relates to the category structure, and play lists in
these categories. Modifications to the titles
themselves (in the ID3 tags) will be granted
though.
(If this is to be avoided, either the modules “BPM
Counter” and “File properties” need to be disabled,
or the checkboxes “write ID3 tags” and “save
ID3Vs tags” need to be deselected.)
Play Lists read only
This checkbox deactivates the “SAVE LIST”
button within all play-lists. This avoids lists being
saved, or present lists to be overwritten. The user
will only be able to access prepared play lists, he
can change them while the program is running.
Saving modifications at the end of the session is
not possible though.
User Administration
Enable delete files
This checkbox activates the pop up menu option
of File Archive and Play Lists to delete files from
the hard drive. When deactivated, files can merely
be removed out of the Play List and the File
Archive. To deactivate this option can be helpful
to avoid accidental file deleting.
Enable program termination
If this checkbox is selected, the logged on user
can close BPM Studio. If previously a log out
password has been defined it will be required
though.
If this checkbox is not marked, the administrator
password is required to exit BPM Studio. If BPM
Studio has been defined as exclusive shell
application, and the PC is not accessible, this
way it can be avoided that user gains
unauthorized access to the system.
Checkboxes “
Ripper” to “
Mixer”
Here the different modules are activated /
deactivated for a particular user
Enable Options
When selected, the user is authorized to modify
the Program Options.
If a Master File Archive is accessible
through the network, access will always
be granted on a “read only” basis, even if
“File Archive read only” checkbox is not
selected.
If the “Separate Settings” checkbox is not
selected, the user will have access to the
same options as the system administrator.
80
BPM Studio
User Administration
3.21.3. Example Configurations
If you upgrade from BPM Studio Home
to BPM Studio Pro, the settings of the
use administration will not be
automatically adopted. If so, please
specify the old folder during the
installation. Read also the more
extensive explanation in the Update
instructions.
A given PC is used by the system administrator
(e.g. the dance club owner) and two DJs. The
owner keeps the File Archive current, and
frequently adds new titles. Both DJs work with
those titles available on the system. DJ 1 merely
uses the File Archive provided by the owner, DJ
2 has created his own File Archive, and updates
it himself. Both DJs work independently at
different times.
( =selected,
=not selected, !=necessary,
*=recommendable, .=irrelevant)
DJ 1:
DJ 2:
* Separate Settings
! Separate Settings
! Separate File Archive
! Separate File Archive
* File Archive read only
! File Archive read only
. Playlists read only
. Playlists read only
* Enable delete files
* Enable delete files
. Enable Program termination
. Enable Program termination
* Ripper
* Ripper
. File Info
. File Info
. BPM Counter
. BPM Counter
. File Editor
. File Editor
. Sample Editor
. Sample Editor
. Recorder
. Recorder
. Mixer
. Mixer
* Options
* Options
81
BPM Studio
Network Functions
3.22. Network Functions
This part explains the extended network functions
of BPM Studio.
The first two subchapters separately explain the
different functions. Following, different examples
of application and example configurations are
described. Since the network functions strongly
interact with the user administration, it is
recommended to consult the User
Administration in your studies. Deploying BPM
Studio in a network basically has the objective of
serving MP3 files to clients from a central server,
res. a client that also shares this task. Additionally,
network wide access to file archives is possible.
Addressing MP3 files via the Drive letter
This form of addressing is predefined in the
Program Options logical drive letter assignment
on the “Storing” register tab. It is also a
requirement for correct functioning of the network
functionality in general, and the “Update” function
in the File Archive. Also when you add MP3 files
to the File Archive using the “+FILE” or “+DIR”,
you usually select them via
Desktop\My Computer\[LW]:[Folder].
3.22.1 Addressing MP3 Files
At the end of this page two example entries are
shown. In the first section of the entry, the location
of the files becomes obvious. Also, at initial
program start, only logical drives, meaning local
drives, and network drives will be scanned. A
network drive can be connected in Windows
Explorer -> connect network drive.
You can install BPM Studio on several client PCs,
and then use a shared pool of MP3 files, which is
basically a requirement when working with
network file archives. Although we recommend
the use of a 100Mbit network, but also 10Mbit
networks of up to 5 clients are known to run
smoothly. The folder /s with the MP3 files will be
shared on the server PC. On the client PCs
access can now be gained either over a network
drive (recommended), or via the network client
of Windows98.
Addressing will follow the LW:\[Folder]\
[Subfolder]\*.mp3 pattern
Addressing via drive letter:
Example entry in a *.grp-file of the File Archive
(Displayed with a word wrap, that is not present in the original file)
Track0=C:\PROGRAMME\ALCATECH\BPM-STUDIO PROFI\DATA\A-HA - EARLY
MORNING.MP3|TAG|A-HA|EARLY MORNING||HEADLINES AND DEADLINES THE HITS OF AHA|||OTHER|MP3|0|179696|0|327680|0|0|-1|0|0|0|3|128|7|-1|0|0|0|-1|||0|
Example entry in a Playlist
(Displayed with a word wrap, that is not present in the original file)
C:\MP3\EIFEL 65 - BLUE DABADI.MP3|TAG|EIFEL 65|BLUE DABADI||||HTTP://
WWW.BPMSTUDIO.DE||MP3|0|221152|0|327680|0|0|-1|0|0|0|3|128|8|-1|0|0|0|1019794890|||0|
82
BPM Studio
Network Functions
Addressing MP3 files via the computer name
If no network drives are supposed to installed on
a client PC, for example if the client PC is
connected to particular servers only randomly, it
is possible to access the files through the
Windows network client. Here also the files or
folders are loaded with +DIR or +FILE, but now
via the network neighborhood of Windows, not
“My Computer”
The address of the MP3 files will then be in form
of\\[Computername]\[Folder]\
[Subfolder]\*.mp3
An example of a File Archive row, in which the
file is addressed via the computer name, can be
found at the end of this page. In place of the drive
letter here \\HOLI\ (the computer name) and the
name of the shared folder DATA1 are displayed.
When using this method of addressing though,
at every access a Windows name resolution
needs to be performed, which can, under
circumstances, lead to timing problems for
example if the address of the WIN-SMasterbrowser changes. Until now though,
dropouts due to this addressing method are
unheard of. Be also reminded though, that the
BPM File Archive “Update” functions don’t work
correctly.
In mobile use with local server connectivity it is
recommended, to create a user for every place
of use, and then load the files via the network
client.
3.22.2. Network File-Archives
A BPM File Archive consists of a group of text
files located at the DATA folder of the particular
BPM Studio installation. The files Groups.gps and
Groups.idx contain the folder directory of the File
Archive. The *.grp files, like Default.grp, contain
the paths to the different MP3 files. These files
can be located on a local drive, a connected
network drive, or on a PC addressed via
\\[computer name]\ See also addressing via
computer name. With no regards to the type of
the file archives, it is always the MP3 files provided
by the central server that are actually accessed.
In general one tells apart between a Master File
Archive, and user file archives.
A Master File Archive will be provided by the
server, and is only editable from there. It can be
viewed on the clients in read only mode. Any given
user can use this File Archive, without having to
worry about updating or maintenance. This will
be the network administrator’s task.
A user file archive can be created on the client
PCs or, similar to the Master File Archive, on the
server. If the user file archive stored locally, there
is no way to access it from another client PC.
Modifications would have to be made by each
particular user.
Addressing via the Network Client:
Example entry in a *.grp-file of the File Archive
(Displayed with a word wrap, that is not present in the original file)
Track620=\\HOLI\DATA1\MP3\RUBRIKEN\HOUSE\WATERGATE - MADE OF
ORLEANS.MP3|TAG|WATERGATE|MADE OF ORLEANS||DREAM DANCE - VOL.13 - DISC
1||||MP3|0|230400|0|327680|0|0|-1|0|0|0|3|128|8|-1|0|0|0|-1|||0|
83
BPM Studio
For this reason it is possible to store the user file
archives on the server. This way the user can
find his own, current archive on every client PC.
All these settings can be adjusted in the user
administration on the “Storing” register tab. What
type of network file archives actually will be used,
depends on the type of network, number of users,
maintenance strategy, and other local
circumstances. In general it is recommended to
analyze these facts before the installation, and
to coordinate with the network operator.
Creating a Master File Archive
When initially installing BPM Studio on the server
(or the client PC that will later on provide server
services) a default archive is created in the
program folder under \DATA. This archive will not
be deleted, even if new user accounts are created,
and can be edited through the administrator
account.
The path to this File Archive is defined in the
Program Options-> file storage. Additionally the
equalizer presets (eq.eqp), and the locally stored
CDDB (cdda.cdb) inquiry results are stored here.
Also the default path to the encoded mp3 files is
located here after the initial installation, which
should at this point be modified to the shared
folder for MP3 Files. (See also shared MP3 files)
To be able to access this File Archive from a BPM
Studio client on another PC, some adjustments
are necessary.
To begin with the folder \DATA in the BPM Studio
directory must be unlocked in the file sharing
options if Windows Explorer. (There is also the
possibility to grant access to the whole drive c: of
the server PC, for security reasons this ids not
recommendable though).
84
Network Functions
On the client PCs a new drive letter will be
created, and assigned to the shared DATA folder.
Afterwards, in the BPM Studio Program Options
of the client PCs, the server PCs folder can be
selected via this drive letter. When closing the
Program Options, BPM Studio will now announce
the presence of a File Archive, after a security
inquiry, this Master File Archive will be displayed,
instead of the user File Archive.
Protected Access of Network File Archives
To ensure that current information is available on
all clients, BPM Studio has two background
functions.
1.)
The File Archive can only be edited on the
server, and will be provided to the clients in
read only mode. BPM Studio automatically
detects if a File Archive is located on the
server, or no a client.
2.)
Each client inquires the server in short
intervals for modifications of the file archive,
and updates its own archive accordingly.
Title search function when loading
When several PCs use a shared File Archive, it
can not be guaranteed that a MP3 file will be
located under the same drive letter, although it
will be in the same folder res. the same directory.
Therefore BPM Studio scans all logical drives for
a file when it is loaded. This is also useful on
standalone platforms, when additional hard drives
are added to the system. BPM Studio will
automatically scan for the same directory under
all other drive letter.
Network Functions
3.22.3. Example Configuration
With this example the work method of network
functions are explained.
A dance club with 1 server in the office, and 2
clients in different areas. All DJs work with the
same File Archive provided by the dance club,
but can make their own BPM Studio settings and
adjustments on the clients. Archiving of new CDs,
and File Archive maintenance are done at the
server.
Configuration:
The MP3 files and a Master File Archive are saved
on the server. The servers access the File Archive,
and the files in “read only” mode.
Server:
The server is consists of a system drive C:\, two
data drives D:\ and E:\, and a CD-ROM drive F:\.
Reading in CDs is done locally in the office, which
can be done during an event without any
problems. To do so, the server needs to have W98,
and a version of BPM Studio Home installed.
The User Administration on the server will be
unmodified. On drive C:\, the BPM Studio \DATA
folder, drive D:\ and drive E:\, will be opened for
file sharing.
BPM Studio
Three network drives, connected with the server:
E:\ as the data directory of the server
F:\, G:\, with D:\ and E:\ of the server
Now, in BPM Studio, the data path will be modified
from C:\program files\Alcatech\BPM Studio\DATA
to the server (D:\, since this is the logical drive
connected with the server’s DATA folder). Thus
the administrator of the client PC will hence use
the Master File Archive. Modifications can from
now on only be done on the server.
After a restart of BPM Studio the Master File
Archive will be loaded from the server, and the
client will automatically log on to the server. If a
title of the file archive is selected, BPM Studio
scans the two connected network-drives for this
title, and loads it.
Expansion for multi user:
More users can be created on the client, which
will have their own settings, and will also be able
to store their own play lists, while still being able
to access the Master File Archive. To do so, the
two new users will get entries into the user
administration, get passwords, and the according
entries will be made. Additionally, the “File Archive
Write Protected“ function should be enabled.
Client:
The client PCs will be configured as follows:
System drive C:\,
W98, BPM Studio Home or Professional
Sound Card depending on intended purpose
CD-ROM drive D:\
85
BPM Studio
First Steps
4.1. Where can I get MP3 files?
BPM Studio will be delivered without any MP3
Files. Our systems are designed for you to copy
your Audio CDs to your computers hard drive,
and save them as MP3 Files. Thus you can be
assured that there will be no loss in quality, and
playability of the titles. But also the most MP3
titles from other systems, as well as MP2, and
WAVE files can be played with BPM Studio. Stepby-step instructions on how to copy CDs, and
creating a File Archive can be found in the First
Steps chapter of this manual. You can also utilize
other encoders from other vendors, be aware
though, that quality differs between different
encoders.
Legal reminder:
BPM Studio may only be used to copy/encode
titles if you are the author, or if the author, or a
person owning the copyrights has authorized you
to do so. Otherwise you take the risk that you
make yourself liable to prosecution, res. to be held
liable by the copyright owner. Please pay attention
to laws and regulations regarding the use of MP3
files. You can inform yourself about these either
with the regional office of the GEMA, or on the
Internet at www.gema.de. If you use BPM Studio
outside of Germany, please refer to the according
institutions representing ar tist, and record
company rights.
Lately, titles are offered for purchase in the MP3
file format already, these can usually used be with
BPM Studio without problems.
4.2. How can I play MP3 files?
BPM Studio offers two independent Players for
playing MP3 files, which provide all functions of
a professional double-CD-player for DJs.
A requirement to use BPM Studio that there are
already MP3 files saved on a PC. These will be
read in, and displayed in the play lists, at the
first program start after the installation. The
players will automatically play the play list in
descending order.
1.)
At any given time titles can be added to the
Play List by clicking the
button at left
lower corner of the Play List The title selected
in the File Archive will be added to the play
list. If no title is selected, a Explorer window
will open showing the directory of your hard
drive(s). Select here the MP3 files to be
inserted, and confirm with OK. The selected
MP3 files will now be inserted into the play
list.
86
2.)
Load a given title out of a Play List or the
File Archive into one of the two players by
Drag&Drop. To do so, move the mouse
pointer over the title, press the left mouse
button, and hold it down. The mouse pointer
will change into two little musical notes. Now
move the mouse pointer over one of the two
players, and let go of the button. The title
will be loaded into the player, and the red
LED display over the [CUE] button will come
on. A click on the [PLAY] button starts the
playback. Alternatively you can start the title
via the remote control unit also. The buttons
[PLAY] [CUE] on the computer screen are
identical with the buttons [4] and [5] on the
unit.
In the following chapter read how you can mix
MP3 files with single beat accuracy, and use the
players professionally. In the Player chapter of
this manual you can find detailed descriptions of
all player functions.
BPM Studio
First Steps
4.3. Beat Matching with BPM Studio
As when working with regular CD – players, single
beat accurate mixing takes quite an amount of
empathy and lots of practice. But to make the
transition from CD to MP3 as easy as possible,
the especially for BPM Studio developed remote
control units and the extensive and versatile
software allow you work with the same look &
feel as with a high quality, conventional double
CD player.
Single beat accurate mixing means a titles
seamless transition into the next one, where the
base beats of both titles can be heard
simultaneously, but appear to be one. (3)
During this process both titles play simultaneously
for a certain time, which allows to create various
effects.
To achieve this it is necessary that both players
play the titles at exactly the same speed. The BPM
values (Beats per Minute) of both titles must be
exactly equal. Also, the beats of both titles must
be played simultaneously. (Beat synchronizing 3.).
BPM Studio offers powerful tools to simplify beat
matching. The real time BPM counter determines
the BPM value of every title in real time. With the
[SET] button [21] (also called BPM Match button)
the BPM value of the other player (Master) is
automatically adopted, and both title’s speed is
automatically equaled.*
Only remote control units with Pitch Controls:
When this process is executed the pitch LED [25],
and the pitch indicator in the equaled players
display [14f] will blink. The adjusted player will
maintain its pitch value, until you position the pitch
control on the remote control unit to the value
indicated by the software. Following the pitch
value of the adjusted player can be manipulated
from this position on again. (With the pitch wheel
of the RCP-2001-B this value can be manipulated
again immediately)
Quick description of single beat accurate
mixing:
1.) Select two titles that somewhat correspond
in style and speed. Load these titles into the
two players, e.g. via Drag&Drop out of the
File Archive. Now the BPM value for both
titles will automatically be determined, and
be indicated in the top right corner of the
player’s displays. (If this indicator shows
PITCH, it can easily be switched to BPM by
left clicking on it.
2.)
Initially, move both pitch controls back to
zero. To do so, right click on the slider scale
of both pitch-controls.
3.)
Activate speed control (Pitch) with the
button. The green pitch LED should now be
on in both players.
4.)
In player B click on the BPM match button
(
), and observe the BPM indicator. The
BPM value of player A should be adopted. If
this is not the case, then the difference
between the two speeds is to small for the
currently selected pitch range. By clicking
on the
or
button select a larger
range, and try again to adjust by clicking on
the
oder
button. (The BPM Match
button is also available at the remote control
units.)
87
BPM Studio
5.)
6.)
7.)
8.)
9.)
First Steps
When the BPM values in both players are
equal, the titles are played with the same
speed. You can ensure this, if you start
Player B, and screen with headphones
simultaneously to Player A.
Now prepare the second title to be mixed
in, by setting a Cue Point directly in front of
a beat. To do so start the player B with
headphones.
Stop player B at approximately the first beat
of a new bar. BPM Studio will from now on
remember this point a Cue Point
Now start player A, and try to start player B
at a beat of player A. You can try this several
times by not stopping player B with the Play/
Pause button, but with the Cue button. Thus
the player will return to the stored point, and
will start from there on again. Should the
two titles not be approximately
synchronized, the Cue Point needs to be
corrected as follows.
Click one of the search buttons
or
smartly. The player is now in loop
mode, and frequently repeats 160ms of the
title from the Cue Point on. Through clicking
these two buttons again (or with the jog
shuttle dial at the remote control unit) you
can now move this Cue Point forward, and
backwards, within the title. By screening the
title through headphones, and by observing
the spectrum analyzer in the player’s display,
you can place the Cue Point exactly on the
beginning of the beat. The loop mode will
be ended by clicking the Cue- or Play button,
and made adjustments will be adopted.
When the Cue Point is placed so accurate
that you can start player B approximately
simultaneously with player A, not until then
the title is prepared for accurate beat mixing.
88
10.) Now you can start player B simultaneously
to a beat of player A by clicking the
button. Player B will now play approximately
synchronous to player A.
11.) Now you can shor tly slow down, or
accelerate the player B with the
and
buttons,
by
and
compare
headphones when the beats will be exactly
synchronous. If you discover that the titles
become asynchronous after a little while,
simply adjust the pitch value with the
according control in the smallest, possible
increments. For this the pitch wheel of the
RCP-2001-B remote control unit is
especially suitable.
After BPM equalizing with the [SET]
button the adjusted player will block the
use of RC’s Sliders. As soon as you
position the pitch slider of the locked
player to its true position at the remote
control unit, the block will be removed,
and thus the pitch value can be modified
again, e.g. to make slight corrections.
The PITCH indicator on the remote
control unit will blink when blocked, and
will show the difference between remote
control unit slider, and real position of
the slider, which simplifies positioning
the remote control unit slider to its real
position.
12.) From now on there are no limits to your
imagination when it comes to working with
the two synchronously playing titles.
Alternate between the two players by beat
or by bar with the manual fader, kill
frequencies at the external mixer, or just play
both titles parallel.
BPM Studio
First Steps
4.4. How do I work with Playlists?
BPM Studio saves the title order in the play lists
below the two players. The player will now play
those titles in the order of this list.
You can modify this list to your liking, add titles,
delete titles, rearrange the title order, or save the
list for further use. It is also possible to enter a
title a couple of times repeatedly, or in different
positions on the list. All modifications made to
the list, (for example with the File Editor) will be
stored, and will be available when loading this
list again.
In the Play List Archive you will manage all your
play lists conveniently and you can even copy
parts of one play list into another, or load complete
lists into the player. During this process only the
title information get modified, the MP3 files
themselves will stay at their location.
4.4.1. Adding titles to a play list
1.)
Click on the
button, in the bottom left
corner of the play list. The title selected from
the File Archive will now be inserted into
the play list at the predefined spot. If no title
is selected, a Explorer window will open
showing the root directory of your hard drive/
s.
2.)
Now select the MP3 files to be inserted, and
click OK to confirm. The selected titles will
be inserted into the play list.
You can also pull complete play lists or
categories from the File- and Play List
archive into a play list. The titles will be
added. Pull a complete play list, or
category on a player, and the old list will
be replaced with the new one.
4.4.2. Modifying the title order
This part of the manual only covers handling of
single play lists. Read in the File- / Play List
Archives what possibilities you have when
archiving play lists.
Via Drag&Drop the order of titles can be modified.
Click on a title, and drag it to another position
within the list. A little red arrow to the left in the
list simplifies sorting in.
89
BPM Studio
4.4.3. Storing a Play List
Click on
. An Explorer window will open in
First Steps
4.4.6. Adding a play list to the archive
Click into the head row of a play list window of a
player, and hold the mouse button down.
which you can specify a name, and a folder for
the play list to be saved. OK confirms, and the
play list will be stored under this name.
You can also store the complete Play List
in the Play List Archive, by dragging and
dropping it on the group window. Upon
doing so, you can renamed the newly
created list.
You can also store the complete Play List in the
Play List Archive, by dragging and dropping it on
the group window. Upon doing so, you can
renamed the newly created list.
Now drag the play list into the group window of
the Play List Archive. There, a list symbol will
appear beside the mouse pointer.
4.4.4. Loading a Play List from Hard
Drive
Click on
. A Explorer window will open, from
which you can load BPM Studio play lists (*.pls),
as well as other formats like for example WinAMP
play lists. The previously loaded list will be lost
though.
4.4.5. Drag&Drop functionality of Play
Lists
BPM Studio offers various functions to
conveniently assemble, load, and archive play
lists. A central position in this functionality is
presented by the Play List Archive. Here, the play
lists can be stored in freely definable categories.
Also, the play list history is located here. Switch
to the play list archive by clicking the
button. The left window will now display the
different play list categories, and the right window
(title list) will show the titles within a category
selected to the left.
90
Drop the play list by letting go of the mouse button,
it will now be added to the archive under the name
PLAYLIST. Now choose [rename] in the pop up
menu of this entry, and define a name that makes
sense for this list. You can also sort this new list
into another category by Drag&Drop, or move it
freely within the group window.
First Steps
BPM Studio
4.4.7. Loading a Play List from the
Archive into a Player
4.4.9. Adding title sequences of a play
list to an already loaded list
In the group window of the Play List Archive click
on the list to be loaded, and hold down the mouse
button. A note symbol will appear beside the
mouse pointer.
In the group window select the desired play list
containing the titles to be added. Then mark the
desired titles by clicking right into the title window.
By holding the [Ctrl] key down, you can select
and deselect multiple titles. When all desired
songs are selected, click on one of the selected
titles, and drag the whole block into the play list
window of the player, and drop them.
You can also, as when loading complete
play lists, drag the selected titles directly
on the player. Thus the selected titles will
be loaded into the player, and the
previous play list will be discarded.
Now drag the selected play list on the desired
player. Drop the list by letting go of the mouse
button. This play list will now be loaded into the
player, and the previous one will be replaced.
Read how to amend, or insert a play list onto or
into a already present list in the next chapter.
4.4.8. Merging a Play List to an
already loaded List
Scroll to the end of the play list window of the
desired player. In the group window of the Play
List Archive click on the list to be loaded with the
left mouse button, and hold it. A little note symbol
appears beside the mouse pointer. Now drag the
play list to the last title of the loaded play list, and
drop it below. The new play list will be amended
to the one already loaded.
4.4.10. Screening titles
With the preview player in the lower right hand
corner of the play lists you can screen marked
titles, without having to load them into a player.
The preview player of the File Archive can
also be controlled with the Sample Player
keys <, 0, and > of the remote control unit.
0 stops and starts the player, < and > are
used for rewind and fast forward.
In chapter 3.3 all functions of the play list are
extensively explained
You can also insert the new play list at
any other desired spot within the loaded
play list. The little red arrow to the left of
the list simplifies this.
91
BPM Studio
First Steps
4.5. Creating Fades between Titles
The Cross-Fader enables automatic fades
between the two players. Every single title of the
play list can have a different fade assigned. Thus
the fade can be adjusted exactly to the particular
title.
1.)
Screen the end of the title to be faded, and
select a point from which on you wish to start
fading out. Before doing so, switch the time
indicator to REMAIN so you can observe
the remaining playtime of the title.
2.)
Adopt the remaining playtime of the title into
the cross fader as fade
time. To do so, adjust the
FADE TIME control
accordingly.
3.)
Now pick up the end of the
level curve of the title to be
faded, by clicking the left
mouse button on it.
The mouse pointer changes into
a bi-directional arrow.
Move the end of the curve into
the lower right hand corner of the
cross fader display.
92
Now the last seconds of the title to be faded will
be displayed in the cross fader’s display. The time
will also be displayed.
The title will be faded out in accordance with the
adjusted level curve. If this curve is set like in this
picture, the cross fader will start fading out slowly
at half of the set fade time.
By moving the start point of the fade curve you
can adjust the time, in which the title will be faded
out.
If you move the point all the way to
the right for example, then the title
will be played with the full volume
all the way to the end.
If the start point of the curve is set
all the way to the left, a slow, and
continuos decrease of volume until
the end of the title will be applied.
But also any other desired fade pattern can be
adjusted by Drag&Drop.
First Steps
Assigning a fade to a title
When all adjustments have been made in the
cross fader, the prepared fade needs to be
assigned to the according title.
This is also accomplished by
Drag&Drop. To do so, click on
an empty spot within the cross
fader display.
Drag the adjusted fade to the title in the play list,
which it is to be assigned to. The mouse pointer
will have a little cross fader symbol accompanying
it:
BPM Studio
Once the fade is assigned, this title will be marked
with a little rectangle in front of the time column
of the play list:
All following titles in the play list, will now have
the same fade assigned, until another fade is
assigned to one of the following titles. If an already
assigned fade needs to be modified, the modified
fade needs to be reassigned via Drag&Drop to
confirm. This avoids unwanted modifications on
previously assigned fades.
The Automatic-Mode will be switched on and off
with
. Only when automatic-mode is active,
will the assigned fades be applied.
All functions will be explained extensively in the
Cross Fader Chapter.
93
BPM Studio
First Steps
4.6. How can I change title information?
BPM Studio offers convenient options on how the
informations attached to a title are managed.
These informations are stored in the ID3 tags of
the files themselves, and in the play list files (*.pls)
1.)
2.)
Point the mouse pointer on the title to be
modified.
With the right mouse button / pop up menu
select the “Properties” point. Alternatively
you can also use the
3.)
button.
The File Info Box will be opened:
Here all information contained in the ID3 tag will
be displayed. If you want to modify any of the
information, simply overwrite it, and confirm with
OK. The information will be updated in the ID3
tag, as well as in the Play List.
To the right of the BPM field, the complete path
to this MP3 file will be displayed. If there is not
enough space, you can move the mouse pointer
over it, and the whole path will be displayed as
tool tip.
The “MORE” button will only appear if the selected
file is a CD-at-once track. Read the CD-Player /
CD-at-once chapter for further explanations.
With the BPM... button you can open the BPM
Counter module, and be able to determine the
BPM value directly out of the properties dialog,
and save it.
Edit... will start the File Editor with the selected
title.
In the chapter File Properties Dialog you can find
further information and descriptions about
modifying title information.
When you select several files, and open
the File Properties Dialog, a checkbox
will appear beside every entry. If this
checkbox is marked, the modification in
the according field will be applied to all
titles. This is especially useful if several
titles are to be assigned to a particular
genre, or album title.
94
First Steps
BPM Studio
4.7. Ripping and Archiving Audio-CDs
BPM Studio does not only provide the means to
professionally play and mix titles. Also many
functions and perfected modules are available for
copying and archiving audio-CDs. How you can
transfer your existing CD collection to the BPM
Studio system, is explained in the following
section.
Requirements:
Music in the MP3 format occupies about 1 MB of
hard drive space for 1 minute of music. This
means that on a hard drive with 30 GB capacity
approximately 8,000 to 10,000 titles with an
average length of 3.5 minutes can be stored.
The Audio-CDs are read in with the CD-ROM drive
and copied to the hard drive. This procedure is
also called “ripping”. The speed of this process
mainly depends on the quality of the drive. But
also the performance of the overall system is
important, for example if copying and encoding
are to be done in one single process.
After the installation of BPM Studio, MP3 files
will be stored in the \DATA folder on drive C by
default. We recommend, when using the program
professionally, to install a second (or even more)
additional hard drive/s, and to move the MP3
folder accordingly to the new hard drive. This can
be done in the Program Options, “storage”
register tab.
Optimally create a \MP3 folder on the new hard
drive, and select this folder as standard for MP3
files. BPM Studio will then store all ripped, and
encoded files in this folder.
A large relief, when adopting title lists on the PC,
is the global CD database on the Internet. There,
the title information of the most known and current
CDs are stored, and can be downloaded for free.
BPM Studio has a built in CDDB inquiry function,
to be started over the
button. If a
particular CD can not be found in this database,
an alternative CDDB-database can be defined in
the Program Options. Or, the information can be
entered manually in the file properties dialog.
To be able to use the CDDB inquiry you need a
Internet connection either over the dial up network
adapter of Windows, or through a real Internet
connection through a masked network. Standard
Proxy software for Windows only offers HTTP and
FTP services. If you own a UNIX system as
gateway, activate masquerading, and enter the
IP Address of the gateway into the network
settings of Windows. If you use programs like
WinGate, or AVM KEN!, please activate the
SOCKS Proxy in these programs, res. install the
proper client software on the BPM Studio PC
You can get more help from about this topic from
your system administrator, or your local PC store.
We recommend to save all MP3 files in
one folder. The BPM Studio File Archive
and the hard drive directory stand in no
relation to each other. If you move a file
in the BPM Studio File Archive, the
physical location on the hard drive
remains unchanged. This way, it can get
messy very easily, if you store files in
different folders on your hard drive, and
later on rearrange them in the File
Archive.
95
BPM Studio
First Steps
Ripping Audio-CDs:
1.) Switch to the CD-Player of BPM Studio by
clicking the
button. Insert a audio-CD
into the CD-ROM drive. After a couple of seconds,
all titles on the CD should appear in the players
Play List. Since BPM Studio doesn’t know this
CD yet, all titles will be displayed as TRACK –
followed by their title number.
2.) Now click on the
button.
Provided Windows has a Internet connection set
up, the PC will log on to the Internet, connects to
the CDDB (central disc data base for audio-CDs)
and try’s to retrieve the information for the CD in
the drive.
3.) After successful CDDB query all titles of the
CD will be listed.
If no information was provided in the CDDB for
this particular CD, at this point enter them
manually, in the file properties dialog. Now mark
the titles to be read in with the according checkbox
to their left in the list, and click on
.
All marked titles will now be read in. The progress
will be displayed in a status window.
96
After successful encoding all files will
automatically listed in the File Archive’s “NEW
FILES” category. For clearer appearance a
subfolder with the current date will be created.
(See also screen shot at end of page)
In the chapter CD Player you can read up more
functions available for convenient audio-CD read
in BPM Studio. You can, for example, read in
whole CDs as one track, or retrieve the CD
information for several CDs with one single CDDB
query.
Creating a own File Archive:
BPM Studio can manage several ten thousands
of titles. At such vast
numbers, it is easy
to loose track, if
titles
are
not
assigned to different
general categories.
For this purpose the
File Archive is used.
In the screen shot to
the side you can see
an
example
structure of an
archive of this kind.
It consists of a
number
of
categories, and sub
categories that can
be opened and
closed by double
click. After the initial
installation or after reading in CDs you’ll find new
titles here that can be assigned to categories
according to your preference.
The archive shown here consists of the following
categories:
First Steps
NEW FILES:
This category will automatically created by the
ripper, whenever new CDs are read in. The date,
of when the CD was ripped, will be used as sub
category. In this sub category you will then find
all the titles that have been read in at this particular
day.
FIND RESULTS:
This category will be created from BPM Studio
after the initial installation, when all hard drives
are scanned for MP3 files. This category will
contain sub categories, sorted by drive letter, in
which all found MP3 files will be located.
DEFAULT:
If you do not wish to make further modifications
in different categories res. subcategories, you can
sort in all titles here. Otherwise just leave the
groups empty. This particular group/category is
necessary for BPM Studio to work properly, and
can not be deleted.
Drag&Drop out of the group window:
You can drag a whole group out of the
group window (to the left in File Archive
or Play List Archive), and drop it on a
player. The previous play list will then be
replaced with the new titles. If you drag
the titles into a play list, they will all be
amended to this list.
BPM Studio
ARTIST:
This category is created individually. As sub
categories, different artists are defined. In one of
these sub categories all titles of a certain artist
present on the system are listed. This is very
useful if you have a lot of titles from one particular
artist, or whole albums are intended to be saved
together. The sub category MIKE OLDFIELD for
example contains a second branch sub category
called TUBULAR BELLS, in which all titles of this
particular album are saved.
TIME:
This also individually created category utilizes
different times as sub directories. Here titles are
saved for which not the artist, but the release date
is used as index.
Of course these are only examples. Every user
should create a File Archive according to his own
needs, and in the for him most overviewable
fashion, so it can be browsed quickly during
events.
Independent of the File Archive structure, it is
recommended to use the search function, to find
a particular title.
Read in the File- and Play List Archive chapter
about even more functions available in BPM
Studio for archiving titles. You can, for example
not only archive files, but whole Play Lists, in
which the order of titles will also contain all fades.
97
BPM Studio
First Steps
4.8. How do I use the Sampler most efficient?
With the sampler of BPM Studio
you can load shor t jingles,
loops, and sound effects, and
then replay them by the click of
a button. The maximum length
of such a sample in BPM Studio
LE is 20 seconds. As in the two
players the playback will start
exactly when the sampler button
is clicked. This is achieved by
utilizing very fast Direct Sound
drivers, or the Kernel Driver
developed by ALCATech. Learn now, how you can
load and play samples with the sample player.
1.)
Look up a jingle in your Play Lists. (You can
also use a regular title, merely 20 seconds
will be loaded in the sampler though.
2.)
Drag the title onto the desired button of the
sampler, e.g.
. To do so, place your
mouse pointer over the title, push the left
mouse button and hold it down, while you
point at the desired button with the pointer
now. The n let go. The sampler LED will
shortly change its color from green to red,
thus indicating that the sample has been
loaded. When the sample is loaded
completely, the digit on the Sampler Button
will become brighter, this making it easier
to determine which buttons have samples
assigned.
You can also load a
sample directly from the
hard drive, via the pop up
menu. To do so point on
the desired button, and
click the right mouse
button. In the appearing
menu select “Load”, and
select the desired file in
the Explorer window
popping up. Confirm with
OK.
98
3.)
Now click on the sampler button. The sample
will be played. For the duration of the sample
playback can be stopped, by clicking the
same button again (not in scratch mode).
You can also start the sample with the
number block on your PCs keyboard or with
the sample block of the remote control unit
(not RCP-1001). These buttons work parallel
Through the pop up menu two different playback
modes can be selected for the sample player.
4.8.1. Single Play:
When this option is activated (a little check mark
can be seen in front of the entry) a possible still
playing other sample will b stopped. Only ONE
sample will be played at a time.
BPM Studio
First Steps
4.8.2. Scratch mode:
When this option is activated (a little check mark
can be seen in front of the entry), upon clicking
the same button again the sample will not be
stopped, but restarted. With this function a sample
can for example be played repeatedly to the beat
of the title.
The volume of the sample player can be adjusted
at the two [VOLUME] controls. Also the speed of
the sample player, (Pitch) can be manipulated:
4.8.3. Configuring the Sample Player:
BPM Studio supports output of the different
devices, through different sound card channels.
If not enough channels are available though the
sample player can share the two output channels
of player A and B. In Program Options, register
tab Audio I/O, simply the same channel as for
player A, is entered for the sample player. When
using BPM Studio, the assignment keys
und
are used to select if the output is
combined with that of player A or B. Please be
aware that shifting the title takes a couple of
seconds. This will also be indicated by the sampler
LED, when turns green again, the sampler is
ready.
99
100
RC V3
BPM Studio
Front view
RC V3 View
Reverse view
BPM Studio
RC V3 Description
5. Remote Control Unit RC V3
The basic operation of the RC V3 is identical with
the top area of the program window. If the remote
control unit is registered in the Program Options,
the program will check at start if the remote control
unit is connected and ready.
Installation
( Also refer to the reminders for connection of
remote control units, and reminders for the initial
program start on page 13)
The remote control unit will be connected to the
PCs serial por t (COM1 or COM2) via its
connection socket [REMOTE/PC] [38] and the
supplied cable. A power supply unit is also
provided.
Now start BPM Studio and open the remote
control units register tab. The following
adjustments need to be made:
COM1 / COM 2
Enter which COM port the unit is connected to.
RC Active
Mark this checkbox to inform the program about
the presence of a remote control unit. The
program will from now on check at start up if the
unit is present, and ready.
Operation
The remote control unit is divided in sections for
Players A and B, and the Sample Player. The
basic functionality corresponds to the module
descriptions on the according pages for Player
and Sample Player.
If the program finds a external remote control unit
at startup, and the controls of this unit are
configured for Pitch, the pitch controls in the
player’s program window will be locked. Pitch
modifications can then only be made at the
remote control unit. The sliders on the monitor
the merely indicate the slider position on the unit.
The purpose of the sliders and the programmable
multi purpose buttons can be assigned in the
Program Options, register tab remote control
unit. The two sliders on the two players [10] (Slider
A and B in the Program Options) can either be
used to control pitch, or volume. Thus, when using
a notebook mixing can be done without external
mixer, and the pitch will be adjusted by software.
The slider in the Sample Player [47] (Slider C in
the Program Options) can be programmed to
control sample volume, sample pitch, or manual
fading between player A and player B.
Also the multi purpose buttons in
the top right corner of the two
players [49], [50] and [51] can be
configured for different functions.
101
BPM Studio
Controls at the front side of the
device:
[3] Cue-Play-Button
This button combines the two buttons Cue and
Play. If the player is in play mode (The green LED
[46] is on) it will jump back to the previous Cue
Point and start playing from there on, upon
pressing the [Cue-Play] button. If the player is in
pause mode, it will jump to the current Cue Point,
and play from there on.
Alternative Cue-Play Function
Alternatively to the functions of the [Cue-Play]
button described above, another variant can be
selected in the Program Options. If this other
variant is selected, the title will start playing upon
pressing the [Cue-Play] and will play as long as
the button is held. Upon releasing the button the
title will be reset to the current Cue Point
RC V3 Description
[10] Pitch Control
Adjust this control to the desired playback speed.
On the display [40] the deviation will be indicated
in %.
This control is only active when the [Pitch] –
button [24] is switched on, and the Pitch-LED [25]
is also on.
[19] Time Button
With this button the time indicator in the display
[40] can be switched between elapsed, and
remaining playtime.
[24] Pitch Button
This button can block adjustment of the playback
speed with the [Pitch-Control] [10]. The Pitch
LED [25] will indicate the current status.
[25] Pitch LED
This LED indicates if the Pitch Control [10] is
active.
[4] Cue Button
Upon pressing this button the player will jump
back to the previous Cue Point, and switch to
pause mode.
When pressing the button for longer than one
second, the player will jump back to beginning of
the title res. will jump back to that Cue Point when
pressing for more than one second again.
[5] Play Button
When pressing this button the player will start
playing from its current position, res. from the set
Cue Point. If pressed again the player will go back
to pause mode.
The current starting position of the player will be
saved as Cue Point if the Play button is pressed
again, and can be located with again at any time
with the [Cue] button.
[28] Sample Buttons 1 to 9
These buttons start the samples 1 to 9 of the
Sample Player of BPM Studio. Read the chapter
Sample Player in this manual to learn about the
different possibilities when working with samples.
[29] Sampler-Status-LED
The three colored status LED indicates the mode
of the Sample Player. If green, the Sample Player
is ready. Orange means ready in scratch mode.
A red LED indicates that data is loaded into the
Sampler. During this period no samples can be
played.
[30] Sampler-Control, res. controlling
the Preview Player
With the two buttons
[9] Pitch-Bend-Button
With these keys the playback speed can
temporarily be in- or decreased. An indispensable
tool when synchronizing the beats of two titles
102
and
the Sample
Player’s output can be assigned to Player A or
Player B. This is only necessary if the Sample
Player does not have its own sound card channel
assigned, res. only two channels are available
(depending on hard- and software outfit of your
system) The [0] – button stops the playback of all
samples.
BPM Studio
RC V3 Description
Controlling the Preview-Player:
Whenever the Sample-Player is in pause-mode,
meaning, when no sample is played, you can start
the preview player from within the File Archive
with the [0] button. Now the selected title will be
played over the monitor channel and can be
screened independently from the running
[40d] Indicates the pre load buffer
[40e] Current playtime (Can be switched between
ELAPSED and REMAIN with the [TIME] button
[19])
[40] LCD Displays
[40f] Indicates the selected pitch range. This
selection can be made with the multi purpose
buttons
A, B, and C ([49], [50] and [51]) if this is set up
accordingly in the Program Options. (see also
page 11)
In the LCD display the most important feedback
of the particular player is indicated.
[40g] Signal level indicator
program. In this mode the two
and
buttons function as rewind and fast forward.
[41] to [44] Track- and Search buttons
With the track buttons you can select titles in
currently loaded play list. The search buttons are
used for exact setting of Cue Points. For this
purpose a small portion of the title will be played
as a loop. The position of this loop will then be
moved with the search buttons.
Also read the chapter about players in this
manual.
[40a] Indicates if speed control is applied with or
without master speed function. (At this remote
control unit only at the program window of the
two players).
[45] Cue LED
This LED will come on if the player goes into
pause mode
[46] Play LED
[40b] The deviation of the title from its standard
speed in %
This LED will come on if the player goes into play
mode
[40c] Current title. Here the title and artist are
indicated out of the ID3 tag of this MP3 File. This
display will scroll automatically if not all
information of this tag can be displayed. If
problems with the system’s performance are at
hand, this scrolling can be deactivated in the
Program Options, on the register tab remote
control unit.
[47] Manual Fader res. Sampler Pitch
The horizontal control below the Sample Player
can be used as manual fader, sample volume
control, or pitch control of the sample player. The
according settings are defined in the Program
Options, on the remote control register tab.
When set as manual fader cross fades between
player A and B can be created without external
mixer.
103
BPM Studio
[49], [50], [51] Universal keys
The universal keys can be verified in the program
options, section Remote Control , every time as
described below:
The A [49] key:
The B [50] key:
The C [51] key:
-
Pitch range 1
Player A Monitor
Loop - Sampler Record
Pitch range 2
Player B Monitor
Loop - Sampler play
Pitch range 2
CD Player Monitor
Loop - Sampler Play
RC V3 Description
[38] Serial cable socket (reverse side)
Connect plug (9-pin, Sub-D) of Remote Control
Unit through serial cable to your PC. The maximal cable’s length is 15 m, however we do not
recommend to use more than 10 m.
[39] Power supply socket (reverse side)
Connect delivered power supply cable (9 V, at
least 500 mA).
[52] Fader start cable socket (reverse side)
Connect to this plug (9-pin, Sub-D) an Fader start
cable which is optional available as accessory
by ALCATech. Please read instructions of ‘Fader
start’ on the following pages of the manual before
using it the first time.
Fader Start Functions RC V3 (BPM Studio Pro/HW from Ver. 3.00 B)
Fader start functions are only working with a
Remote Control Unit from Ver. 3.00 B. According
to the Remote Control Unit, connection of the
mixer (fade start enabled) via the Fader-StartAdapter (special accessory) or by the normal 3,6
mm stereo jack cable. Please pay attention to
the installation instructions in the chapters of
respective RCs, if you have acquired adapter
separately or later.
From Ver. 3.00 B will be supported:
Mixer with Reedcontact or microsensor,
Mixer with of impulse control (for example
PIONEER) is Ver. 3.00 C required.
The version number of your Remote Control Unit
will be shown during start-up / Program start of
BPM Studio. (By pressing CTRL key, the dialog
box stays visible until the key will be released
again).
104
In the program options, you can choose the
following different operation modes:
Fader Start (Program options / Remote
Control Unit)
If this checkbox is active, then Player starts when
the control of the external mixer will be put on.
Fader Stop (Program options / Remote
Control Unit)
If this checkbox is active, then Player stops when
the control of the external mixer will be put off.
RC V3 Description
BPM Studio
Fader Start Functions RC V3 (BPM Studio Pro/HW from Ver. 3.00 B)
So you can connect Fader start adapter to
Remote Control Unit and to the external Mixer
105
106
RCP-1001
BPM Studio
Front view
Reverse view
RCP-1001 view
BPM Studio
RCP-1001 Description
6. Remote Control Unit RCP-1001
Remote Control Unit RCP-1001 is a simple
version of the RCP-2001 with a limited functions
range. It works with the BPM Studio Professional
und with BPM Studio LE ex Version 4. Besides of
very clear VFD displays, it is equipped , exactly
as RCP-2001, with Track Selector and Jog Shuttle
Wheels as well. It allows among other to choose
directly the titles of the file archives (only BPM
Studio Pro software). If external Remote Control
Unit is logged-on in the program options, then
program examines during start up, if the Remote
Control Unit is connected and operative.
Installation
(Please, read the instructions on how to connect
the Remote Control Unit on page 12 and
instructions how to run the program for the very
first time on page 13).
Connect [REMOTE/PC] [38] socket of Remote
Control Unit using the supplied cable to a serial
port (COM1 or COM2) on your computer. Power
supply is given by delivered power adapter.
Following settings should be made:
COM1 / COM 2
Select to which COM portthe Remote Control Unit
is connected
RC Active
Select this check box to inform the program that
a Remote Control Unit is connected. Every time
the program is started it will check, if Remote
Control Unit is connected and operative.
Operation
The Remote Control Unit contains a controller
for both Player A and B. The basic functionality
is the same as described in the section of the
manual dedicated to the player. When the program finds an external Remote Control Unit during
its startup and the Remote Control Unit has the
pitch button activated, then the pitch slider of both
players in the program are locked. Only the
external Remote Control Unit can change the
pitch. The slider on the screen shows merely the
position of the slider on the Remote Control Unit.
Using the Remote Control options tab in the program options, you can program the slide bars.
They are adjustable by either Pitch or volume. If
you are using the notebook version, it is also
possible to mix without an external mixer. The
Pitch setup will be taken over by the software.
107
BPM Studio
Control elements on the front side
of device:
[1] [2] Jog Shuttle Wheel
The Jog Shuttle Wheel allows you to use a lot of
the BPM Studio functions easily and
ergonomically. The external ring [1] and the
internal disc [2] are working touch sensitive. If
the ring is moved further i.e. if the internal wheel
is moved more quickly so the parameter
modification of the player will be made more
quickly. Jog Shuttle Wheel have 3 operation
modes: Search, Cue und Archive mode.
Jog Shuttle Wheel in Search Mode:
This is the standard mode which is active during
play of any title. Search Mode will be shown in
the Display [14] by symbol
. You can
influence the play back of the loaded or played
title with the wheel.
You can move the loaded title forward or in the
reverse direction using the external ring.
According to the turn angle of the ring [1], there
are 3 different search speeds available (+1, +2,
+3 or -1, -2, -3) and step mode where you can
play the title in 1 minute steps (+min or -min).
Using the internal disc [2] of the Jog Shuttle Wheel
this title will slow down or accelerate. It works
also when title slows down straight by BRAKE
function or on start-up.
108
RCP-1001 Description
Jog Shutter Wheel in Cue Mode:
If the Player is in Pause Mode, then a Cue Point
can be set exactly with the internal disc [2]. If the
Player is stopped and the disc will be moved by
one step, then the Player goes into this mode
and 160 ms of the current play position will be
played repeatedly as Loop. This position can be
now positioned exactly before the next Beat.
Changes of the Cue-Point are taken over by
pressing the Cue key anew.
Beat-Stepping:
If in the Cue mode the [ LOAD] key [11] is
additionally held down, then you can move exactly
step-by-step forward or backwards to a Beat in
the title. Read chapter “Beat Stepping using the
BPM Studio” too.
Jog Shuttle Wheel in Archive Mode:
In the Archive mode you can comfortably navigate
in File Archive or Playlist Archive using this wheel.
You can switch into the appropriate mode using
[Archive] or [P.List] keys [16], [17]. The archive
mode is shown in the display by the symbols
or
. Choose the desired group in
left part of archive window using external ring [1].
Once more you can choose from four different
Scroll speeds. -1 or 1 switches exactly one group
further or back. +2/+ 3 or -2/-3 present two
different search speeds in the list with the groups.
+min/-min finally moves the selcetion bar to the
beginning or to the end of the list.
A group will be opened if you stay longer than
one second on a group using the selection bar.
Then, you can select the subgroups using the
Jog Wheel. Now in this case you can load the
complete group into Playlist by pressing the
[LOAD]-key [11].
You can also select any title from the group using
internal disc [2]. Loading may be made also by
[LOAD]-key [11]. By a simple click, the title will
be loaded into Playlist after the marked position.
RCP-1001 Description
If you would like to play the title immediately, then
load it directly to the Player by double click. The
just selected group or title will be shown in the
display [14] during the selection using the Jog
Shuttle Wheel. Therefore the Archive can be
operated without looking constantly at the monitor.
You can move back to the Search mode by
pressing the [ARCHIVES] or [P.List] key [16, 17]
anew. The Archive mode ends automatically after
10 seconds without any entry.
[4] Cue Button
Pressing this key moves the player back to the
last Cue-Point and goes into Cue mode.
Press the Cue key longer than one second and
the player then moves to the beginning of the
title or by pressing one second again will move it
to the current Cue-Point.
BPM Studio
[11] LOAD Button
The function of this key depends on the set mode
of the Jog Shuttle Wheel [1] and [2]. In Search
mode (standard), the next title of the Playlist is
loaded into0 the Player by pressing of the [LOAD]
key.
In Cue mode, additional holding of [LOAD] key
will cause a change of current position of CuePoint by beat or by tact (see chapter ‘Beat
stepping using BPM Studio’ too). In Archive mode,
pressing the [LOAD] key will load the selected
title into the Playlist using the Jog Shuttle Wheel.
This title will be loaded into Player immediately
by double click.
Holding the key longer than 3 seconds will replace
the complete Playlist by the selected group or
playlist in the archive.
[12] Track Selector
[5] Play Button
Pressing this key starts the player from the current
position (i.e. the Cue-Point). If the Play button is
pressed again, the player goes into Pause Mode.
The current start position of the player (before
any anew pressing on the Play key is made) is
stored as a Cue-Point and can be started again
with the [Cue] key any time.
You can move inside the Playlist using the Track
Selector. A full turn of the ring switches 24 titles
down the list. If you navigate in really big lists,
then by pressing the Track Selector and turning it
at the same time, you can move by 10 steps at a
time. By pressing the button the selected title will
be loaded into the Player.
[14] The VFD display
[9] Pitch-Bend Buttons
Using these keys, you can temporarily increase
or decrease the play speed. These keys are an
indispensable tool for synchronizing the second
title’s Beats. They are used to navigate by Beat
in a title, if the Player is in Cue Mode (see also
chapter ‘Beat stepping using BPM Studio’).
In the VFD display, all the parameters and activity
modes of the respective Player will be shown as
follows:
[10] Pitch Slider
Set the desired playback speed using the Pitch
Slider. The actual speed in BPM appears on the
display [14] as well as the difference in percent.
The slider is only active if the [Pitch] key [24] is
on and the Pitch-LED [25] enlights.
109
BPM Studio
[14a] Indicates the number of loaded Tracks
[14b] NEXT TRACK indicator.
(Not active by RCP-1001)
[14c] Displays the time. Playtime of the title is
shown in minutes, seconds and in tenth of
seconds. Time information can be switched over
by using the [TIME] key [19] between total title
play time (ELAPSED), remaining title play time
(REMAIN) and total remaining play time of the
playlist (TOTAL). If the Player is in Cue mode,
then the current Cue-Point will be shown.
[14d] Operation mode of the time display,
switchable by the [TIME] key [19]
[14e] BPM value indicator, here the display will
show BPM value taken from the ID3-Tag of the
loaded title or value of real time BPM Counter.
[14f] Displays Pitch value in percents.
[14g] Displays the Pitch mode type. According
to the chosen mode in the program panel, you
will see if the changes of speed will work with or
without change of the sound level (MasterTempo).
[14h] Displays the mode of Jog Wheel. Using the
Archive [16], [17] keys it is possible to switch
between operation modes of the Jog Wheels.
indicates File Archive Mode,
indicates the Playlist Archive Mode and the
Search Mode (standard operation
mode).
RCP-1001 Description
This display can be also used to show a lot of
supplementary information. In the archive mode
for example, the respective selected group,
Playlist or the title in archive will be displayed here
temporary.
[14l] Displays the four additional functions: Single/Continous-Play, Shuffle and Repeat.
Programming can be done using the [MODE] key
[20] and [SET] key [21].
[14 m] Display for the Loop-Sampler
(not active in BPM Studio LE or RCP-1001)
[16], [17] Archive Keys
Using the [ARCHIVE] [16] key you can switch
the Jog Wheel [1], [2] into the File Archive Mode.
It is indicated additionally in the display by symbol.
The [P.List] key [17] switches to the Playlist
Archive mode. By pressing the key again the
Search mode will be switched back (switching
back takes place automatically as well, when any
other key of the Player is pressed or after 30
seconds, if you have not moved the Jog Shuttle
Wheel during this time).
[19] Time Button
Using this button you can switch the play time
indicator in display [14] between total play time
(ELAPSED) and remaining time of title (REMAIN).
(TOTAL is not supported at present)
[14i] Bar indicator displays the current play
position
[14k] The title display shows the current loaded
title and the interpreter from ID3- Tag of the MP3
file. The display scrolls automatically when data
cannot be completely presented. If you
experience problems with the performance of your
system, title scrolling can also be turned off in
the program options of the Remote Control Unit.
110
[20] MODE Button
By this button you can program four additional
functions: Single-/Continous-Play, Shuffle and
Repeat.
By pressing this [MODE] button multiply you can
select one of the modes. Corresponding indicator
will blink in display [14].
RCP-1001 Description
BPM Studio
[21] SET Button
(Also BPM Match key) The current BPM value of
respective (Master) Player will be taken over by
pressing the SET key in Standard Mode. Read
also chapter ‘Beat-Matching using BPM Studio’.
Please read in this chapter the exact description
of the function of the SET button. If the
Programming Mode is active ( [MODE]-key [19]
pressed), pressing the SET key will then switch
that function on or off.
[24] Pitch Button
Using this key, you can deactivate the settings of
the playback speed via the [Pitch slider] [10].
Reverse side sockets:
Now, using the [SET]-key [21] function, you can
switch it on/off.
:
Continous Play
If this mode is activated, then next title in the
Playlist will be automatically loaded and played
at the end of the current title.
Single Play
:
If this mode is activated, then next title in the
Playlist will be automatically loaded but not started
at the end of the current title.
Shuffle
:
The titles in the Playlist will be played in random
order. Each change of the Playlist will cause a
random new title order of list as long as this mode
is enabled.
:
Repeat
If this function is active, then the loaded title is
played continuously. If this function is turned off,
then the next title of the list will be loaded.
111
BPM Studio
RCP-1001 Description
[36] Fade Start Input Socket
[36a] Device ground
This socket usually works with all mixers that have
an available fade/start function, for example the
PIONEER series. Connect the plug (1/8 inch jack)
of the Remote Control Unit using a universal cable
to your mixer. Connect the ground device (GND
[36a]) with the ground of the mixer.
Connect the device ground (GND) to the ground
of mixer.
How it works:
Both players are controlled by a separated 1/8
inch stereo jack. The player starts by locking the
contact S1 (temporarily or constantly) and stops
when contact S2 is locked (temporarily or
constantly). Through program options you can
activate fade start and also stop the separate fade.
Do not set up the grip ground to the same as the
device ground! This will avoid a short circuit
between the device and the grip ground.
[37] Remote start input (P. START)
This input works with mixers through the Remote
Start function (or Puls Start). An example would
be some of the BEHRINGER models. Both
players will be controlled using one contact.
Connections to the mixer are mostly
accomplished through a ¼ inch - mono jack.
Connection to the BPM Studio Remote Control
Unit RCP-1001 by the RCP-2001 can be made
through a 1/8-inch stereo jack. So, please use an
adapter connecting the 1/8-inch stereo jack to ¼
inch - mono jack. Remote Start Input has to be
chosen in the program options (index card
„Remote Control”, Checkbox „Puls Start”). Finally
you can activate Fader-Start and Fader-Stop.
How it works:
Player A is started by locking contact A and is
stopped by locking it once more. The same is
valid for Player B and contact B. Through program
options you can activate fade start and also stop
separate fade.
[38] Serial cable socket
Connect the (9-pin, Sub-D) plug of the Remote
Control Unit with the supplied serial cable to your
PC. The maximum length of cable that can be
used is 49.2 feet (15 m), however we do not
recommend using more than 32.8 feet (10 m).
Another socket to connect power supply and
serial connection is on the left side of casing. This
makes it possible to use Remote Control Unit also
as table device without bothering plugs on the
back side of device. To use it you need a special
cable, which is available from your local
ALCATech dealer or directly from ALCATech.
[39] Power supply socket
Connect delivered power supply cable (12 V, at
least 1 A) to this socket.
112
diese Seite ist zu entfernen und durch das Doppelblatt zu ersetzen
BPM Studio
Front view
RCP-2001-B
RCP-2001-B Description
113
114
RCP-2001 view
Reverse view
RCP-2001-B
BPM Studio
BPM Studio
RCP-2001 Description
7. Remote Control Unit RCP-2001
RCP-2001-B with Pitch Wheel
The Remote Control Unit RCP-2001 is available
in two different designs. The RCP-2000-A is
equipped with a conventional Pitch-Slider. The
RCP-2001-B is equipped with Pitch-Wheels
developed by ALCATech. These Pitch-Wheels
enable independent changes of Pitch value of
both Players between Software and Remote
Control Unit. It is especially of importance by
using the BPM Match function or by connecting
several Remote Control Units. Not lastly it is also
possibility to make finer regulation of Pitch values
up to 0.1 % steps. The RCP-2001 works with BPM
Studio LE and Professional from Version 4 up. In
addition to the easily readable VFD display, it is
equipped with Direct-Cue keys, Loop - Sampler
and Jog Shuttle Wheels. Among others, it allows
direct selection of titles from the File archives (only
in BPM Studio Pro software).
Installation
(Also, read the instructions on how to connect
the Remote Control Unit on page 12 and
instructions how to run the program for the very
first time on page 13).
Connect [REMOTE/PC] [38] socket of Remote
Control Unit using the supplied cable to a serial
port (COM1 or COM2) on your computer. Power
supply is given by delivered power adapter. All
settings will be made by index card Remote
Control and are in chapter 3.18 ‘Program options’
detailly described.
RCP-2001-A
with Pitch Slidern
Operation
The Remote Control Unit controls both Players
A and B. The essential function of the unit
corresponds to the description of the player on
the corresponding pages of that manual. If the
program finds an external Remote Control Unit
and the sliders of the Remote Control Unit are
configured at Pitch during start up, then the Pitch
sliders of both players are set in the program panel
interface. Then Pitch modifications can be made
but only using the external Remote Control Unit.
The Sliders on the screen will only show the
position of the sliders.
Using the Remote Control options tab in the
program options, you can program the slide bars
of the RCP-2001-A. They are adjustable by either
Pitch or volume. If you are using the notebook
version, it is possible to mix with the RCP-2001A without using an external mixer. The pitch setup
will be taken over by the software.
115
BPM Studio
Control elements on the front side
of device:
[1] [2] Jog Shuttle Wheel
The Jog Shuttle Wheel allows you to use a lot of
the BPM Studio functions easily and
ergonomically. The external ring [1] and the
internal disc [2] are working touch sensitive. If
the ring is moved further i.e. if the internal wheel
is moved more quickly so the parameter
modification of the player will be made more
quickly. Jog Shuttle Wheel have 3 operation
modes: Search, Cue und Archive mode.
Jog Shuttle Wheel in Search Mode:
This is the standard mode which is active during
play of any title. Search Mode will be shown in
the Display [14] by symbol
. You can
influence the play back of the loaded or played
title with the wheel.
You can move the loaded title forward or in the
reverse direction using the external ring.
According to the turn angle of the ring [1], there
are 3 different search speeds available (+1, +2,
+3 or -1, -2, -3) and step mode where you can
play the title in 1 minute steps (+min or -min).
Using the internal disc [2] of the Jog Shuttle Wheel
this title will slow down or accelerate. It works
also when title slows down straight by BRAKE
function or on start-up.
116
RCP-2001 Description
Jog Shutter Wheel in Cue Mode:
If the Player is in Pause Mode, then a Cue Point
can be set exactly with the internal disc [2]. If the
Player is stopped and the disc will be moved by
one step, then the Player goes into this mode
and 160 ms of the current play position will be
played repeatedly as Loop. This position can be
now positioned exactly before the next Beat.
Changes of the Cue-Point are taken over by
pressing the Cue key anew.
Beat-Stepping:
If in the Cue mode the [ LOAD] key [11] is
additionally held down, then you can move exactly
step-by-step forward or backwards to a Beat in
the title. Read chapter “Beat Stepping using the
BPM Studio” too.
Jog Shuttle Wheel in Archive Mode:
In the Archive mode you can comfortably navigate
in File Archive or Playlist Archive using this wheel.
You can switch into the appropriate mode using
[Archive] or [P.List] keys [16], [17]. The archive
mode is shown in the display by the symbols
or
. Choose the desired group in
left part of archive window using external ring [1].
Once more you can choose from four different
Scroll speeds. -1 or 1 switches exactly one group
further or back. +2/+ 3 or -2/-3 present two
different search speeds in the list with the groups.
+min/-min finally moves the selcetion bar to the
beginning or to the end of the list.
A group will be opened if you stay longer than
one second on a group using the selection bar.
Then, you can select the subgroups using the
Jog Wheel. Now in this case you can load the
complete group into Playlist by pressing the
[LOAD]-key [11].
You can also select any title from the group using
internal disc [2]. Loading may be made also by
[LOAD]-key [11]. By a simple click, the title will
be loaded into Playlist after the marked position.
RCP-2001 Description
If you would like to play the title immediately, then
load it directly to the Player by double click. The
just selected group or title will be shown in the
display [14] during the selection using the Jog
Shuttle Wheel. Therefore the Archive can be
operated without looking constantly at the monitor.
You can move back to the Search mode by
pressing the [ARCHIVES] or [P.List] key [16, 17]
anew. The Archive mode ends automatically after
10 seconds without any entry.
[3] Cue-Play button
This key unites two keys: Cue and Play. If the
player is in Play Mode (green LED [46] lights),
then the player moves back to the last Cue-Point
by pressing the the [Cue-Play] button and begins
to play again from there. If the player is in Cue
Mode, then the title will be started from the current
Cue-Point.
Alternative Cue-Play function
As alternative to the described function of the
[Cue-Play] key, second variant can be chosen
from the program options. The title starts then by
pressing the [Cue-Play] key and goes until the
key is released and then it moves back to the
current Cue-Point.
[4] Cue Button
Pressing this key moves the player back to the
last Cue-Point and goes into Cue mode. Press
the Cue key longer than one second and the
player then moves to the beginning of the title or
by pressing one second again will move it to the
current Cue-Point.
[5] Play Button
Pressing this key starts the player from the current
position (i.e. the Cue-Point). If the Play button is
pressed again, the player goes into Pause Mode.
The current start position of the player (before
any anew pressing on the Play key is made) is
stored as a Cue-Point and can be started again
with the [Cue] key any time.
BPM Studio
[6], [7], [8] Loop Player
Using Loop Player you can repeat any
programmed sequence as often as you wish. You
can set start and end points on-the-fly. Each Loop
can also be stored in Direct Cue key [15] and is
also at the disposal again after system restart.
You will find exact description how it works in
chapter ‘First steps - Working with Loop Player”.
[9] Pitch-Bend Buttons
Using these keys, you can temporarily increase
or decrease the play speed. These keys are an
indispensable tool for synchronizing the second
title’s Beats. They are used to navigate by Beat
in a title, if the Player is in Cue Mode (see also
chapter ‘Beat stepping using BPM Studio’).
[10] Pitch Slider
Set the desired playback speed using the Pitch
Slider. The actual speed in BPM appears on the
display
[14] as well as the difference in percent. The slider
is only active if the [Pitch] key [24] is on and the
Pitch-LED [25] enlights.
[11] LOAD Button
The function of this key depends on the set mode
of the Jog Shuttle Wheel [1] and [2]. In Search
mode (standard), the next title of the Playlist is
loaded into0 the Player by pressing of the [LOAD]
button. In Cue mode, additional holding of LOAD
button will cause a change of current position of
Cue-Point by beat or by tact (see chapter ‘Beat
stepping using BPM Studio’ too). In Archive mode,
pressing the LOAD button will load the selected
title into the Playlist using the Jog Shuttle Wheel.
This title will be loaded into Player immediately
by double click. Holding the key longer than 3
seconds will replace the complete Playlist by the
selected group or playlist in the archive.
117
BPM Studio
[12] Track Selector
You can move inside the playlist using the Track
Selector. A full turn of the ring causes switching
24 titles down the list. If you navigate in really big
lists, then by pressing the Track Selector and
turning it at the same time, you can move by 10
steps at a time. By pressing the button chosen
title will be loaded into player.
[13] MEMORY button
(not active in the BPM Studio LE)
This key has vast functions to store and delete
different Cue-Points, Loop and other parameters.
Pressing this button switches the Player into
memory mode. It will be indicated while the key
lights in green. The memory mode will be
abandoned automatically after 10 seconds
without any entry.
RCP-2001 Description
7.) Holding on [MEMORY] button and
simultaneously pressing key A of the Loop Player
[6] will delete stored Loop.
8.) Pressing on [MEMORY] button longer than 3
seconds will complete DirectCue keys and Loop
Player deleted.
You will find detailed description of these functions
in chapters “Working with DirectCue keys” and
“Working with Loop Player” of manual worker.
[14] The VFD display
In the VFD display, all the parameters and activity
modes of the respective Player will be shown as
follows:
1.) If the Player is in the Play mode, then pressing
[MEMORY] button, followed by DirectCue key
[15] will set Cue-Point “on-the-fly”.
2.) If the Player is in the Pause mode, then
pressing [MEMORY] button, followed by
DirectCue key [15] will store current play position
as Cue-Point on this DirectCue key.
3.) If the Player is in the Loop Player mode, then
pressing [MEMORY] button, followed by
DirectCue key [15] will store current Loop on
DirectCue key.
4.) If the Player is in the Loop Player mode, then
pressing [MEMORY] button, followed by Sample
Player key will store current Loop on this Sample
Player key [28].
5.) Pressing on [MEMORY] button, followed by
[SET] -key [21] will take over BPM value
discovered by real time BPM-Counter into ID3Tag.
6.) Holding on [MEMORY] button and
simultaneously pressing DirectCue key will delete
Cue-Point or Loop of this key.
118
[14a] Indicates the number of loaded Tracks
[14b] NEXT TRACK indicator.
(Not active by RCP-1001) Indicates the Titel
"parked" by the [NEXT TRACK]-button [18]
[14c] Displays the time. Playtime of the title is
shown in minutes, seconds and in tenth of
seconds. Time information can be switched over
by using the [TIME] key [19] between total title
play time (ELAPSED), remaining title play time
(REMAIN) and total remaining play time of the
playlist (TOTAL). If the Player is in Cue mode,
then the current Cue-Point will be shown.
[14d] Operation mode of the time display,
switchable by the [TIME]-key [19]
RCP-2001 Description
[14e] BPM value indicator, here the display will
show BPM value taken from the ID3-Tag of the
loaded title or value of real time BPM Counter.
[14f] Displays Pitch value in percents.
[14g] Displays the Pitch mode type. According
to the chosen mode in the program panel, you
will see if the changes of speed will work with or
without change of the sound level (MasterTempo).
[14h] Displays the mode of Jog Wheel. Using the
Archive [16], [17] keys it is possible to switch
between operation modes of the Jog Wheels.
[Archive] indicates File Archive Mode, [P.List]
indicates the Playlist Archive Mode and the
[Search] Search Mode (standard operation
mode).
[14i] Bar indicator displays the current play
position
[14k] The title display shows the current loaded
title and the interpreter from ID3- Tag of the MP3
file. The display scrolls automatically when data
cannot be completely presented.
If you experience problems with the performance
of your system, title scrolling can also be turned
off in the program options of the Remote Control
Unit.
This display can be also used to show a lot of
supplementary information. In the archive mode
for example, the respective selected group,
Playlist or the title in archive will be displayed here
temporary.
[14l] Displays the four additional functions: Single/Continous-Play, Shuffle and Repeat.
Programming can be done using the [MODE] key
[20] and [SET] key [21].
BPM Studio
[15] DirectCue keys 1 - 6
(Not active in the BPM Studio LE)
The Direct-Cue keys make it possible to store up
to 6 favourite positions in any title as Cue-Point
on-the-fly or optionally to save Loops recorded
with the Loop Player. Then, these points and
Loops can be started just by a single touch of the
DirectCue key. Stored Cue-Point will be indicated
by a key lightning in red. If a stored Loop is on
this key, then key color is changed into orange.
Read all about these keys in chapter “Working
with DirectCue keys” and “Working with the Loop
Player”.
[16], [17] Archive button
Using the [ARCHIVE]-key [16] you can switch
the Jog Wheel [1], [2] into the File Archive Mode.
It is indicated additionally in the display by
symbol. The [P.List] key [17] switches
to the Playlist Archive mode
. By pressing
the key again the Search mode will be switched
back
(switching back takes place
automatically as well, when any other key of the
Player is pressed or after 30 seconds, if you have
not moved the Jog Shuttle Wheel during this time).
[18] NEXT TRACK button
Using this function, you can “park” any next title
in waiting position during current reproduction of
a title. Then, it will be played automatically as next
title irrespective of current Playlist. Press NEXT
TRACK key. In the display [14] will be
displayed. Now, choose a title from current Playlist
by the TRACK SELECTOR [12]. (Chosen title is
shown in the display under
).
Optionnaly you can enlighten a title immediately
and then start NEXT TRACK also by pressing
TRACK-Selector.
[14m] Display for the Loop-Sampler
(not active in BPM Studio LE or RCP-1001)
119
BPM Studio
[19] Time Button
Using this button you can switch the play time
indicator in display [14] between total play time
(ELAPSED) and remaining time of title (REMAIN).
(TOTAL is not supported at present)
RCP-2001 Description
By pressing this [MODE] button multiply you can
select one of the modes. Corresponding indicator
will blink in display [14]. Now, using the [SET]key [21] function, you can switch it on/off.
:
Continous Play
If this mode is activated, then next title in the
Playlist will be automatically loaded and played
at the end of the current title.
Single Play
:
If this mode is activated, then next title in the
Playlist will be automatically loaded but not started
at the end of the current title.
[20] MODE Button
By this button you can program four additional
functions: Single-/Continous-Play, Shuffle and
Repeat.
:
Shuffle
The titles in the Playlist will be played in random
order. Each change of the Playlist will cause a
random new title order of list as long as this mode
is enabled.
Repeat
:
If this function is active, then the loaded title is
played continuously. If this function is turned off,
then the next title of the list will be loaded.
[21] SET Button
(Also BPM Match key) The current BPM value of
respective (Master) Player will be taken over by
pressing the SET key in Standard Mode. Read
also chapter ‘Beat-Matching using BPM Studio’.
Please read in this chapter the exact description
of the function of the SET button. If the
Programming Mode is active ([MODE]-key [19]
pressed), pressing the SET key will then switch
that function on or off.
120
BPM Studio
RCP-2001 Description
[22] Tempo Button
[29] Sampler-Status-LED
Press this key to change the playback speed
without modification of the pitch. The TEMPO LED [23] indicates the Master-Tempo function.
Attention! The pitch range changes when closing
the Master Tempo function. Please also read the
information contained in chapter Player of this
manual.
3 colors LED display shows the Sample Player
status. If the green light is on, then Sample Player
is ready to work. Orange light indicates that
Scratch mode is ready. Red light indicates that a
file is loading into the Sampler Player. During this
time no sample can be played.
[23] TEMPO - LED
[30] Sampler Control and Preview
Player’s Control
Is lit if the Master Tempo function is active.
With both
[24] Pitch Button
Using this key, you can deactivate the settings of
the playback speed via the [Pitch slider] [10].
[25] Pitch-LED
and
keys you can assign
output of the Sample Player to Player A or Player
B. It is only necessary when no own
sound card channel is assigned or only two output
channels are at disposal (according to the
hardware and software configuration of your
system). [0] key stops playing all samples.
Is lit if the Pitch or Master Tempo function is active.
[26] BRAKE-LED
Is lit if the function BRAKE is active. If BRAKE is
in progress, then this LED is blinking.
[27] BRAKE Button
The BRAKE function simulates braking down to
0 or the push of a turn-table. The effect is triggered
if the BRAKE light is on and the title is started or
stopped using the [PLAY] button [5]. Once the
breaking effect of the title has started you can
slow it down or stop playing by using the internal
Jog Wheel disc.
[28] Sample Player [1] to [9]
Using these keys you can start the Samples to 9
of the BPM Studio Sample Player. Read section
Sample Player in this manual about different
possibilities of working with samples.
Preview Player’s Control:
If the Sample Player is in Pause mode, that
means, if no sample is played, you can start the
Preview Player of the File archive using the [0]
key. Now, the selected title will be played via the
monitor channel and can be heard irrespectively
of the running program. In this mode, the
and
keys work as fast forward and fast
reverse.
[31], [32], [33] Fade Control
(not active in the BPM Studio LE)
These three keys adjust the automatic Cross
fader.
[AUTO] [31] switches Auto-fade mode on or off.
If the Auto-fade mode is activated then this key
shines in red.
By the [FADE] key [32] you apply the set fade
process to the current title. This key blinks in red
as long as Cross fader is on and both Players
run. Using the [MODE] key [33] you can switch
between 6 different fade process presets. The
current running fade process will be deleted.
121
BPM Studio
[34] Pitch Wheel
(only in RCP-2001-B)
Set the desired playback speed using the Pitch
Wheel. On the display [14] the actual speed in
BPM and the difference in percent appear. The
Wheel is only active if the [Pitch] key [24] is on
and the Pitch-LED [25] is shining.
[35] Pitch Reset
(only in RCP-2001-B)
You can put the Pitch to 0 using this key.
RCP-2001 Description
Reverse Side Sockets:
[36] Fade Start Input Socket
This socket usually works with all mixers that have
an available fade/start function, for example the
PIONEER series. Connect the plug (1/8 inch jack)
of the Remote Control Unit using a universal cable
to your mixer. Connect the ground device (GND
[36a]) with the ground of the mixer.
How it works:
Both players are controlled by a separated 1/8
inch stereo jack. The player starts by locking the
contact S1 (temporarily or constantly) and stops
when contact S2 is locked (temporarily or
constantly). Through program options you can
activate fade start and also stop the separate fade.
Do not set up the grip ground to the same as the
device ground! This will avoid a short circuit
between the device and the grip ground.
[36a] Device ground
Connect the device ground (GND) to the ground
of mixer.
122
RCP-2001 Description
BPM Studio
[37] Remote start input (P. START)
[38] Serial cable socket
This input works with mixers through the Remote
Start function (or Puls Start). An example would
be some of the BEHRINGER models. Both
players will be controlled using one contact.
Connections to the mixer are mostly
accomplished through a ¼ inch - mono jack.
Connection to the BPM Studio Remote Control
Unit RCP-1001 by the RCP-2001 can be made
through a 1/8-inch stereo jack. So, please use an
adapter connecting the 1/8-inch stereo jack to ¼
inch - mono jack. Remote Start Input has to be
chosen in the program options (index card
„Remote Control”, Checkbox „Puls Start”). Finally
you can activate Fader-Start and Fader-Stop.
Connect the (9-pin, Sub-D) plug of the Remote
Control Unit with the supplied serial cable to your
PC. The maximum length of cable that can be
used is 49.2 feet (15 m), however we do not
recommend using more than 32.8 feet (10 m).
Another socket to connect power supply and
serial connection is on the left side of casing. This
makes it possible to use Remote Control Unit also
as table device without bothering plugs on the
back side of device. To use it you need a special
cable, which is available from your local
ALCATech dealer or directly from ALCATech.
How it works:
Player A is started by locking contact A and is
stopped by locking it once more. The same is
valid for Player B and contact B. Through program
options you can activate fade start and also stop
separate fade.
[39] Power supply socket
Connect delivered power supply cable (12 V, at
least 1 A) to this socket.
123
BPM Studio
Professional working with RCP-2001
8.1. Working with Loop Player
Using the Loop Player you can reapeat any
programmed sequence as often as you wish. Start
and exit points can be set on-the-fly and edited
any time later. Using the Tact-Stepping function
you can make each Loop wider or shorter in exact
steps of 4 Beats. Each Loop can be also stored
by the DirectCue key [15] or Sample Player key
[28] and will be also at the disposal again after
system restart.
(only Remote Control RCP-2001)
Press the[RECORD] key [6] to set the start point
of the sample (Point A) and to begin recording of
the sample.
will be shown in display and the
A key shines.
8.1.1. Recording and reproduction
of the Loop:
Learn in this section how you can record a
sequence of the running title as Loop. The Player
has to be in reproduction mode. To make first
attempts, we recommend to use any title with well
recognizable Beat (Dance, House or TechnoTrack). It would be best if you try to press keys A
and B in the exact tact.
Press (for example after exactly 4 beats or 1 tact)
the [STOP] key [7] to set the stop point of the
sample (Point B). Now, the Player goes
immediately into the Loop Mode and the stored
tact will be repeated constantly.
is shown in
the display and the keys A and B are lighting in
orange, the [EXIT/RELOOP] key will light in
green. Simultaneously LOOP A <-> B will be
shown in the title display.
As long as you pressed only the A key,
you can overwrite the old start point of
the Loop by pressing the A key anew and
you set new point on-the-fly.
124
As soon as the B key is pressed, you
can set the end point (B) on-the-fly by
pressing the B key and again and reduce
the Loop in this way.
Professional working with RCP-2001
BPM Studio
Set a start point at any position by pressing the
A key. After that A key lights in orange.
If you press the [EXIT/RELOOP] key, the sample
will be played up to the point B and then pass
seamless into the title again. In this time the
[EXIT/RELOOP] key and
are blinking.
Finally all the three keys (A, B and [EXIT/
RELOOP]) are lighting in orange.
Switch now to the Edit mode pressing the [CUE]
key ([CUE] key will light in red) and then the A
button. A key will start to blink. (This is usually
the Edit mode for the start point).
Press the B key. A Loop with exactly one tact (4
beats) is created automatically and played
instantly.
The Loop can be played again any time by
pressing the [EXIT/RELOOP] key.
8.1.2. Recording using Auto-Loop
function:
It is a little problematical to fix the end point of a
Loop manually exactly at the first attempt. The
Auto-Loop function of the BPM Studio helps at
this, while it automatically record a tact exactly
and then switches into the Loop-Play mode. Use
the Auto-Loop function as follows:
The DirectCue information cannot be
loaded into the Player in the Autofade
Mode. Please do NOT use this mode if
you want to use stored DirectCue’s.
125
BPM Studio
Now the B key and the [EXIT/RELOOP] key will
light in green.+
Now, using the Tact-Stepping function (ring of Jog
Shuttle Wheel). you can make the Loop longer or
shorter by a tact at a time. The result will be
constantly played by what other interesting effects
can be produced.
Professional working with RCP-2001
After that this key will light in orange, what
indicates that there is a stored Loop (Cue-Points
will be shown by a red key). The stored Loop can
be activated any time by pressing that key.
Thereupon it will be taken to the Loop Player (keys
[6] to [8]) and started. Also editing functions are
once more at your disposal as usually.
8.1.5. Loop storing by a Sample
Player key
The Player has to be in the Loop Play mode (Step
2 on the previous page).
8.1.3. Loop storing
You can store a Loop for later use in two different
ways. A Loop is at your disposal again after
system restart as soon as the title is loaded into
the Player.
As long as the Loop is played (A and B keys are
lighting in orange and the [EXIT/RELOOP] key
lights in green), the Loop can be stored by a
DirectCue key (see also “Working with DirectCue
keys”). This way up to 6 different Loops for each
title can be stored and always are at your disposal,
if the title is loaded to the Player. If the Loop should
be at your disposal as well when another title is
loaded, you can store it in the Sample Player.
8.1.4. Loop storing by a DirectCue key
The Player has to be in Loop-Play mode (Step 2
on the previous page).
Press the [MEMORY] key [13], next followed by
any of 6 DirectCue [15] keys.
126
Press the [MEMORY] key [13], next followed by
any of 9 keys of Sample Player [28]. Now, the
Loop is at your disposal any time in the Sample
Player by this key. Please, pay attention however
that it is not automatically a new independent
Sample. As soon as original title is deleted or
displaced from the system, the Loop gets lost.
8.1.6. Deleting of the Loop Player
Hold the [MEMORY] key [13] and press
simultaneously the A key of Loop Player [6].
Release all three keys and the sample will be
deleted (Deleting works also using the B key or
[EXIT/RELOOP] key).
Store the Loop by creating a real sample.
For this you can open the File Editor of
the corresponding Sampler key. The Loop
will be displayed here automatically by
start- and end-marker. Extend this area,
select it and then choose “Expor t
Selection” in context menu. Then, you
can load the stored sample the usual way
into the Sample Player.
Professional working with RCP-2001
BPM Studio
8.1.7. Editing a Loop
Recorded Loop can be edited and changed using
the Loop Player. Therefore the Player has to be
in the Cue mode. Therefore press the Cue key
[4]. Now, all the three keys of the Loop Player
light in orange and Cue key shines in red:
8.1.8. Beat-Stepping
Replacing of the start point (A):
Press the A key [6] now.
Hold the [LOAD] key [11] pressed and
additionally turn the disc of Jog Shuttle Wheel,
then you can move the A point exactly one tact
(per 4 beats).
After that this key blinks and 160 ms after this
point will be played repeatedly as Loop. (This Cue
mode is equal as editing of the Cue points. See
also chapter “Beat matching using the BPM
Studio”). In the title display “MOVING-> A” will be
shown additionally and the exact time of the start
point. Now, you can move the point using the disc
of Jog Shuttle Wheel:
We recommend to store the BPM value, exactly determined by the Realtime BPM Counter
earlier, using the key combination: [MEMORY] + [SET]. It decreases possible differences of
those positions in the title, where Beat cannot be predetermined exactly.
127
BPM Studio
If you hold the [LOAD] key [11] pressed, you can
navigate with the Pitch Bend buttons exactly one
beat forward or reverse.
Professional working with RCP-2001
Replacing of the end point (B):
The Player has to be again in Pause mode. Press
the B key [7].
After that this key will blink and the complete Loop
will be played. In the title display “MOVING-> B”
will be shown additionally and in the time display
the total length of the Loop, and the time between
A and B as well.
Now you can displace this point by the disc of
the Jog Shuttle Wheel.
Press again while the A key is still blinking to
transfer the changes.
You can also change the exit point equally by
pressing the B key in Edit mode or start the Loop
by [EXIT/RELOOP], for example for preliminary
listening. In every case, edited points are taken
over.
Read chapter “Beat Stepping” in this manual,
where you will find more about the way of how to
work exactly with these functions.
If the Player is in Cue mode (for example
by editing a normal Cue-Point), then this
point can be taken over immediately as
a A point. Then, by pressing on the A
key, you will arrive at once in Edit mode
for the start point.
128
This way an exact correction of the Loop is
possible, for example if the end point was not
exactly met during the first setting.
Professional working with RCP-2001
BPM Studio
Shifting of the end point by tacts
(Tact-Stepping):
Using the ring of Jog Shuttle Wheel, the end point
B can be moved in Edit mode by tacts (exactly 4
beats).
This means it is presupposed that the title is a 4/
4 tact. Also at a 2/4 tact, efficient results can be
reached, however not by titles with 3/4 or 6/8 tacts.
(1.) The Player is in Edit mode for the exit point
(B blinks).
Press again on the still blinking B key to take over
changes.
You can also change the exit point equally by
pressing the B key in Edit mode or start Loop by
[EXIT/RELOOP], for example for preliminary
listening. In every case, the edited point is taken
over.
It is necessary, to store the BPM value,
exactly determined by the Realtime BPM
Counter earlier, using the key
combination: [MEMORY] + [SET] . It
decreases possible differences of the
positions in the title, where Beat cannot
be predetermined exactly.
Move the ring of Jog Shuttle Wheel to the right
stop.
Now, the point of exit is moved behind by exactly
4 Beats (= 1 tact in 4/4 tacting) (2.) and the Loop
has been extended by 4 beats consequently. You
can repeat it as many times as you wish or reduce
the Loop once more.
129
BPM Studio
Professional working with RCP-2001
8.2. Working with DirectCue buttons
(only Remote Control RCP-2001)
The BPM Studio offers beside the standard Cue
function additionally 6 Direct-Cue keys. Therefore
it is possible to store up to 6 favourite positions in
any title on-the-fly as Cue-Point. Then, these
points can be called up without delay by a single
press of a Direct Cue key. All the stored DirectCue
points are available after system restart and at
your disposal after the title is loaded again. With
the Remote Control Units RCP-2001 you have
comfortable access via the Direct-Cue keys 1 to
6 [15]. In the user interface of the software (only
the BPM Studio Pro from Version 4 on up) all
DirectCue points will be shown alternately in the
title display. Read first how to use the Standard
Cue-Funktion.
If you activate now the [CUE] key [4], then the
Play position is set on this CUE point and the
Player is switched to CUE. Now, the [CUE] key
[4] lights in red and indicates, that the current
Play position is at the CUE point.
8.2.1. Define a Standard Cue-Point
The Player is in the Play mode, [PLAY/PAUSE]
key [5] enlights in green.
Press the [PLAY/PAUSE] key, then the Player is
in Pause mode, [PLAY/PAUSE] key blinks in
green and indicates that the Player is stopped at
the paused Play position.
A new pressing of the [PLAY/PAUSE] key [5]
allows you to continue the playing of the title.
Simultaneously, this PAUSE position will be stored
as Cue-Point.
By pressing the [PLAY/PAUSE] key [5] starts the
Player from the CUE point.
Now, you can stop the Player any time by pressing
the [CUE] key [4] and set it back to Cue-Point
position, in order to start it again by using the
[PLAY/PAUSE] key [5].
8.2.2. Editing of a Cue-Point
If the CUE point was not exactly hit by the [PLAY/
PAUSE] key [5], then it can be corrected later.
Therefore the Player has to be in CUE mode, the
([CUE] key [4] lights and in the display the current
CUE point appears(for example 01:22:43)).
130
Professional working with RCP-2001
Now, move the disc of the Jog Shuttle Wheel [2].
The [CUE] key [4] is extinguished and 160 ms
will be played as Loop repeatedly from that CUE
point. (See also chapter “Beat-Matching with the
BPM Studio”).
BPM Studio
Press again and then the corrections will be
stored by the [CUE] key [4] and the Player
remains in Pause Mode.
Now, you can displace that point using the disc
of the Jog Shuttle Wheel:
You can also immediately store corrections by
pressing the [PLAY/PAUSE] key [5] and start the
Player at once from this corrected Cue-Point.
8.2.3. Beat-Stepping
Hold the [LOAD] key [11] pressed and
additionally turn the disc of the Jog Shuttle Wheel,
then you can displace a Cue-Point one exact tact
(4 beats each).
Edit of a Cue-Point with the Remote
Control Unit RC V3 or the software can
be made by using the Search keys [43]
and [44].
8.2.4. Storing of a Cue-Point by a
DirectCue key
(Available only with the BPM Studio Pro Software
and only included with the Remote Control Unit
RCP-2001)
Every CUE point can be stored by a DirectCue
key for later use. In this case the Player has to be
in CUE mode (the [CUE] key [4] lights and in the
display the current CUE point appears (for
example 01:22:43)).
If you hold the [LOAD] key [11] pressed, then
you can navigate with the Pitch Bend keys each
time exactly one beat forward or reverse.
Press the [MEMORY] key [13] above the display.
Now, this one enlights for 10 seconds in green.
131
BPM Studio
Press the Direct Cue key within this 10 seconds
to store the Cue-Point onto this key.
The [MEMORY] key [13] is extinguished and the
selected Direct-Cue key lights in red.
Now, the title can be started any time from this
point by pressing the Direct-Cue key.
Professional working with RCP-2001
8.2.6. Editing of DirectCue points
Start the title to edit the DirectCue point by
pressing the corresponding DirectCue key.
Then stop the Player by pressing the [CUE] key
[4]. Now, you can edit the Cue-Point as written
on the previous pages. Changes can be
transferred by using the key combination
[MEMORY] and pressing the corresponding
DirectCue key anew.
8.2.7. Deleting of Direct-Cue points
The DirectCue points cannot be loaded
into the Player in Autofade Mode.
Please do NOT use this mode, if you
want to use stored DirectCue’s.
8.2.5. Setting DirectCue points
on- the-fly
You can store Cue-Points directly to the DirectCue
keys, while a title is played. Simply press the
[MEMORY] key [13] during play and then at the
desired time point (but within 20 seconds) on the
selected DirectCue key. Each pressing of
DirectCue key prolongs the holding time of the
[MEMORY] key by 20 seconds.
Hold the [MEMORY] key pressed and then press
the Direct-Cue key you wish to delete within 3
seconds.
8.2.8. Deletion of all DirectCue points
and the Loop Player
Hold the [MEMORY] key pressed longer than 3
seconds. Then, all the 6 DirectCue keys and the
contents of the Loop Player will be deleted.
By a Checkbox in the program options you
can prevent that pressing a DirectCue key
will result in an immediate start of the Player
by a Cue-Point or a stored Loop, if the
Player is in the Pause or Cue Mode. If the
Checkbox “Cue Memory Direct Start” is
deactivated, then Cue-Points are merely
taken into the Player and primarily started
by the [PLAY/PAUSE] key or the [EXIT/
RELOOP] key.
132
Professional working with RCP-2001
8.3. Beat-Stepping
Based on the exact BPM values of the Realtime
BPM Counter you can navigate unrestricted within
the exact Beat Raster of the title as soon as a
Cue-Point has been singly synchronized to a beat.
This possibility can be useful by editing CuePoints and start or end points in the Loop Player.
All the following functions are only practicable if
the Player is in Cue Mode or if the Edit Mode of
the Loop Player is activated. Read corresponding
chapters of manual how Beat-Stepping can be
especially applied.
BPM Studio
(nur RCP-1001 und 2001)
This can be attained by simultaneous holding the
[LOAD] key and pressing any of the Pitch Bend
keys:
(3.) By using Tact-Stepping you can navigate
through the title by tacts (4 beats each), beginning
from a already defined Cue-Point.
(1.) A usual change of a Cue point will move it
constantly forward or backwards. This way also
the first Cue-Point will be defined for the BeatStepping resp corrected. You can use the disc of
the Jog Shuttle Wheel to displace a Cue-Point.
Therefore hold the [LOAD] key [11] pressed and
turn the disc of the Jog Shuttle Wheel.
(2.) Using Beat-Stepping you can navigate
through the title by beats beginning from a already
defined Cue-Point.
It is necessary to store the BPM value
determined exactly by the Realtime BPM
Counter earlier, using the key
combination: [MEMORY] + [SET] . It
decreases possible differences in the
positions of the title, where the Beat
cannot be predetermined exactly.
While the Player is in Cue mode, each time 160
ms will be played from the Cue-Point repeatedly
as a Loop. (See chapter “Beat Matching with BPM
Studio”).
133
BPM Studio
9.1. Keyboard use
134
Keyboard use
BPM Studio
Keyboard use
General functions:
Menu key: opens the context menu
Insert:
1. Add records to the list with focus
2. Add new group
3. Alt+Insert: Add new subgroup
Space: Play/Stop Monitor
oder Expand/Collapse Group
F1: Help
CTRL-P, SHIFT-P, ALT - P:
Loads a track from a selected playlist into a
respective Player (CTRL for Player A, SHIFT for
Player B, ALT for CD-Player) by inserting the
selected title into the playlist of this player after
the current loaded title.
CTRL-Q, SHIFT-Q:
Loads a track from the FileArchive into the left or
right playlist (after the selected title in the playlist)
Alt
Alt
Alt
Alt
Alt
Alt
Alt
Alt
Alt
Alt
Alt
Alt
Alt
Alt
Alt
+ A: AutoFade on / off
+ B: BPM counter
+ C: Clear List or Clear Groups
+ D: Load Directory
+ E: File Editor
+ F: Start Manual Fade
+ G: Show Group-File Archive
+ H:
+ I: File Info Box
+ J:
+ K:
+ l: Load list (or load files into File Archive)
+ M: Show Mixer
+ N: Normalize
+ O: Options
Alt
Alt
Alt
Alt
Alt
Alt
Alt
+ R: Show Ripper
+ S: Search files
+ T:
+ U:
+ V:
+ W: Waitlist / PlayList
+ X: Exit
Sampler’s control:
ALT - Q:
Loads a track from the FileArchive into the Waitlist
(after the selected title in the Waitlist)
Other functions:
Toggle + P: Load selected Track into Player
Toggle + Q: Load selected Track in Playlist
Toggle + Y: Pitch reset
Toggle + Z: Pitch on/off
Clipboard functions (Windows compatible):
CTRL-A: Select all
CTRL-C (CTRL-Insert): Copy
CTRL-V (SHIFT-Insert): Paste
CTRL-X (SHIFT-Delete): Cut
135
BPM Studio
Tips and Instructions
9.2. Tips ans Instructions
General information:
The different virtual devices of BPM Studio can
be put on two different sound cards, respectively
one multi-channel sound card. Assignments are
made in the Audio I/O section of the Program
Options. Usually BPM Studio works with all sound
cards serving DirectSound, installing one driver
for all available channels.
If you experience any problems, you should at
first (as a rule) load the newest driver for your
sound card, searching for it on the Web Site of
the manufactuirer. Normally drivers are
continuously updated and as the sound card is
the most important system component for BPM
Studio, you should regularly check if a new driver
is available.
ALCATech recommends and tests actual sound
cards for Windows 98 systems, however we
cannot support NT or 2000, so we recommend
to use Windows 98 resp ME. Most sound cards
are anyway not equipped with useful drivers for
those systems and they might have some
disadvantages opposite to Windows 98/ME. They
are suitable as server operating systems, but for
multimedial pur poses they are completely
unsuitable.
Several sound cards in one PC:
(This information concerns the „normal“ sound
cards with one stereo output, for example
Soundblaster, Terratec etc.).
Sound card driver usually can support only one
sound card. They do not recognize the presence
of 2 identical sound cards in one PC. So, as a
rule you should use different sound cards. If actual
driver by Creative Lab from November ’99 shall
be used, these drivers must be from other
manufacturers, for example SB-Live and Terratec
DMX. The preference should be given in any case
to a multichannel card, because they are
essentially more simpler to install and mostly
cascadable.
136
The distribution of resources:
The BPM Studio evaluates all frames of a MP3
file and needs therefore a little more resources
than other simple MP3 player as WinAmpTM for
example. BPM Studio has essentially a much
greater function range than this player and a direct
comparison does not make any sense. So, we
should point out, that all sound cards possess
their own, free IRQ and that is no other card or
PC element uses it.
Also other components like hard disk, CD-Rom
or graphic card play a role whcih is not to
underestimate for the total performance of a
system. It is also recommended to use a PC
exclusively for BPM Studio (for professional use).
Driver latency:
Under „latency“, we understand the „delay“
between a command as for example ‘Play’, ‘Pause’ or ‘Stop’ and the moment the sound card
reacts to these commands and begins play for
example. Fundamentally ‘latency’ depends on the
used driver type and partially on the driver too.
As lower the latency of a driver is, the more
qualified is the driver for exact Beat-mixing.
More information, description of our
current sound card tests, program
updates and answers to frequently asked
questions (FAQ), can be found on our
web site: www.alcatech.com
Contact
BPM Studio
Contact, support
ALCATech GmbH assures the technical support
by e-mail and fax. Your questions by e-mail please
send to [email protected] or by fax to +49
3675 4201 20.
Please remember to give your Registration
number and program version. We will be glad to
receive your suggestions to improve this manual.
Updated: 06/14/2001.
137
BPM Studio
Glossary
9.4. Glossary
Application
Software programs that perform different tasks
that otherwise wouldn't be accomplished by an
operating system itself. Examples of such
applications are: a text-editing program such as
Microsoft WORD, a bookkeeping program and
BPM Studio.
Buffer
A memory space where data is held temporarily
before final treatment. BPM Studio loads the title
from the hard disk into the buffer for a few seconds
and then uncompresses it before the sound card
receives it. Thanks to this action, no lockups or
other malfunctions occur.
ASF
Abbreviation for Advanced Streaming Format. It
is a streaming format for files developed by Microsoft.
Configuration
"To configure" means to adapt the hardware and
software to meet your own needs. BPM Studio
has a lot of possible different configurations in
the program options context menu. Please, read
the program options section in this manual for a
detailed description of each selection.
Beat
A repeating sound that defines speed and tempo
of a title and is normally produced by an
instrument such as a drum for example.
Bit
A Bit is the smallest unit for binary data. With a
Bit exactly two different states (0 and 1) are
representable. (Bit = binary digit). A Bit is also a
position in the dual system. Most of the PCs and
also the modern information technology are
based on this numerical system.
Bit Rate
The bit rate is a measure for the transmission
speed of binary information. The scale unit for
the bit rate is bps (bits per second, number of
transmitted bits at one second). The maximal bit
rate of a connection is also named as "bandwidth".
As greather the bandwidth, as bigger is the
transmission speed. Some standard bit rates are
e.g.: 96 Kbit, 128 Kbit, 196 Kbit, 244 Kbit. As
higher bit rates allow to transfer more information
a better sound quality is obtainable. But a higher
bit rate is always associated with a higher demand
on memory space, as you have to store more
information as well.
138
Constant Bit Rate
It means simply that the bit rate is not changed
during the copying or encoding. (See VBR also Variable Bit Rate)
Cue
A cue is a position within a title that the player
recognizes as a beginning point. BPM Studio
makes it possible to set up different Cue-Points
for a title. You can also start playing within a title
from this place.
Cursor
Symbol which shows on the monitor the position
of the next input. The traditionally cursor (e.g. at
a DOS operating system) was displayed as a
simply, blinking underline. Since the era of grafical
user interfaces and operating sytems the cursor
can change its design in accordance with its
function.
Desktop
The desktop or the background is what you see
on your computer monitor before you start any
other programs. This is the place where you start
to work with other programs or files that you may
open.
Glossary
BPM Studio
Dialogue box
The Dialog box is a window that you can use to
communicate with the computer or application.
Dialog boxes give you information on the progress
of a working application and offer you the option
to put that information to the use in the application.
For example BPM Studio will show the program
options as a dialog box.
In this process, titles are copied from the CD as
WAVE files to the hard disk. Then, an encoder
will read these files and transform them into MP3
FORMAT. BPM Studio also offers the option to
encode the CDs into MP3 format immediately
during reading ('ripping'). You can activate that
option (rip and encode) in the program options > option CDDA.
Directory
A directory is an area on the hard disk designated
for storage for data files and other directories. As
an example, you would store all of your music
titles in a directory.
Encryption
Data translation into an appropriate code to
protect information against unauthorized use by
other persons. To be able to read coded files, you
must to have access to a code (or to a password)
that authorizes you to decipher the coded
information.
Driver
A driver is a program that determines how a
computer will communicate with a peripheral
device such as a sound card or video card. The
manufacturers of the peripherals create the
drivers. We recommend always visiting the
manufacturer homepage of your sound card and
other peripherals to find the newest information
about their drivers.
Dynamics
Dynamics (or dynamic volume) in regard to sound
is a range between the smallest and the greatest
value of volume (the softest and the loudest
position). If the possibility to copy or play silence
or loudness is greater, then greater the dynamics
will be. It is also valid in the same way in the
recording of audio signals.
Encode, Encoder, Encoding
To encode (code) means to transfer messages
or files into an encrypted form. Code is a system
of rules that is applied to transform a message
into an impossible form so that it can only be read
by authorized persons (normally to keep a
message in secrecy). Another way to encode is
by decreasing the number of determined rules
used by an application with regards to huge data
transfer without a considerable loss of content.
MP3 files are created as audio files by using an
audio Codec that holds only a fraction of the original size of the file. The reading of AUDIO CDs
is also called 'ripping'.
File
Data collection (based on an application or program) of a determined type put on a computer,
on floppy disks, on CD etc. Each file is stored
under an attributed name so that it's quick to find
for later use.
Format
This is the preparation of a data medium (for
example: a hard disk) to store files. This is usually
done during the first installation of an operating
system on a hard disk. It is also done to any
additional hard disk in a PC.
Format is a word that determines arrangement
based on rules. For example, there are left hand
and right hand text formats and there are
determined audio file formats like WAVE, MP2
and MP3.
Icon
A small image on the Desktop that symbolizes or
represents a program or file. You can see
examples of different icons on your Desktop.
Normally, they are arranged on left side of the
screen as 'Recycle Bin', 'My Computer', and 'My
Documents'. They are also called 'shortcut icons'.
Programs associated with an icon will start by
double clicking on the icon.
139
BPM Studio
Glossary
ID3 Tag
This is a feature of MP3 technology that gives
the user the possibility of storing information
regarding the MP3 within the MP3 itself. Basically,
there are two types of ID3 tags: the old ID3-Tag,
which is the fundamental tag and also the ID3V3
tag, which is a more developed tag. BPM Studio
supports both formats and gives you the option
to choose the one you want to use. We
recommend using the ID3V3 Tag, because it can
contain much more information than the original
tag. The choice for which tag is used is made in
the program options.
Modem
This makes it possible for a PC or similar device
to connect to the Internet through a telephone
line. A modem (MOdulator / DEModulator)
transforms digital signals from the PC into analog tones in preparation to send them across
telephone lines. This is needed because
traditional telephone lines can only support analog signals. Modems are mostly used to connect
to the Internet. There are also modems that send
data digitally. An example of this type of modem
is an ISDN modem. ISDN works on a dedicated
digital telephone line instead of an analog line.
Interface
This is the medium between hardware, software
and the user. Basically, it allows the user to
communicate with the PC in a simple way.
Module
Hardware or software that is a part of a bigger
system and represents influences to this system.
A software module is a program that is developed
to take over a specific part of a bigger program.
The virtual Player, Mixer and CD - Player/Encoder
are modules of BPM Studio. These modules are
available in some or all versions of software.
Joint Stereo
This means that the encoder dynamically chooses
an encoding algorithm according to the contents
of the audio file for each separate frame. This
way each frame is encoded with the best possible
quality. The file size is simultaneously reduced
thanks to a better compression ratio. These files
are also known as VBR files. BPM Studio can
play these files without any problems.
Kbit (kilobit)
A kilobit corresponds to 1024 bits (1 kBit = 1024
bits). The BPM Studio glossary definition should
not be confused with the metric system definition
where kilo is 1000.
Metronome
This is a device that utters a fixed or continual
sound (Tick, Whistle or blinking light). It is
primarily used by musicians to maintain a desired
beat or play speed of a title so that it is not slower
or faster than what is designated.
Midi
Midi is a serial communication protocol between
electronic musical instruments and effect devices.
It serves to enlarge the sound capacities of a
device. An example of this would be a PC with
MIDI software.
140
MP3
This is a file format developed by Fraunhofer IIS
in Germany. It contains compressed audio and
ID3 tag information. MP3's are intelligently
compressed and are adapted to the sensibility of
the human hearing and acoustic susceptibility. It
dynamically takes away all of the redundant, nonessential and not perceptible information and only
stores the necessary information for Hi-fi quality
play. The file size can be minimized to 1/8th and
1/19th of the original Wave file size. Thanks to
the MP3 Format, it was possible for the first time
to transfer music through Internet in Hi-fi quality
with minimal download times. Larger and larger
hard disks make it possible to store more music
titles directly on your computer. As a result of all
this, it was possible for BPM Studio to be
developed and introduced as a MP3 technology
into the DJ field.
Parameter
A parameter is a factor that determines a range
of variations. By adding parameters to the end
of a program command line, you can make the
program run differently. A few examples of
parameters in BPM Studio are: buffer size, data
path and compression rate.
Glossary
BPM Studio
Peripheral
An auxiliary device, such as a printer, modem,
storage system or external Remote Control Unit
that works in conjunction with a computer.
Subdirectory
This is a director y within a director y.
Subdirectories are used to organize files. This
makes it easier to find files.
Pitch
Professional CD players allows the user to change
the playback speed of a track. This is neccesary
e.g. for synchronizing two titles with different
speed (BPM - beats per minute) resp. playback
with the same speed. The measure of the
changed speed in contrast to the original speed
is called "pitch" and is stated in percent. A pitch
value of +100% means that the title will be played
with the double speed, -50% plays the titel with
the half of the speed.
Tempo
Tempo is the original speed of a title. The song
writer or interpreter defines this speed. With the
Pitch function of most professional CD players,
and BPM Studio as well, this speed can be
changed in a wide range.
Pitch Bend
Using the Pitch Bend function a temporary
increaseing or decreasing of the pitch is possible.
This is usefully if two titles, already played back
with the same speed, shall be synchronized in
beat. By pressing a Pitch Bend button the speed
will be increase or decrease continuously. At
releasing the button the title returns continuously
to its originally speed as well. With the Pitch Bend
buttons the beats of two titels can synchronized
exactly and very small corrections of both players
are possible.
Rip, Ripping
Ripping is act of reading an Audio CD using the
CD-ROM drive of a computer and storing the
information onto a hard disk. IBM PC's use the
Wave format for ripping and Mac computers use
the AIFF format. The generation of an MP3 file
can happen either after a rip or simultaneously
as the rip is being performed.
Root Directory
When a floppy or hard disk is formatted for use,
this particular directory is created. It is called the
Root Directory. It contains important systematic
files and is the first level for subdirectories.
Text field
This is a rectangular box where text can be
entered. There are many different ways to use
these Text boxes for example: changing standard
text entries or other pretending text (if the change
is allowed), entering necessar y program
information to enable the program to work and
also editing title entries in the ID3V3 tags for later
use.
Track
We refer to a Track as recorded title, a piece of
music or a song.
VBR Files
Compared to CBR (Constant bit rate), the encoder
analyzes the title's VBR (variable bit rate) and
chooses an exact compression algorithm for
every frame adapted by the MP3 encoding. This
allows for better compression at higher bit rates
compared to the compression of a simple signal
or CBR.
WAVE file
This format is used by Windows to store audio
signals free of sound quality loss. Examples of
sources of this sound quality could be: Audio
CD's, Film soundtracks and records. All signals
are copied exactly. The quality in the WAV file is
the same as in the original data. But, in order to
have this kind of quality it is necessary to have a
large amount of free hard disk space.
Selection box
This is a text box that enables a choice between
'ON' and 'OFF' or 'Yes' or 'No'.
141
BPM Studio
© 1999-2002 by ALCATech GmbH. All rights reserved.
BPM Studio user manual for Windows
This working manual as well as the software described in it are
part of the license agreement and can only be used or copied in
accordance with conditions of the license and it is not considered
as an ALCATech GmbH obligation. ALCATech GmbH does not
give any guarantee or warranty in regard to the correctness and/
or exactness of the contents of this manual. No part of this license
can be reproduced, stored in data banks, or transferred in any
other form, whether it be electronic, photomechanical, on sound
media or in any other way - unless by the electronically-agreed
license, without prior written permission of ALCATech GmbH.
License conditions:
The program and all its parts are copyright protected.
The buyer is granted the right to use the program on one computer.
This right is not transferable, rentable or distributable. It is forbidden
to change, duplicate, rent, transfer and use the contents of the
142
CD-ROM on other data storing media. All authors and productive
rights reserved. ALCATECH GmbH takes no responsibility for any
damage caused by the use of the CD-ROM. Before installing any
new software programs (including BPM Studio) on your computer,
you should make a backup of your files. Intel is a registered
trademark of the Intel Corporation. Pentium, Pentium II and Pentium Pro are trademarks of the Intel Corporation. Microsoft, Windows, Windows 95, Windows 98, Windows 98SE, Windows NT
and Windows 2000 are registered trademarks of Microsoft in the
USA and other countries. All other trademarks are property of
their respective owners.
Composed and designed by ALCATech, Germany.
Copyright © 1999-2002 ALCATech GmbH,
D-96515 Sonneberg, Otto-Bergner-Strasse 30, Germany.
Internet: www.alcatech.de · www.alcatech.com
Printed in Germany
143
144