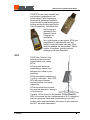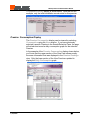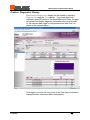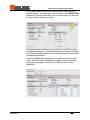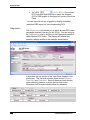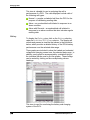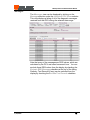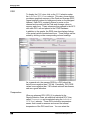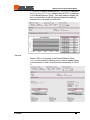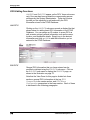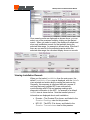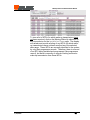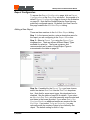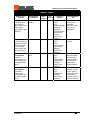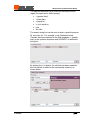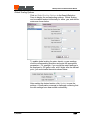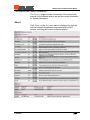
1
NCC Operation and
Administration Manual
Manual
Release Version 7
471-1002 - 11/2/2008
© 2009 Aclara
All Rights Reserved. No part of this document may be photocopied,
reproduced, stored in a retrieval system, or transmitted, in any form or by
any means whether, electronic, mechanical, or otherwise without the prior
written permission of Aclara
No warranty of accuracy is given concerning the contents of the information
contained in this publication. Aclara has thoroughly tested the equipment
and reviewed the documentation. However, Aclara does not warrant the
performance of the product for any particular purpose. In no event is Aclara
liable for any damage resulting, directly, or indirectly, from the use of this
product.
Aclara reserves the right to change details in this publication without notice.
Windows is a trademark and Microsoft, MS-DOS, and Windows NT are
registered trademarks of Microsoft Corporation. Other product and
company names herein may be the trademarks of their respective owners.
Aclara
23905 Mercantile Road
Cleveland, OH 44122
Phone 216.464.1057
Toll Free 800.969.1057
Fax 216.464.5308
http://www.Aclara.com
NCC Operation and Administration Manual
Table of Contents
Table of Contents......................................................................................................i
WARNINGS, CAUTIONS and Notes....................................................................... iii
STAR System Overview...........................................................................................1
Introduction...........................................................................................................1
MTUs....................................................................................................................1
DCU......................................................................................................................3
NCC......................................................................................................................4
STAR System Benefits .........................................................................................5
Basic Navigation ......................................................................................................7
Introduction...........................................................................................................7
Home Page...........................................................................................................7
Main Menu............................................................................................................9
Standard Functions ............................................................................................16
Premise Information ...............................................................................................19
Introduction.........................................................................................................19
General...............................................................................................................20
Premise: Readings Display ................................................................................24
Premise: Consumption Display...........................................................................27
Premise: Maintenance Display ...........................................................................29
Premise: Transmissions Display.........................................................................30
Premise: Diagnostics Display .............................................................................31
Premise Views Editing Functions .......................................................................40
Communications ....................................................................................................46
Introduction.........................................................................................................46
General...............................................................................................................46
Alias/Group Management...................................................................................55
Firmware Management.......................................................................................56
Managing DCUs.....................................................................................................60
Introduction.........................................................................................................60
General...............................................................................................................61
DCU RSSI ..........................................................................................................63
System DCU Views ............................................................................................63
Individual DCU Views .........................................................................................69
DCU Editing Functions .......................................................................................74
Managing Installations ...........................................................................................80
Introduction.........................................................................................................80
General...............................................................................................................81
Viewing Installation Records ..............................................................................83
Viewing Programmer Records............................................................................84
Viewing Exceptions ............................................................................................86
Installation Views Editing Functions ...................................................................88
Table of Contents
i
Table of Contents
Reporting ............................................................................................................... 90
Introduction ........................................................................................................ 90
General .............................................................................................................. 90
Viewing and Deleting Reports ............................................................................ 92
Report Configuration .......................................................................................... 93
Report Types...................................................................................................... 95
Report Groups.................................................................................................... 98
Special Search Characters .............................................................................. 103
Auto Historical .................................................................................................. 107
NCC Administration ............................................................................................. 108
Introduction ...................................................................................................... 108
Settings ............................................................................................................ 108
Users................................................................................................................ 114
Roles................................................................................................................ 115
Virtual Utility ..................................................................................................... 117
Alarms.............................................................................................................. 119
Archiving .......................................................................................................... 120
Meter Types ..................................................................................................... 121
Electric Units of Measure ................................................................................. 123
NCC Help ............................................................................................................ 124
Introduction ...................................................................................................... 124
Support ............................................................................................................ 124
About................................................................................................................ 125
ii
©2009 Aclara RF Systems, Inc.
NCC Operation and Administration Manual
WARNINGS, CAUTIONS and Notes
WARNING, CAUTION and Note statements are used throughout this manual to emphasize
important and critical information to help you ensure safety and prevent product damage.
These statements are defined below.
WARNING
WARNING indicates a potentially hazardous situation which, if not
avoided, could result in death or serious physical injury.
CAUTION
CAUTION indicates a situation, which, if not avoided, could result in
damage to equipment, damage to software, loss of data or invalid
results.
Note: indicates important supplemental information.
WARNINGS, CAUTIONS and Notes
iii
WARNINGS, CAUTIONS and Notes
iv
©2009 Aclara RF Systems, Inc.
NCC Operation and Administration Manual
1
Chapter
STAR System Overview
Introduction
The Aclara STAR System is a fixed-network, Automatic Meter
Reading (AMR) system that automatically reads water,
electric, and gas meters daily
….from a central location
….without the need for meter readers or vans.
The STAR System uses advanced wireless technology in a 3tier configuration that starts with Meter Transmitter Units.
MTUs
STAR MTUs are self-contained, sealed units that link
individual meters to the STAR System.
STAR System Overview
1
STAR System Overview
Each MTU contains a microprocessor, a transmitter and an
internal antenna in addition to a 20-year battery.
•
Gas MTUs mechanically connect to the register, either
directly or indirectly.
•
Electric MTUs can be built into many popular meters
and can include two-way (transmit and receive)
capability to support readings-on-demand and other
advanced functions.
•
Water MTUs connect to the meter via a simple, 3-wire
interface.
•
Dual-port MTUs are also available for use where two
separate meters or a dual-head compound meter are in
use at a single location.
STAR MTUs automatically read meter data and transmit it to a
Data Collector Unit via a high-power, narrow band signal on an
FCC licensed channel. The licensed channel provides the
security of reliable, consistent communications without
disruptive interference.
2
©2009 Aclara RF Systems, Inc.
NCC Operation and Administration Manual
STAR MTUs are easily installed and
are activated, programmed, and
tested using a Field Programmer essentially a lightweight handheld
computer with a programming probe.
Actions performed are logged by the
Field Programmer. After each shift,
activity logs are
uploaded to the
Network Control
Computer for
verification.
On a typical water or gas system, MTUs are
programmed to automatically read and
transmit meter data twice each day. More
frequent readings can be provided. Electric
meters, for example, typically transmit
readings much more frequently.
DCU
STAR Data Collector Units
receive and process radio
transmissions from nearby
MTUs.
DCUs are self-contained,
solar/battery powered, and
designed for rooftop or pole
mounting.
DCUs are typically installed on a
½ mile to 1 mile grid. One STAR
DCU will support several
thousand meters in a typical
urban area.
DCUs decode and error-check
the received data before storing it
in local memory.
Typically, DCUs connect to the Network Control Computer
(NCC) once each day via a cellular phone or Wi-Fi connection
and pass along the meter data for processing at the NCC.
System status and maintenance information is also passed to
the NCC with each transmission.
1/15/2009
3
STAR System Overview
STAR DCUs can be programmed to initiate an immediate call
upon receipt of an urgent condition such as a safety or security
alarm. They can also be configured for two-way
communications to support advanced functions such as
readings-on-demand.
NCC
The Network Control Computer
(NCC) is a centrally located network
server that receives meter data from
the DCUs. The NCC processes the
incoming data and loads it into a
database for storage and retrieval.
The NCC can be scaled easily to
support applications ranging from
small utilities and submetering
installations up to large metropolitan
utilities.
Meter data can be viewed by authorized personnel through an
easy-to-use, web interface.
Consumption data can be linked to your billing system and
other mission-critical applications.
A variety of detailed consumption reports can be created to
allow monitoring of usage at any level.
4
©2009 Aclara RF Systems, Inc.
NCC Operation and Administration Manual
Management reports are also provided to assist in identifying
abnormal usage, leaks, and tampering.
DCU performance reports and MTU installation and diagnostic
reports are also provided to aid in system management.
STAR System Benefits
With the STAR System, major utilities and small submetering
operations can:
•
Immediately respond to customer disputes and
inquiries.
•
Detect leaks in a timely manner.
•
Eliminate the expense of unscheduled reads.
•
Reduce meter reading costs.
•
Eliminate estimated bills.
Whether your system includes hundreds, thousands, or even
millions of meters, the Aclara STAR System reads Every
Meter, Every Day to allow you to manage based on an up-todate view of your entire system.
1/15/2009
5
STAR System Overview
6
©2009 Aclara RF Systems, Inc.
NCC Operation and Administration Manual
2
Chapter
Basic Navigation
Introduction
This chapter provides an overview of the basic organization of
the STAR System and its main menu structure and
conventions. Although each major section of the main menu is
introduced in this chapter, each section is also covered in
detail in a later section of this manual.
What You’ll Learn
Tasks covered in this chapter include:
•
How to use the banner information to aid in navigation.
•
How to identify the major functions provided in each
section of the STAR System main menu.
Home Page
The STAR Home Page is the page initially displayed when
browsing the STAR NCC. You can also return to the Home
Page from any of the other STAR System displays by clicking
on the STAR logo in the upper left corner of each STAR
display.
As shown in the illustration, the Home Page consists of a
banner, the main menu, and a Quick Links section along with
information about the STAR System.
Banner
The banner appears at the top of each STAR System display.
A text display on the right side of the banner indicates the
current page, the current user logon, and the database
currently in use.
Basic Navigation
7
Basic Navigation
Quick Links
The Quick Links section provides easy access to some of the
most frequently used displays of the STAR System.
MTU Readings – This link will display the default Premise
page, which is used to search for readings from a specific
premise/account/location. You will be introduced to the
Premise: Views page later in this chapter on page 9.
Detailed information on Browsing Premise Information is
provided in Chapter 3 (see page 19).
DCU Call Summary – This link will display the default DCU:
Views page, which presents a summary of recent DCU call
performance. The DCU: Views page is introduced in this
chapter on page 12. Chapter 5 provides detailed
information on Managing DCUs.
Installations Report – This link will display the default
Installation: Views page, which lists recent installation
activity. A brief introduction to the Installation: Views
page is provided in this chapter on page 13. Detailed
information on Managing Installations is provided in
Chapter 6 (see page 80).
8
©2009 Aclara RF Systems, Inc.
NCC Operation and Administration Manual
Main Menu
There are six major sections to the STAR System main menu,
plus a seventh Help section. Users with full administrative
access will see all seven selections, as shown on the previous
page. The six most commonly used selections are Premise,
Communications, DCU, Installation, Reporting, and
Administration.
Note: The labeling of the ‘Premise’ selection is configurable
and can be labeled ‘Account,’ ‘Location,’ or any other
descriptive term that users are accustomed to. See page 109
for additional information.
Premise Information
General
Clicking on the Premise tab of the main menu reveals the
Premise sub-menu and displays the Premise Views page as
shown below. The main body of this page consists of a
Search/Selection Pane and a View Pane.
Note: The choices presented on the main menu and the SubMenus vary depending upon your access privileges.
1/15/2009
9
Basic Navigation
Search/Selection Pane
The Search/Selection Pane can be used to locate and select
an individual Premise from the STAR Database. Once a
specific Premise is selected, information about that Premise
appears in the View Pane.
View Pane
The View Pane displays information about the currently
selected Premise. The specific information displayed varies
depending upon the view and date range selected in the top
section of the View Pane.
Communications Information
General
Clicking on the Communications tab of the main menu
reveals the Communications Sub-Menu and displays the
Communication Views page as shown below. Again, the
main body of this page consists of a Search/Selection Pane
and a View Pane.
Search/Selection Pane
The Search/Selection Pane is used to locate and select an
individual MTU from the STAR Database. Once a specific
MTU is selected here, options to communicate with the
selected MTU appear in the View Pane.
10
©2009 Aclara RF Systems, Inc.
NCC Operation and Administration Manual
View Pane
For Communications, the View Pane provides the user with a
list of basic communications test commands.
Using the Add button initiates a test command which will
update in the response field to the right once complete. You
can add several test commands to the communications queue
while waiting for responses.
For MTU Read Commands, the View Pane reads
configuration information on the MTU.
Using the ANSI Table Display, the View Pane displays the
unfiltered raw table data out of the meter (for meters so
equipped).
1/15/2009
11
Basic Navigation
DCU Information
General
Clicking on the DCU tab of the main menu reveals the DCU
Sub-Menu and displays the DCU Views page as shown
below. Again, the main body of this page consists of a
Search/Selection Pane and a View Pane.
Search/Selection Pane
The Search/Selection Pane is used to locate and select an
individual DCU from the STAR Database. Once a specific
DCU is selected here, information about that DCU appears in
the View Pane.
View Pane
For Individual DCU Views, the View Pane displays
information about the currently selected DCU. The specific
information displayed varies depending upon the view and
date range selected in the top section of the View Pane.
For System DCU Views, the View Pane displays information
about all of the DCUs currently active in the system. For these
system-wide views, the Search/Selection Pane has no effect.
12
©2009 Aclara RF Systems, Inc.
NCC Operation and Administration Manual
Installation Information
When you click on the Installation tab on the main menu,
you’ll be presented with the Installation Views Page and SubMenu. Again, the layout is similar to the pages discussed
previously with a Search/Selection Pane and a View Pane.
This page is designed for use in tracking the installation of
MTUs. You can easily view and search installation records
and their corresponding Field Programmer records.
Exceptions can also be quickly identified and corrected.
1/15/2009
13
Basic Navigation
Reporting
Clicking on the Reporting tab of the main menu reveals the
Reporting Sub-Menu along with a Search/Selection Pane and
a View Pane. Any configured reports will be listed in the
Search/Selection pane and can be selected with a click on the
corresponding entry. The available results will then be listed in
the view pane and can be easily displayed and printed. If you
have appropriate access privileges, you can also use the
Reporting Sub-menu to configure new reports and report
groups and schedule when reports are run.
14
©2009 Aclara RF Systems, Inc.
NCC Operation and Administration Manual
Administration
NCC administrative functions appear under the
Administration tab of the main menu. This section is
intended for use by the system administrator and includes
functions for managing users and groups, configuring alarms,
and managing archiving. You’ll note that it is organized
similarly to the other pages with a Sub-Menu, a
Search/Selection Pane, and a View Pane.
1/15/2009
15
Basic Navigation
Standard Functions
Several standard functions are implemented throughout the
various STAR System displays. These functions operate the
same way on all pages on which they appear. The operation
of these standard functions is explained in this section.
Reset
All of the data entry displays in the STAR System incorporate
a Reset button along with any additional buttons (i.e. Save,
Search, Update, etc.) required for that specific display.
Clicking on the Reset button restores the default values for the
corresponding data entry fields.
Records per Page
Many views of STAR System Data may contain long lists of
individual entries. For example, The DCU Calls view may
contains hundreds of records of individual DCU calls. For
convenience, the data for these views is displayed across
multiple pages.
These reports contain a Records/Page drop-down list like the
one shown below, with a default setting of 50.
By clicking on the down arrow at the right of the box, you can
set the number of records displayed per page to All, 5, 10, 25,
50, or 100. Choose the desired value and the display
automatically refreshes with the selected paging.
Page Controls
When multiple pages of data are present in a view, paging
controls like those shown below appear in the header of the
View Pane. You can use these controls to move among the
pages. The function of each of these controls is outlined
below.
16
©2009 Aclara RF Systems, Inc.
NCC Operation and Administration Manual
Sorting
Many views include sorting controls in the header at the top of
the View Pane. For example, in the illustration below, note
that Total Call Time, Records Expected, and Records
Transferred are links that can be used to sort the data in that
view.
One click on any of these links sorts the data in descending
order by the selected column and displays a small down arrow
( ) in the header of the selected column.
A second click on the same column header resorts the data in
ascending order by the selected column and displays a small
up arrow ( ) in the header.
Export
Many of the views displayed on the STAR System can be
exported as a comma-separated-variable (.csv) file, which can
then be imported into other applications such as Microsoft
Excel. When the Export function is available, an Export icon
( ) appears in the header at the top of the View Pane.
To export the file:
Step 1 - Click on the Export icon ( ). A dialog box identifying
the .csv file appears on your desktop.
Step 2 – Save the report to the appropriate location.
Step 3 –The resulting file can now be opened with Microsoft
Excel or any other application capable of reading .csv files.
1/15/2009
17
Basic Navigation
18
©2009 Aclara RF Systems, Inc.
NCC Operation and Administration Manual
3
Chapter
Premise Information
Introduction
This chapter provides instructions on how to use the Premise
Views page to search for and browse detailed information about
each Premise (i.e. account, location) serviced by the Aclara STAR
System. This page provides five different views of Premise data
and is a portion of the STAR System that is used frequently.
What You’ll Learn
Tasks covered in this chapter include:
Premise Information
•
How to search for and select a specific Premise.
•
How to view reading, consumption, maintenance, transmission,
and diagnostic information for a specific Premise.
•
How to limit your search to a specific range of dates.
•
How to edit Premise information.
•
How to delete reading transmissions.
19
Premise Information
General
When you first select Premise from the main menu, the Premise
Views page shown below is displayed. You’ll notice the Sub-Menu,
the Search/Selection Pane, and the View Pane as introduced in the
previous Chapter. Since no specific Premise was selected at this
point, the View Pane is blank.
View Selector
Note the area highlighted in the picture above. At the left of this
area is the View selector. By default, the Premise Views page
initially displays with the Readings view selected, as shown. You
can use this selector to alternately select the Readings,
Consumption, Maintenance, Transmissions, or Diagnostics
Views.
20
©2009 Aclara RF Systems, Inc.
NCC Operation and Administration Manual
Date Range Selector
To the right of the View selector is the Date Range selector. By
default, the Date Range selector for the Premise Views page
typically covers the previous 30 days. You can easily change the
date range by clicking in the Start and End boxes and entering a
specific range of your choice. In addition, the default value for the
date range can be set/changed using the Default Readings Span
setting on the Administration:Settings – Display Options page (See
page 111).
Search/Selection Pane Operation
The Search/Selection Pane includes a Search By selector that
allows you to search by Premise, MTU ID, Address, Name, Phone
Number, Meter Serial Number, Cycle, Route, or Billing Account.
Simply click on the down arrow at the right edge of the drop down
box and then click on the field that you wish to search. Premise is
selected by default and is likely to be the search field that is used
most often.
Note: The option to search for Premise Information by Cycle,
Route, and Billing Account is available only if the corresponding
features are enabled by the System Administrator. See Chapter 8
for additional information.
In the Search For box, you can enter a specific alphanumeric
character string or you can use an asterisk (*) as a wildcard
character. The asterisk character represents an unknown string of
any length. For example, searching the Premise field for ‘3000*’
would find Premises whose premise ID starts with ‘3000’.
Multiple wildcards are permitted in one Search For term. For
example, searching the Address field using a Search For term of
‘*main*’ would find all addresses containing the string ‘main’
including ‘455 Main Avenue’ and ‘24583 Main Street’. Note that
alpha characters used in Search For terms are not case sensitive.
1/15/2009
21
Premise Information
Once you have selected a Search By field and entered a Search
For term, click the Search button to execute the search. In the
illustration below, we have searched for Premises using a Search
For term of ‘3000*’. Two matches were found and are listed in the
lower portion of the Search/Selection Pane.
Once search results are displayed as shown above, you can select
one of the Premises found by clicking on the desired match.
Special Search Characters
In addition to the asterisk (*) wildcard character, there are several
other special characters that can be used in the Search For box
when performing a search. These are explained and illustrated in
the table below. Note that all of these functions can be used
multiple times in a single Search For term if necessary.
22
©2009 Aclara RF Systems, Inc.
NCC Operation and Administration Manual
Special Search Characters
Character(s)
Function
*
Substitutes for an unknown
character string of any
length.
Searching for a Premise ID of:
*88
would match premise IDs of any
length ending in “88”
?
Substitutes for a single
unknown character.
Searching for a Premise ID of:
88?9763
would match 7 character strings
beginning with “88” followed by
any single character followed by
“9763”
Specifies a range of values
to match a single numeric
digit.
Searching for a Premise ID of:
88[1-5]9763
would match 7 character strings
beginning with “88” followed by
any of the digits 1, 2, 3, 4, or 5
followed by “9763”
Specifies a range of values
to NOT match a single digit.
Searching for a Premise ID of:
88[^1-5]9763
would match 7 character strings
beginning with “88” followed by
any single digit except the digits
1, 2, 3, 4, or 5 followed by “9763”
Specifies a range of alpha
characters to match a single
character.
Searching for a meter serial
number of:
[a-f]9763*
would match strings beginning
with any single alpha character a
through f followed by “9763”
followed by anything.
Specifies a range of alpha
characters to NOT match a
single character.
Searching for a meter serial
number of:
[^a-f]9763*
would match strings beginning
with any single alpha character
except a through f followed by
“9763” followed by anything.
[x-y]
Where x and y
are numeric
digits 0-9
[^x-y]
Where x and y
are numeric
digits 0-9
[a-b]
Where a and b
are alpha
characters a-z
[^a-b]
Where a and b
are alpha
characters a-z
1/15/2009
Example
23
Premise Information
Premise: Readings Display
With a valid Premise selected, the Premise Readings display
appears similar to the illustration on page 25. Let’s examine this
display in detail.
First, at the top of the View Pane, the basic Premise information is
displayed including name, address, phone, and the assigned
MTU(s) and meters. You’ll note that there is an Edit MTU link next
to the MTU information and an Edit Meter link next to the meter
information. These links appear only if you have been given the
corresponding access privileges by the System Administrator. Use
of these editing functions is discussed later in this chapter.
The lower section of the View Pane displays the readings at the left,
with graphic displays of the daily and monthly consumption at the
right. The upper graph displays the daily consumption over the last
30 days. The lower graph displays the monthly consumption for up
to the previous twelve months. In this example, only two months
are displayed because only two months of data have been
accumulated to date.
Notice the First (|◄), Previous (◄), Next (►), and Last (►|) buttons
located at the top of the readings column. You can move through
the list of readings by using these buttons.
24
©2009 Aclara RF Systems, Inc.
NCC Operation and Administration Manual
REF
If any reading errors have occurred, an error message appears in
the Reading column. A legend is provided to explain error
messages. You can access the Error Legend by clicking on the
Error Legend link just above the top right corner of the Daily
Consumption chart.
1/15/2009
25
Premise Information
Note the Display Comments link at the upper right corner of the
View Pane. Clicking on this link displays a Comment History like
that shown below containing a history for this premise. The
Comment History window also provides an opportunity to add
comments of your own. Comments entered are stored in the
database and become a part of the history for the corresponding
Premise.
icon
When comments are present for a specific Premise, an
appears on the Premise Views page next to the Display
Comments link.
Programming Records
Each time a technician visits a Premise and performs any actions
with the STAR Field Programmer, a record of this activity is logged
by the Field Programmer. These records are then uploaded to the
NCC and appear in the readings display for the corresponding date.
For example, the display below shows the installation record that
was created when the MTU was first installed.
You can click on the Programmer Records link to display the MTU
Programmer History for that MTU. An example of the MTU
26
©2009 Aclara RF Systems, Inc.
NCC Operation and Administration Manual
Programmer History display is shown below. Note that for this
example, only the initial installation record exists for this premise.
Premise: Consumption Display
The Premise Consumption display can be viewed by selecting
Consumption using the View selector. If you have previously
selected a specific Premise in the Search/Selection Pane, the page
will refresh and reveal a daily consumption graph for the selected
Premise.
In the example of the Premise Consumption display shown below,
you’ll note that the upper section of the View Pane shows exactly
the same information that was displayed in the Premise Readings
view. Only the lower portion of the View Pane has updated to
display the Daily Consumption graph.
1/15/2009
27
Premise Information
Above the graph, a selector allows you to interactively select from
four different views of consumption:
•
Interval – This view plots a line graph of the interval
consumption (consumption between each reading) for the
selected date range.
•
Daily – This view plots a bar graph of the daily consumption
for the selected date range.
•
Weekly – This view plots a bar graph of the consumption by
calendar week for the selected date range.
•
Monthly - This view plots a bar graph of the consumption by
calendar month for the selected date range.
Examples of all four views are shown below.
28
©2009 Aclara RF Systems, Inc.
NCC Operation and Administration Manual
Premise: Maintenance Display
The Premise Maintenance display can be viewed by selecting
Maintenance using the View selector. If you have previously
selected a specific Premise in the Search/Selection Pane, the page
will refresh and display the maintenance history for the selected
Premise and date range. In the example screen shown below, note
that the upper portion of the View Pane is the same as in the other
Premise views. The lower portion, however, displays the
Maintenance History covering the programming of the MTU.
Similar entries appear in the history for each occasion during the
selected date range when the Field Programmer was used to
service that MTU. You can click on the hyperlink in the leftmost
column of the maintenance history to display to display the detailed
MTU Programmer History for that premise.
1/15/2009
29
Premise Information
An example of the detailed history display is shown in the following
illustration. Note that for this example, only the initial installation
record exists for this MTU.
Premise: Transmissions Display
The Premise Transmissions display can be viewed by selecting
Transmissions using the View selector. If you have previously
selected a specific Premise in the Search/Selection Pane, the page
will refresh and display the details of the reading transmissions
received from the MTU at that Premise during the selected date
range. Included in these details is the raw (unscaled) reading
received, the DCU ID of the DCU that received the transmission,
and diagnostic information that was received along with the reading.
30
©2009 Aclara RF Systems, Inc.
NCC Operation and Administration Manual
Premise: Diagnostics Display
The Premise Diagnostics display can be viewed by selecting
Diagnostics using the View selector. If you have previously
selected a specific Premise in the Search/Selection Pane, the page
will refresh and display diagnostic information about that Premise
for the selected date range in both graphical and table form, as
shown in the example below.
Once again, note that the top portion of the View Pane continues to
display the basic information about that premise.
1/15/2009
31
Premise Information
The bottom portion now displays:
•
A graph of the minimum daily MTU battery voltage for the
MTU associated with this Premise. Electric MTUs (like the
one depicted in the graphic on the previous page) will not
display battery voltage.
•
A graph of the average signal strength (RSSI) received by
each DCU that successfully passed readings to the NCC
from the MTU associated with this Premise.
•
A table listing each transmission received from the
associated MTU during the selected date range and the
RSSI and battery voltage recorded for that transmission.
This information can be very valuable when diagnosing problems.
For example, MTU battery voltage generally maintains a very
consistent level at or near 3.6 volts. It is not problematic until it
drops to a voltage approaching 2 volts, at which time the MTU
should be considered for replacement.
Receive Signal Strength (RSSI) should consistently be more
positive than -120. If it falls below (more negative) that level, it
could indicate that something has begun to partially block signals
from that MTU. If the MTU is being received by multiple DCUs, at
least one DCU should be capable of receiving the MTUs
transmission at an RSSI more positive than -120.
Edit MTU
Clicking the Edit MTU or Edit Meter link displays all of the available
parameter editing options for either the MTU or the meter.
32
©2009 Aclara RF Systems, Inc.
NCC Operation and Administration Manual
Clicking Edit MTU displays the master configuration page for the
MTU. From here you can update the installation date / time, review
or change MTU settings, issue commands to the MTU, and set the
time zone.
1/15/2009
33
Premise Information
To correct the install date, enter the correct date and time in the text
box and click on Update.
The Select Item list box allows a user to select a specific read
request for the targeted MTU. Selecting an item from the drop-down
and clicking Read will queue a read request for the displayed
configuration setting and retrieve the latest MTU memory setting. A
user with either FULL or READ ONLY access can view this
information and refresh any of the settings accordingly.
The Select Items list box can display a wide variety of MTU
settings:
34
©2009 Aclara RF Systems, Inc.
NCC Operation and Administration Manual
A user with FULL access to the control will see the Edit Button,
identified below. It is important to note that users with READ ONLY
access can view this information, but not edit anything. In this case
the button will be hidden from view.
The displayed data updates in near-real-time. If an MTU reports a
configuration change, or another privileged user requests a change,
the information will be updated on the current browser screen (once
completed and verified).
Clicking the Edit button displays the Unit Settings control in edit
mode. Most options are editable and require a user with access
and proper knowledge of the MTU and AMI system to make
alterations.
1/15/2009
35
Premise Information
Changing a configuration setting is simple and straightforward.
Change the configuration setting accordingly and click the Update
Button when complete. A MTU write request queues into the
system and transmits to the MTU. After the write request
completes, a read request is sent for verification. The Unit Settings
update with the new setting after the read request completes. If
the user wishes to exit edit mode without making changes, a
convenient Cancel Button returns to the page to read-only mode.
At the bottom of the Unit Settings control is the Unit Communication
History table. This table details previous requests made to this unit
by all users in the system.
The following table explains the columns in the Unit Communication
history:
Command
Direction
Attempt
Data
Status
Time Requested
Time Received
Requestor
The configuration setting that is being read or changed
Indicates whether the command is a read or a write
Shows what attempt number the command is on, as well as how
many attempts remain
Displays the data read from or written to the unit
Shows near‐real‐time updates of the message as it travels through
the Star system
A timestamp of when the command was queued
A timestamp of when the response was received and processed
An indication of who made the request
Status can have the following values:
INITIATED
PENDING
SENT_OUT
RECEIVED
RETRY_MAXED
COMM_FAILURE
BAD_COMMAND
WRONG_IMAGE
INVALID_RESPONSE
36
Waiting to start
Waiting for Polaris to pick up
Waiting for response
Successfully received
The configurable number of retry attempts has been exceeded
and the system has aborted future attempts.
Polaris never “sent out”
System does not recognize the command
DCU image was not as expected
Response received was not the response expected
©2009 Aclara RF Systems, Inc.
NCC Operation and Administration Manual
The Get Data interface on the Edit MTU page allows users to issue
specific commands to the targeted MTU. The Get Data control is
displayed for users with both FULL and READ ONLY access
permissions.
The Get Data interface features dynamic controls and entry boxes
as needed.
In the above illustration the Current Reading radio button is
selected. A dynamic control of port (channel) selection check
boxes appears after the Current Reading selection has been made.
Selecting a port and clicking the Send button queues an instant
read request of the data being measured and collected on port one
of the MTU. The secondary selections are as detailed in the
following table:
Current Reading
Current Demand (MTU)
Current Demand (Meter)
Reset Demand (MTU)
Reset Demand (Meter)
Previous Reading
ANSI Table Data
Power Status
Ping
1/15/2009
Desired Port(s)
N/A
N/A
N/A
N/A
Desired Port(s), Day, Hour, Minute
Desired ANSI Table Number to Read
See Next Section for Details
N/A
37
Premise Information
Clicking the Power Status radio button in the Get Data section
returns a status indicating whether voltage is currently applied to
the MTU.
For users with the correct access permissions, an additional button
labeled Connect or Disconnect will appear. Clicking on
Disconnect will issue a Disconnect Command to the MTU. Clicking
on Connect will issue a Reconnect Command to the MTU. After
the Disconnect or Reconnect Command completes a Power Status
Check Command is issued. The Power Status is updated after the
Power Status Command completes.
The Communication History Table provides near-real-time status of
the Get Data requests which have been submitted to the targeted
MTU.
38
©2009 Aclara RF Systems, Inc.
NCC Operation and Administration Manual
As with the Unit Settings history table, this table shows all data
requests made to the unit and features the following information:
Command
Time Sent
Time Received
Result
The configuration setting that is being read or changed
A timestamp of when the command was queued
A timestamp of when the response was received and processed
Provides near‐real‐time status of the request while in progress, and also
provides the result(s) of the query
At the bottom of the page under add time zone information, select
the desired time zone from the drop down list and click Add.
You can also optionally set an effective date for the new time zone
information by entering a date and time in the Date-Time Effective
box before clicking the Add button.
Note: Time zone information is displayed and/or available for
editing only if the STAR System has been configured for GMT
mode. See Chapter 7 for additional information.
The Edit MTU display can also be used to delete an MTU from the
STAR Database. Simply click the Delete button to delete the
currently displayed MTU. You will be prompted to confirm your
intent to delete the MTU before the deletion is actually performed.
CAUTION
Deleting an MTU should only be done when appropriate to
correct invalid data. Deleting an MTU erroneously could
cause the loss of data.
1/15/2009
39
Premise Information
Edit Meter
Clicking the Edit Meter link allows the user to change the type of
meter associated with a premise.
Premise Views Editing Functions
As mentioned previously, the Edit MTU link and the Edit Meter link
appear only if you have been given the corresponding access
privileges by the System Administrator. This also applies to the
Edit and Delete Xmits selections on the Premise Sub-Menu.
These functions appear on the Sub-Menu only if you have been
granted the appropriate level of access. We’ll cover the use of
these functions in this section.
Edit (Premise)
Once a valid premise has been selected in the Search/Selection
Pane, clicking on the Edit tab in the Premise Sub-Menu displays
the basic Premise Information in an editable format as shown
below.
Since the Search/Selection Pane is also available on this display,
you can also search for and select a specific Premise using the Edit
Premise page.
To modify any of the information, click in the corresponding box and
make the necessary corrections. Then click Update to save the
corrections to the database.
40
©2009 Aclara RF Systems, Inc.
NCC Operation and Administration Manual
Note: The Cycle, Route, and Billing Account information is
displayed on the Edit Premise page only if the corresponding
features are enabled by the System Administrator. See Chapter 7
for additional information.
1/15/2009
41
Premise Information
Change Premise
At the far right of the Installation History header on the Edit
Premise page, a Change Premise link appears. Clicking on this
link displays a Change Premise page which allows you to change
the Premise ID. To change the Premise ID, enter the new Premise
ID and click Update. The new Premise ID that you have entered
and saved takes effect immediately. All other data associated with
the old Premise ID is now associated with the newly saved Premise
ID.
CAUTION
Premise IDs are also stored in MTUs as they are
programmed. Changing a Premise ID using the
web interface DOES NOT change the Premise
ID stored in the corresponding MTU. If it
becomes necessary to change a Premise ID in
the STAR database, It should also be changed in
the corresponding MTU using the Field
Programmer. See the Field Programmer
documentation for additional information.
Delete Xmits
Selecting the Delete Xmits tab on the Premise Views Sub-Menu
presents a display like the one below listing the reading
transmissions for the selected date rage and Premise. To delete
reading transmissions, simply click the checkboxes at the left of the
readings to be deleted and press Delete. You will be asked to
confirm your intention to delete the selected reading transmissions
before they are deleted from the STAR Database.
42
©2009 Aclara RF Systems, Inc.
NCC Operation and Administration Manual
CAUTION
Proceed with caution. Deleted transmissions
cannot be recovered.
Edit Meter
Like the Edit MTU link, the Edit Meter link appears on many of the
Premise View pages if you have the corresponding access
privileges. Clicking on the Edit Meter link displays a page like the
one below, allowing you to change the install date, serial number, or
meter type for the currently selected MTU.
CAUTION
Meter Types are also stored in MTUs as they are
programmed. Changing a Meter Type using the
web interface DOES NOT change the Meter
Type stored in the corresponding MTU. If it
becomes necessary to change a Meter Type in
the STAR database, It should also be changed in
the corresponding MTU using the Field
Programmer. See the Field Programmer
documentation for additional information.
1/15/2009
43
Premise Information
To change this information, make the desired changes and click on
the Update button. The revised information is saved to the STAR
Database.
Note: Only Meters that are compatible with the currently selected
MTU are listed in the Meter Type display. Be sure to select the
correct type for the Meter that is actually installed. Selecting a
compatible, but incorrect, meter type will result in readings that are
improperly scaled, and therefore incorrect.
44
©2009 Aclara RF Systems, Inc.
NCC Operation and Administration Manual
1/15/2009
45
Communications
4
Chapter
Communications
Introduction
This chapter provides instructions on how to use the
Communications page to seek and read data from electric meters
with a built-in MTU.
What You’ll Learn
Tasks covered in this Chapter include:
•
Basic pings, data retrieval, and disconnect requests.
•
How to collect various interval data and other information from
the Port registries within the electric meter.
•
How to view the ANSI raw data within the electric meter’s Port
registries.
•
How to manage groups of MTUs.
•
How to upload MTU and DCU firmware.
General
After you select Communications from the main menu, the View
Selection defaults to the Communications view page.
Communications View
You must first select either the MTU or the Alias (assigned function
grouping) in the Search Selection Pane.
46
©2009 Aclara RF Systems, Inc.
NCC Operation and Administration Manual
Aliases are created using the Administration functions. They can be
a collection of any classification of meters, geographic information,
or functional use of the end point. Using the Search By dropdown,
change the Search By criteria to Alias.
The communications sub menu interface displays.
1/15/2009
47
Communications
The Select Item list box allows a user to select a specific read
request for the targeted MTU. Selecting an item from the drop-down
and clicking Read will queue a read request for the displayed
configuration setting and retrieve the latest MTU memory setting. A
user with either FULL or READ ONLY access can view this
information and refresh any of the settings accordingly.
48
©2009 Aclara RF Systems, Inc.
NCC Operation and Administration Manual
The Select Items list box can display a wide variety of MTU
settings:
1/15/2009
49
Communications
A user with FULL access to the control will see the Edit Button,
identified below. It is important to note that users with READ ONLY
access can view this information, but not edit anything. In this case
the button will be hidden from view.
The displayed data updates in near-real-time. If an MTU reports a
configuration change, or another privileged user requests a change,
the information will be updated on the current browser screen (once
completed and verified).
Clicking the Edit button displays the Unit Settings control in edit
mode. Most options are editable and require a user with access
and proper knowledge of the MTU and AMI system to make
alterations.
50
©2009 Aclara RF Systems, Inc.
NCC Operation and Administration Manual
Changing a configuration setting is simple and straightforward.
Change the configuration setting accordingly and click the Update
Button when complete. A MTU write request queues into the
system and transmits to the MTU. After the write request
completes, a read request is sent for verification. The Unit Settings
update with the new setting after the read request completes. If
the user wishes to exit edit mode without making changes, a
convenient Cancel Button returns to the page to read-only mode.
At the bottom of the Unit Settings control is the Unit Communication
History table. This table details previous requests made to this unit
by all users in the system.
The following table explains the columns in the Unit Communication
history:
Command
Direction
Attempt
Data
Status
Time Requested
Time Received
Requestor
The configuration setting that is being read or changed
Indicates whether the command is a read or a write
Shows what attempt number the command is on, as well as how
many attempts remain
Displays the data read from or written to the unit
Shows near‐real‐time updates of the message as it travels through
the Star system
A timestamp of when the command was queued
A timestamp of when the response was received and processed
An indication of who made the request
Status can have the following values:
INITIATED
PENDING
SENT_OUT
RECEIVED
RETRY_MAXED
COMM_FAILURE
BAD_COMMAND
WRONG_IMAGE
INVALID_RESPONSE
1/15/2009
Waiting to start
Waiting for Polaris to pick up
Waiting for response
Successfully received
The configurable number of retry attempts has been exceeded
and the system has aborted future attempts.
Polaris never “sent out”
System does not recognize the command
DCU image was not as expected
Response received was not the response expected
51
Communications
The Get Data interface on the Edit MTU page allows users to issue
specific commands to the targeted MTU. The Get Data control is
displayed for users with both FULL and READ ONLY access
permissions.
The Get Data interface features dynamic controls and entry boxes
as needed.
In the above illustration the Current Reading radio button is
selected. A dynamic control of port (channel) selection check
boxes appears after the Current Reading selection has been made.
Selecting a port and clicking the Send button queues an instant
read request of the data being measured and collected on port one
of the MTU. The secondary selections are as detailed in the
following table:
Current Reading
Current Demand (MTU)
Current Demand (Meter)
Reset Demand (MTU)
Reset Demand (Meter)
Previous Reading
ANSI Table Data
Power Status
Ping
52
Desired Port(s)
N/A
N/A
N/A
N/A
Desired Port(s), Day, Hour, Minute
Desired ANSI Table Number to Read
See Next Section for Details
N/A
©2009 Aclara RF Systems, Inc.
NCC Operation and Administration Manual
Clicking the Power Status radio button in the Get Data section
returns a status indicating whether voltage is currently applied to
the MTU.
For users with the correct access permissions, an additional button
labeled Connect or Disconnect will appear. Clicking on
Disconnect will issue a Disconnect Command to the MTU. Clicking
on Connect will issue a Reconnect Command to the MTU. After
the Disconnect or Reconnect Command completes a Power Status
Check Command is issued. The Power Status is updated after the
Power Status Command completes.
The Communication History Table provides near-real-time status of
the Get Data requests which have been submitted to the targeted
MTU.
1/15/2009
53
Communications
As with the Unit Settings history table, this table shows all data
requests made to the unit and features the following information:
Command
Time Sent
Time Received
Result
The configuration setting that is being read or changed
A timestamp of when the command was queued
A timestamp of when the response was received and processed
Provides near‐real‐time status of the request while in progress, and also
provides the result(s) of the query
ANSI Table Display View
To read data from electric meter registers, begin by using the
Search selection menu to locate the MTU. This is more effectively
accomplished by using the Premise function search first and the
Communicate radio button, but you can search for the MTU from a
master list.
Once the MTU is selected, the raw data collected in each of the
Port registers displays in the View area.
54
©2009 Aclara RF Systems, Inc.
NCC Operation and Administration Manual
Alias/Group Management
Click on Group Management on the Communications sub-menu
to display the Group Management page. Here, you can create
Group (Alias) profiles; any kind of classification by which you group
types of equipment, geographic distribution of the MTUs, or any
other cluster classification that suits your business. An example of
the default Group Management page is shown below.
The blank input box under Groups allows you to create new group
classifications for MTU clusters.
The blank box under Members is the place to enter specific MTU
numbers that define the population of each Group.
After clicking on Add, a command is queued into the system and
transmits to the MTU. The MTU then sends a response. A window
displays the status of adding the MTU to the group.
Clicking on the Retry Fails button will reissue the command to
MTUs in the group without a response.
1/15/2009
55
Communications
Firmware Management
Click Firmware Management on the Communications sub-menu
to display the default Firmware Management screen.
Scheduling a Firmware Update
You can schedule a firmware update for one of the following:
•
A single MTU
•
An aliased group of MTUs
•
A single DCU unit
•
Multiple DCU units
Begin by selecting MTU ID, DCU ID, or Alias criteria from the
Search By dropdown. Enter a combination of numbers and
wildcard characters in the Search For field and click Search.
The Search Selection pane populates with all the units matching the
search criteria.
You can either select one specific unit for firmware upgrade, or – if
you are selecting multiple DCUs – you can hold the Ctrl button to
click and highlight multiple units to target for a firmware upgrade.
56
©2009 Aclara RF Systems, Inc.
NCC Operation and Administration Manual
1/15/2009
57
Communications
When all applicable units have been selected, click Submit.
If there are multiple boards to receive the firmware upgrade, as
there are in a DCU, it’s important to select the specific board or
board slot using the radio buttons provided.
Then select the Firmware Revision from the Firmware Rev
dropdown.
NOTE: Firmware images must be loaded into the database
using a separate utility.
Give the update a logical, user-friendly name in the Update Name
box.
Enter the scheduled update time in the Update Date/Time box and
click Schedule.
58
©2009 Aclara RF Systems, Inc.
NCC Operation and Administration Manual
Reviewing Scheduled Firmware Updates
To check the status of pending and completed firmware updates,
change the Action selection dropdown from Schedule to Review.
The list of completed and pending firmware updates displays for the
date range specified in the range at the top of the view screen.
If you do not see the firmware update job you entered, you may
have to expand the Start Date/End Date range to include the dates
of past (completed) or future (scheduled) jobs.
If the list of scheduled firmware updates is extensive, you can
narrow the displayed jobs by selecting a restrictive criterion from the
Job Type dropdown.
You can cancel any incomplete update job by clicking the
corresponding Cancel button.
1/15/2009
59
NCC Operation and Administration Manual
5
Chapter
Managing DCUs
Introduction
This chapter provides instructions on how to use the DCU
Views page to search for and browse detailed information
about each DCU serviced by the Aclara STAR System. This
page can provide summary information about all of the DCUs
currently associated with your STAR System in addition to
detailed information about the performance of individual
DCUs. System administrator(s) and maintenance personnel
will find these reports and information useful in managing and
maintaining the STAR System.
What You’ll Learn
Tasks covered in this Chapter include:
Managing DCUs
•
How to view and use system-wide summary reports on
DCU call performance, RF background noise levels, DCU
diagnostic messages, and DCU battery performance.
•
How to view detailed performance information for individual
DCUs.
60
NCC Operation and Administration Manual
General
When you first select DCU from the main menu, the default
DCU Views page is displayed. An example is shown below.
You’ll notice the Sub-Menu, the Search/Selection Pane, and
the View Pane as introduced in Chapter 2.
View Selector
Note the highlighted area at the top of the View Pane. At the
left of this area is the View selector. By default, the DCU
Views page initially displays with the Call Summary System
DCU View selected, as shown. You can use this selector to
alternately select from any of four System DCU Views or any
of four Individual DCU Views. Only one of these eight Views
can be selected at any time.
1/15/2009
61
Managing DCUs
Date Range Selector
To the right of the View selector is the Date Range selector.
By default, the Date Range selector for the DCU Views page
covers the previous day. When combined with the Call
Summary view selection mentioned above, this fills the View
Pane with a summary of the previous days DCU calls, as
shown above. You can easily change the date range by
clicking in the Start and End boxes and entering a range of
your choice. You can then click the Search button next to the
Date Range selector to refresh the display based upon the
new date range.
Note: The DCU Date Range selector can be configured to
allow selecting Date only or Date and Time. This can be set
by the System Administrator using the DCU Search Format
setting on the Display Options page (see page 111).
Search/Selection Pane Operation
The Search/Selection Pane includes a Search By selector
that allows you to search by DCU ID, Name, or Location.
Simply click on the down arrow at the right edge of the drop
down box and then click on the field that you wish to search.
DCU ID is selected by default, and is likely to be the search
field that you will use most often.
Note that it is not necessary to search for and select a specific
DCU if you are only interested in one of the four System DCU
views. The System DCU Views provide information, such as
call summaries, for the entire population of DCUs currently on
your STAR System. No individual DCU ID selection is
necessary.
In the Search For box, you can enter a specific alphanumeric
character string or you can use an asterisk (*) as a wildcard
character. The asterisk character represents an unknown
string of any length. For example, searching the DCU ID field
for ‘40*’ would find DCUs whose ID starts with ‘40’. Note that
alpha characters used in Search For terms are not case
sensitive.
Once you have selected a Search By field and entered a
Search For term, click the Search button to execute the
search. In the illustration below, we have searched for DCU
IDs using a Search For term of ‘40*’. Thirteen matches were
found and are listed in the lower portion of the
Search/Selection Pane.
62
©2009 Aclara RF Systems, Inc.
NCC Operation and Administration Manual
Once search results are displayed as shown above, you can
select one of the DCU IDs found by clicking on the desired
match. Note that if you select a specific DCU while one of the
System DCU Views is selected, the View selection
automatically changes to select an Individual DCU View.
DCU RSSI
Many of the DCU reports present information about DCU RSSI
values. It is important to understand what RSSI represents as
it is reported in the STAR System’s DCU reports.
Each DCU continuously monitors its assigned frequency for
reading transmissions from MTUs. As it monitors the
airwaves, it also notes any background noise on the assigned
frequency. Once each hour, DCUs record the Peak receive
signal strength (RSSI) value of the background noise and the
Average RSSI value of the background noise. The values
recorded are passed to the NCC when the DCU connects.
These RSSI values are useful in determining whether there is
noise on the assigned frequency which could interfere with the
reception of regular MTU transmissions. As a general rule, the
average RSSI for a DCU should be below (more negative
than) -120 db. Essentially, DCU RSSI values more negative
than -120 indicate minimal interference, and are a good
indication.
System DCU Views
As mentioned previously, there are four System DCU views
provided. These provide information about all of the DCUs
currently installed on the system and are not affected by the
Search/Selection Pane.
1/15/2009
63
Managing DCUs
Call Summary
When you first select DCU from the main menu, the default
DCU Views page is displayed, with the Call Summary view
selected and a date range covering the previous day.
Generally, this summary is monitored daily as a means of
verifying that each DCU is successfully connecting with the
NCC and uploading its readings. An example of the Call
Summary view is shown in the following illustration. Note that
several pieces of information are displayed about each call:
64
•
DCU ID – This is the unique identifier for each DCU.
•
Location – The location of each DCU is displayed here.
Note that location information must be entered manually
using the Edit DCU sub-menu, covered later in this
Chapter.
•
First Call – The time and date of the first call from the
corresponding DCU during the selected date range.
•
Last Call - The time and date of the last call from the
corresponding DCU during the selected date range.
•
# of Calls – The total number of DCU calls from the
corresponding DCU during the selected date range.
•
Total Call Time – The total time of all DCU calls from the
corresponding DCU during the selected date range.
•
Records Expected – The total number of records
expected from the corresponding DCU for all calls
occurrring during the selected date range.
©2009 Aclara RF Systems, Inc.
NCC Operation and Administration Manual
•
Records Received - The total number of records received
from the corresponding DCU for all calls occurrring during
the selected date range.
•
Cleared – Whether or not (Yes or No) the last call from
the corresponding DCU resulted in complete transfer of
all accumulated records.
•
Always On – Those DCU IIs connected to an ethernet or
capable of two-way communication via an IP address are
noted with a “Yes.”
RSSI Thumbnails
The RSSI Thumbnails view provides a convenient way of
monitoring all of your DCUs for potential background noise
problems. To select it, click on the RSSI Thumbnails
selection under System DCU Views. The View Pane will
refresh and present thumbnail sized graphs of the Peak and
Average RSSI values for all system DCUs for the selected
date range. An example follows.
Note that only six DCUs are shown per page. You can use the
Page Controls or the Go To DCU drop-down list to move
through the displays:
•
1/15/2009
- Page Controls - These buttons can be
used to move to the first, previous, next, or last page
respectively.
65
Managing DCUs
•
- Go To DCU – Choose any
DCU from this drop-down list to move the selected
DCU’s RSSI graphs to the upper left corner of the View
Pane.
You can also click on any of graphs to display a detailed
individual RSSI report for the corresponding DCU.
Diagnostics
The Diagnostics view allows you to easily browse DCU alarm
messages received from any (or all) DCUs. You can bring up
the Diagnostics view by clicking on the Diagnostics selection
under System DCU Views. The display will refresh and
present a display similar to the example shown below.
In this view, the top section of the View Pane displays a twolevel menu. The top level provides three choices: Battery,
Data Xfer, and Operation. Each of these top level choices,
when selected, presents a unique second level menu.
Examples of all three are shown below for reference.
66
©2009 Aclara RF Systems, Inc.
NCC Operation and Administration Manual
These menus allow you to select a particular category of
diagnostic messages. When selected, the View Pane will
refresh and present a listing of any messages of the
corresponding type that were received from any system DCU
during the selected date range.
An example display with Data Xfer – Connect Errors selected
follows. You’ll notice that during the selected date range, this
system had several DCUs that experienced connect errors.
Note: Connect errors occur when a DCU is unable to connect
to the NCC for the transfer of readings and diagnostic
information. When a connect error occurs, the DCU tries to
conect again at a later time and/or using a different
connection.
1/15/2009
67
Managing DCUs
Battery Thumbnails
The Battery Thumbnails view provides a convenient way of
monitoring all of your DCUs for potential battery problems. To
select it, click on the Battery Thumbnails selection under
System DCU Views. The View Pane will refresh and present
thumbnail sized graphs of the loaded and unloaded voltage
and the charging current values for all system DCUs for the
selected date range. An example is shown in the illustration
below.
Just as with the RSSI Thumbnails display, only six DCUs are
shown per page. You can use the Page Controls or the Go To
DCU drop-down list to move through the displays. You can
also click on any of the graphs to display a detailed battery
performance report for the corresponding DCU
Note: DCU battery voltage is sampled both under a full load (loaded voltage) and
with no load (unloaded voltage) and these values are reported separately. The
loaded voltage will always be less than the unloaded voltage, but should as a
general rule be no less than 80% of the unloaded voltage.
68
©2009 Aclara RF Systems, Inc.
NCC Operation and Administration Manual
Individual DCU Views
The four Individual DCU views allow you to focus on one
specific DCU that you have selected from the
Search/Selection Pane. Once you have searched for and
selected a DCU using the Search/Selection Pane, you can
display any of these views by selecting either Calls, Battery,
Messages, or RSSI in the Individual DCU Views selector at
the top of the View Pane. If a DCU II is selected, there will also
be views for Temperature and Version.
Calls
When you first select a DCU by clicking on one of the DCUs
listed in the Search/Selection Pane, the Calls view is selected
by default. You can also manually display this view by clicking
on the Calls selection under the Individual DCU Views
selector.
This view, as shown in the following illustration, displays a
graph of the records transferred from that DCU each day
during the selected date range along with a detailed history of
the individual DCU calls from that DCU during the selected
date range. The detailed history includes the start and end
time of each call, the number of records transferred and
whether or not the DCU was able to clear, transferring all of its
stored records to the NCC.
1/15/2009
69
Managing DCUs
This view is valuable for use in analyzing the call-in
performance of a DCU. The calls displayed include calls of
the following call types:
Normal – a regular, scheduled call from the DCU for the
purpose of transferring reading data.
Alarm – an unscheduled call initiated in response to an
alarm condition.
Alarm with Records - an unscheduled call initiated in
response to an alarm condition that also includes regular
reading data.
Battery
To display the Battery view, click on the Battery selection
under the Individual DCU Views selector. The display will
refresh and present a view like that shown in the illustration
below, which provides a detailed history of the DCUs battery
performance over the selected date range.
Three graphs are included to show the loaded and unloaded
voltage and charging current over the selected date range. In
addition, each graph is accompanied by a detailed listing of
the individual values used to plot the graphs. These listings
can be sorted by clicking on the corresponding column
headings.
This view is used for monitoring the battery and charging
system of the DCU.
70
©2009 Aclara RF Systems, Inc.
NCC Operation and Administration Manual
Messages
The Messages view can be displayed by clicking on the
Message selection under the Individual DCU Views selector.
This view displays a listing of all of the diagnostic messages
received from that DCU during the selected date range.
Note that many of the messages are RSSI values, which are
calculated by the DCU and saved once each hour. You can
exclude these RSSI values from the display by checking the
Exclude RSSI Messages checkbox at the top of the listing.
Similarly, Test Records (if any) can be excluded from the
display by checking the Exclude Test Records checkbox.
1/15/2009
71
Managing DCUs
RSSI
To display the RSSI view, click on the RSSI selection under
the Individual DCU Views selector. This view, shown below,
provides a graphical summary of the Peak and Average RSSI
(signal strength) values for background noise on the assigned
channel. Each DCU constantly listens for noise on the
channel and records both the Peak and Average values in
memory each hour. These values are then passed to the NCC
with each DCU call and placed in the STAR Database.
In addition to the graphs, the RSSI view also displays listings
of the actual values recorded each hour. These listings can be
sorted by clicking on the corresponding column headings.
As a general rule, the average RSSI for a DCU should be
below (more negative than) -120 db. Essentially, DCU RSSI
values more negative than -120 indicate minimal interference,
and are a good indication.
Temperature
When an advanced DCU (DCU II) is selected in the
Search/Selection Pane, an additional Individual DCU View
called Temperature can be selected using the Individual
DCU Views selector. These DCUs include a temperature
sensor that is used to measure and record the internal
temperature of the DCU each hour. You can select the
72
©2009 Aclara RF Systems, Inc.
NCC Operation and Administration Manual
Temperature view by clicking on the Temperature selector in
the Individual DCU Views selector while a DCU II is selected
in the Search/Selection Pane. This will produce a display like
the one shown below with the hourly temperature readings
presented in both graph and table form.
Version
When a DCU II is selected in the Search/Selection Pane,
Version view enables, allowing users to see an update history
of the firmware on each of the firmware components in a DCU
II.
1/15/2009
73
Managing DCUs
DCU Editing Functions
Add DCU and Edit DCU appear on the DCU Views sub-menu
only if the user has been granted the corresponding access
privileges by the System Administrator. These two choices
provide you the capability to add and modify the DCU
information stored in the STAR Database.
Add DCU
Clicking on the Add DCU sub-menu reveals a display like that
shown below for adding basic DCU information to the STAR
Database. You can assign an ID number to a new DCU as
well as enter optional general information such as the name,
location, and installation details. Simply key in the desired
information and click on Add to add the information you’ve
entered to the STAR Database.
Edit DCU
General DCU information that you have entered can be
modified or deleted using the Edit DCU sub-menu. Click on
the Edit DCU sub-menu to display the Edit DCU page, as
shown in the illustration on page 75.
Note that the View Pane for this page is divided into three
sections: general DCU information at the top; DCU
Commands in the center section; and DCU Alarm
Configuration parameters in the lower section. Each of these
is discussed in the following paragraphs.
74
©2009 Aclara RF Systems, Inc.
NCC Operation and Administration Manual
General DCU Information
This display, at the top of the View Pane, is similar to the Add
DCU page discussed previously. When a DCU is selected in
the Search/Selection Pane, the DCU ID and optional general
information is displayed here and is available for editing. To
change any of the values shown, enter the desired values and
click the Update button.
REFX
DCU Commands
CAUTION
DCU Commands should only be modified by
someone with an in-depth knowledge of the
system configuration and the potential impact of
the changes. Inappropriate modifications to
DCU Commands could cause the loss of data.
1/15/2009
75
Managing DCUs
Information in the Commands section is transferred to the
selected DCU at the next scheduled Call In Time (HH:MM).
This includes the Call In Time (HH:MM) and the primary,
secondary and emergency phone numbers for the DCU to use
when connecting to the NCC. To change these values, edit
the desired values and click Update. The revised values are
saved in the database and transferred to the DCU during its
next scheduled call, after which the new values will take effect.
A (pending) label will be displayed next to any updated values
until they are transferred to the DCU to indicate that they are
not yet in effect.
The DCU Commands displayed will vary depending upon the
type of DCU. One-way DCUs (DCU I) will display a command
section like that shown here, listing the DCU ID, Call-In Time,
and Contact Numbers.
DCUs with two-way capability (DCU II) will display additional
command parameters as shown below, including Transmit
Frequency, Transmitter Slot, Call-In Interval and Receive
Frequencies for up to three receivers.
DCU Call Modes
It is important to designate whether the DCU has a scheduled
communication window (cell phone calls), or if it’s always on
and open to communication (Ethernet). DCU IIs are usually
always on.
76
©2009 Aclara RF Systems, Inc.
NCC Operation and Administration Manual
The status of the call mode can be confirmed in the overview
DCU View mode.
Hovering over the DCU number will open a floating dialog box
offering the actual, current status of the DCU (not the settings).
Interval Frequency Setup
The Interval/Frequency Setup screen provides input fields for
the IP or phone numbers for the various communication slots.
1/15/2009
77
Managing DCUs
DCU Alarm Configuration
The lower section of the View Pane is used to configure DCUs
to place an unscheduled call to the NCC when specific alarms
occur. This section consists of two common parameters and a
listing of the many types of alarm messages that can occur.
Note: The specific alarms that apply to your system depend
upon the system configuration and the types of meters in use.
Normally, alarm messages are passed to the NCC when the
DCU makes its regularly scheduled call to the NCC. Selecting
an alarm on this page, however, instructs the DCU to place an
unscheduled call to the NCC when the corresponding alarm
message occurs.
The Alarm Hold Duration parameter establishes the amount
of time that the DCU waits after the occurrence of an alarm
before connecting to the NCC and passing along the alarm
information. Normally, this is set to 15 minutes to allow the
DCU to collect any related alarm transmissions that may occur
soon after the first alarm before passing a group of related
alarm messages to the NCC.
When the DCU places an unscheduled call to the NCC, it can
be configured to pass along alarm information only or to
include normal reading transmissions along with the alarm
information. To configure the DCU to deliver reading
information along with the alarm information, check the box
labeled Deliver Readings With Alarms.
78
©2009 Aclara RF Systems, Inc.
NCC Operation and Administration Manual
Updating DCU Information
After you have made any desired changes to the General DCU
information, DCU Commands, and/or DCU Alarm
Configuration, click Update to save the changes to the STAR
Database. Note that changes made to the DCU Commands
or Alarm Configuration take effect after the next scheduled
call from that DCU.
The Edit DCU page can also be used to delete a DCU from
the STAR System. To do so, select the desired DCU in the
Search/Selection Pane and then click Delete. You will be
prompted to confirm your intent to delete the DCU before the
deletion is actually performed.
CAUTION
Deleting a DCU should only be done when
appropriate. Deleting a DCU erroneously could
cause the loss of data.
1/15/2009
79
NCC Operation and Administration Manual
6
Chapter
Managing Installations
Introduction
This chapter provides instructions on how to use the
Installation Views page to manage MTU installation activity.
This page can provide summary information on recent MTU
installations in addition to detailed programmer records and
diagnostic information.
What You’ll Learn
Tasks covered in this chapter include:
Managing Installations
•
How to quickly view a summary of recent installations.
•
How to search for a specific installation record.
•
How to view and search MTU programmer records.
•
How to view and use the Missing Programmer and Missing
Wake-up exception reports.
•
How to create installation records.
80
NCC Operation and Administration Manual
General
When you first select Installations from the main menu, the
default Installation Views page is displayed. An example is
shown below. You’ll notice the Sub-Menu, the
Search/Selection Pane, and the View Pane as introduced in
Chapter 2.
View Selector
At the top left of the View Pane is the View Selector. By
default, The Installation Views page initially displays with the
Installs view selected as shown above. You can use this
selector to alternately select Installs, Programmer Records,
Missing Programmer, or Missing Wake-up views. Only one
of these views can be selected at a time.
1/15/2009
81
Managing Installations
Date Range Selector
At the top center of the View Pane is the Date Range
Selector. By default, the Date Range Selector for the
Installations View page covers the previous day. When
combined with the Installs view selection previously
mentioned, this fills the view pane with a summary of the
previous days installations.
You can easily change the
date range by clicking in the
Start and End boxes and
entering a range of your
choice. You can then click the Search button next to the Date
Range selector to refresh the display based upon the new
date range.
Search/Selection Pane Operation
The Search/Selection Pane includes a Search By selector
that allows you to search by MTU ID, Premise, Installer or
Programmer. Simply click on the down arrow at the right edge
of the drop down box and then click on the field that you wish
to search. MTU ID is selected by default, and is likely to be
the search field that you will use most often.
Note that it is not necessary to search for and select a specific
MTU or Premise if you are only interested in summary
information. The Installation Views page provides
information, such as the Installs view, for the entire population
of MTUs currently on your STAR System. No individual MTU
selection is necessary.
In the Search For box, you can enter a specific alphanumeric
character string or you can use an asterisk (*) as a wildcard
character. The asterisk character represents an unknown
string of any length. For example, searching the Premise field
for ‘294238*’ would find Premises whose premise ID starts
with ‘294238’. Note that alpha characters used in Search For
terms are not case sensitive.
Once you have selected a Search By field and entered a
Search For term, click the Search button to execute the
search. In the illustration below, we have searched for
Premises using a Search For term of ‘294238*’. Ten matches
were found and are listed in the lower portion of the
Search/Selection Pane.
82
©2009 Aclara RF Systems, Inc.
NCC Operation and Administration Manual
Once search results are displayed as shown above, you can
select one of the premises found by clicking on the desired
match. When you select a match, the display will refresh and
show only installation records for that premise during the
selected date range. An example is shown below. Note that if
there are no records for the selected premise within the
selected date range, the refreshed display shows no records.
Viewing Installation Records
When you first select Installation from the main menu, the
default Installation Views page is displayed, with the Installs
view selected and a date range covering the previous day.
Generally, this summary is monitored daily as a means of
verifying that newly installed MTUs are successfully
communicating with DCUs and passing readings and
diagnostic information to the NCC. An example of a default
Installs view is shown below. Note that several pieces of
information are displayed about each installation:
1/15/2009
•
Premise – The Premise ID is shown, and linked to the
Premise: Readings view for this premise.
•
MTU ID - The MTU ID is shown, and linked to the
Premise: Transmissions view for this premise.
83
Managing Installations
•
Port – This identifies the port number, which is only
significant for dual-port MTUs.
•
Reason – This column shows the selection that the
installer made on the Field Programmer when initially
programming this MTU.
•
Install Time – This shows the time and date that the
installation and programming took place.
•
Installer – This reflects the logon ID that the installer
used to log on to the Field Programmer to perform this
installation.
•
Reading – The reading obtained and/or recorded from
the meter at the time of installation.
•
Meter Type – This identifies the Meter Type selected by
the installer during initial programming.
•
Wake-Up Received – This is a Yes/No indication of
whether or not an initial wake-up transmission has been
received from this MTU.
•
Reading Received – This Yes/No indicator shows
whether or not a normal reading transmission has been
received from this MTU.
Viewing Programmer Records
To display the Programmer Records view, click on the
Programmer Records selection on the view selector for the
Installation Views page. The display will refresh and present
a view like that shown below providing a list of Field
Programmer Records for the currently selected date range.
.
84
©2009 Aclara RF Systems, Inc.
NCC Operation and Administration Manual
Several pieces of information are displayed about each
programmer record:
•
Activity Date – This shows the time and date that the
field programming activity took place.
•
Action – This column shows the selection that the
installer made on the Field Programmer.
•
MTU - The MTU ID is shown here.
•
Port – This identifies the port number, which is only
significant for dual-port MTUs.
•
Status – This indicates the ON/OFF condition of the
port.
•
Premise – The Premise ID is provided here.
•
Installer – This reflects the logon ID that the installer
used to log on to the Field Programmer to perform this
activity.
•
Programmer – This indicates the serial number of the
Field Programmer used to perform this activity.
At the left edge of each programmer record is a small ±
symbol. Clicking on this symbol expands the record to provide
full details about the corresponding activity, as shown below.
1/15/2009
85
Managing Installations
Viewing Exceptions
For each installed MTU, both wake-up transmissions and
programmer records must be received by the NCC to provide
the installation information required by the STAR Database.
The Installation Views page provides two views specifically
designed to assist in identifying MTUs where either the wakeup transmission or the programmer record is missing.
Missing Programmer Records
Click the Missing Programmer selection on the view selector
for the Installation Views page. The display will refresh and
present a view like that shown below providing a list of MTUs
for which programmer records have not been received as of
the selected date range. These MTUs are currently identified
to the system by only their wake-up transmissions. The
corresponding programmer records have not been processed.
An example of a typical Missing Programmer view is shown
below.
Missing programmer records typically occur when these
records are not uploaded to the NCC from Field Programmers
after field installation work is completed. If this was just an
oversight, when those records are uploaded and added to the
database, the corresponding MTUs will no longer appear on
the Missing Programmer view.
Missing Wake-up Transmissions
When an MTU is first installed and programmed, it begins a
wake-up cycle lasting approximately 1 hour. During this time,
the MTU sends out eight (8) wake-up transmissions
announcing itself to the system. If the MTU has been
positioned and installed properly, these wake-up transmissions
should be picked up by one or more DCUs and passed along
to the NCC on the next scheduled call from the DCUs.
86
©2009 Aclara RF Systems, Inc.
NCC Operation and Administration Manual
To view a list of MTUs for which wake-up transmissions have
not been received, click on the Missing Wake-Up selection on
the view selector for the Installation Views page. The display
will refresh and provide a listing of any MTUs for which wakeup transmissions have not been received as of the selected
date range. These MTUs are currently identified to the system
by only their programmer records. Therefore, there is a record
of an MTU being installed and programmed (the programmer
record), but there is currently no record of having received a
wake-up transmission from these MTUs.
1/15/2009
87
Managing Installations
Installation Views Editing Functions
If you have been given the corresponding access privileges by
the System Administrator, the Add Installation Record choice
appears on the Installation Views Sub-menu. This function
appears on the Sub-Menu only if you have been granted the
appropriate level of access. The use of the Add Installation
Record function is covered in this section.
Add Installation Record
The Add Installation Record sub-menu selection allows the
user to manually create (Add) installation records. Generally,
this should be used only to create installation records to
substitute for any installation records that for some reason
cannot be retrieved in the normal manner from Field
Programmers.
To Add an installation record, click on the Add Installation
Record sub-menu selection. The Add New Installation
Record screen shown below is displayed. Simply enter the
appropriate values and click on the Add button to create the
new installation record.
88
©2009 Aclara RF Systems, Inc.
NCC Operation and Administration Manual
1/15/2009
89
NCC Operation and Administration Manual
7
Chapter
Reporting
Introduction
This chapter provides instructions on how to use the
Reporting page to create, view and manage STAR System
reports.
What You’ll Learn
Tasks covered in this chapter include:
•
How to view and delete reports.
•
How to configure and schedule reports.
•
How to modify report configurations.
•
How to create and use report groups.
General
When you first select Reporting from the main menu, the
default Reporting page is displayed. An example is shown in
the illustration on page 91. You’ll notice the Sub-Menu, the
Search/Selection Pane, and the View Pane as introduced in
Chapter 2. The Search/Selection Pane lists any reports that
are currently configured on the STAR System. Since no
specific report is selected when first accessing this page, the
View Pane is initially blank, as shown in the illustration on
page 91.
Reporting
90
NCC Operation and Administration Manual
REF7
Search/Selection Pane Operation
The Search/Selection Pane for the Reporting page consists of
a simple listing of all of the reports that have been configured
on the system. Simply click on the name of the report that you
wish to select, and the View Pane will refresh and display a list
of any instances of that report that are available for viewing.
An example is shown below.
REF8
1/15/2009
91
Reporting
Viewing and Deleting Reports
Once a report is selected in the Search/Selection Pane, the
View Pane provides a listing of any instances of that report
that are available for viewing, as shown above. For each item
listed, the start and end times for that specific report are
provided along with a View link and a Delete link. To view the
corresponding report, click on the View link. The
corresponding report opens for viewing in a separate window,
as shown in the illustration on page 92.
To delete an instance of a report, click on the Delete link. You
will be asked to confirm your intention to delete the
corresponding report before the report is deleted from the
system.EF9
92
©2009 Aclara RF Systems, Inc.
NCC Operation and Administration Manual
Report Configuration
To access the Report Configuration page, click on Report
Configuration on the Reporting sub-menu. An example of a
default Report Configuration page is shown in the illustration
on page 93. Note that the Search/Selection Pane lists any
previously configured reports. By default, the View Pane for
this page contains the Add New Report dialog.
Adding a New Report
There are three sections to the Add New Report dialog.
Step 1 - In the topmost section, enter a descriptive name for
the report you are configuring in the Report Name box.
Step 2 – Select a Report Type using the Report Type
dropdown box. There are eleven different Report Types
available for selection. The format, purpose, and
recommended use for each of these Report Types is
summarized in the table on page 95.REF10
Step 2a – If enabled for the Report Type you have chosen,
select the desired End Date from the End Date dropdown
box. Note that for some report types, this dropdown box is
disabled. See the table on page 95 for details. If you select
an Absolute End Date, you must manually enter the start and
end dates in the boxes provided. If you select End of the
Previous Month, no additional entries are required for the
End Date. If you select Today or Yesterday, you may
optionally enter the number of days to be covered by the
report. The default setting for this is 1 day.
1/15/2009
93
Reporting
Step 3 – Select the appropriate schedule for the Report you
are configuring. You can run the report once, specifying a
time and date, or you can choose Daily or Monthly. Selecting
Daily or Monthly updates the display and allow you to select
specific days or months for the report to be run. The Daily
choice allows you to select a specific time of day for the report
to run. A selection of Monthly allows you to specify both a day
of the month and a time of day for the report to run.
Step 4 – Select the MTUs to be included in the report using
the Select MTUs to Include section of the page. You can
include All Active MTUs by clicking on the corresponding
selector. You can also choose from any Report Groups that
have been configured by clicking on the Report Group
selector and choosing the desired Report Group from the
Report Group dropdown box.
Note: If Virtual Utilities are enabled on your STAR System, a
Virtual Utilities choice also appears in the Select MTUs to
Include section of the page. To select a Virtual Utility for
inclusion in the report, click on the Virtual Utilities selector
and choose the desired Virtual Utility from the Virtual
Utilities dropdown box.
Step 5 – Click the Add button to create the Report and add it
to the list of available reports. Once added, the new Report is
available for selection in the Search/Selection Pane.
94
©2009 Aclara RF Systems, Inc.
NCC Operation and Administration Manual
Report Types
Report Type /
Content
Configurable
Parameters
End
Date
Control
Yes
Use
Groups
Columns in
Report
Recommended
Use
Yes
Premise, MTU,
Port,
Percentage,
Meter Serial
Number, Meter
Type Address
Should be run
periodically.
No
No
DCU
Name &
Location
Hi Charge
Current
Lo Charge
Current
Low Voltage
SRAM Errors
Loss of Lock
Resets
Did Not Call
Connect Errors
Should be set up to
run daily.
None
No
Yes
Premise
MTU
Port
Meter Serial
Number
Meter Type
Address
Should be run
periodically, with
increased
frequency during
high volume
installations.
Duplicate MTUs
Lists occurrences
of duplicate MTU
ID numbers.
None
No
No
Premise
MTU
Port
Meter Serial
Number
Meter Type
Address
Should be run
periodically, with
increased
frequency during
high volume
installations.
List of all premises
exhibiting an
E-Coder alarm
Filter by
individual
E-Coder alarm
type or All
types
Yes
No
AccountNum,
MTU ID, Port,
Serial #,
Address, Alarm,
Alarm Time
Should be used as
needed.
Lists MTUs with
average
consumption
above or below a
configurable
percentage
Window, Limit
DCU Analysis
Provides technical
and diagnostic
information on
DCU performance.
Cutoff Time
Duplicate Meter
Serial #
Lists occurrences
of duplicate meter
serial numbers.
1/15/2009
95
Reporting
Report Types
Report Type /
Content
Configurable
Parameters
High Read Rate
MTUs
Lists MTUs with
read rates above
configurable
minimums.
Water Interval,
Electric
Interval, Gas
Interval
MTU Low Battery
Lists MTUs with
battery voltages
below a
configurable
threshold.
Voltage
Threshold
List premises that
are linked too
more than one
MTU
End
Date
Control
No
Use
Groups
Columns in
Report
Recommended
Use
Yes
Premise
MTU
Port
Read Interval
Meter Serial
Number
Meter Type
Address
Should be used as
needed to monitor
MTUs with unusual
read rates.
Yes
Yes
Premise
MTU
Port
Minimum
Voltage
Meter Serial
Number
Meter Type
Address
Should be run
quarterly.
No
No
No
Account #,
MTU, Address,
Port
Negative
Consumption
Lists premises
showing negative
consumption over
the specified date
range.
None
Yes
Yes
Non Numerics
Lists MTUs
reporting nonnumeric readings.
(For encoder type
water meters
only.)
Limit
Yes
Yes
Premise
MTU
Port
Consumption
Meter Serial
Number
Meter Type
Address
Premise
MTU
Port
Non-Numerics
Meter Serial
Number
Meter Type
Address
Should be run
monthly, with
increased
frequency during
high volume
installations.
Should be run
monthly.
96
Should be run
monthly, with
increased
frequency during
high volume
installations.
©2009 Aclara RF Systems, Inc.
NCC Operation and Administration Manual
Report Types
Report Type /
Content
Configurable
Parameters
End
Date
Control
Yes
Use
Groups
Columns in
Report
Yes
Premise
MTU
Port
Actual Readings
Expected
Readings
Percent Missed
Meter Serial
Number
Meter Type
Address
Premise
MTU
Port
Non-Numerics
Meter Serial
Number
Meter Type
Address
Premise
MTU
Port
Consumption
Meter Serial
Number
Meter Type
Address
Premise
MTU
Port
Meter Serial
Number
Meter Type
Address
Reception
Lists MTUs that
have failed to
report more than a
configurable
percentage of their
readings.
% Missed
Reads
Tamper
Lists MTUs whose
tamper circuit has
been interrupted.
(For pulse type
water meters and
gas meters only.)
None
Yes
Yes
Total
Consumption
Lists the
consumption for
each premise over
the specified date
range.
Utility and
Units
Yes
Yes
Zero
Consumption
Lists MTUs
showing zero
consumption over
the specified date
range.
None
Yes
Yes
1/15/2009
Recommended
Use
Should be run
monthly, with
increased
frequency during
high volume
installations.
Should be run
monthly.
Should be run as
often as needed.
Groups can be
used to provide
sub-reports for
areas and/or
account classes.
Should be run
monthly. Groups
can be used to
isolate valid ‘Zero
Consumption’
premises such as
vacant properties.
97
Reporting
Report Groups
Click on the Report Groups sub-menu selection to display the
Report Groups page. An example is shown below.
General
The Report Groups page allows the user to create logical
groups of premises/MTUs for ease of reporting and
monitoring. For example, there may be one area (i.e. one
street) within a community that you are interested in focusing
on. You could create a Report Group containing all of the
individual premises on that street. You could then configure
specific reports to run using the Report Group that you’ve
defined, essentially creating reports focused only upon the
group of premises/MTUs that you are interested in.
Static and Dynamic Groups
Two different types of Report Groups are supported:
98
•
Static Groups – contain specific premises and/or MTUs.
Each time a report is run on a Static Group, the same
MTUs and Premises are included in the report.
Membership in the group is static. It does not change.
•
Dynamic Groups – contain MTUs and/or premises that
meet specific rules or criteria. For example, you might
create a dynamic group that includes all premise IDs
that begin with ‘9’. Each time a report is run on this
group, the STAR System looks through the database
and includes all premises that begin with a ‘9’. When
new premises beginning with a ‘9’ are added to the
database, they are automatically included in this group
the next time the report is run. Membership in this
group is dynamic. Membership in the group is actually
determined when the report is run by including any
MTUs and/or premises that meet the specified criteria.
©2009 Aclara RF Systems, Inc.
NCC Operation and Administration Manual
Creating a Report Group
To create a new Report Group:
Step 1. Type a descriptive name for the group in the
Name box.
Step 2. Click the Static checkbox to create a static group
or leave it unchecked to create a dynamic group.
Step 3.
Click the Add button to create the new group.
Defining Group Membership
To define or add to the membership of a particular Report
Group, click on the name of the desired group in the
Search/Selection Pane. The display will refresh and enable
the Group Membership section of the page.
Static Group Membership
When a static group is selected in the Search/Selection Pane,
the Group Membership section appears as shown below.
Since this example shows a newly created group, the member
list is blank. For static groups, the Add control at the bottom
of the View Pane is active and can be used to add members to
the group.
1/15/2009
99
Reporting
The Add control consists of three parts as shown below:
The field dropdown list provides the following choices:
• Premise
• Zip/Postal Code
• Cycle (If enabled)
• Route (If enabled)
• City
• Meter Serial #
The operator dropdown list provides the following choices:
•
•
•
•
•
•
> (greater than)
< (less than)
= (equal to)
<> (not equal to)
Like
Not Like
The search string box can be used to enter a specific premise
ID, zip code, etc. For example, in the illustration below,
‘Premise’ has been selected in the field dropdown, = (equal to)
in the operator dropdown, and ‘00559087’ in the search string
box.
By clicking the Add button, the MTU associated with the
specified premise is added to the Member list, as shown on
the next page.
100
©2009 Aclara RF Systems, Inc.
NCC Operation and Administration Manual
You can continue in this manner, adding individual MTUs to
the group. You can also use the Add control to add multiple
MTUs to the group. For example, if you wanted to add all
premises with premise IDs greater than 00559087, you can
simply change the operator dropdown to ‘>’ (greater than) and
click on the Add button. The display will refresh and add all
MTUs associated with premise IDs greater than 00559087 to
the selected Report Group, as shown below.
The > (greater than), < (less than), = (equal to) and <> (not
equal to) operators can all be used in a similar manner with
specific search strings. Wildcard characters are not available
with these operators. When using the ‘Like’ or ‘Not Like’
operators, however, a full range of special search characters
(see table on page 103) can be used in the search string box.
This provides many possibilities, some of which are illustrated
on the next page.
1/15/2009
101
Reporting
Example 1 - These settings….
….will add all premises on Broadway to the selected static
group. (The * wildcard before and after the word ‘Broadway’
ignores anything before and after ‘Broadway’.)
Example 2 - These settings…
….will add all premises in Zip codes beginning with ‘441’ to the
selected static group. (The ? wildcards at the end of the
search string accept any character in the final two digits of the
zip code.)
Note that individual MTUs can be deleted from a static group
by clicking on the Delete link next to the MTU ID in the
member list. You will be asked to confirm you intention to
delete the selected MTU from the group before the deletion is
performed.
102
©2009 Aclara RF Systems, Inc.
NCC Operation and Administration Manual
Special Search Characters
Character(s)
Function
*
Substitutes for an unknown
character string of any
length.
Searching for a Premise ID of:
*88
would match premise IDs of any
length ending in “88”
?
Substitutes for a single
unknown character.
Searching for a Premise ID of:
88?9763
would match 7 character strings
beginning with “88” followed by
any single character followed by
“9763”
Specifies a range of values
to match a single numeric
digit.
Searching for a Premise ID of:
88[1-5]9763
would match 7 character strings
beginning with “88” followed by
any of the digits 1, 2, 3, 4, or 5
followed by “9763”
Specifies a range of values
to NOT match a single digit.
Searching for a Premise ID of:
88[^1-5]9763
would match 7 character strings
beginning with “88” followed by
any single digit except the digits
1, 2, 3, 4, or 5 followed by “9763”
Specifies a range of alpha
characters to match a single
character.
Searching for a meter serial
number of:
[a-f]9763*
would match strings beginning
with any single alpha character a
through f followed by “9763”
followed by anything.
Specifies a range of alpha
characters to NOT match a
single character.
Searching for a meter serial
number of:
[^a-f]9763*
would match strings beginning
with any single alpha character
except a through f followed by
“9763” followed by anything.
[x-y]
Where x and y
are numeric
digits 0-9
[^x-y]
Where x and y
are numeric
digits 0-9
[a-b]
Where a and b
are alpha
characters a-z
[^a-b]
Where a and b
are alpha
characters a-z
1/15/2009
Example
103
Reporting
Dynamic Group Membership
When a dynamic group is selected in the Search/Selection
Pane, the Group Membership section appears as shown
below. Since this example shows a newly created group, the
membership rules list is blank. For dynamic groups, the Add
control at the bottom of the View Pane is active and can be
used to create rules that define group members.
The Add control consists of three parts as shown below:
The field dropdown list provides the following choices (the
same as for static groups):
•
•
•
•
•
•
104
Premise
Zip/Postal Code
Cycle (If enabled)
Route (If enabled)
City
Meter Serial #
©2009 Aclara RF Systems, Inc.
NCC Operation and Administration Manual
The operator dropdown list provides the following choices
(again, the same as for static groups):
•
•
•
•
•
•
> (greater than)
< (less than)
= (equal to)
<> (not equal to)
Like
Not Like
The search string box can be used to enter a specific premise
ID, zip code, etc. For example, in the illustration below,
‘Premise’ has been selected in the field dropdown, > (greater
than) in the operator dropdown and ‘00559087’ in the search
string box.
By clicking the Add button, the rule that has been created in
the Add control is added to the membership rules list, as
shown below.
1/15/2009
105
Reporting
Note that the rule itself, not the specific premises/MTUs, is
added to the Group Membership display. This is a dynamic
group. Each time this group is used in a report, the STAR
System searches the database for premise IDs greater than
00590807. When new premises are added to the system with
IDs greater than 00559087, they are automatically a part of
this group.
You can add more rules if you choose to. Just as with the
static groups, the > (greater than), < (less than), = (equal to)
and <> (not equal to) operators can all be used with specific
search strings. Wildcard characters are not available with
these operators. When using the ‘Like’ or ‘Not Like’ operators,
however, a full range of special search characters (see table
on page 103) can be used in the search string box.
Note that individual rules can be deleted by clicking on the
Delete link next to the rule in the membership rules list. You
will be asked to confirm your intention to delete the selected
rule before the deletion is performed.
Editing Report Groups
To edit a Report Group, simply click on the name of the group
in the Search/Selection Pane. After a few seconds, the
display will refresh and reveal the current settings for that
group. The group name and membership can be changed as
necessary. Note that it is not possible to change a static group
to a dynamic group or vice versa.
Using Report Groups
Once report groups have been created, they are available for
use in the Report Groups dropdown list on the Report
Configuration page. See the section on Report
Configuration for additional information.
106
©2009 Aclara RF Systems, Inc.
NCC Operation and Administration Manual
Auto Historical
Click on the Auto Historical sub-menu selection to display the
Auto Historical page. An example is shown below.
Enter a date range and press the Update button to see an
accounting of any missing anchor reads that occurred within
the specified time frame.
Note the Status column for the missing reads. The Historical
Scan function of the STAR® system may have already
rescanned to collect and resolve missing anchor reads.
If a MTU exceeds the configured number of retries without
finding the missing interval read, there is a strong possibility
that the MTU in question may have been removed from
service or exchanged for repair.
The historical scan service will not activate if it knows a service
outage or a firmware update caused missing interval reads. In
those instances there is no data to collect and attempting to
collect non-existent data would only waste bandwidth and slow
more critical network traffic.
1/15/2009
107
NCC Operation and Administration Manual
8
Chapter
NCC Administration
Introduction
This chapter provides information and instructions for the
person responsible for day-to-day administration of the STAR
System.
What You’ll Learn
Tasks covered in this chapter include:
•
How to modify NCC display options, feature options and
scaling options.
•
How to create and modify user accounts.
•
How to manage access permissions using Roles.
•
How to create and use Virtual Utilities.
•
How to view Alarm information.
•
How to manage archiving.
•
How to manage meter types.
Settings
When you first select Administration from the main menu, the
default Administration page is displayed. An example is
shown in the illustration on page 109. You’ll notice the SubMenu, the Search/Selection Pane, and the View Pane as
introduced in Chapter 2. By default, the Settings sub-menu is
selected and the Search/Selection Pane lists three groups of
settings that can be configured here:
Display Options
Feature Options
Global Scaling Options
NCC Administration
108
NCC Operation and Administration Manual
The Display Options settings are selected by default, as
shown in the illustration on page 109.REF11
Display Options
The Display Options page, as the name suggests, provides
various settings that impact the way that data is displayed
throughout the STAR System. To change any of the settings
listed here, simply enter the desired values or select the
desired entries from the dropdown boxes provided and click
Update. A confirmation message is displayed confirming that
the new settings have been saved successfully. Each of the
individual Display Options parameters is explained briefly in
the following paragraphs.
Unique Location Label
The default setting for the Unique Location Label is
‘Premise’. This determines the labeling on the primary tab of
the main menu as well as the labeling for the unique location
field in the STAR System Database. It can be changed to any
string of up to 10 alpha characters (no numerics). Commonly
used alternate labels include ‘Account’ and ‘Location’. The
setting of this label has no impact on the operation of the
system and is configurable only for the purpose of adapting
the system displays to locally accepted terminology.
1/15/2009
109
NCC Administration
Date Order
The Date Order setting affects the way that date information is
displayed on the STAR System. The default setting is ‘Month,
Day, Year’, which is generally the preferred setting for U.S.
installations. Using the Date Order dropdown list, you can
alternately select ‘Day, Month, Year’, which is frequently used
in non-U.S. installations.
Date Separator
The Date Separator setting allows you to choose the
character that is used to separate month, day, and year in date
notation. The default setting is “/” (slash). The Date
Separator dropdown list allows you to alternately select “-“
(dash).
Time Format
The Time Format setting affects the way that time information
is displayed on the STAR System. This setting allows you to
choose between AM/PM and 24-hour (military) format. Select
the desired value from the Time Format dropdown list.
Mail Codes
The Mail Codes setting allows you to choose whether address
information includes U.S. States and ZIP codes or Canadian
Provinces and postal codes. A setting of ‘U.S States’ is
provided by default, which configures the address format for
U.S. State names and Zip codes. The Mail Codes dropdown
list can be used to alternately select ‘Canadian Provinces’,
which configures the address format for Canadian Provinces
and postal codes.
Customer Label
The contents of the Customer Label field appear on the
STAR System home page. By default, this is typically set to
‘STAR AMR System’, but it can be changed to any alpha
character string of up to 50 characters (no numerics).
110
©2009 Aclara RF Systems, Inc.
NCC Operation and Administration Manual
DCU Search Format
The DCU Search Format setting is set to ‘Date’ by default.
This is the appropriate setting for systems whose DCUs are
scheduled to call in during a specific time period each day,
such as between midnight and 6:00AM. On larger systems
with DCUs calling in at various times throughout the day, the
‘Date and Time’ setting should be selected from the DCU
Search Format dropdown box. If set to ‘Date and Time’, the
DCU Views page allows searching by both date and time. If
set to ‘Date’, the DCU Views page allows searches by date
only.
Default Readings Span
The Default Readings Span setting determines the number of
days of readings that are displayed by default on the Premise
Views page. The default value is 30. It may be set to any
integer value from 1 – 999.
Feature Options
Click on Feature Options in the Search/Selection Pane to
display the Feature Options settings, as shown below. Each
of these settings is summarized in the following paragraphs.
1/15/2009
111
NCC Administration
Use Billing Cycle/Route
This feature, if enabled by selecting the corresponding
checkbox on the Feature Options page, provides two, fivecharacter numeric fields associated with each Premise. These
are commonly used for billing Cycle and Route codes, but may
be used for other purposes if not required for Cycle and Route
information. The labels for these two fields are ‘Cycle’ and
‘Route’ by default, but may be changed by entering alternate
labels in the boxes provided on the Feature Options Page.
Use Billing Account
The Billing Account feature, if enabled by selecting the
corresponding checkbox on the Feature Options page,
provides a numeric Billing Account Field and a corresponding
Effective Date field associated with each Premise. The
contents of these fields can be viewed and edited on the
Premise Views: Edit page.
Use Virtual Utilities
The Virtual Utilities Feature, if enabled by selecting the
corresponding checkbox on the Feature Options page,
provides a Virtual Utilities sub-menu selection and associated
functionality accessible on the Administration sub-menu. For
additional information on this feature, see page 117.
System Time Zone
The System Time Zone setting should be set to the time zone
of the location of the NCC. Use the dropdown box to select
the appropriate time zone. Reading transmission times
displayed on the STAR System are based upon the selection
made here.
Communication Server IP Port
Enter a valid port number for the communications server.
Note: This setting should not be changed without an in-depth
knowledge of the specific System Configuration and the
potential impact of the changes being considered.
112
©2009 Aclara RF Systems, Inc.
NCC Operation and Administration Manual
Global Scaling Options
Click on Global Scaling Options in the Search/Selection
Pane to display the corresponding settings. Global Scaling
can be enabled and set individually for water, gas, and electric
meters as shown below.
To enable global scaling for water, electric, or gas readings,
click the corresponding checkbox and enter the appropriate
parameters. For example, if you would like water readings to
be displayed in 100 gallon units, with 2 digits after the decimal
point, you would make the entries shown below.
After making the desired entries, click Update to save the
settings. A confirmation message is displayed confirming that
the new settings have been saved successfully.
1/15/2009
113
NCC Administration
Users
Click on Users on the Administration sub-menu to display
the page where user accounts are created and managed. An
example of the default Users page is shown below.
Note that the Search/Selection Pane lists Current Users,
while the View Pane provides an Add New User form along
with a list headed Role Assignment. By default, only one role
is provided, which is the built-in administrator role included
with every STAR System.
To add a new user, first enter a User ID. If you are using the
Windows Security Model, the User ID must be one that is
configured in Windows for access to the NCC computer. If
you are using a standalone security model, you are required to
enter a password for each new user you create. The Name,
Description, E-Mail, and Phone fields are optional, although
an e-mail address is required if the user needs to subscribe to
alarm messages.
Once you have entered the desired properties for the new
user, you can assign a role (or roles) to that user by clicking
the checkbox next to the desired role(s). For more information
on roles and how to create additional roles please see page
115.
You can now click Add to create the new user account. A
confirmation message is displayed confirming that the new
user has been created and the user appears in the
Search/Selection Pane.
114
©2009 Aclara RF Systems, Inc.
NCC Operation and Administration Manual
Alarm Subscriptions
When a user account is selected by clicking on its name in the
Search/Selection Pane, the current settings for that account
are displayed in the View Pane, along with the Current Alarm
Subscriptions listing as shown below.
You can add alarm subscriptions to the selected user account
by clicking on the Add link next to the desired alarm. The user
will then receive e-mail alarm notifications for the
corresponding type of alarm.
Roles
Click on Roles on the Administration sub-menu to display
the Roles page. Here, you can define roles based on users
needs to access or modify specific portions of the STAR
System. An example of the default Roles page is shown
below.
1/15/2009
115
NCC Administration
The Search/Selection Pane lists any previously defined roles.
The Administrator role is built-in and cannot be modified or
deleted. This role has full access to all STAR System web
interface capabilities.
To create a new role, enter a Name for the role. You can also
optionally enter a Description for the role. Next, use the
Assign Authorization list at the right of the View Pane to
select the appropriate access privileges. In the example
display below, the name ‘Maintenance Manager’ has been
entered and the Access controls used to grant Full rights to
the DCU and Installation sections but no rights (setting: None)
to the Administrative section.
When you have configured the appropriate authorizations,
click Add to create the new role. A confirmation message is
displayed confirming that the new role has been created and
the Name of the role appears in the Search/Selection Pane.
The newly created role also now appears on the
Administration:Users page, where it can be assigned to
individual users. Please see page 114 for information on
assigning users to roles.
116
©2009 Aclara RF Systems, Inc.
NCC Operation and Administration Manual
Virtual Utility
Click on Virtual Utility on the Administration sub-menu to
display the Virtual Utility page. Here, you can define virtual
groups of specific premises and/or MTUs. An example of the
default Virtual Utility page is shown below.
To create a Virtual Utility, enter a descriptive name for the
utility in the Utility box. You can also enter an abbreviation in
the Abbreviation box if desired. Click Add to create the
Virtual Utility. A confirmation message is displayed and the
name of the newly created Virtual Utility appears in the
Search Selection Pane. An example is illustrated below.
Once you have created a Virtual Utility, the Membership
section of the page becomes active and can be used to add
MTUs to the Virtual Utility.
1/15/2009
117
NCC Administration
In the example below, the dropdown boxes have been used to
select ‘All MTUs’ and ‘in City of’ and ‘Cleveland Heights’.
Clicking the Add Members button has added two MTUs to the
Virtual Utility. The last dropdown list is automatically
populated with Cities, Zip Codes, and Cycle:Route codes from
your database to aid you in building Virtual Utilities using this
page.
Note that individual MTUs can be deleted from a Virtual
Utility by clicking on the Delete link shown next to the MTU ID
and Port Number.
Once established, Virtual Utilities can be used similarly to
report groups. A dropdown list on the Report Configuration
page allows you to easily configure reports that include all
members of the Virtual Utilities you have created. See page
93 for information on configuring reports.
118
©2009 Aclara RF Systems, Inc.
NCC Operation and Administration Manual
Alarms
Click on Alarms on the Administration sub-menu to display
the Alarms page. Here, you can sort, search, and view
records of system alarms that have occurred. An example of
the default Alarms page is shown below.
Use the Search/Selection Pane to select a specific type of
alarm or select ‘All’ to view all alarms. You can also use the
Enter Date Range control to limit the list to specific days. By
default, the date range displays alarms that have occurred
during the previous week.
1/15/2009
119
NCC Administration
Archiving
Click on Archiving on the Administration sub-menu to
display the Archiving page. Here, you can create archival
data records of past readings and messages. An example of
the default Archiving page is shown below.
To manage and create archives, select an Archive Data Type
by clicking on one of the types listed (MTU Readings or DCU
Messages) in the Search/Selection Pane. The display will
refresh and present a listing of any existing archival data
records of that type previously created.
At the far right of the display for each archive is a checkbox to
indicate whether the archive is Active or not. Check this box
to make the archive Active, which allows the data in the
Archive to be searchable throughout the STAR System
displays. If the data is archived for storage only and is not
expected to be used routinely, you can un-check the Active
checkbox to mark the Archive as Inactive and exclude the
archived data from Star system searches.
To create a new archive of the selected Archive Data Type,
click on the Add button. The display will refresh and present a
form as illustrated below.
120
©2009 Aclara RF Systems, Inc.
NCC Operation and Administration Manual
Complete the form. If you have the required network access
privileges, you can use the browse buttons ( ) to browse to a
server and connect to a specific database on that server. You
will, however, need a valid SQL Login Name and Password
to complete the connection. You will also need to enter a
Table Name and the desired Start Date and End Date for the
archive. When you have completed all entries on the form,
click Create to create the archive.
Meter Types
Click on Meter Types on the Administration sub-menu to
display the Meter Types page. Here, you can create meter
type profiles. An example of the default Meter Types page is
shown below.
The meter list displayed by default contains over 1000 different
water, gas and electric meters that can be used with STAR
MTUs. Since only a relatively small number of those meters
are typically used in any specific STAR System, Meter Types
Profiles allow you to limit the selections to those that are
actually in use or planned for use.
To create a Meter Types Profile, key in a name for the profile
in the box provided, click the checkboxes next to the meter
types that you wish to include and press Add. The name of
the newly created Meter Types Profile appears in the
Search/Selection Pane under Current Profiles.
To modify an existing Meter Types Profile, click on the name
of the profile in the Search/Selection Pane. The display will
refresh and display the current contents of the corresponding
profile. You can now make any desired changes and click
Update to save your modifications. A confirmation message is
displayed confirming that the changes have been saved
successfully.
1/15/2009
121
NCC Administration
Once a Meter Types Profile (or profiles) has been created, The
Meter Types displayed on the Edit Meter page (see page 43)
are limited to those meters that are included in the profile(s)
that have been created.
Downloading Meters INI Files
Meter Types Profiles can also be used to create INI files for
use in the Field Programmer. These files limit the selections
available to the installers to those meters that are in use or
planned for use on the STAR System. To create an INI file for
use in the Field Programmer:
Step 1 – Select the Meter Types Profile for which you want to
create an INI file by clicking on the name of the profile in the
Search/Selection Pane as shown in the illustration below.
Step 2 – Click on the Download INI File link that appears at
the upper right corner of the View Pane. (See illustration
above.)
Step 3 – A File Download dialog box similar to the one below
will appear. Click on Save to save the INI file to your
computer. Be sure to save it in a location that you will
remember.
122
©2009 Aclara RF Systems, Inc.
NCC Operation and Administration Manual
Refer to the documentation for the Field Programmer for
information on how to load the INI file onto the Field
Programmer.
Electric Units of Measure
Click on Electric Units of Measure on the Administration
sub-menu to display the Electric Units of Measure page.
Here, you can define new incremental measurement criteria
for a given electric meter equipped with an MTU. An example
of the default Electric Units of Measure page is shown
below.
You can use the New Channel Data input fields to define a
new unit of measurement.
More likely, you may return to this input screen to change the
encoding on the meters to match your business needs.
1/15/2009
123
NCC Operation and Administration Manual
9
Chapter
NCC Help
Introduction
This chapter provides information and instructions for users in
need of additional resources for operating or troubleshooting
the NCC system.
What You’ll Learn
Tasks covered in this chapter include:
•
How to access the NCC manual and Contact Information.
•
How to determine the current release version of the NCC.
Support
When you first select Help from the main menu, the default
Help page is displayed.
Support Options
User Manual
Contact InformationF11
NCC Help
124
NCC Operation and Administration Manual
User Manual and Contact Information
The Support page provides a download of the current user
manual for the release version, as well as contact information
for Aclara (Hexagram).
About
Click About on the Help sub-menu to display a list of all the
various software components associated with the NCC
system, including their current software revision.
1/15/2009
125