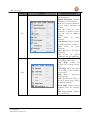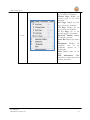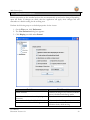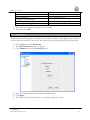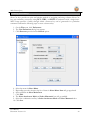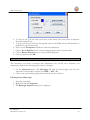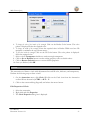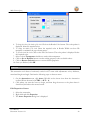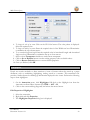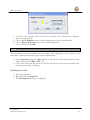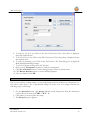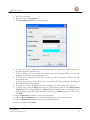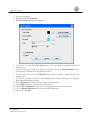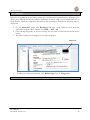
1
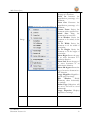
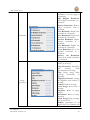
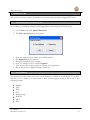
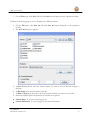
MST Viewer for Java A MS Technology Product Digital Imaging and Document Management Solution User Manual Version 13.1 MST Viewer (Java) Licensing and Copyright Information The software described in this guide is furnished under license agreement and is used in terms of accordance only. Product Version: MST Viewer v 13.5 Document Version: 13.1 Copyright © 2012 MS Technology. All rights reserved. This guide and accompanying software are confidential and proprietary to MS Technology. No part of this document is reproduced in any form by any means without prior authorization of MS Technology. The information provided in this document is used as a guide only and is subject to change without any notice. MS Technology reserves the rights to change and update their product or make changes in the context without any obligation to notify any person for such changes. MS Technology, P.O. Box 471843 Charlotte, NC 28247 USA Tel: 704-544-3403 Fax: 704-544-0262 Email: [email protected] Website: www.ms-technology.com If you find a typographical error in this manual, or if you have thought of a way to make this manual better, we would love to hear from you, feel free to share with us at [email protected]. User Manual Document Version: 13.1 2 MST Viewer (Java) Table of Contents 1. Getting Started...................................................................................................................................... 5 1.1 Brief about User Guide ................................................................................................................. 5 1.2 Overview ....................................................................................................................................... 5 1.3 Need of the Product ...................................................................................................................... 5 1.4 Features ........................................................................................................................................ 6 1.5 Benefits ......................................................................................................................................... 7 1.6 Supported File Formats ................................................................................................................. 8 1.7 Compression Types ....................................................................................................................... 9 2. Understanding Interface ..................................................................................................................... 10 3. Common Tasks .................................................................................................................................... 16 4. 3.1 Append Document in a Working Set........................................................................................... 16 3.2 Save Document ........................................................................................................................... 16 3.3 Print Document ........................................................................................................................... 18 3.4 Bookmarks .................................................................................................................................. 19 3.5 Image Processing ........................................................................................................................ 19 3.6 Setting Default Properties........................................................................................................... 22 3.7 Apply Theme ............................................................................................................................... 23 3.8 Setting Shortcut Keys .................................................................................................................. 24 Annotation .......................................................................................................................................... 25 4.1 Line .............................................................................................................................................. 25 4.2 Rectangle..................................................................................................................................... 26 4.3 Circle ........................................................................................................................................... 27 4.4 Arrow .......................................................................................................................................... 28 4.5 Highlighter................................................................................................................................... 29 4.6 Pen .............................................................................................................................................. 30 4.7 Text ............................................................................................................................................. 31 4.8 Stamp .......................................................................................................................................... 32 4.9 Sticky Note .................................................................................................................................. 36 4.10 Redaction .................................................................................................................................... 38 User Manual Document Version: 13.1 3 MST Viewer (Java) 4.11 Setting Default Properties........................................................................................................... 39 5. Short Cut Keys ..................................................................................................................................... 41 User Manual Document Version: 13.1 4 MST Viewer (Java) 1. Getting Started This section lets you get acquainted with various sections covered in this user manual which further helps you in understanding the product, MST Viewer in a better way. You can also understand the purpose of developing such product. This user guide also contains key features with the system requirements for proper installation and use of product. 1.1 Brief about User Guide Welcome to the user guide of MST Viewer which is proficient, competent and result-oriented product. This user guide has been designed in such a way that the user is able to understand the software in an efficient and effective manner. So we recommend you to carefully go through the user guide before launching the product and keep it in a safe, easily accessible place for future reference. 1.2 Overview MST Viewer for Java is our innovative thin-client, web-based version of MST Viewer. MST Viewer for Java has all the great features and benefits of our regular MST Viewer to be used within an internet browser. MST Viewer for Java is an image and document viewer that operates seamlessly on Java platform. It provides a vast array of standard features and functions as well as industry-specific options to meet the entire imaging requirements for documents, images and files. It is a multilingual application; its User Interface can be converted to multiple languages. It also supports viewing of documents in a different variety of languages. Our applet version of the MST Viewer for Java supports all the features of the regular version and it is capable to access the documents and images from a basic file structure such as your desktop or from URL (server). Easily configurable applet component is available for other applications. 1.3 Need of the Product There is no other advanced viewer available in the market that handles PDF files, all standard image file formats (JPEG, bitmap, TIFF files, etc.), MS Office files, IBM proprietary file formats with the number of advanced features. MST Viewer for Java has been developed and can be customized to fit your exact requirements. User Manual Document Version: 13.1 5 MST Viewer (Java) 1.4 Features MST Viewer is loaded with rich features that make it complete and outstanding. Some of the features are listed below: User Interface options: Resizable, free floating window Thumbnail image selection File menu image selection Customize to support corporate branding using your logo, colors, and labels Customizable toolbar, add remove buttons at runtime Document Info. at status bar Splitter Panes Tree View (for quickly browsing through the documents) User Friendly User Interface Viewing Images: Auto detection of image formats View images and documents from your local hard drive or network Streamed image display avoids dead time when downloading new images Multiple page support Ultra fast image display, zooming, scrolling, rotation Fit to height or width Rotation in 90 degree increments Thumbnails Aspect ratio correction Pan button Working Set / Multi-Part Document Support Create and Annotate: Create new documents easily using cut, copy, paste, merge, and save functionality Annotate ANY format supported and save the document with annotations without modifying the original document. Draw freehand or use standard annotation shapes Insert bitmaps Merge the annotation with the image Ability to resize objects and the annotation will remain linked with the underlying image Rotate annotation data Add sticky notes with text edit capability User Manual Document Version: 13.1 6 MST Viewer (Java) Manipulation: Crop, paste, merge, and save Image Cleanup Image Enhance Scale-to-gray resizing for 1bit images Bilinear Interpolation for resizing Bi-Level images Bi-Cubic Interpolation for resizing color images Printing High resolution printing (300, 600, 1200 dpi) Print Selected Area Saving (Saving to multiple formats) PDF JPEG TIFF MODCA IOCA BMP GIF 1.5 Benefits MST Viewer provides benefits in a variety of following ways: Reduce Overhead and Increase Productivity: Allows companies to reduce a number of applications to one efficient universal document and image viewer. File Formats: Supports over 50 common and proprietary file formats. Email and Fax: Email and/or fax images and documents directly from MST Viewer application. Annotations: Access to a number of different annotations including, but not limited to redaction, line, arrow, rectangle, circle, text, note, highlighter, pen stamp, watermark and eraser. Internal Development: All file formats are developed by in-house MST developers and do not use any third party APIs. This gives you the ability to have customization, prompt resolutions to issues, and release control. Individual Release Control: Reduces deployment and upgrade cost. Every customer has their own release version of the product. User Manual Document Version: 13.1 7 MST Viewer (Java) 1.6 Supported File Formats MST Viewer supports the following file formats: TIFF JPEG BMP GIF JFIF PCX DCX IBM (MO:DCA, IOCA, PTOCA) PDF Email (MSG, EML) DWG WBMP ASCII MS Office (Word, Excel, PowerPoint) PPM PGM PBM RTF PNG User Manual Document Version: 13.1 8 MST Viewer (Java) 1.7 Compression Types MST Viewer supports following compression types: ABIC BMP RLE CCITT G3 CCITT G4 G3-2D Huffman IBM_MMR JBIG2 JPEG JPEG2000 LZW Packed Bits User Manual Document Version: 13.1 9 MST Viewer (Java) 2. Understanding Interface A user interface is the means by which you are able to communicate with the application. MST Viewer interface is a user friendly and provide quick access to all important functions. Menu Bar Annotation Toolbar Document View Area Toolbar Thumbnail View The following are the components in the application user interface. Menu Bar: It is the top most bar of the application interface that contains all the available features of the application. It has eight menu options: File Edit View Image Bookmarks Image Operations Annotation Help User Manual Document Version: 13.1 10 MST Viewer (Java) Menu File Edit User Manual Document Version: 13.1 Options Options Description New Document: Creates a new Working Set Append Document: Appends documents in a Working Set Save: Saves an active document with its current filename and location Save As: Saves an active document to another location with the same or different filename Print: Prints an active document Print Preview: Shows how the file will look when you print it Close: Closes an active document Close All: Closes all opened documents Exit: Closes all opened documents and quit application Cut Page: Cuts the selected text or image from a page Copy Page: Copies the selected text or image from a page Paste Page: Inserts the copied text or image at the insertion point (cursor) Redo: Redo a previously undone change Undo: Reverses the effect of the most recent image editing or filtering operation Delete Page: Deletes selected document from the Working Set PDF Text Search: Searches text in a PDF file 11 MST Viewer (Java) View User Manual Document Version: 13.1 First Page: Display the first page of an active document Previous Page: Display the previous page of an active document Next Page: Display the next page of an active document Last Page: Display the last page of an active document Go To Page: Go to the specified page of a document Operation Toolbar: Display the operation tool bar Status Bar: Display the Status bar Thumbnails: Display the thumbnail view of the documents opened in a Working Set Ruler: Display ruler on the page Hide Annotations: Hide annotation toolbar and option from the menu bar 12 MST Viewer (Java) Image User Manual Document Version: 13.1 Enhance: Magnify the view of the page of a document Zoom In: Increases the magnification percentage of a document Zoom Out: Decreases the magnification percentage of a document Custom Zoom: Resize the document with a specified size Actual Size: Bring the document in its actual size Fit in Window: Resize the document to fit entirely in the window Fit To Width: Resize the document to fit the width of the window Fit To Height: Resize the document to fit the height of the window Rotate Right: Rotate the page of an active document in a clockwise direction Rotate Left: Rotate the page of an active document in an anticlockwise direction Rotate 180 degrees: Rotate the page of an active document in a 180° direction Image Magnifier: Magnifies a specific part of an image Split Window: Divide documents either horizontally or vertically Redact Page: Redactions will not move and will be saved permanently Image Properties: Displays properties of an image 13 MST Viewer (Java) Bookmarks Image Operations User Manual Document Version: 13.1 Add Bookmark: Add bookmark to an active page of a document Add Multiple Bookmark: Add multiple bookmarks on a document Remove Bookmark: Remove added bookmark from a document First Bookmark: Display first bookmark in a document Next Bookmark: Display next bookmark in a document Previous Bookmark: Display previous bookmark in a document Last Bookmark: Display last bookmark in a document Go to Bookmark: Go to the specified bookmark in a document Remove All Bookmark: Delete all the added bookmarks in a document Image Filters: Apply various effects on an image Edge Detections: Identifying and locating sharp discontinuities in an image Flips: Rotate image either vertically, horizontally or diagonally Brightness/Contrast: Change the brightness and contrast of an image Emboss: Emboss an image Invert Image: Invert color of an image Sharpness: Makes an image sharper Smoothness: Makes an image smoother Initial Image: Bring an image into its actual look RedEye: Appearance of red pupil in the eyes of humans and 14 MST Viewer (Java) animals Help: Open user manual for assistance About: Check the product version and licensing information Help Toolbar: Frequently accessing tools through the menu bar is little bit clumsy. MST Viewer for Java has floating toolbars with several buttons that can be easily access to quickly perform any action. The toolbars can be dragged to any location so as not to hinder the view of the document. New Document Save As Save Document Export Print Document User Manual Document Version: 13.1 Undo Select Area Cut Redo Paste Copy Image Magnifier Zoom Out Zoom In Enhance Custom Zoom Rotate Left Rotate Right Rotate 180° Fit in Window Window Width Window Height 15 Close All MST Viewer (Java) 3. Common Tasks This section lists some common operations that can be performed while managing MST Viewer. 3.1 Append Document in a Working Set In a working set, multiple documents can be appended by performing the following steps: 1. On the File menu, click Append Document. 2. The Select Location dialog box appears. 3. 4. 5. 6. 7. 8. 3.2 Select the required location from the available options. The Append dialog box appears. Navigate and find the file to append. Once you found it, select it and click Append. If the selected file is supported will be opened in the application. Repeat the process to append multiple documents. Save Document The document can be saved in one of the several formats to a folder on your desktop, or your hard disk drive or to a folder on a network drive. MST Viewer supports saving a file in one of the following formats: WBMP TIFF JPEG GIF Bitmap (bmp) MODCA IOCA PDF User Manual Document Version: 13.1 16 MST Viewer (Java) Perform the following steps to save a document: 1. On the File menu, click Save OR click the Save button displayed on the Operation toolbar. Perform the following steps to save a document in a different format: 1. On the File menu, click Save As OR click Save As button displayed on the Operation toolbar. 2. The Save As dialog box appears. 3. In Save In drop down, select the location where you want to save the file and navigate to the path. 4. In File Name box, enter the name of the file. 5. In Files of Type drop down box, select the format in which you want to save the file. 6. Select the required option from the list of available save options: Current Page: To save the current page only. Current Document: To save all pages of the current document. User Manual Document Version: 13.1 17 MST Viewer (Java) Pages: To save some specified pages, enter the page numbers using up and down arrow keys. 7. Click Settings for BMP Compressions. 8. Once done, click Save. 9. The document has been successfully saved in a different format. 3.3 Print Document The document can be printed by performing the following steps: 1. Open the document that you want to print. 2. On the File menu, click Print OR click the Print button displayed on the Operation toolbar. 3. The Print dialog box appears. 4. Under Select Printer group, select the printer you want to use (if it is not selected). 5. Under Print Range group, specify the portion of the document that you want to print. If you click Pages, you have to enter the page numbers or page ranges you want to include. 6. Under Copies group, select the number of copies that you want to print. 7. To adjust page settings, go to Page Setup tab. 8. Click Print. To see how your document looks before you print it, go to the File menu and select Print Preview. This will generate a preview of how your document will look like when it's printed on paper. User Manual Document Version: 13.1 18 MST Viewer (Java) 3.4 Bookmarks Bookmarks provide a different way to navigate within a document. If you’re working on a large document and need to return to specific locations in the document for editing or for some other purpose, Bookmark feature can prove invaluable. Rather than having to scroll through pages of the document, you can quickly return to marked locations to resume with the work. Perform the following steps to work with bookmarks: 1. From the Bookmarks menu, do one of the following: To add bookmark: Click Add Bookmark. A star will display at the top left side of the page. To add multiple bookmarks: Click Add Multiple Bookmark. The Add Bookmark dialog box will appear. Enter the page number on which you want to apply bookmark separated by commas in Enter Pages text box field. Click Add. To apply on all pages, select All Pages checkbox. To remove bookmark: Select the page and click Remove Bookmark. To view first bookmark: Click First Bookmark To view next bookmark: Click Next Bookmark To view previous bookmark: Click Previous Bookmark To view last bookmark: Click Last Bookmark To go to specified bookmark: Click Go To Bookmark. The Go To Bookmark dialog box appears. Provide the File Name and Page No. of the desired bookmark in the respective fields. Click OK. To remove all added bookmarks: Click Remove All Bookmark. The application will prompt ‘Do you want to remove all bookmarks’? Click Yes. 3.5 Image Processing Supported Image Operations Supported Image Filters Brightness Gaussian Filter Sharpness GrayScale Filter Smoothness Glow Filter Robert Lens Blur Filter Contrast Maximum Filter Invert Minimum Filter Prewitt Median Filter Edge Detection Noise Filter Emboss Unsharpen Filter User Manual Document Version: 13.1 19 MST Viewer (Java) Base Image Image after Prewitt Image after Emboss Image after performing Sharpness User Manual Document Version: 13.1 20 MST Viewer (Java) Image after performing Frei Chen Image after Glow Filter Image after Lens Blur Filter Image after Gray Scale Filter User Manual Document Version: 13.1 21 MST Viewer (Java) 3.6 Setting Default Properties Default properties are the standard options that are automatically set and can be changed depending upon the needs. If changes are made, then the application will apply those changes and will remember as a default setting for the working area. Perform the following steps to set default properties for the viewer: 1. On the File menu, click Preferences. 2. The User Preference dialog box appears. 3. Click Display provided under General. Field Name Enable Enhance Field Description Enhances an image. If not selected, Enhance option is disabled under Image menu Maximize window when displaying the Opens document in a maximized window document Create enhanced thumbnail by default Enhances thumbnail images Annotations are visible while being moved Display all annotations made on the document clearly while moving User Manual Document Version: 13.1 22 MST Viewer (Java) Hide annotation Split to New Document Show Thumbnail Cropped to New Document Percentage of Zoom change Default display of image Hides all annotations tools Divide documents into two tabs Display Thumbnail view Magnification percentage of a document Determines the window size of documents 4. Make necessary changes depending upon your needs. 5. Once done, click OK. 3.7 Apply Theme Themes allow personalizing the 'look and feel' of the Viewer. Setting a theme applies styles and skins to all the pages and controls in the viewer. The theme can be set by performing the following steps: 1. On the File menu, click Preferences. 2. The User Preferences dialog box appears. 3. Click Themes provided under General option. 4. Select the required theme from the list of available themes. 5. Click Apply. 6. The selected theme will reflect when you reopen the application again. User Manual Document Version: 13.1 23 MST Viewer (Java) 3.8 Setting Shortcut Keys Short Cut keys provide an easier and quicker method of navigating and using software. Short Cut keys are commonly accessed by using ALT, CTRL, or SHIFT in conjunction with a single letter. MST Viewer provides a facility through which a shortcut key can be generated for a particular command. Perform the following steps to create a shortcut key: 1. On the File menu, click Preferences. 2. The User Preferences dialog box appears. 3. Click Shortcuts provided under General option. 4. 5. 6. 7. 8. 9. 10. Select the menu in Select Menu. Depending upon the selection, the list of items in Select Menu Item will get populated. Select submenu in Select Menu Item. Click Edit. The Select Accelerator Mask and Select Mnemonic box will get enabled. Select the combination and key in Select Accelerator Mask and Select Mnemonic box. Click Save. User Manual Document Version: 13.1 24 MST Viewer (Java) 4. Annotation Annotations are comments, notes, explanations, or other types of external remarks that can be added to a selected part of the document to explain or illustrate its meaning. MST Viewer provides tools to enable you to freely write your own comments to the document and can share with others. It provides facility to add comments via sticky notes, apply digital stamps and much more thus making MST Viewer an ideal solution for business work flow. It also allows you to save, copy, paste and print annotation and contents. Annotation marks are saved within a MO:DCA image file as annotation data that is kept separate from the image data. Whenever we make some annotations, a file with the same name with an extension .t_l is created in the current directory. Any annotation that is NOT burned-in (embedded) is put in this file. These marks can also be merged with the image data in a process known as burning-in. To save annotations to any file type other than MO:DCA or TIFF, we save .t_l file. The .t_l file is a GOCA file. Once annotations are burned-in a MO:DCA document, they become part of the base image but still can be manipulated by the annotation functions. MST Viewer has a full range of annotation tools. Following is a list of the annotation and markup tools included in MST Viewer, with a brief description of their functionality. 4.1 Line This annotation tool draws a horizontal, vertical, or lines at 45° with adjustments: color, thickness, and transparency. Perform the following steps to draw a line: 1. On the Annotation menu, click Line OR click on the Line icon from the Annotation toolbar OR use shortcut key CTRL + ALT + L. 2. Click where you want the line to begin, and then drag the mouse to the place where it should end, and release the mouse button. Edit Properties of Line 1. Select the annotation. 2. Right click and click Properties. 3. The Line Properties dialog box is displayed. User Manual Document Version: 13.1 25 MST Viewer (Java) 4. To change the color of the line: Click on the Line Color button. The color palette is displayed. Select the required color. 5. To change the width of the line: Enter the required value in Line Width text box OR maximize or minimize the up or down arrows. 6. Select or clear Transparent checkbox to make line transparent. 7. Click on Set as Defaults button to make existing property values as default values. 8. Click on Restore Defaults button to restore default properties. 9. Once you finished, click OK. 4.2 Rectangle This annotation tool draws a rectangle with adjustments: line and fill color, thickness, and transparency. Perform the following steps to draw a rectangle: 1. On the Annotation menu, click Rectangle OR click on the Rectangle icon from the Annotation toolbar OR use shortcut key CTRL + ALT + R. 2. Click on the screen and drag diagonally and release the mouse button. Edit Properties of Rectangle 1. Select the annotation. 2. Right click and click Properties. 3. The Rectangle Properties dialog box is displayed. User Manual Document Version: 13.1 26 MST Viewer (Java) 4. To change the color of the border of the rectangle: Click on the Border Color button. The color palette is displayed. Select the required color. 5. To change the width of the rectangle: Enter the required value in Border Width text box OR maximize or minimize the up or down arrows. 6. To fill color inside the rectangle: Click on the Fill Color button. The color palette is displayed. Select the required color. 7. Select or clear Transparent checkbox to make rectangle transparent. 8. Click on Set as Defaults button to make existing property values as default values. 9. Click on Restore Defaults button to restore default properties. 10. Once you finished, click OK. 4.3 Circle This annotation tool draws a circle with adjustments: line and fill color, thickness, and transparency. Perform the following steps to draw a circle: 1. On the Annotation menu, click Circle OR click on the Circle icon from the Annotation toolbar OR use shortcut key CTRL + ALT + C. 2. Click on the screen and drag diagonally and release the mouse button. Edit Properties of Circle 1. Select the annotation. 2. Right click and click Properties. 3. The Circle Properties dialog box is displayed. User Manual Document Version: 13.1 27 MST Viewer (Java) 4. To change the color of the border of the circle: Click on the Border Color button. The color palette is displayed. Select the required color. 5. To change the width of the circle: Enter the required value in Border Width text box OR maximize or minimize the up or down arrows. 6. To fill color inside the circle: Click on the Fill Color button. The color palette is displayed. Select the required color. 7. Select or clear Transparent checkbox to make circle transparent. 8. Click on Set as Defaults button to make existing property values as default values. 9. Click on Restore Defaults button to restore default properties. 10. Once you finished, click OK. 4.4 Arrow This annotation tool draws a horizontal, vertical or 45° arrow with adjustments: color, thickness, arrowhead length and angle. Perform the following steps to draw an arrow: 1. On the Annotation menu, click Arrow OR click on the Arrow icon from the Annotation toolbar OR use shortcut key CTRL + ALT + A. 2. Click where you want the arrow to begin, and then drag the mouse to the place where it should end, and release the mouse button. Edit Properties of Arrow 1. Select the annotation. 2. Right click and click Properties. 3. The Arrow Properties dialog box is displayed. User Manual Document Version: 13.1 28 MST Viewer (Java) 4. To change the color of an arrow: Click on the Fill Color button. The color palette is displayed. Select the required color. 5. To change the width of an arrow: Enter the required value in Line Width text box OR maximize or minimize the up or down arrows. 6. To set arrowhead length and angle: Enter the required value in Arrowhead Length and Arrowhead Angle text box OR maximize or minimize the up or down arrows. 7. Select or clear Transparent checkbox to make arrow transparent. 8. Click on Set as Defaults button to make existing property values as default values. 9. Click on Restore Defaults button to restore default properties. 10. Once you finished, click OK. 4.5 Highlighter People use creative methods to draw attention to items of interest when they mark up a paper document, such as underlining, highlighting, circling words in a sentence. This annotation tool provides a similar feature for marking up information displayed in the viewer. Perform the following steps to draw highlighter: 1. On the Annotation menu, click Highlighter OR click on the Highlight icon from the Annotation toolbar OR use shortcut key CTRL + ALT + H. 2. Click on the screen and drag diagonally and release the mouse button. Edit Properties of Highlighter 1. Select the annotation. 2. Right click and click Properties. 3. The Highlighter Properties dialog box is displayed. User Manual Document Version: 13.1 29 MST Viewer (Java) 4. To fill color inside highlighter: Click on the Fill Color button. The color palette is displayed. Select the required color. 5. Click on Set as Defaults button to make existing property values as default values. 6. Click on Restore Defaults button to restore default properties. 7. Once you finished, click OK. 4.6 Pen This annotation tool draws freehand lines and shapes with adjustments: color, thickness, and transparency. Perform the following steps to draw a freehand line: 1. On the Annotation menu, click Pen OR click on the Pen icon from the Annotation toolbar OR use shortcut key CTRL + ALT + P. 2. Click on the screen and drag the mouse. The line will follow your mouse moves. Release the mouse button to end your drawing. Edit Properties of Pen 1. Select the annotation. 2. Right click and click Properties. 3. The Pen Properties dialog box is displayed. User Manual Document Version: 13.1 30 MST Viewer (Java) 4. To change the color of freehand line: Click on the Pen Color button. The color palette is displayed. Select the required color. 5. To change the width of freehand line: Enter the required value in Pen Width text box OR maximize or minimize the up or down arrows. 6. Select or clear Transparent checkbox to make freehand line transparent. 7. Click on Set as Defaults button to make existing property values as default values. 8. Click on Restore Defaults button to restore default properties. 9. Once you finished, click OK. 4.7 Text This annotation tool enters text with adjustments: size and color of the fonts and the text box. Perform the following steps to add any text: 1. On the Annotation menu, click Text OR click on the Text icon from the Annotation toolbar OR use shortcut key CTRL + ALT + T. 2. Click where you want to place the text. 3. A cursor will appear on the screen allowing you to type in text. 4. To finish editing the text, click anywhere outside of the text box. 5. To edit the text later, just double click on the text. Edit Properties of Text 1. Select the annotation. 2. Right click and click Properties. 3. The Text Properties dialog box is displayed. User Manual Document Version: 13.1 31 MST Viewer (Java) 4. To change the color of the text: Click on the Text Color button. The color palette is displayed. Select the required color. 5. To fill color in the text box: Click on the Fill Color button. The color palette is displayed. Select the required color. 6. To change the formatting of text: Click on the Font button. The Font dialog box is displayed. Make required formatting changes. 7. To edit text: Edit the existing text in the Text box. 8. Select or clear Transparent checkbox to make text transparent. 9. Click Set as Defaults button to make existing property values as default values. 10. Click Restore Defaults button to restore default properties. 11. Once you finished, click OK. 4.8 Stamp Just as you would use a rubber stamp, you can stamp images and text anywhere on a document. You can choose either from a list of pre-defined stamps or create your own stamps. Perform the following steps to add stamp: 1. On the Annotation menu, click Stamp OR click on the Stamp icon from the Annotation toolbar OR use shortcut key CTRL + ALT + S. 2. Click where you want to place the stamp. 3. The Stamp dialog box appears. User Manual Document Version: 13.1 32 MST Viewer (Java) 4. Select the required stamp from the predefined list of stamps that you want to place on the document. 5. The preview of the selected stamp will be displayed in Preview group. 6. Once selected, click OK. 7. The MultiPage dialog box appears and do one of the following: To place stamp on all pages: Select All pages checkbox. To place stamp on the current page only: Select Current Page checkbox. To place stamp on the specified page: Provide the page number on which you want to place stamp in Enter Pages text box. 8. Once done, click Add. User Manual Document Version: 13.1 33 MST Viewer (Java) Edit Properties of Stamp 1. Select the annotation. 2. Right click and click Properties. 3. The Stamp Properties dialog box is displayed. 4. To change the color of the stamp: Click on the Border and text color button. The color palette is displayed. Select the required color. 5. To adjust thickness of the stamp: Enter the required value in the Border Width text box OR minimize or maximize the up and down arrows. 6. To fill color in the stamp: Click on the Fill Color button. The color palette is displayed. Select the required color. 7. To change the formatting of stamp: Click on the Font button. The Font dialog box is displayed. Make required formatting changes. 8. To display text: Click on the Text radio button. Provide text of the stamp in the Text box. 9. To display image: Click on Image radio button. Click on Image button. The Select Stamp Image dialog box is displayed. Click on Browse button and navigate to the image that you want to display. Adjust the height and width of the image in Resize group box. Once done, click OK. 10. Select Transparent checkbox to make text transparent. 11. Click on Set as Defaults button to make existing property values as default values. 12. Click on Restore Defaults button to restore default properties. 13. Once you finished, click OK. User Manual Document Version: 13.1 34 MST Viewer (Java) Create New Stamps All the existing stamps are located in the list of pre-defined stamps. If you want to add a new stamp, then you can create a new stamp in MST Viewer. Perform the following steps to create a new stamp: 1. On the Annotation menu, click Stamp OR click on the Stamp icon from the Annotation toolbar OR use shortcut key CTRL + ALT + S. 2. Click anywhere on the screen. 3. The Stamp dialog box appears. 4. Click New Stamp. 5. The New Stamp Properties dialog box appears. 6. Under Frame Settings group box, for the new stamp, select the Text Color and Thickness in Text Color and Border Width fields respectively. 7. Under Fill Settings group box, if you want to fill the color inside the stamp then click on the button. The color palette is displayed. Select the required color. Click OK. Click on the Transparent checkbox to make stamp transparent. 8. Under Style group box, select from the available options the type of new stamp either Text or Image. For Text stamp, enter the name of the stamp in the text box. For Image stamp, click on Image button. The Select Stamp Image dialog box is displayed. Click on Browse button and navigate to the image that you want to display. Adjust the height and width of the image in Resize group box. Once done, click OK. 9. Click on the Font button to change formatting of text. 10. Once done, click OK. 11. The newly created stamp has been created and will be listed in the Stamps list box. User Manual Document Version: 13.1 35 MST Viewer (Java) Delete a Stamp: Perform the following steps to delete any existing or pre-defined stamps: 1. On the Annotation menu, click Stamp OR click on the Stamp icon from the Annotation toolbar OR use shortcut key CTRL + ALT + S. 2. Click anywhere on the screen. 3. The Stamp dialog box appears. 4. Select the stamp from the list of available stamps in Stamps group box. 5. Click Delete. 6. The selected stamp has been removed from the list of stamps. You cannot delete all the stamps. There should be atleast one stamp be available in the list. 4.9 Sticky Note Sticky Note is quite similar to typical sticky note that is stuck with the hard copy documents. It is more efficient and provides a natural and familiar means by which you can add and share comments in the form of a note anywhere on a page over text, images or blank spaces without editing the content. Perform the following steps to add a sticky note: 1. On the Annotation menu, click Sticky Note OR click on the Sticky Note icon from the Annotation toolbar OR use shortcut key CTRL + ALT + N. 2. Click on the screen to stick down your note. 3. It will open a sticky note box. 4. Enter comments in the note. 5. Once done, click Close button displayed at the top right of the note to release from sticky note. 6. To edit note later, double click on the note. 7. It will open sticky note box in an edit mode. 8. Edit the text and click Close. User Manual Document Version: 13.1 36 MST Viewer (Java) Edit Properties of Sticky Note 1. Select the annotation. 2. Right click and click Properties. 3. The Note Properties dialog box appears. 4. To change the text color: Click Text Color button. The color palette is displayed. Select the required color. 5. To adjust thickness of the Sticky Note: Enter the required value in the Border Width text box OR minimize or maximize the up and down arrows. 6. To fill color inside Sticky Note: Click Fill Color button. The color palette is displayed. Select the required color. 7. To change the formatting of Sticky Note: Click Font button. The font dialog box is displayed. Make required formatting changes. 8. Select Transparent checkbox to make Sticky Note transparent. 9. Select Wrap checkbox to arrange text in different lines. 10. Click on Set as Defaults button to make existing property values as default values. 11. Click on Restore Defaults button to restore default properties. 12. Once done, click OK. User Manual Document Version: 13.1 37 MST Viewer (Java) 4.10 Redaction Redaction, by definition, means hiding certain type of information from documents. Redacting a file allows you to hide the document's sensitive information. It can be used to cover information such as Social Security Numbers, competitive information and even images. Perform the following steps to draw mask: 1. On the Annotation menu, click Redaction OR click on the Redaction icon from the Annotation toolbar OR use shortcut key CTRL + ALT + M. 2. Click and drag diagonally on the text or image that you want to redact and release the mouse button. 3. The solid rectangle will be displayed at the selected portion. Redaction 4. To hide text or image permanently, click Redact Page from the Image menu. Once you redact any text or image, it will be hidden permanently. User Manual Document Version: 13.1 38 MST Viewer (Java) 4.11 Setting Default Properties Default properties are the standard options that are automatically set and can be changed depending upon your needs. If changes are made, then the application will apply those changes and will remember as a default setting for the working area. Perform the following steps to set default properties for the annotations: 1. On the File menu, click Preferences. 2. The User Preference dialog box appears. 3. Expand Annotations. 4. Click on the annotation of whose property that you want to set. 5. Clicking the annotation will display the properties on the right side of the window. User Manual Document Version: 13.1 39 MST Viewer (Java) 6. Make necessary changes as per your needs. 7. Click on Set as Defaults button to make existing property values as default values. User Manual Document Version: 13.1 40 MST Viewer (Java) 5. Short Cut Keys Short Cut keys provide an easier and quicker method of navigating and using software. Short Cut keys are commonly accessed by using ALT, CTRL, or SHIFT in conjunction with a single letter. As you begin to memorize shortcut keys, you'll notice that many applications share the same shortcut keys. The below basic shortcut keys are a listing of shortcut keys that will work with almost all IBM compatible computers and software programs. It is highly recommended that all users keep a good reference of the below shortcut keys or try to memorize the below keys. Doing so will dramatically increase your productivity. Command New Close Close All Documents Save As Print Cut Copy Paste Undo Redo First Page Previous Page Last Page Next Page Enhance Zoom In Zoom Out Custom Zoom Actual Size Fit in Window Fit to Width Fit to Height Rotate Right Rotate Left Rotate 180 Pen Highlighter Rectangle Circle Line User Manual Document Version: 13.1 Short Cut Key Ctrl + O Ctrl + W Ctrl + Shift + W Ctrl + F12 Ctrl + P Ctrl + X Ctrl + C Ctrl + V Ctrl + Z Ctrl + Shift + Z Home Page Up End Page Down Ctrl + E + Ctrl + M Shift + 1 Shift + 3 Shift + 2 Shift + 0 Ctrl + R Ctrl + L Ctrl + 8 Ctrl + Alt + P Ctrl + Alt + H Ctrl + Alt + R Ctrl + Alt + C Ctrl + Alt + L 41 MST Viewer (Java) Arrow Sticky Note Stamp Text Redaction Add Bookmark Add Multiple Bookmark Remove Bookmark First Bookmark Next Bookmark Previous Bookmark Last Bookmark Go To Bookmark Remove All Bookmarks User Manual Document Version: 13.1 Ctrl + Alt + A Ctrl + Alt + N Ctrl + Alt + S Ctrl + Alt + T Ctrl + Alt + D Ctrl + Shift + F1 Ctrl + Shift + F2 Ctrl + Shift + F3 Ctrl + Shift + F4 Ctrl + Shift + F5 Ctrl + Shift + F6 Ctrl + Shift + F7 Ctrl + Shift + F8 Ctrl + Shift + F9 42