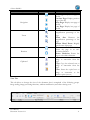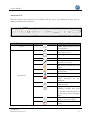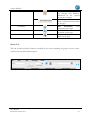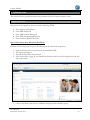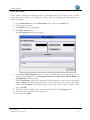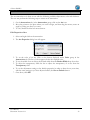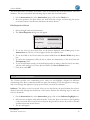
1
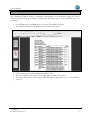
eViewer HTML 5 A MS Technology Product Digital Imaging and Document Management Solution User Manual Version 2.1.1 eViewer HTML5 Licensing and Copyright Information The software described in this guide is furnished under license agreement and is used in terms of accordance only. Product Version: eViewer HTML5 v 1.0.178.2 Document Version: 2.1.1 © 2012-2014 MS Technology. All rights reserved. This guide and accompanying software are confidential and proprietary to MS Technology. No part of this document can be copied, modified, reproduced, republished, uploaded, or distributed in any form by any means without prior authorization of MS Technology. Unauthorized use of the information appearing here may violate copyright, trademark and other applicable laws, and could result in criminal or civil penalties. The information provided in this document is used as a guide only and is subject to change without any notice. MS Technology reserves the rights to change and update their product or make changes in the context without any obligation to notify any person for such changes. MS Technology, P.O. Box 471843 Charlotte, NC 28247 USA Tel: 704-544-3403 Fax: 704-544-0262 Email: [email protected] Website: www.ms-technology.com If you find a typographical error in this manual, or if you have thought of a way to make this manual better, we would love to hear from you, feel free to share with us at [email protected]. User Manual Document Version: 2.1.1 2 eViewer HTML5 Table of Contents 1. 2. 3. 4. Getting Started...................................................................................................................................... 5 1.1 Brief about User Guide ................................................................................................................. 5 1.2 Overview ....................................................................................................................................... 5 1.3 Features ........................................................................................................................................ 5 1.4 Benefits ......................................................................................................................................... 6 1.5 Supported File Formats ................................................................................................................. 6 Understanding User Interface (UI) ........................................................................................................ 8 2.1 The Ribbon .................................................................................................................................... 8 2.2 Toolbars and Tabs ....................................................................................................................... 10 Common Tasks .................................................................................................................................... 15 3.1 Open Document .......................................................................................................................... 15 3.2 Save Document ........................................................................................................................... 17 3.3 Export Document to PDF ............................................................................................................ 17 3.4 Print Document ........................................................................................................................... 17 3.5 Thumbnail Window ..................................................................................................................... 19 3.6 Zoom Text/Image in a Document ............................................................................................... 20 3.7 Search Text in a Document ......................................................................................................... 21 Annotation .......................................................................................................................................... 23 4.1 Line .............................................................................................................................................. 23 4.2 Rectangle..................................................................................................................................... 24 4.3 Circle ........................................................................................................................................... 24 4.4 Arrow .......................................................................................................................................... 25 4.5 Highlighter................................................................................................................................... 26 4.6 Pen .............................................................................................................................................. 27 4.7 Text .............................................................................................................................................. 28 4.8 Stamp .......................................................................................................................................... 29 4.9 PolyLine ....................................................................................................................................... 33 4.10 Polygon........................................................................................................................................ 34 4.11 Arc ............................................................................................................................................... 35 User Manual Document Version: 2.1.1 3 eViewer HTML5 4.12 Angle ........................................................................................................................................... 36 4.13 Ruler ............................................................................................................................................ 36 4.14 Cross Measure............................................................................................................................. 37 4.15 Scratch Out.................................................................................................................................. 38 4.16 Cloud ........................................................................................................................................... 38 4.17 Strikeout and Highlighter ............................................................................................................ 39 4.18 Check Point ................................................................................................................................. 43 4.19 SideNote...................................................................................................................................... 45 5. Add Watermark to a Document.......................................................................................................... 47 6. Bookmark Pages in a Document ......................................................................................................... 47 7. Electronic Signatures........................................................................................................................... 49 8. Split Documents .................................................................................................................................. 51 9. Smart Redaction.................................................................................................................................. 52 User Manual Document Version: 2.1.1 4 eViewer HTML5 1. Getting Started This section lets you get acquainted with various sections covered in this user manual which further helps you in understanding the product, eViewer HTML5 in a better way. You can also understand the purpose of developing such product. This user guide also contains key features with the system requirements for proper installation and use of product. 1.1 Brief about User Guide Welcome to the user guide of eViewer HTML5 which is proficient, competent and result-oriented product. This user guide has been designed for users to understand the software in an efficient and effective manner. So we recommend you to carefully go through the user guide before launching the product and keep it in a safe, easy accessible place for future reference. 1.2 Overview eViewer HTML5 is a very powerful, yet hassle-free, Zero Footprint viewer for viewing multiple formats including TIFF, JPG, PDF, MO:DCA and many others. It is a high-performance document viewing solution that enables users to view documents and images from a desktop or any mobile device within an internet browser. It uses HTML5, CSS, and JSP/Servlet to give your organization the peace of mind that the documents are safe yet provide a portable and dynamic viewing solution. 1.3 Features eViewer HTML5 is loaded with rich features that make it complete and outstanding. Some of the features are listed below: Documents and images directly retrieved and viewed through browsers. Hassle-Free integration: No workstation installation or platform compatibility issues due to the use of Java, AJAX, & HTML5 technologies. File Support: Supports most of the file formats as supported by our flagship viewer, MST Viewer. Annotation support: Including PDF & MO:DCA annotations. File Conversion: Automatically converts files temporarily into an image format to display in an internet browser. Also, provides an option to save the converted file to PDF, TIFF, JPEG, GIF, BMP, or back to the original format. Image Processing: Performed on the server to deliver an extremely high-speed response. Easy Navigation: Go directly to any page on the document. Printing: Print single and multi-page documents with or without annotations. User Manual Document Version: 2.1.1 5 eViewer HTML5 1.4 Benefits eViewer HTML5 provides a number of benefits including: Reduce Overhead and Increase Productivity: Allows companies to reduce a number of applications to one efficient universal document and image viewer. Zero Footprint HTML5 Viewer: Compatible with up-to-date internet browsers with zero client-side installation needed. Annotations: Access to a number of different annotations including, but not limited to redaction, line, arrow, rectangle, circle, text, highlighter, pen, and stamps. Internal Development: All file formats are developed by in-house MST developers and do not use any third party APIs. This gives you the ability to have customization, prompt resolutions to issues, and release control. 1.5 Supported File Formats eViewer HTML5 supports following file formats: IBM proprietary file formats MO:DCA (Mixed Object: Document Content Architecture) IOCA (Image Object Content Architecture) PTK (PTOCA) Office file formats DOC (Microsoft Word Document) DOCX (Microsoft Word Document 2007 & above) XLS (Microsoft Excel Spreadsheet) XLSX (Microsoft Excel Spreadsheet 2007 & above) PPT (PowerPoint Presentation) PPTX (PowerPoint Presentation 2007 & above) VSD (Microsoft Visio) Documents PDF (Adobe Portable Document) RTF (Rich Text) TXT (ASCII Text) User Manual Document Version: 2.1.1 6 eViewer HTML5 CAD File Format DWG (AutoDesk Drawing) DWF (AutoDesk Vector) DXF( Drawing Interchange) Image file formats ABIC BMP (Windows and OS/2 Bitmap Formats) CAL (CALS Raster) DCX (Paint Brush) DCM (DICOM) EMF (Windows Metafile) GIF(CompuServe GIF) JBG (JBIG) JB2 (JBIG2) JPG(Joint Photographic Experts Group (JPEG)) JPEG-XR (Windows Media Photo / HD Photo (HDP)) JPEG-LS (JPEG Lossless) J2K (JPEG 2000) JP2 (JPEG 2000 Compressed) JPM (JPEG 2000 Part 6) JPX (JPEG 2000 Part 2) PNG (Portable Network Graphics) PNM (Portable Bitmap Utilities) PPM (Portable Bitmap Utilities) PBM (Portable Bitmap Utilities) PCX (Paint Brush) RAS (SUN Raster) TIFF (Tagged Image File) WBMP (Wireless Bitmap) WMF (Windows Metafile) XPM (XPicMap) User Manual Document Version: 2.1.1 7 eViewer HTML5 2. Understanding User Interface (UI) eViewer HTML5 has a very user friendly and intuitive user interface that provide quick access to all important functions the user needs. Tabs Ribbon Groups Document View Area 2.1 The Ribbon Ribbon combines the menu bar and toolbar into a single floating pane. The purpose of the ribbon is to bring the most popular commands to the forefront, so you don’t have to search for the most common commands in the viewer. Additionally, the ribbon includes several tabs that are used to reveal different groups of commands. Since the ribbon contains both the program's menu options and toolbar commands, it cannot be removed from the screen. The Ribbon offers ease of use and convenience, with all common actions shown at one place. The Ribbon has three parts – tabs, groups, and commands. User Manual Document Version: 2.1.1 8 eViewer HTML5 Tabs The Ribbon has four basic tabs across the top with each tab represents an activity area with their own specified commands. By default, the Home tab is displayed when the viewer is opened. Groups Commands are sectioned into groups within each tab. Commands A Command is a button or a box or a menu where you enter information. Commands are organized in logical groups that are collected together under tabs. For example, in the above group Zoom, ( User Manual Document Version: 2.1.1 ), ( ), ( ) are zoom commands. 9 eViewer HTML5 2.2 Toolbars and Tabs eViewer HTML5 has one main toolbar that allows modifying any type of file. This main toolbar i.e. File Tab contains options - Save, Print, Create Digital ID, Sign & Export, Export, Comments. Home Tab This is the standard view tab that is comprised of the following groups: Page Navigation, Zooming, Rotation, Clipboard, and editing. User Manual Document Version: 2.1.1 10 eViewer HTML5 Group Name Navigation Zoom Rotation Clipboard Commands Command Decription First Page: Display first page of the file Previous Page: Display previous page of the file Next Page: Display next page of the file Last Page: Display last page of the file Zoom In: Increase the magnification percentage of the page Zoom Out: Decrease the magnification percentage of the page Rubber Band Zoom: Magnify specific area of the page Rotate Counterclockwise: Rotate the page in an anticlockwise direction Rotate Clockwise: Rotate the page in a clockwise direction Cut: Cut the selected text or image or annotation from the page Copy: Copy the selected text or image or annotation from the page Paste: Insert the copied text or image or annotation at the insertion point (cursor) View Tab This tab allows to change the view of the document that is comprised of the following groups: image scaling, image processing functions, window modification, and other viewing tools. User Manual Document Version: 2.1.1 11 eViewer HTML5 Group Name Scaling Commands Command Decription Fit to Window: Resize the document to fit entirely in the window Fit to Width: Resize the document to fit in the width of the window Fit to Height: Resize the document to fit in the height of the window Invert: Invert the color of the page Flip Page: Flip page horizontally or vertically Image Processing either Gray Scale: Range of shades of gray without apparent color Enhance: Enhances the page of a document Split: Splits the window to view two documents in the same viewer window. Window View Side by Side: Places the two documents side-by-side to easier comparison Synchronous Scrolling: Enables synchronized scrolling of both documents in the window at the same time. Ruler: Display ruler on the viewer Show Tree View: Display tree structure of the document Thumbnails: Display view of the document User Manual Document Version: 2.1.1 view thumbnail 12 eViewer HTML5 Annotation Tab This tab contains the annotation tools available with the viewer with additional features such as adding bookmarks and watermark. Group Name Color Annotations User Manual Document Version: 2.1.1 Command Command Description Color: Applies border color on the annotation Line: Draw horizontal and vertical lines at 45° Rectangle: Draws a rectangle Circle: Draws a circle Arrow: Draw horizontal and vertical or 45° arrows Pen: Draws freehand lines and shapes Highlighter: Highlight text on the document Text: Enter text on the page Stamp: Place images or text stamp anywhere on the document Polyline: Series of open and connected lines Polygon: Series of closed, connected straight lines with the last line connecting back to the first line to form a complete shape Angle: Measure angle of the image to the nearest degree CheckPoint: Review and verify forms 13 eViewer HTML5 Watermark Bookmark Delete SideNote: Allow reviewers to step through each SideNote annotation in the opened documents or images Show/Hide Annotation: Show or hide annotations made on the page Add Watermark: Add watermark on the page Add Bookmark: Add bookmark on the page Delete: Delete annotations drawn on the page Redact Tab This tab contains redaction functions available in the viewer including the groups for text search, redaction reason, and redaction option. . User Manual Document Version: 2.1.1 14 eViewer HTML5 3. Common Tasks This section lists the operations that can be performed by the eViewer document viewer. 3.1 Open Document Document can be opened in eViewer from the following ECMs: From Microsoft SharePoint From IBM FileNet P8 From IBM Content Manager 8 From EMC Documentum Webtop From another CMIS ECM system Open a Document from Microsoft SharePoint Perform the following steps to open a document from the SharePoint repository: 1. 2. 3. 4. Open an Internet browser and enter in the SharePoint URL. The login page appears. Provide the user name and password. After successfully logging in, the SharePoint Libraries and Lists will be displayed on the left side of the screen. 5. Click on the library from the list of libraries, displayed in the Libraries group. User Manual Document Version: 2.1.1 15 eViewer HTML5 6. The list of folders and documents exist in the selected library are populated on the right side of the screen. 7. Perform one of the following: For documents listed in library: Hover the mouse over the document that you want to view in the eViewer. A checkbox will appear at the beginning corresponding to the document. Select the checkbox and click eViewer HTML5 icon displayed on the ribbon. The selected document will be opened in the viewer in a separate window. For folders listed in library: Double click on the folder. The list of document exist in the folder were populated on the screen. Hover mouse over the document that you want to view in the viewer. A checkbox will appear at the beginning corresponding to the document. Select the checkbox and click eViewer HTML5 icon displayed on the ribbon. The selected document will be opened in the viewer in a separate window. Open a Document from FileNet P8 Perform the following steps to open a document from FileNet P8 repository: 1. Open an Internet browser and enter the FileNet P8 URL. 1. 2. 3. 4. The login page appears. Provide the user name and password. The FileNet object stores page appears. Select the object stores from the existing list. User Manual Document Version: 2.1.1 16 eViewer HTML5 5. 6. 7. 8. The list of folders exists in the object stores were populated on the screen. Click on the folder whose documents that you want to view in the viewer. The list of documents exist in the selected folder were displayed on the screen. Right click on the document that you want to view in the viewer and select Open in MST viewer. 9. The selected document will be opened in the viewer in a separate window. Open a Document from IBM Content Manager 8 Please contact us to assist you with the integration with Content Manager 8. Open a Document from EMC Documentum Webtop Please contact us to assist you with the integration with EMC’s Documentum for Webtop. Open a Document from another CMIS ECM System Please review the developer’s guide on the available exposed APIs for connecting to other applications. 3.2 Save Document To save a document, click on the File tab and then click Save or click the Save button displayed on the Standard toolbar. 3.3 Export Document to PDF To export a document, click on the File tab and then click Export. 3.4 Print Document The document can be printed by performing the following steps: 1. Open the document that you want to print. 2. From the File tab, click Print. 3. The Print Document dialog box will appear. User Manual Document Version: 2.1.1 17 eViewer HTML5 4. Provide the range of page numbers to print in From Page and To Page respectively. 5. Select or clear Print Annotation checkbox to print or not to print annotations made on the page. 6. Select or clear Print Strike Out checkbox to allow strikeout comments to be print or not to print with the page. 7. Select or clear Print Highlight checkbox to allow highlighted text to be print or not to print with the page. 8. Click OK. 9. The Print dialog box appears. 10. Under Printer group, select the printer to use (if it is not selected). 11. Under Copies group, select the number of copies to print. 12. Once done, click OK. User Manual Document Version: 2.1.1 18 eViewer HTML5 3.5 Thumbnail Window The Thumbnail Window displays a miniature representation of the document pages that allows easily navigating multi-page documents. Perform the following steps to view thumbnail view of a document: 1. On the View tab, in the Show group, select the Thumbnails checkbox. 2. The Thumbnail Window will display at the left side of the viewer. 3. Click on the page from the thumbnail window to view. 4. The selected page will be opened in the right window pane of the viewer. 5. To change the sequence of the pages, click and drag the page and move it to the different position. User Manual Document Version: 2.1.1 19 eViewer HTML5 3.6 Zoom Text/Image in a Document Zoom is a feature that either increases or decreases the size of a page or the size of all the text displayed in a page (Text Zoom) in order to improve readability. You can zoom in to get a close-up view of the file or zoom out to see page at a reduced size. Perform the following steps to zoom text/image: 1. On the Home tab, in the Zoom group, click Zoom In ( magnification percentage of the page. ) button to increase the 2. On the Home tab, in the Zoom group, click Zoom Out ( magnification percentage of the page ) button to decrease the Rubber Band Zoom Another type of zoom that the eViewer HTML5 provides is the Rubber Band Zoom that magnifies selected image/text area in order to improve the readability of the image/text. Perform the following steps to perform rubber band zoom on a text/image: 1. On the Home tab, in the Zoom group, click the Rubber Band Zoom ( ) button. 2. Select an area on the page. For this, hold down the left mouse button and drag the mouse pointer diagonally. 3. A box forms between the starting and ending positions of the mouse pointer. 4. Release the left mouse button when the area has been defined. 5. The rubber-banded magnified area will display in the center of the screen. User Manual Document Version: 2.1.1 20 eViewer HTML5 3.7 Search Text in a Document The eViewer provides the text search functionality to enable users to quickly find text information in a document. Perform the following steps to search text in a document. 1. On the Home tab, in the Tools group, provide the text to search in Search Text box. 2. Press Enter. 3. If the result is found, the searched text will be highlighted in the document. 4. Click arrows to go to the previous and next matched text. 5. Select or clear Highlight All checkbox to display all the searched text found in the document. 6. Select or clear Match Case checkbox to search only for words that match the case of the word or phrase that has been typed in the text box. This means that the search becomes case-sensitive. For example, if you search menu, the result includes all instances of menu with this exact spelling but not Menu or MENU. 7. Select or clear Hide Annotation checkbox to show or hide annotation displayed on the page. 8. Click Advanced Search to search the text with other advanced search options. 9. The Advanced Search dialog box will appear. 10. Provide the text to search in Find field and select the option as per your need. Match case: If selected, then searches only for words that match the case of the word or phrase that has been typed in the text box. This means that the search becomes casesensitive. For example, if you search menu, the result includes all instances of menu with this exact spelling but not Menu or MENU. User Manual Document Version: 2.1.1 21 eViewer HTML5 Match whole word only: If selected, restricts the search to whole words only. Whole words are words separated, on both sides, by a space. For example, if you search for edit, the result includes instances of edit only not editing, editor, editorial, and edited. 11. Click Search. 12. All the matched text will display in the dialog window. 13. Click on the desired matched text. 14. The application will bring to the page on which the match was found. User Manual Document Version: 2.1.1 22 eViewer HTML5 4. Annotation Annotations are comments, notes, markups, explanations, or other types of external remarks that can be added to a selected part of the document to point out, explain or illustrate an area or item on the document. The eViewer provides tools to enables users to freely write their comments, sticky notes and add markups on documents to help with collaborating with others. Additionally it provides the ability to add digital stamps, and other markups to make the eViewer an ideal solution for a business workflow environment. Annotation marks are saved as annotation data that is stored on a separate file and not on the original document. Whenever a user makes an annotation, a file with the same name as the document with an extension .xml is created in the current directory. The annotations can also be printed with the document if the user chooses. The following are the available annotations that are provided by the eViewer: 4.1 Line The Line annotation tool provides the user with the ability to draw a horizontal, vertical, or lines at 45° with the following adjustments: color, thickness, and transparency. The user can perform the following steps to create a line annotation: 1. On the Annotations tab, in the Annotations group, click on the Line icon. 2. Click where you want the line to begin, and then drag the mouse to the place where it should end, and release the mouse button. Edit Properties of Line 1. Select and right click on the annotation. 2. The Line Properties dialog box will appear. 3. To set the color of the line: Click on the button displayed under Color group in the Annotations tab. The list of colors will appear. Select the required color. 4. To set the width of the line: Select the width from the Border Width drop down box. 5. To adjust the transparency of the line: Slide the bar to adjust the transparency of the line from Transparency field. User Manual Document Version: 2.1.1 23 eViewer HTML5 6. To set the Border Width and Transparency adjustment settings as the default properties in order to draw the line, next time, with the same settings as you have adjusted earlier, click Set as Default button. 7. Once done, click OK. 4.2 Rectangle The rectangle annotation tool draws a rectangle with the following available adjustments: line and fill color, thickness, and transparency. The user can perform the following steps to create a rectangle annotation: 1. On the Annotations tab, in the Annotations group, click on the Rectangle icon. 2. Click and drag diagonally on the screen and release the mouse button. Edit Properties of Rectangle 1. Select and right click on the annotation. 2. The Rectangle Properties dialog box will appear. 3. To set the color of the border of the rectangle: Click on the button displayed under Color group in the Annotations tab. The list of colors appears. Select the required color. 4. To set the width of the rectangle: Select the width from the Border Width drop down box. 5. To fill color inside the rectangle: Select the color from the list of colors displayed in the Background Color. 6. To adjust the transparency of the rectangle: Slide the bar to adjust the transparency of the rectangle from Transparency field. 7. To set the Border Width, Background Color and Transparency adjustment settings as the default properties in order to draw the rectangle, next time, with the same settings as you have adjusted earlier, click Set as Default button. 8. Once done, click OK. 4.3 Circle The circle annotation tool draws a circle with the following adjustments: line and fill color, thickness, and transparency. The user can perform the following steps to create a circle annotation: 1. On the Annotations tab, in the Annotations group, click on the Circle icon. User Manual Document Version: 2.1.1 24 eViewer HTML5 2. Click and drag diagonally on the screen and release the mouse button. Edit Properties of Circle 1. Select and right click on the annotation. 2. The Circle Properties dialog box will appear. 3. To set the color of the border of the circle: Click on the button displayed under Color group in the Annotations tab. The list of colors appears. Select the required color. 4. To set the width of the circle: Select the width from the Border Width drop down box. 5. To fill color inside the circle: Select the color from the list of colors displayed in the Background Color. 6. To adjust the transparency of the circle: Slide the bar to adjust the transparency of the circle from Transparency field. 7. To set the Border Width, Background Color and Transparency adjustment settings as the default properties in order to draw the circle, next time, with the same settings as you have adjusted earlier, click Set as Default button. 8. Once done, click OK. 4.4 Arrow The arrow annotation tool draws a horizontal, vertical or 45° arrow with the following adjustments: color, thickness, and transparency. The user can perform the following steps to create an arrow annotation: 1. On the Annotations tab, in the Annotations group, click on the Arrow icon. 2. Click and drag diagonally on the screen and release the mouse button. Edit Properties of Arrow 1. Select and right click on the annotation. 2. The Arrow Properties dialog box will appear. User Manual Document Version: 2.1.1 25 eViewer HTML5 3. To set the color of an arrow: Click on the button displayed under Color group in the Annotation tab. The list of colors appears. Select the required color. 4. To set the width of an arrow: Select the width from the Border Width drop down box. 5. To adjust the transparency: Slide the bar to adjust the transparency of an arrow from the Transparency field. 6. To set the Border Width and Transparency adjustment settings as the default properties in order to draw the circle, next time, with the same settings as you have adjusted earlier, click Set as Default button. 7. Once done, click OK. 4.5 Highlighter The highlighter annotation tool provides the user with the ability to provide highlight markups with the viewer. The user can perform the following steps to create a highlight annotation: 1. On the Annotations tab, in the Annotations group, click on the Highlighter icon. 2. Click and drag diagonally on the screen and release the mouse button. Edit Properties of Highlighter 1. Select and right click on the annotation. 2. The Highlighter Properties dialog box will appear. 3. To fill color inside highlighter: Select the color from the list of colors displayed in the Background Color. 4. To adjust the transparency: Slide the bar to adjust the transparency of the highlighter from the Transparency field. User Manual Document Version: 2.1.1 26 eViewer HTML5 5. To set the Background Color and Transparency adjustment settings as the default properties in order to draw the highlighter, next time, with the same settings as you have adjusted earlier, click Set as Default button. 6. Once done, click OK. 4.6 Pen The pen annotation tool draws freehand lines and shapes with the following available adjustments: color, thickness, and transparency. The user can perform the following steps to create a freehand line annotation: 1. On the Annotations tab, in the Annotations group, click on the Pen icon. 2. Click on the screen and drag the mouse. The mouse will follow your moves. Release the mouse button to end your drawing. Edit Properties of Pen 1. Select and right click on the annotation. 2. The Pen Properties dialog box will appear. 3. To set the color of freehand line: Click on the button displayed under Color group in the Annotation tab. The list of colors appears. Select the required color. 4. To set the width of freehand line: Select the desired width from the Border Width drop down box. 5. To adjust the transparency: Slide the bar to adjust the transparency of the freehand line from the Transparency field. 6. To set the Border Width and Transparency adjustment settings as the default properties in order to draw the pen, next time, with the same settings as you have adjusted earlier, click Set as Default button. 7. Once done, click OK. User Manual Document Version: 2.1.1 27 eViewer HTML5 4.7 Text The text annotation tool enters text on a page with the following available adjustments: size and color of the font and the text box. The user can perform the following steps to create and place any text annotation: 1. 2. 3. 4. 5. 6. 7. On the Annotations tab, in the Annotations group, click on the Text icon. Click and drag diagonally on the screen and release the mouse button. Double click on the text box to enter text in the box. A cursor will appear on the screen allowing you to type in text. To finish editing text, click anywhere outside the text box. To edit the text later, double click on the text. The text box can be repositioned by dragging the text box border and the size of the text box can be adjusted by dragging the selection handles. Edit Properties of Text 1. Select and right click on the annotation. 2. The Text Properties dialog box will appear. 3. To set the border color of the text box: Click on the button displayed under Color group in the Annotations tab. The list of colors appears. Select the required color. 4. To set the width of the text box: Select the width from the Border Width drop down box. 5. To fill color in the text box: Select the color from the list of colors displayed in the Background Color. 6. To adjust the transparency: Slide the bar to adjust the transparency of the box from the Transparency field. 7. To set the color of the text: Select the color from the list of colors displayed in the Text Color. 8. To set the font size of the text: Select the size from Text Font-Size drop down box field. 9. To set the font family of the text: Select the font family from Text Font Face drop down box field. User Manual Document Version: 2.1.1 28 eViewer HTML5 10. To set the adjustment settings as the default properties in order to write the text, next time, with the same settings as you have adjusted earlier, click Set as Default button. 11. Once done, click OK. 4.8 Stamp The user can place images and/or text stamps anywhere on a document. The user can choose either from a list of predefined stamps or create their own stamps. The user can perform the following steps to create and place a stamp annotation on a document: 1. On the Annotations tab, in the Annotations group, click on the Stamp icon. 2. Click where you want to place the stamp. 3. The Stamp dialog box will appear. 4. 5. 6. 7. Select the desired stamp from the list of available stamps displayed under Stamp group. The preview of the selected stamp will be displayed in the Stamp Preview group. Click OK. The selected stamp will be displayed on the page of the document. User Manual Document Version: 2.1.1 29 eViewer HTML5 Edit Properties of Stamp 1. Select and right click on the annotation. 2. The Stamp Properties dialog box will appear. 3. To set the border color of the stamp: Click on the button displayed under Color group in the Annotations tab. The list of colors appears. Select the required color. 4. To set the width of the stamp: Select the width from the Border Width drop down box. 5. To fill color in the stamp: Select the color from the list of colors displayed in the Background Color. 6. To adjust the transparency: Slide the bar to adjust the transparency of the stamp from the Transparency field. 7. To set the text color of the stamp: Select the color from the list of colors displayed in the Text Color. 8. To set the font size of the text of the stamp: Select the size from the Text Font-Size drop down box field. 9. To set the font family of the stamp: Select the font family from the Text Font Face drop down box field. 10. To set the adjustment settings as the default properties in order to put the stamp on the document, next time, with the same settings as you have adjusted earlier, click Set as Default button. 11. Once done, click OK. As you make any changes in the properties of a stamp, the same will be reflected in the Stamp-Preview section. User Manual Document Version: 2.1.1 30 eViewer HTML5 Create New Stamp All the existing stamps are located in the list of predefined stamps. If you want to add a specific stamp, then you can create a new stamp in the viewer. The user can perform the following steps to create a new stamp: 1. 2. 3. 4. 5. On the Annotations tab, in the Annotations group, click on the Stamp icon. Click to place the stamp. The Stamp dialog box will appear. Click New Stamp button. The New Stamp dialog box will appear. 6. Under New Stamp Properties group, for the new stamp, select the border and text color, thickness and transparency in the Background-Color and Text-Color, Border-Width and Transparency fields respectively. 7. Under Text/Image group, select from the available options the type of new stamp either Text or Image. For Text stamp, provide the name of the stamp in the text box. For Image stamp, click on Browse button and navigate to the image that you want to display. Once done, click OK. 8. The newly created stamp has been created and will be listed in the Stamps list box. 9. Select from the list of stamps the stamp to use. 10. Once done, click OK. User Manual Document Version: 2.1.1 31 eViewer HTML5 Delete a Stamp Perform the following steps to delete any existing or predefined stamps: 1. 2. 3. 4. 5. 6. On the Annotations tab, in the Annotations group, click on the Stamp icon. Click where you want to place the stamp. The Stamp dialog box will appear. Select the stamp from the list of available stamps in the Stamps group box. Click Delete. The selected stamp will be removed from the list of predefined stamps. You cannot delete all the stamps. There must be at least one stamp available in the list. User Manual Document Version: 2.1.1 32 eViewer HTML5 4.9 PolyLine The polyline annotation is a series of open, connected straight lines. Users can perform the following steps to create a polyline annotation: 1. On the Annotations tab, in the Annotations group, click on the Polyline icon. 2. Move the pointer to the place to begin drawing. Click the left button to create the start point, move the pointer, and click to create each segment. 3. To exit, double click the left mouse button. Edit Properties of PolyLine: 1. Select and right click on the annotation. 2. The Polyline Properties dialog box will appear. 3. To set the color of polyline: Click on the button displayed under Color group in the Annotations tab. The list of colors appears. Select the required color. 4. To set the width of the polyline: Select the desired width from the Border Width drop down box. 5. To adjust the transparency: Slide the bar to adjust the transparency of the polyline from the Transparency field. 6. To set the Border Width and Transparency adjustment settings as the default properties in order to draw the polyline, next time, with the same settings as you have adjusted earlier, click Set as Default button. 7. Once done, click OK. User Manual Document Version: 2.1.1 33 eViewer HTML5 4.10 Polygon The polygon is a series of closed, connected straight lines with the last line connecting back to the first line to form a complete shape. The polygon can be filled with a color or be transparent. This tool gives you more control and flexibility in creating the desired annotation shape needed by the user. The user can perform the following steps to create a polygon annotation: 1. On the Annotations tab, in the Annotations group, click on the Polygon icon. 2. Move the pointer to the place where you want to begin drawing. Click the left button to create the start point, move the pointer, and click to create each segment. 3. To exit, double click the left mouse button. Edit Properties of Polygon 1. Select and right click on the annotation. 2. The Polygon Properties dialog box will appear. 3. To set the color of polygon: Click on the button displayed under Color group in the Annotations tab. The list of colors appears. Select the required color. 4. To set the width of the polygon: Select the desired width from the Border Width drop down box. 5. To fill color inside the polygon: Select the color from the list of colors displayed in the Background Color. 6. To adjust the transparency: Slide the bar to adjust the transparency of the polygon from the Transparency field. 7. To set the adjustment settings as the default properties in order to draw the polygon, next time, with the same settings as you have adjusted earlier, click Set as Default button. 8. Once done, click OK. User Manual Document Version: 2.1.1 34 eViewer HTML5 4.11 Arc The arc annotation tool draws an arc with the following available adjustments: color and thickness. The user can perform the following steps to create an arc annotation: 1. On the Annotations tab, in the Annotations group, click on the Arc icon. 2. Move the pointer to the place where you want to begin, and then drag the mouse; create an angle by joining two lines at a vertex. 3. To exit, double click the left mouse button. Edit Properties of Arc 1. Select and right click on the annotation. 2. The Arc Properties dialog box will appear. 3. To set the color of an arc: Click on the button displayed under Color group in the Annotations tab. The list of colors appears. Select the required color. 4. To set the width of an arc: Select the desired width from the Border Width drop down box. 5. To adjust the transparency: Slide the bar to adjust the transparency of an arc from the Transparency field. 6. To set the adjustment settings as the default properties in order to draw the arc, next time, with the same settings as you have adjusted earlier, click Set as Default button. 7. Once done, click OK. User Manual Document Version: 2.1.1 35 eViewer HTML5 4.12 Angle The angle annotation tool easily and quickly measures the angle of the image to the nearest degree with the following available adjustments: color and thickness. It consists of two simple lines joined at a vertex to create an angle. The user can perform the following steps to create an angle annotation: 1. On the Annotations tab, in the Annotations group, click on the Angle icon. 2. Move the pointer to the place where you want to begin, and then drag the mouse; create an angle by joining two lines at a vertex. 3. To exit, double click the left mouse button. Edit Properties of Angle 1. Select and right click on the annotation. 2. The Angle Properties dialog box will appear. 3. To set the color of an angle: Click on the button displayed under Color group in the Annotations tab. The list of colors appears. Select the required color. 4. To set the width of an angle: Select the desired width from the Border Width drop down box. 5. To adjust the transparency: Slide the bar to adjust the transparency of an angle from the Transparency field. 6. To set the adjustment settings as the default properties in order to draw the angle, next time, with the same settings as you have adjusted earlier, click Set as Default button. 7. Once done, click OK. 4.13 Ruler The ruler annotation tool draws a line that is used to measure the distance between two points of the image with adjustments: color and thickness. The user can perform the following steps to create the ruler annotation: 1. On the Annotations tab, in the Annotations group, click on the Ruler icon. 2. Move the pointer to the place where you want the line to begin, and then drag the mouse to the place where it should end, and release the mouse button. User Manual Document Version: 2.1.1 36 eViewer HTML5 Edit Properties of Ruler 1. Select and right click on the annotation. 2. The Ruler Properties dialog box will appear. 3. To set the color of the ruler: Click on the button displayed under Color group in the Annotations tab. The list of colors appears. Select the required color. 4. To set the width of the ruler: Select the desired width from the Border Width drop down box. 5. To adjust the transparency: Slide the bar to adjust the transparency of the ruler from the Transparency field. 6. To set the adjustment settings as the default properties in order to draw the ruler, next time, with the same settings as you have adjusted earlier, click Set as Default button. 7. Once done, click OK. 4.14 Cross Measure The cross measure annotation tool draws an “x” that is used to measure the distance horizontally and vertically between two points of the image with the following available adjustments: color and thickness. The user can perform the following steps to create the cross measure annotation: 1. On the Annotations tab, in the Annotations group, click on the Cross Product icon. 2. Move the pointer to the place where you want the cross to begin, and then drag the mouse to the place where it should end, and release the mouse button. Edit Properties of Cross Measure 1. Select and right click on the annotation. 2. The Cross Product Properties dialog box will appear. 3. To set the color of the Cross Measure: Click on the button displayed under Color group in the Annotations tab. The list of colors appears. Select the required color. User Manual Document Version: 2.1.1 37 eViewer HTML5 4. To set the width of the Cross Measure: Select the desired width from the Border Width drop down box. 5. To adjust the transparency: Slide the bar to adjust the transparency of the cross product from the Transparency field. 6. To set the adjustment settings as the default properties in order to draw the cross product, next time, with the same settings as you have adjusted earlier, click Set as Default button. 7. Once done, click OK. 4.15 Scratch Out The scratch out annotation tool draws zigzag lines with the following available adjustments: color and thickness. The user can perform the following steps to create the stretch out annotation: 1. On the Annotations tab, in the Annotations group, click on the Scratch Out icon. 2. Move the pointer to the place where you want the zigzag lines to begin, and then drag the mouse to the place where it should end, and release the mouse button. Edit Properties of Scratch Out 1. Select and right click on the annotation. 2. The Scratch Out Properties dialog box will appear. 3. To set the color of the Scratch Out: Click on the button displayed under Color group in the Annotations tab. The list of colors appears. Select the required color. 4. To set the width of the Scratch Out: Select the desired width from the Border Width drop down box. 5. To adjust the transparency: Slide the bar to adjust the transparency of the Scratch Out from the Transparency field. 6. To set the adjustment settings as the default properties in order to draw the Scratch Out, next time, with the same settings as you have adjusted earlier, click Set as Default button. 7. Once done, click OK. 4.16 Cloud User Manual Document Version: 2.1.1 38 eViewer HTML5 The cloud annotation tool draws cloud with a series of connected lines with adjustments: color and thickness. The user can perform the following steps to draw the cloud annotation: 1. On the Annotations tab, in the Annotations group, click on the Cloud icon. 2. Move the pointer to the place where you want the cloud to begin, and then drag the mouse to the place where it should end, and release the mouse button. Edit Properties of Cloud 1. Select and right click on the annotation. 2. The Cloud Properties dialog box will appear. 3. To set the color of the Cloud: Click on the button displayed under Color group in the Annotations tab. The list of colors appears. Select the required color. 4. To set the width of the Cloud: Select the desired width from the Border Width drop down box. 5. To adjust the transparency: Slide the bar to adjust the transparency of the cloud from the Transparency field. 6. To set the adjustment settings as the default properties in order to draw the cloud, next time, with the same settings as you have adjusted earlier, click Set as Default button. 7. Once done, click OK. 4.17 Strikeout and Highlighter The eViewer provides two commenting tools, strike out and highlight, designed for different commenting tasks. Most comments include two parts: the markup or icon that appears on the page, and a text message that appears in a pop-up note when you select the comment. Strikeout: The ability to cross out words. After you use this feature, the word remains, but a line is drawn horizontally through the midsection of the letters. Perform the following steps to strike out text in a document: 1. On the Annotations tab, in the Annotations group, click on the Strikeout/highlight icon. 2. Select the text to display with strikeout marks. To do this, place your cursor at the beginning of the text, hold down your left mouse button, drag the mouse across the word or sentence and then release the mouse button. 3. The box will appear. User Manual Document Version: 2.1.1 39 eViewer HTML5 4. Provide the comments in the comment area. 5. Click ( ) to change the color of the comment area. The color palette will appear. Select the required color from the list of available colors. 6. Provide tag for comments – correction, suggestion, fixed or important. 7. To provide new tag to the comment, click New tag text box. 8. Clicking the box will bring the text box in an editable mode. 9. Provide the new tag name. 10. 11. 12. 13. Click . The new tag has been added in the tag list. Click Save. The comment has been strike out in the page and is displayed in the right hand side of the viewer within a comment box. 14. Click Edit to re-edit the comment. 15. Click Reply to reply with your valuable feedback on the reviewed comments. 16. Click Delete to delete comment. User Manual Document Version: 2.1.1 40 eViewer HTML5 17. Click ( ) to minimize comment box. 18. The ( 19. Click ( ) icon is displayed at the strike out text. ) to read the strikeout comment. Highlight text: The user can perform the following steps to highlight text in a document. 1. Select the text to display with the highlighted color. To do this, place the cursor at the beginning of the word, hold down your left mouse button, drag the mouse across the word or sentence and then release the mouse button. 2. The box will appear. 3. Click ( ). 4. The pop up window will appear. User Manual Document Version: 2.1.1 41 eViewer HTML5 5. Click Highlight and select the color from the list of available colors to highlight text with the selected color. If you do not select color, then the text will be highlighted with the default selected color. 6. Provide the comments in the comment area. 7. Click ( ) to change the color of comment area. The color palette will appear. Select the required color from the list of available colors. 8. Provide tag for comments – correction, suggestion, fixed or important. 9. To provide new tag to the comment, click on the New tag text box. 10. Clicking the box will bring the text box in an editable mode. 11. Provide the new tag name. 12. 13. 14. 15. Click . The new tag has been added in the tag list. Click Save. The comment has been highlighted in the page and is displayed in the right hand side of the viewer within a comment box. User Manual Document Version: 2.1.1 42 eViewer HTML5 16. 17. 18. 19. Click Edit to re-edit the comment. Click Reply to reply with your valuable feedback on the reviewed comments. Click Delete to delete comment. Click ( ) to minimize comment box. 20. The ( 21. Click ( 4.18 ) icon is displayed at the highlighted text. ) to read the comment of the highlighted text. Check Point The Check Point annotation is a great tool to assist users in reviewing and verifying forms. Users open the Check Point pane to quickly jump from area to area, verifying the information according to the instructions and mark each item as “Approved” or “Rejected”. The user can perform the following steps to add a checkpoint annotation on any specific area of the document: 1. On the Annotations tab, in the Annotations group, click Check Point annotation tool. 2. The pointer will change to tick mark. 3. Move the pointer to the place where the checkpoint to begin. Click and drag diagonally on the screen and release the mouse button. 4. The comments dialog box will appear. 5. Provide the comments for the checkpoint in the textbox and click Save. 6. The CheckPoint dialog box will pop up from the right hand side with your comments and two buttons – Accept and Reject. User Manual Document Version: 2.1.1 43 eViewer HTML5 7. The reviewer will review the comments and if agree, will Accept the comments otherwise Reject. Upon Accepting, the status will change from unchecked to Approved and other requisite information such as Approver’s name with date and time will appear in the Information section. 8. Upon rejecting, the pop up will appear asking reason of rejection. Provide the reason in the provided text box and click OK. User Manual Document Version: 2.1.1 44 eViewer HTML5 9. Upon Rejecting, the status will change from unchecked to Rejected and other requisite information such as Rejecters name with date and time and the reason of rejecting will appear in the Information section. 4.19 SideNote The SideNote annotation enables reviewers to step through each Note annotation in the opened documents or images, review and add additional information and comments regarding an annotation, along with a complete audit trail of the comments. The user can perform the following steps to add a sidenote on any specific area of the document: 1. On the Annotations tab, in the Annotations group, click SideNote annotation tool. 2. Move the pointer to the place where you want the sidenote to begin. Click and drag diagonally on the screen and release the mouse button. 3. The comments dialog box will appear. User Manual Document Version: 2.1.1 45 eViewer HTML5 4. 5. 6. 7. 8. Provide the title name of the side note in the Enter the Title field. Provide the comments in the comments area. Select option from the list of available options in both the drop down boxes field. Click Save. The SideNote dialog box will pop up from the right hand side with your comments and the selected options. User Manual Document Version: 2.1.1 46 eViewer HTML5 9. Click Add Reply to reply to any comment. 10. Click Next and Back to view next and previous sidenotes in the document. 5. Add Watermark to a Document Watermarks are text or pictures that appear behind document text. They often add interest or identify the document status, such as marking a document as a Draft, Confidential, and Urgent. The eViewer provides a list of standard watermarks, or the user can create their own custom watermark, such as company logo. The user can perform the following steps to create a watermark: 1. In the Annotations tab, in the Watermark group, click Add Watermark icon. 2. The eViewer Watermark dialog box will appear. 3. Provide the details of the watermark corresponding to each field. 4. Click OK. 5. The watermark will be added on each page of the document. 6. Bookmark Pages in a Document A user working with a large document needs to return to a specific location in the document for any purpose, Bookmark feature can prove invaluable. Rather than having to scroll through the pages of the document, user can quickly jump to the marked page with this feature. The user can perform the following steps to add bookmark page(s): 1. Go to the Thumbnail Window that lists all the pages of the document. If it is not open, go to the View tab, in the Show group, select Thumbnail checkbox. 2. Hover mouse on the desired page(s) to place bookmark in the document. User Manual Document Version: 2.1.1 47 eViewer HTML5 3. The blue color icon ( ) will display at the top left corner of the page. 4. Click ( ). 5. The selected page(s) has been successfully bookmarked. 6. Repeat the above steps to add multiple bookmarks in the document. Edit/remove bookmark page(s): Bookmarks can be edited/removed by one of the following ways: Menu option Thumbnail Window option Through Menu Option: 1. In the Annotations tab, in the Bookmark group, click Add Bookmark icon. 2. The Edit Bookmarks dialog box listing bookmarked and non-bookmarked pages of the document will appear. The icon ( ) corresponding to the page(s) are bookmark pages(s). 3. To remove bookmark from any specific page, click ( ) icon corresponding to that page. 4. The ( ) icon will become ( ) signifies that bookmark has been successfully removed from the selected page. 5. To add bookmark on any page, click ( ) icon corresponding to the page. The ( ) icon will become ( ) signifies that bookmark has been successfully added on the selected page. 6. Click Update. User Manual Document Version: 2.1.1 48 eViewer HTML5 Through Thumbnail Window: 1. Go to the Thumbnail Window that lists all the pages of the document. If it is not open, go to the View tab, in the Show group, select Thumbnail checkbox. 2. The page(s) marked with blue color icon ( ) are bookmark pages(s). 3. To remove bookmark from any page, click ( ) icon corresponding to that page. 4. The icon will disappear from the selected page signifies that the bookmark has been successfully removed from the page. 7. Electronic Signatures Easily add electronic signatures to documents and create a new, signed PDF of the original document. The Electronic Signature feature is designed to allow the placement of user-specific markup stamps (Signature items) such as Signature images, Seal images, Name strings, Title strings, etc. on the documents. Signatures added trusted level of security and verify the authenticity of the documents. User can sign documents with secure and globally verified digital signatures that prove signer's identity, and document’s integrity. Signature files can be created through the Create Digital ID button. Additionally, user can also use their own existing actual signatures. Once created, these files can be set for use as signature items and can be placed on the documents. Create Electronic Signature: Perform the following steps to create electronic signature: 1. From the File tab, click Create Digital ID option. 2. The Add Digital ID dialog box will appear. User Manual Document Version: 2.1.1 49 eViewer HTML5 3. Provide details of the signature corresponding to each field. 4. Click Create. 5. The viewer starts creating the signature. Once created, the certificate will be downloaded on the system. Place Electronic Signature on Documents: Once signature is created, these can be placed on documents. User can also use the image of their own existing signature on documents. Perform the following steps to place signature on documents: 1. From the File tab, click Sign & Export option. 2. The Signing Tool dialog box will appear. User Manual Document Version: 2.1.1 50 eViewer HTML5 3. Provide the required details corresponding to each field. In the Keystroke File field, browse to the signature file that you have created or choose your own existing signature file. 4. Click Export. 5. The file will be converted to the PDF file containing the signature. 8. Split Documents Viewing and editing a large document can be a cumbersome task. Instead of scrolling through an entire document, you can save your time by splitting the document into two parts and view it together. The eViewer provides a feature through which a document can be split vertically into two sections – left and right pane. Both the panes work separately and each pane has its own scroll bars. This makes it much easier to cut and paste text from one section and apply it elsewhere in your document. The user can perform the following steps to split a document: 1. On the View tab, in the Windows group, click Split button. 2. The document will get split vertically into two parts, arranged side by side, in one single window. Also, a new group will be added at the end in the View tab. 3. Click on any document and scroll through the mouse or click scroll bars of the panes to view the document. 4. Click Synchronous Scrolling button to scroll both the files simultaneously. 5. Click View side by side button to scroll one of the file. Scroll with the mouse or click the scroll bars to view the document. User Manual Document Version: 2.1.1 51 eViewer HTML5 9. Smart Redaction Several type of confidential information comes in the form of text patterns such as Social Security numbers, account numbers, Date of Births, passport numbers, names, etc. that needs to be removed from view. The eViewer provides a text pattern search capability that allows fast and easy identification of predefined text patterns in the documents and files. The Smart Redaction™ provides numerous powerful predefined text search pattern options to automatically find and highlight the matching searches and then redact them. Smart Redaction works on all file formats supported by the eViewer including: Word, Excel, PDF, and TIFF. Redacted files can be published in any formats including PDF, TIFF, and any other image format. In the published file, anything redacted is permanently removed and cannot be found in a search and can't be copied. Perform the following steps to redact any specific text pattern in the document: 1. In the Redaction tab, in Predefined Categories group, select the category to redact text from the list of existing categories. 2. Click ( ) button. 3. The matched text based on the selected category will get highlighted in the document. 4. To search any specific pattern of text, provide the text pattern in the text box provided in the Redact What? Group, select the option as per the need - Case sensitive and Whole Word and click ( User Manual Document Version: 2.1.1 ) button. 52 eViewer HTML5 Case Sensitive: If selected, then searches only for words that match the case of the word or phrase that has been typed in the text box. This means that the search becomes casesensitive. For example, if you search menu, the result includes all instances of menu with this exact spelling but not Menu or MENU. Whole Word: If selected, restricts the search to whole words only. Whole words are words separated, on both sides, by a space. For example, if you search for edit, the result includes instances of edit only not editing, editor, editorial, and edited. 5. To redact any text, click ( ) button and drag over the text. 6. The solid rectangle will display over the redacted text. 7. To convert the file with redacted text into PDF, click ( ) button. The file gets converted into PDF with redacted text. The redacted text in PDF file cannot be found in a search and can't be copied. User Manual Document Version: 2.1.1 53