1
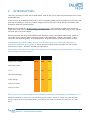
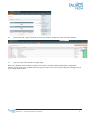
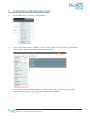
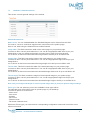
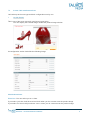
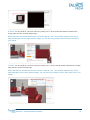
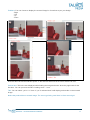
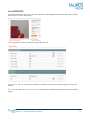
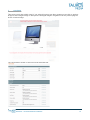
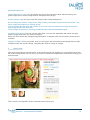
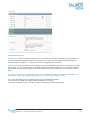
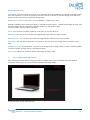
ULTIMATE ZOOM MODULE
MAGENTO V1.0 (BETA)
INSTALLATION & USER MANUAL
V1.0 DECEMBER 2012
TAUROS MEDIA NEDERLAND B.V. POSTBUS 75035, 1077 AA AMSTERDAM
[email protected]
MANUAL – ULTIMATE ZOOM MODULE
1
1. INDEX
1
Index --------------------------------------------------------------------------------------------------------------- 2
2
Introduction ------------------------------------------------------------------------------------------------------- 3
3
Feature set -------------------------------------------------------------------------------------------------------- 4
4
Package ------------------------------------------------------------------------------------------------------------ 4
5
Requirements ----------------------------------------------------------------------------------------------------- 5
6
Installation --------------------------------------------------------------------------------------------------------- 5
7
Configuration ------------------------------------------------------------------------------------------------------ 7
General configuration ------------------------------------------------------------------------------------------- 8
Outer zoom -------------------------------------------------------------------------------------------------------- 9
Inner zoom --------------------------------------------------------------------------------------------------------- 13
Lightbox ------------------------------------------------------------------------------------------------------------- 14
Lens zoom --------------------------------------------------------------------------------------------------------- 15
Featured zoom ---------------------------------------------------------------------------------------------------- 17
Full screen featured zoom ------------------------------------------------------------------------------------- 18
8
Change log ----------------------------------------------------------------------------------------------- ---------- 19
9
FAQ -------------------------------------------------------------------------------------------------------- ---------- 20
MANUAL – ULTIMATE ZOOM MODULE
2
2.
INTRODUCTION
They say “A picture is worth a thousand words” and we say “Let’s zoom the picture and turn it into a
thousand Euros.”
It has become an established fact that for online shoppers quality product images are one of the top
4 factors and ability to zoom on product images is one of the top 3 things that the customers look
forward to while on a product page.
Based on the results of a National Retail Federation study*, your product images have become a
major factor and could even be holding your sales back. Product images today play an even greater
role than any of us ever realize.
When presented with a list of 26 different site elements, survey participants listed image quality as
one of the most important factors influencing their buying decisions, ranking it #4 overall —more
important than product guides, short descriptions, long descriptions, and even product reviews.
An impressive 85% said the ability to zoom in on the image was “very to somewhat important” to
selecting and ultimately buying products. When women’s responses were singled out, that number
climbed even higher – with 86% indicating its importance.
When visiting a merchant’s product page, how important is the following image related information to selecting
and ultimately purchasing a product?
VERY TO SOMEWHAT IMPORTANT
TOTAL
WOMEN
MEN
Quality of the image
94%
96%
92%
Alternative views
88%
91%
83%
Zoom
85%
86%
81%
Item specific image
77%
79%
74%
Color change
65%
72%
51%
View on a model
61%
65%
55%
View in a room
50%
52%
44%
Source: http://nrf.com/modules.php?name=News&op=viewlive&sp_id=812&parent_id=960&peer_rev=1
Allowing customers to zoom-in on product images gives them a sense of control over what they are
buying. It gives them an equivalent feeling of looking at the products closely when they are in a real
store.
MANUAL – ULTIMATE ZOOM MODULE
3
While developing Magento webshops for our esteemed clients we realized that there are no good Zoom
modules available in the Magento module market. Available modules lack shiny features, some are not
developed as per standard Magento coding practices and some are simply waste of money.
So we set upon a quest of developing a solution so good and so full of features that it will be an ultimate
choice when it comes to Magento Zoom Modules.
3.
FEATURE SET
Tauros Media’s Ultimate Zoom Module is the result of our quest for a perfect Magento zoom module.
Our Ultimate Zoom Module is developed for webshop owners/developers who have a Magento webshop
or are developing a new one and want to use state-of-the-art image zoom feature on their product
pages.
The Ultimate Zoom module offers unprecedented 6 different zoom effects to choose from:
1
Outer zoom
2
Inner zoom
3
Lightbox
4
Lens zoom
5
Featured zoom
6
Full screen featured zoom
*
The module is very easy to install and use. You can simply install it on a Magento webshop
and start using it without making a single change in your CSS or phtml files.
*
All these zoom effects are highly configurable from the Magento backend.
*
You can customize almost all the output factors as per your design requirements right from the
backend: like zoom window dimension, location, zoom factor, opacity etc.
*
Default configuration values are already included in the module code. So you don’t have to worry
about configuring everything from scratch. At the max you will have to tweak the values a bit to
suit your needs.
*
It allows you to use the native Magento zoom if there is ever a need.
*
It is Magento multi-store and multi-version compatible.
*
You can setup different zoom types for your separate store fronts.
*
Works with all major browsers (tested on IE 8/9, Firefox, Chrome and Safari)
4.
PACKAGE
The package contains:
4.1.
Ultimate Zoom Module.
4.2.
Module installation and user manual.
MANUAL – ULTIMATE ZOOM MODULE
4
5.
REQUIREMENTS
5.1.
Magento webshop (Magento CE 1.5.X and above, EE 1.10.X and above) and working
knowledge of Magento backend.
5.2.
Cpanel/server ftp access (to install the module files).
5.3.
An Up-to-date Test environment (separate from but exact copy of your live setup)*.
5.4.
Ioncube should be installed on your live as well as test server. You can get the appropriate
version for your server from: http://www.ioncube.com/loaders.php
As suggested by Magento, new extensions/modules should never be directly installed on live setup.
Always try on a Test setup first. Also, it is a good practice to make backups of both Magento and the
database before installing any extension.
6.
INSTALLATION
At this point we assume that you have no other zoom module installed on your webshop.
If you have, then kindly disable it from yourrootfolder/app/etc/modules/yourzoommodule.xml
6.1.
Download and unzip the Ultimate Zoom module directory.
6.2.
Open the /Ultimate-Zoom-Module folder, here you can see the ‘app’, ‘js’ and ‘skin’ folders. These
folders contain the module.
6.3.
Upload the ‘app, js & skin’ folders to your Magento shop directory using your favorite FTP client.
This will not overwrite any files from your webshop folders.
6.4.
Additionally, If you have a custom theme implemented in your webshop (you most probably
have) then you will have to manually upload the following 2 files from module package to your
Magento installation:
1
Module file path:
Ultimate-Zoom-module\app\design\frontend\default\default\layout\zoom.xml
to your webshop file path: …/app/design/frontend/default/yourcustomthemefolder/layout/
2
Module file path:
Ultimate-Zoom-module\app\design\frontend\default\default\template\zoom\media.phtml
to your webshop file path:
…/app/design/frontend/default/yourcustomthemefolder/template/zoom/
On some systems if you get a prompt asking whether to overwrite the folder, please select merge
instead
6.5.
Now log in to your Magento backend. Go to System > Cache management
MANUAL – ULTIMATE ZOOM MODULE
5
6.6.
Click ‘Select All’. Select ‘Refresh all’ from the ‘Actions’ drop-down menu and click ‘Submit’.
Refresh the ‘Cache’ irrespective of them being enabled or disabled.
6.7.
Log out of the admin panel and login again.
Now your Ultimate zoom module is ready to use and it is already loaded with default configuration
values. All you have to do is select the zoom type you want to use and may be adjust the settings as per
your design requirements.
MANUAL – ULTIMATE ZOOM MODULE
6
7.
MAGENTO CONFIGURATION
7.1.
Go to Admin panel > System > Configuration.
7.2.
Once on this page, click on ‘Catalog > Tauros Zoom’ section in the left column. You will find
‘Tauros Zoom’ listed as an option under ‘Catalog’ section.
You will see 7 module related sections on ‘Tauros Zoom’ page. The first one is ‘general
configuration’ and other 6 are zoom types available in the module.
MANUAL – ULTIMATE ZOOM MODULE
7
7.3
GENERAL CONFIGURATIONS
This section controls general settings of the module.
FIELD EXPLANATION
Native zoom: You can enable/disable the ‘Standard Magento zoom’ feature from this field.
If it is set to ‘Yes’ then it will show regular zoom mechanism on the product page.
Set it to ‘No’ while using the Ultimate Zoom module features.
Image width: This field controls the width of the main image on your product page.
You have to fill in numeric pixel values here. You can fill in appropriate width here as per your
design/theme. Ask your designer/developer for exact size in pixels for product images.
ex: As shown in above shot we wanted the image width to be 265 px so we filled in 265.
Image height: This field controls the height of the main image on your product page.
You have to fill in numeric pixel values here. You can fill in appropriate height here as per your
design/theme.
ex: As shown in above shot we wanted the image height to be 265 px so we filled in 265.
Thumb width: This field controls the width of the thumbnail image on your product page.
You have to fill in numeric pixel values here. You can fill in appropriate width here as per your
design/theme.
ex: As shown in above shot we wanted the thumbnail image width to be 56 px so we filled in 56.
Thumb height: This field controls the height of the thumbnail image on your product page.
You have to fill in numeric pixel values here. You can fill in appropriate height here as per your
design/theme.
ex: As shown in above shot we wanted the thumbnail image height to be 56 px so we filled in 56.
Note: Ask your designer/developer for exact required image sizes (in pixels) for product images settings.
Zoom type: You can select any one of the available 6 zoom type effects.
The selected zoom effect will be used on product page of your webshop.
You have 6 options to choose from:
- Outer zoom
- Inner zoom
- Lightbox
- Lens zoom
- Featured zoom
- Full screen featured zoom
Whichever ‘Zoom type’ you select here its corresponding configuration section will control the zoom
effects on frontend
MANUAL – ULTIMATE ZOOM MODULE
8
7.4
ZOOM TYPE CONFIGURATION
Let’s take up each zoom type and their configuration one-by-one.
1
OUTER ZOOM
This is one of the most commonly used zoom types today.
You can display the zoomed image outside the product image window.
Its configuration section looks like the following image.
FIELD EXPLANTION:
Show lens: You can select yes or no here.
If you select ‘yes’ then it will show a lens block when you do a mouse-over the product image.
If you select ‘no’ then it will just show a cross + when you do a mouse-over the product image.
MANUAL – ULTIMATE ZOOM MODULE
9
X Offset: You should fill in a numeric value (in pixels) here. It is the horizontal distance between the
image edge and the zoomed image edge.
Notice the effect in the shot below when I saved X offset as ‘100’. The zoomed image moves 100 px
away horizontally from the main product image. You can fill in any positive numeric value here as per
your design.
Y Offset: You should fill in a numeric value (in pixels) here. It is the vertical distance between the image
edge and the zoomed image edge.
Notice the effect in the shot below when I saved Y offset as ‘100’. The zoomed image moves 100 px
away vertically from the main product image. You can fill in any positive numeric value here as per your
design.
MANUAL – ULTIMATE ZOOM MODULE
10
Positions: You can choose to display the zoomed image in 4 locations as per your design.
- Right
- Left
- Up
- Down
Note that there should be sufficient space on the selected side so that the zoom window can fit in.
Preload text: This is the text displayed while loading the image and zoom when the page loads for the
first time. You can put some text like ‘Loading zoom…’ here.
Title: You can select ‘yes’ or ‘no’ here. If ‘yes’ is selected then it will display product title on the zoomed
image.
Notice the product title on zoomed image. The zoom type being used here is ‘Outer zoom-right’.
MANUAL – ULTIMATE ZOOM MODULE
11
Zoom width: This is a numeric field and controls the width of the zoomed image window.
Set it as 200 if you want your zoom window to be 200 px wide.
Zoom height: This is a numeric field and controls the height of the zoomed image window.
Set it as 200 if you want your zoom window to be 200 px in height.
MANUAL – ULTIMATE ZOOM MODULE
12
2
INNER ZOOM
If you have selected ‘Inner zoom’ as zoom type then it will display the zoomed section of the image
inside the main image block itself.
The configuration section of this zoom type looks like this
Preload text: You can save the text you want to display on the frontend while image and zoom are
loading.
Title: You can select yes or no here. If yes is selected then it will display product title on the zoomed
image.
MANUAL – ULTIMATE ZOOM MODULE
13
3
LIGHTBOX
This zoom type is also widely used. If you select this zoom type then customers can click on product
image to see enlarged image. It will open the enlarged image in a lightbox over the product page as
shown in below image.
The configuration section of this zoom type looks like this:
MANUAL – ULTIMATE ZOOM MODULE
14
FIELD EXPLANATION:
Overlay Background color: You can specify the color of the translucent layer which shows up over
product page and is used a background for enlarged product image.
Overlay Opacity: You can also control the opacity of the overlay background.
Do not change the values in Image close, Image loading, Next button and previous button fields. They
call for respective images from module file set.
You can replace these images with images of your choice but the replacement images should be of
exact image format, size and name.
These images are placed in: yourmagentofolder/skin/frontend/default/default/images/
Container resize speed: This is a numeric value field. It controls the speed/time with which the large
product image loads when you click to enlarge it.
Higher the value slower the enlarged image will load ie. it will take more time to load the entire layover
container.
Lightbox message: This is a text field. Here you can type in the informative text message that you want
to display under your product image, something like ‘Click on image to enlarge’.
4
LENS ZOOM
This zoom type enlarges a small section of the product image and displays it in a rectangular box inside
the product image block. Not only this, you can also increase the magnification inside the lens using your
mouse scroller.
This is how the configuration section looks like for this zoom type:
MANUAL – ULTIMATE ZOOM MODULE
15
FIELD EXPLANATION:
Default power: This is a numeric value field. It controls the zoom factor of the lens. From this field you
can set the default magnification power when the mouse rolls over the image. Value should be an
integer greater or equal to 1. A value of 1 means no magnification by default.
Power range: From this field you can control how much magnification the visitor can achieve by using
the scroller. You can set the range of possible magnification powers when the user scrolls the mouse
wheel while over the target image. Be sure this range covers the ‘Default power’ setting in the above
field.
You see 2,7 as the value saved in the above shot. Therefore the minimum/default magnification is 2
times and the maximum magnification that can be achieved by scrolling is 7 times.
Size: From this field you can control the size of your magnifier/lens block.
You can fill in any width and height value separated by a comma.
Just make sure that you do not make the lens size larger than base image block.
MANUAL – ULTIMATE ZOOM MODULE
16
5
FEATURED ZOOM
This is one of the most advanced and extensive zoom type of the module.
It is loaded with features and has a UI of its own. Your product page will look like this if this zoom type is
selected.
The backend configuration section looks like this:
MANUAL – ULTIMATE ZOOM MODULE
17
FIELD EXPLANATION:
UI Disabled: You can choose to show or not to show the UI icons (marked in red above) on product page
from this dropdown. If it is set as yes then the icons will not be shown on product image and it will be a
simple scroll-in scroll-out of the product image zoom.
Disable Zoom-in/Zoom-out button: You can disable +/- buttons from here.
Similarly 'Disable jump to max zoom button', ‘Disable fit screen button’, ‘Disable percentage zoomed’ and
‘Disable rotate buttons’ control the respective buttons on the product page.
You can enable only the buttons you need.
Zoom: You can fill in a numeric value for zoom here or you can save ‘fit’.
Max zoom: You can set in the maximum magnification value that you want to allow.
Minimum zoom: You can set in the maximum magnification value that you want to allow.
Zoom step: This will field controls the zoom steps ie. By how much the image will be zoomed in each
step.
Updated on resize: This dropdown controls how tie image looks on page resize. If false, it doesn't update
on window resize and this can be controlled manually.
Zoom base: Value in %, which is used in calculation of image scale.
6
FULL SCREEN FEATURED ZOOM
This zoom type can be called a full page version of earlier zoom type. If enabled the zoom window
covers the whole page. The zoom window looks like following image:
Its configuration section looks like this
MANUAL – ULTIMATE ZOOM MODULE
18
FIELD EXPLANATION:
Zoom: You can fill in a numeric value for zoom % here or you can save ‘fit’.
Max zoom: You can set in the maximum magnification value that you want to allow.
Minimum zoom: You can set in the maximum magnification value that you want to allow.
Zoom step: This will field controls the zoom steps ie. by how much the image will be zoomed in each
step.
Zoom scroll text: You can put in informative text in this field. This text will be visible at the bottom of
zoom window.
*
Use your scroll-wheel or the zoom buttons to zoom in/out. Click and drag to view other parts of
the image when zoomed.
Fullscreen message: You can put in informative text in this field. This text will be visible under the
product image on your product page.
This covers everything the Ultimate zoom module has to offer.
We hope the module makes your webshop stand out from your competition.
Feel free to write to us at [email protected] if you have any query, feedback or suggestions
regarding the Ultimate Zoom Module.
8.
V 1.0.
CHANGE LOG
* Module launched, Manual created, Demo installed.
MANUAL – ULTIMATE ZOOM MODULE
19
9.
FAQ
1
CAN I SEE THE MODULE IN ACTION SOMEWHERE?
Yes, we have setup a demo Magento store just for this purpose.
You can access it at:
Frontend: http://www.webshopmagento.nl/ultimatezoom/
Backend: http://www.webshopmagento.nl/ultimatezoom/index.php/admin
Username: zoom
Password: zoom123
2
HOW TO GET OPTIMAL PERFORMANCE FROM THE ULTIMATE ZOOM MODULE?
Ultimate Zoom module heavily depends on the quality of product images you upload.
Here are some suggestions that you can follow while creating product images for your webshop:
If you are using 'lightbox' zoom type then we suggest that you keep the width of the zoom image nearly
equal to width of your webpage.
For zoom effects to work perfectly you should upload product images that are 2-3 times the size of the
image visible on your product page.
Try to limit the size of the product images to 1 mb. Large sized images take longer to load hence make
your product page and zoom load slower.
Preferably use product images in 'png' if transparency is needed or jpg otherwise.
Try to keep your product image dimensions in proportion. Too high or too wide images do not look good
on product page or when zoomed.
Make sure that the focus of the product image is product itself and not the background. Use light colored
or plain white background for your images.
3
CAN I SET DIFFERENT ZOOM TYPES FOR DIFFERENT PRODUCTS
No, that is not possible in Magento. One zoom type will cover all product pages in one store.
You can set separate zoom types for different stores. Ultimate zoom module is multi-store compatible.
4
IT SHOWS A 404 ERROR MESSAGE IN BACKEND AFTER UPLOADING THE MODULES. WHY?
Please refresh Magento cache and log-out of the admin. Login again and continue using the Ultimate
zoom module.
5
I UPLOADED AND CONFIGURED EVERYTHING BUT NOTHING CHANGED ON MY PRODUCT
PAGES. WHY?
Make sure that you have disabled ‘Native zoom’ from General configurations section.
Also, copy the 2 theme related files to your custom theme folder. Refer to installation section for more
information.
MANUAL – ULTIMATE ZOOM MODULE
20