1
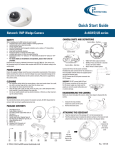
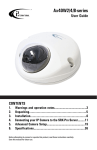
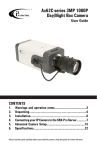
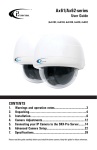
SRX-Pro Mobile Remote App - Android
©2012 i³ International Inc.
The contents of this user manual are protected under copyright
and computer program laws.
™
INNOVATIONS AT THE SPEED OF THOUGHT
Table of Contents
Installing SRX-Pro Mobile Remote App ....................................................................................................................... 2
Creating and Managing Remote Connections .............................................................................................................. 6
Adding a New Remote Connection ........................................................................................................................ 6
Editing Existing Remote Connection ....................................................................................................................... 9
Deleting Existing Remote Connection ................................................................................................................... 12
Organizing Remote Connections .......................................................................................................................... 14
Connecting to the Remote Server ............................................................................................................................ 17
Disconnecting from the Remote Server .................................................................................................................... 22
Configuring Remote Connection Settings .................................................................................................................. 24
Ratio View ........................................................................................................................................................ 25
Alarm Settings .................................................................................................................................................. 25
Frame per second .............................................................................................................................................. 27
Video Quality..................................................................................................................................................... 28
Layout .............................................................................................................................................................. 29
View alarm list in ............................................................................................................................................... 30
Alarm logs searching by ..................................................................................................................................... 31
Channel mapping ............................................................................................................................................... 32
Searching Alarm Logs ............................................................................................................................................. 34
Controlling PTZ Camera .......................................................................................................................................... 38
Taking a Snapshot .................................................................................................................................................. 39
Application Hot Key ................................................................................................................................................ 42
Exiting the App ...................................................................................................................................................... 44
Index..................................................................................................................................................................... 47
ii
SRX-Pro Mobile Remote App User Guide - Android OS
Copyright © 2012 i³ International Inc.
All rights reserved. No part of this manual may be reproduced or transmitted in any form or by any means, electronic or
mechanical, including photocopying, recording, or by any information storage or retrieval
system, without the prior written permission of the copyright owner and the publisher. SRX-Pro is a registered trademark
of i³ International. i³ reserves the right to change the contents of this manual without
notice.
Disclaimer
SRX-Pro Mobile Remote App User Guide - Android OS is provided as is, without warranty of any kind, expressed or
implied, including but not limited to performance, merchantability, or fitness for any particular purpose. Neither i³
International
Inc. nor its dealers or distributors shall be liable to any person or entity with respect to any liability, loss, or damage,
caused or alleged to have been caused directly or indirectly by this information.
Furthermore i³ International Inc. reserves the right to revise this publication, and to make changes to the content at any
time, without notice.
FCC
This device complies with part 15 of the FCC Rules. Operation is subject to the following two conditions: (1) This device
may not cause harmful interference, and (2) this device must accept any interference
received, including interference that may cause undesired operation.
Address:
i³ International Inc. • 780 Birchmount Road, Unit 16 • Scarborough • Ontario • Canada M1K 5H4
Tech Support: 1.877.877.7241 / [email protected]
Web Site: www.i3international.com
1
Installing SRX-Pro Mobile Remote App
Step 1.
Start by downloading SRX-Pro Mobile Remote app from Google Play store. Search "srx pro" to locate the app.
Step 2.
Select SRX-Pro Mobile Remote app from the list.
2
Installing SRX-Pro Mobile Remote App
Step 3.
Touch Install.
Step 4.
Touch Accept & download to accept permission requirements and to begin downloading and installing the app to your
Android device.
3
SRX-Pro Mobile App User Guide - Android
Step 5.
Wait while the app is downloading to your Android device.
4
Installing SRX-Pro Mobile Remote App
Step 6.
Once the app has been downloaded and installed to your Android device, locate the SRX-Pro icon in the menu and launch
the app.
SRX-Pro Mobile Remote startup screen will be displayed.
5
Creating and Managing Remote Connections
Adding a New Remote Connection
Step 1.
To add a new remote connection in SRX-Pro Mobile Remote app, launch the SRX-Pro Mobile Remote app, then press the
Menu button
on your Android device. Touch Connect.
Step 2.
In the Choose Server window touch Add New Server.
6
Creating and Managing Remote Connections
Step 3.
Add Server window will be displayed.
In the Add Server window, touch each blank field to enter your remote server's information.
a. Enter the Server Name - a descriptive name for the server.
b. Enter the Server Address (Server IP). This value can be either static or DDNS (Dynamic Domain Name
System). Obtain this information from Server Info Setup tab on SRX-Pro Server.
c. It is recommended that you keep the Server Port default value of 13225. If the port value must be changed,
contact your IT specialist for help.
7
SRX-Pro Mobile App User Guide - Android
d. Enter the Server ID. This must match the remote Server ID as entered in the Server Info Setup tab on SRX-Pro
Server.
e. Enter the User name and Password. This must match user information in the User Management Setup tab on
SRX-Pro Server.
Note: When trying to connect to the remote server, the system will check the Server ID, Server IP, User name
and Password together. If either of the variables is incorrect, the Remote software will not be able to connect to
the site.
f. Touch Save to add the new remote connection to the list.
g. Touch Yes in the Save this server? window.
h. The new connection will be saved to the remote connections list.
8
Creating and Managing Remote Connections
i.
Repeat Steps 1-3 to add other remote SRX-Pro server connections
Editing Existing Remote Connection
When changes are made to the remote Server, such as IP Address change, User Name or Password change, Server ID
change - you must update your saved remote connection in the SRX-Pro Mobile app, otherwise you will no longer be able
to connect to your remote Server.
Step 1.
To make a change to the remote connection, launch the SRX-Pro Mobile Remote app, then press the Menu button
on your Android device. Touch Connect.
9
SRX-Pro Mobile App User Guide - Android
Step 2.
In the Choose Server window, touch and hold the remote server connection that needs to be edited until the menu
window is displayed. Touch Edit.
10
Creating and Managing Remote Connections
Step 3.
In the Edit Server window, make changes to the Server settings: Server Name, Server Address, Server Port, Server ID,
User Name or Password. Touch Save.
11
SRX-Pro Mobile App User Guide - Android
Step 4.
Touch Yes in the Save this server? window.
Deleting Existing Remote Connection
Occasionally you may wish to delete a remote Server connection from the list of stored remote connections.
Step 1.
To delete an existing remote connection, launch the SRX-Pro Mobile Remote app, then press the Menu button
your Android device. Touch Connect.
12
on
Creating and Managing Remote Connections
Step 2.
In the Choose Server list, touch and hold the remote server connection that needs to be deleted until the menu window is
displayed. Touch Delete.
13
SRX-Pro Mobile App User Guide - Android
Step 3.
Touch Yes in the Delete server? window. The Server connection will be removed from the list.
Organizing Remote Connections
For convenience, you may choose to arrange your stored remote connections in an specific order.
Step 1.
To organize the list of your stored remote connections, launch the SRX-Pro Mobile Remote app, then press the Menu
button
14
on your Android device. Touch Connect.
Creating and Managing Remote Connections
Step 2.
In the Choose Server list, touch and hold the remote server connection that needs to be moved Up or Down in the list until
the menu window is displayed.
Touch Up or Down in the menu to move the selected remote connection in the list. Repeat Steps 1-2 until your remote
connections are sorted in the order of your choosing.
15
SRX-Pro Mobile App User Guide - Android
16
Connecting to the Remote Server
Step 1.
To connect to a remote SRX-Pro location with your Android device, launch the SRX-Pro Mobile Remote app, then press
the Menu button
on your Android device. Touch Connect.
Step 2.
1. In the Choose Server window, touch and hold the remote server connection you would like to connect to until
the menu window is displayed. Touch Connect.
17
SRX-Pro Mobile App User Guide - Android
2. The split screen with available channels will be displayed. Swipe to the left to display the next set of channels in
your selected display screen mode (in this example - quad, 4 divisions) or swipe to the right to display the
previous set of channels.
Note: When trying to connect to the remote server, the system will check the Server ID, Server IP, User name
and Password together. If either of the variables is incorrect, the Remote software will not be able to connect to
the site.
18
Connecting to the Remote Server
3. Double-tap the desired channel in the split screen division to display it in the full screen mode. Swipe to the left
to display the next channel or swipe to the right to display the previous channel.
4. To return to the split-screen mode, press the Back button
on your Android device.
Step 3.
1. To connect to a different server, press the Menu button
the menu.
on your Android device and select Connect in
2. In the Choose Server window, the active server is identified. In the screen shot below, the Android device is
currently connected to the remote server titled "i3-demo".
Touch and hold a different remote server connection you would like to connect to until the menu window is
displayed.
19
SRX-Pro Mobile App User Guide - Android
3. In the menu, touch Connect.
4. Touch Yes in the disconnect confirmation window.
20
Connecting to the Remote Server
5. The current server will be disconnected from and the new connection will be established to the remote SRX-Pro
server selected from the list. The split screen with available channels will be displayed. Swipe to the left to
display the next set of channels in your selected display screen mode (in this example - quad, 4 divisions) or
swipe to the right to display the previous set of channels.
21
Disconnecting from the Remote Server
When finished browsing remote video channels, disconnect from the Remote Server to prevent unwanted data streaming
to your device.
Step 1.
Press the Menu button
on your Android device and touch Disconnect.
Step 2.
Touch Yes in the disconnect confirmation window.
Step 3.
SRX-Pro Mobile Remote startup screen will be displayed.
22
Disconnecting from the Remote Server
23
Configuring Remote Connection Settings
SRX-Pro Mobile Remote app allows making changes to the remote connection. To access Settings, Connect to the remote
server first.
Once you're connected to the server of your choice, press the Menu button
Touch Setting in the menu.
on your Android device.
Settings window will be displayed.
Online Settings Mode
Offline Settings Mode
24
Configuring Remote Connection Settings
Ratio View
Note: This setting is also available in the Offline mode.
Ratio View can be set to either:
> Stretch: will stretch to fit your Android device's resolution
> Keep Origin Ratio
Alarm Settings
Note: This setting is also available in the Offline mode.
Alarm Settings allows configuring alerts in response to Server events.
25
SRX-Pro Mobile App User Guide - Android
Enable sensor triggered alarm. Tick the checkbox to enable an alert whenever a Sensor alarm has been triggered on
a connected remote Server.
Two types of alerts are possible for this type of alarm:
1.
2.
Tick the Play a sound checkbox to enable a sound alert in response to the sensor alarm detection on a connected remote
server.
Touch audio file... button to browse for the custom audio file to be played whenever the Sensor alarm has been detected.
Tick the Full screen related channel checkbox to display the channel related to the sensor alarm in the Full screen
mode on your Android device. For this function to work, the channel must be first assigned to the enabled sensor(s) on the
SRX-Pro Server side.
Enable motion alarm. Tick the checkbox to enable an alert whenever a Motion alarm has been triggered on a
connected remote Server.
Two types of alerts are possible for this type of alarm:
1.
2.
26
Tick the Play a sound checkbox to enable a sound alert in response to the motion alarm detection on a connected remote
server.
Touch audio file... button to browse for the custom audio file to be played whenever the Motion alarm has been
detected.
Tick the Full screen related channel checkbox to display the channel related to the motion alarm in the Full screen
mode on your Android device. For this function to work, Motion detection has to be enabled on one or more channels on
the SRX-Pro Server side.
Configuring Remote Connection Settings
Enable video loss alarm. Tick the checkbox to enable an alert whenever Video Loss alarm has been detected on a
connected remote Server.
1.
Tick the Play a sound checkbox to enable a sound alert in response to Video Loss alarm detection on a connected remote
server.
Touch audio file... button to browse for the custom audio file to be played whenever the Video Loss alarm has been
detected.
Enable stop recording alarm. Tick the checkbox to enable an alert whenever connected remote Server has stopped
recording.
1.
Tick the Play a sound checkbox to enable a sound alert whenever connected remote Server has stopped recording.
Touch audio file... button to browse for the custom audio file to be played whenever the connected remote Server has
stopped recording.
Volume Level. Configure the volume level for audio alerts.
Select and click Save to save any changes made to this setup.
Select and click Reset Default to return all settings to factory default.
Frame per second
Note: This setting is available in the Online mode only.
Frame per second setting allows configuring the display frame rate for the SRX-Pro Mobile Remote app. This setting
will apply to all channels of the connected remote site.
The frame rate can be set from 1 fps to 30 fps.
The lower the frame rate, the choppier the video will appear. However, if your Connection is set to your device's data
plan, lower frame rate also means lower data usage.
The higher the frame rate, the more fluid the video will appear. The higher frame rate setting will also mean higher data
usage when the Connection is set to your device's data plan.
27
SRX-Pro Mobile App User Guide - Android
Video Quality
Note: This setting is available in the Online mode only.
Video Quality setting allows configuring the quality of video transmitted through SRX-Pro Mobile Remote app. This
setting will apply to all channels of the connected remote site.
Video Quality can be set to 10% - 100% in 10% increments.
The lower the video quality, the grainier the video will appear. When connected using the device's data plan, lower video
quality also means lower data usage.
The higher the frame rate, the finer the video will appear. The higher video quality setting will also mean higher data
usage when connected using the device's data plan,
28
Configuring Remote Connection Settings
Layout
Note: This setting is available in the Online mode only.
Layout setting lets you choose how many channels you can view at once on your Android device.
The layout choices are 1 Division, 4 Divisions, 8 Divisions, 9 Divisions, 16 Divisions, 25 Divisions and 36
Divisions.
29
SRX-Pro Mobile App User Guide - Android
View alarm list in
Note: This setting is available in the Online mode only.
The SRX-Pro Mobile Remote app will display the list of alarm logs for the past X number of days based on this setting. The
setting options are 1-5 days.
30
Configuring Remote Connection Settings
Alarm logs searching by
Note: This setting is available in the Online mode only.
This setting will apply the default quick filter to the list of alarm logs based on the event type. You will be able to change
the filter options after running the log report.
The quick filter settings available are: All, Motion, Sensor, Stop recording, and Video loss.
31
SRX-Pro Mobile App User Guide - Android
Channel mapping
Note: This setting is available in the Online mode only.
Arrange channels from the connected server in a way that is most convenient to you.
For example, if your Layout is set to 4 divisions by default, assign four video inputs most important to you to the
Channels 1-4 for quick display. This way the most important channels will be displayed first once you have connected to
your Remote server through your Android device.
32
Configuring Remote Connection Settings
33
Searching Alarm Logs
You may search alarm logs on your connected remote site through your SRX-Pro Mobile Remote app.
Start by Connecting to the Remote Server via SRX-Pro Mobile Remote app.
Once you're connected to the server of your choice, press the Menu button
Touch Alarm List in the menu.
on your Android device.
History Alarms window will be displayed. The logs for the last 1 to 5 days will be displayed. To increase/decrease the
historical length of the logs, configure the corresponding setting.
34
Searching Alarm Logs
Alarms log will display either All, Motion, Sensor, Stop Recording or Video Loss alarm logs based on the default
setting.
You may change the filter setting at any time. Touch Filter by drop-down menu to select your filter.
In the example below, the Stop Recording filter has been applied to the alarm log to display only Stop Recording-type
alarm events.
35
SRX-Pro Mobile App User Guide - Android
36
Searching Alarm Logs
37
Controlling PTZ Camera
You can remotely control a PTZ camera on your connected remote site through your SRX-Pro Mobile Remote app.
Start by Connecting to the Remote Server via SRX-Pro Mobile Remote app.
Once you're connected to the server of your choice double-tap on the PTZ channel in the split-screen division to display it
in the full screen mode.
Note: If you cannot see your PTZ channel in the split-screen displayed on your phone, keep swiping to the left to display
the next set of channels until you locate the PTZ channel.
Then, touch and hold the screen in the direction in which you would like the PTZ channel to Pan/Tilt.
For example, to pan right, touch and hold the right area of the screen and wait while the PTZ channel pans in your chosen
direction. Lift your finger off the screen to make the camera stop Panning/Tilting.
Pinch Out to Zoom In or Pinch In to Zoom Out.
38
Taking a Snapshot
SRX-Pro Mobile Remote app allows you to take snapshots of the live video transmitted from the connected remote site.
Step 1.
To save the snapshot, start by Connecting to the Remote Server via SRX-Pro Mobile Remote app.
When the default screen division is displayed, tap the desired channel on the screen. Selected channel will have a red
frame around the image. In the example below, Channel 1 is selected.
Double-tap on the channel to bring it into the Full Screen mode (optional). If you skip this step, the app will take the
snapshot of the channel currently selected in the split-screen division (the one with the red frame around the image).
Step 2.
Press the Menu button
on your Android device, touch Snapshot in the menu.
39
SRX-Pro Mobile App User Guide - Android
Step 3.
A message similar to the one below will be displayed displaying the name of the snapshot file and location where it can be
found on your phone.
All snapshots are named as follows: Channel##_Resolution_YYYY_MM_DD_HH_MM_SS.jpg
Touch OK to close the confirmation window.
Step 4.
To locate your new snapshot, go to the File Manager on your phone. Touch Internal phone storage.
40
Taking a Snapshot
Step 5.
Go to i3data > images and locate your snapshot file.
>
>
>
>
41
Application Hot Key
The following hot keys are supported by SRX-Pro Mobile Remote application for Android devices.
KEY
FUNCTION
Space
Switch multi-view
N
Next Channel(s)
P
Previous Channel(s)
T
Snapshot
D
Disconnect
M
Minimize
A
About
H
Help
PTZ Control:
S
Left
F
Right
E
Up
X
Down
W
Left Up
Z
Left Down
R
Right Up
C
Right Down
I
Zoom In
O
Zoom Out
Touch Screen
Slide to left (up)
Next Channel(s)
Slide to right (down) Previous channel(s)
Tap
Focus channel
Double-tap
Full screen channel
PTZ Control:
Hold left region
Left
Hold right region
Right
Hold top region
Up
Hold bottom region
Down
Hold left top region
Left Up
Hold left bottom region Left Down
Hold right top region Right Up
42
Hot Keys
Hold right down region Right Down
Pinch Out
Zoom In
Pinch In
Zoom Out
43
Exiting the App
When finished working with the SRX-Pro app, close/exit the application to prevent unwanted data streaming to your
Android device. The app will be automatically disconnected from the remote server on exit.
If you wish to stop the video transmission but want to keep working with the SRX-Pro app, consider Disconnecting from
the Remote Server instead.
To exit the app, press the Back button
the Menu button
on your Android device until you see the exit confirmation window OR press
on your Android device and touch More in the menu.
Touch Close in the menu.
Touch Yes in the exit confirmation window.
44
Exiting the App
45
Index
A
Add New Server........................................................6
Alarm ..................................................................... 25
Motion............................................................... 26
Sensor Triggered ................................................ 26
Stop Recording ................................................... 27
Video Loss ......................................................... 27
Alarm List ............................................................... 34
Alarm Logs ............................................................. 34
Filtering ............................................................. 35
Searching........................................................... 34
Alarm Settings ........................................................ 25
C
Channel Mapping .................................................... 32
Connecting ............................................................. 17
D
Disconnecting ................................................... 22, 42
E
Exiting.................................................................... 44
F
Frame per Second ................................................... 27
Frame Rate ............................................................. 27
H
History Alarms ........................................................ 34
Hot Keys ................................................................ 42
N
Next Channel .......................................................... 42
P
Pan .................................................................. 38, 42
Password .................................................................8
Previous Channel ..................................................... 42
PTZ ................................................................. 38, 42
R
Ratio View ............................................................. 25
Remote Connection ................................................... 6
Adding ................................................................ 6
Deleting ............................................................ 12
Editing ................................................................ 9
Organizing ......................................................... 14
Sorting .............................................................. 14
S
Server Address ......................................................... 7
Server ID ................................................................. 8
Server Name ............................................................ 7
Server Port .............................................................. 7
Settings ................................................................. 24
Snapshot ......................................................... 39, 42
Locate ............................................................... 40
Take ................................................................. 39
SRX-Pro Mobile Remote App ..................................... 2
Downloading ....................................................... 2
Installing ............................................................. 2
T
Tilt38, 42
U
User Name ............................................................... 8
V
Video Quality .......................................................... 28
Volume .................................................................. 27
Z
Zoom ............................................................... 38, 42
47
i³ INTERNATIONAL INC.
1.866.840.0004
www.i3international.com
U.S.A. 1967 Wehrle Drive, Suite 1
PMB# 034 Buffalo,
NY 14221
Canada 780 Birchmount Road,
Unit 16, Scarborough.
ON, M1K 5H4
48