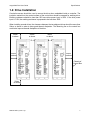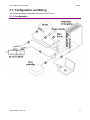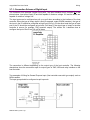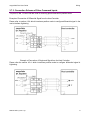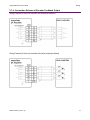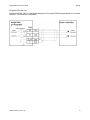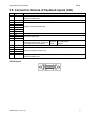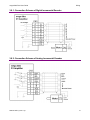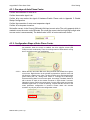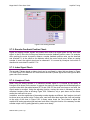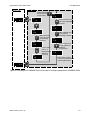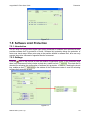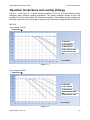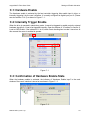
1
mega-fabs D1 Drive User Guide HIWIN Mikrosystem Corp. mega-fabs D1 Drive User Guide Version 3 Nov 2011 HIWIN Mikrosystem Corp. mega-fabs D1 Drive User Guide 此頁空白 HIWIN Mikrosystem Corp. TABLE OF CONTENTS About This Manual ............................................................................................................................................................................... iv Product Warning ................................................................................................................................................................. iv Revision History ................................................................................................................................................................... v 1: Specifications .............................................................................................................................................................................. 1 1.1: Certifications ........................................................................................................................................................................... 2 1.2: Drive Basic Specifications ....................................................................................................................................................... 2 1.3: Drive Dimensions.................................................................................................................................................................... 4 1.4: Drive Installation ..................................................................................................................................................................... 5 1.5: Specification Requirements of PC........................................................................................................................................... 6 2: Motion Basics .............................................................................................................................................................................. 7 2.1: Modes..................................................................................................................................................................................... 8 2.1.1: Position Mode ............................................................................................................................................................ 8 2.1.2: Modes that use voltage command.............................................................................................................................. 9 2.1.3: Modes that use PWM command .............................................................................................................................. 10 2.1.4: Stand-alone Mode.................................................................................................................................................... 10 2.2: Encoders .............................................................................................................................................................................. 10 2.2.1: Digital....................................................................................................................................................................... 10 2.2.2: Analog ..................................................................................................................................................................... 11 2.3: Buffered Encoder and Encoder Emulator .............................................................................................................................. 11 2.4: Path Planning ....................................................................................................................................................................... 12 2.4.1: Position .................................................................................................................................................................... 12 2.4.2: Velocity .................................................................................................................................................................... 12 2.4.3: Acceleration ............................................................................................................................................................. 13 2.4.4: Smooth Factor ......................................................................................................................................................... 13 2.4.5: Emergency Stop ...................................................................................................................................................... 13 2.5: Servo loops........................................................................................................................................................................... 13 2.6: Common Gain ...................................................................................................................................................................... 13 2.7: Move & Settle ....................................................................................................................................................................... 14 2.7.1: Position error ........................................................................................................................................................... 14 2.7.2: Target radius............................................................................................................................................................ 14 2.7.3: Total time ................................................................................................................................................................. 14 2.8: Error Mapping ....................................................................................................................................................................... 15 2.9: Velocity Ripple ...................................................................................................................................................................... 16 2.10: Enabling the Motor.............................................................................................................................................................. 16 2.10.1: SM Mode ............................................................................................................................................................... 16 2.10.2: Phase Initialization ................................................................................................................................................. 16 2.11: Some Terms in Motor Specifications ................................................................................................................................... 17 2.11.1: Continuous Current ................................................................................................................................................ 17 2.11.2: Peak Current .......................................................................................................................................................... 17 2.11.3: Back EMF .............................................................................................................................................................. 17 2.12: Some Terms in Drive Specifications.................................................................................................................................... 17 2.12.1: Drive Voltage Input................................................................................................................................................. 17 2.13: Rms and Amplitude ............................................................................................................................................................ 18 2.14: Basic Variables List ............................................................................................................................................................ 18 3: Wiring ......................................................................................................................................................................................... 20 3.1: Configuration and Wiring ...................................................................................................................................................... 21 3.1.1: Configuration ........................................................................................................................................................... 21 3.1.2: Connector Specifications ......................................................................................................................................... 23 3.2: Main Power Wiring................................................................................................................................................................ 24 3.3: Motor Power Wiring .............................................................................................................................................................. 25 3.4: Connection of the Regen Resistor (optional) ......................................................................................................................... 25 3.5: Connections of the Control Power Supply and Brake ............................................................................................................ 26 3.6: RS232 communication (CN1) ............................................................................................................................................... 27 3.7: Connection of the Control Signal (CN2) ................................................................................................................................ 28 3.7.1: Connection Schema of Digital Input ......................................................................................................................... 29 3.7.2: Connection Schema of Digital Output....................................................................................................................... 31 3.7.3: Connection Schema of Pulse Command Inputs ....................................................................................................... 33 3.7.4: Connection Schema of Encoder Feedback Output ................................................................................................... 34 3.7.5: Connection Schema of Analog Command Input ....................................................................................................... 35 3.7.6: Connction Schema of Digital Command (PWM Command) ...................................................................................... 35 3.8: Connection Schema of the Feedback Inputs (CN3) .............................................................................................................. 37 3.8.1: Connection Schema of Digital Incremental Encoder ................................................................................................. 38 3.8.2: Connection Schema of Analog Incremental Encoder................................................................................................ 38 3.8.3: Connection Schema of Motor Over-Temperature Input ............................................................................................ 39 3.8.4: Connection Schema of Digital Hall Sensor ............................................................................................................... 39 3.9: Accessories of the D1 Drive .................................................................................................................................................. 40 3.9.1: Motor Power Cable .................................................................................................................................................. 40 3.9.2: Feedback Signal Cables .......................................................................................................................................... 40 3.9.3: Control Signal Cable ................................................................................................................................................ 41 3.9.4: RS232 Communication Cable .................................................................................................................................. 41 3.9.5: Accessory Pack of Connector .................................................................................................................................. 42 3.9.6: EMC Accessory Pack............................................................................................................................................... 42 HIWIN Mikrosystem Corp. i mega-fabs D1 Drive User Guide 4: 5: 6: 7: Table of Contents 3.9.7: Regen Resistor ........................................................................................................................................................ 42 3.9.8: Heat Sink ................................................................................................................................................................. 42 Drive Setting .............................................................................................................................................................................. 43 4.1: Installation and Communication ............................................................................................................................................ 44 4.1.1: Software Installation Files ........................................................................................................................................ 44 4.1.2: Communication Setup .............................................................................................................................................. 45 4.1.3: Main user’s interface window ................................................................................................................................... 46 4.2: Configuration Center ............................................................................................................................................................. 47 4.2.1: Motor Type............................................................................................................................................................... 48 4.2.2: Encoder Parameter .................................................................................................................................................. 52 4.2.3: Hall Sensors ............................................................................................................................................................ 57 4.2.4: Operation Mode ....................................................................................................................................................... 58 4.2.5: The last step of configuration ................................................................................................................................... 60 4.3: Auto phase center................................................................................................................................................................. 61 4.3.1: Pre-steps of Auto Phase Center ............................................................................................................................... 62 4.3.2: Configutation Steps of Auto Phase Center ............................................................................................................... 62 4.3.3: Notices of Phase Initialization .................................................................................................................................. 64 4.4: I/O Configuration................................................................................................................................................................... 65 4.4.1: Digital Inputs ............................................................................................................................................................ 65 4.4.2: Digital Outputs ......................................................................................................................................................... 66 4.5: In-Position Configuration....................................................................................................................................................... 69 4.5.1: Introduction .............................................................................................................................................................. 69 4.5.2: Setting ..................................................................................................................................................................... 69 4.6: Homing ................................................................................................................................................................................. 70 4.7: Save to flash ......................................................................................................................................................................... 70 Drive Tuning .............................................................................................................................................................................. 71 5.1: Status Display and Quick view .............................................................................................................................................. 72 5.1.1: Status Display .......................................................................................................................................................... 72 5.1.2: Quick view ............................................................................................................................................................... 72 5.1.3: Software Hot Key ..................................................................................................................................................... 73 5.2: Performance Center ............................................................................................................................................................. 74 5.3: Scope ................................................................................................................................................................................... 76 5.4: Data Collection ..................................................................................................................................................................... 78 5.5: Plot view ............................................................................................................................................................................... 79 5.5.1: Graphic Display........................................................................................................................................................ 79 5.5.2: Save to/ Read from File ........................................................................................................................................... 83 5.5.3: Math ........................................................................................................................................................................ 84 5.6: Advanced Gains ................................................................................................................................................................... 87 5.6.1: Filter......................................................................................................................................................................... 87 5.6.2: Acc Feedforward ...................................................................................................................................................... 90 5.6.3: Schedule Gains and velocity loop gain (vpg) ............................................................................................................ 92 5.6.4: Analog Input Bias Correction .................................................................................................................................... 94 5.6.5: Current Loop ............................................................................................................................................................ 95 5.7: Encoder Signal Checks......................................................................................................................................................... 95 5.7.1: Encoder test/tune ..................................................................................................................................................... 95 5.7.2: Encoder Feedback Position Check .......................................................................................................................... 96 5.7.3: Index Signal Check .................................................................................................................................................. 96 5.7.4: Lissajous Circle ........................................................................................................................................................ 96 5.8: Error Map ............................................................................................................................................................................. 97 5.8.1: Error Map Operation ................................................................................................................................................ 97 5.8.2: Error Map Activation................................................................................................................................................. 99 5.8.3: Save and load Error Map Values............................................................................................................................ 100 5.8.4: Error Map Value and Encoder Resolution .............................................................................................................. 100 LCD Operations ....................................................................................................................................................................... 101 6.1: Display Panel Introduction .................................................................................................................................................. 102 6.2: Four Modes of LCD ............................................................................................................................................................ 102 6.3: Home Page......................................................................................................................................................................... 103 6.4: Display Parameters Page ................................................................................................................................................... 105 6.5: Change Parameters Page .................................................................................................................................................. 107 6.5.1: SAVE TO FLASH ................................................................................................................................................... 108 6.5.2: Configure Parameters ............................................................................................................................................ 109 6.5.3: Non-numeric Parameters Change .......................................................................................................................... 111 6.5.4: Advanced Parameters Settings .............................................................................................................................. 113 6.6: Actions Page ...................................................................................................................................................................... 117 6.6.1: Enable/Disable (ENA/DIS) ..................................................................................................................................... 118 6.6.2: JOG ....................................................................................................................................................................... 119 6.6.3: Absolute Motion (MOV2POS) ................................................................................................................................ 120 Protection................................................................................................................................................................................. 123 7.1: Motion Protection ................................................................................................................................................................ 124 7.1.1: Introduction ............................................................................................................................................................ 124 7.1.2: Max Velocity, Max Acceleration, Max Deceleration Setup ...................................................................................... 124 7.1.3: Cancellation of protections of velocity, acceleration and deceleration..................................................................... 125 7.1.4: Smooth Motion....................................................................................................................................................... 125 HIWIN Mikrosystem Corp. ii mega-fabs D1 Drive User Guide 8: 9: A: B: C: D: Table of Contents 7.2: Position and Velocity Error Protection ................................................................................................................................. 125 7.2.1: Position Error Limitation ......................................................................................................................................... 125 7.2.2: Warnings of Position Error and Velocity Error ........................................................................................................ 126 7.3: Brake Output ...................................................................................................................................................................... 126 7.3.1: Introduction ............................................................................................................................................................ 126 7.3.2: Brake/Stop Sequence ............................................................................................................................................ 126 7.3.3: Settings.................................................................................................................................................................. 127 7.4: Limit Switch Settings ........................................................................................................................................................... 127 7.4.1: Introduction ............................................................................................................................................................ 127 7.4.2: Settings.................................................................................................................................................................. 127 7.5: Software Limit Protection .................................................................................................................................................... 128 7.5.1: Introduction ............................................................................................................................................................ 128 7.5.2: Settings.................................................................................................................................................................. 128 7.6: Motor Over-Temperature Protection ................................................................................................................................... 129 7.6.1: Introduction ............................................................................................................................................................ 129 7.7: Soft-Thermal ....................................................................................................................................................................... 129 7.7.1: Introduction ............................................................................................................................................................ 129 7.8: Drive Over-Temperature Protection .................................................................................................................................... 129 7.8.1: Introduction ............................................................................................................................................................ 129 7.9: Regen Resistor (Optional)................................................................................................................................................... 129 7.9.1: Introduction ............................................................................................................................................................ 129 Error and Warning ................................................................................................................................................................... 131 8.1: Error and Warning Messages of D1 Drive ........................................................................................................................... 132 8.2: All of the Error and Warning Messages ............................................................................................................................... 132 Trouble shooting ..................................................................................................................................................................... 134 9.1: Trouble Shooting ................................................................................................................................................................ 135 9.1.1: The Descriptions of Status Indicator ....................................................................................................................... 135 9.1.2: Error Descriptions and Trouble Shooting................................................................................................................ 135 Drive Thermal Curve................................................................................................................................................................ 138 Operation temperature and Cooling strategy ............................................................................................................................. 139 A.2: Heat Sink Displacement ..................................................................................................................................................... 140 Auto Phase Initialization And Freq Analyzer ......................................................................................................................... 141 B.1: Frequency Analyzer Window of Auto Phase Center............................................................................................................ 142 B.2: Close Loop Test for Step Mode (SMCL test) ...................................................................................................................... 143 B.2.1: SMCL Parameters ................................................................................................................................................. 143 B.2.2: To Use Freq Analyzer ............................................................................................................................................ 143 B.2.3: To Use Filters ........................................................................................................................................................ 144 Setting of Enable Activation ................................................................................................................................................... 146 C.1: Hardware Enable ............................................................................................................................................................... 147 C.2: Internally Trigger Enable .................................................................................................................................................... 147 C.3: Confirmation of Hardware Enable State ............................................................................................................................. 147 C.4: Externally Activated Enable ................................................................................................................................................ 148 Compare Parameter RAM to Flash ......................................................................................................................................... 149 HIWIN Mikrosystem Corp. iii ABOUT THIS MANUAL Product Warning DANGER: Hazardous voltages. ! DANGER Exercise caution during installing and adjusting. Failure to notice this warning can cause equipment damage, injury, or death. Risk of electric shock. ! DANGER High-voltage circuit is connected to main power. Failure to notice this warning can cause equipment damage, injury, or death. HIWIN Mikrosystem Corp. iv mega-fabs Drive User Guide About This Manual Revision History Release 1.0 2.0 Date 2011.01.11 2011.07.11 HIWIN Mikrosystem Corp. Applies to D1-series Drive D1-series Drive Notice First Release 1. Add LCD panel operation in Chapter 6. 2. Chapter 7 introduces protection. 3. Chapter 8 introduces error and warning 4. Chapter 9 introduces troubling shooting v mega-fabs Drive User Guide About This Manual 此頁空白 HIWIN Mikrosystem Corp. vi 1: SPECIFICATIONS This chapter mainly describes specifications of the D1 drive. Contents include: Title Page 1.1: Certifications ........................................................................................................................................................................... 2 1.2: Drive Basic Specifications ....................................................................................................................................................... 2 1.3: Drive Dimensions.................................................................................................................................................................... 4 1.4: Drive Installation ..................................................................................................................................................................... 5 1.5: Specification Requirements of PC........................................................................................................................................... 6 HIWIN Mikrosystem Corp. 1 mega-fabs Drive User Guide Specifications 1.1: Certifications The D1 Drive is in compliance with below certifications: CE Compliance EMC LVD EN 55011 EN61000-6-2 EN61800-3 EB61800-5-1 1.2: Drive Basic Specifications Type: D1 Power Input Voltage Frequency Phase Control voltage Control current Continuous current Power Output Peak current Continous time of peak current Main loop control Type of motor Status LED Input port Position mode Pulse command mode Maximum input frequency Command generator Electrical gear ratio Control Velocity mode Torque mode Input Resistance Analog Voltage Input Time Command constant Resolution PWM 100% PWM Digital 50% Input Command Frequency Pulse width Limit Command generator Analog Input Command Digital command format Command generator HIWIN Mikrosystem Corp. MD-36-S 100 - 240 VAC 47 to 63 Hz 1 Ø or 3 Ø +24 Vdc ±10% 1A minimum 12 Adc [8.5 Arms] (Notice:Heat sink installed) 36 Adc [25.5Arms] 1 second IGBT PWM space vector control AC servo motor, linear motor and torque motor Red:Error; Green:Servo Ready [ I9, I9M][I10, I10M]Differential or I9, I10 single end input Pulse/Direction; CW/CCW ; AqB Pulse (2M Pulses/s max.); Quad A/B(8M counts/s max.) Pulse from host controller Gear ratio:pulses / counts pulses:1~32767, counts:1~32767 10KΩ ±10 Vdc 2.2 us 12bits I9: PWM = 0% - 100% I10: Direction= 1/0 I9: PWM = 50% ± 50% I10: Nonfunction 3.6KHz minimum, 100KHz maximum 220 ns minimum Voltage or PWM from host controller Same as velocity mode Same as velocity mode Voltage or PWM from host controller 2 mega-fabs Drive User Guide Encoder Type Specifications Operation voltage Input signal Digital Bandwidth Input amplitude Analog Bandwidth Resolution Output of Feedback pulse Hall signal Communication Regen Circuit Maximum 65528 Counts/cycle Maximum 18M Count/s, RS422 differential signal output, Scaling adjustment Single end signals with 120° phase difference:HA, HB,HC Protocol Full duplex, Baud rate: 115,200bps, Binary format Inputs [ I1~I6, I11, I12][I9,I10] -74HC14 Schmitt trigger input Note:[I9, I10] not for general purpose I/O under pulse mode 0.3Adc max, +40Vdc max (Open Drain) [O1],[O2], [O3] 3 digital outputs Brake output Resistor Turn on voltage Turn off voltage DC Bus Capacitance Operation Temperature Storage Temperature BRAKE [O4], 1Adc max External +HV > 390 Vdc +HV < 380 Vdc 1880 uF Short, Over voltage(> 404Vdc),Position error too big,, Encoder error, Motor cable lost connection, Drive over-temperature(IGBT > 80℃± 3℃), Motor over-temperature,Under voltage(< 60Vdc) Linear motor Established compensation table to compensate encoder error by linear interpolation Maximum 16,000 points Flash ROM, Disc file Um, count Activated internally by home complete, or activated externally by input signal 0~50℃(if over 55℃, air circulation is needed) -20℃~65℃ Humidity Elevation Vibration IP Code 0 to 90%RH Under 1000Meters 1G (10 to 500Hz) IP20 Applies to Method Samples Storage Unit Aviation Environment 1MHz maximum line (cycle) frequency RS232 to PC Protection Error Mapping 1Vp-p (Sin/Cos),different signal Interface 10 digital inputs Programmable I/O interface +5Vdc±5% @400mA A,/A,B,/B,Z,/Z,RS422 differential signal 5MHz line frequency, after 4x 20M Count/s Cooling System Natural circulation and to install two types of heat sink Weight 1,250 g(min) Dimension 191.6mm X 139.8 mm X 64.8 mm Chassis Compliance with U.L. Spec 94 V-0 Flammability Rating HIWIN Mikrosystem Corp. 3 mega-fabs Drive User Guide Specifications 1.3: Drive Dimensions 4 Drive dimensions and mounting holes positions are shown below. The units for all dimensions are labeled mm and the diameter of mounting hole is 4mm. HIWIN Mikrosystem Corp. 4 mega-fabs Drive User Guide Specifications 1.4: Drive Installation Conductive screws should be used to secure the drive when embedded inside a controller. The insulation material on the contact surface of the control box should be scraped for earthing drive. Earthing resistance should be less than 50Ω once drive power input is 220V. If the drive power input is 110V, the earthing resistance is proposed to be less than 100Ω. When installing several drives, the clearance between the two adjacent drives should be more than 20mm or above in order to have good thermal dissipation. The Mounting fan on the control box would also improve thermal dissipation of the drive. 50mm or above 50mm or above 20mm or above 20mm or above 50mm or above Chassis of Control Box 50mm or above HIWIN Mikrosystem Corp. 5 mega-fabs Drive User Guide Specifications 1.5: Specification Requirements of PC CPU RAM Storage Communication Port Operation System Monitor Resolution 1.0GHz or above 512MB or above 50MB or above RS232 communication port. If no RS232 ports available, adaptor of USB to RS232 is also good. Win 2000, Win XP, Win 7 1024 ×768 pixel or above HIWIN Mikrosystem Corp. 6 2: MOTION BASICS This chapter mainly describes basic concept of motor, drive and glossary. Contents include: Title Page 2.1: Modes..................................................................................................................................................................................... 8 2.1.1: Position Mode ............................................................................................................................................................ 8 2.1.2: Modes that use voltage command.............................................................................................................................. 9 2.1.3: Modes that use PWM command .............................................................................................................................. 10 2.1.4: Stand-alone Mode.................................................................................................................................................... 10 2.2: Encoders .............................................................................................................................................................................. 10 2.2.1: Digital....................................................................................................................................................................... 10 2.2.2: Analog ..................................................................................................................................................................... 11 2.3: Buffered Encoder and Encoder Emulator .............................................................................................................................. 11 2.4: Path Planning ....................................................................................................................................................................... 12 2.4.1: Position .................................................................................................................................................................... 12 2.4.2: Velocity .................................................................................................................................................................... 12 2.4.3: Acceleration ............................................................................................................................................................. 13 2.4.4: Smooth Factor ......................................................................................................................................................... 13 2.4.5: Emergency Stop ...................................................................................................................................................... 13 2.5: Servo loops........................................................................................................................................................................... 13 2.6: Common Gain ...................................................................................................................................................................... 13 2.7: Move & Settle ....................................................................................................................................................................... 14 2.7.1: Position error ........................................................................................................................................................... 14 2.7.2: Target radius............................................................................................................................................................ 14 2.7.3: Total time ................................................................................................................................................................. 14 2.8: Error Mapping ....................................................................................................................................................................... 15 2.9: Velocity Ripple ...................................................................................................................................................................... 16 2.10: Enabling the Motor.............................................................................................................................................................. 16 2.10.1: SM Mode ............................................................................................................................................................... 16 2.10.2: Phase Initialization ................................................................................................................................................. 16 2.11: Some Terms in the Motor Specifications ............................................................................................................................. 17 2.11.1: Continuous Current ................................................................................................................................................ 17 2.11.2: Peak Current .......................................................................................................................................................... 17 2.11.3: Back EMF .............................................................................................................................................................. 17 2.12: Some Terms in the Drive Specifications .............................................................................................................................. 17 2.12.1: Drive Voltage Input................................................................................................................................................. 17 2.13: Rms and Amplitude ............................................................................................................................................................ 18 2.14: Basic Variables List ............................................................................................................................................................ 18 HIWIN Mikrosystem Corp. 7 mega-fabs D1 Drive User Guide Motion Concept 2.1: Modes Operation modes between the D1 drive and the host controller can be configured in several modes: Position mode Velocity mode Force/Torque mode Stand-alone Following are descriptions of these operation modes: 2.1.1: Position Mode The motion controller or host controller sends the pulses as position command to the drive. Each pulse corresponds to specific distance. The Main role of the motion controller is to calculate the motion profile. During the time period of acceleration, the motion controller sends pulses and sends pulse frequency at constant velocity. There are three types of pulses namely Pulse/Dir, Pulse up/pulse down (CW/CCW) and Quadrature (A/B phase). In pulse mode electronic gear is used for scaling the resolution between command pulse and encoder count. In normal case, 1 input pulse corresponds to 1 encoder count. For example of electronic gear set to 2:3, it means that 2 input pulses correspond to 3 encoder counts. According to the way of hardware wiring the TTL logic signal can be the type of differential and single end. HIWIN Mikrosystem Corp. 8 mega-fabs D1 Drive User Guide Motion Concept PULSE DIR Clockwise Counter clockwise Clockwise Counter clockwise CW CCW Phase A Phase B Clockwise Counter clockwise 2.1.2: Modes that use voltage command The host controller can transmit instruction as voltage to the drive. It is also called V command. The range of voltage input is +10V~-10V. The drive converts voltage received to corresponding velocity or the current output to the drive motor. Velocity and force/torque mode are under this kind of operation. The following are descriptions of the two modes. Velocity mode The drive transfers voltage received from the host controller to the velocity command for control of the motor velocity. When receiving higher voltage, the drive will drive the motor at higher velocity. On the other hand, the drive drives the motor at lower velocity after receiving lower voltage. Negative voltage received by the drive means negative velocity command that drive will output to the motor, so that motor will move toward the reverse direction. It can be setup to scale 1Volt input corresponding to the specified velocity command output. Force/torque mode According to the input voltage coming from the host controller drive changes output current to control motor force/torque. When higher voltage is received, the drive will output higher current to the motor but will not exceed the maximum current of the motor. On the other hand, lower voltage received output lower current to motor. Negative voltage received by the drive means negative current command that drive will output to the motor, so that the motor will move toward the reverse HIWIN Mikrosystem Corp. 9 mega-fabs D1 Drive User Guide Motion Concept direction. It can be setup to scale 1Volt input corresponding to the specified current command output. 2.1.3: Modes that use PWM command Besides transmitting voltage, the host controller can also transmit PWM signal to the drive, namely PWM command. PWM command uses different duty cycle to output a different velocity or current command. There are two modes of PWM command. One is based on 50% duty cycle, namely PWM-50% and the other based on 100% duty cycle namely PWM-100%. For PWM-50%, when duty cycle in lower than 50%, the drive moves the motor toward the reverse direction. Otherwise, the drive motor will move in the positive direction. For PWM-100%, one more pin is necessary to receive direction command to move the motor toward the specific direction. Velocity mode The drive transforms the PWM command to the velocity command for directly controlling motor velocity. It can be setup to scale full PWM to corresponding maximum speed. Force/torque mode The drive transforms PWM command to the current command and controls the motor force/torque. It can be setup to scale full PWM to corresponding maximum current. 2.1.4: Stand-alone Mode There is a high speed computing DSP inside the drive to perform calculation of motion profile. Without motion controller integration, the drive can execute the motion program to the drive motor independently. 2.2: Encoders The encoder is a key component used in the motor under servo loop control. It provides position or angle depending on the motor type to drive for servo loop control. Optical and magnetic encoders are commonly used in servo loop control. Both optical and magnetic encoder output two types of signal. One is digital signal and the other is analog one. 2.2.1: Digital Normally, the digital encoder (Incremental encoder) outputs TTL RS422 differential signal which is composed of two pulse signals with 90° phase shift. The resolution is shown below. A resolution of 1um is very often needed in the field application. HIWIN Mikrosystem Corp. 10 mega-fabs D1 Drive User Guide Motion Concept Resolution 2.2.2: Analog The analog encoder outputs two sinusoidal signals with 90° shifted and amplitude is 1Vp-p. The specification of the analog encoder is its grating period. For example, a grating period of 40um is very often used in the field. The D1 drive is featured to divide the grating period of the analog encoder to a resolution as fine as 1 nanometer. Grating period 2.3: Buffered Encoder and Encoder Emulator The encoder feedback signal is needed for the drive to implement servo loop control. For some applications, the host controller may also need to receive encoder feedback from the drive. In this case the drive transmits position or angle signal to the host controller. Based on the signals received from the controller in the D1 drive two options are available: Buffered Encoder The function of the buffered encoder is to transmit encoder signal received to from the host controller when the digital encoder is used. Encoder Emulator The encoder emulator provides the function that transmits the emulated encoder signal to the host controller. The emulated encoder signal is emulated from the interpolated signal inside drive. HIWIN Mikrosystem Corp. 11 mega-fabs D1 Drive User Guide Motion Concept D1 Switch Buffered encoder output Emulated encoder output Encoder Signal processor 2.4: Path Planning The main purpose of the motion controller is the calculation of motion command as shown in the figure below according to the demands of distance, velocity, and acceleration. These calculated motion commands, such as pulses or V-command are sent by motion controller to the drive. The drive under stand-alone operation mode can also calculate motion commands. By itself, the user can select between different configurations. 2.4.1: Position The motor position signal comes from the encoder. For linear motion, units of position are um, mm and m. For rotary motion, encoder count is usually used the unit. The reference position defined in the D1 drive software means command position calculated by profile generator. The target position is the command which is indicated by the user or sent from the host controller. The target position has been received by the drive, the profile generator calculates the reference position then moves the motor to the specific position. 2.4.2: Velocity Velocity is defined as change of position per unit time. For linear motion the unit for velocity is um/sec, mm/sec or m/sec. For rotary motion the unit of velocity is usually count/sec, rps or rpm. HIWIN Mikrosystem Corp. 12 mega-fabs D1 Drive User Guide Motion Concept 2.4.3: Acceleration Acceleration is defined as change of velocity per unit time. For linear motion, the unit of acceleration is um/sec2, mm/sec2 or m/sec2 and rps2 for rotary motion. 2.4.4: Smooth Factor When acceleration is increasing or decreasing rapidly in short time, the inertia force acts on the moving part will increase or decrease rapidly. In order to eliminate the influence, technology of smoothing motion is applied for an improvement of motion performance. Smooth factor is a special technology developed in the D1 drive to reach this performance. 2.4.5: Emergency Stop The drive provides a function for emergency stop. When the enable signal to I1 is disabled, the drive activates the function of emergency and stop motor by specified deceleration, kill dec for safety aspect. 2.5: Servo loops Currently velocity and position loops are included in the D1 drive for servo control. The architecture is shown in the picture below. The position, velocity and current loop are cascaded for positioning the motor. In velocity mode the velocity and current loop are combined for the control of motor velocity. In current mode the current loop controls motor commutation and voltage command is sent from the host controller. The D1 drive also simplifies the parameters of tuning. Only one parameter, the common gain, is used to set and adjust performance of servo loop control. Target Position Refence Position Common Gain Refence Velocity Position Loop Feedback Position Command Current Velocity Loop Filter Feedback Velocity Current Loop PWM Output Filter Motor & Encoder Actual Current 2.6: Common Gain A high speed computing DSP is used inside the D1 drive to implement motor control. In common for digital servo loop control several gain parameters should be adjusted. The D1 drive has unique technology to simplify these gain parameters to only one gain: the common gain. It brings convenience for adjustment. HIWIN Mikrosystem Corp. 13 mega-fabs D1 Drive User Guide Motion Concept 0.1…………………………………0.5……………………………………1 Low Control High Stiffness 2.7: Move & Settle Move and settle is defined as time of motion from commands of profile generator and then settles the motion until within tolerance. 2.7.1: Position error The position error is the error between the target position and the feedback position from encoder. 2.7.2: Target radius The target radius is a tolerance while position error remains, so that the motor move is considered to be at target position. 2.7.3: Total time As shown in the picture below, when the motor is moved to target position and the position error is less than the specific target radius for duration of debounce time, the signal of in position will be set. Otherwise, if the position error keeps exceeding target radius, it is namely not in position. The total time indicates duration from beginning of motor motion to status in-position. The total time is the sum of the move time and the settling time. HIWIN Mikrosystem Corp. 14 mega-fabs D1 Drive User Guide Motion Concept Feedback position Position Target position + targat radius - targat radius Reference position Debounce time Move time Settling time Time Total time 2.8: Error Mapping The Positioning accuracy defined in the drive usually depends on the performance of encoder. Sometimes the encoder cannot fulfill specific accuracy. In this case more accurate equipment such as laser interferometer can be used to measure the error. The D1 drive includes a high performance control algorithm to store the error and compensate it to improve positioning accuracy. Pulses D1 Drive Motor cable Host controller Position feedback HIWIN Mikrosystem Corp. Error compensator Motor Position feedback 15 mega-fabs D1 Drive User Guide Motion Concept 2.9: Velocity Ripple Motion stability is defined as how stable the motor moves is during constant velocity section under motion control. Velocity ripple can be used to indicate motion stability. The main reasons of causing bad velocity ripple include cogging force, cable chain, pneumatic tubes and friction of linear guide-way. The velocity ripple is a critical performance in specific applications, like scanning or inspection machines. Formula of velocity ripple: = 1 2 V max V min 100% , where Vtarget means target velocity, Vmax the V t arg et maximum and Vmin the minimum feedback velocity during constant velocity section. As shown below, picture (a) shows bigger velocity ripple meaning worse stability and picture (b) a better one. Vtarget (a) (b) Vmax Vmax Vtarget Vmin Constant velocity section Vmin Constant velocity section 2.10: Enabling Motor After enabling the drive can receive motion command from the host controller. 2.10.1: SM Mode SM mode is open loop control. In this mode the drive controls the motor as a stepping motor and encoder feedback is not used. It can be used to check the direction of current output to motor and direction of encoder feedback and see if their directions are matching. If the directions are different, it is not proper for phase initialization for servo control. 2.10.2: Phase Initialization The first step after drive control power has been turned on is phase initialization. The HIWIN D1 drive is capable of doing this process without motor motion. In addition, using hall sensor to do phase initialization is another option. Normally, the host controller sends a signal to the D1 digital input port (For example, I1) to let the drive do the enabling procedures. HIWIN Mikrosystem Corp. 16 mega-fabs D1 Drive User Guide Motion Concept 2.11: Some Terms in Motor Specifications 2.11.1: Continuous Current Continuous current is the current output to motor coils to continuously produce force or torque. Normally, when the continuous current flows through the motor coils, the highest temperature will not exceed the rated temperature, 80℃. 2.11.2: Peak Current Peak current is the current supply to instantly produce peak force or torque in a motor. The design concept of the HIWIN motor is that the peak current is 2~3 times continuous current. Peak current cannot be supplied motor over 1 second. 2.11.3: Back EMF Back emf is the voltage generated by a moving (spinning) motor and is proportional to velocity. Back emf constant is defined as ratio of voltage to velocity. In specification label Kv is representing back emf constant. 2.12: Some Terms in Drive Specifications 2.12.1: Drive Voltage Input The D1 drive has 2 independent voltage inputs. One is control voltage input (DC) and the other voltage input for the driving motor (AC Main). Control Voltage Input The D1 drive has high performance DSP inside. The control voltage is supplied for the DSP, IO and communication. The voltage is not only for drive operation, but also making communication work well. The host control can still monitor the drive even when the motor main power is turned off. AC Main Power The AC main power supplies high voltage for the driving motor. The high voltage is connected to capacitors inside the D1 drive for rectifying and filter and to DC bus and PWM, then output to the motor. The high power IGBT in combination with DC bus control current to move the motor using PWM technology. HIWIN Mikrosystem Corp. 17 mega-fabs D1 Drive User Guide Motion Concept 2.13: Rms and Amplitude The motor current is usually represented in rms or amplitude. The rms value represents the equivalent or effective current and amplitude related to peak force output to motor. The relation between rms and amplitude values are the following: (Also refer to the figure below). Amplitude = √2 ×Rms or 1.414 ×rms Thus, rms value is 1/√2 of amplitude. On the other hand, amplitude is 1.414 times of rms value. Different units are used by different manufacturers, HIWIN lists rms values to in motor’s specifications. I rms I amplitude I p-p 2.14: Basic Variables List No. Variable Name Description 1 Feedback Position Feedback Position 2 Reference Position Position that goes into position loop 3 Target Position Position from the user or host controller 4 Position Error Difference between Reference position, also called following error 10 Feedback Velocity Velocity derived from Feedback position 11 Reference Velocity Velocity that goes into velocity loop 12 Velocity Error Difference between Reference and Feedback velocity 20 Reference Acceleration Acceleration that goes into servo loop 30 Actual Current Current from sensors HIWIN Mikrosystem Corp. and Feedback 18 mega-fabs D1 Drive User Guide Motion Concept 31 Command Current 40 Analog Command 41 Bus Voltage Line to line voltage from DC bus 42 Servo Voltage Percentage Servo voltage in percent 43 SIN-Analog Encoder 44 COS-Analog Encoder Cos signal of analog encoder 45 PWM Command Torque/force/velocity command (from host controller) 46 Digital hall bits Digital hall sensor signal 50 Amplifier Temperature Temperature from IGBT power module 51 Soft-Thermal Accumulator Software temperature estimation 61 I1 Digital input port 1 62 I2 Digital input port 2 63 I3 Digital input port 3 64 I4 Digital input port4 65 I5 Digital input port 5 (Motor over temperature signal) 66 I6 Digital input port 6 67 I9 Digital input port 9 (pulse command ) 68 I10 Digital input port 10 (pulse command) 69 I11 Digital input port 11 70 I12 Digital input port 12 81 O1 Digital output port 1 82 O2 Digital output port 2 83 O3 Digital output port 3 84 O4 Digital output port 4 (brake signal) HIWIN Mikrosystem Corp. Command Current Voltage from host controller Sin signal of analog encoder 19 3: WIRING This chapter mainly describes the wiring of the D1 drive. Contents include: Title Page 3.1: Configuration and Wiring ...................................................................................................................................................... 21 3.1.1 Configuration ............................................................................................................................................................ 21 3.1.2 Connector Specifications .......................................................................................................................................... 23 3.2: Main Power Wiring................................................................................................................................................................ 24 3.3: Motor Power Wiring .............................................................................................................................................................. 25 3.4: Connection of the Regen Resistor (optional) ......................................................................................................................... 25 3.5: Connections of the Control Power Supply and Brake ............................................................................................................ 26 3.6: RS232 communication (CN1) ............................................................................................................................................... 27 Pin Assignment............................................................................................................................................................................ 27 3.7: Connection of the Control Signal (CN2) ................................................................................................................................ 28 3.7.1: Connection Schema of Digital Input ......................................................................................................................... 29 3.7.2: Connection Schema of Digital Output....................................................................................................................... 31 3.7.3: Connection Schema of Pulse Command Inputs ....................................................................................................... 33 3.7.4: Connection Schema of Encoder Feedback Output ................................................................................................... 34 3.7.5: Connection Schema of Analog Command Input ....................................................................................................... 35 3.7.6: Connction Schema of Digital Command (PWM Command) ...................................................................................... 35 3.8: Connection Schema of the Feedback Inputs (CN3) .............................................................................................................. 37 3.8.1: Connection Schema of Digital Incremental Encoder ................................................................................................. 38 3.8.2: Connection Schema of Analog Incremental Encoder................................................................................................ 38 3.8.3: Connection Schema of Motor Over-Temperature Input ............................................................................................ 39 3.8.4: Connection Schema of Digital Hall Sensor ............................................................................................................... 39 3.9: Accessories of the D1 Drive .................................................................................................................................................. 40 3.9.1: Motor Power Cable .................................................................................................................................................. 40 3.9.2: Feedback Signal Cables .......................................................................................................................................... 40 3.9.3: Control Signal Cable ................................................................................................................................................ 41 3.9.4: RS232 Communication Cable .................................................................................................................................. 41 3.9.5: Accessory Pack of Connector .................................................................................................................................. 42 3.9.6: EMC Accessory Pack............................................................................................................................................... 42 3.9.7: Regen Resistor ........................................................................................................................................................ 42 3.9.8: Heat Sink ................................................................................................................................................................. 42 HIWIN Mikrosystem Corp. 20 mega-fabs Drive User Guide Wiring 3.1: Configuration and Wiring This chapter describes configuration and wiring of the D1 drive. 3.1.1: Configuration 4 3 1 2 7 5 6 HIWIN Mikrosystem Corp. 21 mega-fabs Drive User Guide Wiring Item Name Description ○ 1 ○ 2 3 ○ ○ 4 ○ 5 ○ 6 ○ 7 AC main power cable Connection of 1Φ/3Φ the AC main power Motor power cable Connection of the motor Regen resister Connection of the external regen resister(Optional) Control power cable Connection of the 24V DC power supply and motor brake RS-232 communication cable (CN1) Connection of the PC/Laptop (Remove it after completing parameter settings) Control signal cable (CN2) Connection of the host controller Feedback signal cable (CN3) Connection of the encoder HIWIN Mikrosystem Corp. 22 mega-fabs Drive User Guide Wiring 3.1.2: Connector Specifications Connector Connector of the AC main power Specification 4 pins, 7.5mm pluggable female connector Manufacturer, P/N Manufacturer: Wago P/N: 721-204/026-000 Connector of the motor power cable 4 pins, 5.0mm pluggable female connector Manufacturer: Wago P/N: 721-104/026-000 Connector of the regen resistor 3 pins, 7.5mm pluggable male connector Manufacturer: Wago P/N: 723-603 Connector of the control power supply 3 pins, 5.0mm pluggable female connector Manufacturer: Wago P/N: 721-103/026-000 Connector of RS232 communication Connector of the control signal 6 pins, RJ-11 connector 26 pins, .050" Mini D Ribbon (MDR), Standard solder type connector 26 pins, 050" Mini D connector, Molded insulation displacement (IDC) type Back cover Connector of feedback signal the 20 pins, 050" Mini D Ribbon (MDR), Standard solder type connector 20 pins, 050" Mini D connector, Molded insulation displacement (IDC) type Back cover Manufacturer: 3M P/N: 10126-3000 Manufacturer: Molex P/N: 0543062619 Manufacturer: Molex P/N: 0523162619 Cable diameter 22 - 12 AWG (12 AWG, 600V is suggested) 22 - 12 AWG (12 AWG, 600V is suggested) 22 - 14 AWG (14 AWG, 600V is suggested) 22 - 14 AWG (18 AWG is suggested) Note Tool: Wago 231-131 Tool: Wago 231-131 Tool: Wago 231-131 Tool : Wago 231-131 24 - 30 AWG 28 AWG Manufacturer: 3M P/N: 10326-52F0-008 Manufacturer: Molex P/N: 0543310261 Manufacturer: 3M P/N: 10120-3000 Manufacturer: Molex P/N: 0543062019 Manufacturer: Molex P/N: 0523162019 24 - 30 AWG 28 AWG Manufacturer: 3M P/N: 10320-52F0-008 Manufacturer: Molex P/N: 0543310201 Note: In order to avoid electric shock tools are necessary to be used while wiring up. HIWIN Mikrosystem Corp. 23 mega-fabs Drive User Guide Wiring 3.2: Main Power Wiring Before connecting AC main power to the D1 drive, please make sure if the connection of the drive is well grounded. Connection schema of the AC main power (signal phase, 1Φ) It is suggested to use single phase line filter, Schaffner FN2090-10-06. Not to exceed 1 Meter. Cable length should be less than 1m Connection schema of the AC main wiring (three phase, 3Φ) Not to exceed 1 Meter. Cable length should be less than 1m It is suggested to use three phase line filter, Schaffner FN3258-7-45。 HIWIN Mikrosystem Corp. 24 mega-fabs Drive User Guide Wiring 3.3: Motor Power Wiring Connection Schema of the Motor 3.4: Connection of the Regen Resistor (optional) Connection Schema of the Regen Resistor HIWIN Mikrosystem Corp. 25 mega-fabs Drive User Guide Wiring 3.5: Connections of Control Power Supply and Brake Please refer to the connection schema of control power supply, 24 Vdc, and the motor brake. When the brake is not used, positive of 24Vdc is connected to PIN3 and negative to PIN1. When the brake is used, the brake output port BRK should be connected to relay besides the connection of control power supply. When the brake signal is activated, the relay will be triggered to engage mechanical brake or external dynamic brake circuit. The output type of brake is open-drain with capability is 40V maximum and 0.3A maximum. Normally, as default the output port O4 corresponds to the brake output. It also can be configured to other output signals. The section 4.4.2 describes how to configure output signals. Connection Schema of the Control Power Supply and Brake HIWIN Mikrosystem Corp. 26 mega-fabs Drive User Guide Wiring 3.6: RS232 communication (CN1) Pin Assignment Pin Signal Function 1 2 3 4 5 6 N/C RXD SG SG TXD N/C No connection Receive data from computer Signal ground Signal ground Transmit data to computer No connection Connection Schema of RS232 Communication It is suggested to use the HIWIN accessory with part number LMACR21D. CN1 RJ11 Pin Assignment 1 HIWIN Mikrosystem Corp. 2 3 4 5 6 27 mega-fabs Drive User Guide Wiring 3.7: Connection of Control Signal (CN2) Pin 1 2 Signal FG SG Function Frame ground, cable shield connection Signal ground 3 I1 Servo on/Enable, also programmable assigned to other function 4 5 6 7 I2 I3 I4 I6 8 I9M 9 I10M 10 I9 11 I10 12 13 14 15 I11 O1 O2 O3 16 17 18 19 20 21 22 23 24 25 26 A /A B /B Z /Z +5 V SG Ref + Ref I12 General purpose input (programmable) In position mode the 4 ports are used for command pulses input. In the other modes I9 and I10 are general purpose input, I9M and I10M no function General purpose input (programmable) Speed Standard Pull-up/pull-down Group A Standard Standard Standard High speed High speed High speed High speed High speed Standard Group A Group A Group B Group C Group D Group D Group D General purpose output (programmable) Output pulse of feedback (Buffered encoder or emulated encoder) +5V dc output, load current not to exceed 400 mA Signal ground Analog command input positive pin Analog command output negative pin General purpose input (programmable) Standard Group D Specific Inputs These inputs of specific purpose are related to operation modes. Mode Position Mde Torque/Velocity Mode Input I9, I9M I10, I10M I9, I10 Function Pulse /Direction Pulse Direction General purpose input I9M, I10M No function CN2 Pin layout HIWIN Mikrosystem Corp. CW/CCW CW CCW 13 1 26 14 AqB A B 28 mega-fabs Drive User Guide Wiring 3.7.1: Connection Schema of Digital Input The Connector CN2 provides 9 digital input ports. The input interface circuit is shown as in the picture below. Input ports I9 and I10 are both capable of maximum voltage 12V and the others are capable of maximum voltage 24V. The input ports can be configured as pull up or pull down according to the interface of the host controller. When the type of output signal is sink (for example, output of NPN transistor), the type of the input in the D1 should be configured as high level (Pull up). On the other hand the type of input port in the D1 should be configured as low level (Pull down) if the signal type of output in the host controller is source (for example, PNP transistor output). The section 4.4.1 describes how to configure the input of the D1 as Pull up/Pull down. The connection is different depending on the output type of the host controller. The following descriptions show the connection ways for output types of PNP, NPN and relay interface on the host controller. Two examples of Wiring for General Purpose Input (Host controller uses sink type output) such as NPN transistor. The input group should be configured as pull-up mode. HIWIN Mikrosystem Corp. 29 mega-fabs Drive User Guide Wiring An example of Wiring for General Purpose Input (the Host controller uses source type output) such as the input group should be configured as pull-down mode. A wiring example of the interface of the host controller or optical switch as PNP transistor: Note: If the power of the external optical switch is 5V, it can be connected to pin22 in connector CN2. But total current cannot exceed 400 mA. HIWIN Mikrosystem Corp. 30 mega-fabs Drive User Guide Wiring 3.7.2: Connection Schema of Digital Output The D1 drive connector CN2 supports three general outputs (O1~O3) shown in the picture below. These outputs are of open-drain type whose maximum voltage is 40V and maximum current 0.3A. Output O4 in the control power connector is usually used for brake output. It also could be configured as general purpose output as well. Section 4.4.2 describes how to configure the output signal. Example of Connection to the Host Controller HIWIN Mikrosystem Corp. 31 mega-fabs Drive User Guide Wiring Example of Connection to Relay When a relay is used, please also use a diode in parallel connection to avoid damage to the drive. Example of Connection of External Load The outputs can directly connect to the load (For example, indicator lamp) shown in the picture below. External voltage cannot exceed 40V and current 0.3A. HIWIN Mikrosystem Corp. 32 mega-fabs Drive User Guide Wiring 3.7.3: Connection Schema of Pulse Command Inputs The pins I9, I9M, I10 and I10M are used for receiving pulse command in position mode. Example of Connection of Differential Signal from the Host Controller Please refer to section 4.2.4 which introduces position mode to configure differential signal in the user’s interface Lightening. Example of Connection of Single-end Signal from the Host Controller Please refer the section 4.2.4: which introduces position mode to configure differential signal in Lightening. HIWIN Mikrosystem Corp. 33 mega-fabs Drive User Guide Wiring 3.7.4: Connection Schema of Encoder Feedback Output Wiring Example (for the host controller with differential interface) Wiring Example (for the host controller with optical coupling interface) HIWIN Mikrosystem Corp. 34 mega-fabs Drive User Guide Wiring 3.7.5: Connection Schema of the Analog Command Input The input impedance is 10KΩ and range of voltage command ±10V. 3.7.6: Connection Schema of Digital Command (PWM Command) In velocity and torque modes besides receiving analog command, the D1 drive also can receive digital command. There are two types of digital command: single line (PWM 50%) and double line (PWM 100%). Please see the descriptions of velocity and torque in section 4.2.4. Example of Single Line Single line PWM 50% is using digital input port I9 to receive PWM command I10 is not used. The connection is as below: HIWIN Mikrosystem Corp. 35 mega-fabs Drive User Guide Wiring Example of Double Line Double line PWM 100% is using digital input ports I9 to receive PWM command and I10 to receive direction. The connection is as below: HIWIN Mikrosystem Corp. 36 mega-fabs Drive User Guide Wiring 3.8: Connection Schema of Feedback Inputs (CN3) Pin 1 2 Signal FG SG 3 4 5 6 7 8 9 10 11 12 13 14 +5V A /A B /B Z /Z SG HA HB HC I5 15 16 17 18 19 20 SG sin+ sincos+ cosSG Function Frame ground, pin for cable shield connection Signal ground and +5v dc ground. This pin is for inner shielding when dual shielding is applied in feedback wire. Encoder and hall sensor +5V dc power supply .Total load current should not exceed 400 mA Digital incremental encoder input Signal ground and +5v dc ground. Hall sensor signal input Default configuration is motor temperature switch input. It also can be configured as other functions Signal ground and +5v dc ground. Standard Speed Pull-up/pull-down Group B Analog incremental encoder input Signal ground and +5v dc ground. This pin is for inner shielding when dual shielding is applied in feedback wire. CN3 Pin layout HIWIN Mikrosystem Corp. 10 1 20 11 37 mega-fabs Drive User Guide Wiring 3.8.1: Connection Schema of Digital Incremental Encoder 3.8.2: Connection Schema of Analog Incremental Encoder HIWIN Mikrosystem Corp. 38 mega-fabs Drive User Guide Wiring 3.8.3: Connection Schema of Motor Over-Temperature Input When using the HIWIN motor, I5 and group B should be configured as pull up to the make motor over temperature protection work. 3.8.4: Connection Schema of Digital Hall Sensor HIWIN Mikrosystem Corp. 39 mega-fabs Drive User Guide Wiring 3.9: Accessories of the D1 Drive 3.9.1: Motor Power Cable AC Servo motor cable Part name Model HV04FRACP □□ A HV06FRACP □□ A Motor cable Description No brake signal included Brake signal included □□Represents cable length as the following: □□ Cable length(m) 30 50 A0 3 5 10 Linear and torque motor cable Part name Model Description For LMS series linear motor and motor OT cable included For LMC series linear motor and motor OT cable included For TMS series torque motor LMACS□□D Motor cable LMACS□□K LMACS□□F □□Represents cable length as the following: □□ Cable length(m) 03 3 04 4 05 5 06 6 07 7 08 8 09 9 10 10 3.9.2: Feedback Signal Cables Feedback signal cable of AC Servo motor Part name Feedback signal cable Model HV00FRACE □□ A HV00FRACE □□ B Description Non-flexural endurance Flexural endurance □□Represents cable length as the following: □□ Cable length HIWIN Mikrosystem Corp. 30 3 50 5 A0 10 40 mega-fabs Drive User Guide Wiring Feedback signal cable of linear and torque motor Part name Model LMACE□□Y LMACE□□Z Encoder Cable LMACE□□C LMACE□□J LMACE□□AA Description For Renishaw Digital Encoder, motor OT For Renishaw Digital Encoder, motor OT, and digital hall sensors For Renishaw Analog Encoder, motor OT For Renishaw Analog Encoder, motor OT, and digital hall sensors For Jena analog encoder and motor. For TMS □□Represents cable length as the following: □□ cable length (m) 03 3 04 4 05 5 06 6 07 7 08 8 09 9 10 10 3.9.3: Control Signal Cable Part name Control Cable Model LMACK30R LMACK□□A Description For motion controller (about 3m long) For ACS SPiiPlus SA motion controller □□Represents cable length as the following: □□ cable length (m) 03 3 04 4 05 5 06 6 07 7 08 8 09 9 10 10 3.9.4: RS232 Communication Cable Part name RS232 communication cable HIWIN Mikrosystem Corp. Model Description LMACR21D Cable length is 2 meters long and connector type RJ11 at the drive side 41 mega-fabs Drive User Guide Wiring 3.9.5: Accessory Pack of Connector Part name D1 drive accessory pack (without CN3) D1 drive accessory pack (CN3 connector included) Model D1-CK1 D1-CK2 Description AC main power connector: 4 pins and pitch 7.5mm Motor cable connector: 4 pins and pitch 5mm Regenerative resister connector: 3 Pin and pitch 7.5mm 24V dc power and brake connector: 3 pins and pitch 5mm CN2 control signal connector: MDR 26P Connecter tool: Wago 231-131 AC main power connector: 4 pins and pitch 7.5mm Motor cable connector: 4 pis and pitch 5mm Regenerative resister connector: 3 pins and pitch 7.5mm 24V dc power and break connector: 3 pins and pitch 5mm CN2 control signal connecter: MDR 26P CN3 encoder connecter: MDR 26P Connecter tool: Wago 231-131 Quantity 1 1 1 1 1 1 1 1 1 1 1 1 1 3.9.6: EMC Accessory Pack Part name D1 EMC accessory pack (single phase) D1 EMC accessory pack (three phase) Model D1-EMC1 D1-EMC2 Description Single phase filter FN2090-10-06 EMI Core KCF-130-B Three phase filter FN2090-10-06 EMI Core KCF-130-B Quantity 1 2 1 2 3.9.7: Regen Resistor Part name Regen resistor Model 050100700001 Description 68Ω, Rated power100W and peak 500W Model D1-H1 D1-H2 Description Standard Small 3.9.8: Heat Sink Part name Heat sink Heat sink HIWIN Mikrosystem Corp. 42 4: DRIVE SETTING This chapter mainly describes software installation of the D1 drive and the basic settings of the driving motor. Contents include: Title Page 4.1: Installation and Communication ............................................................................................................................................ 44 4.1.1: Software Installation Files ........................................................................................................................................ 44 4.1.2: Communication Setup .............................................................................................................................................. 45 4.1.3: Main user’s interface window ................................................................................................................................... 46 4.2: Configuration Center ............................................................................................................................................................. 47 4.2.1: Motor Type............................................................................................................................................................... 48 4.2.2: Encoder Parameter .................................................................................................................................................. 52 4.2.3: Hall Sensors ............................................................................................................................................................ 57 4.2.4: Operation Mode ....................................................................................................................................................... 58 4.2.5: The last step of configuration ................................................................................................................................... 60 4.3: Auto phase center................................................................................................................................................................. 61 4.3.1: Pre-steps of Auto Phase Center ............................................................................................................................... 62 4.3.2: Configutation Steps of Auto Phase Center ............................................................................................................... 62 4.3.3: Notices of Phase Initialization .................................................................................................................................. 64 4.4: I/O Configuration................................................................................................................................................................... 65 4.4.1: Digital Inputs ............................................................................................................................................................ 65 4.4.2: Digital Outputs ......................................................................................................................................................... 66 4.5: In-Position Configuration....................................................................................................................................................... 69 4.5.1: Introduction .............................................................................................................................................................. 69 4.5.2: Setting ..................................................................................................................................................................... 69 4.6: Homing ................................................................................................................................................................................. 70 4.7: Save to flash ......................................................................................................................................................................... 70 HIWIN Mikrosystem Corp. 43 mega-fabs D1 Drive User Guide Drive Setting 4.1: Installation and Communication Lightening is the user’s interface for the D1 drive. It is used for initializations, settings, operations, motion test and parameters saving. All the functions are done in PC via RS232 communication. This section describes how to install it and establish communication. 4.1.1: Software Installation Files The folder of the Lightening installation includes the files as shown below. It includes setup.exe and firmware folder. Figure 4-1 The user can use the installation disc to install Lightening automatically. User also can download them from the website: (http://www.hiwinmikro.com.tw/Support_Download_Cad.aspx?type=LM) then execute setup.exe file. The installation is shown as in Figure 4-2. The installation destination is “C:\mega_fabs\” as default. Please do not change the installation destination. After pressing the Start button, the process of installation will start automatically. A message window will pop up when installation completes. Press OK button to finish installation procedures. Figure 4-2 HIWIN Mikrosystem Corp. 44 mega-fabs D1 Drive User Guide Drive Setting Figure 4-3 There is a short cut created on the desktop for opening Lightening after installation complete as showing in Figure 4-4. The short cut of execution root is “C:\mega_fabs\dce\toolswin\winkmi\lightening.exe”. Figure 4-4 4.1.2: Communication Setup Before launching Lightening, the PC should connect to drive via RS232 and 24Vdc power supply to turn on the drive. Normally, after launching Lightening, it will communicate with the drive automatically. Sometimes it is needed to change the settings in communication setup (Ctrl+N) under Tools in the menu. Figure 4-5 The communication setup is shown in Figure 4-6 below. RS232 is supported by the D1 drive. BPS means transmission rate with default value 115200. Port should be set to the communication port of PC which connects to the drive. Keep the other settings as default and communication will work well. Figure 4-6 HIWIN Mikrosystem Corp. 45 mega-fabs D1 Drive User Guide Drive Setting 4.1.3: Main user’s interface window The main window of the user’s interface is shown below and the main functions in the window are described in the followings. : Save parameters from drive RAM to file : Load parameters from a file to drive RAM : Save parameters from drive RAM to Flash : Reset drive MMain Tool Bar Connected drives Status Display Area Error Messages Quick View: Variable Monitoring Communication Status Figure 4-7 Status Display Area There are two leds displaying statuses: : If the hardware enable input is activated, the led is shown light green, otherwise it shows dark green. If the hardware enable input is not activated, the motor cannot be enabled. The hardware enable signal is configured at digital input page. Please see the contents of section 4.1.1: and appendix C. : The led will show light green when the software is enabled and dark green when the software is disabled. The motor will enable when the hardware and software are both enabled. Pressing the Enable button in the Performance center will make the software enabled. Pressing the Disable button will make software disabled. The hardware will enable active when the PC disconnects with the drive following, the software will enable. Lightening will interrogate need to “Toggle On” or “Remain Off” when the user closes Lightening with the connect drive. HIWIN Mikrosystem Corp. 46 mega-fabs D1 Drive User Guide Drive Setting : The led will show light green when the drive software is ready. Hardware enable and phase initialized. 4.2: Configuration Center When a new D1 drive is used with a motor, or when changing the motor or encoder type, it is necessary to use the configuration center to setup. It can be accessed by clicking at the button on the tool bar or selecting the Conf./Tune and click at configuration center as showing in Figure 4-8 below. Configuration page Figure 4-8 The following steps have to be done for the driving motor. Motor Type:Configure motor type and parameters related to motor. Encoder Parameter:Configure encoder type and resolution. Hall Sensors: Configure hall sensor type. Operation Mode:Configure operation mode of drive. Please see the sections 4.2.1: to 4.2.5: for more details of doing the steps above. HIWIN Mikrosystem Corp. 47 mega-fabs D1 Drive User Guide Drive Setting 4.2.1: Motor Type The D1 drive supports AC servo motor, linear motor and torque motor. The first page of Configuration center is motor type configuration. There are three categories of motor type below the icon . In each category of motor is a group of HIWIN motor models for user’s selection. For example, HIWIN LMC, LMS and TMS series motors. AC Servo Motor Configuration 1. Motor parameters Select HIWIN AC servo motor model to display the parameters and set. 2. Operation parameters Screw Moment of Inertia: Moment of inertia of screw itself which is used and the unit is Kg*m2. Load Mass: The mass of payload and the unit is Kg. Screw Pitch: The lead of ball screw or Acme screw that is the distance moved after making a turn. The unit is mm. Gear Ratio: The ratio of number of gear teeth between load side and drive side. Providing correct operation parameters guarantees more reasonable calculated parameters for servo loop control to drive motor smoothly. Operation Parameters Motor Parameters Figure 4-9 HIWIN Mikrosystem Corp. 48 mega-fabs D1 Drive User Guide Drive Setting Linear Motor Configuration 1. Motor parameters Select HIWIN linear motor model to display the parameters and set. 2. Operation parameters Moving Mass: The mass of payload including forcer and housing of forcer and the unit is Kg. Operation Parameters Motor Parameters Figure 4-10 HIWIN Mikrosystem Corp. 49 mega-fabs D1 Drive User Guide Drive Setting Torque Motor Configuration 1. Motor Parameters Select HIWIN torque motor model to display the motor parameters and set. 2. Operation Parameters Total Moment of Inertia: The moment of inertia of torque motor includes inertia of forcer and payload and unit is Kg*m2. Operation Parameters Motor Parameters Figure 4-11 Customized Motor Configuration The parameters of motors that are not HIWIN standard products can be configured in the page of customized motor, for example, using AC servo motor as in Figure 4-12. Select the category AC servo then the item Customized AC servo for opening the page of the motor parameter configuration. According to motor specifications input the parameters in this page to complete the motor configuration. The user also can save the configured motor parameters as a parameter file (*.mot) for loading it later. 1. Motor Parameters Peak Current: Max current input to motor for a short time and the unit could be A_amp or A_rms. Continuous Current: Current that can be fed to motor continuously and unit could be A_amp or A_rms. Force/Torque Constant: One of motor coil property defines force or torque that can be generated per unit current. The unit can be N/A_amp, N/A_rms, Nm/A_amp and Nm/A_rms. HIWIN Mikrosystem Corp. 50 mega-fabs D1 Drive User Guide Drive Setting Resistance (Line-Line): One of motor coil properties that defines the resistance between coil leads and unit is Ohm. Inductance (Line-Line): One of motor coil properties that defines the inductance between coil lead and the unit is mH. Magnetic Pole Pair Pitch: The distance between two magnets (N or S) and the unit could be mm. Pole Number: Total number of poles per revolution of rotary motor. 2. Operation parameters Screw Moment of Inertia: Moment of inertia of screw itself which is used and the unit is Kg*m2. Total Moment of Inertia: The moment of inertia of torque motor includes inertia of forcer and the unit is Kg*m2. Moving or Load Mass: The mass of payload including forcer and housing of forcer and the unit is Kg. Screw Pitch: The lead of ball screw or Acme screw that is the distance moved after making a turn. The unit is mm. Gear ratio: The ratio of number of gear teeth between load side and drive side. Motor Selection Operation Parameters Motor Parameters Motor Parameters Save/load Parameter OK/cancel button Figure 4-12 HIWIN Mikrosystem Corp. 51 mega-fabs D1 Drive User Guide Drive Setting 4.2.2: Encoder Parameter Usually the drive receives encoder feedback position to perform servo control. The window of the encoder parameter configuration is shown as Figure 4-13 and the user needs to select the correct type of encoder or set correct parameters. In this configuration window there is not only a list that collects all commonly used encoders for the user, but also provides a customized encoder configuration that the user can input parameters for different encoder manufacturer. For example to use the linear encoder click Linear category on the list and select Customized Linear Analog to open the configuration area for input of the parameters of encoder for their specification. After configured, use save function to make an encoder parameter file (*.enc) in disc for later usage. Encoder Selection Area Resolution Configuration Area Encoder Output Configuration Area Encoder Parameter Save/Load Parameter Confirmation OK/Cancel button Figure 4-13 Window of Encoder Parameter Configuration The D1 drive supports various kinds of digital and analog encoders including linear optical encoder, magnetic encoder and rotary encoder. The types of encoder are divided to 4 types as below: Linear Digital Encoder Linear Analog Encoder Rotary Digital Encoder Rotary Analog Encoder Please refer to the sections 4.2.2.1 to 4.2.2.4 that introduce the encoders commonly used in HIWIN motors and section 4.2.2.5 to 4.2.2.8 that introduce the configuration of customized encoders. For integration with host controller, the D1 drive can also output encoder feedback signals (see also section 3.7: Wiring of Control Signal (CN2)). D1 drive provides buffered encoder or emulated encoder for such output purpose. Using emulated encoder can change output resolution by scaling. The sections 4.2.2.9 to 4.2.2.10 describe details of configurations. HIWIN Mikrosystem Corp. 52 mega-fabs D1 Drive User Guide Drive Setting Encoders commonly used in HIWIN motors 4.2.2.1 Linear digital type: For example using HIWIN standard magnetic encoder PM-B-XX-XD-S-XX or Renishaw RGH41X series digital encoder, the user only has to select Digital 1um in the encoder selection area as shown in Figure 4-13. For different encoders the user also can select the correct type according to the encoder resolution from the list. If there is no corresponding resolution, configure it in the window of customized encoder. Please see the section 4.2.2.5. 4.2.2.2 Linear analog type: For example using Renishaw RGH41B analog encoder with grating period of 40um interpolated to 1um resolution, the user could select Linear then Analog 40um-1um item in the encoder selection area as shown in Figure 4-13 to complete configuration. To use different multiplier factor or resolution, user has to select default item or configure it in the window of customized the encoder parameter. Please see the section 4.2.2.6. 4.2.2.3 Rotary digital type: For example using HIWIN FACXX4001 AC servo motor with encoder of 10000 count/rev resolution, the user can select Rotary then Digital 1000 count/rev item in the encoder selection area as shown in Figure 4-13 to complete configuration. For other HIWIN FRAC series AC servo motors please refer to table 4-1. If no corresponding resolution could be found, configure it in the window of customized encoder parameter. Please see the section 4.2.2.7. Table 4-1 Digital encoder resolution of HIWIN FRAC series AC servo motor AC Servo Motor Type Counts per Revolution FRACXX1011, FRACXX1022, FRACXX2011, FRACXX2022, FRACXX4011, FRACXX4022, FRACXX7522 10000 4.2.2.4 Rotary analog type: For example using HIWIN TMS32 torque motor integrated with rotary analog encoder with 3600 sin waves per revolution interpolatd to 0.3 arc-sec resolution, the user can select Rotary then Analog 3600 periods 0.3 arc-sec item in the encoder selection area as showing Figure 4-13 to complete the configuration. For other rotary HIWIN TMS series torque motors please refer to table 4-2. If using different multiplier factor or resolution, user also can configure it in the window of customized encoder. Please see the section 4.2.2.8. Table 4-2 Analog encoder resolution of HIWIN TMS series torque motors Torque Motor Type Grating period/Rev TMS03,TMS07 2048 TMS12, TMS14, TMS16, TMS18, TMS32, TMS34, TMS34L, TMS38, TMS38L, TMS3C, TMS3CL 3600 TMS74, TMS74L, TMS76, TMS76L, TMS7C,TMS7CL 5400 HIWIN Mikrosystem Corp. 53 mega-fabs D1 Drive User Guide Drive Setting Configuration of customized encoder resolution 4.2.2.5 Linear digital type: The user only has to input encoder resolution in the field named Encoder Resolution and select unit to um/count or nm/cout. Figure 4-14 4.2.2.6 Linear analog type: Firstly, input grating period of analog encoder signal then select multiplier factor which is up to 65528. The interpolated resolution will be calculated automatically and updated. The unit is um/count. Figure 4-15 4.2.2.7 Rotary digital type: The user only has to input counts per revolution of encoder signal. The unit is counts/rev. Figure 4-16 HIWIN Mikrosystem Corp. 54 mega-fabs D1 Drive User Guide 4.2.2.8 Drive Setting Rotary analog type: Input how many sine waves per revolution of analog encoder interpolated the multiplier factor is up to 65528. The resolution will be calculated automatically and updated. The unit is counts/rev. Figure 4-17 Encoder Output The D1 drive outputs quadratured AB phases encoder signal via CN2 to host controller as the user demands. As shown in Figure 4-18, the user can click Use buffered encoder or Use emulated encoder in Encoder output area. The resolution of output encoder signal will be displayed in the field named Output Resolution for the encoder output type selected. Encoder Output Configuration Area Figure 4-18 4.2.2.9 Buffered encoder output When the user configures the encoder output as buffered encoder output, the drive sends the encoder feedback signal received from the motor encoder directly to the host controller. In addition, when Invert box is checked the drive inverts the encoder signal then sends it out. The resolution of output will be also displayed in the window for reference. HIWIN Mikrosystem Corp. 55 mega-fabs D1 Drive User Guide Drive Setting Figure 4-19 4.2.2.10 Emulated encoder output When the user configures the encoder output as emulated encoder output, the drive sends the encoder signal after scaling to the host controller. In general, the drive sends the encoder signal with 1:1 scaling. In some cases the host controller cannot receive encoder signal with too high frequency. The user can use different scaling ratio such as 10 encoder count = 1 emulated encoder output to lower the frequency of the encoder signal so that host controller will have no problem receiving. Figure 4-20 shows an example, grating period of analog encoder is 20 um and the resolution of encoder signal interpolated with multiplier factor of 200 is 0.1um/count. In addition, the scaling ratio is configured as 10 encoder counts corresponding to 1 emulated encoder output. Thus, the resolution of output encoder is enlarged to 1um/count. Figure 4-20 HIWIN Mikrosystem Corp. 56 mega-fabs D1 Drive User Guide Drive Setting 4.2.3: Hall Sensors Normally, the D1 drive can do phase initialization without using hall sensor. Thus, configuration of hall sensors is in most cases is configured to none. Using hall sensor depends on the user’s requirement. The configuration page of hall sensor is shown in Figure 4-21. The D1 drive support digital and analog hall sensors. The user has to do the configuration according to whether hall sensor is implemented in motor or not. Do not configure to hall sensors, when no hall sensors are built in the actual motor. Otherwise, the motor will fail to move. Hall Sensors Configuration Parameter Confirmation OK/Cancel button Figure 4-21 HIWIN Mikrosystem Corp. 57 mega-fabs D1 Drive User Guide Drive Setting 4.2.4: Operation Mode Figure 4-22 below shows the operation mode configuration page. After configuration in previous sections, operation mode of the drive is configured in this page as the last step. Mode Selection Parameter Configuration Parameter OK/Cancel button Figure 4-22 Position Mode To work with the host controller sending pulse command, the drive should be set to position mode to receive external motion pulse command. The D1 drive supports 3 pulse formats and also electronic gear ratio for pulse. In position mode digital input ports I9 and I10 are unavailable for general purpose digital input ports. Figure 4-23 HIWIN Mikrosystem Corp. 58 mega-fabs D1 Drive User Guide Drive Setting Velocity Mode To work with the host controller sending analog or PWM velocity command, the drive should be set to velocity mode. Then it is required only to configure the scaling of external command and velocity. The scale is mm/sec/V or the maximum velocity which corresponds to full PWM. Dead band definition Output Input Dead band Figure 4-24 Force/Torque Mode A similar mode to the above mode is force/torque for drive that works with the host controller sending analog or PWM force/torque commands. Then it is required only configure the scaling of external command and current. The scale is A/V or the maximum current which corresponds to full PWM. Figure 4-25 Stand-Alone Mode Stand-Alone mode is implemented when there is no host controller. In this mode the drive takes all motion tasks. HIWIN Mikrosystem Corp. 59 mega-fabs D1 Drive User Guide Drive Setting 4.2.5: The last step of configuration After completing configurations in previous configuration steps which are motor parameter, encoder parameter, hall sensor and operation mode, click the OK button at the bottom of the window of Configuration center. It shows a window displaying comparison table of new and previous parameters as shown in Figure 4-26. Make sure that each parameter is correct then click “Send to RAM” button to send them to drive. If the Cancel button is clicked, it will be closed and return to window of Configuration center. If the parameters need to be saved, click the (Save to Flash) button to save them to non-volatile memory so that they are not lost when 24V is off. New Parameters Previous Parameters 原有參數 Confirmation of parameters sent to RAM/Cancel Figure 4-26 If the user wants to save the parameters to disc of PC as a file, click Amplifier RAM to File) button. The extension of the file name is PRM. HIWIN Mikrosystem Corp. (Save Parameter from 60 mega-fabs D1 Drive User Guide Drive Setting 4.3: Auto phase center Click the icon on the tool bar of the main window or select Auto phase center item under pop-up menu Conf/Tune to open auto phase center. Normally Auto phase center for phase initialization looks like Figure 4-27. However when a digital hall sensor is used, it look like Figure 4-28. Figure 4-27 Auto phase center without hall sensor Figure 4-28 Auto phase center with hall sensor HIWIN Mikrosystem Corp. 61 mega-fabs D1 Drive User Guide Drive Setting 4.3.1: Pre-steps of Auto Phase Center Confirm the connection of motor is ok. Confirm the encoder signal is ok. Confirm drive can receive the signal of Hardware Enable. Please refer to Appendix C: Enable Startup Configuration. Confirm the connection of motor over temperature signal. Confirm AC main power turned on. Set/confirm current: In the Current (SM mode) field input current value (The unit is ampere) which is needed to move the motor under SM mode. Do not set the current value too high (Big enough value to move motor is recommended). The default value is 95% of motor continuous current. 4.3.2: Configuration Steps of Auto Phase Center 4.3.2.1 SM enable: Click SM enable button then the Enabled led is turned on. Please pay attention, when the motor is enabled, the drive supplies current (SM mode) to motor continuously. Thus, do not keep motor in SM enable for a long time to avoid the motor from overheating. 4.3.2.2 Motion direction test under SM mode: Drag the slider bar toward left or right to move motor. Right direction in the window corresponds to positive move and left direction, negative move. Note: The dial of Phase error should swing within green scales (-30°~30°) during motor motion. If it swings out of this range, release and drag slider to move motor again. A message, Feedback detect ok will be shown in step2 in the window as shown in figure below if succeed. Otherwise, please confirm the connections of motor power cable and encoder feedback signal cable. If it’s still not working, it means that the encoder or the motor parameter configuration is incorrect. Please check the encoder resolution or pole pair pitch in the configuration center. HIWIN Mikrosystem Corp. 62 mega-fabs D1 Drive User Guide Drive Setting 4.3.2.3 Confirmation of motion direction: After completing the previous step, if the motion direction is not consistent with user’s definition please click TD button. It will reverse direction. When it shows “Toogle Direction, ended successfully” like picture below, you can use section 4.3.2.2 to do direction confirmation again. 4.3.2.4 If the hall sensor is not used, please go to 4.3.2.5. In Figure 4-28 step 4, click the Hall test/tune button to tune hall sensor signal while using hall sensor. Click the Hall test/tune button to open the configuration window. Clicking the Start Hall tune button drive will start to output current making the motor move. As the motor moves, the user’s interface print phase sequence numbers (0~5). Until the motor moves to a 360゚electrical degree, confirm the displayed message of completed hall sensor test to finish the test steps. 4.3.2.5 Press the Freq analyzer button, execute frequency analyzer to adjust parameters, please refer to appendix B:. User chooses SW method2 or Hall sensor to do phase initialization. This function can help user to tune vpg gain, it refer to section 5.6.3. And the user chooses SW method1 to do phase initialization, the vpg and st_vpg are tuning by Freq analyzer function. The st_vpg is explained in appendix B: 4.3.2.6 Phase initialization: Click the Start Phase initialization button then wait for Phase initialized led tuning on to complete phase initialization. After this, the drive can drive the motor (enter to closed loop control) If phase initialization fails, please refer to appendix B: Advanced Phase Initialization. HIWIN Mikrosystem Corp. 63 mega-fabs D1 Drive User Guide Drive Setting 4.3.3: Notices of Phase Initialization Setting of Enable Current Here are some considerations for the current (SM mode) setting in Auto phase center: The value of the current is below motor continuous current. It is suggested to start with smaller current to move motor if the loading is unknown. Higher friction needs bigger current to move the motor. Higher static friction may need bigger current to overcome it. During transition between static and dynamic friction, stick and slip may happen. It is not an issue of drive. Trouble shooting of Motor Motion Direction When the step 2 in Auto phase center fails, it means a problem with the configuration of the motor motion direction. Please do the actions below: Check encoder power and signal Confirm if the type of encoder signal is differential Check if grounded properly Trouble shooting of Motor Motion When the motor cannot move, please do the actions below: Confirm if the motor is disabled Check interference in mechanism Check if friction is too high on mechanism Check for good connections of the motor power cable Measure the motor coil resistance to check if it is valid Trouble shooting of Hall Sensor Connection Check for loose connection Check the power and signal of hall sensor Check smoothness of mechanism Check if grounded properly HIWIN Mikrosystem Corp. 64 mega-fabs D1 Drive User Guide Drive Setting 4.4: I/O Configuration 4.4.1: Digital Inputs The D1 drive provides 10 digital input ports (I1-I6 and I9-I12). Nine of them are located in the control signal connector (CN2) which I5 located in encoder feedback connector (CN3) for motor over temperature switch (It also can be configured to other functions). I9 and I10 can be configured as general purpose input or pulse command input depending on operation mode. In Position mode the two ports cannot be configured to general purpose input port. For other modes they can. Input functions State Indicator Input Signal Level Configuration Logic Invert Default Configuration Figure 4-29 Level Configuration (Pull-up/pull-down) This configuration is based on actual hardware wiring. If the hardware wiring is sink type, it should be configured to pull-up. Otherwise, for source type of wiring it should be configured to pull-down. Refer to the wiring examples in the section 3.7.1:. Input functions List Click the ( ) pop-up button to show configuration list as the shown in Figure 4-20. Figure 4-30 HIWIN Mikrosystem Corp. 65 mega-fabs D1 Drive User Guide Functions AXIS Enable Left Limit Switch Right Limit Switch Motor Over Temperature Home OK, start err. map Drive Setting Descriptions Enable/disable axis. Default port for this function is I1. It is edge triggered. Hardware left limit. Default port for this function is I4. It is edge triggered. Hardware right limit. Default port for this function is I6. It is edge triggered. Motor over temperature. Default port for this function is I5. It is edge triggered. Homing completed notification from host controller Default Configuration Clicking the Set Default button ( ) will reset all configurations in I/O function List to default. After clicking this button, a message window of “Set Default Input States Configuration” pops up. Click the OK button,to reset all configurations to default as Figure 4-31. Figure 4-31 State Indicator The State indicator shows green to indicate the configured function activated. Otherwise, it shows dark green to indicate the configured function is inactivated. Logic Invert Check the Invert check box to inverse input polarity. 4.4.2: Digital Outputs There are 4 programmable digital output ports in the D1 drive. Three ports (O1-O3) of them are used to be general purpose output in the CN2 connector. The last port, O4 in the 24V power connector is used for brake and it is also however be configured as general purpose output. HIWIN Mikrosystem Corp. 66 mega-fabs D1 Drive User Guide Drive Setting Logic State Logic Invert Output Voltage Status Display Configuration button Default Configuration Figure 4-32 Digital Output Configuration For each port there is an output function list respectively. For example, click the Configure O1( ) button to show its list. The list is divided by 3 groups including Status, Errors and Warning as the shown in Figure 4-33. If the user selected two or more than two items, the output is activated while one of these selected items is active. The user can select Not Configured ( ) button to eliminate all selected items. After selecting specific items, user can click the Apply ( ) button to complete configuration, otherwise clicking the Cancel ( ) button to cancel. There is a button named Set errors ( ). It is suggested to click this button to select all items in the Errors group for the protection during operation. Figure 4-33 HIWIN Mikrosystem Corp. 67 mega-fabs D1 Drive User Guide Drive Setting Default Configuration Clicking the Set Default ( ) button will reset outputs to default. A message window of “Set Default Output Sates Configuration” pops out after clicking this button. See Figure 4-34. Further, the default configuration of O1 is configured to all errors in the Error group, O2 to In-Position signal and O4 to brake. Figure 4-34 Status Display When one of the items in the Configuration is selected, message “Configured” will be displayed in the StatusDisplay column. Otherwise, “Not Configured” will be displayed when no item selected. Logical State It shows the logical values of each configured output. The values are TRUE and FALSE. Logical Invert When using host controller, this function is used to invert voltage polarity that depends on usage. The logical values inside drive are not affected by this function. Output Voltage It shows output voltage. The user should check if the controller is receiving the correct signal. HIWIN Mikrosystem Corp. 68 mega-fabs D1 Drive User Guide Drive Setting 4.5: In-Position Configuration 4.5.1: Introduction Position Error is defined as the difference between command position and encoder feedback position under servo control system. It takes a short time for motor to stabilize its position after the motor moved to its target position. Setting time is the time required for position error to settle within target radius. Then it is said to be In-position. The D1 drive provides a user’s interface to set target radius and debounce time. 4.5.2: Setting After clicking the icon on the main function tool bar to enter the Performance center, the user interface of In-Position displays in the upper part of Position tab. If the user wants to capture motion curve, user can click the Set scope ( ) button to open the scope. This state can be sent out to the host controller via digital output ports and O2 is configured as default for this signal. Please refer to section 4.2.2: about how to configure the digital output port. Figure 4-35 Parameter Target radius Debounce time Move time Settling time Total HIWIN Mikrosystem Corp. Description If the position error is less than this value, the in-position signal becomes true. The default value is 100 times of encoder resolution. The continuous time for the position error to remain within target radius to make in-position true. The time from path planning calculation. Settling time The sum of move time and setting time 69 mega-fabs D1 Drive User Guide Drive Setting 4.6: Homing Click the icon on the main function tool bar to enter Application center. Select the Homing page to show configuration window of Homing as shown in Figure 4-36. Figure 4-36 Parameter Search velocity Time out Home offset Description Homing velocity Max searching time for the homing sequence Offset of the home signal position The Homing function is used to search reference index signal. The drive will do homing function after the user sets homing velocity and presses the Home button in Preference center. When the Home led is blinking green in the Performance center it means homing is under proceeding. It will show green for home finished and red for homing timeout. 4.7: Save to flash Click the icon, (Save to Flash) in the main window to save configured parameters into flash memory. Even 24V power of the drive is turned off the parameters will not be lost. There are two notes as below: The function of the emulated encoder output is invalid temporary during saving process. The compensation table of the Error map will not be saved at this moment. In order to save it the user has to use save function in the Error map window. Please refer to section 5.8:. HIWIN Mikrosystem Corp. 70 mega-fabs D1 Drive User Guide Drive Tuning 5: DRIVE TUNING This chapter mainly describes how to improve performance by tuning. Contents include: Title Page 5.1: Status Display and Quick view .............................................................................................................................................. 72 5.1.1: Status Display .......................................................................................................................................................... 72 5.1.2: Quick view ............................................................................................................................................................... 72 5.1.3: Software Hot Key ..................................................................................................................................................... 73 5.2: Performance Center ............................................................................................................................................................. 74 5.3: Scope ................................................................................................................................................................................... 76 5.4: Data Collection ..................................................................................................................................................................... 78 5.5: Plot view ............................................................................................................................................................................... 79 5.5.1: Graphic Display........................................................................................................................................................ 79 5.5.2: Save to/ Read from File ........................................................................................................................................... 83 5.5.3: Math ........................................................................................................................................................................ 84 5.6: Advanced Gains ................................................................................................................................................................... 87 5.6.1: Filter......................................................................................................................................................................... 87 5.6.2: Acc Feedforward ...................................................................................................................................................... 90 5.6.3: Schedule Gains and velocity loop gain (vpg) ............................................................................................................ 92 5.6.4: Analog Input Bias Correction .................................................................................................................................... 94 5.6.5: Current Loop ............................................................................................................................................................ 95 5.7: Encoder Signal Checks......................................................................................................................................................... 95 5.7.1: Encoder test/tune ..................................................................................................................................................... 95 5.7.2: Encoder Feedback Position Check .......................................................................................................................... 96 5.7.3: Index Signal Check .................................................................................................................................................. 96 5.7.4: Lissajous Circle ........................................................................................................................................................ 96 5.8: Error Map ............................................................................................................................................................................. 97 5.8.1: Error Map Operation ................................................................................................................................................ 97 5.8.2: Error Map Activation................................................................................................................................................. 99 5.8.3: Save and load Error Map Values............................................................................................................................ 100 5.8.4: Error Map Value and Encoder Resolution .............................................................................................................. 100 HIWIN Mikrosystem Corp. 71 mega-fabs D1 Drive User Guide Drive Tuning 5.1: Status Display and Quick view In Lightening the user’s interface Status display and Quick view are two important tools for motor tuning. The two functions help the user to monitor the status of the drive at any time and display important values during motion. 5.1.1: Status Display There are two separate Status displays as shown. At the left side, it is showing the Status display in the main window and at the right side, is the Status display in Performance center. The Status display helps the user to monitor the system status and review error/warning messages. Status Display: Enable: indicates whether the motor is enabled or disabled Hardware Enable Input: it shows the hardware enable signal from the host controller Phase Initialized: it shows whether the motor is already phase initialized Moving: it shows that the motor is moving Homed: it shows that the motor completed homing SM mode: indicates that the motor is enabled under SM mode Error and Warning: Last error: Displays the latest error message Last warning: Displays the latest warning message Please refer to chapter 8: Error and Warning to see more details. Figure 5-1 Status Display 5.1.2: Quick view At the bottom of the main window there is a frame named Quick view. It helps the user to get more details running inside the drive. It provides three channels for displaying physical values for the user. These three values are continuously updated for the convenience of the user’s observation and they provide the possibility for analysis of the status of the system. See Figure 5-2. HIWIN Mikrosystem Corp. 72 mega-fabs D1 Drive User Guide Drive Tuning Figure 5-2 The list ofsical values in Quick view Position Unit For displaying physical values, the user can select the unit to display for the values (position and velocity) See Figure 5-3. Figure 5-3 Setting Position Unit 5.1.3: Software Hot Key In the user’s interface of the D1 drive there are two hot keys: F6 and F12. They are valid only when Lightening becomes active window under operation system. F6: Brings the main window of Lightening to the top of screen. F12: Emergency stop. Pressing F12 during motion will stop motion urgently, the motor becomes disabled. HIWIN Mikrosystem Corp. 73 mega-fabs D1 Drive User Guide Drive Tuning 5.2: Performance Center Most of the tuning processes are done in the Performance center. After completing the motor phase initialization introduced in chapter 4:, the motor can be run. The main purpose of the Performance center is to do the motion test for tuning and to observe performance with help of software tools. Three motion types are provided by the Performance center: point to point motion (P2P), relative motion and jog motion. Related motion parameters like velocity, acceleration/ deceleration, kill deceleration and smooth factor are also set in this window. Figure 5-4 Performance center The following is an example of performing point to point motion (P2P): 5.2.1 Click the button to enable motor 5.2.2 Click the button 5.2.3 Set velocity, acceleration and smooth factor in the fields of Motion Protection (Please refer to 7.1:Motion Protection). If there is no special requirements, using default values is fine to start. 5.2.4 Set the positions of P1 and P2 respectively. If the enable SW limit box is checked, set the positions between Lower SW limit and Upper SW limit. 5.2.5 Click the button to move the motor to P1 position and to P2. If the user wants to execute point to point motion repeatedly, the check Repeat box and input dwell time, then click or button to start motion. The Performance center provides a tool for measuring settling time. Along with the setting of Target radius and Debounce time. Please refer to section 4.5: In-Position Configuration. During motion adjust common gain to reach the demanded settling time. Higher common gain brings shorter settling time. The Performance center updates Move time, settling time and Total time continuously for each motion (See also section 2.7:). A software scope can be opened by clicking the button. It can also be used for observing setting time and related motion curves. HIWIN Mikrosystem Corp. 74 mega-fabs D1 Drive User Guide Drive Tuning The Performance center also provides velocity ripple measurement tool. It can be used to observe the motion smoothness by initiating a point to point motion. Vmax, Vmin and Vavg mean respectively maximum, minimum and average velocity during the constant speed section of motion. Click the button to open software scope to show curves related to velocity ripple measurement. In addition to P2P motion function, there is relative move function, where move distance can be set. And jog motion function provides possibility to move in positive or negative direction by pressing the or button. The settings of velocity, acceleration/deceleration and smooth factor in the Motion Protection are also used for general protection of motion. Thus, after motion test, when the user starts to use host controller to send motion commands, it may not reach the expected velocity or acceleration. In such cases do not forget to change these Motion protection values back to reasonable values. ○ 1 ○ 2 ○ 3 ○ 4 ○ 7 ○ 8 ○ 9 ○ 10 ○ 13 ○ 6 ○ 5 ○ 11 ○ 12 Figure 5-5 Position tab in Performance center ○ 1 Enable: Enable motor ○ 2 Disable: Disable motor ○ 3 Zero: Set current position to zero ○ 4 Stop motion: Stop motor movement ○ 5 Position Units: Set preferred unit. Its function is the same as that of Quick view in the main window. ○ 6 Motion Protection: Motion protection parameters are parameters for motion test in Performance center. It includes velocity, acceleration, deceleration, kill deceleration and smooth factor. Motion profiles like S-curve or trapezoidal curve can be achieved by setting smooth factor with a range of 1~500. Bigger smooth factor makes motion smoother. Smaller smooth factor makes motion profile closer to trapezoidal curve. ○ 7 P2P: Point to point motion ○ 8 Relative move: Relative motion HIWIN Mikrosystem Corp. 75 mega-fabs D1 Drive User Guide Drive Tuning ○ 9 Jog: Jog motion 1○ 0 Home: Homing 1○ 1 Common Gain: A servo loop gain. Bigger gain value makes servo stiffness higher. Use the setting to adjust the servo stiffness. Too high stiffness causes system instability, with vibration and noisy. In such case, it should be lowered. 1○ 2 Status Display: Display motor status. ○ 13 ○ 14 Figure 5-6 Velocity Ripple measurement in Performance Center 1○ 3Vmax: Maximum velocity during constant speed section Vmin: Minimum velocity during constant speed section Vavg: Average velocity during constant speed section 1○ 4Velocity Ripple: shown in percent (Refer section 2.9:) 5.3: Scope The D1 drive provides software scope to help the user observe important physical values during motion for tuning. Scope is also a good tool for debugging, how motor fails to work. Click the icon or the button in the Performance center to open scope. In the tab of Position and Velocity Ripple, clicking the button sets the scope to show corresponding values for corresponding scenario. As shown in Figure 5-7, the user can also change the physical value selection as he wishes, and the scope displays curves in real time. HIWIN Mikrosystem Corp. 76 mega-fabs D1 Drive User Guide Drive Tuning ○ 2 ○ 1 ○ 3 ○ 4 Figure 5-7 Scope ○ 1 Physical value list: Click here to select physical value to observe. ○ 2 Display Unit: Click here to select the unit for displaying physical value. ○ 3 Number of Channels: Clicking here to select number of channel of the scope. ○ 4 Time: Here user can specify the time that corresponds to horizontal axis of the scope. The unit is second. Icon Name Description Scope On/Off (PageDown) View in paper mode (Ctrl+T) Toggle scopes window (PageUp) Fit graph to window Fit graph to window dynamically Fit graph to window dynamically + clip Switch of scope. Turning off and on, scope will start logging from beginning. Change display mode between Normal mode and paper mode. Clicking this, scope will display each channel one by one on a screen. Fit all physical values in proper scale according to already logged data. Dynamically fit all physical values in proper scale. Show last data with plot view tool Like above, but the range of vertical axis increases and never decrease. Use plot view to display the data from scope. Reset scope Clear scope and restart logging from beginning. Show all plots in same window Put all channels in one plot. All channels share one vertical axis. Link selected physical values to Data collection. Open recoder window HIWIN Mikrosystem Corp. 77 mega-fabs D1 Drive User Guide Drive Tuning 5.4: Data Collection In addition to software scope, there is another tool which provides more data capturing functions, advanced graphic display features and data processing capability. It is Data Collection with which the user can set longer or shorter sampling time, conditional trigger for start or stop data capturing. Within scope window, click the button: Open the recoder window icon as shown in Figure 5-7 to open the data collection. It will automatically transform the physical values selected in the Scope to corresponding variable names in Data collection window as below: ○ 4 ○ 1 ○ 3 ○ 2 Figure 5-8 Data collection ○ 1 Sampling rate and samples: In the input field of Samples, it is to input the total number of samples. In the input field of Rate, it is to input the Sampling rate. Different rate results in different sampling frequency. For example, if sampling rate is set to 1, it means a sampling frequency of 15000Hz; and 2 means 7500Hz. The maximum frequency is 15000Hz. Too high frequency will result in too much data to collect within specific time, so it may come to a sudden stop of data capturing earlier than expected. This is due to limited communication bandwidth. In such case, reduce the number of physical variables to capture can possibly solve this problem. In the window, the symbol dt means sampling time. Total sampling time is calculated from Samples*dt. Increase samples also increase total sampling time. ○ 2 Variable name for physical values. ○ 3 Click Start button to start capturing, Stop button to terminate it and Graph button to plot captured data in the window of Plot view. ○ 4 Automatic capturing: The user can set start and stop condition for data capturing. Example 1: If the user wants to capture a motion cycle and plot it, click to check Start event box and set the condition to X_run, then click to check Stop event box and set to X_stop. Then, click the Start button to make it ready for data collection. It will start to capture as soon as the motor starts to move and stop capturing when motor stops. Click the Graph button to plot the curve of the motion cycle. HIWIN Mikrosystem Corp. 78 mega-fabs D1 Drive User Guide Drive Tuning Example 2: If the user wants to capture a velocity profile, click to check Start event box and set the condition to X_vel_fb > 0, then click to check Stop event box and set X_vel_fb < 0. Then, click the Start button to make it ready for data collection.It will start to capture as soon as the condition (velocity > 0) is satisfied, and stop capturing when velocity becomes less than 0. Click the Graph button to plot the velocity profile. 5.5: Plot view Plot view is linked with Data collection. It plots the captured data from Data collection. Plot view provides powerful analysis functions for display, measurement and calculation. Plot view has 4 areas including menu, tool bar, physical value variable name display, graphic area and time scroll bar as shown in Figure 5-9. Menu Tool bar Area of physical quantit displayed Profile area Scroll of time axis Figure 5-9 Data collection 5.5.1: Graphic Display Number of display channels Graphic area is mainly for the display of physical values. After all physical values are captured by scope or data collection, the plot view displays them in the window. The number of Display channels can be changed and there are maximum 8 channels. Following are the descriptions of the related icons on the tool bar: : Set maximum number of display channels : Select and show a single display channel To observe two physical values, click the icon and select 2 graphs in the pop-up menu. To observe only 1 physical value, click the button and select the specific one to display. As in Figure 5-10, it shows an example in which two physical values are captured, but only channel 1 is displayed. HIWIN Mikrosystem Corp. 79 mega-fabs D1 Drive User Guide Drive Tuning Figure 5-10 Show or Hide Physical Parameter If the user unchecks the box of physical variable name, graphic of the channel will be hidden. Figure 5-11 is an example of a display with two physical values unchecked. There is also an icon for clearing all graphs as below: : Clear graphs. This icon is used to uncheck all selected physical values (Delete key has the same effect.) Figure 5-11 Zoom in/out In order to observe more subtle variance in specific interval, the user can use solid and dashed line cursors to specify the area for zooming in. The plot view provides functions of zoom in/out for X and Y axis. The icons on the tool bar and operations are explained as followed: : X axis zoom in between area specified by blue solid and dashed line cursors. : Undo zoom. : Redo zoom. : Cancel all zooming actions on X axis. HIWIN Mikrosystem Corp. 80 mega-fabs D1 Drive User Guide Drive Tuning : Y axis zoom in between area specified by red solid and dashed line cursors. : Cancel all zooming actions on Y axis X axis Zoom in/out In Figure 5-12, it shows an example of zooming in on time interval between 6 ~ 10 seconds. Use the left mouse key to drag blue solid line and mouse right key to drag blue dashed line for specifying this area. Then, click to zoom in. Figure 5-13 shows picture after zooming in. To zoom in further on time interval of 7~9 seconds, repeat the similar sequence mentioned above. If user wants to return the zoom area of the interval 6~10 seconds, click the button. If the user clicks the button, it shows again interval 7~9 seconds. Clicking the actions on X axis and return to the picture like Figure 5-12. button will cancel all zoom Figure 5-12 Figure 5-13 Y axis Zoom in/out If the user wants to zoom in on Y axis, keep Ctrl-key pressed and click mouse left button to drag red solid line cursor and Ctrl-key with mouse right button to drag red dashed line cursor to specify the area as the showing Figure 5-14. After that, click the HIWIN Mikrosystem Corp. button to zoom in as shown in Figure 81 mega-fabs D1 Drive User Guide Drive Tuning 5-15. Now the Y axis scale is shown in red and vertical dynamic scaling is stopped. Therefore dragging the horizontal scroll bar will have no effect to vertical scaling as shown in Figure 5-16. Clicking the icon on the tool bar, it will cancel Y axis zooming and graphic returns to previous picture before Y axis zooming. Figure 5-14 Figure 5-15 HIWIN Mikrosystem Corp. 82 mega-fabs D1 Drive User Guide Drive Tuning Slide direction Figure 5-16 dt, 1/ dt, dSamp When the graphic area is marked with blue solid and dashed line cursors, it displays on the bottom of window three values: dt, 1/dt and dSamp. dt is the time between the two line cursors, dSamp is number of samples in this area, see Figure 5-12. The physical value shows in different channels If the user wants to move a physical value to be shown in another channel, drag the variable name to the other channel. Display of physical value When the blue solid line cursor is moved to a specific time, a value shows up below the physical variable name and it can be displayed in decimal or hex format as shown in Figure 5-12. The icons on the tool bar are: : Display the value in hex format. : Display the value in decimal format. 5.5.2: Save to/ Read from File Plot view provides possibility to save and read graphic data to and from file. The format of file can be text file (*.txt), bitamp file (*.bmp) and gpp file (*.gpp). Saved text files contain values of each physical variable. In a bitmap file, graphic of the curves is saved. And gpp file is a special format that can only be opened by Plot view. Thus, if the user wants to reopen captured data in Plot view in the future, ggp format must be selected. : Save data in text format. : Save data in bmp format. For saving in gpp format, there is no icon, the user can find Save or Open under File menu. It is shown in Figure 5-17. . HIWIN Mikrosystem Corp. 83 mega-fabs D1 Drive User Guide Drive Tuning Figure 5-17 Save to *.gpp file 5.5.3: Math The Plot view provides math functions such as integration, differentiation, addition and multiplication, etc. for operations on physical values. After applying math operations, new signal is generated and displayed in Plot View. Furthermore, there is another feature of statistics with which maximum/minimum values can be shown. And frequency analysis for signals is also available. Statistics table Click the icon to open the table as shown in Figure 5-18. It displays maximum/minimum, average, rms values, Rip, RipA in the selected range for each physical value as shown in Figure 5-18. The picture of the table is below: : Maximum/minimum, rms and ripple values calculation of signals. Figure 5-18 Statistics table HIWIN Mikrosystem Corp. 84 mega-fabs D1 Drive User Guide Drive Tuning Math Operations The user can find math operation under tools pop-up menu or click the to open the window. See Figure 5-19. An example of add operation is shown here. Click the Linear radio button, and select signal names pos_err and vel_fbf under Plot1 and Plot2. Give a name (here lin_1) in the input field of New plot name and set its color if required, then click Create button to perform math operation on the two selected signals. See Figure 5-20. Other math operations are used in a similar way. : Math calculation operation Figure 5-19 Figure 5-20 Fast Fourier Transform (FFT) Click the icon on the tool bar to open the window. See Figure 5-21. Select the physical values on which to apply FFT. For example, select pos_err then click Run FFT to start the transformation and generate the curve. See Figure 5-22. To terminate Fourier transformation view, click the button. HIWIN Mikrosystem Corp. 85 mega-fabs D1 Drive User Guide Drive Tuning : Execute FFT : Terminate FFT view Figure 5-21 Figure 5-22 Natural Logarithm Scale Under FFT view, there is an option for displaying the horizontal axis in Natural logarithm scale. It is not available under non-FFT view. : Click this to switch to logarithmic scale. HIWIN Mikrosystem Corp. 86 mega-fabs D1 Drive User Guide Drive Tuning 5.6: Advanced Gains The main tasks of the drive is to provide a good performance of the motor from the beginning to the target, namely Move time and Settling time (Please refer section 2.7:).Such as, the position error of movement is smaller or not, and the velocity is smooth or not. We can improve the performance by tuning the gain and parameters.To tune Common Gain is the simplest way to enhance the performance of the motor. More common gain brings more stiffness which can cause the vibration and electrical noise of system based on the different machines. Advance Gains Common Gain Figure 5-23 Performance center If Common Gain cannot reach performance requirements, the D1 drive also provides advanced gain adjustment functions (Advanced Gains) including Filter, Acc feedforward, Gain Schedule, Analog input and Current loop for user to fine tune. 5.6.1: Filter The filter is embedded into the servo control loop. The main purpose is to eliminate system high frequency vibration and restrict improper resonance frequency of system. So, using the filter can improve system performance. The D1 drive provides two filters which can be used at the same time and configured as low pass filter and notch filter. Frequency analysis is usually used to analyze system characteristics for filter design. Click the button as shown in Figure 5-24 to open the window of bode plot simulation for filter design. The settings of the two common used filters are below: HIWIN Mikrosystem Corp. 87 mega-fabs D1 Drive User Guide Drive Tuning Figure 5-24 Filter Low Pass Filter A typical setting of low pass filter is shown below: Fr: Cut-off frequency and the unit is Hz. In general 500Hz of setting Fr usually makes good effect. In another condition it could be lowered but may come to worse performance due to Fr being too low. xi: damping ratio. The range is in between 0 and 1. k1: 0 k2: 0 Figure 5-25 Low pass filter HIWIN Mikrosystem Corp. 88 mega-fabs D1 Drive User Guide Drive Tuning Notch Filter If the system has resonance frequency(the range from 10 to 250 Hz)and can’t be improved by adjusting the mechanism. The user can add a proper notch filter to eliminate the resonance, and configure by the result of frequency analysis. Please refer to 5.6.3: the frequency analysis. A typical Notch filter setting described below: Fr: Cut-off frequency and unit is Hz. xi: Damping ratio and range is in between 0 to 1. Damping ration closed to 0 comes to narrow bandwidth. Damping ration closed to 1 comes to wide bandwidth. k1: 0 k2: 1 Figure 5-26 Notch filter HIWIN Mikrosystem Corp. 89 mega-fabs D1 Drive User Guide Drive Tuning 5.6.2: Acc Feedforward In the servo control system, the more moving mass/rotation inertia will cause more position error during the section of acceleration and deceleration. The user can add acceleration feedforward to reduce the position error. Figure 5-27 Acc feedforward The adjustment of acceleration feedforward steps are described below: Step1. Click the “Set scope” button to display Oscilloscope screen. Step2. Set “Acc feedforward gain” to zero as shown Figure 5-27. Step3. Make the motor move with the desired maximum acceleration. Step4. Write down the maximum Command Current during accelerating. As shown in Figure 5-28, command current is 16 in accelerating. Figure 5-28 is showing graphs displaying on the Scope at the start of the move. Using “Toggle scopes windows (Page Up)” button can switch to all graphs drawn in one plot chart. Repeat this button can switch sequentially the graphs of Command Current, Reference Acceleration and Position Error for convenient observation. Step5. Write down the maximum value of reference acceleration in accelerating. For example shown in Figure 5-28, the reference acceleration is 950000counts/s2. HIWIN Mikrosystem Corp. 90 mega-fabs D1 Drive User Guide Drive Tuning Command Current is 16 Switch Graphs in Scope Reference Acceleration is 950000count/s^2 Position Error is 90count Figure 5-28 Motion Parameters Step6. Using the result in step4 to be divided by the result in step5, that is Acc feedforward gain = Command Current/Reference Acceleration then get 16/950000=1.68421e-5. Step7. Input the result in step6 into Acc feedforward gain as shown in Figure 5-29. Figure 5-29 Acc feedforward gain Step8. Check if the position error is decreased as showing in Figure 5-30. It can be found that position error is reduced from 90 counts as shown in Figure 5-28 to 65 counts. Position Error is 65count Figure 5-30 Add acceleration feedforward gain HIWIN Mikrosystem Corp. 91 mega-fabs D1 Drive User Guide Drive Tuning 5.6.3: Schedule Gains and velocity loop gain (vpg) Schedule Gains A movement can be divided into three phases (Refer to section 2.7:): Move: From the beginning to the end of dictated profile. Settling: From the end of dictated profile to the trigger of in position. In-Position: When the position error is less than the target radius during debouce time.Then in-position signal will be triggered. The main purpose of the gain schedule is to adjust the Common Gain during three motion stages (Move, Settling, In position), it can achieve the rigidity of desired output.The adjustment of gains utilizes proportional way.when set to 1 indicates that used the original Common Gain,and then set to less than 1 indicated the Common Gain decrease during this stages. Parameters corresponding to each stage: Move: sg_run Settling: sg_stop In position: sg_idle Assume Common Gain=0.5, sg_run=1.2, the actual Common Gain becomes 0.6(0.5*1.2=0.6) during move stage.The setting of settling and in-position are the same way. The user can adjust the proper Schedule Gain to implement in different situation. Figure 5-31 Schedule Gain Velocity Loop Gain (vpg) Velocity loop gain is an internal control parameter of the D1 drive. The initial value is usually calculated by the parameters the user set in Configuration center. In general it is unnecessary to be modified, but the user can re-adjust it by Freq analyzer as pictured below: HIWIN Mikrosystem Corp. 92 mega-fabs D1 Drive User Guide 5.6.3.1 Click the Drive Tuning button to display the below window. Figure 5-32 Freq analyzer 5.6.3.2 Click the button to enable motor.. 5.6.3.3 Click the button to start frequency analysis. The motor vibrates at low frequency and shouts at high frequency. After completed, the frequency response will be plotted in the screen. Figure 5-33 Frequency response 5.6.3.4 Click the left mouse button on the plot of frequency response then a -20dB cursor line shows up. Drag the cursor line by pressing the left mouse button to close as showing figure below. When dragging the line, the gain will also be recalculated in the meantime and display the value of vpg. To drag the cursor line to the bottom of screen will increase the gain. Otherwise the gain will be reduced. HIWIN Mikrosystem Corp. 93 mega-fabs D1 Drive User Guide Drive Tuning Vpg: Automatically calcuated Cursor line Frequceny response line Figure 5-34 Freq analyzer Click the button to send Velocity Loop Gain to the drive. In order to conserve it, saving it into flash memory in the drive is necessary to be done. 5.6.4: Analog Input Bias Correction In voltage mode voltage command is sent from controller and there may be DC bias containing. This DC bias has deviation of command. The D1 drive has a compensation function inside to correct it. Click the 5-35 below. button to automatically measure and correct offset as shown Figure Figure 5-35 Analog Input HIWIN Mikrosystem Corp. 94 5.6.5: Current Loop After selecting motor type in the Configuration Center, the motor parameters have been used to calculate current loop gain (Ki and Kp). However, if the motor parameters are not set correctly, this function also can be used to adjust current loop gain of this motor. The low pass filter should be set according to the result of frequency response. Higher current loop gain tuned brings the noise of motor. The low pass filter can be set at small frequency (for example, 500Hz) to restrict the noise. Figure 5-36 Cuurrent Loop 5.7: Encoder Signal Checks The encoder plays as key component in the motor servo control. It provides motor position or angle information to achieve servo loop control. In the D1 drive encoder output signal can be confirmed if normal or not by GUI. 5.7.1: Encoder test/tune Click on in the Performance center window or select Encoder test/tune item in the pop-up menu of Tools on the main menu. Open the window for checking the encoder signal or feedback position value is ok or not. By using digital or analog encoder will see different functional window as shown in Figure 5-37 and Figure 5-38. Figure 5-37 Digital Encoder HIWIN Mikrosystem Corp. 95 Mega-fabs D1 Drive User Guide Amplifier Tuning Figure 5-38 Analog Encoder 5.7.2: Encoder Feedback Position Check Digital and analog encoder signals are phases which differ from digital pulse and the sine wave signal. In the D1 drive this function can determine encoder feedback position value. For example, when pushing the motor by specific distance, encoder feedback position value can be observed and checked if it is the same as the distance which the motor actual move. When an analog encoder is used, the original signal can be observed if it is normal by Lissajous circle which is described in more detail in section 5.7.4:. 5.7.3: Index Signal Check The encoder Z-phase signal as index signal can be confirmed by index light as shown in Figure 5-37 and Figure 5-38. When the D1 drive receives encoder Z-phase signal, the index light will blink green color on the screen. 5.7.4: Lissajous Circle When using an analog encoder, it is observed encoder signal if it is normal by the quality of Lissajous circle shown on the screen. In general, the analog encoder signal should be displayed as a perfect circle which the radius between 977.4 and 1954.8. If the circle is too large or too small, the signal needs to re-adjust. Using the adjusting function, moving the motor is necessary to plot a complete Lissajous circle as showing Figure 5-38. Otherwise, only a spot shown on the screen means the motor will not move. In addition, once the amplitudes of the analog encoder signals are different, the Lissajous circle will be shown as a non perfect circle. Further more, zero level offset also causes the circle not locating at the origin of the chart in Figure 5-38 .In these cases check the Tune button to adjust the amplitude of analog encoder signal and zero level offset. Using this function it is necessary to make encoder output over 10 grating periods by motor move slowly. HIWIN Mikrosystem Corp. 96 Mega-fabs D1 Drive User Guide Amplifier Tuning 5.8: Error Map The position accuracy of the linear motor is usually determined by encoder. In general, using the laser interferometer to measure and calibrate the position accuracy for making the position error table. The D1 drive provides an error compensation function. According to an error table which is input to the drive by GUI D1 drive calculates the compensation values by linear interpolation in the fixed distance to increase position accuracy. After position accuracy measurement and error table made, compensation interval and total points should be configured values in the table. 5.8.1: Error Map Operation Building the error map function in the D1 drive are the steps below: 5.8.1.1 Click the button on the tool bar in main window or select Error map item of pup-up menu of Conf/Tune in the main menu to open the window as showing Figure 5-39. Get/Send Flash Open/Save files Each position error map value Error map Trending Figure 5-39 Error Map Window 5.8.1.2 Configure compensation interval and total points. Inputs error compensation values in the error table as well. The unit can be set to be different as requirements. For example, in Figure 5-40 compensation range is 0~1000mm, compensation interval 100mm and total points 11 points. The error values come from the position accuracy measurement by laser interferometer and each value calculated by the positioning error of HIWIN Mikrosystem Corp. 97 mega-fabs D1 Drive User Guide LCD Operations target position. Such as target position is 100mm and 100.002mm measured from laser interferometer to come up with the error value 0.002mm. Data different from flash Figure 5-40 Configurations of Error Map Parameters 5.8.1.3 Click ; make the error map to work. 5.8.1.4 Select ‘’Flash->Send table to flash’’ on Error map window of menu. The message window will spring up when parameters modified or not saved in flash yet. Otherwise, go to the step 5.8.1.6. Error map value in RAM is different from Flash now. If click on''Continue''to save error map value into Flash and drive will be Reset action, and lost motor parameter. 5.8.1.5 Click the Cancel button then back to main window to save motor parameter in the flash. After saved, back Error map window and start the step 5.8.1.4. 5.8.1.6 The confirm window spring up. Click ‘’OK‘’to save error map parameters into Flash and drive will be reset automatically. HIWIN Mikrosystem Corp. 98 mega-fabs D1 Drive User Guide LCD Operations 5.8.2: Error Map Activation After completing the configurations of error map parameters, the drive is capable of error compensation. When homing motor is completed, the drive activates the error map function. There are 2 methods to make motor homing as followed. Homing by Host Controller Example: set I2 ”Home OK, start err. map” like Figure5.41 (Please refer to section 4.4:). After sending motion command as pulse or voltage to drive for moving motor then stop motion command while motor at home position, and host controller should send output to trigger I2 of drive digital input port for confirmation of homing complete to drive. Figure 5-41 Home I/O Set Homing in Stand-Along Mode Open the window of the Performance Center and click the refer to section 5.2:) button do homing. (Please Confirmation of Error Map Activation There is a status indicator to show if the error map function is activatived in the window of Error map. The light of Error map active ( ) showing light green means map activation error. HIWIN Mikrosystem Corp. 99 mega-fabs D1 Drive User Guide LCD Operations 5.8.3: Save and load Error Map Values The error map values can be saved into the disk and loaded from the disk as shown in Figure 5-42 below. According to step 5.8.1.4 in section 5.8.1:, the user can select “Send table to flash” to save the error table to flash memory. But this function is different from “Save to flash” in main window. Using “Save to flash” in main window cannot save error table to flash. Figure 5-42 5.8.4: Error Map Value and Encoder Resolution The error map values inputted in the table are converted automatically by rounding off to the values of integral multiples of encoder resolution. For example, if the encoder resolution is 2μm, 1 um of error map value input in the table is converted to 2um and 0.5um of error map value input in the table converted 0μm. HIWIN Mikrosystem Corp. 100 mega-fabs D1 Drive User Guide LCD Operations 6: LCD OPERATIONS This chapter mainly describes LCD panel display and operation procedures: Title Page 6.1: Display Panel Introduction .................................................................................................................................................. 102 6.2: Four Modes of LCD ............................................................................................................................................................ 102 6.3: Home Page......................................................................................................................................................................... 103 6.4: Display Parameters Page ................................................................................................................................................... 105 6.5: Change Parameters Page .................................................................................................................................................. 107 6.5.1: SAVE TO FLASH ................................................................................................................................................... 108 6.5.2: Configure Parameters ............................................................................................................................................ 109 6.5.3: Non-numeric Parameters Change .......................................................................................................................... 111 6.5.4: Advenced Parameters Settings .............................................................................................................................. 113 6.6: Actions Page ...................................................................................................................................................................... 117 6.6.1: Enable/Disable (ENA/DIS) ..................................................................................................................................... 118 6.6.2: JOG ....................................................................................................................................................................... 119 6.6.3: Absolute Motion (MOV2POS) ................................................................................................................................ 120 HIWIN Mikrosystem Corp. 101 mega-fabs D1 Drive User Guide LCD Operations 6.1: Display Panel Introduction ENABLED Display panel Up key ENTER key LED status indicator Down key Name Display panel Up key Down key F key LED status indicator ENTER key Cursor F key Function Display modified values of parameters, status, parameters and motion. Select options and set values of parameters or do jog motion. Select options and set values of parameters or do JOG motion. Switch in between 4 modes and switch process of edit mode during setting values of parameters. Display of the drive status. Refer to section 9.1.1:. Enter the options of status display, save configured parameters and motion confirmation input. Static cursor: Dash line. Parameters are configurable. Dynamic cursor: Cursor of flashing solid black. Parameters in configuring /continuous motion (Jogging)。 No cursor: Display parameters only. 6.2: Four Modes of LCD There are 4 modes of panel display including Home Page, Display Parameters Page, Change Parameters and Action Page. It can be switched to other modes when pressing the F key. The structure of LCD operation is shown in Figure 6-1. Home Page: Display servo status of drive, error messages or warning messages and motor status (Phase initialization, motor movement, homing and error mapping), etc. Display Parameters Page: Display parameters of motor feedback position, position command, following error, feedback velocity, velocity command and I/O status. Change Parameters Page: This is used to change the parameters of common gain(CG), velocity proportional gain(VPG), phase initialization gain(ST_CG), operation mode, pulse format and save parameters in memory into FLASH. There are over 100 advanced parameters to be configured. Actions Page: Enable or disable motor, JOG motion and move to absolute target position. HIWIN Mikrosystem Corp. 102 mega-fabs D1 Drive User Guide LCD Operations Figure 6-1 LCD Operation Structure 6.3: Home Page The display panel firstly displays enable status of the drive when the drive power is on. When the D1 drive detects occurrence of an error, error messages or warning messages will be displayed on the second line as shown in Figure 6-2. The definitions of the display labels are listed in table 6-1 and 6-2. DISABLED Occurance of error DISABLED E01SHORT HIWIN Mikrosystem Corp. ENABLED Occurance of warning ENABLED W01 HWLL 103 mega-fabs D1 Drive User Guide LCD Operations Figure 6-2 Error and warning display Table 6-1 Descriptions of error display label No. 1 2 3 4 5 6 7 8 9 10 11 Display Label E01SHORT E02OVERV E03PEBIG E04ENCOD E05SWHOT E06UVWCN E07D.HOT E08M.HOT E09UND.V E10V5ERR E11PHINI Lightening Display Error Message Motor short (over current) detected Over voltage detected Position error too big Encoder error Soft-thermal threshold reached Motor maybe disconnected Amplifier over temperature Motor over temperature sensor activated Under voltage detected 5V for encoder card fail Phase initialization error Table 6-2 Descriptios of error display label No. 1 2 3 4 5 6 7 8 9 10 11 Display Label W01SWLL W02SWRL W03HWLL W04HWRL W05SVBIG W06PE W07VE W08CUR.L W09ACC.L W10VEL.L W11BOTH Lightening Display Warning Message Left SW limit Right SW limit Left HW limit Right HW limit Servo voltage big Position error warning Velocity error warning Current Limited Acceleration Limited Velocity Limited Both HW limits are active In addition, pressing the key on the first page of the display panel can enter display servo status. Press the up or down key to switch different display status. The operation procedure is shown in Figure 6-3. For example, OFF displayed in the page of PHAS INI means incomplete phase initialization and ON is displayed to represent complete phase initialization. HIWIN Mikrosystem Corp. 104 mega-fabs D1 Drive User Guide LEVEL ONE LCD Operations LEVEL TWO PHAS INI OFF Phase initialization status MOVING OFF Motor in motion HOMED Homing complete ENABLED OFF ERR. MAP OFF Error mapping Figure 6-3 Flow chart of status display mode 6.4: Display Parameters Page In the display parameters page press the up or down key to switch different parameters which will change their values. The operation procedure is shown in Figure 6-4. Each displayed label definition is listed in the table 6-3. The first column is the parameter name and the second one is its value. HIWIN Mikrosystem Corp. 105 mega-fabs D1 Drive User Guide LCD Operations Figure 6-4 Flow chart of display parameters page Table 6-3 Descriptions of parameters in display parameters page Label 01FB POS 02RF POS 04POSERR 10FB VEL 11RF VEL 12VELERR 30ACTCUR 31CMDCUR 40ANACMD 41DC BUS 50AMPTEM 61 I1 62 I2 63 I3 64 I4 65 I5 66 I6 67 I9 68 I10 69 I11 70 I12 81 O1 82 O2 83 O3 84 O4 Physical variable Feedback Position Reference Position Position Error Feedback Velocity Reference Velocity Velocity Error Actual Current Command Current Analog Command Bus Voltage Amplifier Temperature I1 I2 I3 I4 I5 I6 I9 I10 I11 I12 O1 O2 O3 O4 HIWIN Mikrosystem Corp. Description Motor feedback position Position command Following error Motor feedback velocity Velocity command Velocity error Motor actual current Current command Voltage command(from host controller) Line voltage Drive temperature Digital inport 1 Digital inport 2 Digital inport 3 Digital inport 4 Digital inport 5( Motor over temperature signal) Digital inport 6 Digital inport 9(Pluse command) Digital inport 10(Pluse command) Digital inport 11 Digital inport 12 Digital output 1 Digital output 2 Digital output 3 Digital output 4 (Brake signal) Uint Count Count Count Count/s Count/s Count/s A_amp A_amp Volt Volt ℃ 106 mega-fabs D1 Drive User Guide LCD Operations 6.5: Change Parameters Page In the change parameters page press the up or down key to switch different parameters which will be changed its value. The operation procedure is shown in Figure 6-5. The details of the operation method are described in the next section. Static cursor SAVEFLSH NO CG 0.3 VPG 1.61e-05 ST_CG 0.3 Save parameters in memory of drive to flash Common gain setting Velocity proportional gain setting Phase initialization gain setting MODE STNDALON Operation mode setting. Refer to section 4.2.4 PULSMODE P/D Pulse format setting ADVANCED 0 Advanced parameters modification Notice: 1. Static cursor: Parameter is configurable 2. Dynamic cursor: Parameter in configuring/continuous motion(Jogging) 3. No cursor: Display parameters only. Figure 6-5 Flow chart of change parameters page HIWIN Mikrosystem Corp. 107 mega-fabs D1 Drive User Guide LCD Operations 6.5.1: SAVE TO FLASH The following procedure is the way to save parameters in memory to flash in the drive: (1) Press the ENTER key to enter SAVEFLSH item. (A flashing cursor will be at left side of second column) (2) Press the up or down key to select YES or NO to save parameters in memory to flash in the drive. Select YES to go to next. (3) When the servo is disabled (DISABLE), pressing the ENTER key will show PROCESS Message. It means saving parameters into flash is under proceeding and FINISH! A message will be displayed after completed. The operation procedure is shown in Figure 6-6. When servo is enabled (ENABLE), pressing the ENTER key will show an error message of DO DISBL and no parameters be saved to the flash. Servo disabled should be done for forward this operation and its procedure is shown in Figure 6-7. LEVEL ONE LEVEL TWO SAVEFLSH NO SAVEFLSH NO Dynamic cursor SAVEFLSH YES SAVEFLSH PROCESS. No reaction for pressing any key in the duration of “PROCESS.” Displaying. Wait 2 seconds SAVEFLSH FINISH ! No reaction for pressing any key in the duration of “FINISH !” displaying. Wait 2 seconds Figure 6-6 Flow chart of SAVE TO FLASH (When the motor is disabled) HIWIN Mikrosystem Corp. 108 mega-fabs D1 Drive User Guide LEVEL ONE LCD Operations LEVEL TWO SAVEFLSH NO SAVEFLSH NO SAVEFLSH YES Wait 2 seconds SAVEFLSH DO DISBL Displaying “DO DISPLAY” message to represent motor currently enabled and couldn’t save parameters to flash. Disable motor should be done first than save to flash. Figure 6-7 Flow chart of SAVE TO FLASH(When motor enabled) 6.5.2: Configure Parameters The configurable parameters in the drive like CG, VPG, and ST_CG etc which is assigned a number as its value could be configured using configure parameters function of LCD. In configure parameters page up and down keys are used to move cursor or switch numbers. Press the F key to switch this function. The coming introduction is for the operation procedure of the Common gain (CG) modification. Any configurable parameter could be operated as this procedure to do modification. First the common gain will be changed from 0.5 to 1.2. For example, after entering the COMMON GAIN menu, follow the below sequence. To do parameter modification and operation, the procedure is shown in Figure 6-8. (1) Press ENTER to enter CG configuration mode. (A flashing solid cursor will be at left side of second line) (2) Press the down key once to move the flashing cursor to ‘0’ position. (3) Press the F key once. (Switch the function of up/down key to numeric parameters modification) (4) Press the up key twice until the number changes to ‘1’ then release it. (5) Press the F key once. (Switch the function of up/down key to move cursor) (6) Press the down key twice to move the flashing cursor to ‘5’ position. (7) Press the F key once. (Switch the function of the up/down key to numeric parameters modification) (8) Press the down key twice until the number changes to ‘2’ then release it. (9) Press the ENTER key to done of COMMON GAIN changed to 1.2. Note: There are two notes while using configure parameters function of LCD. (a) Keep pressing the F key for less than 1 second to switch the function of up/down key to move the cursor or switch number. (b) Keep pressing the F key over 2 seconds to go back to LEVEL ONE and abort currently modified values. HIWIN Mikrosystem Corp. 109 mega-fabs D1 Drive User Guide LEVEL ONE LCD Operations LEVEL TWO Make up/down key be used for move cursor. CG 0.5 CG 1.5 CG 0.5 Press it twice to move the cursor rightward 2 columns. CG 1.5 CG 0.5 Make up/down key to be used for switching numbers. Make up/down key to be used for switching numbers. CG 1.5 CG 0.5 CG 1.5 Press it twice until ‘1’ is displayed then release it. (001) Press it twice unitl ‘2’ displayed then release it. (5432) CG 1.2 Note: Refer to figure 6-8-A to see procedure of numeric parameters. CG 1.2 Figure 6-8 A example of COMMON GAIN of flow chart of configure parameters以COMMON GAIN HIWIN Mikrosystem Corp. 110 mega-fabs D1 Drive User Guide LCD Operations (空格) 0 G 1 . 5 e 1 . 5 G 1 G 1 . 5 2 G 1 . 5 - 1 . 5 3 G G 1 . 5 1 . 5 . 4 G 1 . 5 6.5.3: 9 5 1 . 5 1 . 5 8 6 1 . 5 1 7 1 . . 5 1 5 Figure 6-9 Sequence of switch number in configure parameters . Non-numeric Parameters Change5 It can be changed on operation mode of the drive and formats of the drive receiving pulse from the host controller via the function of non-numeric parameters change. Operation Mode Following is how to change operation mode and the operation procedures由are shown as Figure 6-10: (1) After pressing the ENTER key, enter the change mode of non-numeric parameters. (A flashing solid cursor is at left side of second line) (2) Press the up or down key to select Position, Velocity, Force/Torque (Current) or Stand-Along mode. (3) After selected, press the ENTER key to complete the setting. HIWIN Mikrosystem Corp. 111 mega-fabs D1 Drive User Guide LEVEL ONE MODE POSITION LCD Operations LEVEL TWO MODE POSITION CURRENT Position mode MODE VELOCITY Velocity mode or MODE VELOCITY or MODE CURRENT MODE CURRENT Force/Torque mode MODE STNDALON Stand-Along mode or MODE STNDALON Figure 6-10 Flow chart of operation mode Pulse Format Following is how to change pulse format. Operation procedures are shown as Figure 6-11: (1) After pressing the ENTER key, enter change mode of non-numeric parameters. (A flashing solid cursor is at left side of second line) (2) Press the up or down key to select control input commands including Pulse and direction, Pulse up/Pulse Down and Quadrature. (3) After selected, press ENTER to complete the settings. HIWIN Mikrosystem Corp. 112 mega-fabs D1 Drive User Guide LEVEL ONE LCD Operations LEVEL TWO PULSMODE CW/CCW PULSMODE CW/CCW CURRENT PulseUp/ Pulse Down PULSMODE AqB Quadrature PULSMODE P/D Pulse and Direction or PULSMODE AqB or PULSMODE P/D Figure 6-11 Folw chart of change pulse format 6.5.4: Advanced Parameters Settings Following is how to change the settings of advanced parameters. Operation procedures are shown as Figure 6-13: (1) After pressing the ENTER key, enter the ADVANCED parameters page. (A flashing solid cursor is at the left side of second line) (2) Password has to be input to enter advanced parameters settings. Please refer to section 6.5.2: Configure Parameters. (3) After password input, there are over one hundred parameters including codes of parameters for user change as shown in table 6-4. To display password is shown as Figure 6-12. LCD password Figure 6-12 Display and setting of password HIWIN Mikrosystem Corp. 113 mega-fabs D1 Drive User Guide LCD Operations LEVEL ONE LEVEL TWO SAVEFLSH NO ADVANCED 1005 ADVANCED 0 Input password and its default is”1005”. Please refer to section 6.5.2:Configure Parameters. ADVANCED 1005請參考。 0 4.13e+07 1 4.13e+07 1 4.13e+07 Please refer to section 6.5.2: Configure Parameters to do parameter configuration. 2 4.13e+08 161 3 Advanced parameters Figure 6-13 Flow chart of advanced parameters settings HIWIN Mikrosystem Corp. 114 mega-fabs D1 Drive User Guide LCD Operations Tale 6-4 Table of advanced parameters No 0 1 2 3 4 5 6 7 8 12 13 14 15 16 17 18 19 20 21 22 23 24 25 26 27 28 29 30 31 32 33 35 36 Parameter X_acc X_dcc X_dcc_kill X_vel_max X_sw1_pos X_sw2_pos X_p2p_del X_p2p_pos1 X_p2p_pos2 X_Aenc_sin_g X_Aenc_cos_g X_Aenc_s_ofs X_Aenc_c_ofs X_sof_fr X_sof_xi X_sof_k1 X_sof_k2 X_nf_fr X_nf_xi X_nf_k1 X_nf_k2 X_f1_fr X_f1_xi X_f1_k1 X_f1_k2 X_f2_fr X_f2_xi X_f2_k1 X_f2_k2 X_Upi_kp X_Upi_ki X_Vpi_kp X_Vpi_ki 38 X_Aenc_th 39 40 42 43 X_index_vel X_index_tout out_xor X_cntperunit 44 45 46 X_pitchScrew X_enc_360 X_sm_ampl HIWIN Mikrosystem Corp. Definition Maximum acceleration Maximum deceleration Deceleration for emergency stop Maximum velocity Negative software limit Positive software limit Dewell time in point to point moment Position1 of point to point moment Position2 of point to point moment Sin signal gain of analog encoder Cos signal gain of analog encoder DC offset of sin signal of analog encoder DC offset of cos signal of analog encoder Cut-off frequency of filter1 for enable by SW method 1 to enable ratio of filter1 for enable by SW method 1 Damping Parameter of filter1 for enable by SW method 1 Parameter of filter1 for enable by SW method 1 Cut-off frequency of filter2 for enable by SW method 1 to enable ratio of filter2 for enable by SW method 1 Damping Parameter of filter2 for enable by SW method 1 Parameter of filter2 for enable by SW method 1 Cut-off frequency of filter1 in closed loop Damping ratio of filter1 in closed loop Parameter of filter1 in closed loop Parameter of filter1 in closed loop Cut-off frequency of filter2 in closed loop Damping ratio of filter2 in closed loop Parameter of filter2 in closed loop Parameter of filter2 in closed loop Current loop proportional gain (D axis) Current loop intergral gain (D axis) Current loop proportional gain (Q axis) Current loop intergral gain (Q axis) Protection value for squre of minimum radius of Lissajous circle of analog encoder Velocity for finding index Homing is stopped by index finding time over this value Setting of output voltage inversion of digital output Number of counts for motor move unit distance. Number of counts per 100mm for linear motor moment. Number of counts per revolution for rotary motor rotation. Lead of ball screw (mm). For AC servo motor only. Pole pitch of Linear motor Enable current for phase initialization Unit count/s2 count/s2 count/s2 count/s count count msec count count Hz Hz Hz Hz count/s 66.67μs - mm count (A_amp×1000)/36 115 mega-fabs D1 Drive User Guide LCD Operations No 47 48 49 50 51 53 59 64 65 66 67 68 69 70 71 72 74 75 Parameter X_enc_360_div X_st_vpg X_st_cg X_max_err X_curr_mot_peak X_curr_mot_cont X_vpg X_affg X_CG X_sg_run X_sg_idle X_sg_stop X_Ucf_fr, X_Ucf_xi X_Vcf_fr X_Vcf_xi X_tr_time X_tr Definition Pole pair number of rotary motor Velocity proportational gain for enable by SW method 1 Common gain for enable by SW method 1 Limitation value of maximum following error Motor peak current Moor continuous current Velocity proportional gain in closed loop Acceleration feedforward gain in closed loop Common gain Gain in moment phase of Schedule Gains Gain in in-position phase of Schedule Gains Gain in settle phase of Schedule Gains Cut-off frequency of filter in current loop (D axis) Damping ratio of filter in current loop (D axis) Cut-off frequency of filter in current loop (Q axis) Damping ratio of filter in current loop (Q axis) Debounce time of In-Position Target radius of In-Position 76 X_forceConstant Force/Torque constant 77 78 79 80 81 82 X_mass X_mInert X_gearRatyio Vcmd_offs X_cmd_ext_N X_cmd_ext_M Load mass of linear motor Moment inertia of rotary motor Gear ration of AC servo motor Offset adjustment of analog command Numerator of electronic gear ratio (Output) Denominator of electronic gear ratio (Input) 83 X_cmd_ext_v_sc Velocity command ratio. 1 input voltage corresponds to rotary speed. count/s=1V 84 X_cmd_ext_v_dz Dead band of velocity command. Velocity command is 0 for input voltage less than setting. Volt 85 X_cmd_ext_i_sc Current command ratio. 1 input voltage corresponds to current. (A_amp×1000)/36 =1V 86 X_cmd_ext_i_dz Dead band of current command. Current command is 0 for input voltage less than setting. Volt 88 89 90 91 92 93 94 95 112 113 114 115 116 X_pos_err_warn_win X_vel_err_warn_win X_Resistance X_Inductance X_ vel_stop X_delMaxEnToBrk X_delBrkToDis X_index_offs X_Aenc_sgn X_Aenc_mode X_Aenc_mulFac X_new_sm_fac in_xor Warning of following error Warning of velocity error Resistance (line to line) of motor coils Inductance (line to line) of motor coils Velocity to activated brake Delay time of brake activation Brake function time Index offset Encoder direction Encoder type (Analog/Digital) Interpolated factor of analog encoder Smooth factor Logic inversion of digital input count Count/s ohm mH count/s 66.67μs 66.67μs count - HIWIN Mikrosystem Corp. Unit count A_amp A_amp Hz Hz 66.67μs count N/A_amp Nm/A_amp Kg Kg*m^2 Volt - 116 mega-fabs D1 Drive User Guide No 123 124 125 126 128 129 130 131 132 133 134 135 136 137 138 139 140 141 142 143 144 145 146 147 148 149 150 151 152 153 154 155 156 157 158 159 160 Parameter X_hall_mode pullupdn X_rotaryType X_st_phase X_oper_mode X_pulse_mode X_pulse_dir X_fall_rise X_cmd_pwm_mode out_config[0] out_config[1] out_config[2] out_config[3] out_config[4] out_config[5] out_config[6] out_config[7] out_config[8] out_config[9] out_config[10] out_config[11] out_config[12] out_config[13] out_config[14] out_config[15] X_StIdenext X_StIdRL X_StIdLL X_StIdmotTOvr X_StIdhome X_StIdOutBrake X_sw_pos_prot_en X_hw_lim_prot_en X_emu_N X_emu_M X_emap_en X_StIdReset LCD Operations Definition Hall sensor type Signal level of digital input Motor type Motor current inversion Operation mode Pulse format Pulse command inversion Trigger type of pulse command Input command format under velocity and current mote O4 output signal configurations O1 output signal configurations O2 output signal configurations O3 output signal configurations O3 output signal configurations Setting of hardware enable signal Setting of hardware right limit signal Setting of hardware left limit signal Setting of motor over temperature signal Setting of Home complete command from host controller Setting of brake signal On/off software limit On/off hardware limit Numerator of ratio of emulated encoder output Denominator of ratio of emulated encoder output On/off Error map Setting of drive reset signal Unit - 6.6: Actions Page In the actions page it provides the functions of enable/disable, jog and absolute motion to user. The user also can set velocity and target position and press up or down key to change action will be performed. The operation procedure is shown as Figure 6-14. The operation in details is described in the next section. HIWIN Mikrosystem Corp. 117 mega-fabs D1 Drive User Guide LCD Operations ENA/DIS ENABLED Enable/Disable JOG -8 MOV2POS -8 VEL_LCD 5e+05 MOV POS 0 Jog Activate absolute motion to move to the target position. Velocity for Jog/ move to position (Unit: count/s) Assign target position of the function of move to target. Figure 6-14 Flow chart of actions page 6.6.1: Enable/Disable (ENA/DIS) Following is how to select enable/disable. The operation procedures are shown in Figure 6-15: (1) Press the ENTER key to enter ENA/DIS page. (A flashing solid cursor is at left side of second line) (2) Press the up or down key to select ENABLE or DISABLE. (3) After selected, press the ENTER key to complete settings. HIWIN Mikrosystem Corp. 118 mega-fabs D1 Drive User Guide LCD Operations LEVEL TWO LEVEL ONE ENA/DIS DISABLE Disable ENA/DIS ENABLE Enable ENA/DIS DISABLE or ENA/DIS ENABLED Figure 6-15 Operation flow chart of Eable/Disable 6.6.2: JOG Following is how to do jog motion. The operation procedures are shown as Figure 6-16: (1) Press the ENTER Key to enter JOG mode. (A flashing solid cursor is at left side of second line) (2) Press the up or down key to make the motor positive or negative rotation (moment) and feedback position is displayed at the same time. When releasing the key, the motor stops immediately. LEVEL ONE LEVEL TWO Long press up key 01FB POS 323088 (CW) JOG -8 JOG -8 Long press down key Feedback position 01FB POS -65810 (CCW) Feedback position Figure 6-16 Operation flow chart of Jog HIWIN Mikrosystem Corp. 119 mega-fabs D1 Drive User Guide LCD Operations 6.6.3: Absolute Motion (MOV2POS) Following is how to do moment to absolute target position and an example of setting the absolute position 20000 counts: (1) First press the up or down key to select the item of setting absolute position (MOV POS). Please refer to section 6.5.2: to do the settings and target position should be set to 2000. After this, go to the next step. (2) Go to MOV2POS item. After pressing the ENTER key, enter activate motion (Move to target position) item (There is a flashing solid cursor at left side of second line). The operation procedures are shown in Figure 6-17. (3) Press the up key to move motor to absolute position 2000 which is set in MOV_POS. Feedback position (01FB POS) is displayed on LCD panel during motor motion. (4) Press the down key to move the motor to absolute zero position and the feedback position (01FB POS) is displayed during motor motion. (5) Press the ENTER key to go back to LEVEL ONE. Note: When the motor is moving and before to reach target position, if the user presses the up or down key, target position of the motor will be changed. HIWIN Mikrosystem Corp. 120 mega-fabs D1 Drive User Guide LEVEL ONE LCD Operations LEVEL TWO MOV POS 0 MOV POS 0 MOV POS 20 Let up/down key to do switch numbers Let up/down key to do switch numbers ENA/DIS ENABLED MOV POS 0 MOV POS 20 Continuously press 4 times until ‘2’ then release it. (Spacespace012) MOV POS 20 Continuously press twice until ‘0’ then release it. (SpaceSpace0) MOV POS 200 Let up/down key to do switch numbers MOV POS 20 Let up/down key to do switch numbers MOV POS 200 According to the procedures above ((Press F key continuously press up key twice until ‘0’ then release it.) MOV POS 2000 MOV POS 2000 Press twice continuously to move cursor by 2 spaces. Press once to move cursor 1 space rightward. MOV POS 200 Figure 6-17 Operation flow chart of MOV POS HIWIN Mikrosystem Corp. 121 mega-fabs D1 Drive User Guide LEVEL ONE LCD Operations LEVEL TWO MOV2POS 2000 The LCD panel displays feedback position during the move. JOG 01FB POS 1788 -8 MOV2POS 20 Move to target position set in MOV_POS MOV2POS 20 01FB POS 823 VEL_LCD 5e+05 The LCD panel displays feedback position during move. Move to absolute 0 position. MOV2POS 0 Figure 6-18 Operation flow chart of move to target position HIWIN Mikrosystem Corp. 122 7: PROTECTION This chapter mainly describes protections of D1 drive. Contents include: Title Page 7.1: Motion Protection ................................................................................................................................................................ 124 7.1.1: Introduction ............................................................................................................................................................ 124 7.1.2: Max Velocity, Max Acceleration, Max Deceleration Setup ...................................................................................... 124 7.1.3: Cancellation of protections of velocity, acceleration and decleration ...................................................................... 125 7.1.4: Smooth Motion....................................................................................................................................................... 125 7.2: Position and Velocity Error Protection ................................................................................................................................. 125 7.2.1: Position Error Limitation ......................................................................................................................................... 125 7.2.2: Warnings of Position Error and Velocity Error ........................................................................................................ 126 7.3: Brake Output ...................................................................................................................................................................... 126 7.3.1: Introduction ............................................................................................................................................................ 126 7.3.2: Brake/Stop Sequence ............................................................................................................................................ 126 7.3.3: Settings.................................................................................................................................................................. 127 7.4: Limit Switch Settings ........................................................................................................................................................... 127 7.4.1: Introduction ............................................................................................................................................................ 127 7.4.2: Settings.................................................................................................................................................................. 127 7.5: Software Limit Protection .................................................................................................................................................... 128 7.5.1: Introduction ............................................................................................................................................................ 128 7.5.2: Settings.................................................................................................................................................................. 128 7.6: Motor Over-Temperature Protection ................................................................................................................................... 129 7.6.1: Introduction ............................................................................................................................................................ 129 7.7: Soft-Thermal ....................................................................................................................................................................... 129 7.7.1: Introduction ............................................................................................................................................................ 129 7.8: Drive Over-Temperature Protection .................................................................................................................................... 129 7.8.1: Introduction ............................................................................................................................................................ 129 7.9: Regen Resistor (Optional)................................................................................................................................................... 129 7.9.1: Introduction ............................................................................................................................................................ 129 HIWIN Mikrosystem Corp. 123 mega-fabs D1 Drive User Guide Protection 7.1: Motion Protection 7.1.1: Introduction The motion protections of the D1 drive are including max velocity limitation, max acceleration limitation, max deceleration limitation and kill deceleration of motion. When the host controller sends motion commands as pulse or velocity bigger than the protection values set in the drive, motion protections will be activated and limit the motion commands from host controller will not go over the protection values. The D1 drive rests on the different operation modes to have the different protection. The available parameters of each operation mode are below. Limitation operation mode Position Mode Velocity Mode Force/Torque Mode Stand-Alone Mode velocity acceleration deceleration kill deceleration O O O O O O X O O O X O O O X O Note: Mark O means the parameters support the protection. Mark X means the parameter is useless. 7.1.2: Max Velocity, Max Acceleration, Max Deceleration Setup Click the icon to open the window of “Performance center” then the interfaces of motion protection will be shown as the figure below. Figure 7-1 Parameter Speed Acc. Dec. Dec. kill Smooth foctor Description Limitation of max velocity of motor motion Limitation of max acceleration of motor in accelerating Limitation of max acceleration of motor in decelerating The deceleration for emergency stop Parameter of smooth motion Further, after clicking the icon on the tool bar to open the window of Application center, there is an area named Motion Protection the display area of the same setting of motion protection in the Protection page in the window. HIWIN Mikrosystem Corp. 124 mega-fabs D1 Drive User Guide Protection Display only Figure 7-2 The user can set the maximum velocity, acceleration and deceleration in the column of Motion Protection and set the unit depending on demand in the area of Position Unit as the showing Figure 7-2. These settings are not only for motion protection but also for the motion parameters in motor running test. After used the motion functions (P2P, Relative move and JOG) in Performance center, user has to check the settings in Motion Protection are the values for the purpose of motion protection. In order to avoid the motion protection, the user has to multiply the original values of acceleration and deceleration by 10 when operation mode is selected to position or velocity mode. If ignored, this confirmation motor may not reach expected velocity and acceleration/deceleration when the motion command is sent by the host controller. 7.1.3: Cancellation of protections of velocity, acceleration and deceleration In the position mode smooth factor set to zero deactivates velocity, acceleration and deceleration protections to drive motor with the command velocity, acceleration and deceleration from host controller. The user can decide to use motion protection function depending on requirements. 7.1.4: Smooth Motion Smooth factor is set for the purpose of reducing the force impact on the load by motor in accelerating and decelerating. The value of smooth factor is limited in 1~500. Bigger value represents less force impact and the value of 1 for deactivate. Increasing the value of smooth factor brings better performance that setting time will be better due to the reduced force impact by motor. But, more smooth motion will increase move time. Please see the section 2.4.4: that introduces more details. The proper value of smooth factor should be determined and tuned on practical machine. As descriptions in section 7.1.3: above, smooth factor set to zero is for cancellation of motion protection. 7.2: Position and Velocity Error Protection 7.2.1: Position Error Limitation There is always position error existing under servo control system. When the motor starts to move, the position error increases. In some conditions this may also cause a big position error such as HIWIN Mikrosystem Corp. 125 mega-fabs D1 Drive User Guide Protection less lubrication on the bearing or linear guideway, cable routing or cable chain too tight, particles on the travel range, collision of motor and hardstop, encoder working abnormal or encoder signal disturbance, etc. The D1 drive provides an error window. When the position error exceeds set limits, the drive sends an error message “Position error too big” and enter the process of emergency stop, then output brake signal and disable motor sequentially. The configuration as the setting of Maximum pos error in showing Figure 7-3. 7.2.2: Warnings of Position Error and Velocity Error (Besides the position error settings as the mentioned above, the D1 drive also provides the position error warning which is sent before the position error happened. When position or velocity error is over the value set in the “Warning windows”, there is a warning message displayed in the Status of main window to remind occurrence of abnormal condition. Figure 7-3 Parameter Maximum pos error Position error Velocity error Description Limitation of max position error Position error warning Velocity error warning 7.3: Brake Output 7.3.1: Introduction In order to protect the motor and the mechanical structure the D1 drive provides brake output signal to trigger external mechanical brake. It is usually used in the application of Z direction motor motion. In this application there are some issues of sequential motion, for example of drive receiving disable command while motor is moving along Z direction. Activating the mechanical brake in high speed drop, it will cause high vibrations and damage of mechanical parts. In addition, if the motor is disabled too early, the motor and mechanical parts may be damaged. The D1 drive with specific brake parameters setting is capable to prevent these cases. 7.3.2: Brake/Stop Sequence After receiving hardware signal input or operated by GUI to disable motor, the sequence will start as below: 7.3.2.1 While received the disable command, the drive waits for delay time of the brake activation (delMaxEnToBrk) then activates the brake. But, if the motor velocity is less than the brake activation velocity (vel_stop) that earlier before waiting time finished, the brake will be activated. 7.3.2.2 From the beginning of brake activation to the end of brake motion time (delBrkToDis) the drive will turn off the power to disable the motor. This is the purpose of completing motor braking. HIWIN Mikrosystem Corp. 126 mega-fabs D1 Drive User Guide Parameter delMaxEnToBrk Dec. kill vel_stop delBrkToDis Protection Description The delay time from received the disable command to the brake motion started) Deceleration of emergency stop. Please see section 7.1.3:. Velocity for activating brake after motor disabled The delay time from brake motion started to drive turn off the power 7.3.3: Settings Click the icon on the tool bar of main window to open the window of Application center. The button頁 is used for the configuration of digital output port which is usually O4 for output brake signal. After clicking this button, the window of IO Set/test will be opened. The detail descriptions of this window are introduced in section 4.4.2:. Figure 7-4 7.4: Limit Switch Settings 7.4.1: Introduction The D1 drive has hardware limit protection that is used with limit switches. The limit switches are used to check the distance motor moved and its signal are connected to specific digital input ports in the drive. If the motor touches a limit switch, the limit switch will trigger emergency stop which is using the deceleration, Kill Dec. to stop motor for protection. At this moment, the drive can only execute the motion command of opposite direction movement. 7.4.2: Settings Click icon on the tool bar to enter the window of Application center. In HW limit protection page there is a checking box, enable HW limit ( ) to activate hardware limit protection. The button in the page is used for configuration of digital input ports for hardware limit protection. Click this button to open the window of IO set/test for configuration. The detail of IO configuration is introduced in section 4.4.1:. HIWIN Mikrosystem Corp. 127 mega-fabs D1 Drive User Guide Protection Figure 7-5 7.5: Software Limit Protection 7.5.1: Introduction The D1 drive not only provides digital input ports connected to hardware limit switches but also provides software limit for protection of motor. Software limit protection brings the protection of motor over travel range. When motor stop at the position defined in software limit, drive can only execute the motion command of opposite direction movement. 7.5.2: Settings Click the icon on the tool bar to enter the window of Application center. In the Protection page there is an area named Limits includes a check box, enable sw limit ( ). This check box is checked for activating the configuration of software limit protection. In addition, checking the check box, enable sw limit ( ) in the window of the Performance center is used for activating software limit protection as well. Figure 7-6 HIWIN Mikrosystem Corp. 128 mega-fabs D1 Drive User Guide Parameter enable sw limit Lower SW limit Upper SW limit Protection Description Activation of software limit protection Negative software limit protection Positive software limit protection 7.6: Motor Over-Temperature Protection 7.6.1: Introduction Normally there is a temperature switch embedded in the motor to detect the temperature. The signal is usually connected to the drive for the protection of the motor. The protection function of the Motor Over Temperature in the drive is configured to digital input port I5 as default setting. The temperature switch in the motor is normally closed. When the motor is operated in normal temperature, the temperature switch is closed. Otherwise, once the motor temperature is too high the temperature switch is open to activate Motor Over-Temperature in the drive then the drive sends error message “Motor over temperature sensor activated”, then enter the process of emergency stop and disable the motor. 7.7: Soft-Thermal 7.7.1: Introduction Besides the protection by the motor temperature sensor, the D1 drive also has a capability of motor temperature estimation. The temperature estimation is from the calculation of output current, power of motor. If the estimated temperature rises to the default value in the drive, the drive will send an error message “Soft-thermal threshold reached” on the “Status” in the main window and enter the process of emergency stop then disable the motor. Select the variable “Soft-thermal Accumulator” in “Quick View” in main window to monitor the estimated temperature. 7.8: Drive Over-Temperature Protection 7.8.1: Introduction The D1 drive can also detect the temperature of the drive for the protection of drive. If the temperature of the drive reaches over 80℃, drive stops motion and disables the motor, then sends an error message “Amplifier over temperature”. Select the variable of Amplifier Temperature in Quick View to monitor current temperature of drive. 7.9: Regen Resistor (Optional) 7.9.1: Introduction When the motor is moving in decelerating, part of motor kinetic energy is transformed to heat dissipation and the other charge to the capacitance in the drive. Once the energy over the capability of the capacitance, regen resistor is necessary to be used to dissipate the energy for protection of drive. The turn on voltage of regen resistor in the D1 drive is 390Vdc and turn off voltage 380Vdc. The table below shows the product number of the HIWIN standard regen resistor and the user can use it as requirement HIWIN Mikrosystem Corp. 129 mega-fabs D1 Drive User Guide Protection Product number Resistance Continue power Peak Power (5 seconds) 050100700001 68 ohms 100W 500W The dimensions of regen resistor are shown in Figure 7-7 in next page. Figure 7-7 HIWIN Mikrosystem Corp. 130 8: ERROR AND WARNING This chapter mainly describes error and warning messages in the D1 drive. Contents include: Title Page 8.1: Error and Warning Messages of the D1 Drive ..................................................................................................................... 132 8.2: All of the Error and Warning Messages ............................................................................................................................... 132 HIWIN Mikrosystem Corp. 131 mega-fabs D1 Drive User Guide Error and Warning 8.1: Error and Warning Messages of D1 Drive When an error is detected, the D1 drive not only activates protection but also displays the error message in the main window at the same time. As Figure 8-1 Status Display Zone, the latest occurred error is displayed in the area of Last error. The user can do trouble shooting according to the error message. Further, once a warning occurred during motion the warning event is displayed in the area of Last warning. Figure 8-1 Status Display Zone 8.2: All of the Error and Warning Messages The following tables list the messages and meanings of all detectable errors and warnings by the drive. No. Descriptions 2 Warnings Motor short (over current) detected Over voltage detected 3 Position error too big 4 Encoder error 5 Soft-thermal threshold reached Position error is bigger than the setting value 1. AB phases error of digital encoder 2.Amplitude of sinusoidal signal is too low during motor stopped Motor over temperature error by the calculation of drive software Output current has been exceeded the protection value by the Calculation of drive software 1 6 7 8 Motor maybe disconnected Amplifier over temperature Motor over temperature sensor activated HIWIN Mikrosystem Corp. Motor short circuit is detected DC bus voltage is too big Motor power cable is not connected firmly with drive Drive over temperature. Amplifier’s internal temperature exceeds specified temperature. Motor over temperature switch is activated 132 mega-fabs D1 Drive User Guide 9 10 11 Under voltage detected 5V for encoder card fail Motor short (over current) detected Error and Warning DC bus voltage is to low 5V DC power of encoder is abnormal to be supplied to encoder Motor short circuit is detected No. 1 Warnings Left SW limit Descriptions Software negative limit is activated 2 Right SW limit 3 Left HW limit Software positive limit is activated Negative limit switch is activated 4 Right HW limit Positive limit switch is activated 5 Servo voltage big PWM command is bigger than the setting value 6 Position error warning Position error is bigger than the setting value of warning 7 Velocity error warning Velocity error is bigger than the setting value of warning 8 Current Limited Output current reached peak current of motor 9 Acceleration Limited 10 Velocity Limited Acceleration reached the value of acceleration protection in velocity mode Motor speed reached the value of velocity protection in velocity mode 11 Both HW limits are active Trigger right/left hardware limit at the same time HIWIN Mikrosystem Corp. 133 9: TROUBLE SHOOTING This chapter mainly describes the root causes of common errors and how to trouble shoot. Title Page 9.1: Trouble Shooting ................................................................................................................................................................ 135 9.1.1: The Descriptions of Status Indicator ....................................................................................................................... 135 9.1.2: Error Descriptions and Troble Shooting.................................................................................................................. 135 HIWIN Mikrosystem Corp. 134 mega-fabs D1 Drive User Guide Trouble Shooting 9.1: Trouble Shooting 9.1.1: The Descriptions of Status Indicator There are LED indicators in 2 colors on the front panel of the drive to display the drive status. The following list are the status descriptions: Status indicator Indicator color/blink Off Red and orange light blinking for 5 seconds Green light blinking Green light keeps on Orange light blinks and red light keeps on Drive status Drive without +24Vdc power Drive is starting up Drive disabled. Drive enabled without error Drive enable with error Figure 9-1 9.1.2: Error Descriptions and Trouble Shooting Number 1 2 Status descriptions Velocity or acceleration is limited when using pulse or voltage command to be motion command. The direction of motor motion is opposite to the direction the user defined Error message Trouble shooting None Please check if the setting values of the Motion Protection in the Performance center is too small. None Please redo the auto phase steps and click the TD button to reverse the motion direction. Please refer to section 4.3:. 3 Error map is activated or not. None 4 After enabled, the motor is running without any motion None HIWIN Mikrosystem Corp. Open the sheet of Error map in Conf.Tune window to check below steps: 1. Confirm the “Error map enable” is checked. Please refer to section 5.8:. 2. Confirm Homing is completed and input port configured to related settings of homing. 1. Using Quick View or Scope to check the Target Position is received from pulse command. 2. Check the connection of pulse signal cable. 135 mega-fabs D1 Drive User Guide Trouble Shooting command. 5 The motor enabled cannot move after the command has been sent. None 6 The motor doesn’t move after the pulse has been sent. None 7 8 9 10 The motor doesn’t move after the voltage command has been sent. The noise is too loud while the motor is running. None None The drive temperature is too high. Drive over temperature The feedback position signal is not correct. Encoder error 11 The motor temperature is too high The motor over temperature sensor is activated 12 The DC bus voltage is too low Under voltage detected HIWIN Mikrosystem Corp. 3. Check the connection of 0V and ground or shielding is short. 4. Check the drive and machine are grounded. 5. If necessary, add core on the control cable to filter the noise. 1. Check the unit of pulse command is correct. 2. Check if the velocity or acceleration is not zero in the column of Motion Protection. 3. Check if the software limit is enabled. If yes, also check if the value of the Upper limit and the Lower limit is correct. 4. After disabled, check if the motor moves smoothly while pushing it by hand. 1. Using Quick View or Scope to check if the Target Position is received from the pulse command. 2. Check the connection of the pulse signal cable. 3. Check if the electronic gear ratio is set too small. 1. Using Quick View or Scope to check if the Target Position is received from voltage command. 2. Set voltage offset in “Analog input” in the window of “Advanced gains”. 1. Decrease the value of the Common Gain. 2. Configure Filter in the window of Advanced gains. Please refer to the section 5.6:. 1. Check the placement of drive with good ventilation 2. Check if the environment temperature is too high. 3. Wait for the temperature inside the drive to cool down. 4. Check if the duty cycle is too high. Please add the heatsink if necessary. 1. Check if the encoder is powered on and the light is on. If not, please check the 5V power cable and if the signal cable is loose or short. Otherwise, check if the light is green. If red light, linear scale should be checked if it is clean. 2. The gap between the encoder and linear scale must be 0.1 to 0.2 mm. Please also check the signal cable is loose and the linear scale should be away from the magnetic field. 3. Check if the settings of the reader are correct like encoder type is analog or digital, resolution and part number etc. 4. Check the AB phase signals of digital encoder are correct. 5. Check the amplitude of sinusoidal signals of the analog encoder is possible too small 6. Check if the drive, machine and shielding are grounded. 1. Check if the connection of the motor over temperature cable is connected or opened. 2. Check if the motor temperature is too high. 3. Check the settings of the motor peak current and continuous current are same with motor specifications. 4. Check if the duty cycle of the motor operation is too high. 1. Check if the connection of drive AC main power 100V or 240V is connected or opened. 2. Measure the voltage of the AC power input is 100V or 136 mega-fabs D1 Drive User Guide Trouble Shooting 13 DC bus voltage is too high. Over voltage detected 14 Position error is bigger than the setting of maximum position error. Position error too big 15 Motor has short circuit Motor short (over current) detected 16 The output current from drive is over motor continuous current Soft-thermal threshold reached 17 PC fails to connect to drive HIWIN Mikrosystem Corp. None 240V. 1. Check velocity, acceleration and moving mass agree with the specifications. 2. Check if the regen resistor is needed to motor running in high speed. Regen resistor selection should be according to moving mass and motion profile. 3. Check if the moving mass is too high. 4. Check if the speed is too fast. 1. Check if the Common gain is too small. 2. Check if the setting of maximum position error in Motion Protection in the window of the Application center is too small. 3. Check if the motor moves smoothly. 4. Check if the encoder is normal. 5. Check if the linear scale is clean. 6. Check if the moving mass is too big. 7. Not maintenance on linear guide way for long time. 8. Cable chain installed is too tight. 1. Check if the connections of motor UVW coils are short. 2. Check if the motor UVW coils are short with ground. 3. Check if the line resistances of UVW coils are the same. 4. Check if the motor cables have good quality 1. Check the settings of motor peak current and continuous current fulfils with the motor specifications. 2. Check the acceleration of path planning overs motor rated capability. 3. Check if the motor moves smoothly. 4. Reset the drive and then enable motor again. 5. Check if the motor type or currents are configured to be incorrect. 1. Check the transmitter of USB to RS232 is available to use. 2. Check the baud rate (BPS) and communication port are set correctly. Please refer to section 4.1:. 3. Check if the pin assignment of RS232 cable is correct. 137 A: DRIVE THERMAL CURVE Title Page A.1: Operation temperature and Cooling strategy ...................................................................................................................... 139 A.2: Heat Sink Displacement ..................................................................................................................................................... 140 HIWIN Mikrosystem Corp. 138 mega-fabs D1 Drive User Guide Drive Thermal Curve Operation temperature and cooling strategy Figure A - 1 and Figure A - 2 shows operating conditions of the D1 drive with different cooling strategies under maximum working temperature. The cooling strategies include no heat sink installed, D1-H1 heat sink installed, D1-H2 heat sink installed, no fan installed and fan installed. The operation conditions include the ranges of output current under input voltage120VAC and 240VAC. MD-36-S Input voltage: 120VAC Temperature(℃) No Heatsink D1-H1 Heatsink D1-H2 Heatsink D1-H1 Heatsink with fan D1-H2 Heatsink with fan Current(Adc) Figure A - 1 Input voltage: 240VAC Temperature(℃) No Heatsink D1-H1 Heatsink D1-H2 Heatsink D1-H1 Heatsink with fan D1-H2 Heatsink with fan Current(Adc) Figure A - 2 HIWIN Mikrosystem Corp. 139 mega-fabs D1 Drive User Guide ※Fan specifications: Air flow: 153(CFM) Drive Thermal Curve Static pressure: 0.43 (Inch-H2O) A.2: Heat Sink Displacement Appearance of heat sink D1-H1 as shown in Figure A - 3 Figure A - 3 Appearance of heat sink D1-H2 as shown in Figure A - 4 Figure A - 4 HIWIN Mikrosystem Corp. 140 B: AUTO PHASE INITIALIZATION AND FREQ ANALYZER Title Page B.1: Frequency Analyzer Window of the Auto Phase Center ...................................................................................................... 142 B.2: Close Loop Test for Step Mode (SMCL test) ...................................................................................................................... 143 B.2.1: SMCL Parameters ................................................................................................................................................. 143 B.2.2: To Use Freq Analyzer ............................................................................................................................................ 143 B.2.3: To Use Filters ........................................................................................................................................................ 144 HIWIN Mikrosystem Corp. 141 mega-fabs D1 Drive User Guide Advanced Phase Initialization B.1: Frequency Analyzer Window of Auto Phase Center Checking Advanced view in the pop up menu of the Auto phase center can open the window of advanced phase initialization as shown in Figure B - 1. Step 4 is the test of closed loop control under SM mode, so-called SMCL test. In this mode, please click on the button “Start SMCL” to enable the motor and then the indicator will be turned on after enabled. Advanced function Figure B - 1 If the motor works well but fails to phase initialization (section 錯誤! 找不到參照來源。) during the motion direction test (section 4.3.2.2) under SCML mode for phase initialization, it can be suspected that the problem comes from the settings of physical parameters or system itself. If the motor still cannot be enabled after SCML enable procedures, we have to do SMCL test to check system parameters. The following section will describe the operation procedures in detail. HIWIN Mikrosystem Corp. 142 mega-fabs D1 Drive User Guide Advanced Phase Initialization B.2: Close Loop Test for Step Mode (SMCL test) After the advanced phase initialization is opened, click on the button SMCL.Tool in the window of Auto phase center to the tools of SMCL test as shown in Figure B - 2. Buttons of test tools SMCL parameter Monitoring window Figure B - 2 B.2.1: SMCL Parameters st_vpg: A proportional gain of velocity loop under SMCL mode control. The initial value is based on the calculation of the settings of physical parameters including move mass, moment of inertia, resistance and inductance etc (section 4.2.1:.) If the initial value of st-vpg is not able to make the system working well, it is usually caused by the deviation of system parameters or mechanical stiffness of going down. In this situation Freq analyzer is used to the test of frequency response to get bode plot of control system under SMCL mode. According to the result of the bode plot proper value of st_vpg can be calculated. st_cg: A proportional gain of the control loop under SMCL mode. The initial value is also given after motor configuration. If the position error is too big to enable motor during executing SMCL mode, the user can increase the proportional gain a little bit more. It is usually needed to increase st_vpg when friction gets bigger. Filter design: There are two filters available to be used under SMCL mode. Generally only one 2nd order low pass filter is enough and sometimes it can be reduced by cutting off low pass frequency to lower disturbance caused by low frequency of disturbance. The default value of cut off frequency is set to 1192.66Hz. B.2.2: To Use Freq Analyzer Open the tool of Freq analyzer and its mode is set to Stepper/Dcbl plant test. The measurement of frequency domain starts as soon as the button is clicked, it is starting to do the measurement of frequency domain. The user can click on the right button of mouse (, or click twice in blank area) to open slope measuring tool in the measurement display zone. The purpose of this HIWIN Mikrosystem Corp. 143 mega-fabs D1 Drive User Guide Advanced Phase Initialization slope measuring tool is used to select the slope of -20db/dec. Keep pressing the left button of mouse and drag the auxiliary line to get close to the line segment with same slope. The software will estimate a proper value to st_vpg automatically. At the same time, please click on the button to send the calculated value to drive . If you want to use this value later on, click on the button to save it into flash memory to keep it in the drive. Mode select Calculated result Run button Measurement display area of frequency domain Auxiliary line Slope Measuring tool Figure B - 3 B.2.3: To Use Filters The filters introduced in this section are used under SMCL mode. In common the filter is designed to a 2nd order low pass filter. User can change the filter parameters in the input column and recover to previous values in the drive after clicking on the button. Click on the button to send new values to drive and click on the button to reset back to default values. In normal case it is suggested not to cancel filters. HIWIN Mikrosystem Corp. 144 mega-fabs D1 Drive User Guide Advanced Phase Initialization Display area of simulation of frequency domain Filter parameters settings Function tools Figure B - 4 HIWIN Mikrosystem Corp. 145 C: SETTING OF ENABLE ACTIVATION Title Page C.1: Hardware Enable ............................................................................................................................................................... 147 C.2: Internally Trigger Enable .................................................................................................................................................... 147 C.3: Confirmation of the Hardware Enable State........................................................................................................................ 147 C.4: Externally Activated Enable ................................................................................................................................................ 148 HIWIN Mikrosystem Corp. 146 mega-fabs D1 Drive User Guide Settings of Enable Activation C.1: Hardware Enable The Hardware enable is activated by the host controller triggering Axis enable input in drive, or internally triggering it by the user’s interface. It is usually configured to digital input port I1 (Please see also section 4.1.4.1) as shown in Figure C - 1. C.2: Internally Trigger Enable When the drive is operated in stand-along mode, it cannot be triggered to enable motor by external hardware signal thus, it has to be triggered internally. Open the window of “IO set/test” to confirm I1 is set to AXIS Enable. If the indicator of I1 is off, check Invert checking-box to make it turned on. At this moment the motor is enabled to operate. Figure C - 1 C.3: Confirmation of Hardware Enable State When the hardware enable is activated, the indicator of “Hardware Enable Input” in the main window of the user’s interface is turned on as shown in Figure C - 2. Figure C - 2 HIWIN Mikrosystem Corp. 147 mega-fabs D1 Drive User Guide Settings of Enable Activation C.4: Externally Activated Enable When connecting to the drive via Lightening, it means that the user is master to have capability of make capable of making the drive enable. To enable the drive, first connect all hardware and then click on the Enable button in the Performance center of Lightening. When the host controller is connected to the drive, the communication between the PC and the drive has to be terminated. For example, close the user’s interface or disconnect the connection cable to the drive in order to make the host controller have control of the drive. At this moment the host controller can make the drive enable directly via input of Axis Enable. For example, I1 is set to Axis Enable and enable the motor by triggering I1 without communication with the drive. It has to be noticed that the drive is powered on with the AC main power input to make this operation work. HIWIN Mikrosystem Corp. 148 D: COMPARE PARAMETER RAM TO FLASH Title Page D.1: Compare parameter RAM to Flash ..................................................................................................................................... 150 HIWIN Mikrosystem Corp. 149 mega-fabs D1 Drive User Guide Compare Parameters RAM to Flash D.1: Compare parameter RAM to Flash A window to Compare parameter RAM to FLASH will show up in the case of when the user closes the interface after modified motor parameters without saving it into flash memory, or in the case of saving error compensation parameters into flash memory (Refer to section 5.8.1:) as shown in Figure D - 1. It reminds user that parameters are modified but not save into flash yet. Figure D - 1 Compare parameter RAM to flash prompt Click on the button Details to open advanced function window. The user can look into the different values of parameters between RAM and FLASH as shown in Figure D - 2 and Figure D - 3. If the parameters are different in RAM and Flash respectively, they and their values are displayed in blue. In addition, two states are displayed in the column of Flash value: “=”: It means that the parameters’ values saved in Flash and Ram are identical. ”**”: It means that the parameter and its value in RAM are recovered from the Flash as shown in figure D3. ○ 1 2 ○ 3 ○ ○ 6 5 ○ 4 ○ Figure D - 2 Compare function window Detail descriptions of these buttons are below: ○ 1 Save:Save parameters into Flash. ○ 2 Close:Close window. ○ 3 Up: Go back to the previous parameter in RAM different from Flash. ○ 4 Down:Go to the next parameter in RAM different from Flash. HIWIN Mikrosystem Corp. 150 mega-fabs D1 Drive User Guide Compare Parameters RAM to Flash ○ 5 Undo:Recover selected parameter saved in RAM to the value saved in Flash. ○ 6 Refresh:Re-compare the parameters saved in RAM and Flash respectively. ○ 7 Redo:Redo the Undo action. ○ 7 Figure D - 3 advanced compare RAM to flash HIWIN Mikrosystem Corp. 151 mega-fabs D1 Drive User Guide All Rights Reserved HIWIN Mikrosystem Corp. 153