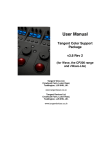
1
Model No. C CP300 0 Users Manu M ual v1 1.4 rev 3 Impo ortant: Check ww ww.tange entwave.co.uk forr update es. Tang gent Wave e Ltd. Crowbush h Farm, Lu uton Road, Todding gton, LU5 6HU, 6 UK. www.ta angentwav ve.co.uk Wave - CP300 - Control Panel - Users Manual v1.4 rev 3 Table of Contents 1. Important safety instructions / Instructions De Sécurité Importantes .................................. 2 2. CE Declaration of Conformity ............................................................................................. 3 3. FCC Compliance Statement ............................................................................................... 3 4. Disposal and Recycling information .................................................................................... 3 5. About this manual ............................................................................................................... 4 6. What’s in the box ................................................................................................................ 4 7. About Wave ........................................................................................................................ 5 7.1 Drivers ........................................................................................................................... 5 7.2 Power and communication ............................................................................................ 5 8. Positioning and use of the panel ......................................................................................... 5 9. Getting started .................................................................................................................... 6 10. Test mode ......................................................................................................................... 6 10.1 Version ........................................................................................................................ 7 10.2 USB state .................................................................................................................... 7 10.3 Knobs and dials ........................................................................................................... 7 10.4 Buttons ........................................................................................................................ 7 10.5 Trackerballs ................................................................................................................. 7 11. Trouble-shooting ............................................................................................................... 8 11.1 A button doesn’t work .................................................................................................. 8 11.2 A knob doesn’t seem to work ...................................................................................... 8 11.3 A trackerball doesn’t seem to work ............................................................................. 8 11.4 My software isn’t communicating with the panel ......................................................... 9 12. Care of your panel ............................................................................................................ 9 13. Firmware updates ............................................................................................................. 9 14. Connecting the Wave to Da Vinci Resolve ..................................................................... 10 14.1 Connection ................................................................................................................ 10 14.2 Setting up communication with Resolve .................................................................... 10 14.3 Important Note ........................................................................................................... 10 15. Connecting the Wave to Color (Apple) ........................................................................... 11 15.1 Introduction................................................................................................................ 11 15.2 Installing the software ................................................................................................ 11 15.3 Configuring Color to use your Wave panel ................................................................ 12 16. Connecting the panels to Scratch (Assimilate) ............................................................... 14 16.1 Connection ................................................................................................................ 14 16.2 Setting up communication with SCRATCH ............................................................... 14 16.3 Setting up the default panel mapping ........................................................................ 14 17. Connecting the Wave to Speedgrade / Framecycler (Iridas) .......................................... 15 17.1 Overview ................................................................................................................... 15 17.2 Setup ......................................................................................................................... 15 17.3 Changing the sensitivity of trackballs, wheels and knobs ......................................... 15 1 Wave - CP300 - Control C Pan nel - Users Manual v1.4 rev 3 1. Impo ortant safetty instructions / Instru uctions De e Sécurité Importantees Read th his manual first before e using the e panel. Keep th hese instru ctions for future f reference. Heed all warnings s in this ma anual. Follow all a instructtions in this s manual. Do not use this ap pparatus ne ear water. Install and a use the e panel onlly as instru ucted. Do not install nearr any heat sources su uch as radiiators, hea at registerrs, stoves, or other ap pparatus (including aamplifiers) that produce e heat. Unplug the appara atus when it’s not going to be u used for lon ng periods s of time. Refer alll servicing g to qualifie ed personn nel. Serviciing is required when: o The T appara atus has be een damaged in any w way. o Liquid L has been spille ed on the apparatus. a o Objects O hav ve fallen in nto the app paratus. o The T appara atus has be een expose ed to rain o or moisture e. o The T appara atus does not n operate e normally.. o The T appara atus has be een droppe ed. Lire les instruction ns suivantes. Conserv ver ces ins structions. Tout av vertissemen nt doit être e pris comp pte. Respec cter les insttructions à la lettre. Ne pas utiliser cett appareil près p de sou urces d’eau u. Nettoye er uniquem ment avec un u torchon sec. Installer selon le m mode d’em mploi fourniit par la chaaîne de producttion. Ne pas installer prrès de sources de chaleur; c’esst-à-dire radiateu urs ou app areils prod duisant de la chaleur.. Débranc cher l'appa areil si celu ui-ci ne serra pas utilissé à de lon ngs intervalles. Se réfèrrer à un pe ersonnel qu ualifié pourr toute réviision de l’appare eil. Une rév vision de l’a appareil es st néccessaaire: o L’appareil L a été endommagé. o Liquide L rép pandu à l’in ntérieur de l’appareil.. o Objets O tom mbés à l’inté érieur de l’appareil. o Si S l’appareiil a été mis s au contac ct de la plu ieou expos sé à l’humidité. o Ou O s’il ne ffonctionne pas norma alment ou a éte renve ersé. 2 Wave - CP300 - Control C Pan nel - Users Manual v1.4 rev 3 2. CE D Declaration of Conform mity angent Wave Ltd of 4 C Crowbush Farm, F Luton Road, Todddington, Un nited Ta Kin ngdom decllare that ou r Wave product is in co ompliance w with the ess sential req quirements and other rrelevant pro ovisions of Directives D 22004/108/EC C and 2006/95/EC and a carries tthe CE marrk according gly. To oddington, January 200 09 An ndy Knox Op perations Diirector 3. FCC Complianc ce Stateme ent h part 15 off the FCC Rules. his device co omplies with R Operaation is sub bject to Th the e following two t conditio ons: (1) This s device ma ay not caus e harmful interference, and a (2) this device mus st accept an ny interfere nce receive ed, inccluding interrference tha at may caus se undesired operationn. 4. Dispo osal and Recycling R in nformation n his symbol in ndicates tha at your prod duct must be disposed of properly y Th according to local laws a and regulatio ons. When your producct reaches the t end of its life pleas se contact yyour supplie er for dispos sal and recyycling options. 3 Wave - CP300 - Control C Pan nel - Users Manual v1.4 rev 3 5. Abou ut this man nual This manual applies a to Wave W contro ol panel (M Model No. CP300). C Forr the latest updates ple ease check www.tange entwave.co. uk and look k under Dow wnloads: Doocumentatio on. This manual does not tell you ho ow to use the panel with your software. For F that info ormation pllease conta act your sofftware vend dor. Where we have bbeen provid ded with info ormation byy the softwa are vendors we have in ncluded this s. If yyou find anyy errors with h this manu ual or you have any suggestions tthen please e contact Tangent Wave. It is only y through yo our feedbac ck and suggestions thhat we can improve our services and a products. 6. Whatt’s in the box ote: also in ncluded in the box i s a self ad dhesive wrist rest. T This is for you to No op ptionally fit to your Wave. W If you u decide to o remove it at a laterr date please note tha at it may le eave residu ual adhesiv ve on your Wave W or may m mark th he surface of it. 4 Wave - CP300 - Control C Pan nel - Users Manual v1.4 rev 3 7. Abou ut Wave Wa ave is a con ntrol panel that t is aime ed at the co olour correcttion and viddeo post pro oduction ind dustry. It doesn’t do any processin ng of video data itself, it just providdes a physiical user inte erface to software s packages, mu uch like yo our compute er keyboardd and mouse. It is dessigned to im mprove spe eed, ease o of use, and efficiency of o your softw ware by putting the con ntrols at yo our finger tip ps without h having to access a them m through m menu functions and mo ouse clicks. Colourists will be fam miliar with the t three tra ackerball laayout for adjusting a primaries and d they will know how essential it is to have them on the panel for this purpose. No ote: What Wave W will co ontrol in yo our softwa are The Wave con ntrol panel is designed d to be gene eric. What we w mean byy generic is that it is nott designed specifically y to be use ed with just one type of o software . This means what fun nction any of o the controls has is n not determined by Tan ngent Wavee, but is dec cided by the e software that you are e using the p panel with. 7.1 1 Drivers There are no drivers to install for W Wave. Wave uses the inbuilt HID D drivers tha at come witth all current operating systems:: Windows, Mac and Linux. Thee HID drive er is the drivver that allo ows your US SB keyboarrd and mous se to work with w your coomputer. 7.2 2 Power an nd commun nication Wa ave receives its power and comm unicates wiith your com mputer throuugh the USB cable. B devices, that is it The only requ uirement is that t your co omputer supports high power USB can n supply 50 00mA thoug gh its USB p port. Most desktop d com mputers cann, it is only la aptop or portable devicces that can n’t. If your in n doubt check your com mputers speecifications. 8. Posittioning and d use of the e panel Health Warrning H S Some experrts believe tthat use of any a human input devicce may caus se s serious injurry to hands , wrists, arm ms, neck or back. If youu feel pain, weakness iin these are n numbness, eas see a qualified heaalth professiional. T reduce th To he risks of ssuch injurie es follow the ese precautiions: take freq quent short breaks. Ge et up and wa alk around at least a couple of times ev very hour. vary you ur tasks thro oughout the e day. keep your shoulderr relaxed with your elbo ows at yourr side. Posittion your control panel p so yo u don't have to reach. Adjust your y chair an nd control panel p so you ur wrists aree straight. Avoid re esting your w wrists on sh harp edges. 5 Wave - CP300 - Control C Pan nel - Users Manual v1.4 rev 3 9. Getting started onnecting the t panel to o your com mputer: Co Firrst make sure that the software yo ou are goin ng to use the panel witth is not run nning on you ur compute er. Use the supplied ca able to plug g the panell into a freee USB slot on your com mputer. The e USB connector is on n the rear of o the panel. If all is w well the disp plays will ligh ht up showing something similar to o the follow wing: Yo ou are now ready to us se the pane el with your software. Refer R to the relevant se ection of thiss manual fo or your softw ware which h will detail how to con nfigure the ssoftware to use the panel. Also refer r to the e manual th hat came with w your software. s Iff you can find f any info ormation in either this manual or tthe manual that came with your ssoftware the en check the e Tangent Wave W webs site for the latest version or conta act your sofftware prov vided for the eir latest ma anual. 10. Test mode e panel will come up i n a test mo ode when you y plug it into your co omputer By default the d your softw ware is not running. and To enter the Test T Mode, do the follo owing: Turn the panel p off by unplugging g the USB cable. c Make sure e your softw ware is not rrunning. p back on o by plugg ging in the USB U cable. Turn the panel The displays will w now sho ow somethi ng similar to o the follow wing: 6 Wave - CP300 - Control Panel - Users Manual v1.4 rev 3 What you see will differ slightly, but basically lines above tell you the following: 10.1 Version This is the panel firmware version number. See the section on updating the firmware for more information on this. 10.2 USB state This is the current status of the USB connection. This will change and update rapidly when the panel is first plugged in but it should finish by saying configured. If it doesn’t say this after a few seconds then remove the USB connection and plug it back in again. If you move any of the controls or press any of the buttons the appropriate bottom line of the display will change to show you the status of the control or button which has been changed. The following describes what you should see for each control or button: 10.3 Knobs and dials If you move a knob, dial or a trackerball the bottom line of the right display will show something similar to this: Encoder moved: 11 4 The first number is the ID number for that control, in this case 11. The second number is the amount it’s moved by, in this case 4. The number gets bigger the faster you turn the control. This should be positive when the knob is turned clockwise and negative if turned anti-clockwise. If the number is always -1 or 1, or doesn’t change then the knob or dial is faulty. 10.4 Buttons If you press a button the bottom line of the middle display will show something similar to this: Key pressed: 6 In this case button number 6 has been pressed. If this doesn’t happen then the button is faulty. Note: in test mode the buttons are scanned slowly so pressing a button too quickly and releasing it may mean that the press is missed. So be sure to press each button slowly. Under normal working conditions this will not be an issue. 10.5 Trackerballs Just like the knobs and dials, moving the trackerball will cause the bottom line of the right display to show something similar to this: Encoder: 15 3 The first number is the ID number for that control, in this case 15. The second number is the amount it’s moved by, in this case 3. The number gets bigger the faster you turn the 7 Wave - CP300 - Control Panel - Users Manual v1.4 rev 3 control. This should be positive when the ball is moved to the right or up. It will be negative if the ball is moved to the left or down. If it does not change then the ball is faulty. Note: due to the way the software scans the movements of the balls, it will be hard to see only changes in the left / right direction. The up / down movements are always displayed in preference by the test mode, and as it’s difficult to move the ball in just the left / right direction with out moving it up / down, you’ll always see mostly up / down changes. 11. Trouble-shooting 11.1 A button doesn’t work Go into test mode and follow the button test procedure. If the button doesn’t work in the test mode then the button is broken. In this case please contact Tangent Wave or your reseller. If the button works in the test mode then it may be a problem with the software you are using the panel with. Contact your software vendor. 11.2 A knob doesn’t seem to work Go into test mode and follow the knob test procedure. If the knob doesn’t work in the test mode then the knob is broken. In this case please contact Tangent Wave or your reseller. If the knob works in the test mode then it may be a problem with the software you are using the panel with. Contact your software vendor. Note: if the knob is turned to quickly then it is possible that the Wave will not be able to keep up with the movement. Try to avoid turning the knob too quickly. 11.3 A trackerball doesn’t seem to work Go into test mode and follow the trackerball test procedure. If the trackerball doesn’t work in the test mode then the trackerball is broken. In this case please contact Tangent Wave or your reseller. If the trackerball works in the test mode then it may be a problem with the software you are using the panel with. Contact your software vendor. Note: from time to you will need to clean the trackerballs. See Care of your panel Cleaning the balls. If there is a build up of dust inside the panel it may affect the optical sensor used to track the balls movements. Note: if the ball is moved to quickly then the optical sensor will not be able to track it. This will produce erratic behaviour in the output from the ball. Try to keep movements of the ball smooth and avoid rapid changes of direction or spinning the ball. 8 Wave - CP300 - Control Panel - Users Manual v1.4 rev 3 11.4 My software isn’t communicating with the panel Generally problems with communication are related to setting up your software to talk to the panel. Refer to your software vendors instructions for doing this. Make sure the USB cable is connected properly. Also make sure the USB port on your computer can supply the 500mA the panel requires. Some laptops do not allow this. If after doing the above, and taking any relevant action, you’re still having trouble, then contact Tangent Wave or your reseller. 12. Care of your panel Your Wave panel should not be cleaned with harsh abrasives or chemical cleaning products. If they become dirty wipe them with a soft damp cloth. Cleaning the balls From time to time you may need to clean the balls and the trackerball unit that holds them. To do this you need to remove the clip on cover over the ball and then remove the ball. See Getting started - Fitting the balls in to the trackerballs. Clean the ball with a soft damp cloth. To clean inside the trackerball unit use a damp cotton bud, paying close attention to the three metal balls the ball sits on, and the lens which houses the optical sensor. 13. Firmware updates The firmware in your Wave panel was the most up to date version when your panel was manufactured. It is possible however that a newer version may be available from our website www.tangentwave.co.uk. Check there under the support tab to see if a newer version is available. Also be sure to read the instructions and release notes with the version. 9 Wave - CP300 - Control C Pan nel - Users Manual v1.4 rev 3 14. Con nnecting th he Wave to Da Vinci R Resolve 14.1 Connecttion onnect and install i the CP300 C Wave puter using tthe USB ca able. e to the Resolve comp Co ve 14.2 Configuring Resolv hen Resolve e is running g click Prefe erences and d the following window will appearr. Wh Ch hoose Tang gent Device es Wave fro om the menu and click Save. nt Note 14.3 Importan ease note th hat, when configured to o use the Wave W panel, Resolve taakes exclusive Ple con ntrol of the panel. This is even tru e when Res solve is not running. Wh hen you want to use the Wave pa nel with ano other applic cation then yyou will nee ed to return to the above a windo ow and cho ose None as a the pane el option. 10 Wave - CP300 - Control C Pan nel - Users Manual v1.4 rev 3 15. Con nnecting th he Wave to Color (App ple) ction 15.1 Introduc Although Wavve does not need a drivver to work with Mac OS O X, it doees need a plug-in to ena able it to ta alk to Colorr. Also, in o order for you u to custom mise how W Wave contro ols Color the ere’s an app plication callled the Pan nel Control Mapper. Th hese are buundled togetther in a Ma ac OS X insstallation package calle ed Tangent Color Supp port. On nce you have installed d the Tang gent Color Support S pa ackage you must first run the Pa anel Control Mapper to o select th e Wave pa anel. Please refer to the Tangen nt Color Support Packa age Manua al for details . You’ll find on the disc c that camee with your Wave. W g the softw ware 15.2 Installing Wave panel into your Mac. M Inssert the discc that came with your W Open n the disc in n a finder w window by double d clicking on the disc icon. i Doub ble click on the Tangen nt Color Support packa age nd follow the to sttart the ins stallation an t on-scre een instru uctions. ou may be prompted to enter yo our passwo ord. This is s the passw word for yo our user Yo acccount on yo our Mac an nd the passsword that you enter when you update you ur Mac’s sysstem softwa are. 11 Wave - CP300 - Control C Pan nel - Users Manual v1.4 rev 3 ur Wave pa anel 15.3 Configuring Color to use you ake sure yo ou have ins stalled the T Tangent Co olor Support package aand configu ured the Ma Pa anel Control Mapper as s described in the Insta alling the software sect ion above. Yo ou need to plug p your Wave W panel into your Mac M with the e USB cablee it came with. w This is jjust a stand dard USB cable c so yo ou can use your own if you wish. If everything is ok you u should se ee the follow wing (or sim milar) on the Waves’ dis splays: If yyou don’t se ee the above e then referr to the Trou uble-shootin ng section oof this manu ual. No ow start Collor. When you y start Co olor you ma ay get a po op-up dialogg window similar to window onc the e one shown below. Do on’t worry iff you don’t as a you can get to this w ce Color is rrunning as explained e la ater. This iss the Color Control C Surfface Setup window. The Control Surface S men nu in the mi ddle of the window allo ows you to choose what panel you u are using Color with.. If this isn’tt set to Tangent Color PlugIn thenn do this now. Then pre ess Yes. If yyou don’t se ee the Conttrol Surface e Setup win ndow then in n Color go to the Setu up room. Click on the User U Prefs ta ab at the bo ottom and th hen click on n Show Conntrol Surface e Dialog wh hich is at the e top right of o the User Prefs. Don n’t forget you will have to load or create c a 12 Wave - CP300 - Control C Pan nel - Users Manual v1.4 rev 3 oject in Color in order to get to tthe rooms. Once you have seleccted Tangen nt Wave pro Co olor PlugIn as the conttrol surface e type quit Color C and restart r it. It is a good idea for now w to also ch heck the Sh how this dia alog again option, o you can alwayss turn this off o again late er. Aftter you have e clicked Ye es the displa ay on Wave e should show the folloowing: Yo ou now need d to load a project. p Oncce you have e done this Wave will l oad its control map and d the displa ays will upda ate to reflecct this. 13 Wave - CP300 - Control Panel - Users Manual v1.4 rev 3 16. Connecting the panels to Scratch (Assimilate) 16.1 Connection Connect and install the CP300 Wave to the SCRATCH computer using the USB cable. 16.2 Setting up communication with SCRATCH SCRATCH uses the cs_devices.xml file to configure communications with external control surface devices. This file is located at C:\Program Files\Assimilate\Settings. Do not edit the default file. Instead, create a copy of the file and rename it ‘cs_devices_init.xml’. Then open this file in any text editing program such as Notepad. The file lists all devices that can be configured with SCRATCH. Locate the section dedicated to the CP300. It will look like this: <device name="Tangent CP-300 Wave" mode="disabled" > <driver>CsDrv_TangentCP300.dll</driver> <entry_data> <!-- The Tangent Wave panel does not require a specific ID number --> <vip>0x04D8</vip> <pid>0xFDCF</pid> <idle_timeout>125</idle_timeout> </entry_data> <!-- We have 3 displays with 5 lines each --> <display>0</display> <lines>15</lines> </device> To enable the CP300, change the mode=”disabled” to mode=”enabled”. in the first line. No further modifications are necessary, so save the file and exit the text editor. 16.3 Setting up the default panel mapping SCRATCH installs a default file for use with the CP300 Wave. In the folder C:\Program Files\Assimilate\Settings, locate the ‘cs_mappings_Wave.xml’ file. This is the file that contains the default CP300 mappings. To use this file with SCRATCH, create a copy of this file and rename it ‘cs_mappings_init.xml’. If you already have a file with this name, make a backup copy of it before overwriting with this new version. Launch SCRATCH and you will have the default CP300 mappings available. The display will show the current SCRATCH build number. The panels will switch to displaying the actual functions once you have entered the SCRATCH Player. See the SCRATCH User Guide for details on customizing the control surface functions. Note: If you have ‘cs_mappings.xml’ files in your SCRATCH User folder, they will be used instead of the default mapping file. To use the default mappings, remove any existing ‘cs_mappings.xml’ files from all SCRATCH User folders. 14 Wave - CP300 - Control Panel - Users Manual v1.4 rev 3 17. Connecting the Wave to Speedgrade / Framecycler (Iridas) 17.1 Overview The Tangent CP300 "Wave" is supported with all IRIDAS FrameCycler and SpeedGrade 2009 products. Depending on the feature set of the application the CP300 can be used for playback control, applying looks, color grading. 17.2 Setup Connect Wave computer as descibed in this manual. Open your FrameCycler or SpeedGrade application, it will automatically detect that the CP300 is present. You don't need to make any further adjustments, the device is ready to use. 17.3 Changing the sensitivity of trackballs, wheels and knobs To adjust the sensitivity simply open the settings of FrameCycler or SpeedGrade, then check for "Tangent". This area applies to both the CP200 and the CP300 series. You can leave all fields for IP address space and unit IDs blank when using the CP300. Scroll to the end of the page. Use the sliders to adjust the sensitivity. 15