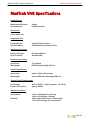
1
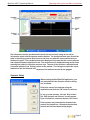
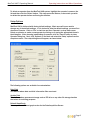
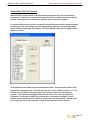
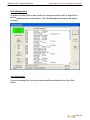
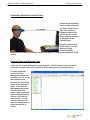
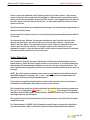
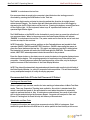
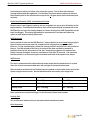
MedTrak VNG Operating Manual MedTrak VNG™ Operating Manual MedTrak VNG Version 1.0 -- EDI Version 5.05 The information contained in this Manual is for the operational use of the MedTrak VNG Video Nystagmographic (VNG) System. © Copyright 2012. The MedTrak VNG System™ All Rights Reserved. No part of this manual may be reproduced, stored in a retrieval system or transmitted in any form or any means, without the prior written permission of the publisher. The original MedTrak VNG™ User Manual was provided by Eye Dynamics, Inc. and has been updated in both content, design and illustration by MedTrak VNG, Inc. For more information or support, contact us at: MedTrak VNG, Inc. 1372 River Spey Avenue Henderson, NV 89012 Telephone: 347-742-4100 Fax: 718-228-7797 www.medtrakvng.com MedTrak VNG™ Operating Manual Table of Contents System Overview ............................................................................................................................1 Operational Considerations ..............................................................................................................3 Functional Description ...................................................................................................................4 Installation Instructions .................................................................................................................5 Operating Instructions and Menu Operations ............................................................................7 Starting MedTrak VNG .................................................................................................................7 The MedTrak VNG Interface ........................................................................................................7 .............................................................................................................................8 Operator Setup Setup Options ..............................................................................................................................9 Summary Page Headings ............................................................................................................10 Customizing The Test Protocol ...................................................................................................11 Folio Management ......................................................................................................................12 Adjusting Video Controls .............................................................................................................13 Advanced Tracking Controls .......................................................................................................14 Testing a New Patient .................................................................................................................15 Goggle Placement .......................................................................................................................16 Positioning Patients for Seated Tests ........................................................................................17 Creating Folios and Running Tests ...........................................................................................17 Ocular Motor Tests ......................................................................................................................18 Recommended Order Of Tests And Placement Of Patient .......................................................19 Tracking and Saccade Tests ......................................................................................................19 Optokinetic and Gaze Tests .......................................................................................................19 Active Head Rotation (AHR) - Horizontal and Vertical ...............................................................20 Spontaneous, Torsion Swing and Torsion Swing w/ Fixation ..................................................21 Torsion Swing Test ......................................................................................................................21 Positional Tests ...........................................................................................................................21 Air Irrigations ...............................................................................................................................21 Editing and Marking Data ...........................................................................................................23 Edit/Marking Screen Features ...................................................................................................23 “Unmarking” A Test .....................................................................................................................24 Notating A Test ............................................................................................................................24 Print Functions ............................................................................................................................25 Marking Observations .................................................................................................................26 Renaming A Test .........................................................................................................................26 Deleting Tests ..............................................................................................................................27 Repeating A Test .........................................................................................................................27 Automatically Interpreting Results with MedTrak™ INTERPRA™ ..........................................28 MedTrak VNG Specifications .....................................................................................................29 MedTrak VNG™ Operating Manual System Overview System Overview MedTrak VNG™ is the video nystagmographic testing unit component of The MedTrak System, the all-in-one balance disorder detection and rehabilitation system. This manual provides an in-depth look at the MedTrak VNG and INTERPRA components only. For additional information regarding the other products and services which comprise The MedTrak System, please visit our website at www.medtrakvng.com. The video-based Goggle component of MedTrak VNG allows for the observation of a patient's ocular responses while their eyes are open in a totally dark, non-fixating, environment during vestibular or during ocular motor testing. Through the use of miniature video cameras, the image of the eye is magnified onto the Laptop Display. This allows the operator to view the patient's horizontal, vertical, and torsional (rotary) vestibulo-ocular responses. The ocular motor tests have the stimulus presented on the Laptop display. An operator controlled moving visual target light provides the stimuli for Tracking, Optokinetic (OPK), Saccade, or Gaze testing. The patient's name, folio or chart/ID number, time and date, as well as the descriptions of the test visit and stimulus are annotated on the Laptop Display. The eye movements can also be recorded on any conventional video tape recorder. Computer analysis of the eye movements is available, along with a hard copy printout of the resulting data. Using our INTERPRA™ online analysis service, you can easily and quickly interpret your VNG test results and create narrative reports. It is suggested that the operator read this Manual in its entirety prior to operating MedTrak VNG. This will make it easier to learn the procedures necessary for its clinical application. MedTrak VNG is used for all conventional test procedures used during ENG testing. Ocular motor tests are usually performed first, as it is important to know if the eyes move in a normal fashion, prior to any examination of the vestibular-ocular reflex. It is important to instruct the patient constantly to follow the moving target light in a back/forth (or up/down) manner, as their attention to the task dramatically effects their ability to follow the stimulus. The saccade test is a constant 20 degree movement. OPK and Gaze testing are also performed. There are 2 speeds of Tracking tests, .4hz and .2hz, which is one-half the speed of .4hz. The .2hz test is done if the patient is unable to reasonably perform the .4hz test. Sometimes both tests are administered and both results will be shown on the Summary Report. Spontaneous nystagmus testing is typically performed when the patient is positioned for the bithermal caloric tests. The importance of this test is the determination if there is any existing nystagmus that would have an effect on the interpretation of the caloric results. Page 1 MedTrak VNG™ Operating Manual System Overview Other Position or Positioning Tests can be performed as desired by the user. There are various positions that seem to hold clinical importance, i.e. head turned to the right/left vs. whole body turned to the right/left for positional vs. cervical influences; head hanging positions, and the Dix- Hallpike tests. The user can configure the MedTrak System for any positions they deem important. The analysis of Caloric Test responses is straightforward in terms of average slow component velocities. Use of the bithermal results to calculate Unilateral Weakness (Reduced Vestibular Response) and Directional Preponderance is automatically presented, and also may be compensated to allow for the existence of any spontaneous nystagmus. Page 2 MedTrak VNG™ Operating Manual Operational Considerations Operational Considerations MedTrak VNG consists of a laptop computer, the goggle and the associated peripheral modules. The goggle is used for the observation and recording of eye movements related to all modes of vestibular stimulations: i.e. Spontaneous, Gaze, Positionals, Dix-Hallpike, Repositioning Maneuvers, Calorics, Fistula, Torsion Swing and, Rotational examinations, etc. The eye movements, including torsional components, are easily visualized on the Laptop Display. The Goggle also has fixation- suppression capability. Patient information and stimulation procedure descriptions are presented on the Laptop Display. Optionally, the video image of the eye can be recorded using screen capture software. As with any vestbulo-ocular procedure, it is preferable to have the patient refrain from antivertiginous medications, sleeping pills, tranquilizers, alcohol and other CNS depressants for several days prior to the examination. The patient should consult with their physician before stopping any medications. In addition, with MedTrak VNG, it is recommended that patients not wear eye makeup, i.e. eye liner, mascara, artificial lashes, etc., as this makes the computer tracking of the eye more difficult. In terms of contact lenses, it is preferable that they be removed prior to the examination, especially hard lenses, as they can slide about the pupil during lid blinks and eye movements. Page 3 MedTrak VNG™ Operating Manual Installation Instructions Functional Description Goggle Assembly A comfortable, lightweight, plastic Goggle which is worn by the patient. The head strap secures the Goggle to the patient. The foam seal eliminates all outside ambient light from the internal chambers of the Goggle. An infrared sensitive, miniature, video camera is attached to the Goggle and provides a video image of the eye on the Laptop display. Invisible, infrared light illuminates the internal aspect of the Goggle allowing the patient to keep their eyes open without the interference of fixation. If fixation is desired, a visible target light can be illuminated by the operator. Computer and Interface Controller The computer controls the functions in the Goggle. The Interface Controller provides the power to the video camera, infrared illuminators, and fixation light. The Laptop automatically tracks the patient's eye movements and displays this data for analysis and printout. A footswitch allows the operator to control pause, next test and, fixation light functions. Page 4 MedTrak VNG™ Operating Manual Installation Instructions Installation Instructions Your MedTrak VNG system will arrive with all the required software and drivers installed and configured on the laptop computer. No further installation of software will be required. To perform testing using MedTrak VNG you will need to connect the components together using the instructions provided below: Laptop and Interface Controller This is the Laptop and Controller that are required for the operation of MedTrak VNG. The Interface Controller 2005 connects to the computer COM port with a supplied cable. Footswitch Connect the footswitch per the Diagram in the Addendum. This item allows Pause, Fixation and Next Test features to be operated remotely from the computer. Goggle Connect the video cable modular connector to the center receptacle on the goggle. The modular connector at the opposite end of the cable attaches to the back of the Interface Controller. This cable provides power to the video cameras, video signal and control of the infrared and fixation lights. Velcro straps insert in the slits on the side of the Goggle. The head strap inserts on the top slit of the Goggle, with the side straps adjustable by the side Velcro straps. The cable sweeps back over the patient's head and is secured to the head strap by a Velcro cable stabilizer. Focus of the lens is by a lever on the underside of camera. Printer You may wish to connect any standard Windows compatible printer to your laptop. Follow the instructions provided with your printer for installation instructions. Recording of Tests If the operator desires to record the video images of the eye, you will need to use any standard screen capture software (i.e., SMRecorder (FREE): www.video2down.com, Debut Video Capture Software ($29.99): http://www.nchsoftware.com/capture/index.html, or Camtasia (most expensive): www.camstudio.org). Page 5 MedTrak VNG™ Operating Manual Installation Instructions Switching Video Camera From Right to Left Eye If desired, the video camera can be switched from the right eye to the left eye by removing the camera adjustment knob/screw and rotating latch and carefully pulling the camera, light occluding boot and cover rearward until it is free from its mounting position. Remove the cover from the left side camera mount location and install the camera and boot in the left side, inserting the camera carefully into the camera mount tube, making sure the boot covers the outer surface of the camera mount tube. Replace the camera adjustment knob/screw and tighten to hold the camera in place. Secure the cover by flipping up the rotating latch. Place cover from left side on right side camera mount space and secure with rotating latch. It is advised that you use a multiple outlet surge protector power strip to connect all your power cables. This will protect your laptop and Interface Controller from power surges. The location of the power switch for the Laptop is above the keyboard. There is no power switch on the Goggle. D.C. operating power for the goggles and footswitch is supplied from the Interface Controller via the multi pin connectors and cables. Page 6 MedTrak VNG™ Operating Manual Operating Instructions and Menu Operations Operating Instructions and Menu Operations Starting MedTrak VNG Connect your MedTrak VNG equipment together using the instructions provided in the Installation Instructions. Turn on the laptop and Interface Controller. After turning on your laptop, Windows will automatically boot. This may take several minutes. After booting completes, the Windows desktop will appear. From the Windows desktop, double click the MedTrak VNG icon. Depending on your version of the MedTrak VNG software, the icon will appear as one of the following: After double clicking, the MedTrak VNG application will load. Allow a few seconds for the system to load and initialize. The MedTrak VNG Interface The MedTrak VNG interface is designed for maximum efficiency and ease of use. Take a moment to become acquainted with the elements that make up the interface: As you can see in the figure above, the top area of your screen is made up of a title bar, a task/menu bar and a tool bar. The title bar displays the name of the application running and you can use the 3 functions provided at its right side to minimize, maximize or exit the MedTrak VNG application. The task/menu bar provides you with access to all the functions provided by the MedTrak VNG application. The tool bar provides easy access to the most utilized functions used during testing. During testing and editing/marking, the interface contains several additional components as shown below: Page 7 MedTrak VNG™ Operating Manual Operating Instructions and Menu Operations The information section provides details about the test currently being run as well as information about both the operator and the patient. The incomplete tests area lists all the tests in the testing protocol which have not yet been run with the current patient and are displayed in green. The completed tests area displays all the tests that the current patients has completed and are displayed in red. The stimulus area is displayed during certain tests requiring the patient to follow an onscreen icon. The size of the stimulus is adjustable and is covered in-depth in the Testing section of this manual. The tracings area provides visual feedback of the test stimulus and response of the patient recorded by the goggles. Operator Setup When starting the MedTrak VNG application, you are prompted with the Operator selection dialog box, as shown: Select the name of the operator using the application and click the ‘OK’ button to continue. To set up a new operator, click the ‘New’ button. The ‘Edit Operator and Protocol’ box will appear. Type in Operator’s name and depress ‘OK’ button. Each operator may customize the standard test protocol for themselves. Otherwise the standard protocol will be listed when testing begins. Page 8 MedTrak VNG™ Operating Manual Operating Instructions and Menu Operations To delete an operator from the MedTrak VNG system, highlight the operator’s name on the list and then click the ‘Delete’ button. This step cannot be undone, so be certain you wish to delete the operator before confirming the deletion. Setup Options MedTrak VNG is delivered with factory default settings. Most users will never need to change any of the default settings. If it is desired to alter the default settings, you must first choose an Operator. Click on ‘File’ on task bar and then ‘Operator’ on drop down menu. Select an operator or make a new operator by clicking on or typing the appropriate items in the dialog box. After choosing/establishing an operator, click on ‘Cancel’ button to close Operator dialog box. Next, click ‘Options’ on the task and select the ‘Setup’ option from the drop down menu. The setup dialog box will appear, as shown below: The following options are available for customization: Data Path This defines where data and folio information files are stored. Archive Path This defines where permanent storage such as ZIP drive or any other file storage location that exists for archiving purposes. Default Graph Scale You may choose different graph scales for the Data Acquisition Screen. Page 9 MedTrak VNG™ Operating Manual Operating Instructions and Menu Operations Analysis Options • Large Stimulus: When chosen, a larger stimulus will appear during tests which require users to follow an onscreen icon. By default, this option is disabled. • Offset Calorics: When chosen, subtracts any Spontaneous Nystagmus measurement from Caloric Nystagmus measurements in the calculation of Unilateral Weakness and Directional Preponderance. By default, this option is enabled. • Legacy SCV: This option is used for compatibility with previous versions of the MedTrak VNG application. By default, this option is disabled and it is strongly advised that you do not enable it unless instructed by MedTrak Technical Support. System Type Defines whether system is 2 channel or not and COM Port location used for Interface Controller connection. MedTrak VNG systems operate as single channel devices and this option should never be changed unless instructed by MedTrak Technical Support. Summary Page Headings After testing a patient, you may print a summary report of the test results. You may wish to customize the headings on the reports to include your name, address, phone number and any other information you wish. To customize the report heading, select ‘Options’ from the task/menu bar and then select ‘Report Text’ from the drop-down menu. The ‘Heading for Report Pages’ dialog box will appear, as shown below: MedTrak VNG Move the mouse pointer to the line of text that is to be edited and click on it. Using the standard ‘Home’, ‘End’, ‘Delete’ and Space bar word processing functions, the text can be centered, have capital letters, etc., all at the discretion of the user. When finished, press the ‘OK’ button. You may also select the heading font and body font for your reports by clicking on either the ‘Heading Font’ or ‘Body Font’ buttons. Page 10 MedTrak VNG™ Operating Manual Operating Instructions and Menu Operations Customizing The Test Protocol MedTrak VNG is delivered with a recommended test protocol (the order of tests being performed). If desired, you may alter the order of the tests or add/remove tests from the protocol. Each operator can maintain a separate protocol within the system. To customize the protocol, select an operator from the Operator selection dialog (accessed by clicking on ‘File’ on the task/menu bar and selecting ‘Operators’ from the drop-down menu) and then clicking the ‘Edit’ button. The ‘Edit Operator and Protocol’ dialog box will appear, as shown: All available tests are listed in the standard protocol order. Use the mouse pointer and a single click to highlight a test. Then put the pointer on ‘Insert’ button and click on it. The test will then be listed on the left column as the custom protocol for that particular operator. It is important to highlight and insert the tests in the order you want them performed. If a mistake is made and a chosen test is not wanted, highlight it on the protocol column and depress the ‘Remove’ button with the mouse pointer. Use the scroll bar on the right side of the columns to review all tests available and/or chosen. Page 11 MedTrak VNG™ Operating Manual Operating Instructions and Menu Operations Folio Management To access an existing Folio or start a new Folio, with mouse pointer, click on ‘Open Folio’ in the File drop down menu on the task bar. The ‘Folio Management’ dialog box will appear, as shown: Open Existing Folio To open an existing Folio, first click on the desired Folio and then click the ‘Open Folio’ button. Page 12 MedTrak VNG™ Operating Manual Operating Instructions and Menu Operations New Folio To create a new folio, click the ‘New Folio’ button. The Folio Information dialog box will appear, as shown: Fill in all the requested information and click the ‘OK’ button when complete. Additional Operations There are various other functions that can be accomplished with the Folio Management dialog box such as copying or moving folios to or from the archive directory. Adjusting Video Controls When you receive your MedTrak VNG system, all video controls are set on a factory default level which should not require any adjustment. However, if you would like to tweak your video settings for optimal data capture, you can adjust the video settings. Click on ‘Options’ on the task/menu bar and then select ‘Video Setup’ from the drop-down menu. The ‘Video Setup’ dialog box will appear, as shown: Page 13 MedTrak VNG™ Operating Manual Operating Instructions and Menu Operations Using your mouse, drag the indicator up or down as required for each setting. The adjustments include: White Out This is the level of white out on the pupil Black Lines This is the density of black cross hairs on pupil Track Level This is the overall tracking level to assure proper pupil capture for eye tracking purposes. There is an additional check box at the top labeled ‘Overlay Video’. By checking this box, the video of the eye will be overlaid with the text when using an external eye video monitor. Advanced Tracking Controls Advanced tracking controls allow you to fine-tune the video cameras used for tracking a patient’s eye. They are accessed by clicking on the ‘Adv. Tracking’ option on the task/menu bar. The ‘Advanced Tracking Controls’ dialog box will appear, as shown: Tracking Level Adjustment This is the overall tracking level to assure proper pupil capture for eye tracking purposes. Capture Mask This reduces the area of the video screen for eye tracking capture. This is used only in the event the patient may have an eye that is difficult to capture for eye tracking. This difficulty may be caused by eye shadow, heavy mascara, tattooed eye liner, deep set eyes, etc. Page 14 MedTrak VNG™ Operating Manual Operating Instructions and Menu Operations To reduce the troublesome area of the eye, use the four controls to pull down and up as well as to pull in from each side, only as needed, the eye tracking area limits. The limit lines are displayed on the video monitor. Drag the controls with the mouse and the reduced area is shown in the dialog box and the actual lines shown on the video monitor. An example of a reduced capture area is shown below: Page 15 MedTrak VNG™ Operating Manual Testing a New Patient Testing a New Patient Now that you’ve set up your MedTrak VNG software, you can begin to test patients. Goggle Placement Place the Goggle on the patient, adjusting the position of the Goggle to ensure that the patient's eye is fully visible on the video monitor. Adjust the Velcro closure on the head strap to tightly secure the Goggle to the patient. If adjustment for centering of the eye is required, loosen the camera adjustment knob on the Goggle and center the eye on the video screen. If the iris markings are not clearly in focus, turn the camera lens adjustment lever while viewing the eye on the video monitor until focus is achieved. Step 1: Place goggle against patients face Step 2: Pull straps over patient’s head creating a snug fit. Page 16 MedTrak VNG™ Operating Manual Testing a New Patient Positioning Patients for Seated Tests Patient should be seated in exam chair facing front of Laptop. Remove cover plate over left eye on Goggle so patient’s left eye can see the ocular motor stimulus which will be displayed on the Laptop display. Using the supplied ‘Ball Chain Gauge’, place the patient so gauge stretches straight between front surface of the Laptop's display and patient’s forehead (approximately 15-18 inches). Creating Folios and Running Tests A folio is a set of tests completed by a single patient. You will need to create a new folio every time you wish to test a new patient (or follow-up testing on an existing patient). To create a new folio, bring up the Folio Management dialog box by clicking on ‘File’ on the task/menu bar and selecting the ‘Open Folio’ option on the drop-down menu. From the Folio Management dialog box, click the ‘New Folio’ button. After completing the New Folio dialog box, click the ‘OK’ button to begin testing. You will now have an open folio ready for testing and your screen will appear as shown: Page 17 MedTrak VNG™ Operating Manual MedTrak VNG Specifications Select a test to be conducted from Protocol column on left side of screen. Place mouse pointer on the test and a single click will highlight it. When the test is completed it will be shown in the lower Completed Test portion of the column. After highlighting a test, click on the ‘Run’ button on the left side of the tool bar. To start data acquisition, click the ‘Pause’ button on tool bar. Data Screen Graph Scale can be adjusted by clicking on the selected scale degree button at the top of the data screen. Across centerline of data screen are one second timing marks and indicate screen width of 10 seconds. For tests other than ‘Calorics’, the operator should press ‘Next’ and the next test in the protocol will be chosen. For caloric tests do not use the ‘Next’ function. Always press ‘Pause’ and then ‘Done’. This assures the data is saved. When the new test is set, press ‘Pause’ again to start the new test. To change to the next non-caloric test it is not mandatory to pause. You may depress ‘Next’ and the next non-caloric test will be selected and data collection continues on a non-stop basis. Ocular Motor Tests The stimulus for Tracking, Saccade, Optokinetic and Gaze tests will be displayed on the Laptop display. Press the 'Auto Capture’ button on the tool bar or ‘A’ on the keyboard and the computer will automatically establish an electronic 'lock-on' to the patient's eye. This will be indicated by the pupil being 'white' with a black cross-hair positioned at the center of the pupil. NOTE: The 'white' pupil area and its black cross-hair only indicate the location on the eye the VIDEO computer is tracking. The ‘+’ and ‘-‘ keys on the numeric keypad allows fine adjustment of the eye tracking threshold feature. If the patient changes their head position, or closes their eyes, the 'lock-on' should be reestablished by pressing the ‘Auto Capture’ button on the tool bar. The Laptop display shows the real-time horizontal and vertical eye movement components. The Right Eye is displayed in RED, and a Stimulus is YELLOW. The patient's Folio Number and Name, Subject Description, Test Set Number, Operator’s Name, the Time and Date and test length time are also displayed. The operator selects the test desired from the Protocol column on the left side of the data acquisition screen. The ‘Pause button or ‘PAUSE’ (left) Footswitch are used to start or pause the collection of eye movement data. When in the Pause mode, the Data Display Monitor will indicate Page 18 MedTrak VNG™ Operating Manual MedTrak VNG Specifications ‘PAUSED’ in a window on the tool bar. Eye movement data is saved to the computer's hard disk when the testing process is concluded by pressing the DONE button on the Task bar. The Fixation Light can be activated to show the patient the direction of straight ahead within the dark Goggle. The fixation light will illuminate within the side of the Goggle by depressing the Left or Right button on the tool bar. Pressing the button a second time turns off the fixation light. On the keyboard, letters keys ‘D’ operates Left fixation and ‘F’ operates Right fixation lights. The PAUSE button or the PAUSE on the footswitch is used to start or pause the collection of eye movement data. When in the pause mode, the Data Display Monitor will indicate ‘PAUSED’ in a window on the tool bar. The pause mode can be used at the end of each test in order to setup for the next test. NOTE: Footswitch: There are three switches on the Footswitch base and provide for foot operated PAUSE, FIXATION and NEXT TEST functions. PAUSE is done using the mouse to press the Pause button on the tool bar. This starts and stops any test that is taking place. The footswitch is labeled- left switch for PAUSE and right for FIXATION. The center base switch, NEXT TEST, when depressed selects the next test in the protocol. Press the Center button on the data screen to center the data on the graphs displayed once data acquisition begins. This centering operation is functional at any time within a test procedure. Centering does not affect the baseline position of the data, only its displayed position because of the limited size of the Data Display Window. NOTE: The data will automatically be centered each time the data scrolls to the left side of the Data Display Window, i.e. every 10 seconds of data acquisition. This will have no effect on any subsequent analysis; it is only for display purposes. Recommended Order Of Tests And Placement Of Patient Tracking and Saccade Tests Observe patient’s eye on video monitor for later marking of observations in Mark Test Data mode. There are 2 speeds of Tracking tests available, .4hz, which is standard and .2hz, which is one-half the speed of .4hz and should be used when the patient is reasonably unable to perform the test at .4hz. If both tests are administered, the result of both tests will be shown and printed on the Summary Report. Computer will analyze for Gain and Phase of Tracking and for Peak Velocity and Latency of Saccade test. Optokinetic and Gaze Tests Computer will analyze and report slow component velocity (SCV) of nystagmus. Best method for good data from the OPK test is to advise patient to stare intently at full screen Page 19 MedTrak VNG™ Operating Manual MedTrak VNG Specifications of stimulus bars and try to follow a bar across the screen. Test is done with stimulus moving leftward and then rightward. For the Gaze Test, have patient continue to stare at the stimulus point for the 10 seconds it stays at the +10 gaze points, both horizontally and vertically. Active Head Rotation (AHR) - Horizontal and Vertical Remove cover from Goggle to open up one eye so patient can see a point of fixation on the Laptop display. Position patient directly in front of the Laptop display and adjust tilt of the AHR Receiver on top of the Laptop display so it faces directly at the AHR Transmitter on the top of the Goggle. This aiming adjustment is important and if not done will affect the quality of data obtained during these tests. AHR Horizontal Advise patient to fixate on the AHR Receiver. Instruct patient to move head left and right in time to metronomic beeps from the computer while keeping their eyes on the AHR Receiver. On the Laptop display, yellow line is head position; red data line is the position of the eye. First 10 seconds of the test is for setup of the data and data for analysis is gathered after the first 10 seconds of the test. As the test progresses, the speed of the beeps increases through 1 Hz up to a maximum of 5 Hz after 15 seconds. It is important that the patient try to keep moving the head back and forth at the speed of the beeps. AHR Vertical This test is conducted as the Horizontal test above except that the head motion is up and down for vertical movement rather than left and right for horizontal movement. Data derived from Horizontal and Vertical tests are plotted on charts with center point of the charts being the most normal. Normal deviations from this center point range from: Horizontal Vertical Velocity Gain 80 – 120% 70 – 130% Asymmetry +10 to -10% +10 to -10% Velocity Phase 160 – 210 deg 160 – 210 deg Data is plotted and reported on Page 2 of the Summary Report and includes: Velocity Gain This is difference between the eye movement and the head movement. Gain Asymmetry Page 20 MedTrak VNG™ Operating Manual MedTrak VNG Specifications This is comparison of left vs. right, or up vs. down movement and calculation of difference, or asymmetric movement. Velocity Phase This is whether the eye movement is leading or lagging behind the head movement and is reported in degrees. Perfect phase is 180 degrees, i.e., the eye and head are moving in exactly opposite directions. Spontaneous, Torsion Swing and Torsion Swing w/ Fixation Turn patient away from Data Monitor. Place cover on open side of Goggle so patient is in darkness. With patient sitting erect in exam chair, conduct: Spontaneous Test. Data may be recorded for an extended time, but must be in excess of ten seconds in order to be saved as a completed test. Gaze w/Fixation. Patient in same position. Turn on Fixation light with ‘F’ key or Fixation Button on Task bar and commence test. Advise patient to look at Fixation light. At end of test turn off fixation light by pressing ‘F’ key or Fixation Button on Task bar. Torsion Swing Test Patient in same position. Make sure fixation light is off. Swing exam chair back and forth at least 30 degrees to the left and 30 degrees to the right for a total movement of 60 degrees of arc. The speed of rotation should be between 1 and 2 Hz. Observe eye of patient on Laptop display for later marking of observations in Mark Test Data mode. Torsion Swing Test w/ Fixation. Patient in same position. Turn on fixation light and again, rotate chair in same manner as prior test moving back and forth through an arc of at least 60 degrees at a speed of 1 to 2 Hz. Observe eye on video monitor for later marking of observations in Mark Test Data mode. Positional Tests Supine, Head Center, Left & Right; Body turned left & right; Dix-Hallpike - Head Left & Head Right. This series of tests is done with patient on the exam table with head flat on the table (not elevated). When the Dix-Hallpike tests begin, lower head to flat position with body positioned so head hangs over end of table in order to achieve the inverted position. Slow component velocity (SCV) of nystagmus will be the result of analysis of eye movements for all of these various positional tests. During Mark Data Mode, the SCV can be viewed in the upper right corner of the data screen. The result will be printed out on the Summary Test Results page. Air Irrigations Because air does not transfer heat as well as water, the irrigations using air as the stimulus must be done for a longer period of time and at temperatures higher and lower than water. Time for air irrigations is 60 seconds. If nystagmus starts appearing prior to 60 second time period, then irrigation may be stopped. Page 21 MedTrak VNG™ Operating Manual MedTrak VNG Specifications Temperature for air irrigations is 48 degrees Celsius for the ‘Warm’ irrigations and 26 degrees Celsius for the ‘Cool’ irrigations. Slow component velocity (SCV) of nystagmus will be the result of analysis of eye movements for all of these various positional and caloric tests. During Mark Data Mode, the SCV can be viewed in the upper right corner of the data screen. The result will be printed out on the Summary Test Results page. The caloric tests will also compute the difference from one ear to the other and so indicate on the Summary Page report. Page 22 MedTrak VNG™ Operating Manual MedTrak VNG Specifications Editing and Marking Data From File menu choose ‘Open Folio’. Folio dialog box appears. Highlight with mouse pointer the Folio to be marked and depress ‘Open’ button. Verify Folio information and depress ‘OK’ button. In lower left is column of completed tests. With mouse pointer, highlight the test to be marked. Double click on the chosen test and it will be opened and displayed on the data screen. Edit/Marking Screen Features Tracings Red is right eye, Yellow is fixation light on or stimulus for Ocular Motor Tests. Upper portion is Horizontal eye position. Lower portion is Vertical eye position. Graph Scale 5 deg = Each division of scale is 5 degrees 10 deg = Each division of scale is 10 degrees 20 deg = Each division of scale is 20 degrees 40 deg = Each division of scale is 40 degrees Centering data on graph Right, Stimulus or All may be chosen for centering. Point to your choice and single click with mouse. Then point to CENTER and single click on mouse and whatever was chosen will be centered. Scrolling through test At bottom of the Horizontal graph screen is a conventional WINDOWS scroll bar. This will move the data to left and right. Use conventional WINDOWS method with mouse pointer to move the scroll bar. On the right side of both Horizontal and Vertical graph screens is a scroll bar for moving data up and down. Page 23 MedTrak VNG™ Operating Manual MedTrak VNG Specifications Information Section provides: Subject name Tested by, date and time of testing Name of test being displayed Length of test in seconds Marking choice Current ‘View’ position in seconds from beginning of test Mark position in seconds from beginning of test The average slow component velocity (S.C.V. in degrees/second) for all nystagmus movements in the displayed 10 second portion of data is shown in the S.C.V. ‘Viewed’ windows (horizontal and vertical channels) on the Data Display Monitor. The vertical placement of the data should be accomplished as described above for the baseline function. Press the ‘MARK’ button to mark the displayed 10 second section of data for analysis. The task bar ‘Markings’ can be selected to show type of marking choices. Default will mark both vertical and horizontal movements. If different markings are desired, select and click on the desired marking method. If the operator scrolls forward or backward to view another section of data within the same test sequence, the S.C.V. for the section and the time of the Viewed Segment as well as the time and S.C.V. for the Marked Segment (if any) are displayed in the upper right corner of the graph display. “Unmarking” A Test If the operator wishes to unmark a test, choose ‘Markings’ on the task bar and click on ‘Unmark’ on the drop down menu. Notating A Test If the operator desires to make notations regarding the presence of rotary nystagmus, latency of response, fatigability of the response, and if the patient experienced subjective sensations of vertigo (dizziness or lightheadedness), depress the ‘SUMMARY’ button on the tool bar. Text can be written to any length desired and will be printed with the Summary Report. Click on any part of the screen that is outside the comment area to return to the eye movement data. Depress the ‘NEXT’ button on the tool bar to bring up the next test for marking or the ‘PREVIOUS’ button to go back to the prior test. When finished marking all tests, depress the ‘DONE’ button to exit the Folio. Page 24 MedTrak VNG™ Operating Manual MedTrak VNG Specifications Print Functions With the selected patient Folio open, depress the ‘PRINT’ button on the tool bar. The Print dialog box appears. With the mouse pointer, click on one of the choices of ‘What to Print’. The following instructions describe the manner in which the marked data will be displayed or printed, depending on the 'print' or 'preview' function chosen by the operator. NOTE: Graphs are printed with the red or bold line representing the ‘RIGHT’ eye; and the thin or light line being the ‘STIMULUS’; Fixation is a bold line on the horizontal ‘time line’. The vertical line is divided into 5 degree segments. Each tic mark on the vertical line is 5 degrees. The Summary Pages will be previewed/printed in sections. If in the PRINT mode, the Summary Pages will be printed, and the conventional WINDOWS indicator will show the status of printing. If in the PREVIEW (screen) mode, to view the bottom of a page or the top of the page, use the 'UP' and 'DOWN ARROW' Keys or the scroll bar on the right side of the page. The 'Graphs & Summary' choice will preview/print the marked data tracing graphs and the Summary Pages. 'Print One Graph' will preview/print any selected graph which has been marked, and will print the 10 seconds that is marked. 'Full Test Graph' allows for the preview/printing of an entire test (not just a 10 second segment). Select which test file is desired by highlighting it in the “Tests Completed” column. Next, push the PRINT button and select whether you wish to Print the graph or View it on the Screen. Select ‘Full Test Graph and the horizontal and vertical eye data (2channel) will be printed or shown on the screen in alternating horizontal and vertical 40 second segments. At the bottom of the dialog box are two additional choices: To Printer: Items chosen will be printed To Screen: Items chosen will be displayed on Laptop display. With mouse pointer, click on button of your choice. If in Screen or Preview mode, click on ‘Page’ on the task bar in upper left corner. A drop down menu allows selection of ‘Next’ page, ‘Previous’ page or ‘Exit’ preview mode. The operator can make their Observational comments as to the presence of rotary eye movements, latency, fatigable nystagmus, and patient sensations of dizziness and vertigo where appropriate, by clicking on the particular observation during the analysis of various Goggle tests. A dialog box for these observations appears when appropriate during the Edit and Marking process. It is located on the upper portion of the Protocol column on the left side of the screen. Tests which were not performed or marked for analysis, are indicated by three periods [ ... ] or N.A.. on the printout. Page 25 MedTrak VNG™ Operating Manual MedTrak VNG Specifications For both the ' Summary Report' and the 'Data Tracings', a zero (0) result means no or less than one degree of nystagmus was detected. Unilateral Weakness (Reduced Vestibular Response-RVR) and Directional Preponderance (DP) percentages are calculated, per the following formulas, for each selected eye, with the calculations being corrected for any spontaneous nystagmus if the 'Caloric Offset' option was selected during system setup. If compensation results in the reversal of the caloric direction a value of 'zero' will be assigned and used in the following formulas: UW or RVR % = (Rt. Cool + Rt. Warm) - (Lt. Cool + Lt. Warm) X 100 Rt. Cool + Lt. Cool + Rt. Warm + Lt. Warm DP % = (Lt. Cool + Rt. Warm) - (Rt. Cool + Lt. Warm) X 100 Rt. Cool + Lt. Cool + Rt. Warm + Lt. Warm NOTE: If the patient has the unusual situation of no caloric responses - bilaterally, the RVR and DP computations will be shown as: NR=AU, meaning NO RESPONSE, BILATERALLY. Marking Observations There are times when user evaluation of items such as; presence/absence of torsional (rotary) nystagmus, latency of response, fatigability, and subjective sensations. This function is done in the 'EDIT AND MARK DATA' function. Look for the dialog box in the upper left column of tests when editing and marking goggle tests. Renaming A Test NOTE: This function is to be used only if a test performed using the Goggle module was incorrectly labeled at the time of data acquisition, i.e., a warm left caloric was performed but was mistakenly labeled as a cold right caloric. Because this inaccurate labeling will have an effect on the resulting analysis, the ‘Rename Test’ function allows the operator to correct this mistake. Ocular Motor tests cannot be renamed since the stimulus is computer controlled and provides only the stimulus selected. With mouse pointer, highlight the completed test that you want to Rename. On task bar choose ‘TESTS’ to access drop down menu. With mouse pointer, click on ‘Rename Test’ in the drop down menu. List of test names appears. With pointer click on the test name that will replace the name of the selected test. Press ‘OK’, the name automatically replaces the name of the test to be renamed in your completed test section. Page 26 MedTrak VNG™ Operating Manual MedTrak VNG Specifications Deleting Tests CAUTION: DOING THIS WILL DELETE THE TEST FROM THE FOLIO AND IT CANNOT BE RECOVERED. Highlight the test to be deleted. On the task bar choose ‘TESTS’ to access drop down menu. Next click on drop down menu item ‘Delete Test’. Confirmation box will ask Yes or No to confirm deletion of the selected test. Repeating A Test Highlight any test in the upper Protocol section. On the tasks bar choose ‘TESTS’ to access drop down menu. Choose ‘Run Any Test’ on drop down menu and from the displayed list, click on the test you want to repeat. The chosen test will be placed in the Protocol and is ready for doing a repeat of the test. Operator must make sure that the proper test is chosen to mark when editing. Page 27 MedTrak VNG™ Operating Manual MedTrak VNG Specifications Automatically Interpreting Results with INTERPRA™ Your MedTrak VNG system has the ability to export test results for automatic interpretation narrative report creation using the MedTrak INTERPRA online system. For more information regarding INTERPRA, please visit www.scottpt.com. Page 28 MedTrak VNG™ Operating Manual MedTrak VNG Specifications MedTrak VNG Specifications Configurations: Measurement Section: Control Section: Goggle Laptop Computer Accessories: 1 set (cables, etc.) Imaging System: Imaging Device: Synchronization: 1 ea CCD Video Camera NTSC Sampling Frequency: 60 Hz Measurement Output Display of Results: Copy of Results: On Laptop Monitor Standard VCR Stimulus Light Source: Luminance: Wavelength: 3 ft. Candles LED Peak Wavelength 660 nm Infrared Light Source: Illumination: Wavelength: Indirect, Diffuse Illumination Infrared LED Peak Wavelength 940 nm System Power Requirements: Line Voltage: Power Consumption: 100/117VAC +/- 10% Frequency: 50/60 Hz Approx. 200VA Ambient Conditions: Temperature: Humidity: +10 to +40 Degrees C operating +10 to + 50 Degrees C storage 10% to 80% operating, non-condensation 5% to 85% storage, non-condensation Page 29