1
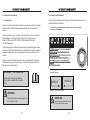
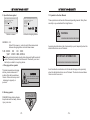
ROBOT MOWER
USER MANUAL
Please read this manual carefully before use
Please keep this manual for future reference
ROHS
T
Thank you for purchasing our product. We know that you will enjoy the
extra free time you will have while using our robot lawn mower to mow
your lawn. You will be impressed with your lawn's appearance and vest of
all, 2000series did it for you.
IMPORTANT!
The following pages contain important safety and operating instructions.
Please read and follow and instructions in this manual. Carefully read and
review all safety instructions, warnings and cautions contained in this
manual.
Failure to read and follow these instructions, warnings and cautions
statements may result in severe injury or death to persons and pets or
damage to personal property.
WARNING
Robot lawn mower can be dangerous
if incorrectly used!
CONTENTS
1. INTRODUCTION AND SAFETY······················································P1
1.1Introduction P1
1.2Symbols on 2000series P2
1.3 Symbols in the User Manual P4
1.4 Safety instructions P5
2. PRESENTATION··········································································P7
2.1 What's in box P7
2.2 Function of 2000series P9
2.3 Technical date P12
2.4 Working route P14
3. INSTALLATION···········································································P15
3.1 Preparations P15
3.2 Hardware adjustments P15
3.3 Charging station installation P17
3.4 Virtual wire installation P19
3.5 Virtual wire and charging station connecting P25
3.6 Power connection P25
4. CONTROL PANEL AND REMOTE CONTROL·································P26
4.1Control Panel view P26
4.2Remote control P27
5. USE····················································································P28
5.1 Preparation P28
5.2 Starting the mower P29
5.3 Stopping mower /Turn off mower P30
5.4 Restart mower P30
5.5 Emergency Switch P30
5.6 Operation pattern P32
5.7 System time setting P32
5.8 Password setting P33
5.9 Address setting P34
5.10 Working schedule setting P35
5.11 Delete working schedule P36
5.12 OTHER setting P37
5.13 Recharging P40
6. MAINTENANCE AND STORAGE··············································P41
6.1 Robot cleaning P41
6.2 Robot Storage P43
6.3 Blade replacement P43
6.4 Fuse replacement P43
6.5 Battery P44
7. TROUBLE SHOOTING····························································P45
8. EXPLODED VIEW··································································P51
8.2 Charging station Exploded View P52
8.1 Mower Exploded View P53
1.INTRODUCTION AND SAFETY
1.INTRODUCTION AND SAFETY
1. Introduction and safety
1.2 Symbols on 2000series
1.1 Introduction
These symbols can be found in the mower. Study them carefully so you
understand their significance.
Product, product specifications and this document are subject to change
without notice. All other trademarks are property of their respective
owners.
1. The symbol is pasted on the top of mower, please read it carefully
before using the appliance.
The lawn mower may be used only by those who know how to operate it
after reading and understanding the instructions in this manual.
Model: 2000 series (L2700, L2800, L2900 named 2000series)
CE, RoHS approved.
1 2
4 5 6
7 8 9
0
The following pages contain important safety and operating instructions.
Please read and follow all instructions in this manual. Carefully read and
review all safety instructions, warnings and cautions contained in this
manual.
Failure to read and follow these instructions, warnings and cautionary
statements may result in severe injury or death to persons and pets or
damage to personal property.
5.WARNING-Operatethe disabling device before working on or lifting the machine
IMPORTANT INFORMATION
2. Handle symbol.
Read through the Operators Manual
carefully and understand the content
before
HANDLE
HANDLE
Always lift the mower by Handle.
WARNING
Robot lawn mower can be dangerous
if incorrectly used.
- P1-
WARNING
severe injury or death may cause
if incorrectly lift the mower.
- P2-
1.INTRODUCTION AND SAFETY
1.INTRODUCTION AND SAFETY
1.3 Symbols in the User Manual
3. Specifications symbol
Taizhou Tianchen Intelligence &Electrics Co,Ltd
Taizhouname:
Tianchen
Intelligence
&Electrics Co,Ltd
Product
Robot
lawn mower
Product
name: Robot
Model:
L2X00
IPX4lawn mower
Model:
XXXXX
IPX4
Input: XXX V — 2A
85W
Input: XXX V --- 2A 85W
Made in China
Taizhou Tianchen Intelligence &Electrics Co,Ltd
Product name: Robot lawn mower
Model: L2X00
IPX4
Input: XXX V --- 2A
Ouput : XXX V — 2A
Made in China
S.N.:XXXXXXXXXXX
These symbols can be found in this owner/operating manual. Study them
carefully so you understand their significance.
Made in China
Address :XX
R O HS
RoHS
R O HS
S.N.:XXXXXXXXXXX
20X X
Pasted on mower
Pasted on charging station
WARNING
xxxxxxxxxxxxxxxxxxxxxxxxx.
ADDRESS: XX
Enter XX to mower, in order to match the communicate
between charging station and robot lawn mower.
S.N.: XXXX XX
XX XXX
year month date number
: Waste electrical products should not be disposed of with household
waste. Please recycle where facilities exist. Check with your Local
Authority or retailer for recycling advice.
A warning box indicates a risk of personal injury exist, especially when the
stated instructions are not followed.
IMPORTANT INFORMATION
xxxxxxxxxxxxxxxxxxxxxxxxxxxxxxx.
4. Charging station symbol.
An information box indicates a risk of material damage exist, especially
when the stated instructions are not followed. The box is also used where
there is a risk of user error.
This label is pasted on charging
station, please make sure to
position this side towards lawn
interior. Failure to do may result
in damage to property or
persons.
Position his side of the charging
station towards lawn interior
5. Warning symbol.
DANGER! Sharp rotating blades.
Keep hands and feet away. Serious
injury can occur.
- P3-
DANGER
- P4-
1.INTRODUCTION AND SAFETY
1.INTRODUCTION AND SAFETY
1.4 Safety instructions
- Use heavy gloves when inspecting or servicing the blades.
- Read the owners/operation manual carefully and follow all the safety
and warning instructions.
- Wear eye protection and use gloves when installing the virtual wire and
driving the wire stakes/pegs. Firmly drive all pegs in order to keep the
wire from becoming a tripping hazard.
- This machine has sharp rotation blades! Never allow the mower to
operate unattended; keep bystanders, children and pets away from
mower when in operation.
- Do not use the charging station power supply with an extension cord.
- Never allow anyone to ride or ait on mower.
- Use only the original equipment power pack and power supply/charger
with this mower.
- Never allow anyone or person who is not familiar with the safe operation
of the mower to operate the mower.
- Do not use the power supply/charger if the cord has become damaged.
- Keep hands and feet away from the cutting blades and other moving
parts.
- Never attempt to service or adjust the mower while it is in operation.
- Inspect and clear the mowing area of all debris (toys, tree branches,
items of clothing, debris' height less than 6cm. etc) before operating the
mower.
- Never raise the mower or attempt to inspect the blades while the mower
is operating.
- Always turn off the power before lifting the mower or attempting any
adjustment.
- When operating the mower in manual mode, maintain a safe distance
from behind or around the mower and wear proper foot apparel.
- Do not operate the mower on slopes greater than 20 degrees or use it in
manual operation on slopes where a firm footing is not possible.
- Do not operate the mower if any safety feature or device is damaged or
inoperable.
- Do not attempt to disable or defeat any safety feature or device.
- P5-
- Do not place metal objects in the area of the charging contacts on the
charging station.
- Do not place metal objects across the charging pins of the mower.
- Do no spray water directly into the docking area of the charging station
or onto the operating panel of the charging station.
- The mower has sharp rotating blades! Please care the mower when it is
mowing, in case of serious injury occur.
- Keep the lawn mower in perfect operating conditions by performing the
maintenance procedures outlined by the manufacturer. Good
maintenance
guarantees better performance and longer service life.
- In order not to irreversibly damage electric and electronic parts, do not
wash the robot with water jets at a high pressure and do not plunge it
partially or thoroughly in water, as it is not watertight.
- It is absolutely forbidden to use the robot in explosive and flammable
environments.
- The operator or user is responsible for accidents or hazards occurring to
other people or their property.
- P6-
2. PRESENTATION
2. PRESENTATION
1 Clamshell:
2. Presentation
This chapter contains information you should be aware of when planning
the instalation.
2.1 What's in box
1
8
2
3
7
5
9
6
4
10
12
13
14
15
16
11
18
MOW
19
24
Open it to adjust cutting height.
2 Adjusting knob:
Screw it to adjust cutting height.
3 Fuse
4 Charging terminal:
Connect with Charger for
recharging directly.
5 Ultrasonic sensor
6 Charging head
7 Control panel
8 Emergency switch:
Press it at any time,
the mower turn off at once.
9 Handle (Human sensor)
Touch it when it’s working,
it stops at once.
10 Blade
11 Blade sheld
12 Home button
Press it when it is operating,
it goes back to charging station
automatically.
13 Virtual wire light
Colorless: in good connecting
Red: Broken wire/ idle
14 Charging light
Red: charging
Green: full charged / idle.
15 Power terminal
16 Virtual wire terminal
17 Copper sheet
18 Charger
19 Virtual wire (100m):
Used to mark mowing area and
create a virtual wall for the mower.
20 Virtual wire connectors (10pcs):
Used to connect virtual wire.
21 Pegs (100pcs):
Used for fix the virtual wire to the
ground around the lawn perimeter
and around obstacles.
22 Stakes (4pcs):
Used for fix the charging station to
the ground.
23 Fuse (2pcs)
24 Remote control
25 Remote control battery
26 Inner hexagon spanner
27 English user manual
17
20
21
25
- P7-
22
26
23
Consumable parts
1. Blade
2. Virtual wire
3. Virtual wire connectors
4. Pegs
5. Fuse
27
- P8-
2. PRESENTATION
2. PRESENTATION
2.2 Function of 2000series
- Lift sensor
There are lift sensors located on each omni-directional wheel. If the
mower was lifted 2cm from the ground in level way, it will stop working
within 2 seconds.
- Mowing schedule
Set up one week (From Monday to Sunday, once for each day) cutting
schedule from control panel. The mower is on auto pattern when in
schedule functioned, if it feels is powerless, it will go back to charging
station for recharge automatically, and it will goes on cutting after it
finishes recharge.
- Tilt sensor
There is tilt sensor installed on the mower too, when the mower was
tilted over 30 degree at any direction, it also will stop working within 2
seconds.
- Anti-theft function
User must enter the correct password then the mower can be started.
What's more, the mower can not be turned on without charging station.
- Cutting width:30cm
- Ultrasonic sensors
Compare to traditional bumpers, the ultrasonic obstacles is much more
safety. The mower selects a new direction before it bumps people or
obstacles automatically. That means no touch! Don't worry, the mower
will never hit your children and pets. Ultrasonic sensors can be selected,
that means it can be turn on or turn off freely.
- Humanistic cutting height selection
3cm-6cm humanistic design.
Easier for user to choose the cutting height. Just screw it!
- Bump sensors
In front of the mower there equipped with bump sensors that will activate
when the mower strikes solid, fixed object when that object is at least 6cm
in vertical height from the supporting surface of the mower. When the
bump sensor is activated, the mower will stop movement in that direction
and reverse itself away from the obstacle.
- Auto recharge system
When the mower is operating it feels powerless, the cutting motor turn off
at once and it will find the virtual wire then go alone it back to charging
station for recharge automatically. (this allows you to keep the charger
connected with the charging station all the time, even after the battery is
fully charged.) On auto pattern, the mower will go on mowing after fully
recharge. But if it is on manual pattern, it will just stay on charging station
after fully recharge.
- Rain sensors
There are two rain sensors on top cover of mower. The mower will go back
to the charging station automatically when it's raining. Rain sensors can
be selected from control panel or remote control.
Turn on it: the mower will go back to home if it is raining.
Turn off it: the mower will go on mowing when it is raining.
- Human sensor
Touch the handle when the mower is cutting, it will cease function within 2
seconds.
- Wireless controller
To control the operate of mower in manual pattenr.
- P9-
- Emergency stop switch
There is an emergency stop switch located on the top of mower and red in
color. If you press it in any case during operating, the mower must stop all
movement and stop the rotating of blades immediately. Rotating the
switch to reset it and the mower is in taskstate by entering the correct
password and choose operate pattern to restart it.
- Two cutting modes
There are two cutting modes of the mower, go straight and go circle (high
efficiency). On manual pattern, we can choose the cutting mode from
remote control. On auto pattern, mower selects cutting mode intelligently.
It goes straight if the grass has be cut, and it goes circle if the grass is
long.
- P10-
2. PRESENTATION
- Virtual wire
The robot lawn mower can't operate without a virtual wire. (we suggest to
use 100m-300m of virtual wire). It leads the mower back to charging
station and the mower will take it as a wall when it is operating. It will get
on the virtual wire until it meets charging sheet which localed in front of
charging station, then it gets off virtual wire and starts cutting.
- Mower stops working if virtual wire has be cut or charging station is
out of power
If virtual wire has been cut off or it's out of sign, the mower must stop
working within 3 seconds. If the charging station is out of power, the
mower also will stop working within 3 seconds.
- Three steps to safe start the appliance
Three necessary steps to start the mower: firstly, connect virtual wire to
charging station and make sure it is in good connecting (virtual wire light
on charging station is colorless). Second, connect charging station with
power supply through charger and the charging station light is in green
color. Third, turn on the power of mower by entering the correct password
and choose operating pattern, the mower started.
- Overload protect
Each of the two blade motors and each of the two wheel driving motors
are monitored continuously during operation for any situation that may
cause these motors to over-heat. In the event this is detected, the mower
will stop operation.
2. PRESENTATION
2.3 Technical date
Model
L2800
L2700
L2900
Mower technical date
Gross weight
24KGS
22KGS
21KGS
Net weight
20KGS
18KGS
17KGS
Mower size
70*48*27cm(LWH) 70*48*27cm(LWH) 70*48*27cm(LWH)
Power
85W
85W
85W
Noise
≤65db
≤65db
≤65db
Qty for cutting blades
1pc
1pc
1pc
Cutting height
2.5-6cm
2.5-6cm
2.5-6cm
Cutting width
30cm
30cm
30cm
Cutting speed
20m/min
20m/min
20m/min
Blades rotate speed
4000rpm
4000rpm
4000rpm
Hill capability
30degree Ma xslope 30degree Maxslope 30degree Max slope
Max ambient functioning temp. 40℃
40℃
40℃
Co verage(for once charging) 800m2+20%
800m2+20%
1200m2+20%
Working capacity
2000m2+20%
2000m2+20%
2600m2+20%
Warranty
1 year
1 year
1 year
- Fuse protect
There is a fuse hold under clamshell (top cover) next to charging jack, it
contains a one-time-use fuse in the event of a short-circuit or power
malfunction.
PS:
How large an area is mown per once recharge depends primarily on the
condition of the blade and the type of grass, growth rate and humidity. The
shape of garden is also significant. If the garden mainly consists of open
lawns, mower can mow more per hour than if the garden consists of
several small lawns separated by trees, flower beds and passages.
- Waterproof
Waterproof design, there is an inner cover under top cover which protect
inside parts from humidify.
Charging station and virtual wire
45*38.5*23.5cm(LWH)
Charging station size
- LED display
Virtual wire maximum length 300m
Standard virtu al wire length 100m
- P11-
45*38.5*23.5cm(LWH) 45*38.5*23.5cm(LWH)
300m
300m
100m
100m
- P12-
2. PRESENTATION
2. PRESENTATION
Type of battery
battery
Lead-acid battery
Lithium battery
Lithium battery
2.4 Working route
Manual pattern
Mower's running path by user's willingness.
7.2Ah
7.2Ah
Charging time
3-4hours
3-4hours
10Ah
5-6hours
Auto pattern
Cutting route when Line is turned on.
Average working time
3hours
3hours
Model
Battery
L2700
L2800
L2900
4.5hours
Functions:
Around virtual wire walking option
Mower can’t be started when
charging station is powerless
Mower can’t be started when
virtual wire has be cut
Intelligent lawn testing
Rain sensor
Auto recharge
Intelligent spiral
Go straight
Anti theft
Cutting route when Line is turned off.
Lift sensor
Tilt sensor
Ultrasonic wave
Bumper sensor
LED display
Waterproof
Human sensor
Time set-up system
Emergency switch
set up password
Rain sensor option
Around virtual wire option
- P13-
- P14-
3. INSTALLATION
3. Installation
This chapter describes how you install this mower. Before starting the
installation read the previous chapter 2. Presentation.
Read the whole of this chapter too before starting the installation. How
the installation is made also affects how well the mower will work. It is
therefore important to plan the installation carefully.
3.1 Preparations
Training
- Read the instructions carefully. Be familiar with the controls and the
proper use of the appliance.
3. INSTALLATION
How to adjust the cutting height:
1.Press the clamshell and open
it.
2. Screw the adjusting knob to the
cutting height you are willing to.
- Never allow people unfamiliar with these instructions or children to use
the appliance. Local regulations may restrict the age of the operator.
3. Close the clamshell.
- The operator or user is responsible for accidents or hazards occurring
to other people or their property.
3.2 Hardware adjustments
Blade adjustment
The mowing system used by this mower is based on an effective and
energy efficient principle. Unlike normal lawn mowers, the mower cuts the
grass instead of striking it off.
Cutting height from 2.5cm to 6cm.
Rain sensors on the mower can be selected(see P38), we recommend
you allow the mower to mainly mow in dry wether to obtain the best
possible result. Even the mower can mow in rain, however, wet grass
easily collects on the mower and the risk of slipping on steep slopes is
greater.
Cutting height explanation :
For example the cutting height
is in 3cm level.
Cut ting he igh t: 3c m
Grass
Height
3CM
The blades must be in good condition to obtain the best mowing result. In
order to keep the blade sharp for as long as possible it is important to
keep the lawn free from branches, small stones and other objects
(especially the objects less than 6cm height).
Adjusting knob
- P15-
- P16-
3. INSTALLATION
3. INSTALLATION
3.3 Charging station installation
- Choose best installation place, please make sure which is flat, no water,
no magnetic interference and no obstacle in the front of charging
station.
- Lay virtual wire in the middle of
charging station.
Virtual wire
Peg
- Fix the charging station with four
stakes.
Charging station best install place:
1. Make sure it
2. No magnetic interference
3. No water
4. No obstacle in front
IMPORTANT INFORMATION
- Please fix the charging station in level place.
Before fix the charging station on the lawn, please examine the
lawn and decide the best location which is easy for the mower
to find the station for recharge.
OK
- P17-
- P18-
3. INSTALLATION
3.4 Virtual wire installation
The virtual wire can be installed in one of the following ways:
- Securing the wire to the ground with staples.
It is preferable to staple down the virtual wire, if you want to make
adjustments to the virtual wire during the first few weeks of operation.
- Bury the wire
It is preferable to bury the virtual wire if you want to dethatch or aerate
the lawn.
3. INSTALLATION
- A minimum distances of front charging station and obstacle is 2 meters.
And make sure the distance from corner to front of charging station is at
least 2.5 meters. Make sure to lay a 2.5 meters minimum straight-light of
virtual wire in front of charging station.
If necessary both methods can be combined so one part of the virtual
wire is stapled down and the remainder is buried.
- Dig virtual wire with pegs 1 meter per piece in straight-line. Dig corner as
picture.
OK
45°
- Bury virtual wire below grass and fasten it on the ground with pegs, so
that the mower should not cut the wire. If the grass grow up, we can still
keep the virtual wire as before.
Add pegs in order to pull the
virtual wire down to the ground
surface, below the grass tips.
virtual wire
Straight - line
at least 2.5 m
Greater than
50cm
IMPORTANT INFORMATION
IMPORTANT INFORMATION
The charging station is not water-proof,
It’s best to make a Rain Shed above the charging station.
Hard or dry ground may cause pegs to break when driving them in.
In extreme cases, watering the lawn where the pegs will be driven.
- P19-
- P20-
3. INSTALLATION
3. INSTALLATION
- If a high obstacle, for example a wall or fence, borders the working area,
the virtual wire should be laid at least 50cm from the obstacle. This will
prevent mower from colliding with the obstacle and reduce body wear.
Greater than
50cm
Greater than
50cm
- The wires leading to the island and
returning from it should be parallel
and touding. But do not cross them!
If protected obstacles are grouped
closely together demarcate them by
a single. Continuous virtual island if
obstacles are dose to edge, leave
them out of the mowing area.
- The distance between charging station and virtual loop should at least
2.5 meters.
- Use the virtual to demarcate areas inside the working area by creating
islands around obstacles that can not withstand a collision, for example,
flower beds and fountains. Run the cable out to the area, route it around
the area to be demarcated and then back along the same route. If
staples are used, the wire should be laid under the same staple on the
return route. When the virtual wire to and from the island are close
together, the mower can drive over the wire.
Max: 1cm
Max: 1cm
1cm
Root
Max: 1cm
50cm
1cm
Tree with hole or flowers
Greater
around require placing a
than 2.5 m wire around it
Max:20cm
Virtual wire
Virtual wire
- P21-
- P22-
3. INSTALLATION
3. INSTALLATION
- How to set virtual wire on the ground which has swimming pool.
Distance between
two wire: 1m
- Care must be taken not to create a corner sharper shorter than 90
degrees when setting up virtual wire. A corner sharper less than 90
degrees can cause the mower to lose track of virtual wire. We can make
greater than 90 degrees corner like follow picture shows.
Incorrect corner
setup
Correct corner set up,
using several angle to
avoid an angle of less
than 90°。
Greater than
2.5m
Rain shed
Greater than
50cm
45°
IMPORTANT INFORMATION
The charging station and charger is not water proof. It’s best to set
a Rain Shed above the charging station.
- P23-
Proper setup in sharp corners
- Joining the boundary wire .
If the boundary wire is not long enough
and needs to be spliced: Use original
solderless couper. It is waterproof and
gives a reliable electrical connection.
To splice: Insert both cable ends in the
coupler. Now press down the button on
top of the connector fully. Use a pair of
pliers or the like, as the button on the
connector is difficult to press down by
hand
- P24-
3. INSTALLATION
4. CONTROL PANEL AND REMOTE CONTROL
4. Control panel and Remote control
3.5 Virtual wire and charging
station connecting
4.1 Control Panel view
2
1
3
- Connect two ends of virtual wire to
patch jack (virtual wire terminal
located on charging station)
randomly, there is no positive and
negative.
3.6 Power connection
1. Insert charger to the station.
2. Connect charger with power
supplier.
4
220V/110V
power supplier
5
6
1 Home button
Press this button when the mower is operating, it goes home for
recharge automatically.
2 Display
2.1
Charging station sign
2.2
Virtual wire sign
Temperature inside the mower
2.3
Match the slop then
screw it!
WAR NI NG
Th e cha rge r is no t wat er -pr oo f the ref or e it mus t be loc at ed on
a pl ac e whi ch is dr y an d ven tilat ed .
- P25-
2.6
Battery voltage
Month / Date
Week
2.7
Hour
2.8
Menu
2.4
2.5
2.1
2.3
12/14
2.5
- P26-
2.4
2.2
15℃
AUTO
MANUAL
TUE
2.6
2.8
13:31
2.7
5. USE
4. CONTROL PANEL AND REMOTE CONTROL
5. Use
IMPORTANT INFORMATION
Operation with Auto Pattern
- Do not leave the machine to operate unattended if you know that there
are pets, children or people in the vicinity
3 Power switch: Power on/ Power off
4 Up / + : there are tree functions for this button.
-select menu, go upward
-select menu, go left
-Select figure, means +
Operation with Manual Pattern
- Mow only in daylight or in good artificial light.
- Avoid operating the appliance in wet grass.
- Do not operate the appliance when barefoot or wearing open sandals.
- Always wear substantial footwear and long trousers.
- Always be sure of your footing on slopes.
- Use extreme caution when reversing the appliance towards you.
- Always switch on the mower according to instructions with feet well
away
from the blade.
5 Confirm button
-To confirm your choose or enter.
6 Down / -
-select menu, go down
-select menu, go right
- Select figure, means 4.2 Remote control
1 To stop the mower. Press it, the
mower enters taskstate.
2 Indicator light.
9
3 Go right.
4 Effected while mower in taskstate.
User has to stop the mower first,
then press it, the mower enters
MANUAL pattern.
8
5 Speed down
6 Effected while mower in taskstate.
User has to stop the mower first,
7
then press it, the mower enters
AUTO pattern.
7 Press it during mower is working,
it goes back to charging station.
8 Go left.
9 Turn ON/OFF blade.
10 Speed up.
10
1
2
3
MOW
Read the safety instructions before you start your mower.
WA R N I N
Keep your hands and feet away from the rotating blade.
Never put your hands or feet close to or under the body when
the motors are running.
5.1 Preparation
6
IMPORTANT INFORMATION
3 5 8 9 10
These five buttons only effected in MANUAL pattern.
- P27-
WARNIN
4
5
- Ensure the correct installation of the virtual wire delineation system as
instructed
- Periodically inspect the area where the appliance is to be used
and remove all stones, sticks, wires, bones, and other foreign
objects especial the objects' height is less than 6cm.
- Periodically visually inspect to see that the blades, blade bolts and
cutter assembly are not worn or damaged. Replace worn or damaged.
- P28-
5. USE
5. USE
blades and bolts in sets to preserve balance.
- On multi-spindle appliances, take care as rotating one blade can
cause other blades to rotate
- Connect two terminals of virtual wire to charging station, and ensure
virtual wire is in good connecting. (Light on charging station is in
colorless).
- Insert charger to charging station and screw it. And then connect
charger to power supplier. Ensure charging station is in good
connecting, light on charging station is in Green.
IMPORTANT INFORMATION
User can' t start the mower if virtual wire and charging
station has problem.
4. Set ADDRESS firstly, otherwise the
mower can not be turn on.
See 5.9 ADDRESS Setting.
5. Select operate pattern (Manual pattern
or Auto pattern) from control panel or
remote control, and confirm it. mower
start cutting.
5.3 Stopping mower /Turn off mower
1. Press power button from remote control .
Mower stops, the blade motor stops.
mower goes into taskstate.
2. The appliance also can be turned off by
press emergency witch
directly.
5.2 Starting the mower
3. Press power button
from control
panel to turn off the appliance.
1.In case LINE is on. Take the mower to
start point.
Start point
2. Press power button from control panel.
3. Clockwise rotate Emergency switch,
the mower start. Display shows as
picture.
- P29-
5.4 Restart mower
1. Press power button
2. Enter password.
3. Select operate pattern and confirm it.
5.5 Emergency Switch
Press emergency switch
at any time
the mower power off at once. User has to
restart the appliance.
- P30-
5. USE
5. USE
Auto
WAVE
LINE
RAIN
Manual
Clock
Robot
mower
main
menu
Code
input password
Address
Time
Del
WAVE
LINE
RAIN
5.6 Operation pattern
There are two operation patterns:
Auto pattern, Manual pattern.
month
date
week
hour
date
- On Auto pattern, WAVE, LINE, RAIN shows
as picture.
set password
MON,TUE,WED,THU,FRI,SAT,SUN
RAIN
13: 3 9
18°C
MANUAL
WAVE
12/ 14
TUE
RAIN
13 :40
5.7 System time setting
1. Select CLOCK and press
enter system time setting.
12/14
1 5°C
CLOCK
CODE
TUE
13:31
button to
Set
Start
hour
- Manual pattern, WAVE, LINE, RAIN shows
as picture.
WAVE
12/1 4
1 8°C
AUTO
LINE
TUE
13 : 3 1
set address
input password
Esc
1 2/14
1 6°C
AUTO
MANUAL
TUE
End
min hour
min
WAVE
LINE
RAIN
Other
CODE
TOUCH
EXIT
- P31-
ON
OFF
ON
OFF
ON
OFF
ON
OFF
ON
OFF
2. To set Month and Date.
- Press
or
to scroll the correct
Month, press
to confirm it
- The arrow moves on Date, press
or
to scroll the correct Date ,
press
to confirm it.
1 6°C
CLOCK
1 2/14
- P32-
13:3 1
1 6°C
CLOCK
1 2/14
3. To set week (MON, TUE, WED, THUR,
FIR, SAT, SUN) by
or
and
confirm it.
TUE
TUE
13:3 1
1 6°C
CLOCK
1 2/14
TUE
13:3 1
5. USE
4. To set Hour and Minute.
- Press
or
to scroll the correct
Hour and press
to confirm it.
- The arrow moves to Minute. Press
or
to scroll the correct Minute and
press
to confirm it.
5. USE
- Press the key
to confirm it, the
arrow moves on to the next position.
16°C
CLOCK
12 / 1 4
TUE
13 : 31
- Press
to confirm it and press it again
to return back to menu.
5. Return back to menu automatically.
5.8 Password setting
1. Select CODE from menu and enter it.
1 5°C
CODE
ADDRESS
12/14
TUE
13:31
or
to set the
- Press the key
to confirm it. the arrow
moves on to the next position.
- Repeat the procedure to set all the
numbers of Initial password.
5.9 Address setting
the mower cold communicate with charging
station, there is an ADDRESS between
mower and charging station. User has to set
the address before using the mower.
Otherwise the mower can not start working
in Auto model. A label with Address Code
paste on charging station.
2. Enter Initial password: 0000
- the following message appears on the
display.
- Press one of the keys
first figure.
- Repeat the procedure to set all the
numbers of new password.
16°C
INPUT PASSWORD
0
1 3: 31
1 2/1 4
TUE
16°C
INPUT PASSWORD
0000
1 3: 31
1 2/1 4
TUE
1. Select ADDRESS from menu and press
to enter it.
2. Enter password.
- The following messages appears on
the display.
or
to set
- P33-
16°C
SET PASSWORD
0
13:31
12/14
TUE
1 6°C
ADDRESS
TIME
1 2 /14
TUE
13:3 1
1 6°C
INPUT PASSWORD
0
13 :3 1
12 / 14
TUE
3. Enter new password
- Press one of the keys
the first new figure.
1 6°C
SET PASSWORD
1234
13:31
12/14
TUE
3. Press Address Code as the label shows.
Taizhou Tianchen Intelligence &Electrics Co,Ltd
Product name: Robot lawn mower
Model: L2X00
IPX4
Input: XXX V --- 2A
Ouput : XXX V
2A
Made in China
Address :XX
R O HS
- P34-
5. USE
5. USE
5.10 Working schedule setting
There are 7 options, MON, TUE, WED, THU,
FIR, SAT, SUN.
1. Select TIME from menu and press
enter working schedule setting.
2. Select TUE by press
or
press
.
(Take TUE for example)
to
and enter it by
12/14
13:31
- The arrow moves to Minute. Press
to scroll “10” and confirm it.
or
1 6°C
TUE
WED
12/ 1 4
08:10
FRI
10:__
13:3 8
1 6°C
TUE
WED
12/ 1 4
08:10
FRI
10:10
13:3 8
1 6°C
TUE
WED
12 / 1 4
3. Display means.
Del: To delete working schedule which has
already set.
Esc: To Esc from working schedule setting.
Set: To set or working schedule setting.
1 6°C
TIME
OTHER
TUE
6. To set End time.
End = End Time
To set Hour and Minute.
(Take 10:10 for example)
- Press
or
to scroll “10” and press
to confirm it.
__:__
Start
FRI
__:__
End
13: 3 8
1 6°C
TUE
__:__
__:__
7. Press
Menu.
and select Esc to return back to
1 6°C
TUE
08:10
10:10
WED
Del / Esc / Set
8. The mower goes back for recharge after it
finishes cutting.
WED
Del / Esc / Set
IMPORTANT INFORMATION
It return back to menu automatically if there isn’t any operate
within 10 seconds.
4. Select Set and press
schedule setting.
to enter working
1 6°C
TUE
__:__
__:__
WED
Del / Esc / Set
5. To set Start time.
Start = Start Time
To set Hour and Minute.
(Take 8:10 for example)
- Press
or
to scroll “08” and press
to confirm it.
- The arrow moves to Minute. Press
or
to scroll “10” and confirm it.
- P35-
1 6°C
TUE
WED
12 / 1 4
08:__
FRI
__:__
WED
12 / 1 4
08:10
FRI
2. Select TUE by press
or
press
.
(Take TUE for example)
12 /1 4
1 6°C
TIME
OTHER
TUE
TUE
08:10
10:10
WED
12/ 1 4
Start
FRI
End
13:4 6
TUE
08:10
to
and enter it by
1 3: 45
1 6°C
13: 3 8
1 6°C
1 6°C
TUE
5.11 Delete working schedule
1. Select TIME from menu and press
enter it.
__:__
13: 3 8
3. Select Del and press
to confirm it.
10:10
WED
Del / Esc / Set
4. Select Esc to exit working schedule deleting.
- P36-
5. USE
5. USE
Setting steps:
- Select OTHER and press
5.12 OTHER setting
Enter OTHER menu there are 5 options,
WAVE, LINE, RAIN, CODE, EXIT.
to enter it.
12 /1 4
Factory setting of the mower:
WAVE: ON
LINE: ON
RAIN: ON
CODE: ON
- Select LINE and press
- Press
or
and press
to enter it.
12/14
- Select WAVE and press
to enter it.
OTHER
1 2/ 14
- Press
or
and press
OTHER
12/ 14
1. WAVE
It’s about ultrasonic sensor setting,
WAVE: ON, ultrasonic sensors functioned.
WAVE: OFF, ultrasonic senors default.
Setting steps:
- Select OTHER and press
to enter it.
to select “ON” or “OFF”
to confirm it.
2. LINE
It’s about virtual wire setting.
LINE: ON, ever time the mower started, it
has to find virtual wire and follow it
back to charging station.
LINE: OFF, the mower does not need to
follow the virtual wire when it starts.
- P37-
OTHER
ON
12/ 14
1 6°C
OTHER
AUTO
TUE
1 6°C
WAVE
LINE
TUE
OTHER
ON
12 / 14
1 3: 51
1 6°C
LINE
RAIN
TUE
1 3: 51
1 6°C
LINE
TUE
OFF
1 3 :5 1
12 /1 4
1 6°C
OTHER
AUTO
TUE
1 3: 52
51
OTHER
1 6°C
RAIN
13:50
1 3: 50
1 6°C
WAVE
TUE
to select “ON” or “OFF”
to confirm it.
1 6°C
OTHER
AUTO
TUE
OFF
1 3 :5 0
3. RAIN
It’s about rain sensor setting.
RAIN: ON, mower goes back to charging
station when it is raining.
RAIN: OFF, mower goes on working when
it is raining.
Setting steps:
- Select OTHER and press
- Select RAIN and press
to enter it.
to enter it.
CODE
12/ 14
- Press
or
and press
to select “ON” or “OFF”
to confirm it.
- P38-
OTHER
ON
12 / 14
TUE
1 3: 52
1 6°C
RAIN
TUE
OFF
1 3 :5 2
5. USE
5. USE
4.CODE
It’s about password setting.
CODE: ON, every time the mower starts,
user has to enter password.
CODE: OFF, user does not need to enter
password each time when it starts.
Setting steps:
- Select OTHER and press
1 6°C
- Select TOUCH and press
to enter it.
OTHER
1 2/ 14
to enter it.
12/14
16°C
OTHER
AUTO
TUE
1 3 : 5 31
- Press
or
and press
to select “ON” or “OFF”
to confirm it.
OTHER
ON
12/ 14
TOUCH
EXIT
TUE
1 3: 54
1 6°C
TOUCH
TUE
OFF
1 3 :5 4
16°C
OTHER
- Select CODE and press
to enter it.
12 /1 4
CODE
TOUCH
TUE
13 : 53
6. EXIT
Exit OTHER setting and it goes back to
menu.
16°C
OTHER
12 /1 4
- Press
or
and press
to select “ON” or “OFF”
to confirm it.
OTHER
ON
12 /14
16°C
CODE
TUE
OFF
1 3: 5 3
IMPORTANT INFORMATION
Each setting will be functioned after restart the mower.
5.TOUCH
It’s about human sensor setting.
TOUCH: ON, the mower stops working if
something touch the handle.
TOUCH: OFF, the human sensor out of
function.
Setting steps:
- Select OTHER and press
to enter it.
12/14
- P39-
16°C
OTHER
AUTO
TUE
1 3 : 5 41
- P40-
EXIT
WAVE
TUE
13 :54
5. USE
6. MAINTENANCE AND STORAGE
6. Maintenance and storage
5.13 Recharging
Recharge Voltage:24V (Lead-acid battery) / 29.4V(Lithium battery)
Recharge current: 2A
- The mower could goes back to recharging automatically if it is power
less. Or press the Home button on the charging station, the mower also
goes back to station for recharge.
- The mower also can recharges by charger directly.
- During maintenance operations, use the individual protections indicated
by the Manufacturer , especially when intervening on the blade.
- Before performing maintenance operations, make sure that the robot
has stopped in safety conditions.
PROGRAMMED MAINTENANCE INTERVALS CHART
Frequency
Component
Steps as follow:
1. Press the clamshell and open it.
See “Robot
cleaning”
If the blade is bent due
to an impact or if it is
worn-out, replace it.
See “Blade
replacement”
Fuse
If the fuse is burned
down
See “Fuse
replacement”
Robot
Carry out cleaning
See “Robot
cleaning”
Every week
Every month
3. Insert charger and screw the
knob.
Match the slop then
screw it!
6.1 Robot cleaning
1.Stop the robot in safety conditions.
4. Connect the charger to power
supplier.
2. Wear protective gloves.
WA R N I N
The charger is not water-proof therefore it must be located on
a place which is dry and ventilated.
- P41-
Reference
Clean and check the
efficiency of the
blade
Blade
2. Unscrew the cap of charging
terminal.
Type of operation
- P42-
6. MAINTENANCE AND STORAGE
3.Clean all the outside surfaces of the robot with a spong soaked in
warm water.
4.Do not use solvents or benzene so not to damage the varnished
surfaces and the plastic components.
5.Do not wash the inside parts of the robot and do not use water jets in
pressure so not to damage the electric and the electronic
components.
WARNING
Never use a high-pressure washer or
even running water to clean the robot.
6.Check the lower part of the robot (cutting blade area and wheels)
and remove the deposits and/or residues that might obstruct the
correct functioning of the robot.
7. To remove the deposits and/or other residues from the blade, use a
suitable brush.
8. Clean the outside of the charging station from any accumulated
residues.
9. Keep all nuts, bolts and screws tight to be sure the appliance is in
safe working condition.
10. Replace worn or damaged parts for safety.
11. Ensure that only replacement cutting means of the right type are
used.
12. Ensure that batteries are charged using the correct charger
recommended by the manufacturer.
13.Incorrect use may result in electric shock, overheating or leakage
of corrosive liquid from the battery.
14. In the event leakage of electrolyte flush with water/neutralising
agent, seek medical help if it comes into contact with the eyes
etc.
15. Servicing of the appliance should be according to
manufacturers instructions. This product ( include battery pack)
must be disposed of at a designated collection pint for electrical
and electronic waste. For more information, contact your local
city office or the shop where you purchased the product.
- P43-
6. MAINTENANCE AND STORAGE
6.2 Robot Storage
Packed the mower and all spareparts with the original package, and
storage the carton off the ground in a cool, dry place. Temperature should
not be colder than -4F°(-20℃)
6.3 Blade replacement
Blade model: 2000B
Specifications:
Blade replace steps:
1.Stop the robot in safety conditions.
2. Wear protective gloves.
3. Turn the Robot upside down.
4. Unscrew the blade and remove it.
5. Replace a new blade and screw it.
6.4 Fuse replacement
Fuse model: 2000F
Specifications:
1. Press the clamshell and open it.
2. Unscrew the cap and take out the
broken Fuse.
3. Replace a new Fuse and screw the
cap.
- P44-
6. MAINTENANCE AND STORAGE
6.5 Battery
The battery is maintenance-free, but has a limited life span of 1-3years.
Battery life is dependent on the length of the using season and how many
hours per week the robot is used. A long season or many hours of use per
week, means that the battery must be replaced more regularly.
IMPORTANT INFORMATION
Charge the battery fully at the end of the season before
winter storage.
- Attentions for lead-acid batteries
Charge the batteries at least once every six months of they are at 25℃
The interval of this charge should be reduced to 5 0% by each 10℃
rise in temperature above 25℃. The self-discharger state, their
capacity may not recover ever after charge. If the batteries are
stored for more than a year at room temperature. The life of batteries
may be shortened.
Store the batteries starting from fully charged state to prevent the life of
the batteries being shortened.
Use the batteries as quickly as possible after receiving them as they
gradually deteriorate even under proper storage conditions.
7. TROUBLE SHOOTING
7. Trouble shooting
Display
Problem
After enter the
correct password
and set operate
patten, but the
mower still can
not start. And the
charging station
is beeping.
16°C
ALAM
VIRTUAL WIRE HAS
12/17
09:02
FRI
1 6°C
ALAM
BEEN CUT
12/17
OFF
09:02
FRI
Storage, we suggest the optimum storage of lithium battery is with 40%
power and keep in the shade.
1. The virtual
wire fails to send
signals.
2. The virtual is
broken
After enter the
correct password
and set operate
patten, but the
mower still can
not start
1 6°C
ALAM
CHARGING
12/ 17
STATION
1.Check the
virtual wire light
(colorless). Be
sure the virtual
wire is connected
to the charging
station that is
motion, and there
is no loose place.
FRI
0 9 :0 2
1 6°C
ALAM
OUT OF POWER
12/17
FRI
09:02
During operating,
Mower stop
cutting enter
taskstate, and
beeping
1 6°C
ALAM
HANDLE TOUCHED
12/17
FRI
09:02
1. No power to
plug receptacle
or main power is
shut off. Bad
communication
between
charging station
and mower
1. Check the
power and check
the plug.
Connect
charging station
with power
supplier.
Users' hands
touch the handle
at the back of
mower.
Do not touch the
handle.
Restart the
mower .
- Disused battery processing
Please contact the nearest waste treatment certer and consultation with
recycling and proper disposal of views.
- P45-
Solutions
2. Connect the
wire with virtual
wire connectors.
- Attentions of lithium batteries
Please charge the lithium batteries in accordance with standard time and
procedures.
When the power is too low. It should be started charging as soon as
possible.
Possible reasons
- P46-
7. TROUBLE SHOOTING
Display
Problem
Mower stop
working and
beeping.
16°C
ALAM
FRONT WHEEL LIFT
09:01
12/17
TUE
Possible reasons
Mower is lifted
over 2CM from
the ground.
16°C
ALAM
UP THE GROUND
0 9: 02
12 /1 7
FRI
Mower stop
working and
beeping.
16°C
ALAM
MOTOR CORRENT IS
09:01
12/17
TUE
16°C
ALAM
TOO LARGE
09:01
12/17
TUE
1. Cutting height
too low.
2. Blade or
running wheels
strike hard
objects.
3. The mower is
trapped in lawn.
7. TROUBLE SHOOTING
Solutions
Put the mower in
lever ground,
turn off the
mower and
restart it.
1 6°C
ALAM
THE SLOPE IS TOO
09:01
12/17
TUE
12/17
16°C
ALAM
STEEP
TUE
Mower is tilted
over than 30
degree from the
ground
09:01
- P47-
Mower stop
working and
beeping.
2. Clean the
grass and make
sure it is free
from hard
objects.
Put the mower in
lever ground,
turn off the
mower and
restart it by
enter password
and choose
operate pattern.
Display
Possible reasons
1 7°C
ALAM
MICROSWITCH
0 9: 0 8
12 / 17
FRI
1. Strike bump
sensors 8 times
continuously.
17°C
ALAM
DEFAULT
12/17
FRI
2.Bump sensors
are locked.
09:08
Solutions
1. Restart the
mower
2. Free bump
sensors
3.Wires of bump
sensors have be
cut off.
Bump sensor is
broken.
3. Change new
wires of bump
sensors. Send
the mower to
provider and
change the
bumper sensors.
Remote control
does not work
The electricity
power is low
Change
batteries
The batteries
can not
recharged
Power nearing
natural end of
life
1. Send the
mower to
service station
and replace the
battery
1. Adjust the
cutting height to
suitable height.
3. Clear the lawn
where the
mower is
trapped or
restart the
mower in
another place.
Mower stop
working and
beeping.
Problem
2. Check
whether the
charger is well
connected.
Grass is
extremely
overgrown or
very wet
- P48-
Cut the grass
appropriate
height.
7. TROUBLE SHOOTING
Problem
Mower does not
complete the
edge.
Mower drives
but blade will not
mow.
Display
7. TROUBLE SHOOTING
Solutions
Problem
Terrain needs
landscaping
repairs.
Fill in all holes,
cover or exclude
all exposed
roots in order to
smooth the
terrain.
Obstacle along
the path
Watch the ful
operation of
edge and
confirm no
obstacle are
present
Possible reasons
1. On manual
pattern, Mow on
remote control
has be turned
off.
2. The cutting
motor is broken.
1. Turn on the
mower button.
2. Send the
mower to
service station
and replace a
new cutting
motor.
Short run time,
operates less
time than normal
Power is not
fully charged for
operation
Recharge the
mower fully.
Mower does not
detect the
charging station
contacts.
The ground
before the
charging station
is not flat.
Reset the
charging station
in a flat place.
- P49-
Display
Possible reasons
Solutions
Mower reached
the charging
station when its
contacts are
above the
charging station
contacts.
Height
difference
between the
charging station
and the lawn
surface at the
entrance to the
charging station.
Confirm the
ground before
the charging
station is leveled
with the
charging station
if necessary fill
area with dirt
and level off.
The robot
behaves in an
anomalous
manner around
the flower beds.
Virtual wire
incorrectly
placed
Relocate the
virtual wire
The robot is very
noisy
1. Damaged
cutting blades
1. Replace the
blade with a new
one.
2. Cutting blade
flooded by
residues(tapes,
ropes, plastic
fragments, etc)
3.The start of
the robot
occurred with
obstacles being
too closed (less
than 1m away)
or in presence of
unexpected
obstacles (fallen
branches,
forgotten
objects, etc.)
- P50-
2. Stop the robot
in safety
conditions; use
protection
gloves to avoid
the risk of cuts
on hands;
remove the fold
cause from the
blade.
3. Start the robot
in a new place.
7. TROUBLE SHOOTING
Problem
The robot is very
noisy
Display
Possible reasons
4. Damaged
running motor
Grass too high
8. EXPLODED VIEW
Solutions
8.1 Charging Station Exploded View
4. Get the motor
repaired or
replaced by
service station
.
5. Increase the
cutting height or
use a normal
lawn mower.
1
2
7
3
6
4
5
1.top cover
2.PCB
3.Power terminal
4.Virtual wire terminal
5.Underpan
6.Copper sheet
7.Copper sheet permanent seat
- P51-
- P52-
8. EXPLODED VIEW
8.2 Mower Exploded View
- P53-
40
Indicator dial
1
Emergency switch
41
Adjusting knob
2
Rain sensors
3
Rain sensor base
4
Up cover
5
Flat cable
6
Middle cover
7
Battery cover
8
Running motor cover
42
Ultrasonic base
43
Ultrasonic sensors
44
Clamshell
45
Clamshell platen
- P54-
9
Lead-acid battery
10
Running motor
11
display PCB
12
Back cover
13
Power swith
14
Human sensor
15
Bearing pressure plate
16
Running gear
17
AXLE
18
Wheel sleeves
19
Wheel hub
20
Shell
21
Bottom case
22
Bearing
23
Fuse
24
Charging terminal
25
gasket
26
Omni-directional wheels
27
Bump sensor
28
Micro swith
29
Main PCB
30
Blade
31
Blade sheld
32
Cutting head
33
Cutting motor
34
Cutting motor base
35
Charging head
36
Permannent seat
37
Screw capping
38
Gland
39
Screw gear