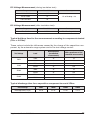
1
MEGOHMMETER ENGLISH User Manual 5050 5060 Statement of Compliance Chauvin Arnoux®, Inc. d.b.a. AEMC® Instruments certifies that this instrument has been calibrated using standards and instruments traceable to international standards. We guarantee that at the time of shipping your instrument has met its published specifications. An NIST traceable certificate may be requested at the time of purchase, or obtained by returning the instrument to our repair and calibration facility, for a nominal charge. The recommended calibration interval for this instrument is 12 months and begins on the date of receipt by the customer. For recalibration, please use our calibration services. Refer to our repair and calibration section at www.aemc.com. Serial #: _________________________________ Catalog #: 2130.20 / 2130.21 Model #: 5050 / 5060 Please fill in the appropriate date as indicated: Date Received: __________________________________ Date Calibration Due: ________________________ Chauvin Arnoux®, Inc. d.b.a AEMC® Instruments www.aemc.com Table of Contents 1. INTRODUCTION.................................................................................. 3 1.1 International Electrical Symbols............................................................3 1.2 Definition of Measurement Categories..................................................4 1.3 Receiving Your Shipment......................................................................4 1.4 Ordering Information.............................................................................4 1.4.1 Accessories and Replacement Parts.......................................4 1.5 Accessory Information..........................................................................5 1.5.1DataView® Software (for Model 5060)......................................... 5 2. PRODUCT FEATURES.......................................................................... 6 2.1 Megohmmeter Features........................................................................8 2.2 Digital Features.....................................................................................9 2.3 Bargraph.............................................................................................10 2.4Symbols..............................................................................................10 2.5 Push-button Functions........................................................................11 2.5.12nd Button..............................................................................11 2.5.2 V-TIME Button........................................................................11 2.5.3 R-DAR-PI-DD / R(t) Button....................................................12 2.5.4 ALARM Button.......................................................................16 2.5.5 Smooth Button.......................................................................17 2.5.6 UP/DOWN Button..................................................................17 2.5.7 SET-UP Function...................................................................18 2.5.8 Clearing the Memory.............................................................20 2.5.9 Communication Rate (RS-232)..............................................20 2.5.10 Default Device Configuration.................................................20 2.5.11 Voltage Disturbance Limit......................................................21 2.5.12 Automatic Measuring Range.................................................21 2.5.13 Blocking (Disabling) Test Voltages.........................................22 3. SPECIFICATIONS.............................................................................. 23 3.1 Reference Conditions.........................................................................23 3.2 Voltage................................................................................................23 3.3 Insulation Resistance..........................................................................23 3.4 Power Supply......................................................................................28 3.5 Environmental Specifications..............................................................29 3.6 Mechanical Specifications...................................................................29 3.7 Safety Specifications...........................................................................29 3.8 Variations in Operating Range............................................................30 Megohmmeter Models 5050/5060 1 4. MEASUREMENT FUNCTIONS............................................................ 31 4.1 AC/DC Voltage....................................................................................31 4.2 Insulation Measurement......................................................................31 5. OPERATION...................................................................................... 33 5.1 Measurement Procedure....................................................................33 5.2 Insulation Measurement......................................................................33 5.3 Operation Examples...........................................................................34 5.4 Capacitance Measurement.................................................................35 5.5 Residual and Leakage Current Measurement....................................35 6. MEMORY / RS-232 (5060)............................................................... 36 6.1 RS-232 Specifications.........................................................................36 6.2 Saving / Recalling Values (MEM/MR Button)......................................36 6.3 Printing Measured Values...................................................................38 6.4 Instantaneous Printing of Measurements (PRINT button).................39 6.5 Printing Data in Memory (PRINT MEM button)...................................40 7. DATAVIEW® SOFTWARE.................................................................... 42 7.1 Installing DataView®............................................................................42 7.2 Connecting the Model 5060 to your Computer...................................46 7.3 Using DataView®.................................................................................46 7.3.1 Configuring the Instrument....................................................47 7.3.2 Running the Test....................................................................49 7.4DataView® Megohmmeter Templates..................................................52 7.4.1 Megohmmeter Summary Report Template............................52 8. MAINTENANCE................................................................................. 54 8.1 Recharging the Battery.......................................................................54 8.2 Fuse Replacement..............................................................................55 8.3 Cleaning..............................................................................................55 8.4 Storage...............................................................................................55 Repair and Calibration.................................................................................56 Technical and Sales Assistance...................................................................56 Limited Warranty..........................................................................................57 Warranty Repairs.........................................................................................57 2 Megohmmeter Models 5050/5060 CHAPTER 1 INTRODUCTION WARNING These safety warnings are provided to ensure the safety of personnel and proper operation of the instrument. • Do not attempt to perform any tests with these instruments until you have read the instruction manual. • Safety is the responsibility of the operator! • Tests are to be carried out only on non-energized circuits! Check for live circuits before making resistance measurements (safety check). • High voltage is present, as is the sample connected to it. Anyone performing or assisting in testing must follow all safety precautions to prevent electrical shock to themselves and to others. • AEMC® considers the use of rubber gloves to be an excellent safety practice, even if the equipment is properly operated and correctly grounded. • When testing samples with a capacitive component, make sure they have been properly discharged and are safe to touch. Dielectric insulation samples should be short-circuited for at least five times the amount of time they were energized. • Megohmmeters should never be used in an explosive environment. • Only use the leads that are supplied with the megohmmeter. If they are defective or worn, replace before testing. • This instrument can be used on installations rated for 1000V, Category III, or 2500V, Category I. 1.1 International Electrical Symbols This symbol signifies that the instrument is protected by double or reinforced insulation. This symbol on the instrument indicates a WARNING and that the operator must refer to the user manual for instructions before operating the instrument. In this manual, the symbol preceding instructions indicates that if the instructions are not followed, bodily injury, installation/sample and product damage may result. Risk of electric shock. The voltage at the parts marked with this symbol may be dangerous. In conformity with WEEE 2002/96/EC Megohmmeter Models 5050/5060 3 1.2 Definition of Measurement Categories CAT II: For measurements performed on circuits directly connected to the electrical distribution system. Examples are measurements on household appliances or portable tools. CAT III: For measurements performed in the building installation at the distribution level such as on hardwired equipment in fixed installation and circuit breakers. CAT IV: For measurements performed at the primary electrical supply (<1000V) such as on primary overcurrent protection devices, ripple control units, or meters. 1.3 Receiving Your Shipment • Match the contents with the ordering information. • Notify your distributor of any missing items. • If the equipment appears to be damaged, file a claim immediately with the carrier and notify your distributor at once. NOTE: Charge the instrument fully before use. 1.4 Ordering Information Megohmmeter Model 5050.............................................................Cat. #2130.20 Includes extra large classic tool bag, set of three 10 ft (5kV) leads (red/black/blue) with integral 5000V rated hippo clips, one guard terminal jumper lead, US 115V power cord, rechargeable battery pack, and user manual. Megohmmeter Model 5060.............................................................Cat. #2130.21 Includes extra large tool bag, set of three 10 ft (5kV) leads (red/black/blue) with integral 5000V rated hippo clips, one guard terminal jumper lead, RS-232 DB9 F/F 6 ft null modem cable, RS-232 to USB adapter, US power cord, rechargeable battery pack, and a USB stick with DataView® software and user manual. 1.4.1 Accessories and Replacement Parts Cable, PC RS-232, DB9 F/F 6 ft Null Modem Cable (5060)............. Cat. #2119.45 Set of 3, Color-coded 10 ft Safety Leads (5000V), 3 Color-coded Alligator Clips (600V CAT IV)............................................................ Cat. #2119.76 Lead – Replacement 1 ft jumper lead............................................... Cat. #2119.78 Fuse, Set of 5, 0.1A, 380V, 5 x 20, .10kA.......................................... Cat. #2119.84 4 Megohmmeter Models 5050/5060 Replacement Lead – Set of 3, Color-coded 10ft (5kV) Safety with Integral Hippo Clips (JUMPER LEAD INCLUDED).............................. Cat. #2119.85 Lead – Set of 3, Color-coded 25ft (5kV) Safety with Integral Hippo Clips (JUMPER LEAD NOT INCLUDED).............................. Cat. #2119.86 Lead – Set of 3, Color-coded 45ft (5kV) Safety with Integral Hippo Clips (JUMPER LEAD NOT INCLUDED).............................. Cat. #2119.87 Extra Large Classic Tool Bag............................................................Cat. #2133.73 Inverter – 12VDC to 120VAC 200 Watt for Vehicle use.......................Cat. #2135.43 Battery – Rechargeable 9.6V............................................................Cat. #2960.21 US 115V Power Cord........................................................................Cat. #5000.14 Adapter – RS-232 to USB 2.0 (5060)................................................Cat. #5000.60 1.5 Accessory Information 1.5.1DataView® Software (for Model 5060) Dataview® software makes it possible to: • Retrieve data from memory and plot graphs of the changes in insulation as a function of the time over which the test voltage is applied, R(t). • Print out protocols of personalized tests, depending on the user’s needs. • Create text files for use on spreadsheets. • Set up and control the instrument entirely by the RS-232. Order Accessories and Replacement Parts Directly Online Check our Storefront at www.aemc.com/store for availability Megohmmeter Models 5050/5060 5 CHAPTER 2 PRODUCT FEATURES The Megohmmeter Models 5050 and 5060 are portable instruments, housed in rugged casing. These megohmmeters are designed to check the safety of electrical installations and equipment. Measures: • Voltage • Insulation Resistance • Capacitance • Leakage Current Advantages: • Automatic voltage detection in all functions, before or during the measurement, which inhibits or stops the measurement. • Automatic detection of external AC or DC voltages on the terminals • Threshold programming in each function, triggering audible alarms • Timed control of measurement duration • Fuse protection, with defective fuse detection and indication • Digital filtering of insulation measurements • Automatic discharge of residual high voltage on the tested device • Automatic shut-off to save the batteries • Battery level indicator • Large easy-to-read back-lit LCD Additional Features (Model 5060): • 128kB memory, real-time clock and serial interface • Control and programming of the instrument from a PC (with DataView® software) • Printing with a serial printer 6 Megohmmeter Models 5050/5060 MODEL 5050 2 4 3 110 - 230V 50/60 Hz 20 VA max CALIBRATION SET-UP MΩ 50-5000V MΩ - 5000V 5 MΩ - 2500V FF 0.1A 380V - 10kA 5x20mm MΩ -1000V 1 MΩ - 500V OFF G V/TIME 6 SMOOTH ALARM START/STOP R-DAR-PI-DD 1000V CAT III ( 2500V ) 2 nd MEGOHMMETER R(t) MODEL 5050 7 MODEL 5060 2 4 3 RS-232 110 - 230V 50/60 Hz 20 VA max SET-UP MΩ 50-5000V MΩ - 5000V 5 MΩ - 2500V FF 0.1A 380V - 10kA 5x20mm MΩ -1000V 1 MΩ - 500V OFF G V/TIME 6 SMOOTH ALARM MEM 1000V CAT III ( 2500V ) 2 nd PRINT R-DAR-PI-DD MR PRINT MEM R(t) START/STOP MEGOHMMETER MODEL 5060 7 Megohmmeter Models 5050/5060 7 2.1 Megohmmeter Features 1. Safety terminals: “+”, “G” and “-” and access to the protective fuse. 2. AC power plug (direct operation on AC and battery recharge). 3. Back-lit liquid crystal display. 4. RS-232 serial interface male plug (9-pin) • For calibration only (Model 5050) • For connection to a PC or printer (Model 5060) 5. Rotary selector switch with 7 positions: • OFF - Instrument is off • MΩ - 500V - Insulation measurement (to 2TΩ) • MΩ - 1000V -Insulation measurement (to 4TΩ) • MΩ - 2500V - Insulation measurement (to 10TΩ) • MΩ - 5000V - Insulation measurement (to 10TΩ) • MΩ - 50V-5000V - Insulation measurement with selectable test voltage • SET-UP - Set-up of the megohmmeter 6. START/STOP button 7. 6 buttons (5050) or 8 buttons (5060), each with a first and second function. The second functions are highlighted in yellow below each button: • 2nd (yellow button) - Selects the second function on each button. • R-DAR-PI-DD - Lets you choose the type of measurement to be performed. Instantaneous Resistance (R), Dielectric Absorption (DAR), Polarization Index (PI), or Dielectric Discharge (DD). • R(t) - Shows/hides the interval values of insulation resistance, test voltage and time-stamping, following a time-controlled test. • V/TIME - When measuring insulation, pressing this button displays the time elapsed since the beginning of the measurement, then the exact voltage generated. When performing resistance or capacitance measurement, this button has no effect. In MR (memory recall), it displays the date and time at which the measurement was stored, the exact test voltage and the OBJ : TEST number. • - Activates or deactivates the “time-controlled” test mode. • - Turns the display backlight ON or OFF. • ALARM - Activates or deactivates the alarms programmed in SET-UP. • - Selects a parameter to be modified. • SMOOTH - Stops/starts smoothing of displayed values during insulation testing. 8 Megohmmeter Models 5050/5060 • - Increases the flashing parameter being displayed. To move about the list of interval insulation measurements, in the R(t) function. • - Decreases the flashing parameter being displayed. To move about the list of interval insulation measurements in the R(t) function. If the and buttons are held down, the movement between parameters is increased to a faster rate. Model 5060 only: • MEM - Saves measured values • MR - Recalls saved data • PRINT - Prints measurement results • PRINT MEM - Prints memory contents 2.2 Digital Features 0.1M 1M 10 M 100 M 1G 10G 100G 1T min sec COM MEM MR 8.8.8.8 V DC AC 8.8.8.8 OBJ. TEST PI 2nd DARDD ALARM P GΩ TΩ MΩ kΩ µA nA µF SMOOTH REMOTE Main Display Indicates the value of: • Insulation measurement (resistance, DAR and PI, DD, capacitance). Small Display Indicates: • Voltage measured or applied by the instrument. • Elapsed time or the output voltage, during insulation measurement. After recording a set of data (5060), the small display also indicates the time and date in MR (memory recall) mode, and the memory address with the OBJ : TEST number. Megohmmeter Models 5050/5060 9 2.3Bargraph • Active during insulation measurement (0.1MΩ to 1TΩ). • Indicates the battery charge at start-up. • Indicates free memory space - one segment representing approximately 100 groups of saved values, with each group holding approximately 50 recordings (1 OBJ and 1 TEST). 2.4Symbols MEM/MR: Memory address (5060) - indicates the memory operation. OBJ:TEST: Memory address (5060) - the number is displayed on the small digital display. COM: Flashes on the screen when data is transmitted to the serial interface (5060) or remains permanently displayed if there is a problem during transfer. DAR/PI/DD: Indicates the mode chosen before insulation measurement or the results of these measurements. Dangerous voltage generated; V > 120V. External voltage present, symbol is activated after pressing START, if V > 25VAC ± 3V or > 35VDC. Activation of “time-controlled test” mode or clock adjustment when in SET-UP (5060). (Yellow button) Selects the second (bottom) function of a button. Flashes if the battery voltage is low, indicating that the battery should be recharged (see § 8.1). The voltage is displayed on the small display for 2 seconds when the instrument is turned on. The main display indicates “bat” when the test is carried on. Warning buzzer is activated. Indicates that the automatic switch-off function has been deactivated. SMOOTH: Smooths the insulation measurements displayed. REMOTE: Remote control via an interface (5060). In this mode, all the buttons and the rotary switch on the instrument are non-functional, except for the OFF position. FUSE -G-: Flashes if the “G” input fuse is defective. 10 Megohmmeter Models 5050/5060 2.5 Push-button Functions 2.5.12nd Button • Selects the second function (highlighted in yellow) on the buttons. • The symbol appears. This symbol disappears upon pressing the function button chosen, except if the button is activated. In this case, it only disappears when the button is pressed again, or if other function buttons are pressed. This allows you to rapidly decrease parameters with the button, without having to press the button every time. 2.5.2 V-TIME / Button First Function - V/TIME Displays all the secondary information available on the small display. For Insulation Measurement: • The time elapsed since the start of the measurement. • The voltage between the instrument’s “+” and “–” terminals. • Date, time, test voltage and OBJ:TEST number in memory recall mode (MR). Second Function - Time-controlled Test Displays the measurement duration programmed in SET-UP on the small display. • The symbol lights up. • Pressing the START button begins the measurement process. The measurement duration is set to 15 minutes by default. • As soon as the measurement starts, the small display counts down the remaining duration of the measurement. Once it reaches zero, the measurement stops. • As the time-controlled test is carried out, interval samples (resistance/ voltage values as a function of time) are automatically saved. The time between each sample is set to 30s by default, but it can be changed in the SET-UP menu. • The samples are displayed with the R(t) function (see § 2.5.3) as long as a new measurement has not been started. With each new measurement, the previous sample value is erased from the memory. These sample values are saved with the last value of the resistance if used with the MEM (memory storage) function. NOTE: If the selector switch’s position is altered, or if the STOP button is pressed during measurement, the measurement is interrupted. This function is only active for insulation measurement. Megohmmeter Models 5050/5060 11 2.5.3 R-DAR-PI-DD / R(t) Button First Function - R-DAR-PI-DD The R-DAR-PI-DD button allows automatic measurement of: • Dielectric Absorption Ratio (DAR) • Polarization Index (PI) • Dielectric Discharge Test (DD) The PI and DAR values are useful on long cables, or when monitoring the aging of insulation on electrical machines. On this material, measurement is adversely affected at the beginning, due to interfering currents (from capacitive charges, dielectric absorption) which eventually cancel each other out. Therefore, in order to get an accurate measurement of the leakage current, it is necessary to carry out the measurement over a long period of time, to reduce the influence of any interfering currents at the beginning of the measurement. Then the PI or the DAR ratios are calculated: PI* = R10 min / R1 min (2 values recorded during a 10 minute measurement) DAR = R1 min / R30 s (2 values recorded during a 1 minute measurement) The quality of insulation depends on the results found. DAR < 1.25 PI <1 <2 State of the insulation Inadequate, even dangerous < 1.6 > 2 to < 4 Good > 1.6 >4 Excellent *The 10 and 1 minute times can be modified in the SET-UP menu, to adapt to any changes or specific applications. For multi-layer insulation, if one of the layers is defective, but all the others show strong resistance, the calculation of the PI and PAR ratios is not sufficient to show this type of problem. Therefore, it is necessary to supplement the PI and DAR indications by a dielectric discharge test (DD). This test measures the dielectric absorption of heterogeneous or multi-layer insulation while ignoring the parallel-surface leak currents. It consists of applying a test voltage for a period sufficient to electrically “charge” the insulation to be measured (a typical value is the application of a 500V voltage for 30 minutes). 12 Megohmmeter Models 5050/5060 The test voltage is chosen in the same way as the insulation measurement in the SET-UP menu. The device then causes a fast discharge during which the insulation capacity is measured, then measured 1 minute after the residual current is circulating in the insulation. The DD value is calculated from the formula below: DD = current measured after 1 minute (mA) test voltage (V) x capacity measured (F) The indication of the insulation quality as a function of the resulting value is as follows: DD value Insulation quality DD >7 Very bad 7 >DD >4 Bad 4 >DD >2 Doubtful DD <2 Good insulation NOTE: The dielectric discharge test is suited for the insulation measurement of rotating machines, and in general, for the insulation measurement of heterogeneous or multilayer insulation containing organic materials. Using the R-DAR-PI-DD Function: During or after measurement, the R-DAR-PI-DD button allows you to scroll through the following values: • DAR (for measurements lasting > 1 min) • PI (for measurements lasting > the programmed PI times) • DD can only be calculated 1 minute after the end of the insulation measurement and circuit discharge, and only if it was selected before beginning the measurement. • Capacitance in µF (only after the measurement has stopped and the circuit has been discharged) • Residual leakage current circulating in the installation in µA or nA • Insulation resistance in MΩ, GΩ or TΩ NOTE: During the measurement, the DAR value is not available if the DD value was preselected before the measurement. The PI value is not available if DAR or DD values were preselected before the measurement. Megohmmeter Models 5050/5060 13 Automatic Measurement of DAR or PI: If the R-DAR-PI-DD button is pressed during the voltage measurement before the start of a measurement, the following is displayed: MΩ DAR PI DD NOTE: The input current may be a depolarization current resulting from an earlier insulation measurement. It is recommended to start a new DAR and PI measurement after the current has dropped to a negligible value (on the order of 100pA) to avoid variations on these measurements. Depending on the choices (DAR or PI), the measurement goes as follows: a) DAR: Press START - the DAR symbol flashes and the display indicates “- - - -” as long as the calculation of the ratio is not possible (t <1 mn). e.g.: DAR After 1 min, the measurement stops and the main display automatically shows the DAR value. During or after measurement, the R-DAR-PI-DD button can be used to see the insulation measurement carried out, but it does not give the PI value since the measurement has not lasted long enough. b)PI: Press START - the PI symbol flashes and the display indicates “- - - -” as long as the calculation of the ratio is not possible (t < programmed PI times). e.g.: PI After the upper PI time has passed, the measurement stops and the main display automatically shows the PI value. During and after measurement, the R-DARPI-DD button makes it possible to display the DAR (after 1 min), the PI and the insulation measurement. c)DD: Press START - the DD symbol flashes and the display indicates “- - - -” as long as the calculation of the ratio is not possible (t <30 min +1 min). e.g.: DD 1 minute after the measurement stops, the DD symbol becomes steady, the display automatically show the value of DD. 14 Megohmmeter Models 5050/5060 Therefore: if the measurement lasts 1 min. - DAR if the measurement lasts longer than the programmed PI time - PI if 1 min. after the end of the measurement - DD NOTE: If during DAR or PI measurement (automatic or not), a high external inter ference voltage becomes present, or the insulation resistance goes beyond the device’s measurement range, then the DAR or PI measurements are interrupted and the screen indicates: DAR MΩ or PI MΩ or DD MΩ The display of the DD value is: • Unknown (- - - -) if C < 1nF and Idd < 100pA • Known and flashing if 1nF ≤ C < 10nF and 100pA ≤ Idd < 1nA • Known and permanent if C ≥ 10nF and Idd ≥ 1nA (with C = measured capacitance and Idd = measured leakage current) NOTE: The 10 min / 1 min measurement durations for PI calculation can be modified in the SET-UP menu (see § 2.5.7), allowing changes to standards or to suit a particular application. Second Function - R(t) Used to access the interval insulation resistance values as a function of time after a measurement in “time-controlled test” mode (see § 2.5.2). The time between each saved sample is programmed in the SET-UP menu. This function is also available on the Model 5050, which has neither a read-write memory for saving measured data, nor an interface for data retrieval from the instrument by a PC. Model 5050: Up to 20 samples can be recorded during measurement at the sample rate chosen in SET-UP (the default value is 30 seconds). It is possible to save more than 20 samples depending on available memory. Model 5060: The number of samples that can be saved is only limited by the memory space available. To enter the display mode, press the R(t) button: • The small display indicates the time 00:30 (e.g. the sampling frequency is every 30s). • The main display shows the corresponding R value. Megohmmeter Models 5050/5060 15 Use the V/TIME button to alternate between the voltage and time (on the small display), associated with the R value on the main display. The button is used to scroll down through the all the samples saved during measurement, allowing you to read the information in order to draw R(t) and V(t) graphs. This makes it possible to carry out R(t) analysis on-site, without a printer or a PC. To exit this function, press the R(t) or R-DAR-PI-DD button again. 2.5.4 / ALARM Button First Function Turns the display back-light ON or OFF. Second Function - ALARM Activates/deactivates the ALARM function. The “ALARM” symbol is displayed when activated. If activated, and the high or low threshold values are programmed, the “ALARM” symbol flashes and the buzzer (if activated) sounds continuously when the threshold is crossed. It is possible to program a different limit in each function. These limits will be stored in memory even after the device is turned off. ACTIVATING THE ALARM INDICATION BEFORE A TEST To activate the Alarm Indication before performing a test you must go through the following steps: • Program the Alarm Set Point Resistance Value for the Test Voltage you will be using. • Turn the Rotary switch to the Setup position. • Press the Yellow 2nd button and then the Alarm button to set Alarms. The first time you press 2nd & Alarm you will see the alarm setting for 50 volt tests. • Press 2nd & Alarm buttons repeatedly until you see the test you wish to set alarms for in the top line of the display. The sequencing will be 500, 1000, 2500, 5000, and set. • Use the cursor keys to adjust the Blinking value. First select KΩ, MΩ, GΩ or TΩ using the Up Arrow Key (). • Next, press the Right Arrow Key () to move to the next selection which is the greater than (>) / less than (<) choice. Use the Up Arrow Key to make your selection. 16 Megohmmeter Models 5050/5060 • Press the Right Arrow Key again to move to the Resistance Value Set Point Selection. You can change this value digit by digit using the Up Arrow / Left Arrow combination working from the highest to lowest digit. • When finished programming the alarm settings, place the rotary switch to the desired test function. • Before initiating a test, press the Yellow 2nd button and the Alarm button to activate the Alarm Notification. The word “ALARM” will appear in the lower left side of the display. • Next, press the round yellow Start/Stop button to begin the test. The Alarm symbol will flash and the buzzer will sound continuously if the Alarm set point is tripped. NOTE: If the rotary switch is turned off prior to the next test, the alarm notification will be deactivated. You will need to press the Yellow 2nd button and the Alarm button to activate the Alarm Notification when you turn the unit back on before starting the next test, if alarm notification is desired. 2.5.5 / Smooth Button First Function Selects the desired parameter to be modified - the selected parameter flashes. The flashing parameter is modified using the button (see § 2.5.6). Second Function - SMOOTH Activates a digital filter for insulation measurement. It only has an effect on the displayed values (which are smoothed) and not the actual measurements. For example, this function is useful when the displayed insulation values are highly unstable, brought about due to a capacitive component in the tested element. 2.5.6 Button Changes the flashing parameters displayed, or views R(t) values (see § 2.5.3). As a general rule, two figures (day, month, hour, min., sec., and OBJ:TEST) flash. The and functions have a “follow-on” mode. (e.g. as soon as the high or low program limit is reached, the parameter to be modified switches automatically to the following low or high limit.) Megohmmeter Models 5050/5060 17 First Function • Press button briefly to increase the displayed number slowly. • Press button for a longer time to increase at a faster rate. Second Function • Press button briefly to decrease the displayed number slowly. • Press button for a longer time to decrease at a faster rate. Unlike all the second functions of other buttons, it is not necessary to press the button each time to get to the function. The symbol remains displayed and is valid for the function (only), as long as the user does not deactivate it by pressing or another button. 2.5.7 SET-UP Function Configures the instrument. After selecting SET-UP with the rotary selector switch: • All the display segments are lit up for 1 second. • The software version number is then displayed. • The instrument ID number is displayed next. • “PUSH” appears on the small display and “btn” on the main display, prompting the operator to press a button. The SET-UP function is used to directly access the parameters to be programmed, by pressing the corresponding button. • After having pressed a button, the corresponding figures or symbols appear on the screen. • The figures or the symbols that can be modified, flash on the screen. • Use the and buttons. • All the parameters are immediately and permanently saved. 18 Megohmmeter Models 5050/5060 The following table defines the buttons that are functional when in SET-UP, and the corresponding display with the possible range of adjustment. Parameter program Command Button Duration of “time-controlled test” 1st and 2nd times for PI calculation R-DAR-PI-DD Display main small symbol value tESt 30:00 min. sec 1:00 - 59:59 second time (10:00) first time (1:00) min : sec :30 - 59:59 00:30 min : sec 0:05 - 30:00 Time between interval samples in “time-controlled test” R(t) Limit for 500V - 2TΩ ALARM 500kΩ 500V ALARM < 30k-2TΩ and >/< ALARM 1MΩ 1000V ALARM < 100k-4TΩ and > / < ALARM 2.5MΩ 2500V ALARM < 300k - 10TΩ and > / < ALARM 5MΩ 5000V ALARM < 300k - 10TΩ and > / < ALARM 5MΩ Set ALARM < 10k - 10TΩ and > / < Limit for 1000V - 4TΩ (2nd press) Limit for 2500V - 10TΩ (3rd press) Limit for 5000V - 10TΩ (4th press) Limit for Var - 50/5000V (5th press) Time Date (European version) Version : USA, European V/TIME V/TIME (2nd press) 17.03 12 :55 hh (00-23) mn (00-59) 2000 dd.mm.yyyy V/TIME (3rd press) USA/Euro Clear Memory MEM then MEM (2s) cLr ALL MEM Selective clearing of memory MEM then and and MEM (2s) FrEE/OCC OBJ : TEST number MEM 9600 bAUd Baud PRINT Default configuration 00...99 300...9600 On ON / OFF (2nd press) On ON / OFF (3rd press) DFLt SEt Buzzer Auto switch-off USA/Euro then START User selectable test voltage (4th press) SEt 100V V 40 / 5100V Disturbance limit voltage (5th press) 0.03 V dISt V 0.03/0.10/0.20 Automatic range (6th press) Auto rAnG Auto/1/2/3 Test voltage locking (7th press) oFF 1000V ON / OFF 40-5100V The values shown on this table, in the “Display/main” and “Display/small” columns, are the factory default values. In case they are accidentally changed, it is possible to get them back. (see § 2.5.10). Megohmmeter Models 5050/5060 19 2.5.8 Clearing the Memory In SET-UP, press the MEM button: • The MEM symbol flashes • The small display indicates “ALL” • The main display indicates “cLR” To clear the entire memory, press the MEM button again for 2 seconds: • The MEM symbol is displayed without flashing • The small display indicates “ALL” • The main display indicates “FrEE” To clear the contents of a specific OBJ : TEST number: • Select the number using the and buttons • “FrEE” or “OCC” appears on the main display Press the MEM button again for 2 seconds to clear the contents: • The small display indicates the OBJ : TEST number • The main display indicates “FrEE” 2.5.9 Communication Rate (RS-232) • In SET-UP, press the PRINT button. • The main display indicates the Communication Rate (e.g. 300, 600, 1200, 2400, 4800, 9600 or Parallel). • “bAUd” appears on the small display. The value can be changed using the and buttons. • “Parallel” appearing in the display means that the parallel mode has been selected. This is for printing on a parallel printer via the serial-toparallel adapter (RS-232 Centronics). 2.5.10 Default Device Configuration In SET-UP, press the button three times: • “SEt” appears in the small display. • “DFLt” (flashing) appears in the main display. Press START to select the default configuration settings (see the previous table). 20 Megohmmeter Models 5050/5060 2.5.11 Voltage Disturbance Limit In SET-UP, press the button five times: • “dISt” appears in the small display. • “003U” (flashing) appears in the main display. • Modify this value if necessary using the between: 0.10 - 0.20 - 0.03). button (possible choice NOTE: This adjustment provides the best compromise between the measure ment build-up time and the presence of external interference voltages (§ 4.2). If no interference voltage is present, choose 0.03 to obtain a rapid measurement build-up time. Example: If an insulation measurement is performed at a test voltage of 5000V and the limit is set to 0.10, it will be possible to perform a correct measurement with the presence of an external interference voltage ≤500V, to the detriment of a longer measurement build-up time. 2.5.12 Automatic Measuring Range In SET-UP, press the button six times: • “rAnG” appears in the small display. • “Auto” appears in the main display. Use the button to choose a fixed (1, 2 or 3 on the main display) or automatic (Auto on the main display) measurement range. NOTE: The fixed measurement ranges correspond to the current ranges of the following measurements: 1: 50pA to 200nA (>500GΩ) 2: 150nA to 50µA (500KΩ to 500GΩ) 3: 30µA to 3mA (<500KΩ) The choice of a fixed measurement range optimizes the measurement build-up time for a known value of insulation resistance. Example: Choice of range 1 for a measurement greater than 500GΩ. Note: In most cases, “Auto” should be selected. Megohmmeter Models 5050/5060 21 2.5.13 Blocking (Disabling) Test Voltages This function prevents insulation measurements from being carried out at selected test voltages. This makes it possible to use the instrument for specific applications and avoid improper voltages. To set the maximum variable test voltage: • Turn the rotary switch to SET-UP • Press the button seven times - “1000V” appears in the small display - “OFF” appears (flashing) in the main display • Press the button to toggle to the maximum test voltage (“1000V” will now be flashing) • To increase the voltage, press the button To decrease the voltage, press the yellow button, then the button • After setting the maximum test voltage, toggle back to “OFF” by pressing the button • Press the button to turn “ON” Example: By choosing ON and a test voltage limit of 750V, the measurement will be performed at 500V for the 500V switch position on the rotary switch, and at 750V for all the other positions on the rotary switch (LIM will appear for 3 seconds on the main display). 22 Megohmmeter Models 5050/5060 CHAPTER 3 SPECIFICATIONS 3.1 Reference Conditions Influence Quantity Temperature Relative Humidity Supply Voltage Frequency Range Capacitance in parallel with the input resistance Electric Field Magnetic Field Reference Values 23°C ±3°K 45 to 55% 9 to 12V DC and 15.3 to 65Hz 0µF nil <40A/m 3.2Voltage Measurement Range 1.0 to 99.9V 100 to 999V Frequency Range* 1000 to 2500V 2502 to 4000V DC and 15Hz to 500Hz Resolution 0.1V Accuracy 1% of Reading ± 5cts Input Impedance 1V DC 2V 2V 1% of Reading ± 3cts 750kΩ at 3MΩ depending on measure voltage *Over 500Hz, the small display indicates “- - - -” and the main display gives only an assessment of the peak value of the measured voltage. Measurement Category: 1000V CAT III or 2500V CAT I (transients ≤2.5kV) 3.3 Insulation Resistance Method: Voltage-current method according to EN 61557-2 (ed. 02/97) Nominal Output Voltage: 500, 1000, 2500, 5000VDC (or adjustable from 40 to 5100V) No Adjustment in Variable Mode: 10V from 40 to 1000V 100V from 1000 to 5100V Open-circuit Voltage: ≤1.1 x Vn ±2V (Vn ±2% in variable mode) Megohmmeter Models 5050/5060 23 Max. Overload of Voltage Vn: (1.05 + dISt) Vn + 50V with dISt - 0.03 - 0.10 or 0.20 Nominal Current: >1mADC Short-circuit Current: < 1 .6mA ± 5% Load Current: 3mADC approx when starting measurement Max. Acceptable AC Voltage: Vpeak - (1.05 + dISt) Vn with dISt = 0.03 - 0.10 or 0.20 Measurement Ranges: 500V: 30kΩ to 1TΩ 1000V: 100kΩ to 3.999TΩ 2500V: 300kΩ to 9.99TΩ 5000V: 300kΩ to 9.99TΩ Variable: 40V to 5100V (see graph below) Resistance Range in Voltage Mode Rmax (TΩ) 12 Rmin (kΩ) 300 10 250 8 200 6 150 4 100 2 50 0 0 1000 2000 3000 4000 5000 0 Variable Voltage (V) Resolution and Accuracy Chart (see curves - pages 26 and 27) Test Voltage 500V 500V - 1000V Range 30 to 99kΩ 100 to 299kΩ Resolution Accuracy 24 1MΩ to 3.999kΩ 4.00 to 39.99MΩ 40.0 to 399.9MΩ 10kΩ 100kΩ ±5% of Reading + 3cts Test Voltage Resolution 300 to 999kΩ 1kΩ Accuracy Range 500V - 1000V - 2500V - 5000V 500V - 1000V - 2500V - 5000V 400MΩ to 3.999GΩ 4.00 to 39.99GΩ 40.0 to 399.9GΩ 1MΩ 10MΩ 100MΩ ±5% of Reading + 3cts 400GΩ to 1.999TΩ 1000V - 2500V 5000V 2500V 5000V 2.000 to 3.999TΩ 4.00 to 10.00TΩ 1GΩ 10GΩ ±15% of Reading + 10cts Megohmmeter Models 5050/5060 DC Voltage Measurement (during insulation test): Range Resolution 40.0 to 99.9V 0.1V 100 to 1500V 1V 1501 to 5100V 2V Accuracy 1% of Reading ± 1ct DC Voltage Measurement (after insulation test): Range Resolution Accuracy 25 to 5100V 0.2% Vn 5% of Reading ± 3cts Typical build-up time for the measurement according to components tested (Vdist = 0.03Vn). These values include the influences caused by the charge of the capacitive component, by the automatic range system and to the test voltage control. Test Voltage 500V 1000V 2500V 5000V Load Non Capacitive (unsmoothed measurement) With capacitance of 1µF (smoothed measurement) 1MΩ 3s 4s 100GΩ 8s 40s 1MΩ 3s 4s 100GΩ 8s 80s 3MΩ 3s 4s 100GΩ 8s 90s 5MΩ 4s 16s 100GΩ 8s 120s Typical discharge time for a capacitive component to reach 25VDC. Initial Voltage 500V 1000V 2500V 5000V Discharge time (C in µF) C x 3s C x 4s C x 4s C x 7s Megohmmeter Models 5050/5060 25 Typical changes in test voltages as a function of the load: 500V Range 600 Output voltage (V) 500 400 300 200 100 0 0.01 0.1 1 Resistance (MΩ) 1000V Range 1200 Output voltage (V) 1000 800 600 400 200 0 0.01 1 Resistance (MΩ) 26 Megohmmeter Models 5050/5060 Typical changes in test voltages as a function of the load (cont.): 2500V Range 3000 Output voltage (V) 2500 2000 1500 1000 500 0 0.1 1 10 Resistance (MΩ) 5000V Range 6000 Output voltage (V) 5000 4000 3000 2000 1000 0 0.1 1 10 Resistance (MΩ) Megohmmeter Models 5050/5060 27 Capacity Measurement (after discharge of tested component): Range Resolution 0.005 to 9.999µF 1nF 10.00 to 49.99µF 10nF Accuracy 10% of Reading ± 1ct Leak Current Measurement Range Resolution 0.000 to 0.250nA 1pA 0.251 to 9.999nA 10.00 to 99.99nA 10pA 100.0 to 999.9nA 100pA 1.000 to 9.999µA 1nA 10.00 to 99.99µA 10nA 100.0 to 999.9µA 100nA 1000 to 3000µA 1µA Accuracy 15% of Reading ± 10cts 10% of Reading 5% of Reading 10% of Reading Calculation of Terms DAR and PI Range Resolution Accuracy 0.02 to 50.00 0.01 5% of Reading ± 1ct Range Resolution Accuracy 0.02 to 50.00 0.01 10% of Reading ± 1ct Calculation of Term DD 3.4 Power Supply • Rechargeable battery NiMh (8 x 1.2V / 3.5Ah) • Recharge: 85 to 256V / 50-60Hz Minimum Battery Charge Life (per NF EN 61557-2) 28 Test Voltage Nominal Charge Number of Measurements 5s on nominal charge (with 25s pause between each measurement) 500V 500kΩ 6500 1000V 1MΩ 5500 2500V 2.5MΩ 4000 5000V 5MΩ 1500 Megohmmeter Models 5050/5060 Average Battery Life: The operating time will be 15 days or 3 weeks, based upon a 10 minute long PI measurement. Recharge Time: 6 hours for 100% capacity (10 hours if the battery is completely drained) 0.5 hours for 10% capacity (charge life: 2 days approximately) NOTE: It is possible to recharge the batteries while performing insulation mea surements provided that the values measured are higher than 20MΩ. In this case, the recharging time is higher than 6 hours and depends on the frequency of the measurements. 3.5 Environmental Specifications Operating Range: 14° to 104°F (-10° to 40°C) during recharging of batteries 14° to 131°F (-10° to 55°C) during measurement 10 to 80% RH Storage: -40 to 158°F (-40 to 70°C); 10 to 90% RH Altitude: <2000m 3.6 Mechanical Specifications Case Dimensions: 10.63 x 9.84 x 7.09" (270 x 250 x 180mm) Weight: 9.5 lbs (4.3kg) approx. Mechanical Protection IP 53 per NF EN 60529 (Ed. 92) IK 04 per NF EN 50102 (Ed. 95) 3.7 Safety Specifications Electrical safety according to EN 61010-1 (Ed. 2 for 2001), EN 61557 (ed. 97) 1000V CAT III, Pollution Degree 2 2500V CAT I Electromagnetic Compatibility: NF EN 61326-1 (Ed. 97) + A1, industrial environment category Megohmmeter Models 5050/5060 29 3.8 Variations in Operating Range Influential Quantity Influence Range of Influence Quantity Influenced* Typical Max. Battery Voltage 9V to 12V V MΩ <1ct <1ct 2cts 3cts Temperature -10° to +55°C V MΩ 0.15% R/10°C 0.20% R 0.3% R ± 1ct 1% R ± 1ct Humidity 10 to 80% HR V MΩ (10kΩ to 40GΩ) MΩ (40GΩ to 10TΩ) 0.2% R 0.2% R 3% R 1% R ± 2cts 1% R ± 5cts 15% R ± 5cts Frequency 15 to 500Hz V 0.3% R 0.5% R ± 1ct AC voltage superimposed on test voltage 0% to 20% Vn MΩ 0.1% R / % Vn 0.1% R / % Vn ± 5cts *The terms DAR, PI, DD and the capacity and current leak measurements are included in the quantity “MΩ”. 30 Megohmmeter Models 5050/5060 CHAPTER 4 MEASUREMENT FUNCTIONS 4.1 AC/DC Voltage • Select any measurement position with the rotary selector switch. • The instrument is automatically in AC/DC voltage measurement mode. • The voltage is continuously measured and is shown on the small display. Measurement is prohibited if an external voltage is present at the terminals before pressing START/STOP. Similarly, if an interference voltage is detected during measurement, the measurement is stopped and that voltage is indicated. 4.2 Insulation Measurement As soon as one of the MΩ positions has been selected, the main display shows “- - - - MΩ”, and the small display indicates the voltage present at the device’s “+” and “–” terminals. WARNING: If the external voltage present at the device’s terminals exceeds the threshold shown below, pressing the yellow START/STOP button does not bring about insulation measurement, but instead triggers an audible signal. The symbol flashes for 2 seconds, then the device goes back to automatic voltage measurement. Threshold: V peak ≥ dISt x Vn • Vpeak: External peak voltage or DC present at unit terminals. • dISt: Coefficient defined in the set-up menu (adjustable to 0.03 - 0.10 0.20 - default value: 0.03). • Vn: Test voltage chosen for insulation measurement. If the external voltage present at the device terminals is less than the value defined previously, then insulation measurement can proceed: Pressing START immediately begins the measurement. The measurement value is displayed on the main digital display and on the bargraph. An audible beep is given out every 10 seconds to indicate that measurement is in progress. WARNING: If the test voltage is considered to be dangerous (>120V), the symbol is displayed. If, during insulation measurement, an external voltage higher than the value defined by the following threshold is detected, the measurement is stopped as long as the voltage is applied to the instrument. Megohmmeter Models 5050/5060 31 The symbol flashes and the voltage value is indicated on the small digital display. Threshold: V peak > (dISt + 1.05) Vn Note: Adjustment of the dISt factor optimizes the measurement build-up time. If there is no interference voltage present, the dISt factor may be adjusted to the minimum value to obtain a build-up time for the minimum measurement. If a significant interference voltage is present, the dISt factor may be increased so that the measurement is not interrupted by the appearance of a negative alternation during the generation of the test voltage, which is the same as optimizing the measurement build-up time in the presence of the interference voltage. If the measurements are unstable, the SMOOTH function can be enabled. By pressing the V/TIME button during measurement, you can alternate between displaying the duration of the voltage measurement and the exact voltage generated, on the small display. Pressing the STOP button stops the measurement. After the measurement has been stopped the result remains displayed. It is possible to scroll through all the other results available on the main display using the R-DAR-PI-DD button. This button can also be used before the measurement is begun. If the “time-controlled test ” mode has been selected, the R(t) button makes it possible to access all the saved interval measurements automatically. If the ALARM function is activated, a buzzer is triggered as soon as the measurement crosses the threshold programmed in the SET-UP configuration menu. Display of values after measurement R-DAR-PI-DD Button Main Display V-TIME Button Small display Small display if the MR button is pressed (Model 5060) Resistance DAR PI DD* Current duration (min. sec) duration (min. sec) duration (min. sec) duration (min. sec) duration (min. sec) date, time, test voltage, OBJ : TEST date, time, test voltage, OBJ : TEST date, time, test voltage, OBJ : TEST date, time, test voltage, OBJ : TEST Capacitance** R(t) duration (min. sec) last test voltage * The value of DD is displayed only one minute after the measurement stops. **Capacitance (µF) measurement is only displayed after the measurement is finished and the circuit has been discharged. 32 Megohmmeter Models 5050/5060 CHAPTER 5 OPERATION NOTE: Charge the instrument fully before use. 5.1 Measurement Procedure • Start the instrument by turning the switch to the corresponding position. All the segments on the LCD screen are displayed, then the battery voltage. • Connect the leads to the “+” and “-” leads to the measurement points. • The voltage is continuously measured and displayed on the small display. • Press the START/STOP button to start the measurement. • Press START/STOP again to stop the measurement. The last result remains on the display until the next measurement is started, or the selector switch is turned. WARNING: If an external voltage is present that is greater than the thresholds described in § 4.2, the instrument indicates this voltage on the small display, the warning symbol flashes, and the measurement is stopped. Note: There are several special functions that can be used (see § 2.5). 5.2 Insulation Measurement This function allows the instrument to measure insulation between 10kΩ and 10TΩ at a test voltage of 500V, 1000V, 2500V, and 5000V or programmed voltage between 40V and 5100V. • Use the rotary switch to select the required test voltage (MΩ-500V, or MΩ-1000V, or MΩ-2500V, MΩ-5000V, or Var. MΩ-50-5000V). • Connect the instrument to the insulator to be tested. • Start the measurement using the START/STOP button and read the results. WARNING: If an external voltage is present that is greater than the thresholds described in § 4.2, then measurement is prohibited. Megohmmeter Models 5050/5060 33 Scroll through the results on the main display with the R-DAR-PI-DD button, or on the small display with the V/TIME button. Use R(t) when carrying out a ‘time-controlled test’ to scroll through the interval measurement values saved at the sampling rate specified in SET-UP. These values are available until another measurement is taken or the selector switch is turned. When measuring high levels of insulation (> 1GΩ), it is advised that the “G” guard terminal be used to eliminate the influence of surface leakage currents. The guard is connected between the two measurement contact points, and the surface susceptible to surface currents, (e.g. dusty, damp cable or transformer insulation). In this case, alligator clips are preferable to test-probes held in the hand. As soon as insulation measurement is stopped, the test circuit is automatically discharged using the instrument’s internal resistance. 5.3 Operation Examples Connection diagram for measurement of low insulation (e.g. motor) + RS-232 110 - 230V 50/60 Hz 20 VA max SET-UP MΩ 50-5000V MΩ - 5000V M MΩ - 2500V FF 0.1A 380V - 10kA 5x20mm MΩ -1000V MΩ - 500V OFF G V/TIME - SMOOTH MEM 1000V CAT III ( 2500V ) 2 nd MR ALARM START/STOP PRINT R-DAR-PI-DD PRINT MEM MEGOHMMETER R(t) MODEL 5060 Connection diagram for measurement of strong insulation a) Example of a motor (reduction of capacitive effects) + RS-232 110 - 230V 50/60 Hz 20 VA max SET-UP MΩ 50-5000V M MΩ - 5000V G MΩ - 2500V FF 0.1A 380V - 10kA 5x20mm MΩ -1000V MΩ - 500V OFF G V/TIME - SMOOTH MEM 1000V CAT III ( 2500V ) 2 nd 34 MR ALARM PRINT R-DAR-PI-DD PRINT MEM R(t) START/STOP MEGOHMMETER MODEL 5060 Megohmmeter Models 5050/5060 b) Example of a cable (reduction of superficial leak effects) External insulator Braid Insulator + RS-232 110 - 230V 50/60 Hz 20 VA max SET-UP MΩ 50-5000V Cable MΩ - 5000V Guard G MΩ - 2500V FF 0.1A 380V - 10kA 5x20mm MΩ -1000V MΩ - 500V - OFF G V/TIME SMOOTH MEM 1000V CAT III ( 2500V ) 2 nd MR ALARM PRINT R-DAR-PI-DD PRINT MEM R(t) START/STOP MEGOHMMETER MODEL 5060 5.4 Capacitance Measurement Capacitance measurement is automatically carried out during insulation measurement. It is displayed after the measurement is stopped and the circuit is discharged, using the R-DAR-PI-DD button. 5.5 Residual and Leakage Current Measurement The measurement of residual current circulating in the installation is automatically made during an insulation measurement. It is displayed at the end of the measurement with the R-DAR-PI-DD button. Megohmmeter Models 5050/5060 35 CHAPTER 6 MEMORY / RS-232 (5060) 6.1 RS-232 Specifications The Baud Rate can be set to 300, 600, 1200, 2400, 4800, 9600, or “Parallel” for printing results on parallel printers via the optional serial-to-parallel adapter. This setting is carried out in the SET-UP menu (see § 2.5.7). Data format: 8 data bits, 1 stop bit, no parity, Xon / Xoff protocol. Connection to a PC or to a Parallel Printer Cable, PC RS-232, DB9 F/F 6 ft Null Modem Cable (5060)............. Cat. #2119.45 2 2 3 3 5 5 9-pin female connector to Model 5060 9-pin female connector to serial printer 6.2 Saving / Recalling Values (MEM/MR Button) NOTE: After replacing or completely discharging the battery, the message “Memory OFF” appears when you try to save a measurement in memory. To be able to save your measurements, you will need to do the following: Set the instrument to SET-UP and press the MEM button (the display shows “MEM All clr”). Press the MEM button for 2s (the display shows “MEM ALL FrEE”). Measurements are now ready to be saved. First Function - MEM (Save) Results can be recorded in the instrument’s memory and stored along with addresses defined by an object number (OBJ) and a test number (TEST). An object represents a ‘box’ into which we can place 99 tests. Thus, an object can represent a machine or an installation upon which a certain number of measurements (insulation, resistance and continuity) are carried out. 36 Megohmmeter Models 5050/5060 1) When the button is pressed, the MEM symbol flashes and the small display indicates the first free OBJ : TEST number (e.g. 02 : 01). The main display indicates “FrEE”. • The OBJ number is the same as that of the last saved measurement, and the TEST number goes up in increments of 1. • It is always possible to modify OBJ : TEST with and . • If the user happens to select a memory address that is already occupied, then OCC appears on the main screen. • If a new OBJ is selected, the TEST goes back to 01. 2) By pressing MEM once again, the present measurement results will be recorded in the selected memory address (occupied or otherwise). The MEM symbol stops flashing and remains displayed. The time and the date of this recording are stored with the available data (R, V, t). If a button other than MEM is pressed, or the selector switch is moved before pressing MEM a second time, the instrument exits from MEM mode without saving the results. 3) If a time-controlled test has been initiated, interval values (samples) are available. They are automatically saved under the same OBJ : TEST number as the final measurement. Memory Capacity • Total memory space: 128kb • Data management: 8kb • Free memory space: 120kb An insulation measurement requires 80 bytes. A “time-controlled test” sample requires 10 additional bytes. Therefore, it is possible to record about 1500 insulation measurements. Free Memory Space This function is automatically activated when a result is saved. Press MEM once to get the following free OBJ : TEST number; the bargraph displayed corresponds to the available free memory space. • If the entire memory is free, all of the bargraph segments appear. • If the entire memory is full, the arrow to the left of the bargraph flashes. • As soon as the storage is complete, the bargraph disappears. Each segment of the bargraph equals approximately 50 recordings. Megohmmeter Models 5050/5060 37 Second Function - MR The MR function allows a recall of any saved data from memory, regardless of the position of the rotary selector switch. • When the button is pressed, the MR symbol is displayed. The small display indicates the last OBJ : TEST number to be assigned (e.g. 02 :11). • 02 “11” flashes opposite the TEST symbol. Use the select the desired OBJ : TEST number. and buttons to • If a new OBJ is selected, TEST is automatically set to the maximum stored number. At this stage, it is possible to review the entire memory with the and buttons, since the measurement values corresponding to the selected OBJ : TEST number are displayed on the main display. Use the R-DAR-PI-DD button to scroll through them. • The V/TIME button gives access to the date /time /V/OBJ-TEST number for each result. • If the recording selected by the OBJ : TEST number corresponds to a time-controlled test, the R(t) values can be accessed by pressing the R(t) button. The small display changes and indicates min:sec (time of 1st sample) and the symbol flashes on the screen. You can scroll through the other samples with the button. To exit from R(t) mode and return to the normal memory recall mode (OBJ : TEST), press R(t) or R-DAR-PI-DD again. To exit the MR function, press MR button once again or turn the selector switch. 6.3 Printing Measured Values (PRINT/PRINT MEM Button - Model 5060) If you use a serial printer, choose the appropriate communication speed (baud rate) in the SET-UP menu, between 300 - 9600 baud, then program the printer to the format run by the instrument (see § 6.1). There are two printing modes possible: • Instantaneous printing of measurement (PRINT) • Printing of recorded data (PRINT memory) NOTE: If the data transmission to the printer is successful, the COM symbol flashes once on the screen. If a problem has occurred, the COM symbol remains on the LCD screen without flashing. 38 Megohmmeter Models 5050/5060 6.4 Instantaneous Printing of Measurements (PRINT button) Following a measurement or after accessing values in MR mode, use the PRINT function to print the measurement results. NOTE: PRINT only works when the test is stopped by pressing the START/STOP button and the value is displayed on the LCD. Press the PRINT button to print the following: • 1 set of measurements (V /R /DAR /PI/DD /date /time) for normal tests. • The R(t) values if the “time-controlled test” has been used. To stop printing, move the position of the selector switch. Depending on the function used, the following models are obtained: Insulation Measurement AEMC® Instruments Model 5060 Instrument number: 000 001 INSULATION RESISTANCE TEST OBJECT: 01...................................... TEST: 01 (only printed in MR mode) Description: .................................................... ........................................................................ Date: .............................................03.31.2001 Start time: .............................................14 :55 Test duration: .......................... 15 min. 30 sec Temperature: ...............................°C ......... °F Relative humidity: ....................................... % Test voltage: ........................................ 1000V Insulation resistance (R):................ 385GOhm DAR (R 1’/R 30”): ..................................1.234 PI (R 10’/R 1”): ......................................2.345 Comments: ..................................................... ........................................................................ Date of next test: .............................../..../....... After a ‘time-controlled test’ other results are printed (interval samples): Time 00 : 30 01 : 00 01 : 30 etc... Resistance 35.94 GOhm 42.00 GOhm 43.50 GOhm Voltage 1005V 1005V 1005V A space for the operator’s signature is available at the end of the printout. Megohmmeter Models 5050/5060 39 6.5 Printing Data in Memory (PRINT MEM button) Prints out the contents of the instrument’s read-write memory. The small display indicates 01 : 01 for the OBJ : TEST number (starting address of printing). The main display indicates the last recording in memory (the end address of printing). e.g. 12 : 06. 01 flashes opposite the OBJ position (use the end addresses of the printout). and buttons to define the start/ • To exit without printing, alter the position of the selector switch. • To proceed with printing, press the PRINT button once more. • To stop printing, alter the position of the selector switch. Only the main results are printed out. Example: AEMC® Instruments Model 5060 Instrument number: 000 001 INSULATION RESISTANCE TEST OBJECT: 01......................................TEST: 01 Description:..................................................... ........................................................................ Date: .............................................03.31.2001 Starting time: .......................................13h 35 Running time:........................... 16 min 27 sec Temperature:.................................°C .........°F Relative humidity:........................................ % Test voltage: ....................................... 5000 V Insulation resistance (IR): ..................3.85 TΩ DAR: ......................................................1.234 PI: ..........................................................2.382 DD:.................................................................. Capacitance:.............................................. µF I residual:.................................................... nA Comments:...................................................... ........................................................................ Date of next test:............................................. OBJECT: 01......................................TEST: 02 Date: .............................................03.31.2001 Starting time: .......................................15h 10 Running time:........................... 15 min 30 sec 40 Megohmmeter Models 5050/5060 Temperature:.................................°C .........°F Relative humidity:........................................ % Test voltage: ....................................... 1000 V Insulation resistance (IR): ................. 3.85 GΩ DAR: ......................................................1.234 PI: ..........................................................2.345 DD:.................................................................. Capacitance:.............................................. µF I residual:.................................................... nA Comments:...................................................... ........................................................................ Date of next test:............................................. A space for the operator’s signature is available at the end of the printout. Megohmmeter Models 5050/5060 41 CHAPTER 7 DATAVIEW® SOFTWARE 7.1 Installing DataView® DO NOT CONNECT THE INSTRUMENT TO THE PC BEFORE INSTALLING THE SOFTWARE AND DRIVERS. NOTE: When installing, the user must have Administrative access rights during the installation. The users access rights can be changed after the installation is complete. DataView® must be reinstalled for each user in a multi-user system. USB Flash Drive Install 1. Insert the USB stick into an available USB port (wait for driver to be installed). 2. If Autorun is enabled then an AutoPlay window should appear as shown. 42 Megohmmeter Models 5050/5060 NOTE: If Autorun is disabled, it will be necessary to open Windows Explorer, then locate and open the USB stick drive labeled “DataView” to view the files on the drive. 3. In the AutoPlay window, select Open Folder to view Files. 4. Double-click on Setup.exe from the opened folder view to launch the DataView setup program. NOTE: If installing onto a Vista based computer the User Account Control dialog box will be displayed. Select the Allow option to proceed. 5. A Set-up window, similar to the one below, will appear. Figure 7-1 There are several different options to choose from. Some options(*) require an internet connection. • DataView, Version x.xx.xxxx - Installs DataView® onto the PC. • *Adobe Reader - Links to the Adobe® website to download the most recent version of Adobe® Reader to the computer. Adobe® Reader is required for viewing PDF documents supplied with DataView®. • *DataView Updates - Links to the online DataView® software updates to check for new software version releases. • *Firmware Upgrades - Links to the online firmware updates to check for new firmware version releases. Megohmmeter Models 5050/5060 43 • Documents - Shows a list of instrument related documents that you can view. Adobe® Reader is required for viewing PDF documents supplied with DataView®. 6. DataView, Version x.xx.xxxx option should be selected by default. Select the desired language and then click on Install. 7. The Installation Wizard window will appear. Click Next. 8. To proceed, accept the terms of the license agreement and click Next. 9. In the Customer Information window, enter a Name and Company, then click Next. 10. In the Setup Type window that appears, select the “Complete” radio button option, then click Next. 11. In the Select Features window that appears, select the instrument’s control panel that you want to install, then click Next. NOTE: The PDF-XChange option must be selected to be able to generate PDF reports from within DataView®. Figure 7-2 12. In the Ready to Install the Program window, click on Install. 13. If the instrument selected for installation requires the use of a USB port, a warning box will appear, similar to Figure 7-3. Click OK. 44 Megohmmeter Models 5050/5060 Figure 7-3 NOTE: The installation of the drivers may take a few moments. Windows may even indicate that it is not responding, however it is running. Please wait for it to finish. 14. When the drivers are finished installing, the Installation Successful dialog box will appear. Click on OK. 15. Next, the Installation Wizard Complete window will appear. Click on Finish. 16.A Question dialog box appears next. Click Yes to read the procedure for connecting the instrument to the USB port on the computer. NOTE: The Set-up window remains open. You may now select another option to download (e.g. Adobe® Reader), or close the window. 17. Restart your computer, then connect the instrument to the USB port on the computer. 18. Once connected, the Found New Hardware dialog box will appear. Windows will complete the driver installation process automatically. Shortcuts for DataView® and each instrument control panel selected during the installation process have been added to your desktop. NOTE: If you connected your instrument to the computer before installing the software and drivers, you may need to use the Add/Remove Hardware utility to remove the instrument driver before repeating the process. Megohmmeter Models 5050/5060 45 7.2 Connecting the Model 5060 to your Computer The Model 5060 is supplied with a serial interface cable necessary for connecting the instrument to the computer. This cable (Cat. #2119.45) is equipped with a 9-pin female connector on each end, thus providing the ability to interface with computers that have 9-pin connectors (see diagram in § 6.1). To connect the megohmmeter to your computer: • Connect the 9-pin connector from one end of the cable to the serial port on the front panel of the Model 5060 megohmmeter. • Connect the 9-pin connector from the other end of the cable to an available serial port on the back of your computer. You are now ready to communicate using DataView® with the megohmmeter. 7.3 Using DataView® Once the serial connection between the computer and the Model 5060 has been completed, as described above, start DataView®. There are two ways to open and use the DataView® software: Using the Megohmmeter Icon • Double-click the Megohmmeter Icon that was created during installation, located on the desktop. • DataView® will open and the Connection window will appear (see Figure 7-6). Using the DataView Icon • Double-click the DataView Icon that was created during installation, located on the desktop. • DataView® will open and display the DataView Quick Start window (see Figure 7-4). • Click the Configure Instrument button and the Connection window will appear (see Figure 7-5). The Quick Start Dialog Box contains the following options: • Configure Instrument: Creates a configuration for the megohmmeter. • Create View from Template: Creates a printable report from existing data already stored on the computer. 46 Megohmmeter Models 5050/5060 Figure 7-4 7.3.1 Configuring the Instrument To configure the instrument, perform the following steps. 1. Click the Configure Instrument button. A dialog box will open, allowing you to select the Communication Rate and the Serial Port for communicating with the Model 5060. Figure 7-5 2. Make sure that the serial port displayed in the dialog box matches the port you plugged the serial cable into. If the correct serial port is not selected, click on the drop down arrow and select the proper one. 3. The Communication Rate will default to 9600 and should be acceptable to any computer. This is also the default rate for the Model 5060. You may select a different rate by clicking on the Communication Rate drop-down menu and selecting from the available values. 4. Once the proper communication parameters have been specified click on the OK button. Megohmmeter Models 5050/5060 47 NOTE: The instrument must be configured for the same communications rate specified in Figure 7-5. If it is not, then you must either select the corresponding rate or change the instrument’s rate. When a serial communication link is established, DataView® will automatically identify the instrument that it is connected to. An instrument selection screen will appear for a few seconds while this takes place. Once identification is complete, the Setup dialog box will appear on the screen. Figure 7-6 This dialog box lets you configure every aspect of the Model 5060 megohmmeter. Each field in the dialog box is identical to the programmable features available from the instrument front panel itself. Refer to § 2.5 for a complete description of each configurable function. Several of the functions are configured by typing the appropriate value in the field provided, such as test run time, which may be programmed from a value of one minute to 59 minutes 59 seconds. Others are configured by clicking on the appropriate radio button, such as, activating or deactivating the buzzer by either selecting ON or OFF. The right hand side of this setup dialog box contains nine command buttons: • Close: Closes the Configuration dialog box and will bring up the Control Panel. • Write to Inst: Programs the megohmmeter using the current settings. • Read from Inst: Reads the current configuration of the megohmmeter attached via the serial cable. 48 Megohmmeter Models 5050/5060 • Save to Disk: Saves the current configuration. This file will reside on the computer’s disk drive. Saving different configuration setups can be useful for future functions and tests. • Load from Disk: Retrieves a saved file from the computer’s disk drive to be used in programming the megohmmeter. • Defaults: Resets all fields in the Setup dialog box back to the original factory settings. • Set Clock: Programs the computer’s time and date into the configuration of the megohmmeter. • Clear Memory: Erases all contents in all memory locations in the megohmmeter. • Download: Retrieves the stored data from all memory locations within the megohmmeter for use on the computer’s disk drive memory. Once all fields in the Setup dialog box have been configured, it is recommended that you perform the following steps. 1. Click on the Save button 2. Name and save the file. 3. Click on the Write button to configure the megohmmeter. 4. Click on the Close button to exit Setup and open the Control Panel. NOTE: While connected, both the DataView® and Megohmmeter windows are open. They have similar main menu options, so you need to be aware of which window you are working in. You can tell which window you are working in by looking at the top left corner of the active window. It will either display “DataView” or “Megohmmeter”. You can toggle between both windows via the Windows taskbar at the bottom of your screen. 7.3.2 Running the Test After configuring the instrument (see § 7.3.1), the Control Panel will automatically open. The Control Panel is used to initiate a timed test from the computer. The Control Panel dialog box consists of five command buttons: • Start: This button begins a timed test. • Clear Display: Clears the statistical data, on the lower left side of the screen, and the graph, on the right side of the screen. • Save to Disk: Saves the current data to a file in the computer. Megohmmeter Models 5050/5060 49 • Configure: Returns to the megohmmeter Setup dialog box for configuring the instrument. • Download: Retrieves data from the memory of the megohmmeter for storage in the computer. Figure 7-7 To run a timed test, perform the following steps: 1. Select the appropriate voltage for the test by clicking on the radio button next to the desired selection. 2. Press the Start button. This will run the test at the selected voltage. As the test is running, all other buttons are grayed out and the Start button becomes a Stop button. Once the test has started, a graph will begin to appear and build on the right side of the Control Panel (see Figure 7-7). The statistical data for the time of the test, DAR, PI, resistance value and other information will appear as they are completed on the lower left side of the Control Panel. The test will stop automatically at the end of the programmed run time. You may also stop the test at any time by pressing the Stop button. When the test is complete, if the “Calculate DD” check box was enabled, the Model 5060 will automatically calculate dielectric discharge ratio. This test takes 60 seconds. NOTE: On small motors and machinery it is possible that the capacitance values are too low for this test to be completed accurately. In these cases, simply press the Stop button to stop the dielectric discharge test. 50 Megohmmeter Models 5050/5060 3. Once the test has been completed press the Save to Disk button to save the results of the test just completed to a disk drive in your computer. 4. Name the file, then press the Save button. This will open the session properties dialog box: Figure 7-8 5. Once you have completed filling in all the information on the screen, press OK. This will open a dialog box allowing you to add a descriptive name for the object and test just performed. 6. Press the OK button. The information is now saved to the computer’s memory. 7. Close the dialog box by clicking on the small the dialog box. at the top right hand corner of 8. You will then be asked if you want to open the database just saved. Click the Yes button, which will open a dialog box labeled Create View from Template. 9. In the Groups window of this dialog box, click on “megohmmeter” then select the desired template, if other than the default is desired. 10. In Step 2: Specify Database(s) window, the file you just saved and named should be visible. If this is the file you wish to generate a report from, click the OK button. The report will now be available on the screen including graph, individual data points and all statistical data. 11. To print this report, either click on the Print icon or click on the File command and then Print. Megohmmeter Models 5050/5060 51 7.4DataView® Megohmmeter Templates 7.4.1 Megohmmeter Summary Report Template The Megohmmeter Summary Report template generates a view with two worksheets. An example of the first page is shown in Figure 7-9 below. Figure 7-9 This worksheet contains the following frames: • Trend Graph: This frame provides a graph of the measurement points in the selected test. • Channel Summary: This frame displays a textual summary of the selected test. • Channel List: This frame displays a list of tests. If more than one test is listed you can display the results of each test by selecting it with the mouse pointer. • Trend Summary List: This frame displays a textual list summary of the sample points for a selected test. Each summary line contains user-specified parameters of a group of sample points. An example of the last worksheet is shown in Figure 7-10. 52 Megohmmeter Models 5050/5060 Figure 7-10 Τhis page contains the following frames: • Title Box - containing the text “Trend Summary Report” • Operator Summary - containing operator information • Site Summary - containing test site information • Comments Summary - containing typed in operator comments • Database - containing the name of the database used to generate the report Each of these frames is customized by using the associated properties dialog box. The properties dialog box for a frame is displayed by selecting the frame, rightclicking and selecting Properties from the list displayed. Megohmmeter Models 5050/5060 53 CHAPTER 8 MAINTENANCE Use only factory specified replacement parts. AEMC® will not be held responsible for any accident, incident, or malfunction following a repair done other than by its service center or by an approved repair center. 8.1 Recharging the Battery If the symbol is flashing, the battery needs to be recharged. Connect the instrument to the 120VAC power cord via the connector (charging starts automatically). • bAt on the small display and CHrG or chAr on the main display, signifies fast charging in progress. • bAt on the small display and CHrG flashing on the main display, signifies slow charging (starts off with fast charge, temperature conditions permitting). • bAt on the small display and FULL on the main display, signifies that charging is over. If the instrument is started up and the battery voltage is > 8V, then the normal use of the device is permitted. NOTE: The battery should only be changed by an authorized repair facility recog nized by AEMC® Instruments. Changing the battery causes data to be lost from the memory. Press the MEM /MR button (“OFF” is displayed). Proceed with a total clearing of memory in SET-UP (see § 2.5.7) so the MEM/MR functions can be used again. 54 Megohmmeter Models 5050/5060 8.2 Fuse Replacement If FUSE -G- flashes on the display, the fuse must be replaced, taking all the necessary precautions when opening up the instrument. Make sure that none of the terminals are connected and that the selector switch is set to OFF before opening up the case. Only use the type of fuse shown on label inside the unit’s cover: 0.1A - Fast Acting - 380V, 5x20mm, 10kA 8.3Cleaning Disconnect the instrument from any source of electricity. Use a soft cloth lightly dampened with soapy water. Rinse with a wet cloth and then dry with a dry cloth. Do not use alcohol, solvents or hydrocarbons. 8.4Storage If the instrument is not used for an extended period of time, it is recommended to charge the instrument every two or three months. Megohmmeter Models 5050/5060 55 Repair and Calibration To ensure that your instrument meets factory specifications, we recommend that it be scheduled back to our factory Service Center at one-year intervals for recalibration, or as required by other standards or internal procedures. For instrument repair and calibration: You must contact our Service Center for a Customer Service Authorization Number (CSA#). This will ensure that when your instrument arrives, it will be tracked and processed promptly. Please write the CSA# on the outside of the shipping container. If the instrument is returned for calibration, we need to know if you want a standard calibration, or a calibration traceable to N.I.S.T. (Includes calibration certificate plus recorded calibration data). Ship To: Chauvin Arnoux®, Inc. d.b.a. AEMC® Instruments 15 Faraday Drive Dover, NH 03820 USA Phone: (800) 945-2362 (Ext. 360) (603) 749-6434 (Ext. 360) Fax: (603) 742-2346 or (603) 749-6309 E-mail: [email protected] (Or contact your authorized distributor) Costs for repair, standard calibration, and calibration traceable to N.I.S.T. are available. NOTE: You must obtain a CSA# before returning any instrument. Technical and Sales Assistance If you are experiencing any technical problems, or require any assistance with the proper operation or application of your instrument, please call, mail, fax or e-mail our technical support team: Chauvin Arnoux®, Inc. d.b.a. AEMC® Instruments 200 Foxborough Boulevard Foxborough, MA 02035 USA Phone: (800) 343-1391 (508) 698-2115 Fax: (508) 698-2118 E-mail: [email protected] www.aemc.com NOTE: Do not ship Instruments to our Foxborough, MA address. 56 Megohmmeter Models 5050/5060 Limited Warranty The Megohmmeter Model 5050/5060 is warranted to the owner for a period of one year from the date of original purchase against defects in manufacture. This limited warranty is given by AEMC® Instruments, not by the distributor from whom it was purchased. This warranty is void if the unit has been tampered with, abused or if the defect is related to service not performed by AEMC® Instruments. Full warranty coverage and product registration is available on our website at www.aemc.com/warranty.html. Please print the online Warranty Coverage Information for your records. What AEMC® Instruments will do: If a malfunction occurs within the one-year period, you may return the instrument to us for repair, provided we have your warranty registration information on file or a proof of purchase. AEMC® Instruments will, at its option, repair or replace the faulty material. REGISTER ONLINE AT: www.aemc.com Warranty Repairs What you must do to return an Instrument for Warranty Repair: First, request a Customer Service Authorization Number (CSA#) by phone or by fax from our Service Department (see address below), then return the instrument along with the signed CSA Form. Please write the CSA# on the outside of the shipping container. Return the instrument, postage or shipment pre-paid to: Ship To: Chauvin Arnoux®, Inc. d.b.a. AEMC® Instruments 15 Faraday Drive • Dover, NH 03820 USA Phone: (800) 945-2362 (Ext. 360) (603) 749-6434 (Ext. 360) Fax: (603) 742-2346 or (603) 749-6309 E-mail: [email protected] Caution: To protect yourself against in-transit loss, we recommend you insure your returned material. NOTE: You must obtain a CSA# before returning any instrument. Megohmmeter Models 5050/5060 57 10/15 99-MAN 100258 v23 Chauvin Arnoux®, Inc. d.b.a. AEMC® Instruments 15 Faraday Drive • Dover, NH 03820 USA • Phone: (603) 749-6434 • Fax: (603) 742-2346 www.aemc.com