1
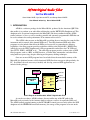
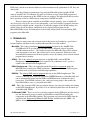
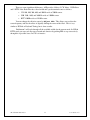
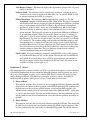
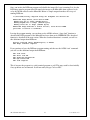
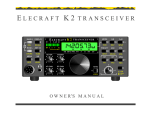
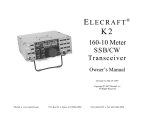
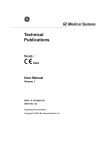
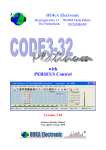
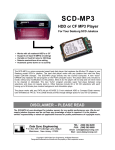
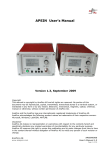
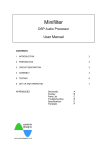
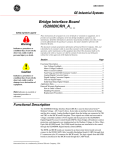
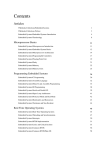
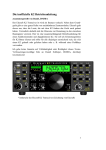
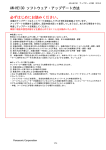
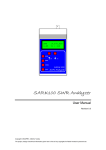
~ User Manual ~
Micro908 DSP Audio Filter
AF908
Revision 1.2a
DSP Audio Filter
AF-908 v1.0
Select Function
AF-908
Contents
1. Introduction .............................................................................................................................................. 2
2. Terminology .............................................................................................................................................. 3
3. Micro908 Hardware Notes ...................................................................................................................... 4
4. Installing AF908 Software Components ................................................................................................ 5
5. Running Your First DSP Program ........................................................................................................ 5
6. Basic Operation of the DSP908 Filter Program .................................................................................... 8
7. Basic Operation of the ASP Filter Program .......................................................................................... 9
8. Reference: Operating the AF908 Control Program on the Micro908 ............................................... 12
9. Reference: Operating the DSP908 Filter Program ............................................................................. 17
10. Reference: Operating the ASP Filter Program ................................................................................... 20
11. Reference: Download DSP Programs to the Micro908 ...................................................................... 22
APPENDIX A: Modifying the Micro908 PC Board ................................................................................. 24
APPENDIX B: AF908 Package Contents ................................................................................................... 25
APPENDIX C: DSP908 Defaults & Options .............................................................................................. 26
APPENDIX D: Developing DSP Programs for the AF908 ....................................................................... 27
APPENDIX E: The DSP Image and Downloading DSP Programs from Other Platforms ................... 28
APPENDIX F: Loading software into the Micro908.................................................................................. 31
AF908 Digital Audio Filter
for the Micro908
Steve Holton N1NB, Lyle Johnson KK7P, and George Heron N2APB
User Manual written by: Steve Holton N1NB
1. INTRODUCTION
AF908 is a software package for the Micro908 kit, produced by the American QRP Club
that enables it to perform as an audio filter utilizing the popular KK7P DSPx Daughtercard. This
daughtercard is an optional component in the Micro908, and when combined with the AF908
control software, it serves as a free-standing, portable and extremely programmable DSP that can
be used to enhance the audio performance of an amateur radio receiver.
The AF908 software runs on the Micro908, providing the user interface for control of the
instrument and for control of the internal DSPx card. Two fully-functional DSP audio filter
programs are also included that allow the DSPx card to provide its comprehensive filtering
capabilities. One filter program provides capabilities similar to the Elecraft K2’s KDSP2 filter
(which also uses the DSPx daughtercard): fully-programmable audio filters for CW, SSB and
data (RTTY, PSK31, AMTOR, et al) . The other filter program provides a robust suite of DSP
filter programs, such as a BFO, an LMS denoiser, a Wiener-filter autonotcher, and other filters
using multi-rate processing, adaptive filtering and frequency shifting techniques.
Once one or more DSP programs have been loaded into the nonvolatile memory of the
Micro908, the platform becomes a fully-functional DSP filter that can operate independently of a
PC. In addition, the tools necessary to modify and develop your own DSP applications are
included in the package.
SEEPROM
Audio Out
LCD
DSP Audio Filter
HC908AB32
MCU
PB1
Vol
PB2
Busy
PB3
PB4
Serial Comm
Headphones
Spkr
Tune
PB5
Batteries
DSP
Audio In
+12V
User Interface
Block Diagram of the Micro908 “AF908” Digital Audio Filter
As can be seen above, AF908 software does not utilize any of the RF paths in the
Micro908 used previously by the Antenna Analyst software, nor does it require the DDS card.
The AF908 control program running on the HC908AB32 control processor only utilizes the DSP
daughtercard, the SEEPROM nonvolatile memory (for storage of the programs to be run on the
AF-908 DSP Audio Filter
2
User Guide v1.0
DSPx card), and the user interface hardware of the instrument itself (pushbuttons, LCD, dial, and
audio paths.
After the preliminary instructions for getting the Micro908 updated and the AF908
software installed, this User Manual will guide you on how to run a simple DSP program and
verify that all the components of the AF908 system are working. The manual will then cover the
basic operations of the two DSP software components: DSP908 and ASP.
There are many options available in the AF908 software package, some of which will
only be used by a few users or used very infrequently, so we have included a complete reference
covering all the available options. Appendices describe the contents of the AF908 package, the
default values for all the options, information on developing DSP programs for the
Micro908/AF908 system, and information on the format and protocols for downloading DSP
programs to the Micro908.
2. TERMINOLOGY
There are many terms and acronyms used in this project and it might be a good idea to
become familiar with them in order to fully understand the rest of this manual.
Micro908 – This is the revolutionary hardware platform designed by the AmQRP Club
(N2APB and N2CX) and introduced in 2004 with its inaugural software program:
“AA908 Antenna Analyst”. The flexible design of the Micro908 allows other software
control programs to run on it, thus allowing it to serve as numerous different test and
measurement instruments for the ham operator, merely by loading a new software control
program into its memory.
AF908 – This is the software program that runs on the Micro908’s internal HC908
Daughtercard to provide user interface control (LCD, pushbuttons, dial), as well as
control of the internal DSPx Daughtercard.
DSPx Daughtercard – This is an optionally-purchased hardware component inside the
Micro908 that is required for AF908 to function. It gets loaded with the DSP programs
(described next) to provide the audio filtering capabilities.
DSP908 – The primary DSP software program that runs on the DSPx Daughtercard. This
software is initially loaded into the nonvolatile SEEPROM memory of the Micro908 and
can be automatically loaded into the DSPx card RAM memory each time the unit is
powered up. The DSP908 software is the “audio processing engine” that enables the
entire Micro908 to serve as a powerful audio filter.
ASP – This is the secondary DSP software program that one can select for loading and running
on the DSPx Daughtercard. It provides a set of additional audio filters for advanced use
of the Micro908 AF908.
C1SIN and C1SIN2 – These are two test software programs for the DSPx that one first loads to
test and demonstrate proper assembly and installation of the DSP and audio path
components in the Micro908 platform. These programs are ported to the DSPx from the
excellent book, Experimental Methods in RF Design available from the ARRL. No
QRPer's bookshelf is complete without this tome!
AF-908 DSP Audio Filter
3
User Guide v1.0
C1FIR – This is a simple DSP filter program that was also are ported to the DSPx from
Experimental Methods in RF Design. It may be of interest to those wishing to develop
their own DSP programs.
DSPterm – This is the software program used on the PC to initially load the DSP programs
(DSP908, ASP, C1SIN, C1SIN2) into the Micro908 non-volatile memory. Additionally,
this program provides an optional way for the operator to interactively control the
Micro908 and DSPx functions from the PC keyboard.
User’s PC
DSPterm
Micro908
HC908 card
(Control Processor)
AF908
Serial
Cable
SEEPROM
(nonvolatile mem)
DSP908, ASP,
C1SIN, C1SIN2
DSPx card
DSP908, ASP,
C1SIN, C1SIN2
Component Block Diagram
Shows where software components (in red) reside
and how they are utilized in the overall Micro908 AF908 system.
3. Micro908 HARDWARE NOTES
1. A minor pc trace modification on the Micro908 pc board must be done before the DSP is
usable. See Appendix A for the details and a method of making the required modifications.
2. The audio inputs on the Micro908 are both stereo jacks. The DSP audio filters provided with
the AF908 package all process just one channel (left) as input. In the Micro908, this
corresponds to the tip of the 3.5mm (1/8” plug). This should eliminate potential problems of
stereo plugs and mono sources. The DSP908 and ASP filters put their filtered output on both
channels. The C1FIR filter puts the original signal on the right channel and the filtered output
on the left channel.
3. For complete information about the hardware, please refer to the Micro908 Technical
Reference Manual, located on the project web page at www.amqrp.org/kits/micro908.
AF-908 DSP Audio Filter
4
User Guide v1.0
4. Installing AF908 Software Components
The AF908 software must be installed on the Micro908. This operation will replace any
previously-loaded programs, like AA908. Calibration data and user settings from AA908 are
preserved when AF908 is loaded and run. You can install the AF908.s19 file on the Micro908
using the same techniques as previously used with the Antenna Analyst. Any of the methods
described in Appendix F can be used. This is the same information that is in the Micro908
Antenna Analyst “Operating Guide”, available on the project web page
(www.amqrp.org/kits/micro908).
Once the AF908.s19 file is loaded into the Micro908, the PC program – DSPterm.exe - is
used to load the DSP programs on to the Micro908, as described in the next section. DSPterm
may be run by double-clicking the filename in the Windows File Explorer window, or for more
flexibility in a Command Prompt/DOS window.
Five DSP programs (DSP908.exe, ASP.exe, C1SIN.exe, C2SIN.exe and C1FIR.exe) and two
PC programs (DSPterm.exe and DSPimage.exe) are provided. For simplicity, DSPterm and the
five DSP programs should all be placed in the same directory.
5. Running Your First DSP Program
This section will describe the steps required to run the simple test DSP programs C1SIN
and C1SIN2 and thereby checkout the proper installation of all the elements of the Micro908
AF908 system. C1SIN generates a 1,000 Hertz tone on the Micro908 speaker and also delivers
it to the audio output jack. C1SIN2 generates two sine waves (700 and 1900 Hz). You may
need to adjust the Volume control on the Micro908 to hear the tones.
The AF908 software has a number of options, and in this section we cover the basic ones
needed to run the simple test programs. More options will be covered in subsequent sections and
a complete description of all options can be found in the Reference Section.
Step 1: Run DSPterm on the PC to create the DSP image file
It’s first necessary to run the DSPterm program on the PC in order to combine the desired DSP
programs into a single “image file” that will be subsequently downloaded to the Micro908 and
stored in the nonvolatile memory (SEEPROM). Throughout this manual, all examples assume
these files are located in a common directory.
Using the Windows Explorer, navigate to the directory where you placed the programs and
double click on DSPterm. This will open a Command Prompt/DOS window and run DSPterm
which will prompt you:
Com Port number(or Enter if com1) com:
You can enter the COM port for the Micro908. Enter only the digit i.e. a “3” for COM3. Like
this:
Com Port number(or Enter if com1) com:3 ◄Type the 3 and hit Enter
If the Micro908 is on com1 then you only need to hit Enter. You will then be prompted for the
name of a DSP program. Type c1sin.exe and hit Enter. You will then be prompted for another
DSP program – type c1sin2.exe and hit Enter. When next prompted for a dsp program just hit
Enter. The window will now look like this:
AF-908 DSP Audio Filter
5
User Guide v1.0
Com Port number(or Enter if com1) com:3
using com3
enter DSP program name (or Enter when done):c1sin.exe
enter DSP program name (or Enter when done):c1sin2.exe
enter DSP program name (or Enter when done):
AF908 DSP Image Build, Steve Holton N1NB
Adding c1sin.exe to image (0x0246 bytes)
Adding c1sin2.exe to image (0x0267 bytes)
AF908 DSP Image Transfer & Serial Console, Steve Holton N1NB
press Esc or Ctrl+C to terminate
At this point the DSPterm program has built an image containing the two programs - c1sin.exe
& c1sin2.exe – is ready to download them the Micro908. An error message you might see at
this point instead of the last two lines shown above is:
Com Port failed to open... in Use by another program??
press Enter to end program
This probably means that the program (TerraTerm, HyperTerminal, etc) you used to install the
AF908 software is still running and continues to control the com port. End that program, then
press enter and repeat the process of double clicking on DSPterm.exe.
When you successfully reach this point leave the DSPterm program running. It has built an
image and is ready to transfer it to the Micro908.
Step 2: Download DSP Image to the Micro908
Power on the Micro908 with the AF908 software installed. After the battery voltage display you
will see the following on the LCD:
Sel. DSP Action
Run
Turn the dial clockwise to the next menu selection which is Download. Pushing the dial
pushbutton will select the download function. In the command prompt window on the PC you
will see the following messages:
Request send DSP image (0004D7 bytes) to AF908
DSP Image transfer complete
The LCD will return to the “run” menu:
Sel. DSP Action
Run
Step 3: Select C1SIN2 program to be run
Pushing the dial pushbutton now will select the run function and you will now be asked to select
which of the two DSP programs you downloaded (c1in or c1sin2) you wish to run. The LCD
will appear like this:
Select DSP pgm
c1sin2
Pushing the dial pushbutton will cause the c1sin2 program to be loaded from the Micro908’s
nonvolatile memory to the DSP, and it will start. You will briefly see on the LCD the following:
Loading DSP with
Pgm=> c1sin2
AF-908 DSP Audio Filter
6
User Guide v1.0
If the DSPterm program is still running on the PC, you will also see in the command prompt
window the following messages:
DSP
DSP
DSP
DSP
DSP
load start
alive test OK1
download checksum OK
Pgm started OK
load complete
Once the program has been loaded and started you should hear c1sin generating two sine waves
(700 and 1900 Hz) on the piezo speaker. You may need to adjust the Volume control on the
Micro908 to hear the tones. The LCD will display:
Sel. DSP Action
end DSP pgm
If instead you see this on the LCD:
DSP Run Failed
And on the serial terminal, if active, you see one of the following:
DSP download checksum failed
DSP pgm failed to start
You should retry it. If retrying doesn’t eliminate the problem, you may have a problem with the
modifications to the pc board described in Section 2 and Appendix A. Recheck the
modifications.
Step 4: Select C1SIN program to be run
Pushing the dial pushbutton will end the current DSP program execution and silence the tones.
The only menu option when running a simple DSP program like this is “end DSP pgm”. Upon
pressing the dial pushbutton to end the program, you will be returned to the “Run” menu option.
Pushing the dial pushbutton again will again show the program name c1sin2, but turning the
dial will show the name of the other program that was downloaded - c1sin . With c1sin on the
LCD display, press the dial pushbutton to execute this program which will produce a single
1000Hz sine wave signal. Use the end DSP pgm command to again silence the output.
If you reach this point successfully you have confirmed that all the basic elements needed for
AF908 are installed and working!
1
Occasionally you will get an “invalid response” instead of “OK”. The reason for this remains a mystery and as
long as the remaining lines are “OK” there is no problem.
AF-908 DSP Audio Filter
7
User Guide v1.0
6. Basic Operation of the DSP908 Filter Program
The DSP908 program is a powerful DSP audio filter that is functionally equivalent to the
program for the Elecraft® KDSP2, also provided by KK7P. DSP908 provides a set of audio
filters that are ideal for enhancing the listening experience for CW, data (RTTY, PSK31,
AMTOR, et al), and SSB modes. Full programmability is provided for the filters’ center
frequency, filter widths, skirt slopes, gain, taps, notch and decay parameters, making this an
extremely versatile component for the radio shack.
An excellent paper describing the design decisions/reasons that the KDSP2/DSP908 code
is the way it is can be found at http://www.elecraft.com/KDSP2/kdsp2design.pdf .
As previously mentioned, the DSP908 software has numerous options and parameters.
Extensive support is provided by the AF908 software running on the Micro908 to control the
operation of this program. In this section we will only describe the basic options needed to get
started productively. A complete description of all the options and default settings is covered in
the Reference Section.
Step 1: Run DSPterm on the PC to create the DSP image file
It’s again necessary to run the DSPterm program on the PC in order to create an “image file” for
the DSP908 program that will be subsequently downloaded to the Micro908 and stored in the
nonvolatile memory (SEEPROM). Again locate the DSPterm program with the Windows
Explorer and double click on it. When prompted for a DSP program name type – dsp908.exe.
Just hit enter when prompted for another DSP program. You will see:
Com Port number(or Enter if com1) com:
using com1
enter DSP program name (or Enter when done):dsp908.exe
enter DSP program name (or Enter when done):
AF908 DSP Image Build, Steve Holton N1NB
Adding dsp908.exe to image (0x1C6C bytes)
AF908 DSP Image Transfer & Serial Console, Steve Holton N1NB
press Esc or Ctrl+C to terminate
This will build an image containing just the DSP908 program. Upon seeing the “Run” menu:
Sel. DSP Action
Run
turn the dial CW to the next menu selection which is Download and push the dial to select this
function. The download will take longer than before with the test programs, or about 10 seconds,
as the program is considerably larger than c1sin and c1sin2.
After the program is downloaded you are returned to the “Run” menu.
Step 2: Download DSP Image to the Micro908
Pressing the dial pushbutton this time will act differently than in the examples in the previous
section.. In this case, AF908 software recognizes that only one DSP program is loaded in the file
image in SEEPROM, and when you push the dial pushbutton it directly begins to load it without
asking you to choose a program. This load will take about 10 seconds.
AF-908 DSP Audio Filter
8
User Guide v1.0
Step 3: Running the DSP908 Audio Filter
When the load is complete and the DSP908 program begins to execute, the behavior of the
AF908 software is different. It recognizes, by the name of the program, that you are running
DSP908 and it has specific run time support for operating the DSP908 audio filter. Now the LCD
will look like this:
C 500 700
Change
The top line is displaying the status of the running DSP908 filter: C for CW, 500 is the width in
Hz and 700 is the center (BFO/Sidetone) frequency. For RTTY/Data and soft CW the symbols
R and c will appear along with width and center frequency. For SSB the symbol will be S and
the low and high frequency would appear like this:
S 200 2500
Change
The “Change” menu item allows you to change various filter parameters. Turning the dial
clockwise, the next option would be “end DSP pgm”. Pressing the pushbutton here would end
the DSP908 program and return to the “Sel. DSP Action/Run” level. Rather than
exiting, go back CCW to the “Change” option and select it by pushing the dial pushbutton.
Now you will see the following on the LCD:
C 500 700
Filter
The status line remains the same and will always display the current status of the filter until the
DSP908 program execution is ended. There are a number of options at this level. The first in the
CCW direction is “Mode” which allows you to change to SSB, RTTY or soft CW mode. The
first option in the CW direction is “Set Widths” the meaning of which will be described
later. If you have moved the dial, return to “Filter” and select it. Now you will see:
C 500 700
Width
Selecting this will now show this:
C 500 700
500
This will allow you to change the width of the filter. Turning the dial will display choices from
50 to 800. Turning the dial CCW will widen the filter while CW will narrow it. Turn the dial
CW. As you turn the dial you will hear the effect of the change in the audio output. When you
reach 150 select it by pushing the dial pushbutton. This will change the width and take you back
to the “Change” level and the LCD will look like this:
C 150 700
Change
A very common function is to change the widths of the filter. For each mode there are three
widths which the AF908 software “remembers”: narrow, mid, and wide. You can “rotate”
through them by successive pushes on Pushbutton 2. Push PB2 three times and observe the width
on the status line change between 800, 250 and 100 with each push. If you prefer some other
AF-908 DSP Audio Filter
9
User Guide v1.0
set of widths you can change them via the “Set Widths” option which is the first CW option
at the “Filter” menu item level. You might also want to change the Center (BFO/Sidetone)
frequency to match your personal preference. The “Center” option is the first CCW at the
“Width” menu item level.
Having customized your preferences you might wish to save them to EEPROM so that they will
be available each time you run the program. You do this by selecting the “Save Settings”
option which is the second CW choice at the “Change” option level. It is also an option at the
“Run” menu item level. At the “Run” menu item level you can restore all the original default
settings with the “Default Settings” choice.
This completes an introductory tour of the operating controls for the DSP908 program. With this
you should be able to put this program to productive use. A full description of all the options,
range of parameters, and default values is in the Reference Section.
7. Basic Operation of the ASP Filter Program
The ASP (Audio Signal Processor) DSP filter program by Johan Forrer KC7WW was
first described in the September 1996 QEX. It has influenced a number of subsequent DSP
programs including DSP908. The ASP software consists of several components: a digital beatfrequency oscillator (BFO), selectable band-pass filters for CW, SSB and other digital modes, a
denoiser based on the least-mean-squares (LMS) technique and a Wiener-filter autonotcher
(removing carriers or heterodynes). Several advanced concepts are applied, such as multirate
processing, adaptive filtering and frequency shifting. These all are of fundamental importance to
anyone wishing to learn more about the finer points of DSP and these principles may be
considered the “tools of the trade” for working with DSP. This not only applies to audio signal
processing, but also is becoming evident in contemporary digital radios.
For a complete description of ASP see: http://www.arrl.org/tis/info/pdf/9609x008.pdf.
ASP doesn’t have the same set of features and parameters as DSP908 but it is supported in a
similar manner.
ASP is recognized by the AF908 software and after it loads, which will take about 7
seconds, when it runs you will see the following on the LCD:
C 200 700
Change
The top line is again as status line. In this case the first number is the width of the filter and the
second number the center. This is true for all modes (CW, SSB, and RTTY). For SSB you would
see something like this:
S 2400 1500
Change
A filter 2400Hz wide centered at 1500Hz. At the change menu option you have three
selection possibilities: Change, End DSP pgm, and Save Settings. These behave
in a similar manner as they do for the DSP908 program.
AF-908 DSP Audio Filter
10
User Guide v1.0
There are some significant differences. ASP provides 9 filters: 5 CW filters, 3 SSB filters
and 1 RTTY filter. Each filter has a fixed width and a predetermined center as follows:
•
CW 100, 200, 300, 400, and 500 Hz wide at 700Hz center.
•
SSB 1200, 1800, and 2400 Hz wide at 1500Hz center.
•
RTTY 200Hz wide at 2210Hz center.
You can change the effective center by Adjust BFO. This allows you to adjust the
center frequency and has the effect of digitally shifting the center of the filter. This is very
similar to IF Shift or Passband Tuning, but is done at audio.
Pushbutton 2 will cycle through all the available widths for the current mode. In SSB &
RTTY mode you can cycle the state of notch and denoiser by pushing PB3 to step successively
through the 4 possible states. In CW it is inactive.
AF-908 DSP Audio Filter
11
User Guide v1.0
~ Reference Sections ~
The section is divided into four parts. The first describes the options of the AF908 software
running on the Micro908 platform. The second section describes the option for explicit
operational support of the DSP908 DSP program running under the AF908 software. The third
section describes the option for explicit operational support of the ASP DSP program running
under the AF908 software. The fourth section covers the options of the DSPterm PC program.
Information on developing DSP programs is in Appendix D and a description of the format of
the DSP image that is downloaded to the Micro908 and the PC program DSPimage.exe is in
Appendix E. Appendix F describes the procedure to load the AF908 application software into the
Micro908 hardware platform.
8. Operating the AF908 Control Program on the Micro908
The AF908 software package supports the following functions:
1. Downloading DSP program images from the PC to SEEPROM
2. Running a DSP program stored on SEEPROM
3. From the Micro908 platform provide explicit operational support to control two
of the provided DSP programs – DSP908 and ASP
4. To control from the PC the operation of a DSP program via a serial terminal. (if
the DSP program provides this function.)
Pushbutton 1: “Main AF908 Control Menus”
Pressing Pushbutton 1 will take you to the initial AF908 menu. Note that when you power up the
Micro908 with the AF908 software installed you will be taken directly to this initial AF908
menu. This menu can also be invoked later by pressing pushbutton 1. This menu offers 8 choices
which are selected by turning the dial and pressing the dial pushbutton when the desired function
is displayed. The menu item displayed first is “Run” The 8 functions available are:
1. Download
This function requests the download of a DSP program image file from the DSPterm
program running on the PC. DSPterm must already be running and waiting for this
request. If it is not, the Micro908 will hang waiting for the PC. When the download is
complete the menu will change from download to Run. You will also see on the PC the
following output from DSPterm:
Request send DSP image (00nnnn bytes) to AF908
DSP Image transfer complete
2. Run
This function loads the DSP with a program from the SEEPROM and starts it running.
When you select this function you will get a menu listing the names of the DSP programs
that are stored in the SEEPROM. The names are the same names as the xxxxx.exe files
that were placed in the image by DSPterm less the .exe extension..The name – xxxxx – is
truncated to 7 characters if longer than 7 characters. By pressing the dial pushbutton the
AF-908 DSP Audio Filter
12
User Guide v1.0
selected program will be loaded into the DSP and started. The LCD will display
“Loading DSP with Pgm=> xxxxx” during the loading process. Also, if a serial terminal
program (including DSPterm) is running you will see the following output during the
loading process on the PC side:
DSP
DSP
DSP
DSP
DSP
load start
alive test OK
download checksum OK
Pgm started OK
load complete
If there is only one program in the DSP image, pressing the dial pushbutton will directly
run the program bypassing the redundant select program step. Once the loading process is
complete and the DSP program is running what you see next depends on which DSP
program is running. The DSP programs DSP908 and ASP are recognized and explicit
operational support is provided for them. This support is described in other sections. For
all other programs a single menu item “End DSP pgm” is displayed. Pushing the dial
pushbutton will terminate the DSP program and return to the “Run” menu item display
where you may select among the 8 menu items described in this section. Whether the
program is DSP908 or ASP is determined based on the name. The check is not case
sensitive.
If there are no DSP programs in the SEEPROM or they have been overwritten by other
software like Link908, you will see a message “SRI No DSP pgms / D/L DSP
pgm 1st” will appear for 1.5 seconds and you will be taken to the “Run” menu item
level where you can select “Download” to download a DSP image from the PC. If the
DSP download checksums don’t match or the DSP program start command fails you will
see this on the LCD:
DSP Run Failed
And on the serial terminal, if active, you will see one of the following:
DSP download checksum failed
DSP pgm failed to start
This should not occur, but might occur occasionally. The cure for which is to try again.
If it occurs all the time it suggest a problem with the serial connection form the HC908
to the DSPx. Check the modifications made in accordance with Appendix A.
3. Run w/PC
This function will also load the DSP with a program from the SEEPROM and start it
running. When you select this function you will get a menu listing the names of the DSP
programs that are stored in the SEEPROM. Once the program is running, however, the
function differs from the “Run” function described above. In this case the AF908
software “steps out of the loop” and lets the user control the operation of the DSP
program from the PC serial terminal program. The only action menu displayed on the
Micro908 LCD is “End DSP pgm”. Pressing the dial pushbutton will end the DSP
program. All other control is from the PC. Both DSP908 and ASP allow control from the
PC. The other sample programs provided in the AF908 package do not. Note: If the DSP
program immediately puts out a message on the serial terminal, it may be missed as the
AF908 software takes a moment to configure the serial port pass-through function. On
AF-908 DSP Audio Filter
13
User Guide v1.0
the other hand, if the DSP program is waiting for input from the serial terminal there is no
problem.
4. Auto Load
It is possible with this function to cause the Micro908 to load and run a specific DSP
program at power on instead of first coming to the initial “Run” menu. With this
function you are given a menu of the names of all the DSP programs that are in
SEEPROM. Pushing the dial pushbutton when the desired program is showing will cause
this to be remembered and the name of the program will be saved in EEPROM so that at
the next power on this program will be run. If there is only one DSP program in the
SEEPROM the program selection step is bypassed. The selected program will not run at
this time. Instead you are returned to the “Run” menu item. At power on a check is made
to ensure that the program is still in SEEPROM. It is considered to still be there if the
program name appears in the same slot in the directory of programs in SEEPROM as it
was when selected with this option. If the DSP program is no longer present you will see
the “Auto Load Failed/DSP PGM Missing” message displayed for 1.5 seconds
and the “Run” menu item appears. If there are no DSP programs in the SEEPROM then
you will see the “SRI No DSP pgms / D/L DSP pgm 1st” message. The
functions available once the program starts running are the same as described in “Run”
above.
5. NO Auto Load
This function cancels any startup load set by the previous function. Then the “Run”
menu item appears.
6. Default Settings
This function re-establishes the default settings and saves them to EEPROM. There are
global settings and settings specific to the DSP908 and ASP DSP programs. The specific
settings are discussed in the discussion of the specific program support, below. The only
global setting at the current time is whether and what program would automatically load
on startup.
7. Save Settings
This saves the current global and specific settings to EEPROM. [Note: If you change the
Startup Load option, described above, the change is always updated in EEPROM. There
is no need to do a “Save Settings” to reflect this.]
8. Exit
As has been described above all the previous functions return you the “Run” menu item
remaining at this level of commands. This function, however, is your escape. It takes to
the very top level - the Select Function command level which allows you to use
the other pushbutton functions. Currently only PB1 “Main”, PB4 “Config.” and PB5
“Direct Serial” are active at the select command level.
Pushbutton 4: “Config”
Pressing pushbutton 4 will present a set of menus …
AF-908 DSP Audio Filter
14
User Guide v1.0
View Battery Voltage – This function displays the approximate voltage of the +V power
supply to the board.
Software Load – This function transfers control to the serial port, enabling the user to
download a new control program to the Micro908 (e.g., an updated AF908.s19 file,
or perhaps reloading the AA908.s19 program.)
Manual Download – This function is not recommended for general use. Use the
“Download” function available from the PB1 “Main”menu. This form of download
will download DSP images prepared by either the DSPimage or DSPterm programs
using a serial terminal program like TeraTerm or HyperTerminal. Getting these
programs to do this is tricky – hence the recommendation to not use this feature.
The reason that this is included is that on other platforms this may be the only
option available. The image file still must be prepared with DSPterm or DSPimage
or an equivalent program. When you select this option a message ***waiting for
DSP pgm *** appears on the terminal. At this point you send the image file. With
Hyperterminal it is relatively straight forward, you send it as a text file even though
it’s a binary file. The terminal settings of 0 msec/char and 20-40msec/line are fine.
You shouldn’t have to change them from what you use to successfully download
new Micro908 software. It is more complicated on TeraTerminal. In the Send File
file selection box you must choose the binary check box, and you must change the
terminal settings to 0 msec/line. These are different settings than for software
download making this error prone on TeraTerm.
Load AA908 – If you are running the integrated AA908/AF908 version of the software
on your Micro908 then you will see this option. Selecting this will end AF908 and
load AA908. If you used Exit to leave a DSP program running it will continue to
run with its current settings when AA908 loads and runs. Note: this feature is not
available in AF908 versions prior to 1.2.
Pushbutton 5: “Direct”
This function provides a means to utilize any PC based software that supports a serial connection
to the DSPx Daughtercard directly without the Micro908 platform software playing any part in
the process. For example, it can be used to load the DSP directly from the PC using programs
such as EzFast or EZLoad . This function is principally of interest to those developing or
modifying DSP programs. When pressed you get a 2 item menu to choose from:
1. Direct w/Reset
This function starts the direct serial mode after resetting the DSP chip. Resetting the DSP
chip activates the built-in monitor program on the DSPX daughtercard. PC programs can
then interact over the serial port with the monitor to load and run DSP programs. The
AF908 software simply passes all serial traffic between the DSP and the PC – acting only
as a port to port bit repeater. To break out of this mode press the dial pushbutton and you
will be returned to the Select Function menu. Note: this function performs no loading of
the DSP.
2. Direct No Reset
This function starts the direct serial mode without resetting the DSP chip. This means that
the DSP needs to already have been loaded utilizing the AF908 software functions. This
in effect, commanders the serial traffic of a running DSP program. The AF908 software
AF-908 DSP Audio Filter
15
User Guide v1.0
then simply passes all serial traffic between the DSP and the PC – acting only as a port
to port bit repeater. To break out of this mode press the dial pushbutton and you will be
returned to the Select Function menu. Note: this function performs no loading of the
DSP. This is intended principally for DSP program development.
AF-908 DSP Audio Filter
16
User Guide v1.0
9. Operating the DSP908 DSP Filter Program
When the DSP program being run is DSP908, specific operating capabilities are active.
Once DSP908 starts running you see a status display on the top line of the LCD and a menu of
commands available on the bottom line via the dial and dial pushbutton selection method as well
as special functions enabled for pushbutton 2 and pushbutton 3. The top line looks like this:
C 500 700 Nr or R 200 2200 or S 200 2500 Nt or c 100 800 Nr
That is the mode CW, RTTY, SSB or Soft CW. (C, R, S or c). The width and center frequencies
for CW, softCw & RTTY or the low and high frequencies for SSB, as well as the denoiser/notch
state being displayed. (Nr denoiser active, Nt notch active)
This status line remains until the DSP program ends and is updated with every change made.
The 2nd line has the 3 menu items:
1. Change
This allows you to change filter settings and presents a menu of
i.
Mode (CCW)
This allows changing mode among the following menu choices:
a. RTTY
b. CW (1st)
c. SoftCW – Soft CW has gentler skirts than CW
d. SSB
ii.
Filter (1st item displayed)
This allows changing filter settings and is context sensitive to mode. When
changing Width, Center, High or Low, the first value you will see is the current
setting. Turning the dial CW lowers the value while CCW increases the value.
You will hear the effect of the change in the audio output as you turn the dial.
Once you select a changed value it will be reflected in the status line.
For CW, and SoftCW you get the following menu choices:
a. Width: Allows you to set the filter width. (1st)
b. Center: Allows you to set the filter center frequency.
c. Toggle Noise: Toggle the state of the denoiser filter.
For RTTY you get the following menu choices:
a. Width: Allows you to set the filter width. (1st)
b. Center: Allows you to set the filter center frequency.
For SSB you get the following menu choices:
a. Toggle Noise: Toggle the state of the denoiser.
b. High: Allows you to set the filter high frequency. (1st)
AF-908 DSP Audio Filter
17
User Guide v1.0
c. Low: Allows you to set the filter low frequency.
d. Toggle Notch: Toggle the state of the autonotch filter.
iii.
Set Widths (CW)
For each mode, there are three widths that are “remembered”: narrow, mid, and
wide. At any time DSP908 is running you can “cycle” through these widths
without changing anything else by successive presses of pushbutton 2.. The
defaults are for CW and SoftCW, which are considered the same mode, 100, 250,
800 Hz.; for RTTY 200, 300, 1000 Hz; and for SSB 300-1600, 300-1900, and
200-2500 Hz. This function allows you to change these defaults. In all modes you
get a menu of Wide, Mid and Narrow. Once you select one of these it becomes
context sensitive. For SSB you enter first the low cut and then the high cut
frequency each from a menu of choices. For the other modes you enter just the
width. The first value you will see is the current setting. In this case, since these
setting do not immediately affect the current filter settings, you do not hear the
effect as you turn the dial.
iv.
Gain
You can set the (digital) gain in each of the three mode specific filters as well as
the denoiser and the autonotch filters and the CODEC itself. You will get a menu
selection for each of these possibilities. The initial value presented will be the
current value for the selected gain. As you turn the dial you will hear the effect of
the change. You can select from a menu of gains is from -6.0dB to +18dB in
0.5dB steps. For the CODEC it is -6.0dB to +6dB in 1.5dB steps. If any gain is set
too high, or the filter is over-driven, loud and unpleasant distortion may result.
These gain controls are provided to allow balancing audio levels. They are not
designed to increase receive system gain for amplification of low signal levels
v.
Taps
The denoiser offers 4 choices for the number of taps in the filter. The default
number is 91. The choices from this menu are: 31, 51, 71, and 91. The initial
value presented will be the current value. As you turn the dial you will hear the
effect of the change
vi.
Exit
This function will exit to the very top level - the Select Function command
level which allows you to use the other pushbutton functions. Currently only PB1
“Main”, PB4 “Config.” and PB5 “Direct Serial” are active at the select command
level. It leaves the current DSP program running with its current settings.
vii.
Decay/Beta
This allows the setting of the decay rate (hold time) and beta (aggressiveness) for
the denoiser and autonotch. They are expressed as number between 0 and 99.
When you select one of the following to change you will see on the second line of
the LCD the current value. Rotating the dial will change the value. Pushing the
dial pushbutton while rotating the dial will move the cursor under the digits. Once
you have the desired value press pushbutton 1 (PB1) to change the setting to the
AF-908 DSP Audio Filter
18
User Guide v1.0
displayed value. If you just wish to know the current setting then simply push
PB1 as soon as you see the current value displayed. Please Note, that PB1 selects
the choice not the dial pushbutton!
a. Noise Decay
b. Noise Beta (1st)
c. Notch
d. Notch Decay
2. End DSP pgm
This function resets the DSP, ending DSP program execution and returns to "Run" menu
item of PB1.
3. Exit
This function will exit to the very top level - the Select Function command level
which allows you to use the other pushbutton functions. Currently only PB1 “Main”,
PB4 “Config.” and PB5 “Direct Serial” are active at the select command level. It leaves
the current DSP program running with its current settings.
4. Save Settings
This saves the settings to EEPROM and returns to the "change" menu item. This is the
same as the save settings in the PB1 menu but is located here as well so that you can save
changes to the filter settings while continuing to operate the DSP program.
Pushbuttons 2 & 3
Any time the DSP908 DSP program is running in SSB mode you can cycle the state of notch and
denoiser by pushing PB3 this will cycle successively through the 4 possible states. In CW and
softCW it toggles the denoiser. For RTTY it is inactive. Similarly you can cycle through the
wide, mid, narrow widths for the current mode by successively pushing PB2. This does not
interfere with the use any other use of PB2 & 3 when DSP908 is not actively running (at the
moment there is no other use). For each push of PB2 or PB3 the DSP is informed and the status
line is updated.
AF-908 DSP Audio Filter
19
User Guide v1.0
10. Operating the ASP DSP Filter Program
When the ASP program is run, specific capabilities are active. Once ASP starts
running you see a status display on the top line of the LCD and a menu of commands available
on the bottom line. Commands are via the dial and dial pushbutton selection method as well as
special functions enabled for PB2 and PB3. The top line looks like this:
C 200 700 Nr or R 200 2210 or S 2400 1500 Nt
That is the mode CW, RTTY, or SSB (C, R, or S). The width and center frequencies as well as
the denoiser/notch state being displayed. (Nr denoiser active, Nt notch active) This status line
remains until the DSP program ends and is updated with every change made.
The 2nd line has the 3 menu items:
1. Change
This allows you to change filter settings and presents a menu of
Taps (CCW)
i.
The denoiser offers 4 choices for the number of taps in the filter. The default
number is 91. The choices from this menu are: 31, 51, 71, and 91.
Adjust BFO (1st item displayed)
ii.
This allows changing center (BFO) frequency for the mode of the current filter.
When you select Adjust BFO you will see the current value on the second line of
the LCD. Rotating the dial will change the value. Pushing the dial pushbutton
while rotating the dial will move the cursor under the digits. Once you have the
desired value push pushbutton 1 (PB1) to change the setting to the displayed
value. If you just wish to know the current setting then simply push PB1 as soon
as you see the current value displayed. Please Note, that PB1 selects the choice
not the dial pushbutton!
iii.
Mode
This allows changing mode among the following menu choices:
a. RTTY
b. CW (1st)
c. SSB
2. End DSP pgm
This function resets the DSP ending the DSP program’s execution and returns to "Run"
menu item of PB1
3. Save Settings
This saves the settings to EEPROM and returns to the "change" menu item. This is the
same as the save settings in the PB1 menu but is located here as well so that you can save
changes to the filter settings while continuing to operate the DSP program.
AF-908 DSP Audio Filter
20
User Guide v1.0
Pushbuttons 2 & 3
Any time ASP is running in SSB or RTTY mode you can cycle the state of notch and denoiser
by pushing PB3 mode to step successively through the 4 possible states. In CW it is inactive.
Similarly you can cycle through the possible filter widths for the current mode by successively
pushing PB2. This does not interfere with the use any other of PB2 & 3 when ASP is not running
(at the moment there is no other use). For each push of PB2 or PB3 the DSP is informed and the
status line is updated
ASP provides 9 filters: 5 CW filters, 3 SSB filters and 1 RTTY filter. Each filter has a
fixed width and a predetermined center as follows:
•
CW 100, 200, 300, 400, and 500 Hz wide at 700Hz center.
•
SSB 1200, 1800, and 2400 Hz wide at 1500Hz center.
•
RTTY 200Hz wide at 2210Hz center.
You can change the effective center by Adjust BFO this allows you to adjust the center
frequency and has the effect of digitally shifting the center of the filter. Because there are a
limited number of widths, the only width selection mechanism is via pushbutton 2.
AF-908 DSP Audio Filter
21
User Guide v1.0
11. Downloading DSP Filter Programs to the Micro908
The DSPterm PC program is used to get one or more DSP program stored on the
Micro908 platform’s SEEPROM. The SEEPROM has 64k bytes of storage. The 5 DSP programs
provided together require only 15k bytes of storage. The DSP programs produced using the ADI
tools have an extension of “.exe”. They are not, however, in a form that can be directly loaded
onto the DSP. They are also in a very “bulky” form. In the”exe” form the 5 programs would take
40k bytes of SEEPROM and require additional processing on the Micro908 platform. The
DSPterm utility program is provided to take one or more DSP programs in “exe” form and make
a compact binary image that can be loaded on to the Micro908’s SEEPROM. This same utility
performs the PC side of the downloading process. The DSPterm PC program is also a serial
terminal program and may be useful for those who wish to develop their own DSP applications
as well as other uses described later.
The DSPterm program can be run in two different ways. If you double click on it in
Windows Explorer or start it at the prompt in a Command Prompt or Dos Window with no
command line arguments it will prompt for parameters. Alternatively you can provide
parameters on the command line. Running with command line parameters offers some additional
options. This section will describe the full set of parameters available when running at the
command prompt. When no parameters are present on the command line, the only parameters
available are com port and DSP program file names as described in Section 5 Step 1 and Section
6 Step 1. DSPterm.exe PC program running in a Command Prompt window as described below
enables the programs full function . If you plan to use the serial terminal features, you’ll want to
increase the number of lines of scrolling available. This is the Screen Buffer Size “Height” in the
Properties->Layout message box. The DSPterm program is started by typing the following at the
command prompt:
DSPterm [comN] d=xxxx.exe [d=yyyyy.exe …..d=zzzz.exe] [o=aaaa.bbb]
Where:
comN is the optional comport where the Micro908 is attached
The default is COM1
d=xxxx.exe is the name of a DSP program to be included in the image
Up to 10 DSP programs may be included in the image
o=aaaa.bbb is the name of an optional image file to be saved on the PC
If an image file had been previously saved then the usage can be like this:
DSPterm [comN] i=aaaa.bbb
Where:
comN is the optional comport where the Micro908 is attached
The default is COM1
i=aaaa.bbb is the name of an image file previously saved on the PC
AF-908 DSP Audio Filter
22
User Guide v1.0
Once you invoke the DSPterm program and it builds the image file, leave it running. It is also the
DSP image transfer program that will transfer the image to the Micro908 when requested to do
so by the AF908 software on the Micro908. Below is sample output from these first steps of
running DPSterm:
D:\micro908\utility >dspterm d=asp.exe d=dsp908.exe d=c1sin.exe
AF908 DSP Image Build, Steve Holton N1NB
Adding asp.exe to image (0x1609 bytes)
Adding dsp908.exe to image (0x1C72 bytes)
Adding c1sin.exe to image (0x0246 bytes)
AF908 DSP Image Transfer & Serial Console, Steve Holton N1NB
press Esc or Ctrl+C to terminate
Leaving the program running, you can then use the AF908 software “down load” function to
download the DSP programs to the Micro908 and store them on its SEEPROM. The download
function is described in the next section. When the download function is executed you will see
this additional output from DSPterm:
Request send DSP image (0034F4 bytes) to AF908
DSP Image transfer complete
If you continue to leave the DSPterm program running and then use the AF908 “run” command
you will see this additional output from DSPterm:
DSP
DSP
DSP
DSP
DSP
load start
alive test OK
download checksum OK
Pgm started OK
load complete
This is because the program is a serial terminal program as well. This may useful at least initially
if any problems are encountered. It will run until you type Ctrl-c or ESC.
AF-908 DSP Audio Filter
23
User Guide v1.0
Appendix A: Modifying the Micro908 PC BOARD
The serial connections between the DSP daughtercard and the HC908 are reversed and the traces
must be modified before the DSP can be used.
1) J9 pin 10 from the daughtercard should go to pin 2 of U6, the level converter – not to
the anode of D11
2) J9 pins 11/12 should go to the anode of D11 – not to pin 2 of U-6.
Step 3: Solder the wires
to D11 and U6
Step 1: Cut traces
Figure 1: Top side of PCB
Step 2: Solder thin insulated
wires to J9 at the pins
shown here, and put wires
through the holes
Figure 2: Bottom side of PCB
AF-908 DSP Audio Filter
24
User Guide v1.0
Appendix B: AF908 Package Contents
The AF908 software is packaged in three parts. Only the executables part is required for normal
operations. The other two parts consist of the sources and the development tools & reference
materials.
1) The executable package consists of 7 files:
1. AF_v01.S19 – the AF908 software to be installed on the Micro908 platform.
2. DSPterm.exe – the PC program for building & downloading DSP program images.
3. C1SIN.EXE – Simple DSP program producing 1000Hz tone.
4. C1SIN2.EXE – Simple DSP program producing 700 & 1900Hz tones.
5. DSP908.EXE – Sophisticated DSP filter program with AF908 operational support.
6. C1FIR.EXE – Simple DSP filter program - 200 Hz wide at 600 Hz.
7. ASP.EXE – A DSP filter intermediate in complexity. AF908 operational support is
provided.
2) The sources package contains the sources for the AF908 software, the DSPterm &
DSPimage PC program and the DSP programs. This is only needed for those wishing to
modify the software or develop DSP programs
3) The development tools and reference materials can be found on the Micro908 CDROM in
the directory “KK7P DSPx Daughtercard”.
AF-908 DSP Audio Filter
25
User Guide v1.0
Appendix C: DSP908 Defaults & Options
Default Settings:
Global Defaults:
AutoLoad – off
DSP908 Defaults:
Initial Mode & Filter – CW, 500Hz Wide, 600Hz Center
CW Filter –500Hz Wide, 600Hz Center
CW Widths – Narrow 100Hz, Mid 250Hz, Wide 800Hz
RTTY Filter –1000Hz Wide, 2200Hz Center
RTTY Widths – Narrow 200Hz, Mid 300Hz, Wide 1000Hz
SSB Filter – 200-2500Hz
SSB Widths – Narrow 300-1600Hz, Mid 300-1900Hz, Wide 200-2500Hz
Gains – denoiser & CODEC +6.0dB, others 0.0dB
Denoiser Beta – 89
Denoiser Decay - 71
AutoNotch Beta - 39
AutoNotch Decay - 7
Taps - 91
DSP908 Parameter Ranges:
CW Widths –50- 800Hz in 50Hz increments
CW Center – 400-1000Hz in 50Hz increments + 1100, 1200 & 1300Hz
RTTY Widths –50Hz, 100-1000Hz in 100 Hz increments, 1200-2000 Hz in 200 Hz
increments
RTTY Center –1000-2500Hz in 100 Hz increments
SSB Low Cut –0, 100-600Hz in 50 Hz increments
SSB High – 1500-3000Hz in 100 Hz increments
Gains – CODEC -6.0dB to +6.0dB, all others -6.0db to +18.0dB
Denoiser Beta – 0-99
Denoiser Decay - 0-99
AutoNotch Beta - 0-99
AutoNotch Decay - 0-99
Taps – 31, 51, 71, 91
AF-908 DSP Audio Filter
26
User Guide v1.0
Appendix D: Developing DSP Programs for AF908
It is beyond the scope of AF908 to include a discussion of the art & science of developing DSP
programs for the DSPx Daughtercard. However, all the tools and basic data are available on the
Micro908 CDROM in the directory “KK7P DSPx Daughtercard”.
The schematic for the daughtercard is in the subdirectory DSPx. The data sheets for the DSP and
all the major components on the daughtercard are in the “Data Sheets” directory. Manuals for the
DSP chip, writing applications for the chip, and the development tools software are in
subdirectories of the ADI directory.
The development tools themselves are in the adi_dsp directory. If you are going to re-build any
programs then this directory needs to be copied to your hard drive and the Path to the location
where you copied the adi_dsp directory and several other Environment Variables need to be set.
(Environment Variables can be set in Windows 98 via the autoexec.bat file and in Windows
2000 and XP via Settings->Control Panel->System->Advanced-> Environment Variables.) What
needs to be set are:
SET path=%path%F:\adi_dsp\21xx\lib;
SET path=%path%F:\adi_dsp\21xx\bin;
SET path=%path%F:\adi_dsp\21xx\etc;
SET path=%path%F:\adi_dsp\21xx\include;
SET ADI_DSP=F:\adi_dsp\
SET ADI_PATH=F:\work;
SET ADII=F:\adi_dsp\21xx\include;F:\work\inc;
Where ‘F:’ is the drive (or path) to which you copied the adi_dsp directory. You need to create
the work and inc directories. They do not need to be in the same path as the adi_dsp directory.
For each DSP program included that is named xxxxx there is a file makexxxx.bat which will
make the DSP program. It should be noted that these tools are the last free tools set from ADI
and they run in a Command Prompt/DOS window. The resulting DSP programs they produce are
in the format that the DSPterm program can process. Later ADI tools such as VisualDSP that
came with later Ez Kit Lite DSP evaluation kits produce a different format DSP program
executable file which is not supported by the DSPterm program. [If any one wants to tackle that,
the format of the DSP image file is provided in Appendix E.] Also note that the Ez Kit Lite
contains a different CODEC than the DSPx card. The program C1FIR may be of interest as it
contains conditional assembly code for both CODECs and is also a useful “skeleton” to begin
writing DSP filters.
AF-908 DSP Audio Filter
27
User Guide v1.0
Appendix E. The DSP Image and Downloading DSP Filter Programs from
Other Platforms
This section describes the format of the DSP Image and a PC utility – DSPimage.exe – that will
produce an image file. This may be of interest to anyone who wants to create and/or download
DSP images to the Micro908 from a device other than a Windows PC.
DSPimage.exe:
This program is the image building part of DSPterm.exe. Its syntax is similar:
DSPimage d=xxxx.exe [d=yyyyy.exe …..d=zzzz.exe] [o=aaaa.bbb]
Where:
d=xxxx.exe is the name of a DSP program to be included in the image
Up to 10 DSP programs may be included in the image
o=aaaa.bbb is the name of the image file to be saved on the PC.
The default if no name is specified is DSP.bin.
DSP Image Format:
The DSP image file produced by either DSPterm or DSPimage consists of a directory
(table of contents) followed by data representing the DSP programs contained in the image. The
data representing the DSP programs is not a simple copy of the .exe files. Such files are not in a
form that can be loaded onto the DSP. The following describes the format of the directory and
the form of the DSP programs within the image.
All binary values are stored Big Endian format in the image.
Directory:
Fixed part (8 bytes)
offset
offset
offset
offset
0
4
5
7
DSP signature "%dSp"
Program count # of DSP programs in this image
Total byte count NN(16 bits) in file (excluding checksum)
First directory entry of up to 10 max.
Up to 10 directory entries (12 bytes long):
offset 0
offset 8
offset 10
Program name Max 7 characters + null
Offset within image of start for this program(16 bits)
total number of bytes for this program(16 bits)
Program Data:
Following last directory entry the DSP programs begin. Each program is in the form of a series
of “command blocks”. Each command block must be 256 bytes in length or less so that each fits
in the 256 byte SEEPROM buffer in the Micro908. Each command block consists of a command
followed by data. There are two commands:
AF-908 DSP Audio Filter
28
User Guide v1.0
$DPxxyy.....Program memory instructions (24 bit words)
$PMxxzz.....initialized Data memory (16 bit words)
xx= load address (16 bits)
yy= # of 24 bit instructions (16 bits)
zz= # of 16 bit data words (16 bits)
The Program memory instructions or Data memory data immediately follow the command. Each
command block must be contiguous with the previous command block for that DSP program.
The handling of the interrupt vectors is a special case. The first 3016 (4810) program words in a
DSP program (starting at DSP program memory offset 0000) must be re-directed to 3FC016. The
DSP’s monitor program will re-locate the interrupt vectors from 3FC016 to location 0000 before
starting the DSP program. That is: the command block for the first 3016 program words must
have 3FC016 in the address part of the command not 0000 which is what is in the “exe” file.
End Following Program Data:
Insert
offset
offset
offset
padding as needed to make file (NN bytes) multiple of 3
NN-6 byte count for file NN same values as at offset 5
NN-4 DSP signature "%dSp"
NN
24 bit check sum on entire file (on NN bytes)
DSP Image File Transfer Protocol
The actual transfer of the image file to the Micro908 utilizes a protocol established for general
purpose transfers between the PC and the SEEPROM on the Micro908 platform. Only the subset
of function specifically needed for transferring DSP image files is discussed here. (The complete
protocol is documented in the source code and in the Micro908 SEEPROM Programmers Guide
which is available on request for serious developers.)
The transfer is initiated by the AF908 software running on the Micro908 in response to the user’s
request to download. AF908 sends the 5 characters ‘zZa??’ The PC side responds with a 16 bit
binary byte count for the image to be transferred – MSB first. AF908 responds with the 2
characters ‘go’ at which point the PC side sends the image data. Upon completion of the transfer
AF908 send ‘ok’ as an acknowledgement.
Transmit Delays: During the data transfer part of the protocol there is a transmit delay of 10ms
for every 128 bytes sent by the PC. At least some delay is needed. I have not experimented with
the values, but have tested this value over a range of machines speeds.
AF-908 DSP Audio Filter
29
User Guide v1.0
The Protocol:
“PC” side
AF908 on the Micro908
zZa??
request:
Request= Text characters “zZa??”
<-----------------------------nn
------------------------------>
nn= byte count Binary MSB 1st
$0000=64K
'go'
<-----------------------------data
------------------------------>
[nn bytes]
'ok'
<------------------------------
DSP Programs “xxx.exe” Format
The format of the DSP programs –the .exe files- produced by the ADI tools supported by AF908
can be found on the AA908 CD-ROM. Look in directory "KK7P DSPx Daughtercard" then
directory "ADI" then directory "swtools release 5_1" and open asm1.pdf. Go to page 146 in the
acrobat application (page B-2 in the book) and you'll find all the details. Note this is not the same
format that is produced by some of the more recent ADI tools like VisualDSP. The tool set used
by AF908 is the last free set from ADI - See Appendix D.
AF-908 DSP Audio Filter
30
User Guide v1.0
Appendix F: Loading software into the Micro908
This appendix overviews a way the user can load an updated software program into the
Micro908, as provided on the project’s Internet web site.
BACKGROUND
Increasingly today, microcontrolled projects have an ability to be “field updated” with new
capabilities and software updates made available by the designer. So instead of needing to send
your instrument back for re-programming to get these new features, you can now simply
download the program update from the Internet and send it to the Micro908 and the instrument
automatically updates its internal memory with the new program. What a great way to keep your
project completely up to date with the latest features!
PC REQUIREMENTS
•
Windows 95, Windows 98, Windows 2000, and Windows XP.
•
Works with computers ranging from 33 MHz Intel 486 processors up to 2.4 GHz P4
processors.
•
An available RS-232 serial port. (USB-to-RS232 adaptors may work for those computers
having only USB-based serial ports.)
•
A dumb terminal emulator program, such as TeraTerm (provided on the Micro908
Resource CDROM.)
USAGE
1. Download the latest Micro908 software from the project website located at
http://www.amqrp.org/kits/micro908 . Save the S19 file in a known location on your PC
(e.g., your desktop folder.) The S19 file is the file with the “.s19” extension to its
filename. This is a text representation of the binary image to be loaded onto the
Micro908.
2. Connect your Micro908 to the PC using a standard, straight-through male-female DB9type serial cable. (Do not use a null modem cable that swaps pins 2 and 3 from end-toend.)
3. Start up the TeraTerm program on your PC. If not already set up, configure the
communications as 9600 8N1, no flow control (in the Setup Serial Port menu) , and
be certain to have the line delay set to at least “40ms/line”. Make sure that you have
TeraTerm configured to be using the active serial port in your PC. Be certain that no
other program has control of the serial port – e.g., if your Palm HotSync program is
running, as evidenced by its icon in the system tray in the lower right of the screen, you
must quit that program by right-clicking the icon and select “exit”.)
4. Issue the Update Software command on the Micro908, located as an option under the
CONFIG menu. See the debug monitor program called “HCmon” display its sign-on
message.
AF-908 DSP Audio Filter
31
User Guide v1.0
5. Type C to clear out memory. See the C character echoed to the screen and the HCmon>
prompt displayed again.
6. Type L to load new program. See message “…waiting …”
7. Pull down the File Send File menu.
8. Navigate to where you saved the *.s19 file
9. Once in the folder that contains AA_908v4-0.s19 file, select that file and click the Open
button. (Be careful to only load S19 files! If you mistakenly select any other file
extension, it is highly likely that you'll mess up the bootstrap loader program.)
10. See line after line of ASCII data displayed in short one-second bursts. This will continue
for about 2 minutes until the entire program has been sent to the Micro908 and flashed
into its memory. DO NOT INTERRUPT THIS PROCESS!! When it is complete, the
HCmon > command prompt will be displayed again.
11. Disconnect the serial cable and restart the Micro908 (i.e., turn the power off and on
again) to start the newly-loaded program. You will observe the new version number
presented in the sign-on display.
AF-908 DSP Audio Filter
32
User Guide v1.0