1
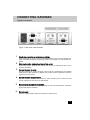
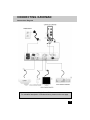
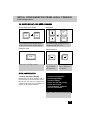
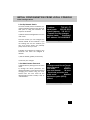
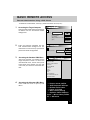
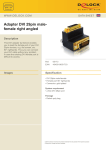
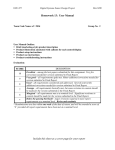
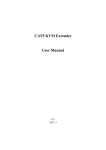
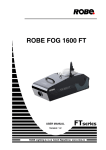
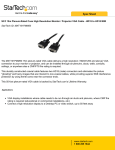
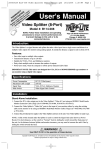
G E T T I N G
S TA R T E D
K A V E M A N
Connecting Kaveman..... 2
Initial Configuration ...... 5
Basic Remote Access..... 8
950.0006.002 Rev 2.0
1
CONNECTING KAVEMAN
Typical Connection
Figure 1: Rear view of the Kaveman
1
2
Check video resolution on server/mouse settings.
Video resolution on server must be 1280x1024@75Hz or less. Mouse settings may
need to be adjusted based on operating system. See Chapter 2 of User Manual for
details.
Disconnect monitor, keyboard and mouse from server
Disconnect monitor, keyboard and mouse from server (or KVM-switch) that is to be
remotely controlled.
3
Connect Kaveman to server
Connect Kaveman to “server computer” ports to server (or KVM-switch) via supplied
KVM cables to allow Kaveman to digitize and emulate monitor keyboard and mouse
signals for remote control.
4
Connect Kaveman to local console
Connect monitor, keyboard and mouse to “local console" ports to allow for local
access of Kaveman and server (or KVM-switch).
5
Connecting the Kaveman to the network
Connect the network and the Kaveman using the on-board 10/100 Base T Ethernet
port (RJ-45) labeled “Network”.
6
Connect power
Connect supplied power cord from Kaveman to power source.
2
CONNECTING KAVEMAN
Connection Diagram
Single Server Mode
For a detailed description of numbered items, please see the next page.
3
CONNECTING KAVEMAN
List of Items in Connection Diagram
1 A/C grounded power source, 100-240
15 VGA cable for monitor port HDDB15
2 Kaveman power connector
16 PS/2 cable for keyboard port 6 pin
VAC 50/60 Hz 1A.
3 Power cord with ground (supplied)
4 RJ-45 network connector
network through which
5 Company
remote client communicates with
Kaveman
6
RJ-45 Category 5 network cable
7 PS/2 connector for keyboard 6 pin
MiniDIN female on server
8 PS/2 connector for mouse 6 pin
MiniDIN female on server
male/male with thumbscrews
MiniDIN male/male
17 PS/2 cable for mouse port 6 pin
MiniDIN male/male
18 VGA connector for monitor HDDB15
female on Kaveman
19 Local Console Keyboard
20 Local Console Mouse
21 Local Console Monitor
22 Serial port 2. Used for power control
(relay module) or secondary serial port
9 VGA connector for monitor HDDB15 23 Reset button. Use a paper clip (or
female on server
10 PS/2 connector for keyboard 6 pin
MiniDIN female on Kaveman
11 PS/2 connector for mouse 6 pin
MiniDIN female on Kaveman
12 VGA connector for Monitor HDDB15
similar) to reset hardware of the
Kaveman. Will not affect controlled
computer.
24 Primary serial port. RS-232C DCE
connection. Connect using a malefemale 9-pin straight-through cable to
any computer.
female on Kaveman for local console
monitor
25 10/100 Speed light: Green - 100 Base
13 PS/2 connector for keyboard 6 pin
26 Link/Activity Light - On indicates good
MiniDIN female on Kaveman for local
console keyboard
14 PS/2 connector for mouse 6 pin
MiniDIN female on Kaveman for local
console mouse
T connection; Orange - 10 Base T.
link connection, Off indicates no link,
Blinking indicates is that there is
network traffic.
27 Red and green indicator lights that
should alternate when the unit is well.
4
TARGET SERVER CONFIGURATION
Recommended Target Server Settings
Recommended
Server(s)
Settings
for
Target
1. Video Resolution - 1280x1024 or less
2. Refresh Frequency - 75 Hz
3. Mouse Speed/Acceleration (see notes
below)
Mouse Speed and Acceleration
In order to ensure mouse control during
remote administration, you must turn off
and/or set to normal all operating system
specific adjustments to mouse speed
and acceleration on the target.
For example, in Windows 2000, visit the
Control Panel, select Mouse Properties
and select Motion. If necessary, change
the Acceleration to none and the set the
Speed tab to the middle (neither slow nor
fast).
Windows NT4:
Control Panel -> Mouse Properties ->
Motion
Set Pointer Speed to "Slow" (the lowest
setting)
Windows 2000:
Control Panel -> Mouse Properties ->
Motion
Set Mouse acceleration to "none" and
leave pointer speed at default (center
position)
the User’s Manual.
Notes About KVMs
It is possible to extend the reach of your
Kaveman by attaching an electronic KVM
switch to the connectors at the back of
the unit to connect to more servers.
Please note that if you attach a KVM
switch to the Kaveman, you will not be
able to utilize the monitoring and
notification features on all of the target
servers.
Kaveman has been designed to operate
when attached to a quality electronic
KVM switch. If you attach an electronic
KVM switch to the Kaveman 8 you may
notice a change in image quality and
mouse/keyboard
emulation
performance. As there are many brands
of KVMs switch available, it is possible
that additional adjustments could be
made to accommodate your solution.
However, we cannot guarantee that our
product will integrate well with every KVM
switch found in the field. It largely
depends on the quality of the KVM
switch.
Windows XP:
Control Panel -> Mouse Properties ->
Motion
Turn off "Enhance Pointer Precision" and
leave pointer speed at default (center
position)
For more settings, refer to Chapter 2 in
5
INITIAL CONFIGURATION FROM LOCAL CONSOLE
Initial Configuration
ON SCREEN DISPLAY (OSD) MENU COMMANDS
Access On Screen Display
Navigation
Page
Up
Scroll
Lock
Scroll
Lock
OR
Page
Down
Press scroll lock twice quickly to gain
access to the local on screen display.
Use arrow or page up/down keys to
navigate through the menu.
Change a Value
Return/Advance
Enter
Press enter to change a value.
Use the left arrow
key to return to
the root menu.
INITIAL CONFIGURATION
1. Call Up On Screen Display
Press Scroll Lock twice quickly to call up
the Kaveman On Screen Display menu .
You will use this menu to configure the
network settings and set up passwords to
enable you to use the Kaveman.
Use the right arrow
key to advance to
a submenu.
Kaveman
O
O
O
O
O
O
O
Network Configuration
Monitoring Settings
Security Settings
Serial port (RS-232) config
Local user control
Virtual Network Computer
Version Information
Figure 2: Main On Screen Display Menu
6
INITIAL CONFIGURATION FROM LOCAL CONSOLE
Initial Configuration
2. Set Up Network Details
You must correctly set the IP address, netmask and default gateway using the local
OSD prior to using the Kaveman. The
steps are as follows:
a) Select Network Configuration from the
main menu.
From this screen, you can configure the
network details for the Kaveman. If you
are reading this over the network (you
are), then these values are probably
pretty close to what you want.
Network Configuration
IP address:
192.165.1.77
Subnet mask:
255.255.255.0
Default Gateway: 192.165.1.1
> Commit IP config changes
Machine name:
Kaveman1
MAC address: 0:01:b2:80:00:07
Network Configuration Menu
b) Select an IP Address to assign to the
Kaveman unit. Enter the assigned IP
address.
c) Set the default gateway if necessary.
d) Commit your changes.
3. Set Administrator Password
a) Select Security settings from the main
menu.
b) Change the admin password. The
default password is xyzzy. We recommend
changing this before using the unit.
Please note: The user name for the
administrator account is always “root” or
“administrator”.
MORE Security settings
+ Change overall security mode
Admin password:
*******
Turtle mode:
Disabled
Turtle reset timeout:
24 hours
Reset turtle protection now
Stealth mode:
Disabled
Require encryption (HTTPS):
Optional
Security Settings Menu
7
BASIC REMOTE ACCESS
Remote Administration Using a Web Browser
1
Accessing the Target Computer
Enter the Kaveman IP address into the
address bar in your browser. When you
have connected to the unit, you will arrive
at the Kaveman Home Page.
2
Check Host Status
From the home page, you can immediately check the status of the host’s
screen and power. You can also access a
log of recent activity.
3
Address
http://292.168.2.73/
Host Status
VGA Screen: 1024x768
Host power: Powered up, looks
okay
Log info: 14 lines buffered View log
here
Taking Control of the Target
Computer
Follow the instructions on the Kaveman
home page to view the current screen
contents and take control of the host’s
keyboard and mouse. You can open a
new window to view the screen contents
or start a new full screen browser
window. You may need to use Alt-F4 to
get out of the full screen window.
8
BASIC REMOTE ACCESS
Remote Administration Using a VNC Viewer
To download a VNC Viewer, visit http://www.uk.research.att.com/vnc/.
1
Accessing the Target Computer
Open the VNC Viewer. Enter the Kaveman
IP address into the Connection Details
dialogue box.
Connection Details
V
VNC server:
Use host display
e.g. snoopy2
(Display defaults to 0 if not
given)
2
3
Enter the Kaveman password into the
VNC Authentication dialogue box. For
instructions on how to set up a password,
please see Initial Configuration.
Accessing the Standard VNC Menu
After a few seconds, you should see the
target computer’s screen. To access the
standard VNC menu, click on the top lefthand corner of the window. It is from this
menu that you choose to send CTRL-ALTDEL.
OK
292.168.2.73
Cancel
Options...
VNC Authentication
OK
V
Session password:
******
Cancel
V Name of Kaveman Unit
Connection options...
Connection info
Request screen refresh
Full screen
Send Ctrl-Alt-Del
Ctrl Down
Ctrl Up
Alt Down
Alt Up
New connection...
Save connection info as...
About VNC Viewer
Kaveman VNC Menu
4
Accessing the Kaveman VNC Menu
Press scroll lock twice to open up VNC
Menu.
R - > Resync mouse position
K - > Reset keyboard shift keys
F - > Redraw whole screen
P - > Power cycle host
L - > Blank screen (debug)
A - > Optimize video sharpness
Arrows - > Move screen position
ESC - > Quit menu
9