1
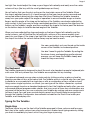
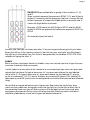
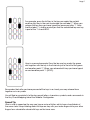
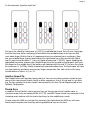
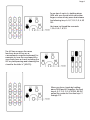
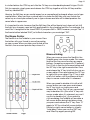
Twiddler2.1 USER MANUAL Rev. 1.7 Copyright @ Tek Gear, Inc. 1992, 2000, 2010 All Rights Reserved Twiddler and Twiddler2.1TM are trademarks of Tek Gear, Inc. Contents GETTING STARTED ......................................................................................3 Overview ........................................................................................................3 The Strap .........................................................................................................3 Changing to Left-Hand Use ..................................................................3 Getting Started: Left or Right? ..............................................................3 How to hold the Twiddler......................................................................3 THE KEYBOARD............................................................................................5 Typing On The Twiddler ............................................................................ 4 Single Keys ............................................................................................4 Chords ...................................................................................................5 Repeating Keys ....................................................................................5 Key Notation .........................................................................................5 Labels ....................................................................................................6 Speed Tip ................................................................................................7 Another Speed Tip ................................................................................8 Thumb Keys ...........................................................................................8 THE MOUSE POINTER ...............................................................................10 Mouse-clicking ................................................................................................10 Installing and Programming the Twiddler ...................................11 Key Assignment Notation ...............................................................................11 Key Chord Mapping .......................................................................................12 Mouse Chord Mapping .................................................................................12 Page 3 GETTING STARTED Overview The Twiddler2.1TM provides the same input to your computer as both a conventional keyboard and a mouse. To do this the Twiddler uses twelve keys on the front and four keys on top plus a NavStick. The top keys are for your thumb and your other four fingers operate the front keys. The Navigational Joystick, or NavStick, under your thumb, performs the pointing function of a mouse. The Twiddler is designed to be operated by only one hand while the hand not holding the Twiddler is free for other tasks. The Strap There is a soft fabric strap that extends from a slot in the side of the Twiddler’s case and attaches to a Velcro pad on the bottom. This strap goes around the back of your hand and holds the Twiddler in position for typing or pointing. When you receive your Twiddler, the strap will be set up for right-hand use, but it may be easily readjusted for left-hand use. Changing to Left-Hand Use To adjust the Twiddler for left-hand use, first remove the strap from its Velcro fastener on the bottom. Next, grasp the strap close to the slot and slide the end of the strap out of the slot. It is designed to be a snug fit. Then slide the same fitted end of the strap into the matching slot on the opposite side of the Twiddler. Be sure to insert it all the way into the slot. Getting Started: Left or Right? Which hand should you use for the Twiddler? The first inclination is to use it in your dominant hand. But you may wish to put off this decision and try the Twiddler with each hand and think about how you will be using it before you decide. Here are a few things to consider: 1. What do you want to be able to do with the hand not holding the Twiddler? If you want to take pencil-and-paper notes, you may wish to try the Twiddler in your non-writing hand. 2. Does your normal computer work involve fine control of the pointing device (such as CAD or drawing programs)? If so, you may want to use the Twiddler in the hand that has the best drawing control. In any case, you may wish to experiment with each hand to see which suits you best. It is always easy to change the strap to the other side. The Twiddler key layout is designed to work equally well in either hand. How to hold the Twiddler How you hold the Twiddler is a matter of personal taste. It is designed to accommodate a wide range of hand sizes and shapes. The following guidelines may help you find a comfortable position: In general, the strap goes around the back part of your hand, between your knuckles and wrist, and attaches to the Velcro fastener on the bottom of the case. Do not make the strap Page 4 too tight. You should adjust the strap so your fingers fall naturally and easily over the center column of keys (the keys with the small guide-bumps on them). You will notice that your thumb is resting on the top inside corner of the Twiddler. When the strap is adjusted correctly, it is loose enough so that your hand can be removed and re-inserted without detaching the strap from the Velcro. Rotating the Twiddler toward or away from your palm adjusts the angle of operation to accommodate longer or shorter fingers; and the angle of the strap on the bottom of the Twiddler can also be adjusted for your comfort. In fact, one way to find a comfortable position is to remove the strap from the bottom, set the Twiddler’s angle, and then re-attach the strap to the Velcro pad. The fastener on the bottom helps to hold the desired angle of the Twiddler. When you have adjusted the strap and angle so that your fingers fall naturally over the center column, you will find that the left and right columns of keys are an equally short reach for your fingers. If the strap is too tight, the closest column may cramp your fingers. If the strap is too loose, the column farther away may be hard to reach. You can comfortably rest your thumb on the inside corner of the Twiddler, in a relaxed position. You don’t need to grip the Twiddler. By resting the thumb as shown, and applying gentle outward pressure, you will keep the Twiddler steady and reach the keys more easily. The Keyboard The Twiddler keyboard is designed to do all the work of a standard computer keyboard plus a lot more. With only sixteen keys, the Twiddler accomplishes this by chording. On a piano keyboard you can play a single note by striking one key or play a chord by playing a number of keys at the same time. The Twiddler works in a similar way. You can type a character or command with a single key or with a combination of keys called a chord. Using various single keystrokes, or chords, you can type all the letters, characters, symbols and commands found on a standard keyboard. In fact, the Twiddler actually offers you over a thousand different programmable chords. And, since most of these key combinations are not preset at the factory, you can customize your Twiddler by making your own assignments to these chords. You can even override factory-preset key/chord/character assignments through the Twiddler Configurator Java software included on the Flash Drive inside your Twiddler, or at Handykey.com Typing On The Twiddler Single Keys There are twelve keys on the front of the Twiddler arranged in three columns and four rows. Each key in the center column has a tiny bump which makes touch-typing easier by letting you know immediately, by touch, which key your finger is pressing. Page 5 Each of your fingers are assigned to a specific row of three keys across. Your index finger presses the keys marked A, E, and SP (space) in the first or top row. Use your middle finger to press B, F, and DEL (delete) in the second row. Your third (ring) finger is for the C, G, and BS (backspace) keys in the third row. And your little finger (pinkie) is in position for the keys in the fourth or bottom row-D, H, and ENT (enter). Press and release any of these keys singly to type the character or command with which the top of the key is labeled. Chords The Twiddler does not register a keystroke until you release a key or keys. For example, when you press the “A” key on the Twiddler and hold it down, nothing happens. But when you release the “A” key, a lowercase letter “A” appears on the screen. When you press a group of keys as a chord, its assigned character does not appear on the screen (or its assigned command is not issued) until you release at least one of the chord’s keys. Because characters are generated by the release rather than the initial press of a key, you do not have to worry about whether you have pressed all the keys in a chord at exactly the same instant. Repeating Keys On a standard keyboard, when you hold down a key it generates a repeating character. To repeat characters in the same way on the Twiddler, press and release a key or chord and then quickly press and hold down the same key or chord. When you do this the desired character will repeat as long as the key or chord is held down. The repeat delay is set in the Twiddler Configurator on the Config Tab. Key Notation This user’s guide and Twiddler Configurator uses a special notation to show you how to type each character and command with a factory-preset chord. As you face Twiddler’s twelve-key layout, you will find four keys (labeled SP, DEL, BS, and ENT) arranged in a column on the left. This column is designated “L”. The four keys in the middle column (E, F, G, H) are referred to as “M”. And the four keys on the right (A, B, C, D) are designated “R”. Each unique chord is defined by a four-symbol sequence indicating which key is pressed in each of the four rows ordered from top to bottom. If no key needs to be pressed in a particular row, a zero (0) in the sequence will indicate that. Remember that the first symbol in the chord notation refers to a key in the top row pressed by your index finger, the second symbol to a key in the second row assigned to your middle finger, the third symbol to a key in the third row pressed by your ring finger, and the fourth symbol to a key in the bottom row reached by your little finger. For example, to type a lowercase letter “a”, your index finger must press and release the key at the right end of the top row, while no other keys need to be pressed in the next three rows. So, the notation for “a” is ROOO. Page 6 FINGER KEYS are indicated by a group of four symbols: 0, L, M, and R. These symbols represent key presses in ROWS 1, 2,3, and 4 (top to bottom). 0 means no button pressed in that row; L means the Left button is pressed; M means the Middle button is pressed; and, R means the Right button is pressed. Example: LOOR means the LEFT Button in ROW 1 and the RIGHT button in ROW 4 are pressed. No buttons are pressed in ROW 2 or ROW 3. This example types the letter k. Similarly, you can type the lowercase letter “k” by pressing and releasing (with your index finger) the left key in the top row, no keys in the next two rows, and (with your little finger) the right key in the bottom row. This chord is designated by the notation LOOR. OOR is the notation for typing the letter “k”. Labels Black, red, blue, and green labels on Twiddler’s keys can remind you how to type the most common characters and commands. A white label on a key refers to the character or command you type when you press and release that key alone. To type a lowercase “a”, you press and release the key labeled with a white “A”. To type a lowercase “b”, press and release the key labeled “B”; and so on for keys labeled C, D, E, F, G, and H. Similarly, keys marked SP (space), DEL (delete), BS, (backspace), and ENT (enter) issue the designated command when pressed and released singly. You will find a colored dot above each top row key. Red marks the top left key; blue marks the top middle key; and green marks the top right key. To the right of each key in the remaining three rows you will find a column of three labels whose colors-red, blue, and green-correspond with the colors of the top row dots. Matching colors indicate a dotted-key/labeled-key chord which types the labeled character. Page 7 For example, press the left key in the top row under the red dot and the right key in the next row beside the red label “I”. When you release the two keys you have typed the lowercase letter “I”. Note that the label “I” is red to remind you that the red-dotted top row key is part of the “i” chord LROO. Here is a second example. Press the top row key under the green dot together with the key in the third row just to the left of the green exclamation point “!”. When you release both keys you have typed an exclamation point “!“ (ROLO). Remember that, after you have pressed all the keys in a chord, you may release them together or in any order. You will find a complete list of factory-preset letters, characters, symbols, and commands in the Key Chord Mapping tab of the Twiddler Configurator. Speed Tip Here is a tip to speed up the way you type a series of letters which have chord labels of the same color: Keep holding down the top row key with your index finger while your other fingers form chord after chord with keys on the lower rows. Page 8 Try this example. Type the word “pin”. First press the chord for lowercase “p” (LOLO)--a red-labeled chord. Then lift your ring finger from the third row while continuing to hold down the red-dotted key in the top row with your index finger. (Notice that a “p” appeared when you released your ring finger.) Now use your middle finger to press and release the right-hand key in the second row. (Note that it is next to the red label “I”.) You just typed a lowercase “I” (LROO). Again, keeping the red-dotted key down, release your middle finger from the second row and reach with your little finger for the middle key in the bottom row (labeled with the red “N”) to form the chord for lowercase “n” (LOOM). Finally, release both top and bottom keys. This technique will help you type faster by avoiding unnecessary finger movements. You can use this with many combinations of letters: st, ry, in, 10... Another Speed Tip The Twiddler offers you another typing shortcut. You can use factory-preset chords to type some of the commonest English words or letter sequences: the, of, to, ed, and, in, ion, and ing. The key notation for these chords can be found in the Key Chord Mapping tab of the Twiddler Configurator. Thumb Keys In addition to the NavStick, there are four keys on the top rear of the Twiddler case. In clockwise order they are labeled NUM, ALT, CTRL, and Shift. These thumb keys take part in the chording and combine with the twelve front keys to form additional chords. Chords using the NUM key include the numerals. You hold down the NUM key with your thumb and complete the chord by pressing additional keys on the front. Page 9 To see how it works, try holding down NUM with your thumb while your other fingers consecutively press and release the following keys: A, B, C, D, E, F, G, H, SP, DEL. You have just typed the numerals 1,2,3,4, 5, 6, 7, 8, 9, 0. The ALT key accesses the same functions as an Alt key on a conventional computer keyboard. For example, to issue the command Alt-x, you simply form a chord, including the ALT key and pressing and releasing the chord for the letter “x” (MLOO). When you form chords by holding down NUM and ALT together, the front keys A, B, C, D, E, F, G, H, SP, DEL, BS, ENT output the codes for Function keys F1 through F12. Page 10 In similar fashion the CTRL key acts like the Ctrl key on a standard keyboard. To type Ctrl-AltDel, for example, simply press and release the CTRL key together with the ALT key and the front key labeled DEL. Likewise, the Shift key, as you would expect on a conventional keyboard, allows you to type capital letters. When you form a chord which includes the Shift key with your thumb, the same key or chord you ordinarily use to type a lowercase letter will instead produce the same letter in uppercase. It is important to note, however, that the Shift key (like all the thumb keys) does not just shift the front keys to upper case, but fully participates in the chording function. For example, the word “the” is assigned to the chord ORRO. If you press Shift + ORRO, however, you get “The”. If the thumb button labeled “Shift” just shifted characters, you would get “THE”. The Mouse Pointer The NavStick on the Twiddler is your mouse. Press the button with your thumb to move the pointer on your screen. When you take your thumb off the Navstick, the onscreen pointer stays where it is. Mouse-clicking When you move or press the NavStick, the Twiddler goes into mouse-mode. This means that the front keys now function as mouse buttons. (Imagine a mouse with 12 buttons.) The “A” key is now the left mouse button and the “SP” key is the right mouse button. Press and release the “A” key to left-click on an on screen object. Press and release the “SP” key to right-click on an object. The “E” key is also a left click button, with the difference that it stays in mouse mode after it is released. When you need to double-click with a left mouse button you can press and release the “E” key twice, or simply press and release the “B” key. This is a very convenient way to double-click. (Since the “A” key exits mouse mode when it is released, you can’t use this to double-click.) If you need to click-and-drag, the Twiddler will emulate a left mouse button being held down when you press and release the “D” key. Press “D” again to “lift” the virtual left mouse button. Similarly, a right mouse button is virtually “held down” when you use the “ENT” key and “lifted” by again pressing ENT. Page 11 The “C” key issues a left-Ctrl-click and the “G” key provides a left-Shift-click. By default, the Twiddler stays in mouse m ode for a period of time after you release the mouse button. (This may be adjusted by the user. See Programming the Twiddler, below) This enables you to position the pointer on the screen, release the NavStick, and then click on an object. Here is an example of a common situation: You are typing a memo and you wish to insert a word two lines above. Press the mouse key and move the pointer where you wish to insert the word. Remove your thumb from the mouse pointer and it stays in mouse mode until you press the “A” key (left-click). This sets the cursor in the selected location and automatically exits mouse mode back to keyboard mode so you can start typing immediately. Installing and Programming the Twiddler The Twiddler comes programmed with the standard default chord mapping. We have found that this chord mapping is the most efficient setup for most users of the Twiddler. If you would like to change or add chords, Twiddler Configurator software is available online at www.handykey.com. Configurator is the program used to configure the Twiddler. If you have Java installed, you should be able to launch Configurator by double clicking on it. Open Configurator then plug in the Twiddler. When you plug the Twiddler into your computer for the first time, it will enumerate as a standard USB Keyboard device and USB Mouse Device only. In order to enable the onboard USB Flash disk, where your config files are located, hold any of the front keys down when you connect the USB connector to your computer. A drive letter corresponding to the Flash Drive should be shown in your file explorer. It is a 2MB FAT12 formatted drive. There are two files on this drive: factory.cfg and twiddler.cfg. Be sure to load the current configuration by selecting File>Open>twiddler.cfg, located on the Twiddler Drive or you will be starting from a blank file. The Twiddler Configurator software is only needed to edit the chord mapping that the Twidder uses. This software is not required to be present on the computer that you use the Twiddler on. Key Assignment Notation The table shown in the Twiddler Configurator shows the default assignments of symbols, functions, or commands to chords formed by pressing and releasing thumb and finger keys. The thumb keys designations are as follows: O = No thumb key pressed S = Shift N = NUM NA = Both NUM and AL T are pressed NS = Both NUM and Shift are pressed Page 12 Key Chord Mapping Once you have loaded twiddler.cfg you can print out the entire chord mapping and settings for the Twidder. In Configurator, click on File>Print. This should give you a single page printout for reference. Click on the Key Chord Mapping Tab to configure the key part of the Twiddler. On the left hand side of the screen you will see a list of the currently programmed chords and their associated key codes. To edit one of the chords just click on it. In the right pane, a graphic of the Twiddler layout will appear with the appropriate keys shaded. If you would like to change the mapping, click on the keys you would like to press instead of the current chord. The key buttons are toggles, click once to change its state, on or off. Only one key per row is allowed. Remember to click the Save button to save the new chord to the configuration file. You may wish to save your changes to a new .cfg file. This way you can have many custom configuration files suitable for different applications. The Twiddler will use twiddler.cfg only. Store your other configurations with different file names. Also, remember to back them up to another drive just in case you reformat your Twiddler. To create a new chord, click on the New Chord button at the top of the screen. A new line will be entered into the left pane and will be designated O OOOO with no key mapping associated with it. Type the key map you would like in the Key Mapping field. The toggle the keys and thumb buttons you would like to use to invoke this chord. Once complete, click save. To Delete a chord, click on the chord that you would like to delete and then click on the delete chord button at the top of the page. Mouse Chord Mapping Mouse chord mapping is done exactly as the Key Chord Mapping outlined above except you are controlling mouse chords. Page 13 Tek Gear Product Warranty Information Tek Gear warrants the Twiddler2.1 against defects in material or workmanship as follows: Tek Gear will repair or replace the unit at no charge for a period of one (1) year from the date of purchase. The decision to repair or replace will be the sole discretion of Tek Gear. Units should be sent prepaid to Tek Gear with a valid RMA (Return Merchandise Authorization) number clearly marked on the outside of the package. An RMA can be obtained by contacting Tek Gear Technical Support via phone, fax or email. Technical Support can be reached (9:00AM to 5:00PM CST M-F) at Phone: (204) 988-3001, Fax: (204) 988-3050, email: [email protected]. You must retain the dated sales slip or invoice as evidence of purchase date. Repair or replacement as provided under this warranty is the exclusive remedy of the purchaser. Tek Gear shall not be liable for any incidental or consequential damages for breach of any express or implied warranty on this product. Except to the extent prohibited by applicable law, any implied warranty of merchantability or fitness for a particular purpose on this product is limited to the duration of this warranty.