1
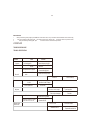
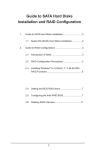
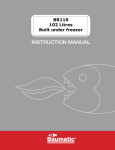
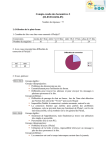
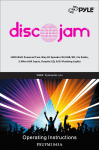
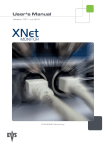
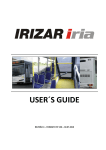
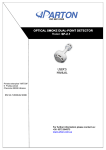
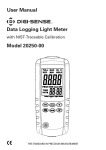
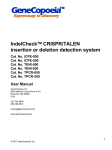
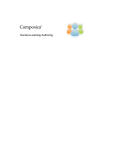
MH-51
CATALOGUE
CATALOGUE
SAFETY INSTRUCTIONS
PRECAUTIONS
SYSTEM CONNECTION
PANEL INSTRUCTION
REMOTE CONTROL
BASIC OPERATION
USB COPY
RADIO/AUDIO INPUT OPERATION
10-11 TROUBLESHOOTING GUIDE
SPECIFICATION
Thank y ou for purc has ing this Os otto produc t. We trus t that it will giv e y ou muc h pleas ure, and long, reliable s erv ic e. Pl eas e tak e the ti me to read thes e
i ns truc ti ons c areful l y , and k eep them s afe for future referenc e.
Your new c omponent s y s tem is not s uitable for repair by the us er. If y ou get a problem, pleas e return it to the manufac turer or to a qualified s erv ic e engineer for
repair.
POWER
This unit is des igned for us e with AC Mains power at 220V.
VENTILATION
Please k eep all v ents c lear to ensure that the unit does not overheat.
HEAT SOURCE
The mac hi ne s hould be k ept away from heat s ourc es , s uc h as radiators and direc t s unl i ght.
WATER AND MOISTURE
Don't us e in humid env i ronments , s uc h as the bathroom or k i tc hen, or damp bas ements .
CLEANING
Before c l eani ng, pleas e disconnect from the mains supply. Don't us e liquid c l eaners or c orros i v e fluid to c lean the mac hi ne, jus t c lean it with a s oft c loth.
POWER CORD
If y ou won’t be us ing y our Os otto produc t for s ome time, pleas e dis c onnec t from the mains ..
DISC TRAY DOOR
While c l os i ng the dis c tray door, mak e s ure that it’s path of trav el is n’t bloc k ed.
LOADING WEIGHT
Av oid plac ing items on top of this produc t..
CONNECTING OTHER EQUIPMENT
Before c onnec ti ng other equi pment to the CD Play er, mak e s ure to s witc h off the power. the power.Laser Beam
Nev er look at the las er unit in the CD play er with nak ed ey es . You will s erious ly damage y our ey es ight.
DISC
Av oid us ing dis c s that are c rac k ed, deformed or repai red. Doi ng s o c an harm the CD pl ay er and c oul d i nv al i date y our warranty .
MALFUNCTION REQUIRING MAINTENANCE
If the fol l owi ng probl ems oc c ur, pleas e dis c onnec t from the mains and s eek the adv ic e of a qualified tec hnic ian:
A. The power c ord or plug is damaged.
B. Li qui d or other forei gn matters in the unit.
C. The unit c as i ng bec omes brok en
REPLACEMENT OF PARTS
The unit is not us er s erv ic eable, and if maintenanc e is required it s hould be entrus ted to a qualified tec hnic ian.
NOTE:
Pleas e read the manual c areful l y before us ing the mac hi ne, and k eep it s afe for future referenc e.
1. When trans porti ng the unit, us e the ori gi nal s hi ppi ng c arton and pac k i ng materi al s .
2.
Don't plac e the CD Play er near to heat s ourc es , or in damp or humid loc ations .
3. The unit will giv e out heat, es pec ially after long periods of us e and at higher v olumes . This is perfec tly normal.
4. While not us ing the CD Play er, pleas e remov e the dis c and turn off the power.
LOCATION PRECAUTIONS
To av oid interferenc e with other dev ic es , it is bes t to av oid pos itioning y our mic ros y s tem nex t to other dev ic es s uc h as y our TV.
CLEANING PRECAUTIONS
1. Cl ean the ex ternal s urfac es of y our mi c ros y s tem us i ng a s oft c l oth.
2. If there is a s tain on the unit, us ing a c loth with a little bit of di l uted detergent to remov e the s tain. Don’t use solvents or other chemicals, as these may damage the
external casing.
3. To c lean the CD las er, us e a proprietary dis k c leaning dev ic e ac c ording to the ins truc tions prov ided by the manufac turer of the c leaning dev ic e.
NOTE: Onl y a qual i fi ed tec hni c i an s houl d undertak e c l eani ng and adj us ti ng i nteri or parts .
DISC USAGE PRECAUTIONS
1. Hold the dis k correctly – don’t touch the s urfac e of the disk!
2. Cl eani ng Dis c : c lean the dis c from the c enter to outs i de with a s oft c loth. If the s ound qual i ty was i nterrupted bec aus e of fi ngerpri nts or dus t on the dis c , try wiping
it with a wet c loth
and then with a dry c loth. Don't use s ol v ents to c l ean the dis c , as they can damage it.
3. Stori ng the dis c in its c as e when not in us e is the bes t way to ens ure longev ity .
BATTERY PRECAUTIONS
Incorrect use of batteries can lead to them leaking a corrosive acid, which will damage the remote.
1.
Nev er s hort-c irc uit the +v e and –v e terminals .
2.
Don't c harge the battery , di s as s embl e i t or throw it into a fire.
3.
Don't mix old and new batteries.
4.
Don't leav e damaged or dead batteri es i n the remote c ontrol .
5.
If not us ing the remote c ontrol for a long time, remov e the batteries .
6.
If the remote does n’ t work as ex pec ted, repl ac e the batteri es .
7.
If battery fluid leak s , c lean the battery c as e well before ins talling new batteries .
8.
Always dispose of old batteries by rec ycling at an approved loc ation. Mos t supermarkets offer this serv ic e.
REMOTE CONTROL PRECAUTIONS
1.
If the remote s ens or on the uni t i s i n di rec t s unl i ght or bri ght l i ght, i t won’ t work as wel l as i n l ow-l i ght s i tuati ons .
2.
Always point the remote at the CD play er sy stem when making selections.
3.
Don't drop the remote c ontrol or s ubjec t it to s hoc k or v ibration
4.
Don't allow the remote to come into contact with liquids.
5.Don't tak e the remore c ontrol apart.
NOTE:
1. For bes t res ults , operate within 7m range.
2. Remember to put the batteries into the remote before us ing it.
1.
SYSTEM CONNECTION
PANEL INSTRUCTION
FRONT PANEL FUNCTION
1
.
P
r
e
v
i
o
u
s
2
.
I
n
p
u
t
s
e
l
e
c
t
i
o
n
3
.
P
o
w
e
r
4
.
L
o
g
o
5
.
V
o
l
u
m
e
6
.
F
u
n
c
t
i
o
n
7
.
S
e
a
r
c
h
8
.
N
12.MIC1
e
x
t
9
.
P
a
u
s
e
1
0
.
S
D
C
a
r
d
1
1
.
A
U
X
1
3
.
D
V
D
d
o
o
r
1
4
.
M
I
C
2
1
5
.
E
a
r
p
h
o
n
e
1
6
.
U
S
B
I
n
p
u
t
1
7
.
C
l
o
s
e
/
O
p
e
n
1
8
.
T
o
n
e
REAR PANEL FUNCTION
(1) (2)
1
.
F
M
R
a
d
i
o
A
n
t
e
n
n
a
J
a
c
k
2
.
W
i
r
e
C
l
a
m
p
f
o
r
S
p
e
a
k
e
r
s
Note:
When connecting the speakers, be sure
not to let the wires short-circuit. This
can damage the unit and could invalidate
your warranty.
When making connections with other
components, please make sure that both
units are switched off.
REMOTE CONTROL
REMOTE CONTROL INSTRUCTION
BASIC OPERATION
1.POWER SWITCH
After c onnec ti ng the speaker cables, pres s the POWER button on the front panel , and select radio or ins ert a CD Dis k or USB to play.
POWER SWITC H
1.Power Standby Func ti on key 2.Number Func ti on key 3.Forward Func ti on k ey 4.Rev ers e Func ti on k ey
5.Pl ay /Paus e Func ti on k ey 6.Stop Func ti on key
7.FM Radio Func ti on key 8.Si ngl e Copy Func ti on key 9.Volume - Func ti on key 10.Mute Func ti on k ey
11.AUX Input Func ti on key 12.All Copy Func ti on key 13.Bas s - Func ti on key
2. VOLUME ADJUSTMENT
POWER SWITC H
Pres s
14.Bas s + Func ti on k ey 15.Trac k Swi tc hi ng Func ti on 16.Di s pl ay Func ti on key
17.Di s c Chamber Func ti on key 18.Go/To Func ti on key 19.Prev i ous Func ti on k ey 20.Nex t Func ti on key
21.Audi ti on Func ti on key 22.Radi o Searc h Func ti on key 23.Volume + Func ti on k ey 24.USB Func ti on
k ey
25.Treble + Func ti on key 26.Treble - Func ti on key
27.On-Sc reen Di s pl ay Func ti on key 28.Repeat Func ti on key
on the front panel or VOL-/VOL+ on the remote c ontrol to adjus t v olume .
3. TONE SETUP
1.
Bas s Setup: Pres s BASS-/BASS+ on the remote c ontrol to turn down or up Bas s (between -14 and +14)
2.
Treble Setup: Pres s TREBLE-/TREBLE+ on the remote c ontrol to turn down or up
Treble (between -14 and +14).
3.
Dual Mono: Pres s MODE on the remote c ontrol , there are three k inds of s ound output to
be s el ec ted: MONO L, MONO R and STEREO.
4.
Di s pl ay Setup: Pres s DSP on the remote c ontrol , then the s ound four
k inds of di fferent s ound field to be c hos en.
BASIC OPERATION
1.
4.CD PLAYER
Pres s POWER button on the front to s witc h the unit on, and pres s
Dis c c orrec tly , and pres s the
The Dis c will start to play automati c al l y after s ev eral s ec onds .
on the front panel or on the remote c ontrol to mak e the Dis k tray open, then put
5. PLAY PAUSE STOP
While pl ay i ng, pres s
While pl ay i ng, pres s
on the front panel or
on the front panel or
on the remote c ontrol to paus e the dis k .
on the remote c ontrol to paus e the dis k .
To recommenc e play, s imply pres s the
k ey onc e more.
To recommenc e play, s imply pres s the
k ey onc e more.
6. PREVIOUS NEXT
While pl ay i ng, pres s
on the front panel or
on the remote c ontrol to re-play the last track.
While pl ay i ng, pres s
on the front panel or
on the
remote c ontrol to sk ip to the next track.
USB COPY
BASIC OPERATION:
When playting the chapters in USB or SD card,the other steps are the same as the operations of the DCD player.
7. USB Play
1.
When no dis c is in the CD
PLAYER, i ns erti ng USB to the USB jac k
will caus e the trac ks on the USB to s tart
play ing automatic ally.
1.
2.
When dis c and USB are in the CD PLAYER, the dis c will be play ed fi rs t. If s wi tc hi ng to USB CARD, pres s USB button on the remote c ontrol , then the dis c
will be s topped pl ay i ng, and c hapters on the USB will be pl ay ed.
NOTE:
When pl ay i ng the trac k s on the USB, other operati ons are the s ame as for a disk.
8. USB COPY
1.
While the CD Play er is pl ay i ng a CD dis c , you can ins ert a USB stick into the USB jac k , and pres s TRACK
COPY on the remote c ontrol or ALL COPY to rec ord.
2.
While the CD Play er is pl ay i ng MP3 dis c , y ou can ins ert a USB to USB jac k , and pres s TRACK COPY to
rec ord.
RADIO / AUDIO INPUT OPERATION
1.
SETUP
When you want to listen to a radio program, put the radio antena into the jack on the rear panel, and select FM on the remote control. Use the SEARCH button
on the remote to search all radio channels automatically between 87 MHZ and 108 MHz. After searching, the radio channels will automatically be stored.
RADIO / AUDIO INPUT OPERATION
CONNECTION WITH OTHER AUDIO EQUIPMENT
When you c onnec t another DVD or MP3 us ing the audio Aux input, pres s the AUX button on the remote c ontrol . You c an pres s VOL-/VOL+ buttons on the panel or
remote c ontrol to adj us t the v ol ume as normal .
F M ANT
AUX
BASIC OPERATION
1.
2.
3.
When you are l i s teni ng to radio program, pres s MODE button on the remote c ontrol , then y ou can s wift the s ound trac k between s tereo and mono lang.
When y ou are l i s teni ng to radio program, pres s
on the remote c ontrol to the nex t c hannel ; pres s
on the remote c ontrol to the prev i ous c hannel .
When you are l i s teni ng to radio program, pres s
on the remote c ontrol to s earc h c hannel s up and down.
LCD DISPLAYE
TROUBLE SHOOTING GUIDE
TECHNICAL SPECIFICATIONS
Cause
Problem
No power
Unit not plugged in
No Sound
No Disc
Not connected to the right input
No sound
Disconnected Audio Input
cable
Solution
Connect the power plug right
Insert Disc
Connect to the right jack
Connect the Audio Input cable
Volume is 0
No disc
Disc is upside down
Insert disc into the CD player
Turn disk over
Dis c does n’t c ontain images
No picture
Disc is dirty or damaged.
Poor aim
The dis tanc e between the remote
c ontrol and rec eiv er is too far
Remote control
doesn’t work
Turn the volume up
Try an image disk
Clean disc
Aim at the receiving window
Operate within 7m
Obstruction between remote
control and receiver
The batteries are old
Remove the obstacle
Replace with new batteries
MP3 wi thout
s ound or with
nois e
Can't play files
in USB
Disc has other file types
No supported files on USB
USB is damaged
Skip those files
Put the supported files onto the
USB
Replace USB
Note: The Company continues to update its
products,
and exact specifications are therefore
subject to change.