1
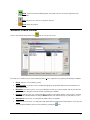
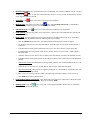
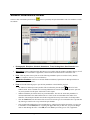
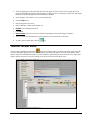
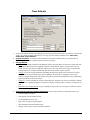
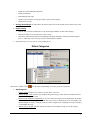
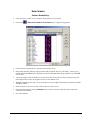
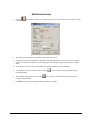
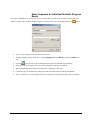
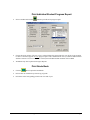
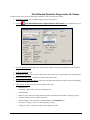
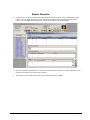
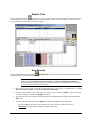
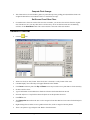
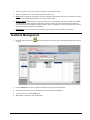
STIClassroom Win – Overview
Logging On
•
User Code: Enter the User Code assigned to you and press the Tab key.
•
Password: Enter the Password assigned to you and press the Tab key. If the User Code and Password entered
are valid, the OK button will be highlighted and your name should appear in red.
•
Click OK to complete.
Main Menu and Teacher Desktop
The Main Menu refers to the entire STIClassroom screen, as displayed upon login. The Teacher Desktop refers to the
smaller menu shown onscreen upon login. The teacher’s name, home room and room number are shown on the desktop.
Lookup Student
One of the most convenient features of STIClassroom is the Lookup Student utility. This feature is available while the
Teacher Desktop is active onscreen. Click the File button in the far upper left corner of the STIClassroom screen and
select Lookup Student. Choose any student in the list and click a descriptive button to the right to view specific
information about the student.
Quick Reference Guide
STI_0912061800
STIClassroom Win – Overview • 1
You may arrange the student list in order by student number, grade or home room. You may also search for students in
these orders, or by a first name.
Teacher Desktop Options
•
Three tabs are displayed in the Teacher Desktop: Term, Period and Course.
•
Teacher specific courses: You will see your home room information and all the sections you are assigned
to teach. The system defaults to the current term. To see all terms, uncheck the box to the left of the Roster
button.
•
The following icons are used to maneuver through the program:
o
Student Class Roster: Shows roster for each selected class.
o
Student Attendance Roster: Used to report daily and period attendance and view attendance
records for students.
o
Manual Grade Entry: Used to manually insert grades into STIOffice without using Grade Book or
to change grades already posted and add comments to report card. Seating charts may be edited and printed
here, in addition to Grade Verification reports.
o
Teacher Grade Book: Used for storing students’ daily work and averaging daily grades.
o
Lesson Planner: Allows you to create, copy, import and export lesson plans.
o
Textbook Management: Keeps track of textbooks for your class.
Quick Reference Guide
STI_0912061800
STIClassroom Win – Overview • 2
o
Skills: Used to track non-traditional grades. This feature may also be used in conjunction with
traditional grades.
o
Help: Quick access to answers to questions onscreen.
o
Close: Exits the program.
Student Class Roster
Select a class in the desktop and click the
icon to view the class roster.
From this screen, teachers may access the following items, if access rights have been granted in the Principal’s Module:
•
Group: Option to view students by group.
•
Demographics: Users have access to student demographics and guardian information from STIOffice on a
VIEW ONLY basis.
•
Discipline: Users have access to view or print discipline records for a selected student, and may also have the
option to initiate a discipline record if selected in the Principal’s Module.
•
Schedule: The user may view a selected student’s schedule, room number and also a class roster by selecting
the class in the schedule and then clicking the Roster button. This information may be printed here, as well.
•
Attendance: The user may view and print attendance history for students.
•
Tests: The user may insert, view and print testing information concerning the selected student. Users may also
cycle through and add the same test for all students by clicking the
Quick Reference Guide
STI_0912061800
icon.
STIClassroom Win – Overview • 3
•
Special Instructions: Any special instructions for a student that were entered in STIOffice may be viewed by
button. At least one of the instructions must be a warning in order for this button to become
clicking on the
active when the student is selected.
•
Special Ed: The
•
Medical Alert: This option, accessible via the
button, is not available in Kentucky. If STIHealth is
installed, the user will have access to view the new format of alerts.
•
Internet Access: If the
•
Print Pictures: The user may print a roster with pictures, if pictures have been loaded into the software and
assigned to students.
•
Print Labels: This option allows the user to print various types of mailing labels using Avery 5160 labels.
Envelopes may also be printed. Perform the following steps to print labels:
button will be active only for Special Ed students.
button is active, the student has permission to use the Internet.
o
Click the Labels button under Print. The Student/Guardian Mailing Labels menu will appear.
o
Use the drop-down arrow to select the individual for whom the labels are to be printed (either Student or
Guardian).
o
If student labels are being printed, choose the Label Type to use: Detail, Simple or Name & ID Only.
o
If guardian labels are being printed, check the Print Student Name box to print a “RE: <Student Name>”
line on the label.
o
Select the Address to Print. There is also an option to check for mailing switches in the Guardian records.
o
If student labels are being printed, check the Skip Duplicate Phone # box to print only one label per phone
number.
o
Student Name Format: If student labels are being printed, select the order in which student names are to be
displayed.
o
Check the Print on Envelopes box to print directly onto envelopes, rather than onto labels.
o
Special Starting Point: Check this box to begin the printing job on a selected sheet, if applicable. This will
prevent labels from being wasted.
o
Enter a First Line Message if desired, which will appear atop each label. Example: To the Parents of…
o
Click Print when ready to generate labels.
•
Print Student Roster w/o Pictures: Click on the printer icon in the lower right corner of the menu to print
course rosters without pictures. Select the Report Type and click Print.
•
Seating Chart: Click the
icon to view, print or edit seating information. Pictures may be selected for
inclusion in the seating chart printout.
Quick Reference Guide
STI_0912061800
STIClassroom Win – Overview • 4
Student Attendance Roster
Choose a class in the desktop and click the
for students.
icon to report daily and period attendance and view attendance records
•
Demographic, Discipline, Schedule, Attendance, Tests, Seating Chart, User Records: These
features offer the same view options as in Student Class Roster, described above.
•
Attendance: Select a student and click this button to view and/or print the student’s attendance history (for All
Day as well as Period attendance if applicable). Check-In/Check-Out information is included as well.
•
Print: Click the printer icon to print one of the following attendance reports: Attendance Today; Monthly
Register; Cumulative Absences; or Period Summary.
•
Withdrawn Checkbox: Check box to include withdrawn students (if permission for this option has been
given in the Principal’s Module).
•
Post: Perform the following steps to post All-Day attendance to the STIOffice program:
o
All students are marked present by default. This is indicated by the red square
to the left of each
student’s name. Select a student who is missing and double-click on the red square or press the space bar
on your keyboard. The red square will become a white square.
o
Students should only be marked Tardy for period attendance. The class for which daily attendance is
calculated should have the student marked Absent. Check in/out records should reflect tardies from
STIOffice. The Principal’s Module can take the tardy permission away from teachers for all-day tardies.
o
Click the Lunch button at the bottom of the screen to select meal types for each student who is present that
day. Meal types must first be set up in the Principal’s Module.
o
Once all applicable students have been marked Missing, and the lunch count has been taken, you may post
to STIOffice. Click the Post button. A warning will appear that tells you that once you post, all changes
must be made through the office. Click OK, then click Yes to post meal types as well, if applicable.
Quick Reference Guide
STI_0912061800
STIClassroom Win – Overview • 5
o
After attendance has been posted, a red square will appear on the desktop in the A column.
•
Change: If the user has been given access to change a previous day’s attendance, there will be a button labeled
Change. To change the attendance, select the date from the drop-down list at the top, then click Change and
alter the code. Click OK when finished. If the Option to Change Consecutive Absences box has been checked in
STIOffice, a message window will appear offering the option to change consecutive absences through the last
date of absences; click Cancel to leave consecutive absences unchanged. All periods will be changed to match.
•
All Day Absences: Absences and tardies are marked and appear in all period rosters all day.
•
Post Period Attendance to the STIOffice Program: Follow these steps:
o
All students are marked present by default. This is indicated by the red square.
o
Select a student who is missing and double click on the red square or press the space bar. The red square
will become a white square.
o
If a student is tardy in a period, select the student and click on the Tardy button. A white square with a red
T will appear by the name.
o
Once all students have been marked tardy (for period attendance only) or absent, you may post to
STIOffice. Click the Post button. A warning will appear saying that once you post all changes must be
made through the office. Click OK.
•
To change period attendance (if applicable), perform the same steps listed above for changing daily attendance.
•
Roster: Students displayed in red font were absent on the previous day.
•
User Record: Option to choose Office or Classroom if activated in Principal’s Module.
Manual Grade Entry
Choose a class in the desktop and click the
icon to manually insert grades into STIOffice without using Grade
Book, or to change grades already posted and add comments to report cards. Seating charts may be edited and printed
here, in addition to Grade Verification reports.
Quick Reference Guide
STI_0912061800
STIClassroom Win – Overview • 6
•
Select the grading period from the drop-down list in the upper left corner of the screen. If grades have been
posted to that grading period, the grades will appear. Grades may also be entered here for those not using Grade
Book after activation through STIClassroom Principal’s Module.
•
Select student to edit or mark Cycle to cycle through the list.
•
Click the Edit button.
•
Edit posted grades as necessary.
•
Insert Comments, Conduct, Exam Grades, etc.
•
Default: Enter a default grade for all.
•
Click Save.
•
Report Cards: Print All or For Selected Student (depending on setup in the Principal’s Module).
•
To print a Grade Verification Report, click the printer icon for selected class or all classes.
•
To edit or print a seating chart, click the
icon.
Teacher Grade Book
Choose a class in the desktop and click the
icon to store students’ daily work and average daily grades. Note that
when the Grade Book appears onscreen, a new GradeBook drop-down menu appears at the top of the desktop. These
options, along with some additional features, are also available by right-clicking in the Grade Book screen, and several
of these options may also be selected by clicking on one of the icons in the Grade Book screen.
Quick Reference Guide
STI_0912061800
STIClassroom Win – Overview • 7
Class Defaults
•
•
•
•
Set up Class Defaults. During each grading period, users must perform this process for each class. After the first
setup, a Copy feature appears which allows you to copy previous settings to another course. (Menu Bar |
Grade Book | Class Defaults).
Activity Sort Order: Ascending is from earliest date to latest date, and Descending is from latest date to
earliest date. There is also an option to group activities by category.
Average Method
o
Points: To use a points method for calculating the final course grade in the selected course, bullet this item.
The Points method controls the weighting of activities based upon the number of points each activity is
worth. Activities with greater weight have a higher point value. The final course average is calculated by
totaling all points for a student, and dividing that total by the number of points possible.
o
Average: To use the Average method for calculating the final course grade in the selected course, bullet
this item. The Average method assigns equal weighting to all activities, by assigning a value to each
activity of 100 percentage points. The final course grade is calculated by totaling all averages and dividing
by the total number of activities entered.
o
Category: To assign weighting to categories, bullet this item. All grades in activities are inflated or reduced
based upon the weighting assigned to each activity category. Category Points or Category Average may be
used.
o
Include Previous Grading Periods: To give a running average for the year; an option is available to choose
the earliest grading period.
Viewing/Printing/Grading Default Checkboxes: Check boxes preferred. No checkmark means none.
o
Include Withdrawn Students
o
Auto Display Current Grading Periods
o
Use Weight Mult On Score only
o
Print Class Average On Progress Report
o
Show Nickname Instead Of Formal Name
o
Display Current Course Average in Skills Gradebook.
Quick Reference Guide
STI_0912061800
STIClassroom Win – Overview • 8
o
Display Previous Grading Period Grades
o
Display Total Points
o
Round Displayed Average
o
Display Letter Grade For Average (the numeric grade will also appear)
o
Display Final Average
•
Average Scale Weight: To add points to the final averages of all of the students in the selected course, enter
the number of points here.
•
Grade Posting
•
o
Only the first line must be addressed (if set up in Principal’s Module: teachers cannot change).
o
Drop-down under Activity and select the course average.
o
Drop down under Heading and select the grading period grade (STIOffice Grade System file designates
this; i.e., GRD, 9WK, etc.). This may be pre-set in the Principal’s Module.
Repeat these steps for every class for every grading period.
Define Categories
This feature, available via the
•
icon, provides broad headings for various groups of assignments.
Add Categories
o
Category Name: Examples: Test, Homework, Daily Work, Classwork.
o
Default Category Value: The user may manually change the Category Value, but the information entered
here establishes the default value.
o
Default Weight Multiplier (if applicable): Every score under this category will be multiplied by the number
entered here, or it will multiply the score and value of the activity if checked to do so in class defaults. The
default multiplier is usually 1. Entering 0 will prevent this category from calculating an average. Entering a
2 would double the value.
o
Default Category Weight Add: The number entered here will be added to every score in this category.
Quick Reference Guide
STI_0912061800
STIClassroom Win – Overview • 9
Copy Activities
Use this utility to copy Activities that have already been entered into one class over to another.
•
In the GradeBook drop-down menu, select Copy Activities. The Copy Activities menu will appear, with the
selected course listed in the Copy To field.
•
In the Copy From field, use the drop-down arrow to select the class from which the Activities are to be copied.
All Activities entered for that class will be listed in the lower right window.
•
Highlight each Activity that is to be copied and click the Copy Activity button, located between the Copy To
and Copy From windows. This button consists of an arrow pointing to the left. All selected Activities should
appear in the Copy To window, in red font.
•
To copy ALL Activities from one class to another, click the All button and then click the Copy Activity
button.
•
To undo the All selection, click the None button- but this must be done before the Copy Activity button is
clicked; otherwise the user must remove Activities from the Copy To field by selecting them and clicking the
Remove Copied Activity button.
Once Activities have been copied from a class, the user may then select Auto when copying Activities
from that class to any other class. All the previously copied Activities will become highlighted. The
user may then choose to copy all the selected Activities; some of them; or none of them, by using the
instructions above.
•
Check the Copy Categories box to copy categories along with Activities.
•
Click the Save button to complete the copy procedure.
Quick Reference Guide
STI_0912061800
STIClassroom Win – Overview • 10
Define Daily Activities
•
Click the
(Define Activities for this Grading Period) icon. The Activity List menu will appear. This
feature may also be accessed from the drop-down GradeBook menu.
•
Tabs to view activities: Order Entered, Date, Category.
•
Window shows grading period, course number and activity number.
•
Date of Specific Activity.
•
Select Category.
•
Description: Specific Assignment for which a Grade is received. The user may add this as assignments are
completed, or several may be added at one time. Check the Cycle box to insert multiple records at once.
•
Value is the value for this one activity.
•
Weight Multiplier multiplies this one activity by the number entered here. (not available in Category Methods)
•
Weight Add adds the number entered here to this one activity for all students.
•
Check the box next to Move to Lesson Planner to send this activity to your Planner. It will create the day and
add the activity.
•
Export and Import (set in the Principal’s Module) allows import/export to other courses or to other teachers’
planners.
•
Skills Bank can be assigned to activities as needed (only if Skills have been set up in STIOffice).
•
Print Activities by date range from the printer icon.
•
Mean, Median and Standard Deviation may be set up for the activity.
Quick Reference Guide
STI_0912061800
STIClassroom Win – Overview • 11
Enter Grades
Column Grade Entry
•
Click anywhere in a white Activity column in which grades are to be entered.
•
Click on the
•
Click in the first cell under the new column to start inserting scores.
•
Enter grades down the column by typing a number and pressing the Enter key. Alternately, you may type a
number and click the Fill button to fill grades entered to each student following the student’s score when Fill
was selected.
•
The Name and Quick Search checkboxes are used as locators. If a checkbox is selected, when you type in a
name and press the Tab key, the program will move to the student's score.
•
Withdrawn Students shown with * can be seen and scores may be added if checked in class defaults to include
withdrawn students.
•
Other functions for all scores are Drop, Undrop and Clear (erase) Scores.
•
Enter comments if desired. Click the Desktop icon to choose an Activity comment from the report card
comment list in STIOffice.
•
Save when finished.
Quick Reference Guide
(Enter Scores Down This Column)button to begin entering grades.
STI_0912061800
STIClassroom Win – Overview • 12
Edit Selected Score
•
Click the
Comment.
•
The user may cycle data entry (if desired) by either Student or Activity.
•
A teacher Comment may be added here and printed on Progress Reports for a specific activity for a selected
student. The comment will print next to the activity grade on the Progress Report from the teacher’s Grade
Book.
•
Check the Drop This Score box to exclude this score from the student’s average calculation.
•
To completely erase the score and comment, click the
accidental deletion.
•
After clicking on the Comment tab, click the
comment list in STIOffice.
•
Click OK to move to the next Student or Activity and to save changes.
Quick Reference Guide
button (Edit Selected Score) or double-click on the score itself. There are two tabs: Score and
STI_0912061800
icon. A warning screen is provided to prevent
icon to choose a course comment from the report card
STIClassroom Win – Overview • 13
Enter Comments for Individual Student's Progress
Report
This option is intended not for specific activities, but for the student(s) specified. The comment will print next to the
student’s average on the Cumulative Progress Report. To use this feature, select the student and click the
button.
•
Type a custom comment in the space provided, if desired.
•
To add a comment from the teacher notes, click the Lookup button and Select a comment or Insert a new
one.
•
Click the
•
Check the Assign to All Students box if you wish to assign the comments to all students.
•
After a comment has been entered, the student name(s) will appear in blue font.
•
Comments appear on Student Progress Reports printed from STIClassroom and Principal’s Module.
•
The User Number box is used to assign a number to students, who may then be sorted by their user numbers.
icon to choose a course comment from the report card comment list in STIOffice.
Quick Reference Guide
STI_0912061800
STIClassroom Win – Overview • 14
Print Individual Student Progress Report
•
Select a student and click the
•
Choose the report options. If Teacher Note is selected, before the report prints, the user will be given an option
to enter a Comment to appear on every progress report. This is different from Activity Comments and Individual
Student Comments. If Course Comment is selected, the individual student comments will be added.
•
Attendance may also be printed on Progress Reports.
button to print his or her progress report.
Print Grade Book
•
Click the
•
Print as often as needed to keep a hard copy of grades.
•
Print at the end of each grading period to turn in at end of year.
Quick Reference Guide
button to print the Grade Book.
STI_0912061800
STIClassroom Win – Overview • 15
Print Selected Student’s Progress for all Classes
Permission must first be given in the Principal’s Module in order for this option to appear.
•
Highlight the student whose schedule progress report is to be printed.
•
Click the
Print Selected Student's Progress Report in All Classes) icon. The Student Progress
Report menu will appear.
•
Select the grading period for this report. STIClassroom defaults to the present grading period, but this may be
changed if desired.
•
Select the student ID to use.
•
Check the Averages Only box to print a simple report that contains only averages and the items checked below.
•
Check Combined Averages to include an average for all of the classes.
•
Select the Starting and Ending Dates for this report; STIClassroom defaults to the dates of the present grading
system, but this may be changed.
•
Check any, all, or none of the items to be included on the report:
o
Student Picture
o
Letterhead: A space will be left for the letterhead to fill.
o
Announcements
o
Round Averages: This will average numerical grades to the nearest whole number for display purposes.
o
Counselor: Print the names of student counselors.
o
Include Comment: This will include comments added via the Comment icon.
o
Activities by Category: Activities will be grouped by category.
o
Category Averages - Categories averages will be displayed, if used.
Quick Reference Guide
STI_0912061800
STIClassroom Win – Overview • 16
o
Parent Signature: Provides a line on the printout for a parent’s signature.
o
Current Teacher Only: Information on the report will be only for the teacher currently selected in Grade
Book.
•
Attendance Codes: Select the attendance codes to include in the report. Use the drop-down arrow to choose
All, None, Excused or Unexcused; individual code types may be clicked to include or exclude them from the
report.
•
Daily Attendance Included: Check Yearly to include daily attendance for the academic year. Check
Grading Period to include daily attendance for the grading period.
•
Period Attendance: Check this box to include period attendance in the report.
•
Failing Message: Check this box to include failing messages on the report for any student whose average is
lower than the figure specified here. Type in the failing message as it should appear on the report.
•
Average: Check this box to print a report for a student with one or more averages in a range. Enter the high
and low figures in the spaces provided.
•
Letter Grades: Check this box to show letter grades instead of number grades. Then use the drop-down list to
select the Scale to Use for converting number grades into letter grades. Check the Letter and Number Grade
box to include both letter and number grades in the reports.
If the user is printing letter grades and the course has a scale defined in the Master Schedule, that scale
will be used.
•
When all criteria have been entered and the report is ready, click the Print button to generate the report..
Post Scores to SSTS
•
Click the
•
Posting occurs only at the end of each Grading Period. This icon will not be visible until the option has been
activated in the STIClassroom Principal’s Module.
•
You may re-post at any time during allowed posting time (as specified in the Principal's Module). Warning:
Each time you re-post, grades that have already been posted are overridden.
button (permission must first be given in the Principal’s Module for this option to appear).
Student Schedule
•
Select a student and click the
button (permission must first be given in the Principal’s Module for this
option to appear) to view the student’s schedule.
•
Tabs to view by: Term, Period, Course, Description or Teacher.
•
Select a student and click this button to view the student's schedule for the current academic year. When the
schedule appears, you may click Roster to view the full class roster for any selected course in the student's
schedule.
•
Once the Roster menu has opened, you have access to all the functionality described above in the section
“Student Class Roster” on page 3.
Quick Reference Guide
STI_0912061800
STIClassroom Win – Overview • 17
Student Demographics
•
Permission must be given in the Principal’s Module in order for this option to appear. Select a student and click
the
button to view that student’s demographic information. This includes personal information such as
Guardian contact details, emergency telephone numbers, special instruction flags, medical alert flags, etc.
•
Demographic information displayed here is drawn from STIOffice and is available on a VIEW ONLY basis.
Any changes to this data must be performed in STIOffice.
Quick Reference Guide
STI_0912061800
STIClassroom Win – Overview • 18
Student Discipline
•
Permission must be given in the Principal’s Module for this option to appear. Select a student and click this
button to view discipline information for the student. This information includes infractions, dispositions,
actions, notes and supplemental dispositions. A discipline record may also be initiated here.
•
Discipline information displayed here is drawn from STIOffice and is available on a VIEW ONLY basis. Any
changes to this data must be performed in STIOffice.
•
This feature is only available if the option is activated in the Principal’s Module.
Quick Reference Guide
STI_0912061800
STIClassroom Win – Overview • 19
Student Tests
Select a student and click the
button to view or insert test dates and scores for the student. This only includes tests
created in STIOffice, such as CTBS and ASVEB. This option does not show ACT, SAT or PSAT. Permission must be
given in the Principal’s Module for this option to appear.
User Records
Select a student in the roster and click the
(User Records) icon to enter customized student information that has
no standard collection method in STIClassroom.
Before any data is entered in User Records, certain setup steps must be performed in Principal's
Module. See “Error! Reference source not found.” on page Error! Bookmark not defined. for
more information on setting up this utility. Note that this section is not available in the Teachers Only
version of the STIClassroom Win user manual.
•
The user may select to access user records created in either Classroom or Office. For further details, see “Error!
Reference source not found.” on page Error! Bookmark not defined..
•
In the User Records menu, use the drop-down arrow to select a Topic. Then click Insert to enter a new record
or select an existing record and click Change to modify it.
•
An Update Records menu will appear. Enter the appropriate information in the fields provided and then click
OK to save.
•
To print a User Records report, click the Printer icon and set the applicable report parameters:
o
Since the student has already been selected, the Select Filter and Order fields will be inactive.
o
ID to Print: Select the type of student ID to include in the report.
Quick Reference Guide
STI_0912061800
STIClassroom Win – Overview • 20
•
o
Topic: Be sure to select the correct Topic from the drop-down list. This must be done regardless of which
topic is shown onscreen in the User Records menu.
o
Student Name Order: Select the order in which student names are to appear on the report.
o
Nickname: Check this box to substitute students' nicknames (as entered in the system) for their first
names, where applicable. Students who have no nicknames entered will not be affected.
o
Unlisted Info: Check this box to include phone and address information that has been designated as
Unlisted on the report.
o
Heading: By default, the heading for the report will include the Topic name and the word Report.
However, the user may enter a new heading as desired.
Print: Click this button to generate the report.
Seating Charts
Click the
(Seating Chart) icon to view a seating chart grid for the selected class. By default, students are
arranged in alphabetical order from left to right.
•
Use the scroll bar on the right side of the Seating Chart menu to navigate up and down the seating chart, if
applicable. The scroll bar will not appear if the entire seating chart fits in the menu.
•
To move any student, click on the student and drag him/her to another box in the seating chart grid. Click the
Save Changes button to save any modifications.
•
To print the seating chart, click the Printer icon.
Reports / Viewing Student Data
Grade Book Report options may be selected under the Reports option from the menu at the top of the screen (when the
Grade Book is open), or by selecting the appropriate desktop icon.
Print Gradebook
•
Print as often as needed to keep a hard copy of grades.
•
Print at the end of each grading period to turn in at end of year.
Print Class Progress Reports
•
Prints progress reports for an entire class.
•
Select report options. If Teacher Notes is selected, before the reports print the user will be given an option to
enter a Comment to appear on every progress report. This is different from Activity Comments and Individual
Student Comments. If Course Comment is selected, the individual student comments will be added.
•
The Average filter allows printing for only a certain range of grades.
•
When printing Averages Only, an option is available to print two students per page.
•
Attendance may also be printed on Progress Reports.
Print Class Worksheet
•
This option prints a grid sheet.
•
Report Options: IDs to print, Lines (Vertical, Horizontal, or Both), Single Line Per Student (puts student name
and ID number on same line), Print Averages, Scores, Letter Grades, etc.
•
There is an option to check Landscape format as opposed to Portrait format.
Quick Reference Guide
STI_0912061800
STIClassroom Win – Overview • 21
•
Print Comment will include the course comment for each student. You may also choose Category Averages to
print. An option is available for No Lines to appear in the printout.
Print Missing Grades
•
Use this report to determine which students need to make up missing grades.
•
Order by Activity or by Student (option to print only selected activity or for selected student).
•
Range of Dates.
•
This option counts 0 as a missing grade.
•
One per page.
Print Progress Report All Classes
•
This will print a progress report for every student in each class for all classes on the student’s schedule. Access
to this utility must be set up in STIClassroom Principal’s Module.
Print Student Lesson Plan
•
This will print a list of students who have no lesson plans in an individual class for a range of dates. There is
also an option to filter by number of plans, which allows the user to look for students who have less than a
specified number of lesson plans.
Print User Records
•
This option prints a report of the user records that are attached to a student in the classroom module.
Other Grade Book Options
The following Grade Book options may be selected by clicking the GradeBook pull-down menu at the top of the
screen.
Define Notes
•
Here you may Insert, Change or Delete teacher notes.
Hide Names
•
Enter user password to hide or unhide student names (Ex: print grade book showing students by numbers only).
Drop Scores
•
Allows the user to drop scores for selected students or for all students. Select lowest/highest and number of
scores to drop.
•
If using Category for the averaging method, choose the Category for which to drop scores.
•
Dropped scores are indicated with an asterisk (*) on the Grade Book screen and in students' Progress Reports,
but are not used in calculation of students' averages.
Sort
•
This option determines the order in which students are listed in the browse box.
•
Sort options: Sort by Student Name/Student Number/ User Number/ Average/ First Name/Random Number/ or
Selected Activity.
Quick Reference Guide
STI_0912061800
STIClassroom Win – Overview • 22
Compute Final Average
•
This feature takes a selected student’s grades (as posted from previous grading periods) and allows them to be
weighted to determine scores needed to achieve a certain Final Average.
Get Scores From Other Class
•
If a student moves from one section of the user class to another, you can move the activities from the original
class into the new one. You may either move activities one by one or let STIClassroom move all matching
activities via the Auto Move button. The courses must have the same valid course number.
Lesson Planner
•
Click the
•
Allows for Weekly or Daily format. If the Weekly box is checked, a weekly format will be used.
•
Calendar Display: Non-school days will appear dimmed on the calendar.
•
Click Insert to add new plans. The Up and Down arrows may be used to move plans that are for the same day.
•
Set Date and Unit Name.
•
Type in information in each tabbed area. Each tab will turn red after data has been entered.
•
Select the Objectives Completed box when all objectives for this plan have been met.
•
Click OK to save.
•
The Categories button allows the user to select categories from those that have been entered in the Principal’s
Console.
•
Right-clicking allows teachers to move grade book activities, skills or categories into the planner.
•
There is an option to copy and paste from Word or from the Internet.
Quick Reference Guide
icon.
STI_0912061800
STIClassroom Win – Overview • 23
•
There is an option to copy the selected Lesson Plan to selected other classes.
•
There is an option to move selected Lesson Plans to another day.
•
Copy: Allows copying or moving from one term to another. If the number of days does not match, the system
will fill in days in order until finished. Leftover days will be blank.
•
Export / Import: Allows the user to copy an entire year or a selected date range of lesson plans into a folder,
to be stored onto a floppy diskette for Importing in the next school year. This would be done after Rollover,
after courses have been assigned to teachers, and after the new calendars have been inserted. Plans may also be
imported into another teacher’s lesson planner.
•
Print Plans: One week usually fits on one page. Select a plan and click the printer icon to print it.
Textbook Management
•
Select the class and click the
to appear.
•
Click the Find button to locate a student who has been assigned a selected textbook.
•
Select the Book for the class from the drop-down list (as assigned in STIOffice).
•
To check out books, click the Out button.
•
When books are turned in, click the In button.
Quick Reference Guide
button. Permission must be given in the Principal’s Module for this option
STI_0912061800
STIClassroom Win – Overview • 24
Skills
•
Select the class and click the
option to appear.
•
Skills will only be available if attached to classes in STIOffice.
•
The Skills Bank is set up in the STIOffice program.
•
To activate icons, you must click in one of the columns. The icons are similar to Grade Book icons.
•
View: The drop-down list contains either Marks or Averages.
•
Marks may be entered through Edit Selected Marks (1st icon) or Column Entry (2nd icon).
•
Other icons are the same as Grade Book.
•
Select Skills to Work With: This utility is available under Options or it may be accessed with a right-click.
This feature allows you to work with selected skills only. If you have selected a set of skills, you may un-select
them at any point to work with all of them, or simply select the menu option Work with All Skills.
Quick Reference Guide
button. Permission must be given in the Principal’s Module for this
STI_0912061800
STIClassroom Win – Overview • 25