1
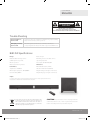
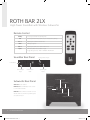
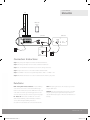
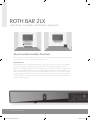
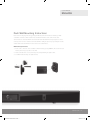
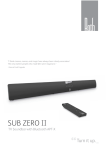
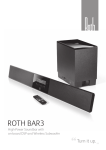
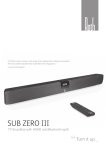
Roth BAR 2LX
High-Power Soundbar with
Wireless Subwoofer
''
Roth BAR2 LX Manual UK VJ.indd 1
Turn it up.
''
19/06/2015 12:07
Roth BAR 2LX
High-Power Soundbar with Wireless Subwoofer
Important Safety Instructions
READ BEFORE OPERATING EQUIPMENT
READ MANUAL
POWER-CORD PROTECTION
Read all the safety and operating instructions before the
Power-supply cords should not be stepped on or pinched by
product is operated.
items placed upon or against them. Pay particular attention
CLEANING
The product should be cleaned only with a polishing cloth
to cords at plugs and the point where they exit from the
product.
or a soft dry cloth. Never use volatile liquids since they may
OVERLOADING
damage the product.
Do not overload wall outlets, extension cords, or power strips
OBJECT OR LIQUID ENTRY
as this can result in a risk of fire or electric shock.
Do not insert any kind of object into this product through any
POWER SOURCES
opening as they may make contact with electrical points and
This product should be operated only from the type of power
result in a fire or electric shock. Avoid spilling any kind of liquid
source indicated on the label. If you are not sure of the
on the product.
type of power supply to your home consult your local power
VENTILATION
company.
Openings in the cabinet are provided for ventilation and to
NON-USE PERIODS
protect the product from overheating, and these openings
The power cord should be unplugged from the outlet when
must not be blocked or covered.
left un-used for a long period of time.
HEAT
LIGHTNING
The product should be placed away from sources of heat
For extra protection during a lightning storm or when the
such as radiators, stoves, or other products that produce heat.
product is left unattended and unused for long periods of
Leave a comfortable gap between this product and all other
time, unplug the power cord. This will prevent damage due to
electronics in your Home Theatre system.
lightning and power surges.
LOCATION
SERVICING
This product should be installed in a stable location.
Do not attempt to service this product yourself as opening the
product may expose you to electric shock, or the product may
be damaged. Refer all servicing to qualified service personnel.
The exclamation point within an equilateral
triangle, is intended to alert the user to
the presence of important operating and
maintenance (servicing) instructions in the
literature accompanying the appliance.
The lightning flash with arrowhead symbol, within an
equilateral triangle, is intended to alert the user to the
presence of uninsulated “dangerous voltage” within the
product’s enclosure that may be of a sufficient magnitude
to constitute a risk of electric shock to a person.
2 | Roth BAR 2LX User Manual
Roth BAR2 LX Manual UK VJ.indd 2
19/06/2015 12:07
User Manual
English
Caution
risk of electric shock
do not open
to prevent the risk of electric shock.
do not open this product.
No user- serviceable parts inside.
Refer servicing to qualified service personnel.
Trouble Shooting
The power LED is on,
If the LED is orange, the soundbar is in standby mode, press the standby
but no sound?
button on in the remote control to power on.
LED display is normal,
Switch through the sound modes to confirm the sound mode is
but no sound?
corresponding with the indicator LED: AUX1 is green and OPTICAL is red.
BAR 2LX Specifications
Design:
Bluetooth aptX
BAR: Cloth Grill. 4 full-range drivers
RCA Analogue Stereo (TV, Audio device)
SUB: Glossy mirror-top finish.
Optical Input (Toslink)
Wireless operation
Power Input: AC 230-240V, 50Hz
Wall mount / Table Top Mount
Dimensions:
Performance:
BAR: 940 x 50 x 75mm (LxDxH)
Output Power: 120 Watts
SUB: 154 x 270 x 261mm (WxDxH)
Wide Frequency Response: 30~20,000Hz
Weight: 4.46Kgs (net weight combined set)
Input Sensitivity: 600mv
Weight: 5.6Kgs (gross weight combined set)
Inputs:
In accordance with our policy of continuous development, we reserve the right to change specifications without notice.
Photographs are for illustration only and actual product may vary. E&OE.
Proper disposal of this product. This label indicates that,
in the EU, electronic devices cannot be disposed of
with regular household waste. Please use the return or
collections systems of your municipality or contact the
seller where you purchased this product
CAUTION To prevent electric shock do not plug a cable into
a wall outlet, extension cord, or other receptacle unless the metal
blades can be fully inserted to prevent blade exposure.
rothaudio.co.uk | 3
Roth BAR2 LX Manual UK VJ.indd 3
19/06/2015 12:07
Roth BAR 2LX
High-Power Soundbar with Wireless Subwoofer
Remote Control
Standby
Pair
Press to put soundbar into standby mode
Press to pair with wireless subwoofer (see instructions on pairing)
Vol +/-
Adjusts your soundbar’s volume level
Mute
Mutes your system
Sub +/-
Adjusts your subwoofer’s relative volume level.
Input
Switches between the soundbar’s inputs.
Toggle through choices: AUX1 > OPTICAL > BLUETOOTH
Soundbar Rear Panel
Analogue Audio Inputs
Power Switch
Power Adapter
Heat Emission
Optical Digital
Input
Vents
Input
Power Adapter Input
Subwoofer Rear Panel
Pairing Button
I/O button: Power ON/OFF
PAIR Button: Press PAIR button for 5 seconds
to connect with soundbar.
Power Switch
On/Off
PAIR-LED: Flashes while the soundbar connects
with the subwoofer, the LED stops flashing after
Power Indicator LED
successful connection
Pairing Indicator LED
4 | Roth BAR 2LX User Manual
Roth BAR2 LX Manual UK VJ.indd 4
19/06/2015 12:07
User Manual
English
TV
Bluetooth
Device
soundbar
subwoofer
DC12V
DVD
Connection Instructions
Step 1: Plug in the power adapters to both the soundbar and subwoofer.
Step 2: Switch the power button ON for both the soundbar and subwoofer
Step 3: Pair soundbar with wireless subwoofer (see below for Pairing instructions)
Step 4: Prepare sound source to connect with soundbar (default is AUX1)
Step 5: Press INPUT in remote to change alternately between: AUX1 > OPTICAL > BT
Step 6: When Bluetooth indicator is on, search for bluetooth name ‘ROTH’ to play sound.
Functions
PAIR - Pairing with wireless subwoofer. Press the PAIR key
AUX1 The input signal indicator. The indicator is green when
on the remote control for 5 seconds until the PAIR red light
using the AUX1 input.
flickers on the soundbar, then press the PAIR button on the rear
of the subwoofer until the green flashing light turns to red. If
connection fails, turn the power off and on again and try again.
BT - Bluetooth The Indicator for Bluetooth connection
OPTICAL The input signal indicator. The indicator is red when
using the optical input, red light blinks slowly for Mute and
only the PAIR indicator light is on when the soundbar unit is on
standby.
status. Frequent blinking of the LED indicates a failure to
connect, while infrequent blinking indicates a
successful connection. Bluetooth connection name: ROTH.
rothaudio.co.uk | 5
Roth BAR2 LX Manual UK VJ.indd 5
19/06/2015 12:07
Roth BAR 2LX
High-Power Soundbar with Wireless Subwoofer
Recommended Soundbar Placement
We recommend you locate your soundbar horizontally, just below, or above your TV. The location that places the soundbar
at the height closest to ‘ear level’ (from your listening position) is best.
Wireless Subwoofer
We recommend you place the subwoofer within a few inches of the front left or right corner of the room (for maximum
bass output), or along the front wall (strong bass output and optimum blending with your soundbar). Connect your
subwoofer’s power supply to live wall power and to the input power jack on the side of the subwoofer and flip the On/Off
switch to the On position. Press the Pair buttons on the soundbar (or Remote) and subwoofer. Within a minute or so your
subwoofer should wirelessly connect to the soundbar and its Blue LED will stop blinking. Once connected play some music
and adjust the subwoofer’s relative volume level using the Sub+ & Sub-buttons on your soundbar remote. The subwoofer
comes with an Auto-On/Off circuit. This circuit will activate the subwoofer when the soundbar is active and deactivate it
when the soundbar is turned off.
6 | Roth BAR 2LX User Manual
Roth BAR2 LX Manual UK VJ.indd 6
19/06/2015 12:07
User Manual
English
Flush Wall Mounting Instructions:
Please note: The hanging methodology employed with this product is intended for mounting on walls
of standard construction, which includes most residential and business office environments. Such
environments are constructed with wooden studs behind the walls that will securely accept the enclosed
screw. If you do not notice resistance behind the wall when drilling the pilot hole you probably do not have
a stud in that location and will then need to use the enclosed wall anchor.
Wall Mounting Instructions:
1. Please refer to the back of the soundbar for Wall mounting spacing (400mm); fixed screw holes (A)
must be placed in proper position on the wall.
2. Faster screws (B) in the correct positioning holes, thereby installing the plastic cradle.
3. Soundbar fastens directly to the plastic bracket.
rothaudio.co.uk | 7
Roth BAR2 LX Manual UK VJ.indd 7
19/06/2015 12:07
Notes
Find us on Facebook.
Just search for Roth AV.
rothaudio.co.uk
Roth BAR2 LX Manual UK VJ.indd 8
19/06/2015 12:07