1
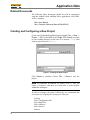
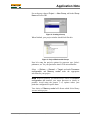
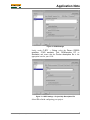
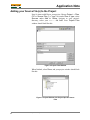
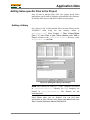
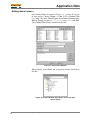
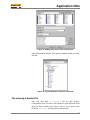
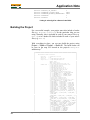
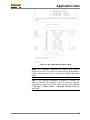
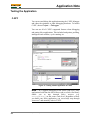
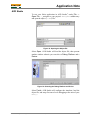
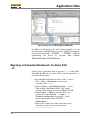
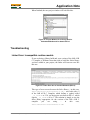
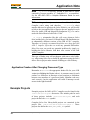
AN-29
Application Note
750 Naples Street
•
San Francisco, CA 94112
• (415) 584-6360
•
http://www.pumpkininc.com
Building a Salvo Application with
IAR's AVR C Compiler and
Embedded Workbench IDE
Introduction
This Application Note explains how to use IAR's
(http://www.iar.com/) AVR C compiler and Embedded Workbench
IDE to create a multitasking Salvo application for Atmel's'
AVR
and
MegaAVR
8-bit
(http://www.atmel.com/)
microcontrollers.
We will show you how to build the Salvo application contained in
\salvo\ex\ex1\main.c for an AT90S8515 using IAR Embedded
Workbench for Atmel AVR.
Note IAR Embedded Workbench for Atmel AVR underwent
changes between v2 (e.g. EW 2.31E, with the last version of the
compiler being v2.28A) and v3 (e.g. EW 3.3A, with v3.x
compilers, e.g. v3.10A). The procedures and illustrations in this
document are from IAR Embedded Workbench for Atmel AVR
v2.31E and the associated IAR AVR C compiler v2.28A. Where
substantive differences exist, they will be noted as such.
For more information on how to write a Salvo application, please
see the Salvo User Manual.
Before You Begin
If you have not already done so, install the IAR Embedded
Workbench for Atmel AVR. You may also install the latest version
of Atmel's AVR Studio, available at http://www.avrfreaks.com/.
created by Andrew E. Kalman on Feb 21, 2004 updated on Feb 21, 2004
All trademarks mentioned herein are properties of their respective companies.
Application Note
Related Documents
The following Salvo documents should be used in conjunction
with this manual when building Salvo applications with IAR's
AVR C compiler:
Salvo User Manual
Salvo Compiler Reference Manual RM-IARAVR
Creating and Configuring a New Project
Create a new Embedded Workbench project under File → New →
Project → OK. Select AVR as the Target CPU Family, navigate
to your working directory (in this case we've chosen c:\temp) and
create a project named myex1.prj:
Figure 1: Creating the New Project
Click Create to continue. Choose File → Save to save the
project.
Note In Embedded Workbench for Atmel AVR v3, first you
create a workspace, and then you create one or more projects
within that workspace.
In order to manage your project effectively, we recommend that
you create a set of groups for your project. They are:
Listings
Salvo Configuration File
Salvo Help Files
Salvo Libraries
Salvo Sources
Sources
2
AN-29 Building a Salvo Application with IAR's AVR C Compiler and Embedded Workbench IDE
Application Note
For each group, choose Project → New Group, add in the Group
Name and select OK.
Figure 2: Creating a Group
When finished, your project window should look like this:
Figure 3: Project Window with Groups
Now let's setup the project's options for processor type, Salvo's
pathnames, etc. for your particular Atmel AVR microcontroller.
Select → Options → General → Target, and under Processor
configuration and Memory model make the appropriate
selections for your project.
Note Wherever possible, you should always choose a Processor
configuration that matches your target processor as closely as
possible. Avoid using the generic (-vN) options unless your
particular configuration requires them.
Your choice of Memory model will dictate which Salvo library
you use in this project.
AN-29 Building a Salvo Application with IAR's AVR C Compiler and Embedded Workbench IDE
3
Application Note
Figure 4: General Settings – Processor Configuration
and Memory Model
Select Project → Options → ICCAVR → Preprocessor and
define any symbols you may need for your project1, and add the
include paths $PROJ_DIR$\ and c:\salvo\inc\:
Figure 5: ICCAVR Settings – Project Include Paths and
Defined Symbols
Next, select XLINK → List → Generate Linker listing. This will
create a useful .map file with the application's ROM and RAM
requirements, etc. Under XLINK → Include, ensure that the
automatically selected .xcl linker filename matches your target
processor.2
4
AN-29 Building a Salvo Application with IAR's AVR C Compiler and Embedded Workbench IDE
Application Note
Figure 6: XLINK Settings
Lastly, under C-SPY → Setup, select the Driver (ICE200
emulator, JTAG emulator Tool, ROM-monitor CC or
Simulator) and ensure that the Device description file is the
appropriate one for your AVR:
Figure 7: C-SPY Settings – Project Chip Description File
Select OK to finish configuring your project.
AN-29 Building a Salvo Application with IAR's AVR C Compiler and Embedded Workbench IDE
5
Application Note
Adding your Source File(s) to the Project
Now it's time to add files to your project. Choose Project → Files,
C/C++ Source Files (*.c,*.cpp,*.cc) under Files of type, select
Sources under Add to Group, navigate to your project's
directory, select your main.c and Add. Your Project Files
window should look like this:
Figure 8: Project Files Window
When finished, select Done, and your project window should look
like this:
Figure 9: Project Window with Project-Specific Source
Files
6
AN-29 Building a Salvo Application with IAR's AVR C Compiler and Embedded Workbench IDE
Application Note
Adding Salvo-specific Files to the Project
Now it's time to add the Salvo files your project needs. Salvo
applications can be built by linking to precompiled Salvo libraries,
or with the Salvo source code files as nodes in your project.
Adding a Library
For a library build, a fully-featured Salvo freeware library for the
AT90S8515 when using the tiny memory model is
3
sfiaravr1t-a.r90. Select Project → Files, Library/Object
Files (*.r*) under Files of type, Salvo Libraries under Add to
Group, navigate to the \salvo\lib\iaravr-v2 directory, select
sfiaravr1t-a.r90 and Add:
Figure 10: Adding the Library to the Project
Note Salvo libraries for IAR's v2.x AVR C compilers are located
in \salvo\lib\iaravr-v2. Libraries for v3.x compilers are
located in \salvo\lib\iaravr-v3. The libraries are not
interchangeable.
Select Done when you are finished. You can find more
information on Salvo libraries in the Salvo User Manual and in the
Salvo Compiler Reference Manual RM-IARAVR.
AN-29 Building a Salvo Application with IAR's AVR C Compiler and Embedded Workbench IDE
7
Application Note
Adding Salvo's mem.c
Salvo library builds also require Salvo's mem.c source file as part
of each project. Choose Project → Files, C/C++ Source Files
(*.c,*.cpp,*.cc) under Files of type, select Salvo Sources under
Add to Group, navigate to \salvo\src, select mem.c and Add.
Your Project Files window should look like this:
Figure 11: Project Files Window
When finished, select Done, and your project window should look
like this:
Figure 12: Project Window with Library, mem.c and User
Source File(s)
8
AN-29 Building a Salvo Application with IAR's AVR C Compiler and Embedded Workbench IDE
Application Note
The salvocfg.h Header File
You will also need a salvocfg.h file for this project. To use the
library selected in Figure 10, your salvocfg.h should contain
only:
#define OSUSE_LIBRARY
#define OSLIBRARY_TYPE
#define OSLIBRARY_CONFIG
TRUE
OSF
OSA
Listing 1: salvocfg.h for a Library Build
Select Project → Files, All Files (*.*) under Files of type, Salvo
Configuration File under Add to Group, navigate to your
project's directory, select salvocfg.h and Add:
Figure 13: Adding the Configuration File to the Project
Your project window should now look like this:
Figure 14: Project Window for a Library Build
AN-29 Building a Salvo Application with IAR's AVR C Compiler and Embedded Workbench IDE
9
Application Note
Tip The advantage of placing the various project files in the
groups shown above is that you can quickly navigate to them and
open them for editing, etc.
Proceed to Building the Project, below.
Adding Salvo Source Files
If you have a Salvo Pro distribution, you can do a source code
build instead of a library build. The application in
\salvo\ex\ex1\main.c contains calls to the following Salvo user
services:
OS_Delay()
OS_WaitBinSem()
OSCreateBinSem()
OSCreateTask()
OSEi()
OSInit()
OSSignalBinSem()
OSSched()
OSTimer()
You must add the Salvo source files that contain these user
services, as well as those that contain internal Salvo services, to
your project. The Reference chapter of the Salvo User Manual lists
the source file for each user service. Internal services are in other
Salvo source files. For this project, the complete list is:
binsem.c
delay.c
event.c
idle.c
init.c
inittask.c
mem.c
portiaravr.c
qins.c
sched.c
timer.c
To add these files to your project, select Project → Files, All
Files (*.*) under Files of type, Salvo Sources under Add to
Group:, navigate to the \salvo\src directory, select4 the files
listed above and Add:
10
AN-29 Building a Salvo Application with IAR's AVR C Compiler and Embedded Workbench IDE
Application Note
Figure 15: Adding Salvo Source Files to the Project
Select Done when finished. Your project window should now look
like this:
Figure 16: Project Window for a Source Code Build
The salvocfg.h Header File
You will also need a salvocfg.h file for this project.
Configuration files for source code builds are quite different from
those for library builds (see Listing 1, above). For a source code
build, the salvocfg.h for this project contains only:
AN-29 Building a Salvo Application with IAR's AVR C Compiler and Embedded Workbench IDE
11
Application Note
#define
#define
#define
#define
#define
OSBYTES_OF_DELAYS
OSENABLE_IDLING_HOOK
OSENABLE_BINARY_SEMAPHORES
OSEVENTS
OSTASKS
1
TRUE
TRUE
1
3
Listing 2: salvocfg.h for a Source Code Build
Building the Project
For a successful compile, your project must also include a header
file (e.g. #include <io8515.h>) for the particular chip you are
using. Normally, this is included in each of your source files (e.g.
main.c), or in a header file that's included in each of your source
files (e.g. main.h).
With everything in place, you can now build the project using
Project → Make or Project → Build All. The build results can
be seen in the map file located in the project's Debug\List
subdirectory:5
################################################################################
#
#
#
IAR Universal Linker V4.53O/WIN
#
#
#
#
Link time
= 21/Feb/2004 16:03:32
#
#
Target CPU
= A90
#
#
List file
= C:\temp\Debug\List\myex1.map
#
#
Output file 1 = C:\temp\Debug\Exe\myex1.d90
#
#
Format: debug
#
#
UBROF version 8.0.2
#
#
Using library modules for C-SPY (-rt)
#
#
Command line = C:\salvo\lib\iaravr-v2\sfiaravr1t-a.r90
#
#
C:\temp\Debug\Obj\mem.r90
#
#
C:\temp\Debug\Obj\main.r90
#
#
C:\IAR\EW23\avr\lib\cl1t.r90 -o
#
#
C:\temp\Debug\Exe\myex1.d90 -rt -l
#
#
C:\temp\Debug\List\myex1.map -xms
#
#
-IC:\IAR\EW23\avr\LIB\ -f
#
#
C:\IAR\EW23\avr\src\template\cfg8515.xcl
#
#
(-D_..X_INTVEC_SIZE=1A -D_..X_FLASH_END=1FFF
#
#
-D_..X_SRAM_BASE=60 -D_..X_SRAM_TEND=FF
#
#
-D_..X_SRAM_END=25F -D_..X_EEPROM_END=1FF)
#
#
-D_..X_HEAP_SIZE=10 -D_..X_CSTACK_SIZE=20
#
#
-D_..X_RSTACK_SIZE=20
#
#
-e_small_write=_formatted_write
#
#
-e_medium_read=_formatted_read -f
#
#
C:\IAR\EW23\avr\src\template\cfg1t.xcl (-ca90
#
#
-w29 -Z(CODE)INTVEC=0-(_..X_INTVEC_SIZE-1)
#
#
-Z(CODE)TINY_F=_..X_FLASH_BASE-FF
#
#
-Z(CODE)NEAR_F=_..X_FLASH_BASE-_..X_FLASH_END
#
#
-Z(CODE)SWITCH=_..X_FLASH_BASE-_..X_FLASH_END
#
#
-Z(CODE)INITTAB=_..X_FLASH_BASE-_..X_FLASH_END
#
#
-Z(CODE)DIFUNCT=_..X_FLASH_BASE-_..X_FLASH_END
#
#
-Z(CODE)CODE=_..X_FLASH_BASE-_..X_FLASH_END
#
#
-Z(CODE)TINY_ID=_..X_FLASH_BASE-_..X_FLASH_END
#
#
-Z(CODE)NEAR_ID=_..X_FLASH_BASE-_..X_FLASH_END
#
#
-Z(CODE)CHECKSUM=_..X_FLASH_BASE-_..X_FLASH_END
#
#
-Z(DATA)TINY_I,TINY_Z,TINY_N=_..X_SRAM_BASE-_..X_ #
#
SRAM_TEND
#
#
-Z(DATA)CSTACK+_..X_CSTACK_SIZE=_..X_SRAM_BASE-_. #
#
.X_SRAM_TEND
#
#
-Z(DATA)HEAP+_..X_HEAP_SIZE=_..X_SRAM_BASE-_..X_S #
#
RAM_TEND
#
#
-Z(DATA)RSTACK+_..X_RSTACK_SIZE=_..X_SRAM_BASE-_. #
#
.X_SRAM_END,_..X_EXT_RSTACK_BASE-_..X_EXT_RSTACK_ #
#
END
#
#
-Z(DATA)NEAR_I,NEAR_Z=_..X_SRAM_BASE-_..X_SRAM_EN #
#
D,_..X_EXT_SRAM_BASE-_..X_EXT_SRAM_END
#
#
-Z(DATA)NEAR_C=_..X_EXT_ROM_BASE-_..X_EXT_ROM_END #
#
-Z(DATA)NEAR_N=_..X_EXT_NV_BASE-_..X_EXT_NV_END
#
#
-Z(XDATA)EEPROM_I,EEPROM_N=1-_..X_EEPROM_END)
#
#
-D_..X_FLASH_BASE=_..X_INTVEC_SIZE -H1895
#
#
-h(CODE)0-(_..X_INTVEC_SIZE-1)
#
#
-D_..X_EXT_SRAM_BASE=_..X_SRAM_BASE
#
#
-D_..X_EXT_SRAM_END=_..X_SRAM_BASE
#
#
-D_..X_EXT_ROM_BASE=_..X_SRAM_BASE
#
#
-D_..X_EXT_ROM_END=_..X_SRAM_BASE
#
12
AN-29 Building a Salvo Application with IAR's AVR C Compiler and Embedded Workbench IDE
Application Note
#
-D_..X_EXT_NV_BASE=_..X_SRAM_BASE
#
#
-D_..X_EXT_NV_END=_..X_SRAM_END
#
#
-D_..X_EXT_CSTACK_BASE=_..X_SRAM_BASE
#
#
-D_..X_EXT_CSTACK_END=_..X_SRAM_BASE
#
#
-D_..X_EXT_RSTACK_BASE=_..X_SRAM_BASE
#
#
-D_..X_EXT_RSTACK_END=_..X_SRAM_BASE
#
#
#
#
Copyright 1987-2002 IAR Systems. All rights reserved. #
################################################################################
[SNIP]
****************************************
*
*
*
SEGMENTS IN ADDRESS ORDER
*
*
*
****************************************
SEGMENT
=======
INTVEC
?FILL1
INITTAB
CODE
ABSOLUTE (ABS)
TINY_I
TINY_Z
CSTACK
RSTACK
SPACE
=====
CODE
CODE
CODE
CODE
DATA
DATA
DATA
DATA
DATA
DATA
DATA
DATA
DATA
DATA
DATA
DATA
DATA
DATA
START ADDRESS
END ADDRESS
=============
===========
00000000 - 00000009
0000000A - 00000019
0000001A - 0000001F
00000020 - 000005FD
0000001C
0000001D
0000001E
0000001F
00000037 - 00000037
00000038 - 00000038
0000004A - 0000004B
0000004C - 0000004D
0000004E - 0000004E
00000059 - 00000059
00000060
00000060 - 0000007F
00000080 - 0000009F
000000A0 - 000000BF
SIZE
====
A
10
6
5DE
TYPE
====
com
rel
rel
rel
rel
ALIGN
=====
1
0
0
1
0
1
1
2
2
1
1
20
20
20
dse
rel
dse
dse
0
0
0
0
****************************************
*
*
*
END OF CROSS REFERENCE
*
*
*
****************************************
1 518 bytes of CODE memory (16 range fill)
104 bytes of DATA memory
Errors: none
Warnings: none
Listing 3: Library Build Results (Abbreviated)
Note The Embedded Workbench for Atmel AVR projects
supplied in the Salvo for Atmel AVR and MegaAVR distributions
contain additional help files in each project's Salvo Help Files
group.
Tip If you configure Embedded Workbench to display the
memory utilization for individual source files and the complete
application you won't have to look in the map file. Select Options
→ Settings → Make Control → Message Filtering Level and
choose All.
AN-29 Building a Salvo Application with IAR's AVR C Compiler and Embedded Workbench IDE
13
Application Note
Testing the Application
C-SPY
You can test and debug this application using the C-SPY debugger
and either the simulator or other debugging hardware. To launch
C-SPY, choose Project → Debugger.
You can use all of C-SPY's supported features when debugging
and testing Salvo applications. This includes breakpoints, profiling,
intelligent watch window, cycle counting, etc.
Figure 17: Testing a Salvo Application in C-SPY
Note C-SPY supports debugging at the source code level. Only
applications built from the Salvo source code or a Salvo Pro library
enable you to step through Salvo services (e.g.
OSCreateBinSem()) at the source code level. Regardless of how
you build your Salvo application, you can always step through
your own C and assembly code in C-SPY.
14
AN-29 Building a Salvo Application with IAR's AVR C Compiler and Embedded Workbench IDE
Application Note
AVR Studio
To test your Salvo application in AVR Studio,6 under File →
Open File …, navigate to your project's Debug\Exe subdirectory
and open the object (*.d90) file:
Figure 18: Opening the Object File
Select Open. AVR Studio will load the object file, then present
another window wherein you can select a Debug Platform and a
Device:
Figure 19: Selecting the Debug Platform and Device
Select Finish. AVR Studio will configure the simulator, load the
object file, and setup for source-level debugging at the start of your
main():
AN-29 Building a Salvo Application with IAR's AVR C Compiler and Embedded Workbench IDE
15
Application Note
Figure 20: Source-Level Debugging in AVR Studio
In addition to debugging in the AVR Studio simulator, you can
also download your application to an Atmel STK500 development
board by selecting Tools → STK500/… → STK500/…, and then
programming the device by selecting Use Current
Simulator/Emulator FLASH Memory,
Migrating to Embedded Workbench for Atmel AVR
v3
Existing Salvo applications built as projects (*.pjt) under IAR's
Embedded Workbench for Atmel AVR v2 can be migrated to v3
using the following steps.
• In Embedded Workbench for Atmel AVR v3, choose
File → New → Workspace to create a new
workspace file (*.eww).
• Choose Project → Add Existing Project …, select
Files of type: Old Project Files (*.prj, *.pew),
navigate to the old project and select Open, then OK.
• Under Project → Options, select the device (e.g.
AT90S8515) under General → Target →
Processor configuration, if necessary. Set the
desired optimizations under ICCAVR →
Optimizations.
• Remove the existing Salvo library from the project,
and replace it with a same-named one from
\salvo\lib\iaravr-v3.
16
AN-29 Building a Salvo Application with IAR's AVR C Compiler and Embedded Workbench IDE
Application Note
When finished, the new project window will look like this:
Figure 21: Project Window for a Library Build in
Embedded Workbench for Atmel AVR v3
Troubleshooting
Linker Error: Incompatible runtime models
If you are doing a library build and your version of the IAR AVR
C Compiler is different from that used to build the Salvo library
you have added to your project, the linker will issue an error like
this one:
Figure 22: Linker Error due to Version Mismatch (EW v3)
This type of error occurs because the Salvo library – in this case,
salvo\lib\iaravr-v2\sliaravr1t-a.r90 – was built with v2
of the IAR AVR C Compiler, which defines a symbol called
__rt_version as 2.30, yet the project was built in EW v3, which
expects __rt_version to be 3. The solution is simply to use the
Salvo library appropriate for the version of the IAR AVR C
compiler
you
are
using
–
in
this
case,
salvo\lib\iaravr-v3\sliaravr1t-a.r90.
AN-29 Building a Salvo Application with IAR's AVR C Compiler and Embedded Workbench IDE
17
Application Note
Note
is used by XLINK at link time to ensure
consistency between modules (C, Embedded C++ or assembler).
See the IAR AVR C/EC++ Compiler Reference Guide for more
information.
__rt_version
Note As long as the major version number of the IAR AVR C
Compiler you're using (and therefore __rt_version's value)
matches that used to generate the Salvo libraries, you will be able
to link to the precompiled Salvo libraries that are supplied in each
Salvo for Atmel AVR and MegaAVR distribution. E.g. v3.x can be
used with Salvo libraries built with v3.10A.7
mismatches like this will occur whenever Salvo
users and the Salvo for Atmel AVR and MegaAVR distribution are
at substantially different versions of the IAR AVR C compiler.
Therefore, we strongly recommend that Salvo users keep their IAR
AVR C compiler up-to-date to avoid any potential difficulties.
Salvo Pro users can avoid any potential problems by simply rebuilding the Salvo libraries with their own version of the IAR
AVR C compiler.
__rt_version
This type of linker error will not happen with source code builds,
e.g. when using Salvo Pro to build an application using the Salvo
source files as project nodes instead of linking to a Salvo library.
Application Crashes After Changing Processor Type
Remember to #include the appropriate header file for your AVR
variant (see Building the Project, above). A common cause for such
crashes is a difference in interrupt vector locations or definitions
between two members of a processor family. Mainline code may
work correctly, but the application will crash if interrupt vectors
are not in the right locations.
Example Projects
Example projects for IAR's AVR C compiler can be found in the
\salvo\tut\tu1-6\sysac directories. The include path for each
of these projects includes \salvo\tut\tu1\sysac, and each
project defines the SYSAC symbol.
Complete Salvo Lite library-build projects are contained in the
project files \salvo\tut\tu1-6\sysac\tu1-6lite.*. These
projects also define the MAKE_WITH_FREE_LIB symbol.
18
AN-29 Building a Salvo Application with IAR's AVR C Compiler and Embedded Workbench IDE
Application Note
Complete Salvo LE library-build projects are contained in the
project files \salvo\tut\tu1-6\sysac\tu1-6le.*. These
projects also define the MAKE_WITH_STD_LIB symbol.
Complete Salvo Pro library-build projects are contained in the
project files \salvo\tut\tu1-6\sysac\tu1-6prolib.*. These
projects also define the MAKE_WITH_STD_LIB symbol.
Complete Salvo Pro source-code-build projects are contained in
the project files \salvo\tut\tu1-6\sysac\tu1-6pro.*. These
projects also define the MAKE_WITH_SOURCE symbol.
Note Tutorial and example projects are provided for IAR
Embedded Workbench for Atmel AVR v2 (*.prj files) and IAR
Embedded Workbench for Atmel AVR v3 (*.ewp & *.eww files).
1
2
3
4
5
6
7
This Salvo project supports a wide variety of targets and compilers. For use
with IAR's AVR C compiler, it requires the SYSAC defined symbol, as well as
the symbols MAKE_WITH_FREE_LIB or MAKE_WITH_STD_LIB for library
builds. When you write your own projects, you may not require any symbols.
We recommend using the Embedded Workbench's argument variables like
$PROJ_DIR$ and $TOOLKIT_DIR$ whenever possible.
This Salvo Lite library contains all of Salvo's basic functionality. The
corresponding Salvo LE and Pro libraries are sliaravr1t-a.r90 and
sliaravr1tia.r90, respectively.
You can Ctrl-select multiple files at once.
We recommend that you add the project's map file to your project's Listings
group.
AVRStudio v4.08 is shown.
In this example, the major version number is 3.
AN-29 Building a Salvo Application with IAR's AVR C Compiler and Embedded Workbench IDE
19