1
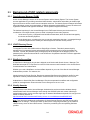
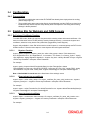
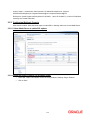
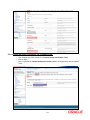
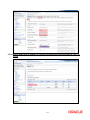
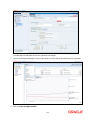
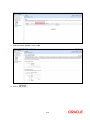
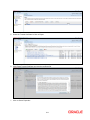
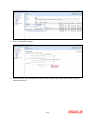
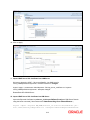
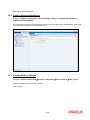
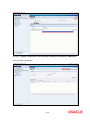
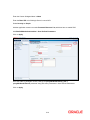
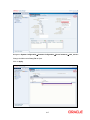
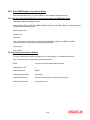
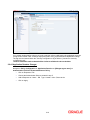
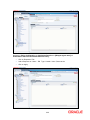
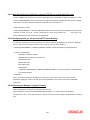
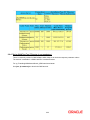
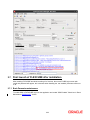
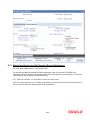
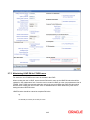
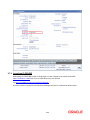
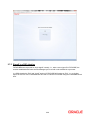
Oracle Access Manager Integration Oracle FLEXCUBE Universal Banking Release 12.0.2.0.0 October 2013 1-1 Table of Contents 1. PREFACE ........................................................................................................................................................ 1-3 1.1 INTRODUCTION ........................................................................................................................................... 1-3 1.2 AUDIENCE .................................................................................................................................................. 1-3 1.3 ABBREVIATIONS ......................................................................................................................................... 1-3 1.4 DOCUMENTATION ACCESSIBILITY .............................................................................................................. 1-3 1.5 ORGANIZATION .......................................................................................................................................... 1-3 1.6 GLOSSARY OF ICONS .................................................................................................................................. 1-3 1.6.1 Related Documents ............................................................................................................................ 1-4 2. ENABLING SINGLE SIGN-ON WITH ORACLE ACCESS MANAGER ............................................... 2-1 2.1 INTRODUCTION ........................................................................................................................................... 2-1 2.2 BACKGROUND AND PREREQUISITES ........................................................................................................... 2-1 2.2.1 Software Requirements ...................................................................................................................... 2-1 2.3 BACKGROUND OF SSO RELATED COMPONENTS .......................................................................................... 2-2 2.3.1 Oracle Access Manager (OAM)......................................................................................................... 2-2 2.3.2 LDAP Directory Server ..................................................................................................................... 2-2 2.3.3 WebGate/AccessGate ......................................................................................................................... 2-2 2.3.4 Identity Asserter ................................................................................................................................. 2-2 2.4 CONFIGURATION ........................................................................................................................................ 2-3 2.4.1 Pre-requisites ..................................................................................................................................... 2-3 2.5 ENABLING SSL FOR WEBLOGIC AND OAM CONSOLE ................................................................................ 2-3 2.5.1 Self-signed Certificate Creation: ....................................................................................................... 2-3 2.5.2 Configuring Weblogic Console .......................................................................................................... 2-4 2.6 CONFIGURING SSO IN OAM CONSOLE ...................................................................................................... 2-8 2.6.1 Identity Store Creation....................................................................................................................... 2-8 2.6.2 Creating Authentication Module...................................................................................................... 2-14 2.6.3 Creating OAM 11g Webgate ............................................................................................................ 2-14 2.6.4 Post OAM Webgate 11g Creation Steps .......................................................................................... 2-18 2.7 FIRST LAUNCH OF FLEXCUBE AFTER INSTALLATION ............................................................................. 2-23 2.7.1 Bank Parameter maintenance .......................................................................................................... 2-23 2.7.2 Maintaining Branch Level DN Template (Branch Maintenance) .................................................... 2-24 2.7.3 Maintaining LDAP DN for FCUBS users ........................................................................................ 2-25 2.7.4 Launching FLEXCUBE ................................................................................................................... 2-26 2.7.5 Signoff in a SSO situation ................................................................................................................ 2-28 1-2 1. 1.1 Preface Introduction This manual discusses the integration Oracle FLEXCUBE Universal Banking and the Oracle Access Manager system. The configurations required for the proper functioning of this integration, and further processing are documented in this manual. 1.2 Audience This manual is intended for the following User/User Roles: 1.3 1.4 Role Function Back office data entry Clerks Input functions for maintenance related to the interface. Back office Managers/Officers Authorization functions. Abbreviations Abbreviation Description System Unless specified, it shall always refer to Oracle FLECUBE OAM Oracle Access Manager UBS Universal Banking Solutions SSO Single Sign-on LDAP Lightweight Directory Access Protocol Documentation Accessibility For information about Oracle's commitment to accessibility, visit the Oracle Accessibility Program website at http://www.oracle.com/pls/topic/lookup?ctx=acc&id=docacc. 1.5 Organization This manual is organized into the following chapters: 1.6 Chapter 1 Preface gives information on the intended audience. It also lists the various chapters covered in this User Manual. Chapter 2 Enabling Single Sign-on (SSO) with Oracle Access Manager discusses the method to integrate Oracle FLEXCUBE with Oracle Access Manager for Single Sign-on. Glossary of Icons This User Manual may refer to all or some of the following icons. 1-3 Icons Function Exit Add row Delete row Option List 1.6.1 Related Documents You may refer the following manuals for more information Procedures User Manual Oracle Access Manager User Manual (not included with Oracle FLEXCUBE User Manuals) 1-4 2. 2.1 Enabling Single Sign-on with Oracle Access Manager Introduction For the purpose of single sign-on FLEXCUBE UBS is qualified with Oracle Identity Management 11.1.1 (Fusion Middleware 11gR1) – specifically using the Access Manager component of Oracle Identity Management. This feature is available in the releases FC UBS V.UM 7.3.0.0.0.0.0 and onwards of FLEXCUBE UBS. This document is expected to provide an understanding as to how single sign-on can be enabled for a FLEXCUBE UBS deployment using Oracle Fusion Middleware 11g. In addition to providing a background to the various components of the deployment, this document also talks about Configuration in FLEXCUBE and Oracle Access Manager to enable single sign-on using Oracle Internet Directory as a LDAP server. 2.2 Background and Prerequisites 2.2.1 Software Requirements Oracle Access Manager – OAM (11.1.1.5) Access Server – 11.1.1.5 Webtier Utilities 11.1.1.6 Web Gate 11.1.1.5 Http Server LDAP Directory Server Please make sure that the LDAP which has been used for Flexcube Single Signon deployment is certified to work with OAM. List of few LDAP Directory servers supported as per OAM document (note – this is an indicative list. The conclusive list can be obtained from the Oracle Access Manager documentation. Though we have only use OID for our testing purposes): Oracle Internet Directory Active Directory ADAM ADSI Data Anywhere (Oracle Virtual Directory) IBM Directory Server NDS Sun Directory Server Web Logic(10.3.5) For the purpose of achieving single sign on for FCUBS in FMW 11gR1, it is necessary for the weblogic instance to have an explicit Oracle HTTP server (OHS). 2-1 2.3 Background of SSO related components 2.3.1 Oracle Access Manager (OAM) Oracle Access Manager consists of the Access System and the Identity System. The Access System secures applications by providing centralized authentication, authorization and auditing to enable single sign-on and secure access control across enterprise resources. The Identity System manages information about individuals, groups and organizations. It enables delegated administration of users, as well as selfregistration interfaces with approval workflows. These systems integrate seamlessly. The backend repository for the Access Manager is an LDAP-based directory service that can be a combination of a multiple directory servers, which is leveraged for two main purposes: As the store for policy, configuration and workflow related data, which is used and managed by the Access and Identity Systems As the identity store, containing the user, group and organization data that is managed through the Identity System and is used by the Access System to evaluate access policies. 2.3.2 LDAP Directory Server To integrate Flexcube with OAM to achieve Single Sign-on feature, Flexcube’s password policy management, like password syntax and password expiry parameters will no longer be handled by Flexcube. Instead, the password policy management can be delegated to the Directory Server. All password policy enforcements would be on the LDAP user id’s password and NOT Flexcube application users’ passwords. 2.3.3 WebGate/AccessGate A WebGate is a Web server plug-in that is shipped out-of-the-box with Oracle Access Manager. The WebGate intercepts HTTP requests from users for Web resources and forwards it to the Access Server for authentication and authorization. Whether you need a WebGate or an AccessGate depends on your use of the Oracle Access Manager Authentication provider. For instance, the: Identity Asserter for Single Sign-On: Requires a separate WebGate and configuration profile for each application to define perimeter authentication. Ensure that the Access Management Service is On. Authenticator or Oracle Web Services Manager: Requires a separate AccessGate and configuration profile for each application. Ensure that the Access Management Service is On. 2.3.4 Identity Asserter Identity Asserter uses Oracle Access Manager Authentication services and also validates alreadyauthenticated Oracle Access Manager Users through the ObSSOCookie and creates a WebLogicauthenticated session. It also provides single sign-on between WebGates and portals. We can get more details on Identity asserter at http://download.oracle.com/docs/cd/E12839_01/core.1111/e10043/osso.htm#CHDGCACF Note: This document containts the configuration of Oracle Interner Directory as LDAP server and its configuration in weblogic. This document will not discuss the configuring and setting up of OAM and LDAP directory server of other LDAP servers. This will be provided by the corresponding Software provider. 2-2 2.4 Configuration 2.4.1 Pre-requisites 2.5 The steps provided below assume that FLEXCUBE has already been deployed and is working (without single sign-on) The provided below steps assume that Oracle Access Manager and the LDAP server have been installed already and the requisite setup already done with respect to connecting the two along Weblogic’s Identity Asserter. Enabling SSL for Weblogic and OAM Console 2.5.1 Self-signed Certificate Creation: To enable SSL mode, WebLogic requires a keystore which contains private and trusted certificates. We have to use the same version of JDK (which is used by Weblogic Domain), to create the keystore and certificates, otherwise it may lead to many difficulties (suggested by Oracle Support). Keytool utility available in Java JDK will be used to create Keystore. In command prompt set PATH to the JDK\bin location. Follow the below steps to create keystore and self-signed certificates: 2.5.1.1 Keystore Creation keytool -genkey -keystore <keystore_name.jks> -alias <alias_name> -dname "CN=<hostname>, OU=<Organization Unit>, O=<Organization>, L=<Location>, ST=<State>, C=<Country_Code>" -keyalg <Key Algorithm> -sigalg <Signature Algorithm> -keysize <key size> -validity <Number of Days> -keypass <Private key Password> -storepass <Store Password> For example: keytool -genkey -keystore AdminFlexcubeKeyStore.jks -alias FlexcubeCert -dname "CN=ofss00001.in.oracle.com, OU=OFSS, O=OFSS, L=Chennai, ST=TN, C=IN" -keyalg "RSA" -sigalg "SHA1withRSA" -keysize 2048 -validity 3650 -keypass Password@123 -storepass Password@123 Note: CN=ofss00001.in.oracle.com is the Host Name of the weblogic server 2.5.1.2 Export private key as certificate keytool -export -v -alias <alias_name> -file <export_certificate_file_name_with_location.cer> -keystore <keystore_name.jks> > -keypass <Private key Password> -storepass <Store Password> For example: keytool -export -v -alias FlexcubeCert -file AdminFlexcubeCert.cer -keystore AdminFlexcubeKeyStore.jks -keypass Password@123 -storepass Password@123 2.5.1.3 Import as trusted certificate keytool -import -v -trustcacerts -alias rootcacert -file <export_certificate_file_name_with_location.cer> keystore <keystore_name.jks> > -keypass <Private key Password> -storepass <Store Password> For example: 2-3 keytool -import -v -trustcacerts -alias rootcacert -file AdminFlexcubeCert.cer -keystore AdminFlexcubeKeyStore.jks -keypass Password@123 -storepass Password@123 References: Oracle Support Articles (Article ID 1281035.1, Article ID 1218695.1), in case of Certificates issued by the Trusted Authorities 2.5.2 Configuring Weblogic Console After domain creation, follow the below steps to enable SSL in weblogic Admin server and OAM Server. 2.5.2.1 Select Admin Server to enable SSL options 2.5.2.2 Follow the steps in General Tab as shown below: Select SSL Listen Port Enabled, Client Cert Proxy Enabled, Weblogic Plug-In Enabled Click on Save 2-4 2.5.2.3 Follow the steps in Keystores Tab as shown below: Click Change and select Keystores as Custom Identity and Custom Trust Click on Save Note: Keystores as Custom Identity and Custom Trust is as suggested by Oracle Support Team 2-5 2.5.2.4 Follow the steps in Keystores Tab as shown below: Enter Custom Identity Keystore and Custom Trust Keystore as same as the Keystore Name created in step 3.2.1.1 with full path. Enter Custom Identity Keystore Type and Custom Trust Keystore Type as jks. Enter Custom Identity Keystore Passphrase, Confirm Custom Identity Keystore Passphrase, Custom Trust Keystore Passphrase and Confirm Custom Trust Keystore Passphrase as same as the Store Password entered in step 3.2.1.1. Click on Save. 2.5.2.5 Follow the steps in SSL Tab as shown below: Enter Private Key Alias as same as the alias name entered in step 3.2.1.1. Enter Private Key Passphrase and Confirm Private Key Passphrase as same as the Private Key Password entered in step 3.2.1.1. Change the Hostname Verification to None. Click on Save. 2-6 2.5.2.6 Select OAM Server to enable SSL options and Repeat the steps performed in 2.2.2.2 to 2.2.2.5 2-7 2.6 Now the admin server and oam servers are SSL enabled. Restart both the servers. Configuring SSO in OAM Console After installing OAM, Webtier Utilities and Webgate, extend the weblogic domain to create OAM server. Follow the post installation scripts deployWebGate and EditHttpConf as provided in (http://docs.oracle.com/cd/E17904_01/install.1111/e12002/webgate004.htm 2.6.1 Identity Store Creation 2.6.1.1 To create new User Identity Store, Login to OAM Console and navigate to System Configuration>>Common configuration>>Data Sources>> User Identity Store Click New icon to create new Identity Store. Input below information in the new User Identity Store. Choose Store Type as Oracle Internet Directory. Location: LDAP server Host name and Port Number in <HOSTNAME>:PORT format Select Enable SSL check box Bind DN: User name to connect the LDAP Server Password: Password to connect the LDAP Server User Name Attribute: The attribute created in LDAP, which will be the User Name for the other application (here it will be treated as the FCUBS Username) User Search Base: The container of the User Name in the LDAP server. Group Search Base: The container of the Group Name in the LDAP server. Click on Apply. Note: User Identity Store will be created only if valid LDAP Parameters are passed. 2-8 To enable SSL for OID LDAP Server refer, follow the below steps. 1. Login to the Enterprise Manager Console of the domain, in which Oracle Internet Directory is associated 2. Click on Create Self-Signed Wallet 2-9 3. Enter the Details as below & Click on OK 4. Click on 2-10 5. Select the Trusted Certificate & Click on Export 6. Click Export Trusted Certificate and save the certificate file. 7. Click on Server Properties 2-11 8. Click on Change SSL Settings 9. Select the Wallet, SSL Authentication as Server Authentication, Cipher Suite, SSL Protocal Version as below & Click on OK 2-12 10. Click on Apply. 11. Import LDAP Server SSL Certificate into OAM Server We have to import the LDAP – Server certificatefile into OAM server’s JAVA_HOME/jre/lib/security/cacerts. Default Password is “changeit” keytool -import -v -trustcacerts -alias ldapcacert –file ldap_server_certificate.cer -keystore JAVA_HOME/jre/lib/security/cacerts -storepass changeit Restart Both OID & OAM Server. 12. Import LDAP Server SSL Certificate into OIM Server Import the Exported Certificate into wlserver_10.3/server/lib/DemoTrust.jks of OIM Server Domain using the below command [ Store Password is DemoTrustKeyStorePassPhrase ] keytool -import -keystore MW_HOME/wlserver_10.3/server/lib/DemoTrust.jks file /home/testoc4j/OIM/globalv.crt -storepass DemoTrustKeyStorePassPhrase 2-13 Restart Both OID & OIM Server. 2.6.2 Creating Authentication Module Navigate to System Configuration >> Access Manager Settings >> Authentication Modules >> LDAP Authentication Module Click New Button to create new Authentication Module. Input the Name of the authentication module and choose the User Identity Store we created in step 1. 2.6.3 Creating OAM 11g Webgate Navigate to System ConfigurationCommon ConfigurationServer Instances oam_server1 Change the Mode under Proxy Tab to Simple. Click on Apply. 2-14 Navigate to System Configuration>>Access Manager Settings>>SSO Agents>>OAM Agents. Click on Create 11g Webgate. 2-15 Enter the Custom Webgate Name in Name Enter the Base URL as in Weblogic Server’s non-ssl URL Select Security as Simple Add the application context root under Protected Resource List, which we have to enable SSO Add filterOAMAuthnCookie=false in User Defined Parameters Click on Apply. Once the OAM 11g Webgate created, Change the proxySSLHeaderVar=IS_SSL to proxySSLHeaderVar=ssl parameter along with other parameters in User Defined Parameters. Click on Apply. 2-16 Navigate to System ConfigurationCommon ConfigurationServer Instances oam_server1 Change the Mode under Proxy Tab to Open. Click on Apply. 2-17 2.6.4 Post OAM Webgate 11g Creation Steps Perform the following steps to copy the artifacts to the Webgate installation directory: 2.6.4.1 On the Oracle Access Manager Console host, locate the OAM Agent folder <DOMAIN_HOME>/output/$Agent_Name Copy the below files to <ORACLE_MIDDLEWARE>/<ORACLE_WIBTIER_HOME> /instances/instance1/ config/OHS/ohs1/webgate/config/ ObAccessClient.xml password.xml cwallet.sso And copy remaining below files to <ORACLE_MIDDLEWARE>/<ORACLE_WIBTIER_HOME> /instances/instance1/ config/OHS/ohs1/webgate/config/simple aaa_key.pem aaa_cert.pem 2.6.4.2 Creating Authentication Scheme To create Authentication Scheme navigate to Policy Configuration >> Authentication Schemes Click on Create button to create new Authentication Scheme. Name : Any name to identify Authentication Scheme Authentication Level :1 Challenge Method : BASIC Challenge Redirect URL : /oam/server Authentication Module : Choose the authentication module created in step 2. Challenge Parameters : ssoCookie=secure 2-18 If it is a basic authentication scheme, we need to add the 'enforce-valid-basic-auth-credentials' tag to the config.xml file located under <weblogic deployment path>/user_projects/domains/<MyDomain>/config/. The tag must be inserted within the <security-configuration> tag as follows: [Just above </securityconfiguration> tag] <enforce-valid-basic-auth-credentials>false</enforce-valid-basic-auth-credentials> 2.6.4.3 Application Domains Changes Navigate to Policy Configuration >> Application Domains >> [Webgate agent name] >> Authentication Policies>>Protected Resource Policy. Click on Responses Tab Choose the Authentication Scheme created in step 5. Add a Response as: Name : DN Type : Header Value : $user.attr.dn Click on Apply. 2-19 Navigate to Policy Configuration >> Application Domains >> [Webgate agent name] >> Authorization Policies>>Protected Resource Policy. Click on Responses Tab Add a Response as: Name : DN Type : Header Value : $user.attr.dn Click on Apply. 2-20 2.6.4.4 Add the Application Certificates to Oracle HTTP Server to work with SSL mode. Use the ORAPKI tool to import the Flexcube and OAM Server certificates to Oracle HTTP Server. Add <Oracle_MIDDLEWARE>/oracle_common/bin to PATH environment variable and also set JAVA_HOME environment variable. Execute the below command in the command line. orapki wallet add -wallet <Oracle_MIDDLEWARE>/<ORACLE_WEBTIER_HOME>/instances/instance1/config/OHS/ohs1/keystore s/default -trusted_cert -cert <export_certificate_file_name_with_location.cer> -auto_login_only Note: Certificate has to be imported into OHS Wallet 2.6.4.5 Configuring mod_wl_ohs for Oracle HTTP server Routing To enable the Oracle HTTP Server instances to route to applications deployed on the Oracle Weblogic Server, add the directive shown below to the mod_wl_ohs.conf file available in <ORACLE_MIDDLEWARE> /<ORACLE_WEBTIER_HOME>/instances/instance1/config/OHS/ohs1. <Location /FCJNeoWeb> SetHandler weblogic-handler WebLogicHost ofss00002.in.oracle.com WeblogicPort 7002 WLProxySSL ON SecureProxy ON WLSSLWallet "<ORACLE_MIDDLEWARE>/<ORACLE_WEBTIER_HOME>/instances/instance1/config/OHS/ohs 1/keystores/default" </Location> Note: in the above example, ofss00002.in.oracle.com is the server name where the Flexcube Application deployed, 7002 is the SSL port and FCJNeoWeb is the context root of the FLEXCUBE application 2.6.4.6 Checking the Webgate 11g Agent Creation After configuration of webgate 11g agent launch the URL https://<hostname>:<ohs_Port>/ohs/modules/webgate.cgi?progid=1 to verify whether the webgate configuration is fine. If the URL launches a screen as below then the webgate configuration is working fine. 2-21 2.6.4.7 Using OAM Test Tool (This step is not mandatory) There is a test tool provided in OAM software which helps us to check the response parameter values. The test tool is available in <OAM Install Dir>\ oam\server\tester. For eg. D:\weblogic\Middleware\Oracle_IDM1\oam\server\tester Use java -jar oamtest.jar to launch the OAM test tool. 2-22 2.7 First launch of FLEXCUBE after installation After installing FLEXCUBE and while launching it for first time, the normal FCUBS login screen with userid and password will appear, this is because when installing the ‘sso installed’ parameter will be set to ‘N’. 2.7.1 Bank Parameter maintenance To enable SSO in FLEXCUBE, login into the application and enable “SSO Enabled” Check box in “Bank Maintenance [SMDBANKP]” screen. 2-23 2.7.2 Maintaining Branch Level DN Template (Branch Maintenance) Go to the “Branch Maintenance” of FLEXCUBE UBS. For each branch LDAP DN template should be maintained, which is used in the FLEXCUBE user maintenance Form to populate corresponding LDAP userid automatically from this template. Go to branch level parameter screen and Click on Preferences Icon. E.g.: LDAP DN Template: cn=<FCJUSR>,cn=Users,dc=i-flex,dc=com Here in this above template cn=<FCJUSR> part preferably must be there and it should not be altered, but the rest of the DN name can change based on the configuration. 2-24 2.7.3 Maintaining LDAP DN for FCUBS users For each user id in FCUBS a user has to be created in the LDAP. When creating the user in LDAP, ensure that the DN used is same as the LDAP DN value that will be updated in user maintenance form. Once the user is created in LDAP go to the user maintenance form in FCUBS. If the FCUBS user already exists then unlock the user and update the LDAP DN value which was set when creating the user in LDAP. Click on Validate button to check whether any other user is having the same LDAP DN value. LDAP DN value should be entered as complete DN value. eg. cn=FCUSR,cn=Users,dc=oracle,dc=com 2-25 2.7.4 Launching FLEXCUBE After setting up FLEXCUBE to work on Single Sign on mode, navigate to the interim servlet URL https://<hostname>:<OHS SSL Port>/<Context Root> from your browser eg: https://ofss00001.in.oracle.com:4443/FCJNeoWeb Since the resource is protected, the WebGate challenges the user for credentials as shown below. 2-26 Once the user is authenticated and authorized to access the resource, the servlet gets redirected to normal FLEXCUBE application server URL and now the new signon form will appear as below. The application will automatically redirect FLEXCUBE home page. 2-27 2.7.5 Signoff in a SSO situation FLEXCUBE does not provide for single signoff currently, i.e., when a user signs off in FLEXCUBE, the session established with Oracle Access Manager by the user will not be modified in any manner. In a SSO situation the “Exit” and “Logoff” actions in FLEXCUBE will function as “Exit”, i.e., on clicking these, the user will “exit” FLEXCUBE and will need to re-launch FLEXCUBE using the FLEXCUBE launch URL. 2-28 Oracle Access Manager Integration [October] [2013] Version 12.0.2.0.0 Oracle Financial Services Software Limited Oracle Park Off Western Express Highway Goregaon (East) Mumbai, Maharashtra 400 063 India Worldwide Inquiries: Phone: +91 22 6718 3000 Fax:+91 22 6718 3001 www.oracle.com/financialservices/ Copyright © [2007], [2013], Oracle and/or its affiliates. All rights reserved. Oracle and Java are registered trademarks of Oracle and/or its affiliates. Other names may be trademarks of their respective owners. U.S. GOVERNMENT END USERS: Oracle programs, including any operating system, integrated software, any programs installed on the hardware, and/or documentation, delivered to U.S. Government end users are "commercial computer software" pursuant to the applicable Federal Acquisition Regulation and agency-specific supplemental regulations. As such, use, duplication, disclosure, modification, and adaptation of the programs, including any operating system, integrated software, any programs installed on the hardware, and/or documentation, shall be subject to license terms and license restrictions applicable to the programs. No other rights are granted to the U.S. Government. This software or hardware is developed for general use in a variety of information management applications. It is not developed or intended for use in any inherently dangerous applications, including applications that may create a risk of personal injury. If you use this software or hardware in dangerous applications, then you shall be responsible to take all appropriate failsafe, backup, redundancy, and other measures to ensure its safe use. Oracle Corporation and its affiliates disclaim any liability for any damages caused by use of this software or hardware in dangerous applications. This software and related documentation are provided under a license agreement containing restrictions on use and disclosure and are protected by intellectual property laws. Except as expressly permitted in your license agreement or allowed by law, you may not use, copy, reproduce, translate, broadcast, modify, license, transmit, distribute, exhibit, perform, publish or display any part, in any form, or by any means. Reverse engineering, disassembly, or decompilation of this software, unless required by law for interoperability, is prohibited. The information contained herein is subject to change without notice and is not warranted to be error-free. If you find any errors, please report them to us in writing. This software or hardware and documentation may provide access to or information on content, products and services from third parties. Oracle Corporation and its affiliates are not responsible for and expressly disclaim all warranties of any kind with respect to third-party content, products, and services. Oracle Corporation and its affiliates will not be responsible for any loss, costs, or damages incurred due to your access to or use of third-party content, products, or services. 2-1