1
Double flight case
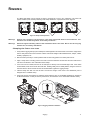
Unpacking
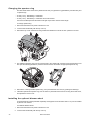
Release the head (tilt) transport lock.
3
Install rigging hardware as described on page 11.
4
With one person on each side, lift the fixture out of the flight
case.
T
2
N
Open the flight case and pull the drawer all the way out.
O
R
F
1
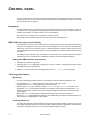
Packing
1
Disconnect the fixture from power and allow it to cool.
2
Turn the yoke parallel to the sides of the base with the tilt
lock closest to the back of the base.
3
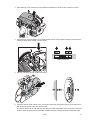
Pull the transport drawer all the way out. With one person
on each side, place the fixture on the drawer with the
‘Front’ arrow pointing into the flight case.
4
Remove and stow rigging hardware. Coil and stow the
power cord in the door.
5
Tilt the head so that the lens points away from the door as
shown in Figure 3. Lock the head in the horizontal position.
Do not lock the yoke.
6
Figure 3: Double unit transport position
Slide the drawer all the way in without forcing. Close the flight case.
Setup for flight case testing
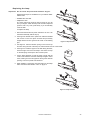
The double flight case has two slide-out arms from which the fixture can hang for testing and setting.
Though unnecessary, the pan and tilt reset can be cancelled by pressing [Menu] and [Enter] at the same
time.
1
Open the flight case and pull the drawer all the way out. Release the transport locks.
2
Pull the test arms out. Tilt the fixture up and over the test arms so that the handle cross-braces that are
second from the back rest on the arms. The fixture should rest at an angle.
3
Push the transport drawer into the flight case.
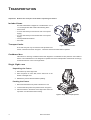
Transportation
7