1
Occupancy Sensor – Ceiling Mounted • Installation Guide
Troubleshooting
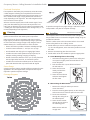
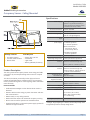
Light Test
Use the light test to measure real-time light levels and confirm
whether the occupancy sensor has sufficient light.
1. Create a realistic lighting condition (the test measures the
real-time light level).
2. Press and hold the Set button for 10 seconds.
••> Red & green LEDs will blink to confirm light test is active.
3. Watch the LED blink rate to determine the light strength.
••> The highest is 5 blinks which indicates very good light
(200 lux or more). 1 blink indicates minimum light (<25 lux).
NOTE: If there is no blink rate, consider relocating the sensor or
installing a battery to provide supplemental power.
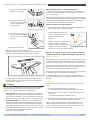
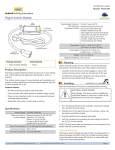
Installing Supplemental Battery (optional)
If light levels are very low where the sensor is installed, auxiliary
battery power (CR2032) can be used to supplement the solar
energy harvester.
Problem
2. Turn the sensor over and identify the battery holder on the
circuit board
▪
Sensor is activated
when there is nothing to detect
▪
▪
▪
▪
▪
▪
Linked device does
not respond to
wireless messages
▪
Explanation of
Occupied & Heartbeat Message Data
Telegrams
902 MHz:
1. Remove the sensor from the mounting plate.
With the push-button interface facing you, slide the sensor
to the right.
Solution Checklist
Sensor does not
generate a wireless
message
Verify the LED blinks when motion is detected
during a walk test
Verify the solar cell is charged properly
Verify there is 4 ft. (1.2 m) clearance from heat
sources that may disturb sensing
Reduce sensitivity setting by moving the PIR
sensitivity switch on the back from REG to
LOW (the left-hand position)
Check for environment or range issues
Verify the device is linked
Check the transceiver connection and the wiring for errors
Check if appropriate devices are linked according to good system planning
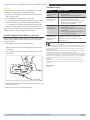
Data Byte 3: Super Capacitor Voltage, 0-255 (% of 0-4.5V)
Data Byte 2: Solar Panel Current, 0-127 microA
Data Byte 1: 0xFF (occupied) or 0x00 (unoccupied)
Data Byte 0: 0x0F
FCC: SZV-EOSW05
IC: 5713-EOSW05
This device complies with part 15 of the FCC rules and Industry Canada ICES-003. Operation
is subject to the following two conditions: (1) This device may not cause harmful interference,
and (2) this device must accept any interference received, including interference that may
cause undesired operation.
IMPORTANT! Any changes or modifications not expressly approved by the party responsible
for compliance could void the user’s authority to operate this equipment.
Le présent appareil est conforme aux CNR d’Industrie Canada applicables aux appareils radio
exempts de licence. L’exploitation est autorisée aux deux conditions suivantes: (1) l’appareil ne
doit pas produire de brouillage, et (2) l’utilisateur de l’appareil doit accepter tout brouillage
radioélectrique subi, meme si le brouillage est susceptible d’en compromettre le fonctionnement.
IMPORTANT! Tous les changements ou modifications pas expressément approuvés par la
partie responsable de la conformité ont pu vider l’autorité de l’utilisateur pour actioner cet
équipment.
Limited Warranty
ONE YEAR
3. Insert the battery under the clip with the positive pole (+) up
and press it in place.
4. Remount the sensor on the mounting plate.
© 2013 Hubbell Building Automation
|
www.hubbell-automation.com
Page 4
XOSCIGPLA