1
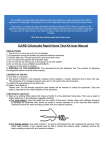
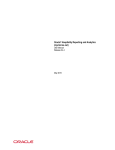
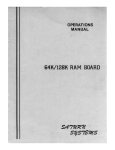
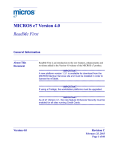
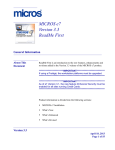
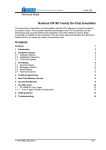
MICROS e7 Version 2.1 ReadMe First About This Document ReadMe First is an introduction to the new features and revisions added in the Version 2.1 release of the MICROS e7 product. Product information is divided into the following sections: What’s New What’s Enhanced What’s Revised MICROS e7 Installation Version 2.1 MD0007-013 January 19, 2006 Page 1 of 47 What’s New What’s New A new feature is defined as one that provides capabilities that were not available in previous versions of the application. New Features Summarized The table below summarizes the new features included in this version. Module New Features Detailed Feature Page POS Operations Stored Value Cards 2 Reports Employee Job Code Labor Report 20 POS Operations Stored Value Cards Support for a new Stored Value System (SVS) Gift Card interface has been added to the e7 application. The interface allows sites to create and manage guest card payment and loyalty programs, and to issue stored value cards (SVCs) that may be applied against future purchases. The e7 POS can support multiple programs and accounts, and customers may participate in more than one of them simultaneously. Note, however, that sites offering SVCs are only responsible for selling, reloading, redeeming, and cashing out cards provided to them by a thirdparty vendor. Rules of participation are determined by the SVC provider. At this time, e7 only supports the use of the iCare gift cards, available from mymicros.net. This feature describes how the SVC process works and includes procedures for installing and configuring the appropriate software to implement SVCs in general, and iCare gift cards in particular. Future releases of e7 will provide instructions for integrating other SVC programs, as they become available. MD0007-013 January 19, 2006 Page 2 of 47 Version 2.1 What’s New Terminology Stored Value Card is a generic term that refers to two types of customer accounts: Gift Cards — An account with a monetary balance that can be tendered in payment for products and/or services. Cards are purchased in advance by a customer, loaded with a specific amount which may be applied to future purchases. Loyalty Cards — An account that tracks customer purchases, assigns a point value to them, and, when a sufficient number of points has accrued, issues a reward in the form of a discount. Unlike gift cards, there is no direct monetary value associated with a Loyalty Card. Other terms applicable to the discussion of this feature include: SVC Server — The device used by the e7 POS System to process SVC transactions. The SVC Server is responsible for routing requests between the POS workstation and the service provider (Host). Host — The gift card service provider responsible for supplying the physical cards, establishing and enforcing the rules for participation, and maintaining the actual accounts. Host Adapter — The software (executables and drivers) used by the Host to process transaction requests to/from the e7 site. Host adaptors provide the electronic link between the e7 POS System and the gift card processor. A separate Host Adaptor is required for each SVC provider. Version 2.1 MD0007-013 January 19, 2006 Page 3 of 47 What’s New Understanding the Process During operations, SVC requests are initiated at an e7 POS workstation and passed to a designated SVC Server. For purposes of discussion, the SVC Server is simply a node in the e7 System that has been assigned responsibility for managing these transaction requests. The server designation is made during the configuration of the SVC interface. Note Any node (PC or WS4) may be designated the SVC Server, subject to the limitations of the Host Adapater software. In the current release, e7 only supports the iCare gift cards which require a PC to connect with the mymicros.net service provider.. From the SVC Server, requests are routed to a Host Adaptor, which translates the information into the proper Host format before passing it on to the SVC provider (see diagram below). The Host then reads the message, checks its database, and sends a response (in reverse process) back to the POS System. MD0007-013 January 19, 2006 Page 4 of 47 Version 2.1 What’s New Enabling the Feature The e7 Setup installs all the system files necessary to run an SVC program on each of the client workstations. To use the feature, additional configuration is required. Specifically, users will need to determine the posting methodology for handling SVC transactions, establish an interface to the card provider, and create touchscreen keys that allow the user to perform gift/loyalty functions. Users must also set job privileges for handling the inquiries. This section describes the configuration issues in detail. To avoid confusion, MICROS recommends new users read the entire section before completing each area, and to do so in the order presented below. Create the Transaction Items The SVC feature offers a number of transaction processes for managing and recording the sale and redemption of gift cards and loyalty discounts. To use these process, users must first decide how the transaction will be posted and then add a corresponding transaction item to the database. In general, transaction items fall into one of four categories: Menu Items/Service Charges — Records the sale of, or addition to, a gift card account. NOTE: During operations, sales of SVC items are posted to the database as non-revenue generating transactions. As such, they do not affect the income section of the balance reports. This is done for accounting purposes, since the sale or addition of money to a gift card is not realized as revenue until the card is redeemed. For more on this topic, refer to the section SVC Report Changes, beginning on page 18. Tender — Records a payment against a gift card account. Discount — Records a discount as a reward for reaching a certain level of purchase points. Inquiry — Requests account status and reports the current balance of the gift card or loyalty program. Version 2.1 MD0007-013 January 19, 2006 Page 5 of 47 What’s New The following table lists the processes included with the SVC feature, provides a brief description of its functionality and limitations, and identifies the options for creating a valid transction item. NOTE 1: Not all processes are supported by every SVC Host System. See page 16 for a list of processes supported by the iCare service. NOTE 2: Configuration will vary, depending on the transaction type selected. To work properly, however, the following options must be set for each SVC menu item, discount, service charge, or tender added: Reference required — Disabled Hide on display — Enabled In addition, when the function key is posting as a: Service Charge — The item must be a Non-Tip transaction and configured as an Open (not Preset) Amount (not Percent). Menu Item — The item must be configured as an Open-Priced Amount. Gift Card Processes Function MD0007-013 January 19, 2006 Page 6 of 47 Description Type Issue Account Activates a gift card for any user-specified amount (e.g., $43, $75.50, $110).* Prompts the user for an account number and amount. Must be performed during an open check. If approved, posts a transaction item to the guest check. Menu Item or Service Charge Activate Account Activates a gift card for the preset amount printed on the face of the card (e.g., $15, $25, $50).* Prompts the user for an account number and amount. Must be performed during an open check. If approved, posts a transaction item to the guest check. Menu Item or Service Charge Version 2.1 What’s New Gift Card Processes Function Description Type Reload Account Adds value to an existing gift card. Prompts the user for an account number and amount. Must be performed during an open check. If approved, post a transaction item on the guest check. Menu Item or Service Charge Cash Out Pays out the value of a gift card. Prompts the user for a gift card account number and then verifies the amount to be paid to the customer. Cannot be performed while a check is open. If approved, prints a separate chit when the transaction is complete. Tender (Pick-Up) NOTE: To use this function key, you must first add a corresponding Tender (Pickup) record, configured as follows: On the Tender tab, enable the option Hide on display. All other options — including Reference required — should be cleared. On the Interfaces tab, open the SVC Interface drop-down list and select the entry for the host provider. Version 2.1 Balance Inquiry Checks the balance remaining on a gift card account. Prompts the user for the account number and returns the amount left on the SVC. May be initiated inside or outside a guest check. Prints a separate chit when inquiry is complete. Inquiry Balance Transfer Moves the balance from one gift card to another. Prompts the user for the account numbers of both the old gift card and the new one. May be initiated inside or outside a guest check. Prints a separate chit when transaction complete. Inquiry MD0007-013 January 19, 2006 Page 7 of 47 What’s New Gift Card Processes Function Description Type Redeem Applies a gift card tender to an open guest check. Prompts the user for the account number and amount to be applied to the check. If prior authorizations are posted on check, prompts for gift card number and amount (including tips). If approved, posts a transaction item (account/ amount) to the guest check. Tender Redeem Authorize Requests amount verification in order to apply a gift card tender to an open guest check. Prompts the user for the account number and amount. If prior authorizations are posted on check, prompts for gift card number and amount (including tips). If approved, posts a transaction item to the guest check. Prints two redeem authorization vouchers — one for customer, one for merchant. Inquiry NOTE: This function is used to print a voucher in a table service environment when the customer wants to pay the check with a gift card. Manual Redeem MD0007-013 January 19, 2006 Page 8 of 47 Applies a gift card tender to an open guest check. This option is used when online communication with the gift card processor is down. Requires the user to obtain verbal confirmation and an authorization code from the processor. Prompts the user for the account number and amount. If prior authorizations are posted on check, prompts for gift card number, amount (including tips), and an authorization code. If approved, posts a transaction item to the guest check. Prints two redeem authorization vouchers — one for customer, one for merchant. Tender Version 2.1 What’s New NOTE: For Loyalty programs, enable the Print to Interface option for each Print Class in the system. Loyalty Card Processes Function Version 2.1 Description Type Issue Points Adds bonus points to an existing customer account based on eligible purchases (amount or item type). Must be initiated within an open guest check. Prompts the user for an account number. If approved, posts a transaction item with points amount on the guest check. Tender Redeem Points Applies a discount for the stated amount/item to the open check. Subtracts the appropriate number of points from the customer’s account. Must be initiated within an open guest check. Prompts the user to enter the account number and point amounts to be used. If approved, posts transaction item with points amount used. Discount or Tender Points Inquiry Reports the number of points accrued to a guest loyalty account. May be initiated inside or outside a guest check. Prompts the user for the account number and returns the points balance. If approved, prints a separate chit when the transaction is complete. Inquiry Issue Coupon Issues a coupon for discounted menu items or currency amounts that can be applied to future purchases. Must be generated within an open guest check. When pressed, prompts the user for an amount, account number, and coupon code. If approved, prints the coupon code and value on the guest check. Tender MD0007-013 January 19, 2006 Page 9 of 47 What’s New Loyalty Card Processes Function Accept Coupon Description Type Applies a discount based on the coupon value (amount or item) to the open guest check. Must be initiated within an open guest check. Prompts the user for a coupon code and account number to validate the transaction. If approved, posts a transaction item to the guest check. Discount or Tender Configure the SVC Interface A separate interface record must be added for each gift/loyalty card type offered by the user. To configure an interface record: 1. Open the e7 Configurator and select the Interfaces form. 2. Select Add Record to add a new interface. The next available number is automatically assigned, but may be edited by the user. 3. On the SVC Host tab, complete the following fields: MD0007-013 January 19, 2006 Page 10 of 47 Name — Enter a user-friendly name for this interface. Interface Code — Select SVC from the drop-down list. A table listing additional parameters will display. Complete the fields as follows: Host Name — Enter the name of the SVC gift card provider (host). This field is case-sensitive. Host Adapter Address — Enter the IP address of the computer where the host adapter resides (e.g., 123.4.5.1). Host Adapter Port — Enter the number of the IP port where the host adapter is listening (e.g., 23001). Version 2.1 What’s New Backup Interface — Not used. Please leave blank. Node — Select a workstation to host the SVC Server interface. This is the workstation (PC or WS4) that will be responsible for gathering and exporting the SVC requests to the gift card processor. This field is required. Log Transactions — When checked, writes all messages sent and received to a log file. For the SVC interface, messages will be sent to the TIFLog_TIFSVC.txt file in the ..\etc folder. NOTE: Since this file will continue to grow as long as the option is active, it should only be enabled when debugging the interface. 4. Go to the SVC Server tab and complete the following: Version 2.1 Server Address — Enter the IP Address of the node (PC or workstation) that is handling the SVC Server responsibilities (e.g., 122.33.4.5). Server Port — Enter the number of the IP Port where the SVC Server is listening. Connect Timeout — Specify how long (in seconds) the SVC Server should wait to connect to the Host for an SVC transaction before timing out. Ack Timeout — Specify how long (in seconds) that the SVC Server should wait for the e7 POS to acknowledge an SVC transaction before timing out. Enable Auto Reversal —Select True to have the SVC Server automatically reverse any SVC transactions that are not properly recognized by the e7 application. The default setting is False. MD0007-013 January 19, 2006 Page 11 of 47 What’s New 5. Go to the Interface Information tab and complete the following: Site ID — Enter a unique identifer for this e7 Site. This field is required for the Host system to identify SVC accounts and handle customer requests. Base Currency — Enter the ISO code for the base currency for this site. NOTE: The code for US$ is USD. Language 1-4 ISO Codes — Enter the ISO code for each of the four languages used by the system) and defined on the Restaurant | Languages tab). Be sure to enter the base or primary language in the Language 1 field. NOTE: The code for US English is en-US. SVC Chit Printer — Specify where SVC chits should be printed (relative to each e7 node) based on the following values: 0 — None (no chits printed). 1 — The workstation’s guest check printer. 2 — The workstation’s report printer. 3 — The workstation’s local order printer. Item Number for (***) — Enter the object number of the item that will be used for this transaction type. Object numbers should correspond to the transaction item (menu item, service charge, discount, or tender) added above. Post Menu Item for Issue/Activate/Reload — Select one of the following to specify how these gift card transaction items will be posted on the guest check: True — Select this entry if the transaction item was defined as a menu item. False — Select this option of the transaction item was defined as a service charge. MD0007-013 January 19, 2006 Page 12 of 47 Version 2.1 What’s New Post Tender for Accept Coupon/Redeem Points — Select one of the following to determine how a coupon/point redemption will be posted on a guest check: True — Posts the transaction as a tender. False — Posts the transaction as a discount. Print Only One Voucher — Set this option to determine the number of voucher copies that will be printed with a redeem authorization request: True — Prints a single copy. False — Prints two copies, one for the merchant and one for the customer. 6. Save the record. Add Touchscreen Keys To control the sale and/or redemption of gift/loyalty cards, sites may want to create a separate touchscreen for the SVC functions. Once the touchscreen is created, users can limit access to it by linking it to a function key that is only accessible to certain types of employees (e.g., Managers). Follow these steps to configure the touch keys: 1. Open the e7 Configurator and select Touchscreens. 2. Select (or add) an appropriate Touchscreen for the placement of the transaction keys. If this is a new screen, select a Screen template to specify the size and shape of the touchscreen area. 3. Select New Button to add to this screen, and complete the following fields for each SVC function supported: Version 2.1 Function — This option identifies the type of action that will be performed when this key is pressed. For SVC functions, select Inquiry for all but the Cash Out key, which should be set to Tender/Media. MD0007-013 January 19, 2006 Page 13 of 47 What’s New Value — Once the Function is chosen, the system filters this drop-down list to display compatible transaction items. Select the corresponding SVC record for this touch key. For example, assuming that a Cash Out record was added to the Tender/Media form, the following options would be set when configuring the [Cash Out] touch key: Function: Tender/Media Value: Cash Out Legend — Enter a text label for this key. Button Color — Specify the background color of the key. Font Color — Specify the text color of the key. Image — Select an optional image to display on the key. Only those images located in the \cf\micros\e7\images directory will be available for selection. Image Position — Specify how the image should be aligned on the key (i.e., right, left, top, bottom, center). Font Size — Specify the text size of the Legend. Enter a 0 to use the default setting. Font Style — Select a text style (regular, bold, underline, or italic) for the Legend. 4. Save the record. Setting Employee Privileges As with other Interface processes, employees must be privileged to perform inquiry functions through the SVC Interface. This option is assigned by enabling: Can perform inquiry (Jobs | Options) for each applicable job function in the Configurator. MD0007-013 January 19, 2006 Page 14 of 47 Version 2.1 What’s New Enabling iCare SVC Cards The initial release of this feature provides support for iCare SVC cards only. To assist the user, this section describes policies and procedures for obtaining the physical cards, ordering the iCare/iCard service, and configuring the system to handle the SVC processes. Obtaining SVC Cards Sites implementing a gift/loyalty card program are responsible for designing, ordering, and purchasing the cards that will be distributed to the customers. These are obtained through a third-party vendor, not your iCare service provider. Before placing an order, you must contact the mymicros implementation team to create an account and obtain the program and customer account numbers that will be printed or embossed on the cards. For more information on account prerequisites or for help in locating a card vendor, please contact your iCare respresentative. Ordering the iCare Service Implementation of this feature requires the purchase and installation of iCare, an enterprise-wide Customer Relationship Management (CRM) solution, and iCard, its stored value card and loyalty services component. iCare is hosted by MICROS and may be purchased as either an ASP service or as a traditional software license with additional hosting service. Instructions for ordering iCare and iCard can be found in PMA04-788 REV, available from the MICROS website under Member Services (http://www.micros.com/members/sales_and_marketing/pmas) A customer login and password is required. A descriptive document and forms for ordering iCare are also located in the Member Services area (http://www.micros.com/members/operations/ north_american_distribution/iCare/ ). Version 2.1 MD0007-013 January 19, 2006 Page 15 of 47 What’s New Setting the Configurator Options The following table summarizes the selections required to configure an e7 System to handle iCare stored value cards. The options are based on the procedures outlined in the section Enabling the Feature (above). Step Before You Begin Supported/Recommended Decide whether the sale of SVC cards will be posted as menu items or service charges. Decide whether the redemption of SVC cards will be posted as tenders or discounts. Create Transaction Items Create a menu item/service charge/discount/ tender/inquiry record for each of these iCareprocesses: For Gift Cards: Issue Account Activate Account Reload Account Cash Out Balance Inquiry Balance Transfer Redeem Redeem Authorize For Loyalty Cards: Issue Points Points Inquiry Accept Coupon MD0007-013 January 19, 2006 Page 16 of 47 Version 2.1 What’s New Step Create the Interface Supported/Recommended Add an new Interface record for the iCare service. Configure the options as follows: On the SVC Host tab: Name: iCare Interface Code: SVC Host Name: msvc-micros Host Adapter Address: Name of the e7 PC. This can be found by typing “hostname” in a DOS Command window on the e7 PC. Host Adapter Port: 23001 Node: (Must be the PC) SVC Server tab: Server Address: 127.0.0.1 Create Touchscreen Keys Server Port: 2323 Connect Timeout: 30 Ack Timeout: 60 Enable Auto Reversal: True Add or select the touchscreen where the SVC functions keys will reside. Add a touch key for each SVC process to be used (e.g., Issue Account, Cash Out, Redeem Points, etc.). Link to an Inquiry for most functions; to a Tender/Pick-up for the Cash Out function . Version 2.1 MD0007-013 January 19, 2006 Page 17 of 47 What’s New SVC Report Changes For accounting purposes, sales of (or additions to) stored-value cards are recorded in the system as non-revenue transaction items. This means that monies collected from the sale (either as cash or credit) are not included in the balance reports as income. Since a form of payment is accepted at time of purchase, the amount paid is included in the tender totals. However, the sale is not posted to receipts (and is not realized as revenue) until the card is actually redeemed. To account for the differences in report totals, the System, Employee, and Workstation Balance Reports have been modified. The primary change was the addition of a new line item — Non-Revenue Items — to the list of transaction types. Sales generated using the SVC Issue/Activate/Reload functions are recorded here. The following sample report illustrats how the sale of a $20 gift card would be accounted for in the System Balance Report. Since the transaction was paid in cash, the monies are included as part of the line item. Notice, however, that the sale does not add to any of the following totals: Net Sales Gross F and B Receipts (Job Code) Labor % (Order Types) Total Net Sales Note In the sample report, a tracking total is shown for the Issue Card item. This change is not part of the standard report, but must be added by the user. MICROS recommends creating a line item for all SVC transactions to the Default Tracking section of these reports. MD0007-013 January 19, 2006 Page 18 of 47 Version 2.1 What’s New Sample Report with Sale of $20 Gift Card Does not add to Income The increase in Cash is noted, however, and accounted for in the new Non-Revenue Items The sale is also reflected in the Tracking Totals Version 2.1 MD0007-013 January 19, 2006 Page 19 of 47 What’s New Reports Employee Job Code Labor Report A new Employee Job Code Labor Report was added to the list of standard reports available from the POS workstation. The report summarizes labor information for each employee and includes the job code, regular and overtime hours worked, and the pay information for each. At run time, users can limit results by selecting the applicable employee(s) and date range. A sample report is shown below. MD0007-013 January 19, 2006 Page 20 of 47 Version 2.1 What’s Enhancements What’s Enhancements An enhancement is defined as a change made to improve or extend the functionality of the current MICROS e7 software. To qualify as an enhancement, the change must satisfy the following criteria: The basic feature or functionality already exists in the previous release of the software. The change adds to or extends the current process. This differs from a revision (i.e., a bug fix) which corrects a problem not caught in the previous release of the software. Enhancements Summarized The table below summarizes the enhancements included in this version. Module Feature Page Hide Menu Item Category Keys from SLU 22 Hide Transaction Item Touch Keys from SLU 23 Credit Cards Enhanced Credit Card Data Security for CISP/PCI Compliance 24 Database Posting to mymicros.net Without a PC 27 Printing Print Check Totals in Alternate Currency 32 Setup Support for Sentinal License Key 33 Configurator Version 2.1 MD0007-013 January 19, 2006 Page 21 of 47 What’s Enhancements Enhancements Detailed Configurator Hide Menu Item Category Keys From SLU When adding menu items to the database, entries can be grouped under a user-defined header, referred to as a menu item Category. For example, the Spaghetti, Ravioli, and Lasagna menu items could be listed in the Pasta Category, while Tiramisu, Cheesecake, and Hot Fudge Sundae could be included in the Desserts listing. During operations, Category keys simplify the order process by limiting the number of system-generated menu item SLU keys displayed on the touchscreen. That is, when the [Dessert] button is pressed, the system only displays touch keys for members of that Category (e.g., [Tiramisu], [Cheesecake], and [Hot Fudge Sundae]). In the past, users could decide whether to show a Category by enabling the Configurator option Display in Navigation Area (Menu | Menu Item Category | Appearance). If checked, the Category button would be added to every touchscreen that had a Category/SLU component. With this release, an option was added to limit Category keys to specified Menus — in other words, to suppress menu items that are not appropriate for a particular dining menu. For example, the [Beer] and [Wine] categories may be relevant selections at Lunch and Dinner, but do not need to be included as part of the Breakfast menu. To support this change, the Hide Category On option was added to the Appearances tab. The option consists of a list of check boxes, one for each of the entries added on the Restaurant | Menus form. Check the appropriate box(es) to prevent the Category from displaying when that Menu is in use. NOTE: This option is only valid if the Display in Navigation Area option is also enabled. MD0007-013 January 19, 2006 Page 22 of 47 Version 2.1 What’s Enhancements Hide Transaction Item Touch Keys From SLU During operations, not all employees need to have access to every transaction item in the system. For example, sites may want to control the sale of certain menu items (e.g., liquor, cigarettes), the application of discounts and service charges, or the handling of gift/loyalty cards. In the past, once an item was defined, there was no way to exclude it from displaying on a system-generated SLU screen. All items belonging to a particular Category were automatically included when the Category button was pressed and the touchscreen was invoked. To correct this problem, an option to Hide on display was added to the following forms in the Configurator: Menu | Main (Options) Tender | Tender (General Options) Discounts | Settings (Options) Service Charges | Settings (Options) This option only controls availability from the SLU screens. Users can still provide access to the item by adding a fixed key to a touchscreen. Similarly, it has no affect on the touchscreen designer. Version 2.1 MD0007-013 January 19, 2006 Page 23 of 47 What’s Enhancements Credit Cards Enhanced Credit Card Security for CISP/PCI Compliance To comply with requirements established by the Cardholder Information Security Program (CISP) / Payment Card Industry (PCI) Data Security Standard, the following modifications were made with regard to the handling, securing, and storing of credit card account information. Masking Credit Card Numbers During operations, the only time the full credit card account number will be available to the site is when the card is first tendered. Once a credit card number has been entered, the e7 System will mask (i.e., replace with asterisks or x’s) the expiration date and all but the last four digits of the account number, whenever and wherever a reference to the card numbers occurs. This includes: In the check detail of the display screen... ... as the credit card is first posted to a open check. ... when a guest check is picked-up or reopened. ... when moving details from one check to another on a split screen. In the account number selection window... ... when more than one card is authorized on a guest check. ... when more than one card is tendered on a guest check. On a printed (or reprinted)... ... credit card voucher. ... guest check. MD0007-013 January 19, 2006 Page 24 of 47 In Reports Plus. Version 2.1 What’s Enhancements In the journal file for the credit card voucher, credit card authorization, or payment. On the Credit Card Batch Utility screen. In the printed Credit Card Report. In the printed Credit Card Batch Transfer Report for omitted records. In mymicros data file exports. In debug logs for... ... any credit card driver. ... the e7 application. Securing Track Data The option to Store Track Data in the database (e7 Configurator | Restaurant | Credit Cards) has been removed from the system. Now, when a credit authorization is saved, all data after the expiration date will be removed before the data is encrypted. In the event that database security is compromised, this will prevent hackers from obtaining sensitive information by re-creating the original track data. Encrypting Account Information To secure retained credit card data, all account information is now stored in the database as encrypted files. The change affects customer names, account numbers, and/or expiration dates stored in the database. Logging Sign-In Attempts To secure the log-in process, the system will now write a warning message to the e7 log file whenever a user fails to provide a correct password when signing-in on a workstation. This will allow sites to monitor security at the workstation and determine if someone is trying to discover a sign-in code through random entries. Version 2.1 MD0007-013 January 19, 2006 Page 25 of 47 What’s Enhancements Using Remote File Utilities As a security precaution, use of the Remote File Utilies module has been changed to a privileged operation. This module is a powerful tool, providing remote access to all of the e7 workstations on the network. Through its interface, users can manage (i.e., copy, move, delete) workstation files and directories and can remotely execute applications on any of them. During operations, the module is started by pressing a preconfigured touch key (Touchscreens | Function: Non-Sales \ Remote File Utilities). Starting with this release, the touch key will not launch the module unless: 1. the user is signed in on the e7 workstation, and 2. the user’s job configuration includes the option to Use database tools and exit e7 (Jobs | Privileges). As a final check of the system, an entry will be posted to the e7 log file after every attempt to start the remote file utilities. MD0007-013 January 19, 2006 Page 26 of 47 If the attempt is successful (i.e., the user is privileged), the entry will note that the module was used and include the last name of the employee who did so. If the attempt fails (i.e., the user is not privileged), an error message will be posted. Version 2.1 What’s Enhancements Database Posting to mymicros.net Without a PC In the Version 1.5 release, e7 introduced functionality that allowed sites to gather and post data to the mymicros.net Enterprise Information Portal (EIP). The portal provides secure access to a suite of centrally located Internet-based applications and services. These applications allow portal subscribers to monitor store activity via a web browser from any Internetaccessible location. Access to the data is restricted to members only and a password is required. Originally, sites that wanted to use EIP functionality were required to have a PC. This was needed to run the eBusiness software — provided by mymicros.net and installed separately — that managed the data collection processes. At 15-minute intervals and at the end of the day, it was the PC’s responsibility to collect and organize the data from each of the workstations and then send it to the mymicros.net website. The mechanism for posting this data is referred to as the remote transfer agent (RTA). With this release, e7 has extended these data posting capabilities to sites without a PC. To do this, an internal e7 transfer agent (ETA) was developed and included in the e7 application. Unlike the eBusiness solution, the integrated ETA is automatically loaded during installation of the e7 software. Since the software can run on both the Win32 and WinCE operating system, this enhancement allows sites to assign any of their workstations (whether PC or WS4) the responsibility for collecting data from the rest of the units and then posting the results to the mymicros website. Limitations Although the e7 solution offers a simple alternative for posting data to mymicros.net, it does not offer all the functionality available with a PC. At this time, a PC is still required for sites that accept the iCare gift cards. The e7 ETA node does not support a dial-up connection, but requires a persistant high-speed internet connection. Version 2.1 MD0007-013 January 19, 2006 Page 27 of 47 What’s Enhancements Prerequisites Implementation of this feature requires the purchase and installation of mymicros.net and -- depending on the selected data transfer solution — may include other software requirements. A discussion of these prerequisties is provided below. Ordering mymicros.net Instructions for ordering mymicros.net for an e7 site can be found in PMA02-702 REV, available from the MICROS website under Member Services (http://www.micros.com/members/sales_and_marketing/pmas) A customer login and password is required. Pricing for this service is based on mymicros.net foundation levels, which are determined by the number of e7 POS terminals installed per location. Foundation Level e7 Terminals 1 1-4 2 5-6 The forms for ordering mymicros.net are also located in the Member Services area (http://www.micros.com/members/operations/ north_american_distribution/mymicros/ ). These include: Filename Order Forms Customer Agreements File Type Description mymicros.net online order form .xls Fill out this two-page spreadsheet online and then print. Includes macros and other tools to assist in selecting part numbers. Manual order form .pdf An alternative to the online form. Print this twopage file and complete by hand. mymicros.net Questionnaire .xls Required after order. Complete with customer and email to [email protected] Service Agreement .pdf Print and complete by hand. Must be signed by customer. This form includes Customer Agreement with Terms and Conditions. MD0007-013 January 19, 2006 Page 28 of 47 Version 2.1 What’s Enhancements System Requirements To access the mymicros.net EIP, the PC or WS4 responsible for data collection and transfer operations must have the following applications installed. For comparison, the table includes requirements for both the e7 and eBusiness solutions: e7 eBusiness PC WS4 Windows 2000 sp4 e7 POS Software or Windows XP Pro sp1 Internet Explorer 5.5 sp2 or Internet Explorer 6.0 or higher e7 POS Software Version 2.1 Version 2.1 PC Only Windows 2000 sp4 or Windows XP Pro sp1 Internet Explorer 5.5 sp2 or Internet Explorer 6.0 or higher Microsoft Virtual Machine (MVM) Sun Java Virtual Machine (JVM) e7 POS Software Version 1.5 or higher Configuring the System After installation of the requisite software, follow these steps to create an interface between the e7 site and mymicros.net: Important! If the site is already configured for mymicros (from a previous version), these steps are not required. Only one mymicros.net interface should be installed per location. Responsibility for this rests with the site, as the e7 Configurator has no way to prevent conflicting records from being added to the system. 1. Open the e7 Configurator and select the Interfaces form. Version 2.1 MD0007-013 January 19, 2006 Page 29 of 47 What’s Enhancements 2. Select Add Record to add a new interface. The next available number is automatically assigned, but may be edited by the user. 3. On the Interface Information tab, complete the following fields: Name — Enter a name for this interface. Interface Code — Select MyMicros from the drop-down list. A table listing additional parameters will display. Complete the fields as follows: Data Export Mode — Specifies the transfer method to be used when exporting data to mymicros.net. The options are: 0 — Idle Mode. This is the default setting. The interface is waiting to be enabled for either the eBusiness or e7 Mode. 1 — eBusiness Mode. Establishes eBusiness’ RTA as the data transfer mechanism. Requires a PC and software provided by the eBusiness team. In this mode, transaction data is exported from the e7 POS every 15 minutes. Daily totals and definitions are exported when the Update Business Date Autosequence Step is executed. This mode should be used when running the .Connect Agent software is a requirement (i.e., if the site is using iCare stored value cards or has a dial-up internet service provider (ISP)). 2 — e7 Mode. Uses the integrated e7 Transfer Agent (ETA) as the data transfer mechanism between the site and the hosting center. May be run on a PC or WS4. In this mode, transaction data is exported from the e7 POS every 15 minutes. Daily totals and definitions are exported when the Update Business Date Autosequence Step is executed. If this mode is selected, the Message Server Configuration and Archive Configuration tabs will be displayed and must be completed. (See Steps 4-6, below). MD0007-013 January 19, 2006 Page 30 of 47 Version 2.1 What’s Enhancements NOTE: Switching the mode from 0 to 1 or 2 will instantly activate the interface. Do this only after the configuration and software installation is complete. If hosting on a WS4, the system may be busy for several minutes once the mode is changed from the default setting of 0. Backup Interface — Not used. Please leave blank. Node — Select a workstation to host the mymicros.net interface. This is the workstation (PC or WS4) that will be responsible for gathering and exporting the data. This field is required. NOTE: This must be the PC for data export node 1 (eBusiness node). Log Transactions — When checked, writes all messages sent and received to a log file. For the mymicros.net interface, messages will be sent to the TIFLog_TIFMYMICROS.txt file in the ..\etc folder. NOTE: Since this file will continue to grow as long as the option is active, it should only be enabled when debugging the interface. 4. If using eBusiness mode, skip to Step 6. Otherwise, go to the Messaging Server Configuration tab and complete the form using the values provided by the mymicros.net service. All fields are required. NOTE: This information should be sent after sign-up. If lost or missing, sites can obtain assistance by calling the support line at 1800-937-2211. Version 2.1 Server Name — Enter the name of the mymicros server where the ETA will be sending data and checking for messages. Send To — Specify the mymicros data center mail account where the e7 site’s messages will be sent. Errors To — Specify the email account where critical error message should be sent. The mymicros data center will configure its mailserver to route these messages to the appropriate person in the e7 site’s organization. MD0007-013 January 19, 2006 Page 31 of 47 What’s Enhancements Site Name — Enter the e7 location name that will be used by the mymicros data center message server to identify the site. Site Password — Enter the encoded password assigned to this location. This password is necessary for the ETA to send/retrieve messages on behalf of the site. 5. Go to the Archive Configuration tab. In the Days to Keep field, specify how long data should be stored for recovery purposes. The options are 1 to 7 days. The default value is 7. 6. Save the record. Printing Print Check Totals in Alternate Currency To improve useability, print functionality was modified to support printing check totals in an alternate currency. In the past, the system would always print the total in the base currency. Description Currency conversion allows users to accept foreign currencies in payment for a transaction. To do this, a separate touch key is created and programmed with the alternate currency exchange rate. In addition, the tender keys are programmed to work in conversion mode by enabling the option Use with currency conversion (Configurator | Tender | Tender). Originally, when tendering a check in an alternate currency, the system would convert the amount due and display the results on the workstation screen or pole display. When the guest check was printed, however, the totals were always in the base currency. This has been modified. MD0007-013 January 19, 2006 Page 32 of 47 Version 2.1 What’s Enhancements Now, when the user selects a currency conversion key, then prints the check, a line item is added below the Total Due indicating the same amount in the alternate currency (Figure 1). When a payment is tendered, the amount paid will be shown in both the base and alternate currency (Figure 2), and the Change Due (if any) will be listed for each (Figure 3). *Alternate currency shown here in blue. Setup Support for Sentinel License Key Beginning with the version 2.0 patch 2 release, MICROS will support the Sentinel-brand of license keys for the e7 System. The new keys are similar in appearance, provide the same functionality, and are compatible with existing license keys. The two types of keys can be mixed in a single install without affecting the overall operation of the POS system. Version 2.1 MD0007-013 January 19, 2006 Page 33 of 47 What’s Revised What’s Revised A revision is defined as a correction made to any existing form, feature, or function currently resident in the MICROS e7 product. To qualify as a revision, the change must satisfy the following criteria: The basic form, feature, or functionality must be part of the previous version of the software. The change must replace the current item or remove it from the application. Revisions Summarized The table below summarizes the revisions included in this version. Module January 19, 2006 Page 34 of 47 CR ID Page Autoseq Employee Tip Report Does Not Prompt for Range When Run as Autosequence 3622081 35 Manager Procedures Changing Employee Job Does Not Adjust Pay Rate 36277488 35 Portal Interface Masked Credit Card Number Incorrectly Hides All Digits N/A 36 Table Turn Time Data Exported in Wrong Format N/A 36 Option ‘Tender over change due limit’ Not Accessible in Record View 3633185 36 POS Configurator MD0007-013 Feature Version 2.1 What’s Revised Module POS Operations Reports Revisions Detailed Feature CR ID Page Percent Discount Not Applied Properly to Menu Item With Priced Condiments 3680805 37 Returning Item With Limited Availability Incorrectly Adds to Menu Item Count 3766627 37 Enabling Option ‘Post % to Tips Paid’ Results in Incorrect Employee Tip Report Totals N/A 37 Autosequences Employee Tip Report Does Not Prompt for Range When Run as Autosequence CR ID #: 3622081 When running the Employee Shift Report as part of an autosequence, the system failed to prompt for an employee range even though the procedure was configured to do so. This has been corrected. Manager Procedures Changing Employee Job Does Not Adjust Pay Rate CR ID #: 36277488 When changing an employee’s job through manager procedures, the correct job title and pay rate was not applied to the time clock record. This problem has been corrected. Now, the appropriate adjustments are reflected in the time clock detail, system balance labor section and job code totals whether or not the employee is clocked in or out, or is or is not earning overtime. The Labor Availability report has also been updated. Version 2.1 MD0007-013 January 19, 2006 Page 35 of 47 What’s Revised Portal Interface Masked Credit Card Number Incorrectly Hides All Digits CR ID #: N/A When exporting files to the web portal, the system would incorrectly mask out the entire credit card number from transaction data rather than masking all but the last four digits. This problem has been corrected. Table Turn Time Data Exported in Wrong Format CR ID #: N/A When exporting files to the web portal, data collected on table turn times was not being converted to an acceptable numeric format (i.e., from floating decimal point to integer). This affected results posted in the Daily Order Type Totals. It has been corrected. POS Configurator Option ‘Tender over change due limit’ Not Accessible in Record View CR ID #: 3633185 During operations, employees must be authorizied to enter a tender amount that results in change greater than the tender’s assigned limit. In the past, this was done by setting the ChangeDueOverLimit option (Configurator | Jobs | Options) which was only available in the Table View of the form. To improve useability, a corresponding option Tender over change due limit was added to the Record View. MD0007-013 January 19, 2006 Page 36 of 47 Version 2.1 What’s Revised POS Operations Percent Discount Not Applied Properly to Menu Item With Priced Condiments CR ID #: 3680805 When applying a percent (touch) discount to a menu item with priced condiments, the system failed to include the condiment prices in the discount calculation. This has been corrected. Returning Item With Limited Availability Incorrectly Adds to Menu Item Count CR ID #: 3766627 Previously, limited availability menu items that were returned to the kitchen were incorrectly added back to the menu item count. This problem has been corrected. Reports Enabling Option ‘Post a percentage to tips paid’ Results in Incorrect Employee Tip Report Totals CR ID #: N/A In a cashier environment, if the option Post a percentage to tips paid (e7 Configurator | Service Charges | Settings) was enabled for the charge tip service charge, the system would post incorrect values in the Tips Paid and Tips Due columns of the Employee Tip Report. This has been corrected. Version 2.1 MD0007-013 January 19, 2006 Page 37 of 47 MICROS e7 Installation Introduction MICROS e7 Installation Introduction MICROS e7 is a robust point-of-sale solution, with the high quality, reliable and extensive features that the marketplace has grown to expect from MICROS. All of this has been packaged specifically for the independent restaurateur. MICROS e7 is a complete solution that utilizes the revolutionary MICROS Workstation 4 (WS4) POS terminal platform and MICROS' 25 plus years of industry leading software solutions. The MICROS e7 user interface offers an intuitive, user-friendly touchscreen design that takes advantage of color, font, and an efficient screen layout to guide servers through the order entry process. The simplicity of the design reduces training time, improves speed of service to the customer, and lowers error rates for daily operations. For more information about the MICROS e7 product, refer to the following resources: Marketing Overview - This manual provides information regarding MICROS, the hospitality industry, features and benefits, sample reports, and a proposed return on investment for MICROS e7. Getting Started - This manual provides site survey, installation, and configuration information to help you get your MICROS e7 site up and running. MD0007-013 January 19, 2006 Page 38 of 47 Version 2.1 MICROS e7 Installation Introduction User’s - This manual provides information on how to use the MICROS e7 System, including POS Operations, Manager Procedures, Credit Card Batch, and Reporting. Note Version 2.1 This MICROS e7 Documentation can be downloaded from Member Services on the MICROS Web Site using the following links: • e7 | Documentation | e7 Marketing Overview downloads the e7MarketingOverview.pdf file. • e7 | e7 [Release Version] | Documentation | e7 ReadMe First downloads the e7_rmf.pdf file. • e7 | e7 [Release Version] | Documentation | e7 Getting Started downloads the e7GettingStarted.pdf file. • e7 | e7 [Release Version] | Documentation | e7 User’s Manual downloads the e7_UsersManual.pdf file. MD0007-013 January 19, 2006 Page 39 of 47 MICROS e7 Installation Downloading the MICROS e7 Product Downloading the MICROS e7 Product The MICROS e7 product is available for download from the MICROS Web Site. There are several download choices that can be made from Member Services | Product Support | MICROS Products: • MICROS e7 Workstation Installation - download this file if you are installing only to a workstation. Use the e7 | e7 [Release Version] | e7 Workstation Software link to download the e7_ws_build_[Version].exe file. • MICROS e7 PC Prerequisites Installation - download this file if you are installing to a PC for the first time. This file contains any prerequisites necessary to run MICROS e7 on a PC, including the .NET framework. The extracted files can be used to burn a CD or to run the MICROS e7 PC Prerequisites program. Use the e7 | e7 [Release Version] | e7 PC Pre-requisite Software link to download the e7_pc_prereq_2_0_.exe file. • MICROS e7 PC Installation - download this file if you are installing to a PC. The extracted files can be used to burn a CD or to run the MICROS e7 PC Setup program. Use the e7 | e7 [Release Version] | e7 PC Software link to download the e7_pc_build_[Version].exe file. • Workstation 4 Platform Image - download this file to extract the platform image for a workstation. Use the e7 | e7 [Release Version] | WS4 Platform Software link to download the ws4_platform_[Release Version].exe file. MD0007-013 January 19, 2006 Page 40 of 47 Version 2.1 MICROS e7 Installation Downloading the MICROS e7 Product Workstation 4 Platform Image Notes The platform image must be installed prior to installing the MICROS e7 software on a Workstation 4. If your system is currently at CAL 32 and CE Image 14.4, the correct versions are already installed. This has not changed from e7 Version 2.0. Use these instructions to install the Platform Image on a Workstation 4. These steps may also be used to install another CE language platform, such as Chinese, Japanese, or Korean. The MICROS e7 software will not be installed as part of these instructions. A PC or laptop is required to extract the zip (.exe) file and copy the extracted files to the appropriate transfer media, such as a USB thumb drive. 1. Copy the ws4_platform_[Release Version].exe file from the MICROS Web Site to a temporary directory on the PC. 2. Double-click on ws4_platform_[Release Version].exe to extract the MICROS e7 files. 3. Enter a directory location where the MICROS e7 files will be extracted (i.e. c:\wsImage). 4. Click on Unzip. 5. Click on Close. 6. Copy the directory from Step 3 (i.e. c:\wsImage) to a USB thumb drive. 7. Attach the USB thumb drive to the USB slot on the back of the workstation 4. 8. Open Windows Explorer on the workstation 4. Version 2.1 MD0007-013 January 19, 2006 Page 41 of 47 MICROS e7 Installation Downloading the MICROS e7 Product 9. Locate the MICROS e7 software directory (i.e. c:\wsImage) on the USB thumb drive. The USB thumb drive should appear in Explorer as \Hard Disk. The following two sub-directories should be available: ..\Standalone CAL Upgrade to 32 ..\Standalone Eng Platform 14.4 10. From the ..\Standalone CAL Upgrade to 32 directory, run Setup.exe to upgrade the CAL client software on the workstation. Notes This step must be completed prior to installing the 14.4 platform. Make sure that each workstation has at least 22 MB of free compact flash space before installing the software on the PC. 11. From the ..\Standalone Eng Platform 14.4 directory, run Setup.exe to install the 14.4 platform. CAL installs the Windows CE image and reboots the workstation. Notes MD0007-013 January 19, 2006 Page 42 of 47 If MICROS e7 Version 1.5 is currently installed, then the 14.4 platform has already been installed and this step is not necessary. Version 2.1 MICROS e7 Installation Downloading the MICROS e7 Product MICROS e7 Workstation Installation Use these instructions to install the MICROS e7 software on a Workstation 4 (WS4) that has the appropriate Windows CE operating system image already installed. A PC or laptop is required to extract the zip file and copy the extracted files to the appropriate transfer media, such as a USB thumb drive. 1. Copy the e7_ws_build_[Version].exe file from the MICROS Web Site to a temporary directory on the PC. 2. Double-click on e7_ws_build_[Version].exe to extract the MICROS e7 files. 3. Enter a directory location where the MICROS e7 files will be extracted. (i.e. c:\e7Software) 4. Click on Unzip. 5. Click on Close. 6. Copy the directory from Step 3 (i.e. c:\e7Software) to a USB thumb drive. 7. Attach the USB thumb drive to the USB slot on the back of the WS4. 8. Open Windows Explorer on the WS4. 9. Locate the MICROS e7 software directory (i.e. c:\e7Software) on the USB thumb drive. The USB thumb drive should appear in Explorer as \Hard Disk. 10. Run Setup.exe. CAL installs the MICROS e7 software and reboots the workstation. Version 2.1 MD0007-013 January 19, 2006 Page 43 of 47 MICROS e7 Installation Downloading the MICROS e7 Product MICROS e7 PC Installation With MICROS e7, a PC can be setup to run the MICROS e7 ReportsPlus, Configurator, and Credit Cards modules. To use these applications on a PC, the .NET framework (Version 1.1) must be installed using the e7 PC Prerequisites installation and MICROS e7 software must be installed using the e7 PC Setup installation. Optionally, the PC may be configured to be a CAL server for the MICROS e7 site, so that it can be used to update the workstations with the MICROS e7 workstation software. Note The .NET framework (Version 1.1) must be installed on the PC prior to running the e7 PC setup program. Use the e7_pc_prereq_2_0_.exe file that can be downloaded from the MICROS Web Site to install the .NET framework. Use these instructions to extract the PC Prerequisites zip (.exe) file and install the extracted files to a PC. Extracting the MICROS e7 PC Prerequisite Files 1. Copy the e7_pc_prereq_[Version].exe file from the MICROS Web Site to a temporary directory on the PC. 2. Double-click on e7_pc_prereq_[Version].exe to extract the files. 3. Enter a directory location where the MICROS e7 files will be extracted. (i.e. c:\e7Prereq) 4. Click on Unzip. 5. Click on Close. Installing the MICROS e7 Prerequisite Files to a PC 1. Open Windows Explorer on the PC. 2. Locate the MICROS e7 prerequisites directory (i.e. c:\e7Prereq) that you extracted in the previous steps. 3. Run e7PreReqs.exe. 4. The necessary files are installed. This may take a few minutes. MD0007-013 January 19, 2006 Page 44 of 47 Version 2.1 MICROS e7 Installation Downloading the MICROS e7 Product Use these instructions to extract the PC Setup zip (.exe) file and install the extracted files to a PC. Extracting the MICROS e7 PC Setup Files 1. Copy the e7_pc_build_[Version].exe file from the MICROS Web Site to a temporary directory on the PC. 2. Double-click on e7_pc_build_[Version].exe to extract the MICROS e7 files. 3. Enter a directory location where the MICROS e7 files will be extracted. (i.e. c:\e7CD) 4. Click on Unzip. 5. Click on Close. Note The MICROS e7 installation can be started from the directory where you extracted files in these previous steps (i.e. c:\e7CD) using the instructions below. or These extracted MICROS e7 files can be burned onto a CD. Then, e7PcSetup.exe can be executed to start the product installation. Version 2.1 MD0007-013 January 19, 2006 Page 45 of 47 MICROS e7 Installation Downloading the MICROS e7 Product Installing the MICROS e7 PC Setup Files to a PC Note Once the CAL software is installed on the PC, the system will automatically upgrade each workstation. Make sure that each workstation has at least 22 MB of free compact flash space before installing the software on the PC. 1. Open Windows Explorer on the PC. 2. Locate the MICROS e7 software directory (i.e. c:\e7CD) that you extracted in the previous steps. 3. Run e7PCSetup.exe. 4. Click Next from the e7 Setup Welcome screen. 5. Review the End User License Agreement, click I Accept the Agreement, and click Next. 6. Enter the location where MICROS e7 will be installed. The default destination location is the same as the previously installed version of MICROS e7 or c:\Program Files\MICROS\e7 for a new installation. Use the Browse button to select a different destination location. 7. Select the additional tasks to be performed by the MICROS e7 installation and click Next. MD0007-013 January 19, 2006 Page 46 of 47 Create shortcut on the desktop—Creates a desktop shortcut for the e7.exe file in the \bin folder. The name of the desktop shortcut is MICROS e7 and the default folder is the \bin folder. Create shortcut in the Start Menu—Creates a selection for MICROS e7 in Start Menu | Programs on the PC. Create shortcut in the Startup folder—Creates a shortcut in the PC’s startup folder for the e7.exe program. Install MICROS CAL Service—Installs the MICROS CAL Service on the PC. If the CAL server is already installed, this choice is greyed out. Version 2.1 MICROS e7 Installation Downloading the MICROS e7 Product 8. Click Finish to begin installing MICROS e7. Version 2.1 Warning After the CAL server install, the workstation operating system images are automatically updated, if necessary. In MICROS e7 Version 1.0, the package had to be selected from each workstation to update the clients. This is no longer necessary with MICROS e7 Version 1.5 or later. Note If told to reboot the PC, please wait until all workstations have finished their CAL upgrade to e7 2.1. MD0007-013 January 19, 2006 Page 47 of 47