1
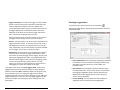
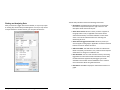
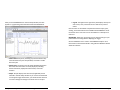
Contents
Contents........................................................................................................1
Introduction ..................................................................................................4
An Overview of HOBOware .............................................................. 4
Installing HOBOware .....................................................................................6
Installing HOBOware or HOBOware Pro from the Onset Website ... 6
Installing HOBOware Pro from the Installation CD ........................... 6
Activating HOBOware Pro ................................................................ 7
Running the Setup Assistant ............................................................ 7
Connecting Devices .......................................................................................9
Connecting a USB Device ................................................................ 9
Connecting a Base Station/Coupler ............................................... 10
Connecting a Device Using a Serial Cable ..................................... 11
Working with Devices.................................................................................. 12
Launching the Logger ..................................................................... 12
Checking Logger Status ................................................................. 14
Reading Out the Logger ................................................................. 16
Plotting and Analyzing Data ........................................................... 17
2
Getting Started: Using HOBOware with HOBO Data Loggers
Introduction
This software is furnished in accordance with a separate license agreement included
with the software, and subject to any restrictions set forth therein. For more
information about Onset's licensing terms and policies, contact Onset Customer Service
at 1-800-LOGGERS, or visit http://www.onsetcomp.com/legal.
This guide is intended to help you become familiar with the basic
functionality of using HOBOware® with HOBO® data loggers,
including:
• Installing HOBOware on Windows® and Macintosh®;
• Connecting devices; and
Contact Information
For support, please contact the company that you bought the products from: Onset
Computer Corporation or an Onset Authorized Dealer.
• Working with devices, including launching, reading out, and
analyzing data.
Onset Computer Corporation
470 MacArthur Blvd.
Bourne, MA 02532
This guide is for both HOBOware and HOBOware Pro and for Windows
and Macintosh. Any differences in functionality are noted.
Mailing Address:
P.O. Box 3450
Pocasset, MA 02559-3450
For detailed information on all HOBOware features, use the online
help or refer to the HOBOware User’s Guide at
http://www.onsetcomp.com/support/manuals/bhw-pro-cd_12730.
Phone: 1-800-LOGGERS (1-800-564-4377) or 508-759-9500
Fax: 508-759-9100
Technical support hours: 8 AM to 8 PM ET, Monday through Friday
Customer support hours: 8 AM to 5 PM ET, Monday through Friday
Email: [email protected]
Main Onset Web site: http://www.onsetcomp.com
This guide covers HOBO data loggers. See www.onsetcomp.com for
details on setting up a HOBO ZW Series Wireless System.
An Overview of HOBOware
© 2009–2014 Onset Computer Corporation. All rights reserved.
Onset, HOBO, and HOBOware are trademarks or registered trademarks of Onset
Computer Corporation for its data logger products and configuration/interface software.
Microsoft, Windows, and Excel are registered trademarks of Microsoft Corporation.
Macintosh is a registered trademark of Apple Inc. Java is a registered trademark of
Oracle and/or its affiliates. Keyspan is a registered trademark of InnoSys Inc. All other
trademarks are the property of their respective companies.
HOBOware software is used for launching, reading out, and plotting
data from HOBO® data loggers. With HOBOware, you can also check
logger status, filter and export data, save changes to graphs in project
files, and scale data with the Linear Scaling and Pulse Scaling data
assistants. There are two versions of HOBOware: HOBOware and
HOBOware Pro. HOBOware Pro offers the following additional
features:
• Support for Conductivity, Dissolved Oxygen, and Water Level
loggers, which use HOBOware Pro Data Assistants
Part #: MAN-BHW-GS
Doc #: 12284-J
• Support for HOBO U-Shuttle and Waterproof Shuttle
Getting Started: Using HOBOware with HOBO Data Loggers
3
4
Getting Started: Using HOBOware with HOBO Data Loggers
• HOBOnode Manager and support for wireless HOBO data
nodes
Installing HOBOware
• Launch and readout time-saving options
You can download and install HOBOware from the Onset website.
HOBOware Pro is available from the Onset website or a software CD
and requires a license key, which is located in the email confirmation
or online receipt you received when purchasing the software or on the
back of the CD case.
• Additional data assistants (Barometric Compensation,
Conductivity, Dissolved Oxygen, Grains Per Pound, Growing
Degree Days, and kWh)
• Importing of text data
To upgrade from HOBOware to HOBOware Pro, call 1-800-564-4377
and ask for Onset Customer Service.
• Bulk Export Tool
• Pie charts for UX90 series loggers
Installing HOBOware or HOBOware Pro from the Onset
Website
• Additional plot preferences (font type, style, and color, and
series and value axis rules)
To download HOBOware from the Onset website, go to the following
URL and follow the instructions for downloading and installing
HOBOware:
• Subset statistics tool for graphing a subset of data
• Series cropping on plots
http://www.onsetcomp.com/products/software
• 21 CFR Part 11 Compliance
To upgrade from HOBOware to HOBOware Pro, call 1-800-564-4377
and ask for Onset Customer Service.
Installing HOBOware Pro from the Installation CD
Windows
Note: HOBOware supports the following five languages: English,
French, German, Spanish, and Portuguese. The HOBOware user
interface can display all of these languages as configured by your
computer (see the HOBOware Help for details). HOBOware
documentation is available in English only.
You must be an administrator to install HOBOware (you do not need
to be an administrator to run HOBOware once it is installed).
1.
Insert the CD into the appropriate drive. The installation program
should start automatically. If it does not, navigate to the CD drive
in My Computer or Windows Explorer and double-click
HOBOware_Setup.exe to launch the HOBOware installer.
Note: HOBOware for Windows requires the Java™ Runtime
Environment. If the correct Java Runtime Environment version is
not already installed on your computer, the HOBOware Setup
program will ask if you want to install it now. Click Yes and follow
Getting Started: Using HOBOware with HOBO Data Loggers
5
6
Getting Started: Using HOBOware with HOBO Data Loggers
the prompts. After the Java Runtime Environment is installed, the
HOBOware installation will continue.
serial ports, units of measurement, and data assistants. To run the
Setup Assistant, click Start and follow the prompts.
2.
Follow the prompts to install HOBOware.
3.
To start HOBOware, double-click the HOBOware icon on your
desktop or select Programs > Onset Applications > HOBOware
from the Start menu.
Note: The Setup Assistant is optional. If you click Cancel, you will be
able to use HOBOware with its default settings listed below.
• Device Types: Default is USB. If you enable serial devices, you
can select the port to use.
Macintosh
• Unit System: Default is US units.
1.
Insert the CD into the appropriate drive.
• Data Assistants: Default is to enable all installed data assistants.
2.
Double-click the CD icon in Finder and then double-click the
HOBOware.pkg to launch the HOBOware installer.
3.
Follow the instructions on the screen.
4.
Click Restart in the last screen so that the operating system is
prepared to work with Onset devices. HOBOware will not
recognize your loggers until you have restarted.
5.
Other Preferences
To see all the preferences you can configure in HOBOware, including
those configured with the Setup Assistant, go to:
Windows: File > Preferences
Macintosh: HOBOware > Preferences
After restarting, open HOBOware by double-clicking the
HOBOware icon in your computer’s Applications folder.
Activating HOBOware Pro
The first time you open HOBOware Pro, you will be prompted to enter
your license key from the email confirmation, online receipt, or the
CD case. Type the license key in the License Key Manager and click OK.
You will need to reopen HOBOware after entering the license key.
Note that you will not be required to enter the license key when
upgrading to subsequent versions of HOBOware.
Running the Setup Assistant
The HOBOware Setup Assistant appears the first time you open
HOBOware to help you quickly select key settings for device types and
Getting Started: Using HOBOware with HOBO Data Loggers
7
8
Getting Started: Using HOBOware with HOBO Data Loggers
Connecting a Base Station/Coupler
Connecting Devices
Connecting a USB Device
Some loggers require an optic USB base station/coupler to connect to
the computer. Consult the manual that came with the device for
specific information about required base stations/couplers.
You can connect most devices to the USB port by using an Onsetsupplied USB interface cable.
Steps
1. Open HOBOware.
HOBOware Pro: For instructions on connecting HOBO shuttles or using
the HOBO Waterproof Shuttle as a base station, refer to the shuttle’s
user guide.
2.
Important: Make sure the base station/coupler is the correct
model for the logger you want to use. Consult the logger/device
user manual if you are unsure.
Steps
1. Open HOBOware.
2.
Plug the large end of the USB interface cable into a USB port on
the computer.
3.
Plug the small end of the USB interface cable into the port on the
device. Refer to the diagram and instructions that came with the
device if you need help finding the port.
3.
Attach the logger to the base station/coupler as described in the
in the logger/device manual, paying close attention to proper
alignment.
Windows: If the base station/coupler or logger has never been
connected to the computer before, it may take several seconds for the
computer to detect the new hardware and report that it has
connected successfully. A message may display indicating that you
need to reboot before you can use the device. This is optional; you do
not need to reboot at this time.
Windows: If the device has never been connected to the computer
before, it may take several seconds to detect the new hardware and
report that it has connected successfully. One or more messages will
appear indicating that new hardware has been found. You may also
hear a chime. A message may display indicating that you need to
reboot before you can use the device. This is optional; you do not
need to reboot at this time.
The status bar at the bottom of the HOBOware window will update to
reflect that the logger is connected. At this point, you can begin using
the device.
Once the device is recognized by HOBOware, the device name will
appear in the status bar at the bottom of the HOBOware window as
shown below. The status bar also lists the total number of devices
connected. At this point, you can access the device from HOBOware.
To disconnect the logger, simply unplug it from the base
station/coupler. Wait for the status bar to update the number of
devices before continuing.
To attach another logger via a base station/coupler, remove the
logger, leaving the base station/coupler connected, and then connect
the next logger.
To disconnect the device, unplug it from the USB cable.
Getting Started: Using HOBOware with HOBO Data Loggers
Plug the base station/coupler cable into a USB port on the
computer.
To disconnect the base station/coupler, unplug it from the USB port.
9
10
Getting Started: Using HOBOware with HOBO Data Loggers
Connecting a Device Using a Serial Cable
Working with Devices
Some loggers use a serial cable to connect to the computer. If your
computer does not have a serial port and you are using a device that
requires a serial cable, you can use a Keyspan™ adapter as described
in this section.
This section covers the basics of working with loggers, including
launching, checking status, reading out, and plotting data. It is
recommended that you perform a trial launch and readout as
described in this section to familiarize yourself with the procedures
before deploying your loggers.
Steps
1. Open HOBOware.
2.
Plug the 9-pin end of the serial interface cable into a serial port on
the computer or into a Keyspan adapter that is plugged into a USB
port.
Launching the Logger
3.
Plug the other end of the serial interface cable into the
communications port on the device. Refer to the diagram and
instructions that came with the device if you need help finding the
port.
The Launch window opens. This window is separated into three panes,
which vary slightly for each type of logger and are described on the
next page.
4.
Windows: If you are using a serial port other than COM1, you will
need to configure HOBOware to use another port. To change the
setting, go to File > Preferences > Communications > Serial Ports.
Note that checking multiple serial ports can take some time, even
when no devices are attached.
5.
Select the logger from the Select Device window and click OK.
To launch the logger, click the Launch icon
on the toolbar.
The status bar at the bottom of the HOBOware window will update to
reflect that the device is connected and selected. At this point, you
can begin using the device.
To disconnect the device, simply unplug it from the serial cable.
Getting Started: Using HOBOware with HOBO Data Loggers
11
12
Getting Started: Using HOBOware with HOBO Data Loggers
• Logger Information. The name of the logger currently selected
appears at the top of this pane, which also includes the serial
number, deployment number, and current battery level.
Use the Description field to type up to a 40-character name for
the logger deployment. This description will be used as the
default file name when you read out the logger and save the
data. It will also be the default title on the plot.
Checking Logger Status
To check the status, click the Status icon on the toolbar.
The Status window appears, displaying information about the device
as described below.
Click the Status button in this pane to see the current status of
the logger and the settings used on the previous launch.
• Sensors. This pane displays a list of the sensors available for the
logger. Choose the sensors, or channels, that you wish to log in
this deployment, and select any external sensors you may be
using, if applicable. This pane also displays any utilities available
for your logger, such as Alarms, Scaling, and Filters.
• Deployment. Use this pane to set the logging interval, which is
the rate at which you want the logger to record data, and to
select when you want the logger to start logging. This pane also
displays the logging duration, which is the approximate time it
will take to fill the logger memory based on the logging interval,
sensors, and other settings currently selected. For some
loggers, you can also set a sampling interval, choose when to
stop logging, and select other options in this pane.
• Device Identification. This pane displays identifying information
for the device currently connected, including the device type,
description entered at launch time, serial number, and
firmware version.
To configure a test launch, set Start Logging to Now, choose a fast
logging interval (such as 30 seconds), change any other settings as
desired, and then click Start. HOBOware displays the progress of the
launch and warns you not to unplug the logger while it is being
configured. Normally, when the launch is finished, you can unplug the
logger and deploy it. For this test, leave the logger plugged in so you
can become familiar with checking the status, reading it out, and
plotting data.
Getting Started: Using HOBOware with HOBO Data Loggers
13
• Device Details. This pane displays specifics about the device,
including battery level, memory used, when it is scheduled to
stop logging (if applicable), when it was last launched, the
deployment number, logging interval, current status and
current state (if applicable).
• Current Readings. This pane shows the latest readings for
configured sensors and derived series (if applicable).
14
Getting Started: Using HOBOware with HOBO Data Loggers
Testing the Logger and Sensors
To verify that your logger and sensors are working and recording data
properly, perform the following tests. When you plot the data later,
you should see the results of these tests in the graph.
Change Sensor Reading:
1. Force a change in the condition you are measuring. For example,
if you are measuring temperature, change the temperature
reading by holding the logger or sensor in your hands for a minute
or two.
2.
Watch the Current Readings in the Status window change as the
conditions fluctuate.
Change Current State:
1. If you are using a U-Series logger that has a button, hold the
button down for several seconds.
2.
Watch the Current State field in the Status window change to
“Button Down.”
3.
Release the button. The Current State field changes back to
“Button Up.”
Reading Out the Logger
To retrieve data recorded by a logger, you must read out the logger.
Reading out the logger copies data from the logger to your computer,
allowing you to save the data in a datafile and view the plot.
During readout, the logger continues to record data unless you have
stopped the logger or the logger is full.
To read out the logger:
on the toolbar.
1.
Click the Readout icon
2.
A warning message appears indicating the logger is currently
logging. Click Don’t Stop to continue logging or Stop to end
logging before reading out.
3.
After reading out the logger, you are prompted to save the datafile.
Type a name and select a location for the file and click Save.
The Plot Setup window appears, which is described in the next section.
Click OK to close the Status window when the tests are complete.
Getting Started: Using HOBOware with HOBO Data Loggers
15
16
Getting Started: Using HOBOware with HOBO Data Loggers
The Plot Setup window contains the following information:
Plotting and Analyzing Data
• Description. This field shows the description you entered at
launch time. Keep this description or type a new one. The
description will be the title of the plot.
After you read out a logger and save the datafile, or any time you open
an existing file, the Plot Setup window appears. Even if you only intend
to export the data to another format, you must plot the data first.
• Select Series to Plot. Select the series you want to appear on
the graph and the units, if applicable. Some series will be
selected automatically. Click the checkboxes to select other
series or use the All and None buttons for selecting and
deselecting all series.
• Select Internal Logger Events to Plot. Select any events you
want to appear on the graph, if applicable. Use the All and None
buttons to select or deselect all events.
• Offset from GMT. This field shows the offset from Greenwich
Mean Time (GMT), also known as UTC, used at launch. Keep the
offset shown or change it to a different one.
• Data Assistants. You can create new data series by converting
logged data to other useful formats with Data Assistants. Only
the Data Assistants supported by that logger type will be
available in this window. See the HOBOware User’s Guide for
more information about using Data Assistants.
• Plot Button. Click Plot to display the selected sensor data on a
graph.
Getting Started: Using HOBOware with HOBO Data Loggers
17
18
Getting Started: Using HOBOware with HOBO Data Loggers
• Legend. The legend to the right of the plot displays the keys for
each sensor, state, and event series as well as any internal
events.
After you click the Plot button in the Plot Setup window, the data
appears in a graph along with other information described below.
Click the icons on the toolbar to experiment with the export, print,
viewing, and customization tools available within HOBOware. Hover
the mouse cursor over each icon on the toolbar for a description of
each tool.
IMPORTANT: Make sure you change any test launch settings to your
preferred launch settings before deploying the logger.
See the HOBOware User’s Guide or the HOBOware Help for more
information on features described in this guide and additional details
about the software.
• Points Table. Data points, including any internal events if they
were selected in the plot setup window, are listed in a table
above the plot.
• Details Pane. The pane on the left shows detailed information
about the series and events currently displayed, including
device information, deployment information, and series
statistics.
• Graph. The plot displays the series and (if applicable) events
selected in the Plot Setup window. If you ran the test described
in Testing the Logger and Sensors, you should see the variances
in sensor readings and changes in internal state on the plot.
Getting Started: Using HOBOware with HOBO Data Loggers
19
20
Getting Started: Using HOBOware with HOBO Data Loggers