1
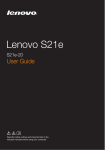
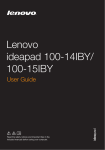
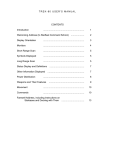
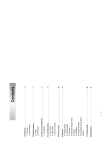
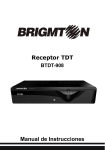
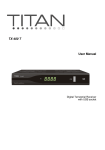
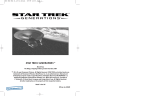
User Manual
Of Digital Set Top Box
DTB-3500
Please read this User Manual carefully to ensure proper use of this
product and keep this manual for future reference.
Table of Contents
Table of Contents ------------------------------------------------------------------------- 1
Introduction------------------------------------------------------------------------------- 2
Safety Information------------------------------------------------------------------------ 3
Remote Control--------------------------------------------------------------------------- 4
Front and Rear panel illustration------------------------------------------------------- 6
Connecting to a Television --- -------- --------------------------------------------------- 7
Connecting to a Television and Video-------------------------------------------------- 8
Connecting to a Surround Sound System------------------------------------------- 9
The setup menu system----------------------------------------------------------------- 10
USB----------------------------------------------------------------------------------------- 21
Troubleshooting-------------------------------------------------------------------------- 22
Specifications---------------------------------------------------------------------------- 23
1
Introduction
Thank you for purchasing this product which has been designed and
manufactured to give you many years of trouble-free service.
About This User Guide
This user guide contains all the information you need to know about how to
setup and watch available free view Channels using your set top box.
What is DVB-T?
It works like traditional TV, but because the signals are Digital you need a
set top box to convert them. This means more channels can be transmitted
with extra features such as interactivity and wide screen pictures.
Accessories In the Box
Remove your Digital set top box carefully from the box ,and remove the
packaging from each part.
You will find the following items:
Digital set top box with fitted mains plug
Remote Control with 2XAAA batteries
User Manual
Look out for this symbol. It indicates useful and important tips.
Trade Mark of the DVB Digital Video Broadcasting
Digital Video
Broadcasting
Project(1991 to 1996)
2
Safety Information
Safety is Important
To ensure your safety and the safety of others, please ensure you read
the Safety Instructions before you operate this product.
Keep this information in a safe place for future reference. Please read all
the safety information before using the product.
Safety Considerations.
Position the cables so that they cannot be walked on or pinched by items
placed on or against them.
Do not use the set top box in humid or damp conditions.
Do not allow the set top box to get wet.
Do not expose the set top box to dripping or splashing.
Do not place water filled objects such as vases on top of the set top box.
Do not place naked flame sources, such as candles, on the top of the set
top box.
Cleaning
ALWAYS unplug the set top box before you clean it.
Do not use liquid or aerosol cleaners.
Clean the set top box with a soft, damp (not wet) cloth.
Ventilation
The slots and openings on the set top box are for ventilation. Do not cover
or block them as it may cause overheating.
NEVER let children push anything into the holes or slots on the case.
Servicing
There are no user serviceable parts in this set top box.
When servicing, refer to qualified service personnel.
Consult your dealer if you are ever in doubt about the installation, operation
or safety of this unit.
Battery Disposal
Please ensure batteries are disposed of safely.
Never dispose of batteries in the fire or with household waste.
Check with your local authority for disposal regulations.
3
Remote Control
STANDBY DTV/VCR TEXT
VOL+
MUTE
PLAY/PAUSE
INFO
EPG
CH+
VOL-
STOP
SETUP
EXIT
23
FAV-
FAV+
ENTER
24
25
CH-
SOURCE
TV/RADIO
1
2
3
4
5
6
7
8
9
0
REV
FWD
PREV
NEXT
RECALL
26
GOTO
27
28
29
30
31
FAVORITE MODE
AUDIO LANGUAGE
32
33
REPEAT
A-B
ZOOM SUBTITLE
34
DTB-3500
Remote Key Function:
1. TEXT: Used to open teletext osd display if
teletext available in the broadcasted stream.
2. MUTE: Used to turn the sound on or off.
3. INFO Used to display information about the
channel being viewed
4. PLAY/PAUSE: Used to playback or pause the
program being viewed.
5. EPG Used to display information about the
program being viewed and what's next.
6. STOP: Used to stop the program being viewed.
7. EXIT Used to return to the previous screen or
menu.
8. ENTER: Used to confirm a selection in a menu.
9. FAV+ Used to move around the menu screens or
select the favourite channels in non-menu state.
10. TV/RADIO: Used to switch between TV channels
and Radio channels.
11. RECALL Used to switch between the last two
viewed channels.
12. GOTO: During playback, press GOTO show the
current time counter position.
13. PREV: Used to skip to previous chapter or track.
14. NEXT: Used to skip to next chapter or track.
15. AUDIO Used to set the sound output, the
available settings are STEREO, LEFT, RIGHT.
16. LANGUAGE Used to switch between different
audio languages that are broadcasted.
17. STANDBY Used to switch the set top box to on
and off.
18. DTV/VCR: Used to switch between the VCR
SCART input and the DTV mode.
19. VOL+: Used to increase the volume in non-menu
state..
20. VOL- Used to decrease the volume in non-menu
state.
21. CH+ Used to move around the menu screens or
select the channels in non-menu state.
22. SETUP: Used to open or close the main menu.
23. FAV-: Used to move around the menu screens or select the favourite channels in nonmenu state.
24. CH-: Used to move around the menu screens or select the channels in non-menu state.
25. SOURCE: Used to switch between DTV and USB.
26. NUMBER KEYS Used to select channel numbers or input numbers in menus.
27. FWD: Used to scan forward. The unit will review the disc at 2,4,8 and 20 times normal
speed during USB mode. Press PLAY button to resume normal playback.
28. REV: Used to scan in reverse. The unit will review the disc at 2,4,8 and 20 times normal
speed during USB mode. Press PLAY button to resume normal playback.
29. MODE: Used to change the video format output.
30. FAVORITE Used to access your favourite channelslist.
31. SUBTITLE: Used to repeatedly to select subtitle language.
32. REPEAT: Used to select repeat single, repeat all or repeat off.
33. A-B: During playback, press A-B button to select point A, again press A-B button to select
point B. The unit will repeat the section from A to B automatically. Press A-B button third
time to cancel A-B repeat and clear points A and B.
34: ZOOM: Used to magnify the image.
COLOR KEYS(RED/GREEN/YELLOW/BLUE): Used to operate different functions in TEXT
screen or other menus.
Note: SUBTITLE/TEXT/LANGUAGE may not be available for all channels
4
Installing the Batteries
Remove the battery cover from the remote control and put 2XAAA size batteries
inside the compartment.
The diagram inside the battery compartment shows the correct way to install the
batteries.
1.Open the cover
O
PE
2.Install batteries
3.Close the cover
N
O
PE
N
Using the Remote Control
To use the remote control, point it towards the front of the digital set top box
The remote control has a range of up to 7 metres from the set top box at an angle
of up to 60 degrees.
The remote control will not operate if its path is blocked.
Sunlight or very bright light will decrease the sensitivity of the remote
control.
5
Front Panel and Rear Panel Illustration
1. Front panel
CHANNEL
1
2
3
4
5
POWER BUTTON: Used to turn on/off the main power supply.
USB: USB Jack, Support USB1.1.
REMOTE CONTROL SENSOR: Used to receive the signal from the remote control.
STANDBY INDICATOR: Used to visually show power state of the set top box, the green
LED will be light if turned on the set top box and the red LED will be light if the set top box
entered standby mode.
CHANNEL UP/DOWN: Used to change channels without using the remote control.
Digital
Audio
R F IN
R F LOOP
THROUGH
Serial No.:
MODEL:DTB-3500
DIGITAL TERRESTRIAL RECEIVER
POWER S UPPLY: AC100-240V~ 5 0/60Hz
MAX POWER CONSUMPTION: 10WATTS
Made in China
AC100-240V~
50/60Hz
Coaxial
TV
VCR O O
1 RF IN : This socket connects to your external aerial.
2 RF LOOP THROUGH: This socket will bypass the RF signal to either your TV or another
video system.
3 COAXIAL: This socket connects to a coaxial socket on your surround sound system.
4 VCR SCART: This socket connects to either a VCR or other video system.
5 TV SCART: This socket connects to TV.
6 MAINS CABLE: This is used to connect to main power supply.
6
Connecting to a Television
TV
(Option)
Set top box
AC100-240V~
50/60Hz
7
Connecting to a Television and Video
TV
Set top box
AC100-240V~
50/60Hz
(Option)
(Option)
VCR or Video system
8
Connecting to a Surround Sound System
TV
(Option)
Set top box
AC100-240V~
50/60Hz
Audio system
9
The setup menu system
Advanced Features
1 Switch on for the first time
Ensure all connections have been made following the diagrams on the
previous pages for reference. To switch on the set top box, press
POWER button on the set top box.
When you first start to use this unit, the unit enters auto scanning menu
Install menu
OSD Language
Set ScanArea
Auto scan
Scanning...
> English
> Spain
> Press OK
>
>
>
8
Strength
0
Frequency
198500KHz
Quality
0
Progress
4/57
Channel
TV : 0000
Press ENTER button to Area Scan!
Press EXIT button to exit install-menu!
RADIO : 0000
Stop scan
Press SETUP to stop and exit
Figure(1)
Figure(0)
2 The Main menu
Press SETUP button to enter the main menu, which is shown in
figure(2)
Press SETUP button again or EXIT button to exit the main menu.
The main menu has four setting items which includes DTV channel,
Configuration, Game and USB. The four setting items are displayed on
the left side of the screen. The right side is the submenu of the left
selected item.
DTV Channel
DTV Channel
Configuration
GAME
USB
Configuration
>
>
>
>
TV Channel
Radio Channel
Program Guide
DVB Booking
>
>
>
>
DTV Channel
Configuration
GAME
USB
Use UP/Down to move cursor or ENTER to select
Press SETUP to cancel or return
Figure(2)
DTV Channel
GAME
USB
System Setting
Area Scan
Manual Scan
Receiver Info
Use UP/Down to move cursor or ENTER to select
Press SETUP to cancel or return
Figure(3)
GAME
Configuration
>
>
>
>
USB
>
>
>
>
BoxMan
Burning Tetris
Hit Rat
>
>
>
DTV Channel
Configuration
GAME
USB
Use UP/Down to move cursor or ENTER to select
Press SETUP to cancel or return
>
>
>
>
Use UP/Down to move cursor or ENTER to select
Press SETUP to cancel or return
Figure(4)
Figure(5)
10
>
>
>
>
3. DTV Channel
This includes TV channel, Radio channel , Program Guide and DVB
booking
3.1TV CHANNEL
The TV channel menu is shown in Figure(6).
TV CHANNELS
FAVORITE
001 Ideal ..
002 UKTV B
003 IMF
004 The HI..
Press ENTER to select
DEL
FAV
MOVE
LOCK
Figure(6)
To Set Favorite channel, Press BLUE button to select FAVORITE menu,
press UP or DOWN button to select TV channel, then press ENTER
button to set or cancel favorite setting. Shown in Figure(7)
TV CHANNELS
FAVORITE
001 Ideal ..
002 UKTV B
003 IMF
004 The HI..
Press ENTER to select
DEL
FAV
MOVE
LOCK
Figure(7)
To delete TV channel, press RED button to select DELECT menu, press
UP or DOWN button to select TV channel, then press ENTER button to
confirm. Shown in Figure(8).
TV CHANNELS
X
DELETE
001 Ideal ..
X
UKTV B
003 IMF
004 The HI..
Press ENTER to select
DEL
FAV
MOVE
Figure(8)
11
LOCK
To move TV channel, press YELLOW button to enter MOVE menu,
press UP or DOWN button to select TV channel, then press ENTER
button to confirm, again press UP or DOWN button to move TV channel.
Shown in Figure(9).
TV CHANNELS
MOVE
001 Ideal ..
002 IMF
UKTV B
004 The HI..
Press ENTER to select
DEL
FAV
MOVE
LOCK
Figure(9)
To lock TV channel, press GREEN button to enter LOCK menu, press
UP or DOWN button to select TV channel, Then press ENTER button to
Confirm. Shown in Figure(10).
TV CHANNELS
LOCK
001 Ideal ..
002 IMF
003 UKTV B
004 The HI..
Press ENTER to select
DEL
FAV
MOVE
LOCK
Figure(10)
3.2 Radio channel
The Radio channel menu is shown in Figure 11.
RADIO CHANNELS
FAVORITE
001 Q
002 Magic
003 The HI..
004 BBC NO..
005 onewor...
Press ENTER to select
DEL
FAV
MOVE
Figure(11)
12
LOCK
To Set Favourite radio channel, Press BLUE button to select favourite
menu, press UP or DOWN button to select Radio channel, then press
ENTER button to set or cancel favourite setting. Shown in Figure(12).
RADIO CHANNELS
FAVORITE
001 Q
002 Magic
003 The Hi..
004 BBC No..
005 onewor...
Press ENTER to select
DEL
FAV
MOVE
LOCK
Figure(12)
To delete radio channel, press RED button to select DELECT menu,
press UP or DOWN button to select radio channel, then press ENTER
button to confirm. Shown in Figure(13).
RADIO CHANNELS
X
DELETE
001 Q
002 Magic
X
The Hi..
004 BBC No..
005 onewor...
Press ENTER to select
DEL
FAV
MOVE
LOCK
Figure(13)
To move radio channel, press YELLOW button to enter move menu,
press UP or DOWN button to select radio channel, then press ENTER
button to confirm, again press UP or DOWN button to move radio
channel. Shown in Figure(14).
RADIO CHANNELS
MOVE
001 Q
002 Magic
The Hi..
004 BBC No..
005 onewor...
Press ENTER to select
DEL
FAV
MOVE
Figure(14)
13
LOCK
To lock radio channel, press GREEN button to enter lock menu, press
UP or DOWN button to select radio channel, press ENTER button to
confirm. Shown in Figure(15).
RADIO CHANNELS
LOCK
001 Q
002 Magic
003 The Hi..
004 BBC No..
005 onewor...
Press ENTER to select
DEL
FAV
MOVE
LOCK
Figure(15)
3.3 Program guide
This is DTV EPG (Electronic Programme Guide), shown in Figure 16.
The EPG menu is used to look at what is being broadcast on a TV or
Radio channel later in the day.
To access the EPG menu, press the EPG button.
The following menu(Figure16) will display. A preview of your current
channel will be displayed in the left area. The detailed program
information of your current viewed channel will be displayed in the right
area. To see what is going to be broadcast after this programme, press
RIGHT button to change the time and press LEFT button to move the
time back.
To view a different channel, press UP or DOWN button. Each channel
selected will be previewed in the left side.
To book a wanted channel for later watching, press ENTER button.
To exit EPG menu and watched the selected channel, press the EPG or
EXIT button.
Electronic Program Guide
Page[1/1]
Page Down
TMF Top 10
2006/10/10 16:00~17:00
Join TMF for a daily
Top 10 countdown ofthe
latest videos.
10/10/2006
UKTV Br
16:00
17:00
t Ide Good F Garden Water
TMF
TMF Top 10
The HITS
StarDate
18:00
Garden UK Bright Id
Matchmaker
Classic Hits
Figure(16)
14
3.4 DVB Booking
The DVB booking menu is shown in Figure(17).
The booking list is used to display all the booking events you looked in
the EPG menu or added by user manually.
To change the booking setting, press ENTER button to edit, press LEFT
button to delete booking list, and press RIGHT button to add new list.
Other, you may add the booking list in the EPG menu. Shown in
Figure(18).
Channel Guide -> Book List
Book List -> Book Setting
Service
Event
Start Time
End Time
Service ID
TMF
Matchmaker
17:00
18:00
Date
TMF
Then & Now
18:00
19:00
Time
TMF
No Repeat Z.
19:00
00:00
End time
Attribute
Service Type
Confirm
>
>
No.
01
02
03
0002
>
>
>
>
>
16:01
2006/10/10
00:00
None
TV
Press OK
>
>
>
>
>
>
>
ENTER key to edit
LEFT key to delete, and RIGHT keyto add
Figure(17)
Figure(18)
4. Configuration
This includes System setting, Area scan, Manual scan and Receiver
info
4.1 System setting
This includes OSD language, Sleep After, Screen Format, TV Type, Set
Brightness, GMT Setting, Set Scan Area, Change Password and
Factory Default. Press UP or DOWN button to select one of the items.
To change the setting, press LEFT or Right button to cycle between the
different settings, or press ENTER button, then press UP or DOWN
button to select item from a list of settings. Shown in figure(19).
System setting -> OSD Language
Active antenna
Screen Format
TV Type
Set Brightness
GMT Setting
Set ScanArea
Change Password
Factory Default
>
>
OSD Language
English
>
>
>
>
>
>
>
4:3PS
OFF
PAL
2
GMT+1
Spain
Press OK
Press OK
Press Up/Down to move cursor
Press ENTER to pop List
Figure(19)
15
>
>
>
>
>
>
>
>
>
4.1.1 OSD Language
The OSD Language menu is shown in Figure(20).
Press UP or DOWN button to move and press ENTER button to select.
System setting -> OSD Language
Active antenna
Screen Format
TV Type
Set Brightness
GMT Setting
Set ScanArea
Change Password
Factory Default
>
>
OSD Language
English
>
>
>
>
>
>
>
4:3PS
OFF
PAL
2
GMT+1
Spain
Press OK
Press OK
>
>
>
>
>
>
>
>
>
English
~
Espanol
Press Up/Down to move cursor
Press ENTER to pop List
Figure(20)
4.1.2 Active antenna
The Active antenna menu is shown in Figure (21)
Press UP or DOWN button to move and press ENTER button to select.
System setting -> Sleep After
Active antenna
Screen Format
TV Type
Set Brightness
GMT Setting
Set ScanArea
Change Password
Factory Default
>
>
OSD Language
English
>
>
>
>
>
>
>
4:3PS
OFF
PAL
2
GMT+1
Spain
Press OK
Press OK
>
>
>
>
>
>
>
>
>
ON
OFF
Press Up/Down to move cursor
Press ENTER to pop List
Figure(21)
4.1.3 Screen Format
The screen format menu is shown in Figure(22)
Press UP or DOWN button to move and press ENTER button to select.
You can select either 4:3 or 16:9. 4:3 should be used for standard
square shaped television screens, and 16:9 should be used for wide
screen rectangular shaped television screens.
System setting -> Screen Format
Active antenna
Screen Format
TV Type
Set Brightness
GMT Setting
Set ScanArea
Change Password
Factory Default
>
>
OSD Language
English
>
>
>
>
>
>
>
4:3PS
OFF
PAL
2
GMT+1
Spain
Press OK
Press OK
>
>
>
>
>
>
>
>
>
Press Up/Down to move cursor
Press ENTER to pop List
Figure(22)
16
4:3PS
4:3 LB
16:9
4.1.4TV Type
The TV Type menu is shown in figure(23).
Press UP or DOWN button to move and press ENTER button to
confirm your selection.
The standard setting is used to set the signal input to your TV. There
are two different standards(PAL and NTSC) available on set top box.
If you are unsure which setting to use, consult the manufactures
r¡¯user
manual for your television.
System setting -> TV Type
Active antenna
Screen Format
TV Type
Set Brightness
GMT Setting
Set ScanArea
Change Password
Factory Default
>
>
OSD Language
English
>
>
>
>
>
>
>
4:3PS
OFF
PAL
2
GMT+1
Spain
Press OK
Press OK
>
>
>
>
>
>
>
>
>
NTSC
PAL
AUTO
Press Up/Down to move cursor
Press ENTER to pop List
Figure(23)
4.1.5 Set Brightness
The Brightness menu is shown in figure(24).
Press UP or DOWN button to move and press ENTER button to confirm
your selection.
System setting -> Set Brightness
Active antenna
Screen Format
TV Type
Set Brightness
GMT Setting
Set ScanArea
Change Password
Factory Default
>
>
OSD Language
English
>
>
>
>
>
>
>
4:3PS
OFF
PAL
2
GMT+1
Spain
Press OK
Press OK
>
>
>
>
>
>
>
>
>
0
2
4
6
8
10
12
Press Up/Down to move cursor
Press ENTER to pop List
Figure(24)
4.1.6 GMT setting
The GMT setting menu is shown in figure(25).
Press UP or DOWN button to move and press ENTER button to confirm
your selection.
System setting -> GMT setting
Active antenna
Screen Format
TV Type
Set Brightness
GMT Setting
Set ScanArea
Change Password
Factory Default
>
>
OSD Language
English
>
>
>
>
>
>
>
4:3PS
OFF
PAL
2
GMT+1
Spain
Press OK
Press OK
>
>
>
>
>
>
>
>
>
Press Up/Down to move cursor
Press ENTER to pop List
Figure(25)
17
GMT-5
GMT-4
GMT-3
GMT-2
GMT-1
GMT
GMT+1
4.1.7 Set Scan Area
The Set Scan Area menu is shown in figure(26).
Press UP or DOWN button to move and press ENTER button to confirm
your selection.
System setting -> Set ScanArea
Active antenna
Screen Format
TV Type
Set Brightness
GMT Setting
Set ScanArea
Change Password
Factory Default
>
>
OSD Language
English
>
>
>
>
>
>
>
4:3PS
OFF
PAL
2
GMT+1
Spain
Press OK
Press OK
>
>
Germany
England
Italy
France
Spain
Portugal
Australia
>
>
>
>
>
>
>
Press Up/Down to move cursor
Press ENTER to pop List
Figure(26)
4.1.8 Change password
The Change Password menu is shown in figure(27).
Press UP or DOWN button to move and press ENTER button to confirm
your selection.
The Change Password menu allows you to change the default
password, the default value is 6666.
Input you new password using the numerical buttons on the remote
control.
Please note that your new password must contain 4 digits.
System setting -> Change Password
Active antenna
Screen Format
TV Type
Set Brightness
GMT Setting
Set ScanArea
Change Password
Factory Default
>
>
OSD Language
English
>
>
>
>
>
>
>
4:3PS
OFF
PAL
2
GMT+1
Spain
Press OK
Press OK
>
>
Old Password:
>
>
>
>
>
>
Press Up/Down to move cursor
Press ENTER to pop List
Figure(27)
4.1.9 Factory Default
The Factory Default menu is shown in figure(28).
Press UP or DOWN button to move and press ENTER button to
confirm.
The Factory Default menu allows you to reset the settings
System setting -> Factory Default
Active antenna
>
>
Screen Format
> 4:3PS Box
Message
OSD Language
TV Type
OFF
PAL
Reset
to default!
2
Set Brightness
GMT Setting
Set ScanArea
Change Password
Factory Default
>
>
>
>
>
>
English
GMT+1
Spain
Press OK
Press OK
>
>
>
>
>
>
>
>
Press Up/Down to move cursor
Press ENTER to pop List
Figure(28)
18
OK
Cancel
4.2 Area Scan
The auto scan menu is shown in Figure(29).
Scanning...
Channel
7
Frequency
191500KHz
Progress
Strength
36
Quality
100
2/57
TV :0000
RADIO :0000
Stop scan
Press MENU to stop and exit
Figure(29)
4.3 Manual Scan
The manual scan menu is shown in figure(30), Before scanning , the
following item are set: Scan Type, Start Freq, End Freq, Band Width. If
the scan type is range scan, the start frequency and end frequency can
be set.
Use UP or DOWN button to select item and LEFT or RIGHT button to
change the setting.
Once done, Press ENTER button to start scan.
ManuaL Scan --> Scan Type
>
>
21
Freguency
Start Scan
>
Press OK
Channel
474000KHz
Sigral
50%
Strength
50%
Use FAV-+ to select or Press ENTER to view List
Press RETURN TO Return
Figure(30)
19
>
>
>
4.4 Receiver info
The system information is shown in Figure(31).
The Receiver info menu displays the software version and hardware
version
Configuration
--> Receiver Info
Model:
Hardware version
software version
Data :
Press RETURN to return
Figure(31)
5. Game.
The game menu is shown in figure(32).
There are three games Box man , burning Tetris
Hit rat
GAME --> BoxMan
DTV Channel
Configuration
GAME
USB
>
>
BoxMan
>
>
Hit Rat
Burning Tetris
>
>
>
Use Up/Down to move cursor or ENTER to select
Press MENU to cancel or return
Figure(32)
6. USB
This unit have a USB jack and supports USB 1.1 you can insert a USB
disc or a MP3 player with USB interface to play the MP3, MPEG4 and
JPEG files.
When select the USB item in the SETUP menu ,or press SOURCE
button on the remote control to select USB function and play USB,
Shown in Figure(33).
[MP3
]------------- .MP3
01. TRACK01A
02._______ ~1
03._______ ~1
04._____
05. TRACK01
06. TRACK09
07. TRACK12
08. TRACK01B
09. TRACK18
10. TRACK05
01. MP3
Figure(33)
20
USB (Universal Serial Bus)
Advanced Features
USB interface
This unit have a USB 1.1 jack, you can insert a
USB DISC or a MP3, MPEG4 Player with USB Interface to play the
MP3, MPEG4 or JPEG files.
The max bit rate supported
USB1.1: 12M bps
How to switch to USB work mode?
Press SOURCE button on the remote control until you switched into
USB work mode.
21
Troubleshooting
If you experience problems with this receiver or its installation, in the
first instance please read carefully the relevant sections of this User
Manual and this Troubleshooting section.
22
Specifications
This symbol on the product or in the instructions m eans that your electrical
and electronic equipment should be disposed at theend of life separately from your
household waste, There are separate collection systems for recycling inthe EU.
For more information, please contact the local authority oryour retailer where you
purchase the product.
23
DTB-3500
1
Digital Video
Broadcasting
2
3
STANDBY DTV/VCR TEXT
VOL+
MUTE
PLAY/PAUSE
INFO
EPG
CH+
VOL-
STOP
SETUP
EXIT
23
FAV-
FAV+
ENTER
24
25
CH-
SOURCE
TV/RADIO
1
2
3
4
5
6
7
8
9
0
REV
FWD
PREV
NEXT
RECALL
26
GOTO
27
28
29
30
31
FAVORITE MODE
AUDIO LANGUAGE
32
33
REPEAT
A-B
ZOOM SUBTITLE
34
DTB-3500
4
O
PE
N
O
5
PE
N
CHANNEL
Digital
Audio
R F IN
R F LOOP
THROUGH
Serial No.:
MODEL:DTB-3500
DIGITAL TERRESTRIAL RECEIVER
POWER S UPPLY: AC100-240V~ 5 0/60Hz
MAX POWER CONSUMPTION: 10WATTS
Made in China
AC100-240V~
50/60Hz
Coaxial
TV
VCR O O
6
TV
(Option)
Set top box
AC100-240V~
50/60Hz
7
TV
Set top box
AC100-240V~
50/60Hz
(Option)
(Option)
VCR or Video system
8
TV
(Option)
Set top box
AC100-240V~
50/60Hz
Audio system
9
Install menu
OSD Language
Set ScanArea
Auto scan
Scanning...
> English
> Spain
> Press OK
>
>
>
8
Strength
0
Frequency
198500KHz
Quality
0
Progress
4/57
Channel
TV : 0000
Press ENTER button to Area Scan!
Press EXIT button to exit install-menu!
Stop scan
Press SETUP to stop and exit
DTV Channel
DTV Channel
Configuration
GAME
USB
Configuration
>
>
>
>
TV Channel
Radio Channel
Program Guide
DVB Booking
>
>
>
>
DTV Channel
Configuration
GAME
USB
Use UP/Down to move cursor or ENTER to select
Press SETUP to cancel or return
DTV Channel
GAME
USB
>
>
>
>
System Setting
Area Scan
Manual Scan
Receiver Info
Use UP/Down to move cursor or ENTER to select
Press SETUP to cancel or return
GAME
Configuration
RADIO : 0000
USB
>
>
>
>
BoxMan
Burning Tetris
Hit Rat
>
>
>
DTV Channel
Configuration
GAME
USB
Use UP/Down to move cursor or ENTER to select
Press SETUP to cancel or return
>
>
>
>
Use UP/Down to move cursor or ENTER to select
Press SETUP to cancel or return
10
>
>
>
>
TV CHANNELS
FAVORITE
001 Ideal ..
002 UKTV B
003 IMF
004 The HI..
Press ENTER to select
DEL
FAV
MOVE
LOCK
MOVE
LOCK
TV CHANNELS
FAVORITE
001 Ideal ..
002 UKTV B
003 IMF
004 The HI..
Press ENTER to select
DEL
FAV
TV CHANNELS
X
DELETE
001 Ideal ..
X
UKTV B
003 IMF
004 The HI..
Press ENTER to select
DEL
FAV
11
MOVE
LOCK
TV CHANNELS
MOVE
001 Ideal ..
002 IMF
UKTV B
004 The HI..
Press ENTER to select
DEL
FAV
MOVE
LOCK
MOVE
LOCK
TV CHANNELS
LOCK
001 Ideal ..
002 IMF
003 UKTV B
004 The HI..
Press ENTER to select
DEL
FAV
RADIO CHANNELS
FAVORITE
001 Q
002 Magic
003 The HI..
004 BBC NO..
005 onewor...
Press ENTER to select
DEL
FAV
MOVE
12
LOCK
RADIO CHANNELS
FAVORITE
001 Q
002 Magic
003 The Hi..
004 BBC No..
005 onewor...
Press ENTER to select
DEL
FAV
MOVE
LOCK
RADIO CHANNELS
X
DELETE
001 Q
002 Magic
X
The Hi..
004 BBC No..
005 onewor...
Press ENTER to select
DEL
FAV
MOVE
LOCK
RADIO CHANNELS
MOVE
001 Q
002 Magic
The Hi..
004 BBC No..
005 onewor...
Press ENTER to select
DEL
FAV
MOVE
13
LOCK
RADIO CHANNELS
LOCK
001 Q
002 Magic
003 The Hi..
004 BBC No..
005 onewor...
Press ENTER to select
DEL
FAV
MOVE
LOCK
Electronic Program Guide
Page[1/1]
Page Down
TMF Top 10
2006/10/10 16:00~17:00
Join TMF for a daily
Top 10 countdown ofthe
latest videos.
10/10/2006
UKTV Br
17:00
16:00
t Ide Good F Garden Water
TMF
TMF Top 10
The HITS
StarDate
18:00
Garden UK Bright Id
Matchmaker
Classic Hits
14
Book List -> Book Setting
No.
01
02
03
Service
Event
Start Time
End Time
Service ID
TMF
Matchmaker
17:00
18:00
Date
TMF
Then & Now
18:00
19:00
Time
TMF
No Repeat Z.
19:00
00:00
End time
Attribute
Service Type
Confirm
ENTER key to edit
LEFT key to delete, and RIGHT keyto add
System setting -> OSD Language
Active antenna
Screen Format
TV Type
Set Brightness
GMT Setting
Set ScanArea
Change Password
Factory Default
>
>
OSD Language
English
>
>
>
>
>
>
>
4:3PS
OFF
PAL
2
GMT+1
Spain
Press OK
Press OK
Press Up/Down to move cursor
Press ENTER to pop List
15
>
>
>
>
>
>
>
>
>
>
>
Channel Guide -> Book List
0002
>
>
>
>
>
16:01
2006/10/10
00:00
None
TV
Press OK
>
>
>
>
>
>
>
System setting -> OSD Language
Active antenna
Screen Format
TV Type
Set Brightness
GMT Setting
Set ScanArea
Change Password
Factory Default
>
>
OSD Language
English
>
>
>
>
>
>
>
4:3PS
OFF
PAL
2
GMT+1
Spain
Press OK
Press OK
>
>
>
>
>
>
>
>
>
English
~
Espanol
Press Up/Down to move cursor
Press ENTER to pop List
System setting -> Sleep After
Active antenna
Screen Format
TV Type
Set Brightness
GMT Setting
Set ScanArea
Change Password
Factory Default
>
>
OSD Language
English
>
>
>
>
>
>
>
4:3PS
OFF
PAL
2
GMT+1
Spain
Press OK
Press OK
>
>
>
>
>
>
>
>
>
ON
OFF
Press Up/Down to move cursor
Press ENTER to pop List
System setting -> Screen Format
Active antenna
Screen Format
TV Type
Set Brightness
GMT Setting
Set ScanArea
Change Password
Factory Default
>
>
OSD Language
English
>
>
>
>
>
>
>
4:3PS
OFF
PAL
2
GMT+1
Spain
Press OK
Press OK
Press Up/Down to move cursor
Press ENTER to pop List
16
>
>
>
>
>
>
>
>
>
4:3PS
4:3 LB
16:9
System setting -> TV Type
Active antenna
Screen Format
TV Type
Set Brightness
GMT Setting
Set ScanArea
Change Password
Factory Default
>
>
OSD Language
English
>
>
>
>
>
>
>
4:3PS
OFF
PAL
2
GMT+1
Spain
Press OK
Press OK
>
>
>
>
>
>
>
>
>
NTSC
PAL
AUTO
Press Up/Down to move cursor
Press ENTER to pop List
System setting -> Set Brightness
Active antenna
Screen Format
TV Type
Set Brightness
GMT Setting
Set ScanArea
Change Password
Factory Default
>
>
OSD Language
English
>
>
>
>
>
>
>
4:3PS
OFF
PAL
2
GMT+1
Spain
Press OK
Press OK
>
>
>
>
>
>
>
>
>
0
2
4
6
8
10
12
Press Up/Down to move cursor
Press ENTER to pop List
System setting -> GMT setting
Active antenna
Screen Format
TV Type
Set Brightness
GMT Setting
Set ScanArea
Change Password
Factory Default
>
>
OSD Language
English
>
>
>
>
>
>
>
4:3PS
OFF
PAL
2
GMT+1
Spain
Press OK
Press OK
Press Up/Down to move cursor
Press ENTER to pop List
17
>
>
>
>
>
>
>
>
>
GMT-5
GMT-4
GMT-3
GMT-2
GMT-1
GMT
GMT+1
System setting -> Set ScanArea
Active antenna
Screen Format
TV Type
Set Brightness
GMT Setting
Set ScanArea
Change Password
Factory Default
>
>
OSD Language
English
>
>
>
>
>
>
>
4:3PS
OFF
PAL
2
GMT+1
Spain
Press OK
Press OK
>
>
Germany
England
Italy
France
Spain
Portugal
Australia
>
>
>
>
>
>
>
Press Up/Down to move cursor
Press ENTER to pop List
System setting -> Change Password
Active antenna
Screen Format
TV Type
Set Brightness
GMT Setting
Set ScanArea
Change Password
Factory Default
>
>
OSD Language
English
>
>
>
>
>
>
>
4:3PS
OFF
PAL
2
GMT+1
Spain
Press OK
Press OK
>
>
Old Password:
>
>
>
>
>
>
Press Up/Down to move cursor
Press ENTER to pop List
System setting -> Factory Default
Active antenna
>
>
Screen Format
> 4:3PS Box
Message
OSD Language
TV Type
Set Brightness
GMT Setting
Set ScanArea
Change Password
Factory Default
>
>
>
>
>
>
English
OFF
PAL
Reset
to default!
2
GMT+1
Spain
Press OK
Press OK
Press Up/Down to move cursor
Press ENTER to pop List
18
>
>
>
>
>
>
>
>
OK
Cancel
Scanning...
Channel
7
Frequency
191500KHz
Progress
Strength
36
Quality
100
2/57
TV :0000
RADIO :0000
Stop scan
Press MENU to stop and exit
ManuaL Scan --> Scan Type
>
>
21
Freguency
Start Scan
>
Press OK
Channel
474000KHz
Sigral
50%
Strength
50%
Use FAV-+ to select or Press ENTER to view List
Press RETURN TO Return
19
>
>
>
Configuration
--> Receiver Info
Model:
Hardware version
software version
Data :
Press RETURN to return
GAME --> BoxMan
DTV Channel
Configuration
GAME
USB
>
>
BoxMan
>
>
Hit Rat
Burning Tetris
>
>
>
Use Up/Down to move cursor or ENTER to select
Press MENU to cancel or return
[MP3
]------------- .MP3
01. TRACK01A
02._______ ~1
03._______ ~1
04._____
05. TRACK01
06. TRACK09
07. TRACK12
08. TRACK01B
09. TRACK18
10. TRACK05
01. MP3
20
21
22
23