1
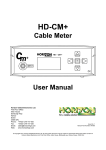
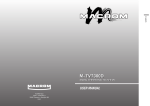
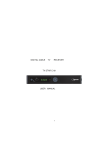
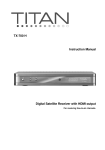
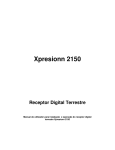
TX-400 T
User Manual
Digital Terrestrial Receiver
with USB socket
INTRODUCTION
This User Manual will help you to operate your Satellite Receiver in a safe manner while
enjoying all the features and benefits it provides for your entertainment
The instructions contained in this User Manual assume that the user of the Satellite
Receiver already has a basic general knowledge on how to operate entertainment
electronic devices
This User Manual must be read by every person that is:
•
Installing
•
Connecting
•
Operating
•
Cleaning
•
Disposing of this Satellite receiver
DISPOSAL OF USED ELECTRICAL AND ELECTRONIC DEVICES
The disposal of used Electrical and electronic devices must be conducted in accordance
with the rules and regulations of the European Union (EU) and that of other European
Countries
All products that are marked either directly or labelled on their packaging with the
following icon:
can not be disposed of through the normal household waste channels. These products
must be disposed of through specialised collection centres for the recycling of electric
and electronic devices
By disposing of this product as required by law, you are contributing to the protection of
the environment and the health of your fellow human beings
Incorrect disposal can be dangerous to human health and hazardous to the
environment
2
Table of contents
Safety Instructions
4
The right location
4
Front Panel / Rear Panel
6
Remote Control Unit
7
S.T.B Connection
9
Main Menu
11
Digital TV Part
11
1. Installation
11
2. Channel Manager
13
3. Configuration
16
4. Software Upgrading
19
5. Factory default
20
6. Version
20
USB Media Play Part
20
1. Movie
20
2. Music
21
3. Photo
21
Game
21
Trouble Shooting
22
Specification
23
3
Safety precautions
Before operating the receiver, please read thoroughly the following safety precautions
You are required to read all the notes, instructions and warnings contained in this User
Manual
Basic safety precautions
Connecting to the mains
· During disturbances unplug the receiver from the mains.
· To avoid the risk of fire and electric shock do not expose the receiver to rain or other
humidity.
· Never open the housing. Otherwise there is the risk of electric shock.
· Only connect the receiver to a properly installed 100-240V, 50-60 Hz mains socket.
· The total power input at the LBN IN antenna socket of the receiver must not exceed
500mA.
· In case of non-use of the appliance for a longer period of time, please disconnect the
plug from the mains. Only pull at the plug, not at the cable.
· Disconnect the plug from the mains during thunderstorms.
· If objects or liquids enter the receiver, immediately pull the plug. Refer the appliance to
qualified service personnel before using it again. Otherwise there is a risk of electric
shock.
· Please make sure that the power supply (socket) is easily accessible.
· Do not bend or squeeze the mains cable.
· If the mains cable is damaged, you have to refer the receiver to qualified service
personnel for repair before using the receiver again. Otherwise there is the risk of electric
shock.
· Do not allow children to use the receiver without supervision or to play with the antenna
appliance.
· Always refer maintenance to qualified service personnel. Otherwise you endanger
yourself and others. Purchase spare parts from the manufacturer only.
4
The right location
Place the receiver on a stable, even surface.
Avoid placing it near:
Heating sources, like radiators,
Naked flames, like candles,
Devices with strong electromagnetic fields, like speakers.
Do not place objects filled with liquids (such as vases) on the receiver.
· Avoid direct sunlight and exceptionally dusty places.
· Never cover the ventilation openings. Ensure sufficient ventilation of the receiver.
· Do not place heavy objects on the receiver.
· Humidity can occur inside when moving the receiver from a cold to a warm place. In this
case, wait for about 1 hour before operating the unit.
Run the antenna cable so that no one can step on or stumble across it.
.
5
Front Panel/ Rear Panel
Front Panel
USB slot
Rear Panel
(1) TV ANT IN: Use to connect an antenna.
(2) LOOP OUT: Use it when connecting to another STB.
(3) TV/VCR SCART: For the Video/Audio input of the TV and VCR.
(4)
(5)
(6)
SPDIF: SPDIF audio format output system.
AUDIO L/R: 3.5MM Jack for connecting the audio RCA or earphone.
POWER: Power ON/OFF switch
6
Remote Control Unit
7
Remote Control Unit
1
2
3
4
5
6
7
8
9
10
STANDBY
NUMBERIC BUTTONS
FAV
PAGE UP
VOL (◄/►)
OK
MENU
CH (▲/▼)
TXT
EPG
11
12
13
14
15
16
17
18
19
20
21
22
23
24
GAME
AUDIO
BACKWARD
ZOOM
FORMER
FORWARD
NEXT
MUTE
PAUSE
PAGE DOWN
EXIT
TIMER
SUBTL
INFO
25
26
27
28
29
30
31
TV/RADIO
SCAN
RECALL
STOP
PAUSE
PLAY
SLOW
Switch between Operation and Standby mode
Changes channels or selects the menu options.
Enter into favorite list
Press to jump one page up or ZOOM up when enabled
Turn up/down volume; Change the page of channel list.
Enter into the menu you choose or select the current option
Turn to the main menu or return to upper menu
Change channels or items from top to bottom on the menu
View the Teletext information of the current channel
Electronic Program Guide button displays the TV/Radio program
guide broadcasting by the TV provider
Turn to games to have a rest
Change audio mode to left right and stereo
Speed back while USB Media playing
Press to Zoom-in and Zoom-out picture
Turn to the former file while USB Media playing
Speed up while USB Media playing
Turn to next file while USB Media playing
Turn off volume
Pause to freeze the screen while watching TV
Press to jump next page or ZOOM down while zoom is enabled
Return to upper menu
Enter into Wake-up timer menu
To display the Subtitle information
Display information of programs; show help information of
Buttons in current menu
Switch between TV and Radio mode
Enter into search menu
Press to jump to previous channel
To Stop playing the USB Media
Pause to freeze the screen while playing the USB Media
Press to play USB Media, such as Movie; Music; Photo
Slower movie playing speed while playing USB movie
8
S.T.B Connection
Various equipment and TV/VCR can be connected to STB.
This manual will explain common ways to connect to the equipment.
If you experience any problem, please contact your sales agency.
1.
How to connect the STB to a TV set
(1) Connect one end of the SCART cable to the TV SCART socket on the back of the
STB and the other end to the SCART input socket on your TV.
(2) Connect the Antenna cable to TV ANT IN collector of the STB.
9
S.T.B Connection
2. How to connect the Audio system
① Connect the AUDIO R/L socket of the STB to the Audio System like HI-FI, Amplifier,
etc.
① Audio System must capable of stereo audio ability.
③If Digital Audio or S/PDIF Optical output are available on STB, you can get better
stereo experience.
10
Main Menu
Plug in the STB, the Main Menu screen, the beginning of the OSD screen, will
appear as shown in the following picture. The Main Menu displays various functions of
the STB or you can select with “CH” buttons and the numeric buttons on the remote
control. To proceed to the next stage, press the “OK” button on the remote control.
DIGITAL TV
Plug in the STB, and power on, there are foreign languages for your choice, choose
the one you prefer. Then, press “Menu” on the remote control to get started.
To get start the STB, please go to installation
menu by pressing “Menu” button on the remote
control (default lock code: 0000). The installation
menu allows you to set and various functions,
and customizes service. Use the ”CH” buttons
on the remote control to select an option and
press the ”OK” button to proceed to enter. To
move backwards to the previous stage, press
the ”Exit” or ”Menu” button.
1. Installation
Your STB can be easily installed by using “Installation” Menu.
Selecting the mode you like from Area search; Manual search; Auto search
1.1
Area Search
Area search is a kind of intelligent and
convenient mode of programs searching which
covers programs of all frequent points of target
countries or regions.
At present, this system covers many targets
countries and regions including:
Germany/England/Italy/France/Spain/Holland/Norway/Sweden/Finland etc.
11
1.2
Manual Search
If you are familiar about digital TV and know the frequency of the program or if you
want to scan the program at any frequency required, you can select manual scanning,
which can save your much time.
1) You can move the cursor to “area search” via press “UP/DOWN” key under
“installation menu”, then press “enter” to enter into area searching page.
2) Prior manual scanning, you need to configure relevant parameters including:
1. Freq (KHz): the default frequency is
474000KHz,you can input relevant
digitals to modify it.;
2. Bandwidth: the default value of
bandwidth is 64MHz.while you can
set it to 6MHz, 7MHz, and 8MHz;
3. Press “ENTER” key after
configuration of parameters to start
manual scan.
3) If any program is detected and the
scanning process is finished, system will exit the scanning page and save the
program.
1.3
Auto Search
You can search the programs of any
channel.
1)
2)
You can move the cursor to “area
search” via press “UP/DOWN” key under
“installation menu”, then press “enter” to
enter into area searching page
Prior to auto searching, you need to
configure relevant parameters including:
12
1.
3)
4)
Start Freq (KHz): the default frequency is 474000KHz. You can input relevant
details to modify it;
2. End Frequency (KHz): the default frequency is 474000KHz. You can input
relevant details to modify it;
Press “ENTER” key after configuration of parameters to start manual scan.
If any program is detected and the scanning process is finished, system will exit the
scanning page and save the program.
2. Channel Manager
System offers an efficient function of
channel management such as channel
deleting, marking, moving, locking, sorting
and grouping.
2.1
Channel Organize
Channel organizer page includes favorite channels, channel deleting, moving, locking
and rename.
.
1) Channel Organizer menu includes:
Favorite Channel; Delete Channel; Skip
Channel; Lock Channel, Rename
Channel
1. Press INFO button to show function
guide to related button of RCU
2. Press RED button to set and cancel
Favorite Channel
3. Press GREEN button to set or
cancel Delete Channel,
4. Press YELLOW button to set or
cancel Skip Channel,
5. Press BLUE button to set or cancel Lock Channel (Default Password: 0000)
6. Press RIGHT button to rename channel.
13
2.2
Channel Sorting
Channel Sorting enable the channels be
listed according to certain sequence so that the
user can easily find them.
1) Before sorting, the type of sorting shall be
set, including the following items:
1. First Option: choose the
programs to be sorted via the
selection area;
2. Second Option: Press FTA (free of
charge), Scramble (encrypted), ALL
Free and Encrypted Channels;
3. Third Option: According to alphabetic order A-Z, or Z-A;
2.3
Channel Grouping
Channel Grouping enable you to set the
different channels into different category like
Movies, Sport, Music, Kids, and Fashion etc.
1)
Press UP/DOWN key to choose the line
where the channel to be grouped is in,
then press the number keys 1-8 on the
remote controller to set different channel
grouping.
14
2.4
Edit Channel
This function enables you to do such operations as Add, Delete and Rename to
channels.
1)
Press the RED button to enter Add Channel menu.
2)
Under Add Channel menu, there are 6 parameters for adding one channel as
follows:
1. Area Name: For Area Name, press
the RIGHT button to enter the Area
Name list on the right, then press
UP/DOWN button to choose area
name, ENTER button to confirm.
2. Carrier: Press LEFT/RIGHT button to
choose;
3. Channel Name: Press LEFT/RIGHT
button to enter Rename Channel
menu.;
4. Audio PID, Video PID, PCR PID,
Press 0-9 number key to revise
values;
5. Press ENTER key to confirm the adding, the system will hint with “Update
succeeds” and return to Edit Channel menu;
6. Press RETURN key to return to Edit Channel page.
3)
Press the YELLOW button to enter Edit Channel menu. The operation for
this menu is as same as for Add Channel function
2.5
Delete All
If you do not like all of the TV or Radio
channels, you can enter Delete All menu to
choose to delete all TV, RADIO, and Carriers.
1)
To delete all TV channels, press
UP/DOWN button to move the cursor to
ALL TV Channels option, press ENTER
key to delete.
2)
To delete all RADIO channel, press UP/DOWN button move the cursor to ALL
Radio Channels option, press ENTER key, to delete.
15
3. Configuration
Configuration provides individualized system setup function; you can configure the
system according to your own hobby and demand.
3.1 OSD
Via OSD menu, you can set the user interface display mode according to your own
demand
1)
All options are listed on the left of the OSD
menu.
1. OSD: Select different theme style of
OSD looking.
2. Time: Select whether to display system
time.
3. OSD Timeout: Select information hint
dialogue box and displays showing time
period.
4. OSD Trans: Select menu transparency
between 0%-60%.
5. OSD languages: Select different languages for different user.
st
nd
6. 1 ; 2 Audio Language: Select the desired audio languages (This function is
valid only when the broadcasting program contains the multi audio service)
3.2
TV
1)
TV menu provides convenient TV input mode in variety.
All options are listed on the left of the TV menu
1. Display Mode
TV mode can change the mode of the
output video, you can adjust TV mode
according to the actual situation of you
receiving equipment.
2. Aspect Ratio
Video output mode can change the
mode of video output, you can adjust TV
mode according to the actual situation
of you receiving equipment.
3. Video Output
Video Output mode can change the
mode of video output, CVBS, RGB, YUV,
S-Video you can adjust TV mode according to the actual situation of you
receiving equipment.
4. Brightness
If the Brightness is not proper during watching, you can adjust the current
brightness to be a proper one.
16
5.
6.
7.
3.3
Contrast
If the Contrast is not proper during watching, you can adjust the current
contrast to be a proper one.
HUE
If the HUE is not proper during watching, you can adjust the current HUE to be
a proper one.
Saturation
Adjust system saturation.
System Setup
System Setup menu provide different useful
functions for your to use.
1.
2.
3.
4.
5.
6.
3.4
EQ setting: To select different Sound
Effect, Standard, Classic, Rock, Jazz,
POP;
default: Standard
Surround: To set Stage Effect OFF, Concert, Church, Passive, Live; Default:
OFF
Active Antenna: To set 5V voltage output to Terrestrial Antenna
JPEG Effect: To set different fading in effect for viewing Photo over USB
device
LCN: To set LCN function on (Logical Channel Number)
Area: To set the country for LCN function
Time
Set the Time mode and GMT time etc. in this
menu
1.
2.
3.
4.
5.
Time Mode: To Select AUTO or
MANUAL setting of time
Date: To set the calendar date
Time: To set the correct time
GMT Offset: To set the GMT time zone
Summer Time: To select ON or OFF
for Summer time
17
3.5
Wakeup Timer
If you want to set channel playing at certain time or giving some hint information such
as Birthday. You can set via Wakeup Timer menu.
1.
3.6
Timer Number: To select the number of each timer, there are total 8 event timer
available.
2. Timer Mode: To set the timer in
different mode, such as OFF; Once;
Daily; Weekly; Yearly.
3. Wakeup Mode: To set Wakeup Mode
option as: OFF; Message; Channel
and ON.
4. Wakeup Message: To set Wakeup
message as: Birthday, Anniversary,
General. A greeting message will
appear on Screen.
5. Wakeup Date: To set the Wakeup
date.
6. On Time: To set the Wakeup time.
7. Duration: To set the duration time of selected channel you want to watch.
Parental Lock
To prevent the unauthorized Accessing of your
STB, you can set the Parental control password
to you receiver. (Default password: 0000)
1.
Press the number key 0-9 on the RCU
to input Old password.
2.
If the password is input correctly, the
cursor can move onto Input New
password option, press number key
0-9 to input new 4-digit password;
3.
The cursor move Confirm New Password option, press number key 0-9 again
to confirm the new password
18
4.
Software Upgrade
This STB provide you an easy way for
updating the STB software through USB stick.
Contact your dealer if there is new software
for your STB available, then you can update it
easily with your USB stick through the USB input
of this STB.
1.
Copy the bin code file (such as p1.bin)
from PC to your USB device, such as
USB stick.
2.
Power on the STB, plug in the USB
disk properly.
3.
Enter the main menu and select the
Software Upgrade item.
4.
Select Download from USB item,
Select the USB device,
such as 0001 /sda.
5.
Select the bin code file, which you
want to be upgraded, such as p1.bin.
6.
STB will upgrade by itself, but
remember that, do not power off.
7.
After being upgraded, system will
restart itself, you will see the new
software interface.
19
5.
Factory Default
The factory default enable you re-set your STB as factory settings mode.
WARNING: You will loss all the settings and channels which you have already tuned.
6.
Version
The version information provides you current hardware and software information of
your STB.
USB MEDIA PLAY
This STB integrates powerful function to
support USB features and you can connect USB
equipments via the USB input to play movies,
MP3, and viewing pictures, At present, system
can support usual USB media players.
Video supporting format: Mpeg1; 2; dat / mpg /
vob / avi / mpeg4 / asp / divx
Audio supporting format: LPCM/PCM / WAV /
MP3
Picture supporting format; JPEG/JPG
1.
2.
3.
1.
Copy media documents to USB device.
Plug in USB device;
Enter device in main menu.
Movie
1
1.
2.
In main menu, press UP/DOWN to
choose Movie option, Press ENTER
key to confirm.
Press ENTER key to enter next
directory, every directory displays only
movie file and folders only
Press PLAY button to start to play the
movie
20
2.
Music
1.
In main menu, press UP/DOWN to choose Music option, to choose ENTER
key to confirm
Press ENTER key to enter next directory, every directory can show music file
and folder name only:
Press PLAY button to start to play the mp3 music.
2.
3.
3.
Photo
1.
2.
3
4
5
In main menu, press UP/DOWN to
choose Photo option, press ENTER
key to confirm.
Press ENTER key to enter next
directory, every directory can show
photo file and folder name
Press ENTER key to play Photo file;
Press PREV key to play previous
Photo, NEXT key to play next Photo.
In full-screen play state:
(1). Press Left, Right key to rotate the
photo clockwise/counterclockwise by 90 degrees;
(2). Press UP key to view lens photo vertically;
(3). Press DOWN key to view lend photo horizontally.
GAMES
If you want to have a rest or to relieve
yourself after hard working, you can play some
games attached in the system.
1
2.
3.
Box Man
Use your brain and push the box into
the right place
Tetris
The classic game of all time, Tetris is
one of most highly playable game.
Hit Rat
A new funny game for your play
21
Troubleshooting
When you found some problems about this STB, please check the table in below.
Because these may not be any serious problems:
Fault Phenomenon
Probably reasons
Resolve
Power on, but no
display on screen
Please carefully check the
power plug, to see it is in
socket of wall or not? Is
power interrupted?
Is the aerial install correct?
Put firmly the power plug to
the socket on
the wall.
Antenna cable input is not
connect
The transmit station turns
off
The sky wave disturbs the
device
The program setups are
incorrect
Connect the antenna cable
input
Attempt until the signal
coming again
Attempt again later
Power on this STB,
then that screen
displays
”No signal”
STB plays a
strange sound
Due to the channel contain
more audio tracks or audio
languages
Reinstall the aerial and
calibrate it
Set the proper
parameters of received
program in the system
settings menu
User can use the “Audio”
button on the RCU to select
the correct audio track or
audio languages
Tips: If you refer to this troubleshooting, but no resolve that problem you encountered.
Please contact the local dealer or technical support instantly, do not open the machine,
because that is very dangerous to you or to the machine in that cases.
22
Specification
1.
2.
3.
4.
5.
Tuner Demodulator
Input Frequency Range
Input Level
Input socket
Output socket
51MHz ~ 858 MHz
32dBm
IEC 169-24 Female XI
IEC 169-24, 5V75mA Max
Demodulator
Coding
Mode
Code rate
Guard
COFDM
2K or 8K
1/2,2/3,3/4,5/6,7/8
1/4,1/8,1/6,1/32
Video decoder
Profile Lever
Bit rate
Aspect Ratio
Output
Video Resolution
MPEG-2 MP@ML
Max 15Mbps
4:3, 16:9, Auto
PAL/NTSC
720 x 576(PAL), 720 x 480
(NTSC)
Audio decoder
Decoding
Mode
Bit rate
MPEG-2&1 Layer 2&1
Mono, Dual, Stereo, Joint stereo
Max 384kbps
USB 2.0
Supported Video
MPEG1, MPEG2, MP@ML
dat/mpg/vob/avi
Supported Audio
Supported Pictures
6.
MPEG4 ASP,Divx4.12,
Divx5.0、5.02、5.03
5.04,5.05,5.1,5.11
5.2,5.21,Xvid1.00,
1.01,1.02,1.03,1.10-beta1,1.10-beta2
LPCM/PCM/WAV/MP3/MPEG1/2
LAYER1/2/3
JPEG/JPG
General
Input Voltage
Power Consumption
Operating Temperature
Storage Temperature
100-240V~, 50/60Hz.
Max.15W
0℃ - 40℃
-40℃- 65℃
23
[email protected]
Thank you for choosing one of our products.
This product complies with the legal standards and is manufactured under constant
quality control.
The technical specifications are up-to-date at the time of printing.
Subject to changes without prior notice.
V1.01
24