1
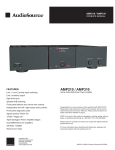
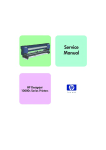
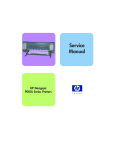
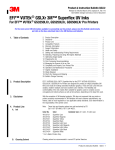
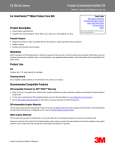
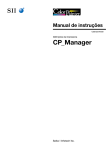
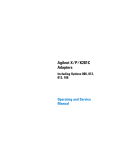
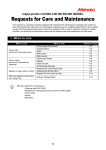
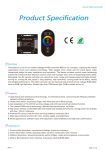
Ink Bag Solution for Seiko/HP9000
Installation and Operation Manual
Cartridge Solution for Seiko Colorpainter, Oce CS 6060 and HP9000
Revised 27 August 2009
TABLE OF CONTENTS:
Introduction ........................................................................................................... 2
Package Contents ................................................................................................... 2
Working with Cartridges .......................................................................................... 2
Installing the ChipCharger Driver for Windows 2000/XP ............................................... 4
Installing the ChipCharger Software .......................................................................... 4
Editing Customer Information................................................................................... 4
Editing Printers ....................................................................................................... 5
Working with InkChips............................................................................................. 5
Verifying Ink Chips.................................................................................................. 6
Recharging the Ink Chips ......................................................................................... 7
Troubleshooting...................................................................................................... 9
Page 1 of 10
Introduction
Permanent Seiko/HP9000 Chip is the technology allowing reusing practically every part of
the Seiko and HP9000 ink cartridges. OEMs are forcing users to use disposable cartridge
assemblies consisting of a cartridge, a bag of ink, and a chip (a circuit board). You are
supposed to discard the cartridge with a chip and an empty ink bag after the ink has been
consumed. Why throw away these parts if they can be used multiple times?
The main part of this system is the Rechargeable Chip. By using the device called
ChipCarger, the Rechargeable Chips can be re-programmed (“recharged”) with a new set
of data unlimited number of times. After a recharge, the Chip will be interpreted by a
Seiko/HP printer as a brand new OEM cartridge.
You have three options:
#1. Re-use the Chip only. You can order ink in chip-less cartridges. Before installing such
cartridge on a printer, you will have to insert a Chip and recharge it. You can return the
used cartridge to us for a credit.
#2. Re-use the Chip and the cartridge. In this case you only need to order pre-filled ink
bags. This is the best money-saving option!
#3. Order complete cartridge assemblies that are ready to go on a printer. Used
cartridges can be returned to us for a credit: we will recycle a cartridge and a chip!
Package Contents
Item
Quantity
Note
Ink Chip, Rechargeable
8
6 Ink Chips are required and 2 are spare.
Cartridges arrive with Ink Chips already
installed in them.
ChipCharger
1
A USB device that must be connected to
your PC. It will recharge the Ink Chips with
new data so they will work as new OEM
chips.
USB Cable for ChipCharger
1
Working with Cartridges
Your Permanent Chip Kit will consist of a set of chips and a Charger. You will also need
empty cartridges, which you may have available after using up OEM ink.
There are 3 steps to prepare a cartridge before mounting it on a printer.
Step 1. Open an empty cartridge and insert a Permanent Chip into it. Make sure that the
gold-plated contacts are visible through the window and they are centered in it.
Step 2. Insert a new ink bag in the cartridge. Push it towards the adhesive tape on the
bottom of a cartridge. A bag must be glued to the wall of the cartridge at least in the area
highlighted in Yellow on the picture below. If the adhesive tape is worn out you can use a
Page 2 of 10
strip of 2-way tape, even if it’s narrow. A Velcro strip will do the job, too. The purpose of
attaching the top of the ink bag to a cassette is to prevent the ink bag from collapsing.
Step 3. Close the cartridge and charge the Chip. Below you will find information on
recharging the Chips.
The cartridge is now ready to go on a printer.
If you ordered from us an optional set of cartridges with the Permanent Chip kit, the
cartridges will arrive to you “provisioned” for all 6 colors. That means the color tabs will
be clipped and the Chips will be charged with corresponding colors. These cartridges are
ready to be plugged into your Seiko/HP9000 printer, as long as you insert ink bags in
them.
A spare cartridge will not be programmed for any color. When needed, you can set up a
spare cartridge to work in the color of your choice. Just clip off one of the 6 tabs on the
side of it.
Page 3 of 10
Installing the ChipCharger Driver for Windows 2000/XP
The driver for ChipCharger will work under Windows 2000 or XP.
1. Look for the sticker at the bottom of the ChipCharger, it contains the login and
password for your account.
2. Go to this web site: www.solventcartridges.com and click on Tech Support.
3. Click on the link “InkStream Customers Login Here”.
4. Enter your login name and password found on the sticker. Click “Login”.
5. On the next screen you will see your company information and information about
your printers. On the bottom of the screen you will see the links to Charger
Software and ChipCharger USB driver. Download both of them.
6. Unzip the charger_driver.zip file into some folder.
7. Connect the ChipCharger to the USB port using the cable provided.
8. Windows should automatically detect it and ask you to locate the driver for it.
9. Browse into the folder where you unpacked the chip_driver.zip file and select the
file Windows is looking for.
10.If you are be asked to reboot, please do so.
Installing the ChipCharger Software
1. Run the charger_setup.exe file you downloaded and install the Charger software.
2. Look for program and run it by going into Start – All Programs – ChipCharger.
3. The program should say “ChipCharger connected”. If it says that the device is
not found and the driver was already installed, please notify your dealer or us and
we will replace the USB device.
4. If your firewall is blocking the Internet access of ChipCharger program, please
unblock it. Internet connection is required for operation of the software.
Editing Customer Information
The web page mentioned above will have an option to edit customer’s information. Click
on My details link at the left bar on the screen and then click on [Edit this
information] in the main window.
Please note that entering information about your company is not mandatory if you have
purchased the bulk system from a dealer. This information is required for warranty and
tech support provided directly from Solvent Cartridges.
We recommend changing the password when you are installing the system for the first
time. This will make sure that no third party, including your dealer, can access your
information.
Page 4 of 10
Editing Printers
By the time you have received the bulk system there will be a printer added to your
account. If you have more than one printer, or if you have both Seiko (Oce 6060) and JV3
printer, you can register them at the Bulk System Support web page.
Click on Add printer link in the left menu and enter the required information.
Printer Serial Number does not have to be a real serial number; it’s only an identification
of a particular printer and you can use any reference name.
Entering a correct region: Europe or Asia is very important because it determines the data
that will be transferred into the Ink Chip. If your printer was purchased in North or South
America, you should choose Europe.
You can also edit the printer information by clicking on [Edit info] in the printer list.
The information about your printer will be used by ChipCharger software. There must be
at least one printer to be able to recharge Ink Chips.
Working with InkChips
InkChip is an electronic circuit board with a micro-controller on it.
InkChips are electrostatic-sensitive devices. Make sure to touch the
printer metal body before touching the InkChip.
When handling InkChips, avoid touching the gold-plated contacts,
which are not insulated. This will extend the life of the chip.
You can verify and recharge chips with a new data using the ChipCharger. Attach the
black head of it to the cartridge so that the gold-plated contacts (see picture) will go in
the chip window. Push the head towards the cartridge. There should be no gap between
them.
Hold the Charger’s Head while verifying or charging the chips. Do not release it until the
software finishes operation.
Page 5 of 10
Verifying Ink Chips
ChipCharger software provides a function to verify if the Ink Chip is responding with a
correct data.
-
Run the ChipCharger software. If you have more than one printer registered,
select the correct printer (Seiko). The Green LED on the Charger must light
up.
-
Attach the Charger Head to a cartridge and hold it as shown on the picture
below.
-
In the software window, press Verify. If verification was successful it will
say “Verification OK” and select the color that was saved on the InkChip.
Page 6 of 10
Recharging the Ink Chips
During the normal course of operation the Seiko will be reducing the ink counter from
100% down to 0%. When the level is near zero you will have to replace an ink bag and
recharge a chip. Do not allow the ink level to go below 2%. Otherwise the printer will
“kill” the Chip, making it useless. Please note that the Internet connection is required for
recharging the chips.
-
Remove the cartridge from a printer.
-
Run the ChipCharger software. If you have more than one printer registered,
select the correct printer (Seiko). The Green LED on the Charger must light
up.
-
Attach the Charger Head to a cartridge and hold it as shown on the picture.
Keep pushing it against the cartridge so there’s no gap.
-
Press “Recharge Same Color” button on the software. Alternatively, you can
select the color manually and press “Recharge”. You can tell the color of the
cartridge by looking which tab is clipped off (see picture).
-
When the software has reported a successful completion of recharging,
remove the Charger Head and re-install the cartridge on a printer.
-
Verify that the printer is recognizing the chip. If not, please refer to
Troubleshooting section of this manual.
Page 7 of 10
Message from the dealer
will appear here.
Depending on the type of
printer selected (Mimaki or
Seiko) the message will be
different.
Printer selector.
Global message for all
customers
Press this button the
recharge an ink chip.
InkChip verification button
Number of remaining codes
Progress report window
Page 8 of 10
Troubleshooting
Problem
Printer does not recognize
the InkChip by showing
“Check XX ink”
Solutions
1. Open and close the ink cartridge cover. If the problem does not
go away, proceed to step 2.
2. Remove the cartridge from the printer and verify the chip using
the ChipCharger. Is the verification OK?
YES – There is a problem with the cartridge. It does not
provide a good connection between the Seiko and the InkChip.
Replace it with a spare cartridge and transfer the Chip.
NO – Try recharging the chip with the same color. If the
recharge isn’t successful, it’s a problem with the InkChip. The
cartridge is most likely OK. Take a spare InkChip and recharge it
with the needed color using a ChipCharger. Install it in place of the
problematic one. Did the problem go away? If not, please contact
us.
Printer shows “X inkcover is
open. Close X inkcover”.
Most likely the cartridge door does not reach to the switch. Adjust
the door position until the switch is working.
Printer shows “Set XX ink”.
If all cartridges are installed and you still see this message on the
Seiko display after closing both cartridge covers, try unplugging the
problematic cartridge and re-inserting it.
If the problem persists, it must be a problem with the cartridge:
poor contact between the Seiko and the InkChip. Replace the
cartridge but use the same InkChip. If problem continues, change
the InkChip, but remember to recharge it before using.
Printer shows “X INK PAST
EXPIRY DATE. CONTINUE?”.
This is normal when working with the rechargeable set. Press OK
twice and the printer will continue operation.
Banding or missing nozzles.
Probably you have some air in the ink lines. To remove the air, try
doing STRONG CLEANING a few times. This alone may not solve
the problem. To get rid of the air:
1. Remove the cover from the carriage, so you could see the
ink lines entering the print heads. Do you see some air
trapped in the high points of the ink lines? If you do,
proceed to the next step.
2. Set your printer offline.
3. Press CANCEL, SHIFT, CANCEL, CANCEL.
4. It will show MAINTENANCE MODE PASSWORD? On Seiko
Colorpinater, press SHIFT, up arrow, down arrow, right
arrow. On HP9000/10000, press left arrow, right arrow,
shift, OK.
5. Using the SHIFT key, scroll through screens until you see
ACTUATOR. Press left arrow to go into this menu. On
HP9000, it is called MOTORS.
6. SEIKO USERS: Scroll until you see ISM1. This is the ink
pump number one. There are a total of 6 pumps. Using this
menu, you can turn the pumps on and off. Our goal is to
pump some more ink into the ink bags, so we could perform
Page 9 of 10
a strong purge allowing us to remove air bubbles.
6.1. Turn on the ISM1 pump for about 30 seconds.
Remember that it will not stop by itself; you have to do it
using a menu.
6.2. Repeat the same with ISM2…ISM6.
6.3. Now exit the ISM menu and scroll to the menu item
called PUMP MOTOR. This will turn on the vacuum pump
that purges the heads. Turn the PUMP MOTOR on and watch
the air trapped in the ink lines go down into the heads. Keep
the motor turned on for few more seconds (around 10), to
make sure the air bubbles are taken away. When you stop
the pump the air bubbles should not come back. If you
hear the ink pumps start working, stop the PUMP
MOTOR immediately! The ink bags should have enough
ink so that ink pumps won’t need to work. Use the ISM
menu to pump more the ink into the bags.
6.4. If the air bubbles come back into the ink lines, it means
that the PUMP MOTOR wasn’t working long enough. Repeat
steps to 9 but make sure to keep the PUMP MOTOR ON for
a bit longer.
7. HP9000 USERS: In the MOTORS menu, go to K PUMP
MOTOR and turn it on for about 30 seconds. Remember to
turn it off. Repeat the same with the other 5 ink pumps.
Then, go to CAP STAT MOTOR. It has 3 functions: PRIME,
UNCAP, STOP. Activate PRIME and allow the motor to turn
for 10 seconds. Then, do STOP it. If you pump too long, it
will deplete too much ink from the sub-tanks so the pumps
will time out and erase the chips. After priming, perform
STRONG HEAD RECOVERY two or three times.
With your technical questions please contact your dealer or us at:
Telephone: +1 905 820 8833
Fax:
+1 905 820 8768
Email:
[email protected]
Page 10 of 10